

When it comes to lunchtime, there’s something magical about the vibrant flavors of Korean cuisine. It’s all about balancing delicious taste with wholesome nutrition. These 13 fun recipes are perfect for tidy midday meals. From the colorful bibimbap to the portable kimbap, each dish is a delightful experience. Trust me, you won’t want to miss out on these mouthwatering options!
Bibimbap: A Colorful Rice Bowl
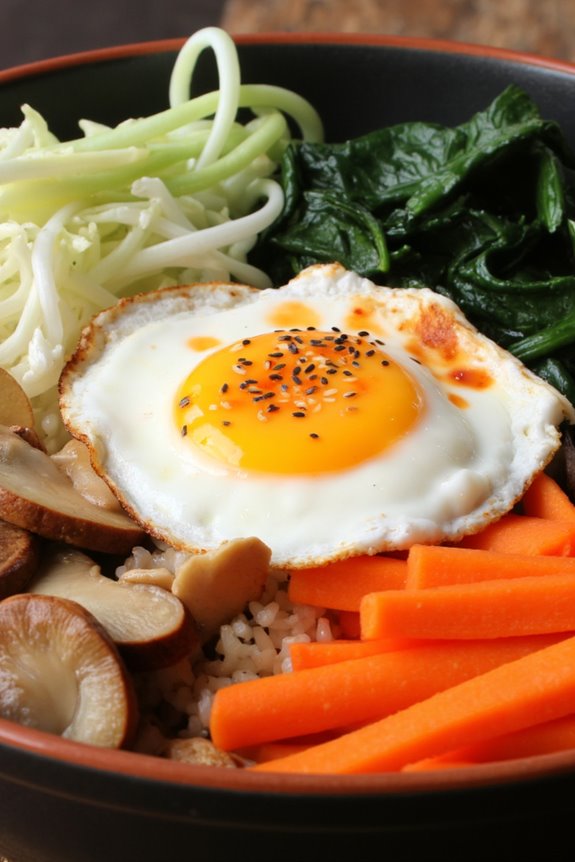
Bibimbap is a traditional Korean dish that translates to “mixed rice.” It’s a vibrant and nutritious bowl filled with a variety of vegetables, protein, and a fried egg, all served on a bed of warm rice. The dish isn’t only delightful to the taste buds but also a feast for the eyes, showcasing a rainbow of colors from the assorted ingredients.
Traditionally, bibimbap is served with gochujang, a spicy red pepper paste that adds a wonderful kick to the dish. This makes it a perfect meal for lunch, providing a balance of flavors and textures that will keep you satisfied throughout the day.
Preparing bibimbap can be as simple or as elaborate as you desire. The beauty of this dish lies in its versatility; you can customize your ingredients based on what’s in season or what you have on hand. Common toppings include sautéed mushrooms, julienned carrots, spinach, zucchini, and bean sprouts, each contributing its unique flavor.
With the right combination, you can create a bibimbap that’s both delicious and visually appealing, making it an excellent option for family meals or gatherings.
Ingredients (serving size: 4-6 people):
- 2 cups of short-grain rice
- 4 cups of water
- 1 cup of spinach, blanched and chopped
- 1 cup of carrots, julienned
- 1 cup of zucchini, julienned
- 1 cup of mushrooms (shiitake or button), sliced
- 1 cup of bean sprouts, blanched
- 4-6 eggs
- 4 tablespoons of gochujang (Korean red pepper paste)
- 4 tablespoons of sesame oil
- 2 tablespoons of soy sauce
- 2 tablespoons of vegetable oil
- Sesame seeds for garnish
- Optional: sliced beef or tofu for protein
Cooking Instructions:
1. Cook the Rice: Rinse the short-grain rice under cold water until the water runs clear. In a rice cooker or pot, combine the rice and 4 cups of water. Cook according to the rice cooker instructions or bring to a boil, then reduce the heat to low, cover, and simmer for about 20 minutes until the rice is tender and the water has been absorbed. Once cooked, let it sit covered for an additional 10 minutes.
2. Prepare the Vegetables: While the rice is cooking, prepare the vegetables. In a skillet, heat 1 tablespoon of vegetable oil over medium heat. Sauté the carrots for about 3-5 minutes until tender. Remove them from the skillet and set aside.
In the same skillet, add another tablespoon of vegetable oil and sauté the zucchini until soft. Set aside. Repeat this process for the mushrooms, cooking them until they’re tender. Finally, blanch the spinach and bean sprouts in boiling water for 1-2 minutes, then drain and chop.
3. Cook the Eggs: In a separate pan, heat a little vegetable oil over medium heat. Crack the eggs into the pan and fry them until the whites are set but the yolks are still runny, or cook them to your desired doneness. If you prefer, you can also scramble the eggs.
4. Assemble the Bibimbap: In a large serving bowl or individual bowls, place a generous scoop of cooked rice at the bottom. Arrange the sautéed vegetables (carrots, zucchini, mushrooms, spinach, and bean sprouts) artfully on top of the rice in sections, creating a colorful display. Place the fried egg in the center.
5. Add Flavor: Drizzle sesame oil and soy sauce over the top of the assembled bibimbap. Serve gochujang on the side or spoon it over the top of the egg, allowing individuals to adjust the spice level according to their taste.
6. Garnish and Serve: Sprinkle sesame seeds over the top for an added crunch. Serve immediately, encouraging everyone to mix their bibimbap thoroughly before eating to combine all the flavors.
Extra Tips:
When preparing bibimbap, feel free to get creative with the toppings. You can add other vegetables like radish or bell peppers, or protein options like marinated beef or tofu.
For a more authentic experience, consider using a traditional stone bowl (dolsot) to serve your bibimbap, which will keep the rice warm and create a delightful crispy crust at the bottom. Remember to adjust the amount of gochujang according to your heat preference, as some might prefer a milder flavor while others enjoy a spicy kick!
Kimbap: Korean Sushi Rolls

Kimbap, often referred to as Korean sushi rolls, is a beloved dish that combines the flavors of seasoned rice, vegetables, and proteins all wrapped in seaweed. This delightful meal isn’t only visually appealing but also versatile, as you can customize the fillings based on your preferences.
Traditionally enjoyed as a picnic or lunchbox food, Kimbap is perfect for sharing with family and friends, making it an ideal dish for gatherings or casual meals.
Making Kimbap is a fun and engaging process that allows you to get creative with your ingredients. While the classic version typically includes ingredients like pickled radish and carrots, feel free to experiment with other vegetables, meats, or even tofu to cater to your taste.
This recipe will guide you through the preparation of a delicious batch of Kimbap that serves 4 to 6 people.
Ingredients
- 4 cups cooked short-grain rice
- 4 sheets of seaweed (nori)
- 1 cup spinach, blanched and squeezed dry
- 1 large carrot, julienned
- 1 cucumber, julienned
- 4 large eggs, beaten
- 1 cup pickled radish (danmuji), sliced into strips
- 1 tablespoon sesame oil
- 1 tablespoon soy sauce
- Salt, to taste
- Sesame seeds, for garnish
Cooking Instructions
- Prepare the Rice: Start by cooking short-grain rice according to package instructions. Once cooked, transfer the rice to a large bowl and let it cool slightly. Drizzle with sesame oil and stir in a pinch of salt. Allow the rice to cool to room temperature for easier handling.
- Sauté the Vegetables: In a skillet over medium heat, add a little oil and sauté the julienned carrots for about 2-3 minutes until they’re tender but still crisp. Set aside to cool. If you haven’t already blanched the spinach, briefly boil it in salted water for about a minute, then drain and squeeze out excess water. Mix the spinach with a dash of sesame oil and a pinch of salt.
- Cook the Eggs: In a separate skillet, pour the beaten eggs and cook over medium-low heat, swirling the pan to create a thin omelet. Cook until set, then remove from the pan and allow it to cool. Once cooled, slice the omelet into thin strips.
- Assemble the Kimbap: Place a sheet of nori on a bamboo sushi mat, shiny side down. Wet your hands to prevent sticking and take a handful of rice (about 1 cup) and spread it evenly over the nori, leaving about 1 inch at the top edge. Layer the sautéed carrots, cucumber, spinach, pickled radish, and egg strips across the rice.
- Roll the Kimbap: Starting from the bottom edge of the bamboo mat, carefully roll the nori over the fillings, applying gentle pressure to form a tight roll. Continue rolling until you reach the unfilled edge of the nori. Use a little water to seal the edge of the nori.
- Slice and Serve: Using a sharp knife, slice the rolled Kimbap into bite-sized pieces (about 1 inch thick). Wipe the knife with a damp cloth between cuts to maintain clean slices. Arrange the slices on a plate and sprinkle with sesame seeds for garnish.
Extra Tips
When making Kimbap, feel free to get creative with your fillings based on what you have available. You can include cooked meats like bulgogi or grilled chicken, or even add avocados for a creamy texture.
If you’re preparing Kimbap for a picnic or lunchboxes, wrap the rolls in plastic wrap to keep them fresh and moist. Additionally, serving Kimbap with a side of soy sauce or gochujang (Korean chili paste) can enhance the flavors even further!
Japchae: Sweet Potato Noodle Stir-Fry
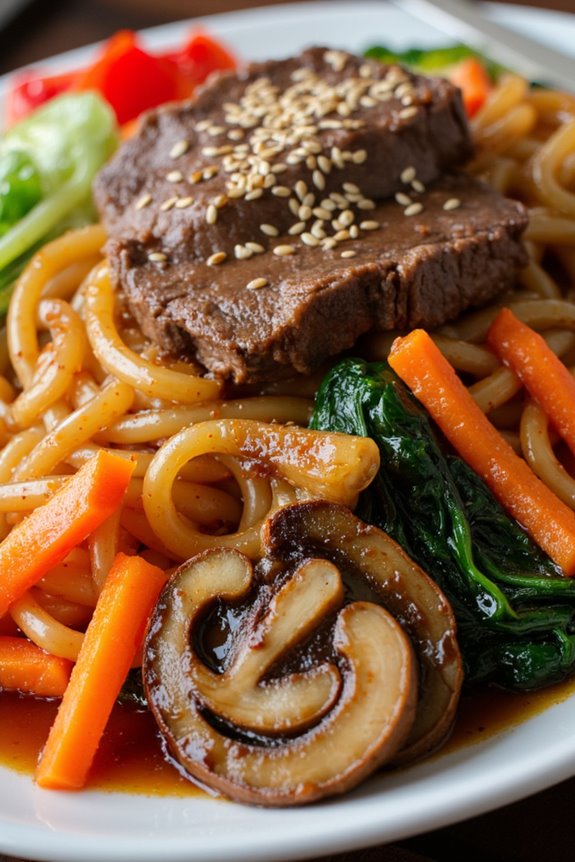
Japchae is a beloved Korean dish that features sweet potato starch noodles, known as dangmyeon, which are stir-fried with a vibrant medley of vegetables and often accompanied by beef or other proteins. This dish has a delightful chewy texture and is flavored with a savory-sweet sauce, making it a perfect addition to any lunch spread.
Traditionally served at celebrations and special occasions, Japchae isn’t only delicious but also visually appealing, making it a favorite among both kids and adults.
Preparing Japchae can be a fun and creative process, as you can customize the ingredients based on your preferences and what you have available. The vegetables can vary widely, but commonly used ones include spinach, carrots, mushrooms, and onions.
With its versatility and rich flavor profile, Japchae can be enjoyed warm or at room temperature, making it an excellent option for lunchboxes or potlucks.
Ingredients (Serves 4-6):
- 8 oz sweet potato noodles (dangmyeon)
- 2 tablespoons vegetable oil
- 1 medium onion, thinly sliced
- 1 medium carrot, julienned
- 1 bell pepper (red or green), julienned
- 1 cup spinach, washed and roughly chopped
- 4 oz shiitake mushrooms, sliced (or any mushrooms of your choice)
- 2 cloves garlic, minced
- 1/2 pound beef (or tofu for a vegetarian option), thinly sliced
- 4 tablespoons soy sauce
- 2 tablespoons sugar
- 1 tablespoon sesame oil
- 1 tablespoon sesame seeds (for garnish)
- Salt and pepper to taste
Cooking Instructions:
1. Prepare the Sweet Potato Noodles: Begin by soaking the sweet potato noodles in warm water for about 30 minutes until they soften. After soaking, drain and set aside. You can also boil them for about 5 minutes if you prefer a quicker method.
2. Cook the Beef (or Tofu): In a large skillet or wok, heat 1 tablespoon of vegetable oil over medium-high heat. Add the sliced beef (or tofu) and stir-fry until fully cooked, about 5-7 minutes. Season with a pinch of salt and pepper. Once cooked, remove from the skillet and set aside.
3. Sauté the Vegetables: In the same skillet, add another tablespoon of vegetable oil. Add the sliced onion, garlic, and carrot, and stir-fry for about 3 minutes until they begin to soften.
Then, add the bell pepper and mushrooms, cooking for an additional 3-4 minutes, until all the vegetables are tender.
4. Combine with Noodles: Add the soaked sweet potato noodles to the skillet along with the cooked beef (or tofu). Pour in the soy sauce, sugar, and sesame oil. Toss everything together gently for about 5 minutes, ensuring the noodles are well-coated with the sauce and heated through.
5. Incorporate the Spinach: Ultimately, add the chopped spinach to the skillet. Toss everything together for another 2-3 minutes until the spinach wilts and combines well with the other ingredients.
Taste and adjust the seasoning with additional salt and pepper if needed.
6. Serve: Transfer the Japchae to a serving dish and sprinkle sesame seeds on top for garnish. Serve warm or at room temperature, and enjoy!
Extra Tips:
When making Japchae, feel free to get creative with the vegetables based on what you enjoy or have on hand. You can also experiment with different proteins such as chicken, shrimp, or even a plant-based alternative.
For added flavor, consider marinating the beef in a little soy sauce, garlic, and ginger beforehand. Finally, remember that Japchae tends to taste even better the next day as the flavors meld together, so it’s perfect for meal prep!
Tteokbokki: Spicy Rice Cakes
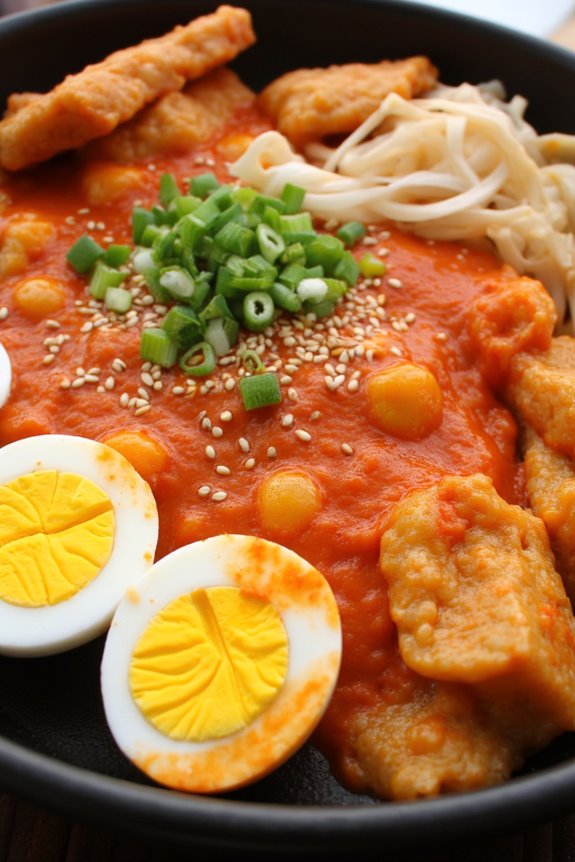
Tteokbokki is a beloved Korean street food known for its chewy rice cakes coated in a spicy and sweet gochujang sauce. This dish isn’t only popular among locals but has also gained international fame for its unique flavor and texture.
Often enjoyed as a snack or a light meal, tteokbokki can be customized with various ingredients such as fish cakes, vegetables, or boiled eggs, making it versatile and satisfying.
Cooking tteokbokki at home allows you to adjust the spice level and add your favorite toppings. The key to achieving the perfect texture is to use fresh, soft rice cakes and to cook them just right, guaranteeing they soak up all the delicious sauce.
Whether you’re enjoying it on a rainy day or as a quick lunch, this dish is sure to delight your taste buds.
Ingredients (Serves 4-6):
- 1 pound of tteok (Korean rice cakes)
- 4 cups of water
- 3 tablespoons of gochujang (Korean chili paste)
- 1 tablespoon of gochugaru (Korean chili flakes)
- 2 tablespoons of soy sauce
- 1 tablespoon of sugar
- 1 tablespoon of minced garlic
- 1 medium onion, sliced
- 2 green onions, chopped
- 1 cup of fish cakes, sliced (optional)
- 2 hard-boiled eggs (optional)
- Sesame seeds for garnish
Cooking Instructions:
- Prepare the Rice Cakes: If you’re using refrigerated or frozen rice cakes, soak them in warm water for about 20-30 minutes to soften them. This step guarantees that they cook evenly and absorb the sauce better.
- Make the Sauce: In a medium bowl, combine the gochujang, gochugaru, soy sauce, sugar, and minced garlic. Mix well until smooth and set aside. This sauce will be the base for your tteokbokki, giving it that signature flavor.
- Cook the Base: In a large pan or skillet, bring 4 cups of water to a boil over medium heat. Once boiling, add the sliced onion and cook for about 2-3 minutes until the onion softens. This will enhance the flavor of the broth.
- Add the Rice Cakes: Once the onion is softened, add the soaked rice cakes to the boiling water. Stir gently to prevent sticking and let them cook for about 5-7 minutes until they become tender.
- Incorporate the Sauce: After the rice cakes are tender, pour the prepared sauce into the pan. Stir well to coat the rice cakes evenly. Let it simmer for another 5-10 minutes, stirring occasionally, until the sauce thickens and clings to the rice cakes.
- Add Optional Ingredients: If you’re using fish cakes, add them to the pan and cook for another 2-3 minutes. If desired, slice the hard-boiled eggs in half and place them on top of the tteokbokki just before serving.
- Garnish and Serve: Once the sauce has thickened to your liking, remove the pan from heat. Garnish with chopped green onions and sesame seeds before serving. Enjoy your homemade tteokbokki hot!
Extra Tips:
When making tteokbokki, feel free to adjust the spice levels according to your preference by adding more or less gochujang.
You can also enhance the dish by incorporating other ingredients like cabbage, carrots, or even mozzarella cheese for a fusion twist. Remember to keep an eye on the sauce while cooking, as it can quickly thicken and burn if left unattended.
Enjoy experimenting with different variations to make this dish your own!
Kimchi Fried Rice: A Flavorful Twist

Kimchi Fried Rice, or “Kimchi Bokkeumbap”, is a beloved Korean dish that transforms leftover rice and kimchi into a quick, satisfying meal. This dish isn’t only simple to prepare but also serves as a canvas for creativity, allowing cooks to incorporate various proteins and vegetables according to their taste preferences.
The combination of the spicy, tangy kimchi with the savory, slightly crispy rice creates a delightful harmony of flavors and textures that’s hard to resist. To elevate this dish, it’s often topped with a fried egg, adding richness and a beautiful presentation.
Whether enjoyed as a hearty lunch or a comforting dinner, Kimchi Fried Rice is a perfect representation of Korean comfort food. Plus, it’s a great way to use up leftover rice and kimchi, making it both economical and delicious!
Ingredients for 4-6 servings:
- 4 cups cooked rice (preferably day-old)
- 1 cup kimchi, chopped
- 1 cup mixed vegetables (carrots, peas, corn)
- 2 tablespoons vegetable oil
- 2 tablespoons gochujang (Korean chili paste)
- 1 tablespoon soy sauce
- 1 tablespoon sesame oil
- 2 green onions, chopped
- 4 eggs (optional, for frying)
- Sesame seeds (for garnish)
Cooking Instructions:
- Prepare the Ingredients: Begin by gathering all your ingredients. If using day-old rice, make sure it’s clumped together and break it apart gently with a fork. Chop the kimchi and any vegetables you wish to include. Having everything prepped will streamline the cooking process.
- Heat the Oil: In a large skillet or wok, heat the vegetable oil over medium-high heat. Once the oil is shimmering, it’s hot enough to start cooking. This step is essential for achieving that slightly crispy texture in the rice.
- Cook the Vegetables: Add the mixed vegetables to the skillet and sauté for about 2-3 minutes until they’re tender. If you want a little more depth, you can also add the chopped kimchi at this point to let it cook down, releasing its flavors.
- Add the Kimchi and Rice: Stir in the chopped kimchi and cook for another minute. Then, add the cooked rice to the skillet. Use a spatula to break up any clumps of rice and mix everything thoroughly. This guarantees that the rice absorbs the flavors of the kimchi.
- Season the Rice: Pour in the gochujang, soy sauce, and sesame oil. Mix everything together until the rice is evenly coated with the sauces. Continue to stir-fry for another few minutes, allowing the rice to fry slightly and develop a bit of a crispy texture.
- Fry the Eggs (Optional): In a separate pan, fry the eggs sunny side up or to your liking. This step is optional but highly recommended for that added richness.
- Serve: Once the rice is well combined and heated through, remove it from the heat. Serve the Kimchi Fried Rice in bowls, topped with a fried egg and sprinkled with chopped green onions and sesame seeds for garnish.
Extra Tips: To enhance the flavors of your Kimchi Fried Rice, consider using aged kimchi, which tends to have a deeper, more complex flavor. Feel free to customize the dish by adding proteins such as diced tofu, chicken, or beef to make it more substantial.
Additionally, you can adjust the amount of gochujang based on your spice preference, and always remember to taste as you go!
Bulgogi: Marinated Beef Stir-Fry
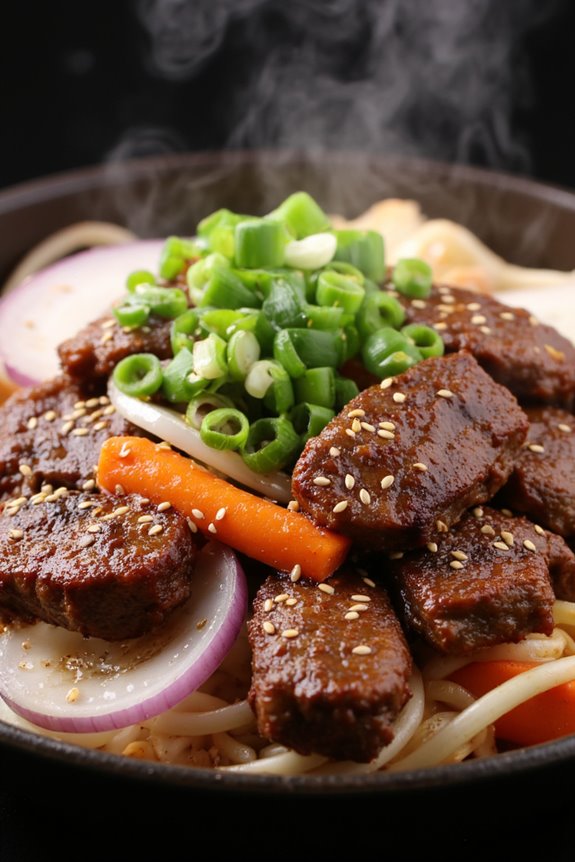
Bulgogi, a classic Korean dish, translates to “fire meat” and is known for its tender, marinated beef that’s grilled or stir-fried to perfection. This dish is celebrated for its sweet and savory flavor profile, making it a favorite among many. The marinade typically consists of soy sauce, sugar, sesame oil, garlic, and pepper, which together create a deliciously rich taste that elevates the beef.
When served with rice and a side of vegetables, bulgogi becomes a complete meal that embodies the essence of Korean cuisine. Preparing bulgogi isn’t just about the cooking; it’s also about the marinating process. Allowing the beef to soak in the marinade for several hours (or overnight) enhances its flavor and tenderness.
This recipe is perfect for a family lunch or dinner, serving 4-6 people, and can easily be adjusted to accommodate larger gatherings. With the right approach, you can bring the taste of Korea into your kitchen with this delightful dish.
Ingredients (Serves 4-6)
- 1 ½ pounds of beef sirloin, thinly sliced
- ½ cup soy sauce
- ¼ cup sugar
- 2 tablespoons sesame oil
- 4 garlic cloves, minced
- 1 teaspoon freshly ground black pepper
- 2 green onions, chopped
- 1 small onion, thinly sliced
- 1 carrot, julienned
- 1 tablespoon vegetable oil (for stir-frying)
- Sesame seeds (for garnish)
Cooking Instructions
- Prepare the Marinade: In a large mixing bowl, combine the soy sauce, sugar, sesame oil, minced garlic, and black pepper. Whisk until the sugar is dissolved, creating a cohesive marinade that will flavor the beef.
- Marinate the Beef: Add the thinly sliced beef sirloin into the bowl with the marinade. Confirm all pieces are well-coated, then cover the bowl with plastic wrap or transfer the mixture to a zip-top bag. Refrigerate for at least 30 minutes, though marinating for 2-4 hours or overnight is ideal for deeper flavor.
- Sauté the Vegetables: In a large skillet or wok, heat the vegetable oil over medium-high heat. Once hot, add the sliced onion and julienned carrot. Sauté for about 2-3 minutes until the vegetables are tender but still crisp. Remove them from the skillet and set aside.
- Cook the Beef: In the same skillet, add the marinated beef along with any excess marinade. Stir-fry the beef for about 5-7 minutes, or until it’s cooked through and caramelized. Make sure to break apart any clumps of beef to confirm even cooking.
- Combine Ingredients: Once the beef is cooked, return the sautéed vegetables to the skillet. Toss everything together for another minute to heat through and combine the flavors. Finally, stir in the chopped green onions.
- Serve: Remove from heat and transfer the bulgogi to a serving platter. Garnish with sesame seeds and serve hot with steamed rice and your choice of side dishes, such as kimchi or pickled vegetables.
Extra Tips
For the best results, choose a well-marbled cut of beef, such as sirloin or ribeye, as this will enhance the tenderness and flavor of the bulgogi. If you have time, let the beef marinate overnight for the most intense flavor.
Additionally, if you prefer a spicier kick, consider adding some gochugaru (Korean red pepper flakes) to the marinade. Enjoy your homemade bulgogi with various side dishes to create a traditional Korean feast!
Mandu: Korean Dumplings

Mandu, the beloved Korean dumplings, are a delightful treat that can be enjoyed either steamed, boiled, or pan-fried. These savory dumplings are typically filled with a mixture of ground meat, vegetables, and aromatic spices, making them a versatile option for lunch or dinner.
Mandu can be served as an appetizer, a main dish, or even as a snack, and they pair wonderfully with a dipping sauce made from soy sauce, vinegar, and sesame oil.
Making mandu at home is a fun and rewarding experience, as you can customize the filling to suit your taste preferences. While the process of making the dumplings may seem a bit intimidating at first, with a bit of practice, you’ll be folding these delicious parcels in no time.
Gather your ingredients, roll up your sleeves, and let’s get started on creating this delightful Korean dish that’s bound to impress family and friends alike.
Ingredients (Serves 4-6 people)
- 1 cup all-purpose flour
- 1/2 cup water
- 1 teaspoon salt
- 1/2 pound ground pork (or beef, chicken, or tofu)
- 1 cup napa cabbage, finely chopped
- 1/2 cup carrots, grated
- 2 green onions, finely chopped
- 2 cloves garlic, minced
- 1 tablespoon ginger, minced
- 2 tablespoons soy sauce
- 1 tablespoon sesame oil
- 1 teaspoon black pepper
- 1 egg (for sealing the dumplings)
Cooking Instructions
1. Prepare the Dough**: In a mixing bowl, combine the all-purpose flour** and salt. Gradually add the water while stirring with a spoon until a dough starts to form.
Once combined, knead the dough on a floured surface for about 5-7 minutes until it becomes smooth and elastic. Cover the dough with a damp cloth and let it rest for at least 30 minutes.
2. Make the Filling: In a large bowl, combine the ground pork, chopped napa cabbage, grated carrots, green onions, minced garlic, minced ginger, soy sauce, sesame oil, and black pepper.
Mix all the ingredients together until well combined. Taste the mixture and adjust seasoning if necessary.
3. Roll Out the Dough: After the dough has rested, divide it into four equal portions. Roll each portion into a thin sheet, about 1/8 inch thick.
Use a round cookie cutter or a glass to cut out circles, approximately 3-4 inches in diameter. Gather any leftover dough, re-knead, and roll it out again to make more circles.
4. Fill the Dumplings: Take a round dough circle and place a tablespoon of filling in the center. Be careful not to overfill.
Brush the edges of the dough with a little beaten egg to help seal the dumplings. Fold the dough in half over the filling to create a half-moon shape and pinch the edges together firmly. For extra flair, you can pleat the edges to make sure they’re well sealed.
5. Cook the Mandu: Choose your cooking method:
- Steaming: Place the dumplings in a steamer basket lined with parchment paper. Steam for about 15-20 minutes.
- Boiling: Bring a pot of water to a boil. Add the dumplings and cook for about 6-8 minutes or until they float to the surface.
- Pan-frying: Heat a tablespoon of oil in a skillet over medium heat. Add the dumplings and fry until the bottoms are golden brown, about 3-4 minutes.
Then, add a splash of water to the pan and cover to steam for another 3-4 minutes until cooked through.
6. Serve: Remove the mandu from the heat and Serve warm with a dipping sauce made of soy sauce, vinegar, and sesame oil.
Extra Tips
When making mandu, feel free to experiment with the filling ingredients to suit your tastes. You can add mushrooms, zucchini, or even kimchi for an extra kick.
Additionally, make sure to seal your dumplings well to prevent any filling from leaking out during cooking. If you have leftover dumplings, they freeze exceptionally well; just make sure they’re separated on a baking sheet before transferring them to a freezer bag.
This way, you can easily enjoy this delightful dish any time you crave it!
Jjigae: Hearty Stews
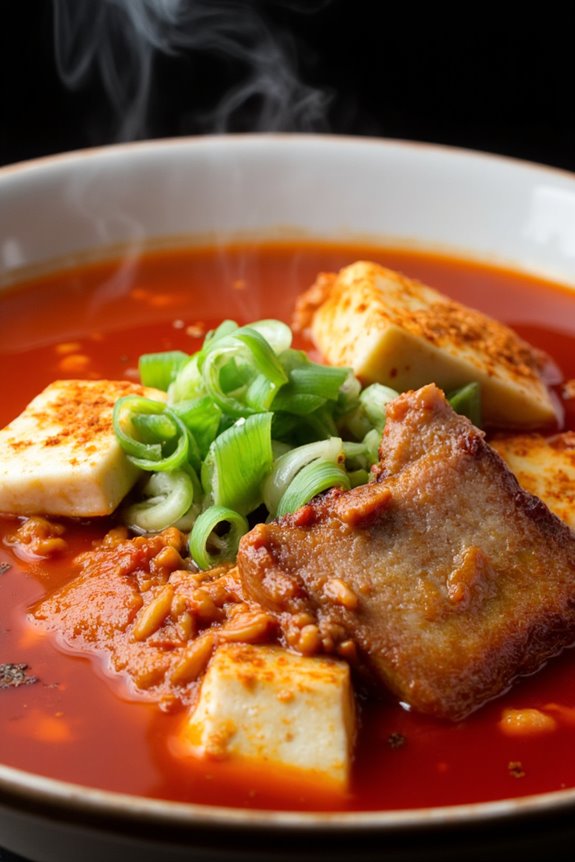
Kimchi Jjigae is a beloved Korean comfort food that showcases the rich and tangy flavors of fermented kimchi. This hearty stew is perfect for lunch, especially on a chilly day, as it offers warmth and satisfaction in every bite. The combination of kimchi, tofu, and various vegetables creates a dish that isn’t only delicious but also packed with nutrients. It’s a staple in many Korean households and can be easily adapted to suit your taste preferences.
To prepare Kimchi Jjigae, you’ll need a few essential ingredients that come together to create a robust flavor profile. The base of the stew is, of course, kimchi, which brings its signature sourness to the dish. Adding tofu introduces a soft texture that complements the bold flavors, while the broth can be customized with different proteins like pork or tuna. This stew isn’t just a meal; it’s an experience that brings warmth and comfort to the table.
Ingredients (Serves 4-6):
- 2 cups of well-fermented kimchi
- 1 cup of firm tofu, cut into cubes
- 200 grams of pork belly or shoulder, sliced (optional)
- 1 medium onion, sliced
- 2 green onions, chopped
- 2-3 cloves of garlic, minced
- 1 tablespoon of gochugaru (Korean red pepper flakes)
- 1 tablespoon of soy sauce
- 4 cups of water or broth (chicken or vegetable)
- 1 tablespoon of sesame oil
- 1 teaspoon of sugar (optional)
- Salt and pepper to taste
Cooking Instructions:
- Prepare the Ingredients: Start by gathering all the ingredients. If using fresh kimchi, verify it’s well-fermented for the best flavor. Cut the tofu into cubes, slice the pork if using, and chop the vegetables. This preparation will make the cooking process smoother.
- Sauté the Pork: In a large pot, heat the sesame oil over medium heat. Add the sliced pork belly or shoulder (if using) and cook until it’s browned and slightly crispy. This step adds depth to the stew’s flavor. If you’re making a vegetarian version, you can skip this step.
- Add the Vegetables: Once the pork is cooked, add the sliced onion and minced garlic to the pot. Sauté until the onion becomes translucent, which should take about 3-4 minutes. This will help to build a flavorful base for the stew.
- Incorporate the Kimchi: Stir in the kimchi and gochugaru. Cook for an additional 5 minutes, allowing the kimchi to caramelize slightly, enhancing its flavor. If you enjoy a spicier stew, feel free to add more gochugaru at this stage.
- Pour in the Broth: Add the water or broth to the pot, followed by the soy sauce. Bring the mixture to a boil, then reduce the heat to a simmer. This will allow all the flavors to meld together beautifully.
- Add Tofu and Simmer: Gently add the cubed tofu into the pot. Let the stew simmer for about 15-20 minutes, allowing the tofu to absorb the flavors and the soup to thicken slightly. Stir occasionally to prevent sticking.
- Season and Serve: Taste the stew and adjust the seasoning with salt, pepper, and sugar if needed. Finally, add the chopped green onions just before serving for a fresh touch. Serve hot with steamed rice.
Extra Tips: For an extra layer of flavor, you can add a splash of fish sauce or a few slices of zucchini or mushrooms. If you prefer a thicker stew, let it simmer longer to allow the flavors to concentrate. Kimchi Jjigae is best enjoyed fresh, but leftovers can be reheated on the stove or in the microwave. Remember that the flavors will continue to develop as it sits, making it even tastier the next day!
Samgyeopsal: Grilled Pork Belly

Samgyeopsal is a beloved Korean dish that highlights the rich flavors of grilled pork belly. It’s often enjoyed in a communal setting, where diners cook the meat tableside, adding an interactive element to the meal. The name “samgyeopsal” translates to “three-layered flesh,” which refers to the unique structure of pork belly, consisting of meat, fat, and skin that delivers a succulent taste with each bite.
This dish is typically served with an array of side dishes, fresh vegetables, and dipping sauces, making it a complete and satisfying meal. Cooking Samgyeopsal isn’t just about preparing the pork; it’s vital to the accompanying ingredients that enhance the experience. Lettuce leaves are used to wrap the grilled pork, along with garlic, green peppers, and a dollop of ssamjang (a savory dipping sauce).
The combination of flavors and textures makes Samgyeopsal a favorite among those who enjoy hearty and flavorful meals. Whether you’re hosting a gathering or simply treating yourself to a delightful lunch, this recipe will guide you through making the perfect grilled pork belly.
Ingredients (Serves 4-6):
- 2 pounds pork belly, sliced into 1/4 inch thick pieces
- Salt and black pepper (to taste)
- 1 tablespoon sesame oil (for dipping)
- 1 tablespoon soy sauce (for dipping)
- 1 tablespoon rice vinegar (for dipping)
- 1 teaspoon gochugaru (Korean red pepper flakes) (optional, for dipping)
- 1 head of butter lettuce or perilla leaves (for wrapping)
- 1 cup sliced garlic
- 1 cup sliced green chili peppers
- 1 cup ssamjang (Korean dipping sauce)
Cooking Instructions:
- Prepare the Grill: If using a tabletop grill, preheat it on medium-high heat. If using a stovetop grill pan, place it on the stove and heat it until hot. Make sure that the grill is clean and lightly oiled to prevent the pork from sticking.
- Season the Pork Belly: While waiting for the grill to heat up, season the sliced pork belly with salt and black pepper. This simple seasoning helps to enhance the natural flavors of the meat without overpowering them.
- Grill the Pork Belly: Place the seasoned pork belly slices on the hot grill. Cook for about 3-4 minutes on each side or until the edges become crispy and golden brown. Use tongs to flip the pieces carefully, ensuring they cook evenly.
- Prepare the Dipping Sauce: In a small bowl, combine sesame oil, soy sauce, rice vinegar, and gochugaru (if using). Mix well and set aside for dipping.
- Assemble the Wraps: Once the pork belly is cooked to your liking, remove it from the grill. To eat, take a piece of grilled pork and place it on a lettuce or perilla leaf. Add a slice of garlic, a piece of green chili, and a spoonful of ssamjang. Wrap the leaf around the filling and enjoy a burst of flavors in each bite.
- Serve the Meal: Serve the grilled pork belly alongside the dipping sauce, fresh vegetables, and any additional side dishes you desire. Encourage your guests to create their own wraps for a fun and interactive dining experience.
Extra Tips:
When cooking Samgyeopsal, it’s crucial to choose high-quality pork belly for the best flavor and texture. Look for meat that has a good balance of fat and lean meat.
Additionally, feel free to experiment with different dipping sauces and side dishes, such as kimchi or pickled vegetables, to customize your meal. If you’re grilling indoors, ensure proper ventilation to avoid smoke buildup. Enjoy this delicious dish with friends and family for a truly authentic Korean dining experience!
Gyeran-jjim: Steamed Egg Custard

Gyeran-jjim, a traditional Korean dish, is a velvety and flavorful steamed egg custard that serves as a perfect side dish for any meal. This comforting dish is known for its smooth texture and rich taste, making it a favorite among both children and adults. The gentle cooking method preserves the delicate flavor of the eggs while allowing them to puff up beautifully.
Often enjoyed as part of a Korean lunch, it pairs well with rice and other banchan (side dishes), creating a balanced and satisfying meal.
To prepare Gyeran-jjim, you’ll need to gather a few simple ingredients that are typically found in most kitchens. The key to achieving the perfect texture lies in the steaming process, which guarantees the custard cooks evenly and remains light and airy. Once you master this dish, you can experiment with additional ingredients, such as vegetables or seafood, to make it your own.
Ingredients (serving size: 4-6 people):
- 6 large eggs
- 1 cup water or chicken stock
- 1 tablespoon soy sauce
- 1 teaspoon sesame oil
- 1 teaspoon salt
- 2 green onions, finely chopped
- Optional: 1/2 cup diced vegetables (e.g., carrots, zucchini) or cooked seafood (e.g., shrimp)
Cooking Instructions:
- Prepare the Egg Mixture: In a mixing bowl, crack the eggs and beat them gently using a whisk. Add in the water or chicken stock, soy sauce, sesame oil, and salt. Whisk until well combined and the mixture is slightly frothy. This will help incorporate air into the eggs, giving the custard a light texture.
- Strain the Mixture: To guarantee a smooth custard, pour the egg mixture through a fine sieve into another bowl or measuring cup. This step removes any bits of egg that may haven’t fully mixed and eliminates any air bubbles.
- Add Optional Ingredients: If you’re using vegetables or seafood, stir them gently into the strained egg mixture. This will add flavor and texture to the custard while still allowing it to steam evenly.
- Prepare the Steaming Setup: Choose a heatproof dish that fits inside your steamer or pot. Lightly grease the dish with oil to prevent sticking. Pour the egg mixture into the dish. Cover it with aluminum foil or a lid to prevent water from dripping into the custard while it cooks.
- Steam the Custard: Bring water to a simmer in your steamer or pot, then carefully place the dish with the egg mixture inside. Cover and steam for about 15-20 minutes over medium heat. Check for doneness by gently shaking the dish; the custard should be set but still slightly jiggly in the center.
- Cool and Serve: Once cooked, remove the dish from the steamer and let it cool for a few minutes. Garnish with the finely chopped green onions before serving. This dish can be enjoyed warm or at room temperature.
Extra Tips: For best results, use the freshest eggs you can find, as they’ll enhance the flavor and texture of your Gyeran-jjim. If you prefer a more intense flavor, feel free to experiment with adding a splash of fish sauce or a sprinkle of pepper to the egg mixture.
Additionally, remember to monitor the steaming process closely, as overcooking can lead to a rubbery texture. Enjoy your dish with a side of rice and other banchan for a complete Korean lunch experience!
Banchan: Tasty Side Dishes

Banchan refers to a variety of small side dishes served along with cooked rice in Korean cuisine. These flavorful accompaniments can range from pickled vegetables to seasoned greens and everything in between, making them an essential part of Korean meals. Each banchan is designed to complement the main dishes, adding depth and variety to the dining experience.
Today, we’ll focus on one of the most popular banchan: Korean Spicy Cucumber Salad (Oi Muchim). This invigorating and spicy dish isn’t only simple to prepare but also brings a delightful crunch to your table.
The beauty of banchan lies in its versatility. This cucumber salad can be adjusted to fit your taste preferences, whether you prefer it spicier or milder. The key ingredients—cucumbers, garlic, and gochugaru (Korean red pepper flakes)—combine to create a bright and zesty flavor that pairs well with any meal. Perfect for summer barbecues or as a side for your everyday lunch, this banchan will surely become a staple in your kitchen.
Ingredients (Serves 4-6):
- 4 medium-sized cucumbers
- 2 teaspoons salt
- 2 tablespoons sugar
- 3 tablespoons rice vinegar
- 1 tablespoon soy sauce
- 2 tablespoons gochugaru (Korean red pepper flakes)
- 2 cloves garlic, minced
- 1 tablespoon sesame oil
- 1 tablespoon sesame seeds
- 2 green onions, finely chopped
Cooking Instructions:
- Prepare the Cucumbers: Start by washing the cucumbers thoroughly. Cut off the ends and slice them in half lengthwise. If you prefer, you can also slice them into thin rounds. Once sliced, place them in a colander and sprinkle with salt. This step helps to draw out excess moisture and enhances the crunchiness of the cucumbers. Let them sit for about 15-20 minutes.
- Rinse and Drain: After the cucumbers have released some of their water, rinse them under cold running water to remove excess salt. Pat them dry with a clean kitchen towel to guarantee they aren’t watery when mixed with the dressing.
- Make the Dressing: In a mixing bowl, combine the sugar, rice vinegar, soy sauce, gochugaru, minced garlic, and sesame oil. Whisk the ingredients together until the sugar dissolves and the mixture is well combined, creating a flavorful dressing.
- Combine the Ingredients: Add the drained cucumbers to the bowl with the dressing. Toss gently to guarantee all the cucumber pieces are evenly coated with the dressing. Be careful not to crush the cucumbers; you want them to remain crisp.
- Add the Final Touches: Ultimately, sprinkle in the sesame seeds and chopped green onions. Toss the salad one final time to incorporate these ingredients, enhancing both the flavor and presentation of the dish.
- Serve and Enjoy: Transfer the Korean Spicy Cucumber Salad to a serving dish. It can be enjoyed immediately, but for best results, let it marinate in the refrigerator for about 30 minutes. This allows the flavors to meld together beautifully.
Extra Tips:
When making Oi Muchim, feel free to adjust the spice level according to your preference by adding more or less gochugaru. For a unique twist, you can also include additional vegetables like carrots or radishes for added color and flavor.
This dish is best served chilled, so preparing it ahead of time can enhance the taste. Finally, remember that banchan is all about balance, so serve it alongside a variety of other dishes to create a satisfying and well-rounded meal. Enjoy your culinary adventure with these delightful Korean side dishes!
Tofu Stir-Fry: A Vegetarian Delight

Tofu Stir-Fry is a vibrant and nutritious dish that brings together the best of Korean flavors in a vegetarian-friendly format. This recipe highlights the versatility of tofu, allowing it to absorb the rich tastes of the sauce while providing a hearty source of protein.
Paired with colorful vegetables, this stir-fry isn’t only visually appealing but also packed with vital nutrients. Whether you’re a lifelong vegetarian or simply looking to incorporate more plant-based meals into your diet, this dish is sure to satisfy your cravings.
Making Tofu Stir-Fry is straightforward and quick, making it an excellent option for a busy lunch or dinner. The key to achieving the perfect texture for the tofu is to press it before cooking, guaranteeing it becomes crispy and golden when sautéed.
With the addition of fresh vegetables and a savory sauce, you’ll have a delicious meal that’s ready in no time!
Ingredients (serving size: 4-6 people)
- 14 oz (400g) firm tofu
- 1 tablespoon soy sauce
- 1 tablespoon sesame oil
- 2 tablespoons vegetable oil
- 1 cup broccoli florets
- 1 cup bell peppers (red and yellow), sliced
- 1 cup carrots, julienned
- 1 cup snap peas
- 3 cloves garlic, minced
- 1 inch ginger, minced
- 2 green onions, chopped
- 1 tablespoon gochujang (Korean red chili paste)
- Salt and pepper to taste
- Sesame seeds for garnish
Cooking Instructions
- Press the Tofu: Start by pressing the tofu to remove excess moisture. Wrap the tofu block in a clean kitchen towel and place a heavy object on top (like a cast-iron skillet) for about 15-20 minutes. This step is fundamental for achieving a crispy texture during cooking.
- Prepare the Vegetables: While the tofu is being pressed, wash and chop your vegetables. Cut the broccoli into small florets, slice the bell peppers into thin strips, julienne the carrots, and trim the snap peas.
- Cut the Tofu: Once the tofu has been pressed, cut it into bite-sized cubes. This allows for even cooking and better absorption of flavors.
- Marinate the Tofu: In a medium bowl, combine the tofu cubes with 1 tablespoon of soy sauce and 1 tablespoon of sesame oil. Gently toss to coat the tofu evenly and let it marinate for about 10 minutes.
- Heat the Oil: In a large skillet or wok, heat 2 tablespoons of vegetable oil over medium-high heat. Confirm the oil is hot before adding the tofu to achieve a crispy exterior.
- Cook the Tofu: Add the marinated tofu to the skillet in a single layer. Let it cook without stirring for about 4-5 minutes until golden brown on one side. Then, gently flip the tofu to brown the other sides for an additional 3-4 minutes. Once cooked, remove the tofu from the skillet and set aside.
- Stir-Fry the Vegetables: In the same skillet, add a little more oil if needed, and toss in the minced garlic and ginger. Sauté for about 30 seconds until fragrant, then add the broccoli, bell peppers, carrots, and snap peas. Stir-fry the vegetables for about 5-7 minutes until they’re tender yet still crisp.
- Combine and Season: Return the cooked tofu to the skillet with the vegetables. Add the gochujang, and season with salt and pepper to taste. Stir everything together and cook for another 2-3 minutes, making sure the sauce coats all the ingredients.
- Garnish and Serve: Once everything is well combined and heated through, remove the stir-fry from the heat. Garnish with chopped green onions and a sprinkle of sesame seeds before serving.
Extra Tips
To enhance the flavors of your Tofu Stir-Fry, consider adding a splash of rice vinegar or a drizzle of honey for a hint of sweetness.
You can also experiment with different vegetables based on what you have on hand, such as mushrooms, zucchini, or bok choy. For a heartier meal, serve your stir-fry over steamed rice or quinoa.
If you’re a fan of spice, feel free to adjust the amount of gochujang to your taste. Enjoy your delicious and healthy vegetarian lunch!
Korean Street Toast: Savory Breakfast Sandwich

Korean Street Toast, also known as “Gilgeori Toast,” is a beloved street food that has gained immense popularity in Korea for its deliciously savory and satisfying taste. This breakfast sandwich is a delightful combination of eggs, vegetables, and sometimes meat, all encased between two slices of crispy bread.
The magic of Korean Street Toast lies in its versatility, allowing you to customize it with your favorite fillings, making it an excellent option for breakfast or a quick lunch. The preparation of this dish is relatively simple and quick, making it perfect for busy mornings.
The key to achieving that perfect balance of flavors is the inclusion of ingredients like cabbage, carrots, and green onions, which add crunch and freshness. Paired with a hint of sweetness from the sauce, this sandwich is sure to become a favorite in your home.
Ingredients (Serves 4-6)
- 6 slices of bread (white, whole wheat, or your choice)
- 4 large eggs
- 1 cup shredded cabbage
- 1/2 cup shredded carrots
- 2 green onions, finely chopped
- 1/4 cup of cooked bacon or ham (optional)
- 1 tablespoon soy sauce
- 1 tablespoon sugar
- 1 tablespoon mayonnaise
- 1 tablespoon ketchup
- Salt and pepper to taste
- Butter or oil for frying
Cooking Instructions
1. Prepare the Vegetables: Start by shredding the cabbage and carrots, and finely chop the green onions. In a bowl, combine the shredded cabbage, carrots, and green onions. If you’re using bacon or ham, chop them into small pieces and add them to the mix.
2. Make the Egg Mixture: In a separate bowl, crack the eggs and whisk them until well combined. Add soy sauce, sugar, and a pinch of salt and pepper. Mix well to guarantee all ingredients are evenly distributed.
3. Cook the Vegetable and Egg Mixture: Heat a non-stick pan over medium heat and add a bit of butter or oil. Once hot, add the vegetable mixture and stir-fry for about 2-3 minutes until the vegetables are slightly softened.
Pour the egg mixture over the cooked vegetables and let it sit for about 1-2 minutes until the edges start to set. Gently stir to combine and continue cooking until the eggs are fully cooked, about another 2-3 minutes.
4. Toast the Bread: In a separate pan, add a little butter or oil and toast the slices of bread on both sides until golden brown.
5. Assemble the Sandwiches: Take one slice of toasted bread, place a generous portion of the vegetable and egg mixture on top. Spread a thin layer of mayonnaise and ketchup on another slice of toast, and place it on top of the filling to create a sandwich.
Repeat the process for the remaining slices.
6. Serve: Cut the sandwiches in half and serve warm. Enjoy your Korean Street Toast as a satisfying breakfast or lunch option!
Extra Tips
For an extra layer of flavor, you can add a sprinkle of cheese on top of the vegetable and egg mixture right before assembling the sandwich; this will melt perfectly and add richness to your toast.
Additionally, feel free to experiment with other ingredients such as sliced avocado or different types of sauces to suit your taste. Remember, the beauty of Korean Street Toast lies in its versatility, so get creative with your fillings!