

When I think of Chinese cuisine, I picture vibrant flavors and colorful dishes that feel both satisfying and light. It’s amazing how these recipes offer a burst of taste without the heaviness of traditional fare. From zesty stir-fries to refreshing salads, there are so many healthy options to explore. Let’s uncover some delightful recipes that promise to nourish and please your palate. Join me on this culinary journey!
Light and Zesty Szechuan Chicken Stir-Fry
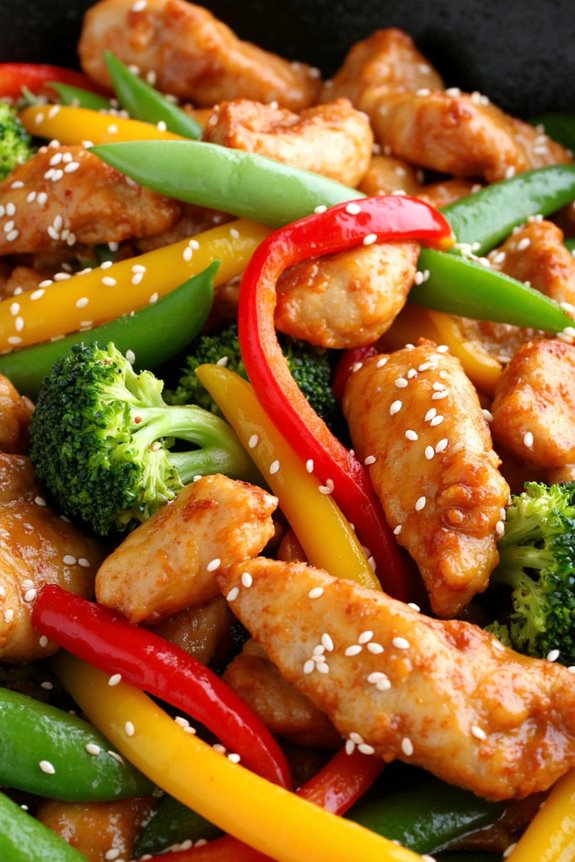
If you’re looking for a dish that combines vibrant flavors with a healthy twist, then Light and Zesty Szechuan Chicken Stir-Fry is your perfect culinary choice. This dish brings together tender chicken breast and an array of colorful vegetables, all tossed in a zesty Szechuan sauce that packs a punch without overwhelming the palate. The use of fresh ingredients makes this stir-fry not only nutritious but also a delightful feast for the eyes and taste buds.
Preparing this dish is quick and easy, making it an excellent option for busy weeknights or a healthy meal prep option. The Szechuan peppercorns add a unique, tingling spice that elevates the dish, while fresh vegetables contribute a satisfying crunch. Serve this stir-fry over brown rice or quinoa for a complete meal that’s sure to impress your family and friends.
Ingredients (Servings: 4-6)
- 1 lb boneless, skinless chicken breasts, sliced into thin strips
- 2 tablespoons vegetable oil
- 1 red bell pepper, sliced
- 1 yellow bell pepper, sliced
- 1 cup broccoli florets
- 1 cup snap peas
- 4 green onions, chopped
- 3 cloves garlic, minced
- 1 tablespoon fresh ginger, minced
- 2 tablespoons low-sodium soy sauce
- 1 tablespoon rice vinegar
- 1 tablespoon Szechuan peppercorns
- 1 tablespoon chili paste (adjust to taste)
- Salt and pepper to taste
- Sesame seeds for garnish (optional)
Instructions
- Prepare the Chicken: Begin by slicing the boneless, skinless chicken breasts into thin strips. This will guarantee that the chicken cooks evenly and quickly during the stir-frying process. Season the chicken lightly with salt and pepper for added flavor.
- Heat the Oil: In a large wok or non-stick skillet, heat the vegetable oil over medium-high heat. It’s essential to use a high smoke point oil like vegetable oil to achieve that signature stir-fry sear without burning the ingredients.
- Cook the Chicken: Once the oil is hot, add the sliced chicken to the pan. Stir-fry the chicken for about 5-7 minutes, or until it’s golden brown and cooked through. Make sure to stir frequently to avoid sticking and confirm even cooking.
- Add Garlic and Ginger: After the chicken is cooked, add the minced garlic and ginger to the pan. Stir-fry for an additional 1-2 minutes until fragrant. Be careful not to burn the garlic, as it can turn bitter.
- Incorporate the Vegetables: Next, add the sliced bell peppers, broccoli florets, and snap peas to the pan. Stir-fry for about 3-5 minutes, or until the vegetables are just tender but still crisp. This helps to retain their vibrant colors and nutrients.
- Make the Sauce: In a small bowl, mix the low-sodium soy sauce, rice vinegar, Szechuan peppercorns, and chili paste. Pour this mixture over the chicken and vegetables in the pan and stir well to coat everything evenly. Cook for an additional 2-3 minutes to allow the flavors to meld.
- Finish and Serve: Ultimately, stir in the chopped green onions and adjust the seasoning with additional salt or pepper if needed. Remove from heat and let it sit for a minute before serving. Garnish with sesame seeds if desired and serve hot over cooked brown rice or quinoa.
Extra Tips
To enhance the flavor profile of your Light and Zesty Szechuan Chicken Stir-Fry, consider marinating the chicken in the soy sauce and rice vinegar mixture for about 30 minutes before cooking. This will infuse the chicken with extra flavor.
Also, feel free to mix and match vegetables based on what you have on hand or prefer; bok choy, carrots, or mushrooms would all be excellent additions.
Finally, be mindful of the heat level; adjust the amount of chili paste according to your spice preference to cater to all palates.
Refreshing Cucumber Salad With Sesame Dressing
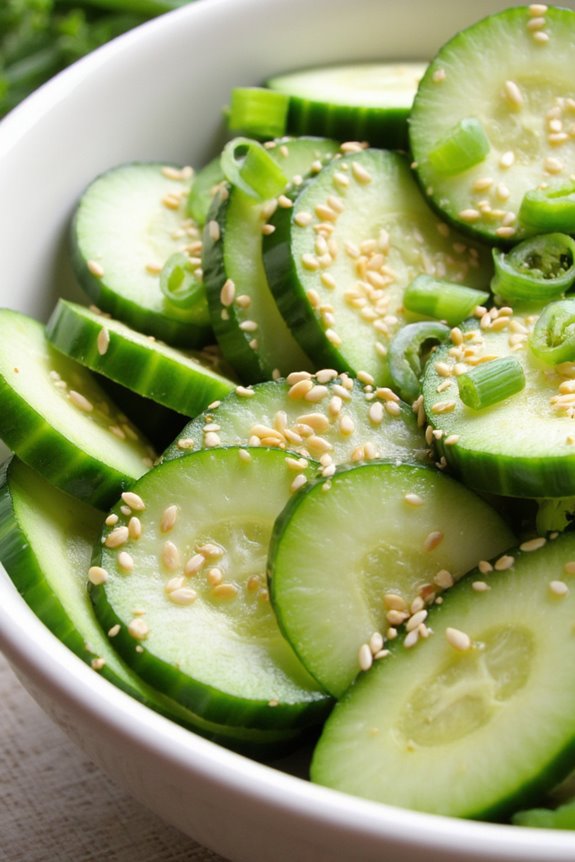
This Invigorating Cucumber Salad with Sesame Dressing is a delightful dish that captures the essence of Chinese cuisine with its crisp textures and vibrant flavors. Perfect for a hot summer day or as a light side dish, this salad is easy to prepare and offers a revitalizing contrast to heavier meals.
The combination of fresh cucumbers, aromatic sesame oil, and tangy rice vinegar creates a harmonious balance that will awaken your palate, making it an ideal appetizer or accompaniment to any Asian-inspired meal.
In addition to being delicious, this salad is packed with nutrients and low in calories, making it a healthy choice for those looking to maintain or improve their well-being. Cucumbers are hydrating, full of vitamins, and low in carbohydrates, while the sesame dressing adds healthy fats and a rich, nutty flavor.
This dish isn’t only quick to prepare but also versatile, allowing you to add other vegetables or proteins if desired.
Ingredients (serving size: 4-6 people):
- 4 medium cucumbers
- 2 tablespoons sesame oil
- 1 tablespoon rice vinegar
- 1 tablespoon soy sauce
- 1 teaspoon sugar
- 1 teaspoon freshly grated ginger
- 2 garlic cloves, minced
- 2 tablespoons sesame seeds
- 2 green onions, finely sliced
- Salt, to taste
- Pepper, to taste
Cooking Instructions:
- Prepare the Cucumbers: Wash the cucumbers thoroughly. Depending on your preference, you can peel them or leave the skin on for added texture and nutrients. Cut the cucumbers in half lengthwise, then slice them thinly into half-moons. Place the sliced cucumbers in a large mixing bowl.
- Make the Dressing: In a separate small bowl, combine the sesame oil, rice vinegar, soy sauce, sugar, grated ginger, minced garlic, salt, and pepper. Whisk the mixture until the sugar is fully dissolved and all ingredients are well incorporated.
- Toss the Salad: Pour the sesame dressing over the sliced cucumbers in the mixing bowl. Gently toss the cucumbers to ensure they’re evenly coated with the dressing.
- Add the Finishing Touches: Sprinkle the sesame seeds and sliced green onions over the salad. Toss lightly to combine and distribute the toppings evenly.
- Chill and Serve: For the best flavor, let the salad sit in the refrigerator for about 15-20 minutes before serving. This allows the cucumbers to absorb the dressing and enhances the overall taste.
Extra Tips:
For an added crunch, you can include some chopped peanuts or cashews as a topping. If you prefer a bit of heat, consider adding a pinch of red pepper flakes to the dressing.
This salad is best enjoyed fresh but can also be stored in an airtight container in the refrigerator for up to two days. Just be aware that the cucumbers may release some water, so give it a gentle toss before serving again. Enjoy your invigorating cucumber salad as a healthy and delicious side dish!
Steamed Vegetable Dumplings
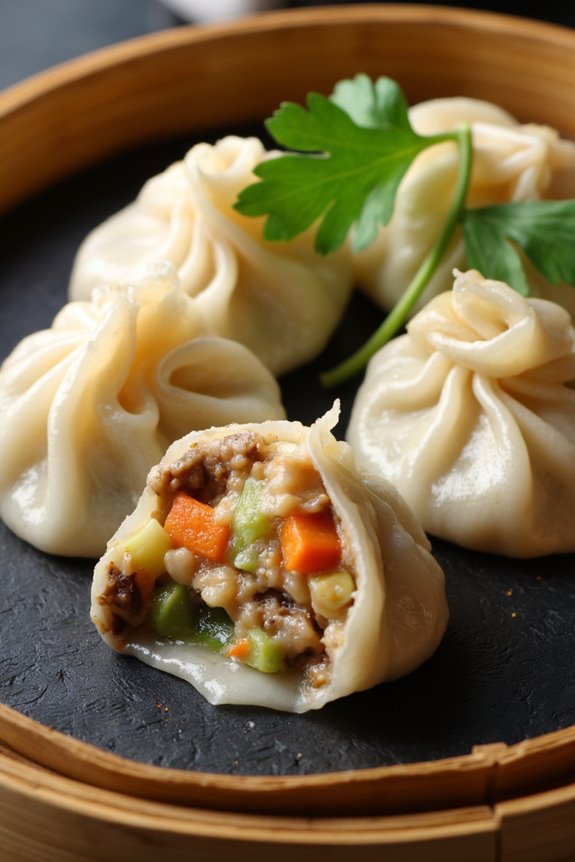
Steamed vegetable dumplings are a delightful and healthy choice for anyone looking to enjoy authentic Chinese cuisine at home. These dumplings are packed with vibrant vegetables and offer a light yet satisfying meal option. They can be enjoyed as an appetizer, snack, or even a main dish. Not only are they nutritious, but the steaming process guarantees that the flavors of the vegetables remain intact while keeping the dumplings moist and tender.
Making steamed vegetable dumplings is a fun and rewarding activity, perfect for a family cooking session or a gathering with friends. The process involves preparing a flavorful filling, wrapping it in delicate dumpling skins, and steaming them to perfection. Serve these dumplings with a side of soy sauce or a homemade dipping sauce for an extra burst of flavor.
Let’s plunge into the ingredients and cooking instructions to create these delicious dumplings for 4-6 people.
Ingredients:
- 2 cups of finely chopped mixed vegetables (carrots, cabbage, mushrooms, and bell peppers)
- 1 cup of firm tofu, crumbled
- 2 green onions, finely chopped
- 2 cloves of garlic, minced
- 1 tablespoon of ginger, minced
- 2 tablespoons of soy sauce
- 1 tablespoon of sesame oil
- 1 teaspoon of salt
- 1 package of dumpling wrappers
- Fresh cilantro leaves for garnish (optional)
Instructions:
1. Prepare the Filling: In a large bowl, combine the finely chopped mixed vegetables, crumbled tofu, green onions, garlic, ginger, soy sauce, sesame oil, and salt. Gently mix all the ingredients together until well combined. This filling is full of flavor and will provide the core taste for your dumplings.
2. Assemble the Dumplings: Take a dumpling wrapper and place about a tablespoon of the filling in the center. Moisten the edges of the wrapper with a little water using your fingertip. Fold the wrapper in half to create a half-moon shape and pinch the edges together to seal. You can crimp the edges for a decorative look if desired.
Repeat this process until all the filling is used up, placing the assembled dumplings on a parchment-lined tray.
3. Prepare the Steamer: Fill a pot with water and bring it to a simmer. If you have a bamboo steamer, line it with parchment paper or cabbage leaves to prevent sticking. If you don’t have a bamboo steamer, you can use a metal steamer basket or a heatproof plate set over a pot of simmering water.
4. Steam the Dumplings: Once the water is simmering, place the dumplings in the steamer basket, making sure they aren’t touching. Cover the steamer with a lid and Steam the Dumplings for about 10-12 minutes, or until the wrappers are translucent and the filling is cooked through.
5. Serve and Enjoy: Carefully remove the dumplings from the steamer and transfer them to a serving plate. Garnish with fresh cilantro leaves if desired, and serve with soy sauce or your favorite dipping sauce.
Extra Tips:
When making steamed vegetable dumplings, feel free to experiment with different vegetable combinations based on your preference or what you have on hand. You can also add a touch of spice by incorporating chili flakes or sriracha into the filling.
If you’re short on time, pre-made vegetable dumpling wrappers can save you preparation time. Finally, make sure that the water in the pot is kept at a gentle simmer during steaming for consistent cooking. Enjoy your healthy and delicious homemade dumplings!
Quinoa Fried Rice With Veggies
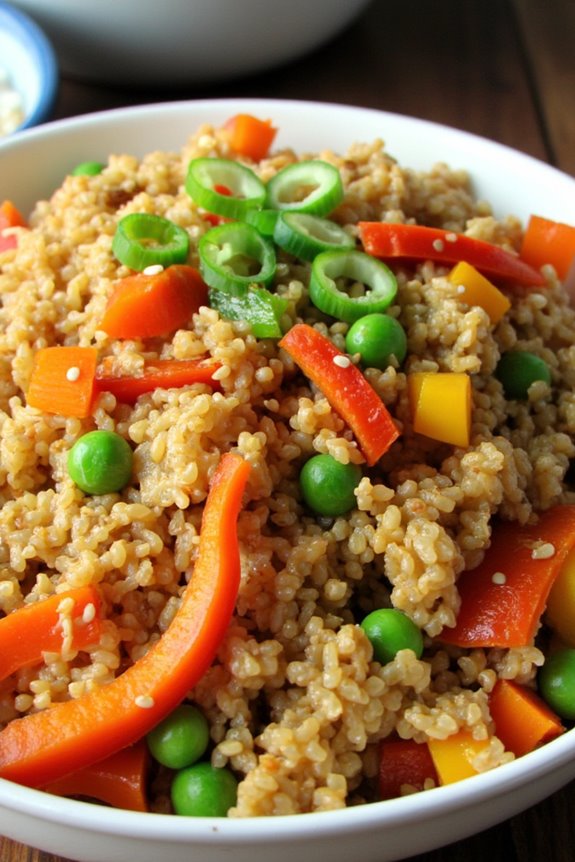
Quinoa Fried Rice With Veggies is a delightful twist on the traditional fried rice, offering a nutritious base with the benefits of quinoa while maintaining the classic flavors of Chinese cuisine. This dish isn’t only quick to prepare but also incredibly versatile, allowing you to use whatever vegetables you have on hand. Packed with protein, fiber, and essential nutrients, this recipe makes for a wholesome meal that everyone in the family will enjoy.
Cooking quinoa instead of rice provides a nutty flavor and a delightful chewy texture. This recipe features colorful vegetables and a hint of soy sauce, creating a savory dish that’s perfect as a side or a main course. Whether you’re looking to make a healthy dinner or simply need a quick lunch option, this Quinoa Fried Rice With Veggies is guaranteed to satisfy your cravings.
Ingredients (serving size: 4-6 people)
- 1 cup quinoa
- 2 cups vegetable broth or water
- 2 tablespoons vegetable oil
- 2 cloves garlic, minced
- 1 small onion, diced
- 1 cup carrots, diced
- 1 cup bell peppers, diced (any color)
- 1 cup frozen peas
- 2 tablespoons soy sauce (or tamari for gluten-free)
- 1 tablespoon sesame oil
- 2 green onions, sliced
- Salt and pepper to taste
- Optional: sesame seeds for garnish
Cooking Instructions
1. Rinse and Cook Quinoa: Begin by rinsing 1 cup of quinoa under cold water to remove its natural coating, called saponin, which can impart a bitter taste. In a medium saucepan, combine the rinsed quinoa with 2 cups of vegetable broth or water. Bring it to a boil, then reduce the heat to low, cover, and simmer for about 15 minutes or until the quinoa is fluffy and the liquid is absorbed.
Remove from heat and let it sit covered for an additional 5 minutes, then fluff with a fork.
2. Sauté Aromatics: In a large skillet or wok, heat 2 tablespoons of vegetable oil over medium heat. Once hot, add the minced garlic and diced onion. Sauté for about 2-3 minutes until the onion is translucent and fragrant, stirring frequently to avoid burning.
3. Add Vegetables: Next, add the diced carrots and bell peppers to the skillet. Cook for an additional 4-5 minutes, stirring occasionally, until the vegetables are tender but still crisp. Then, stir in the frozen peas and cook for another 2 minutes until they’re heated through.
4. Combine Quinoa and Season: Once the vegetables are ready, add the cooked quinoa to the skillet. Pour in 2 tablespoons of soy sauce and 1 tablespoon of sesame oil. Stir well to combine all the ingredients, making sure the quinoa is evenly coated with the sauces.
Season with salt and pepper to taste.
5. Garnish and Serve: Remove the skillet from heat and fold in the sliced green onions. If desired, sprinkle with sesame seeds for a bit of crunch. Serve the Quinoa Fried Rice warm, either on its own or alongside your favorite protein.
Extra Tips
To enhance the flavor of your Quinoa Fried Rice With Veggies, consider adding protein sources such as scrambled eggs, tofu, or cooked chicken. You can also experiment with different vegetables based on seasonal availability or personal preference.
If you prefer a spicier kick, a dash of chili sauce or red pepper flakes can be added. Always taste and adjust the seasoning before serving to ascertain your dish is perfectly seasoned!
Lemon-Ginger Tofu With Broccoli
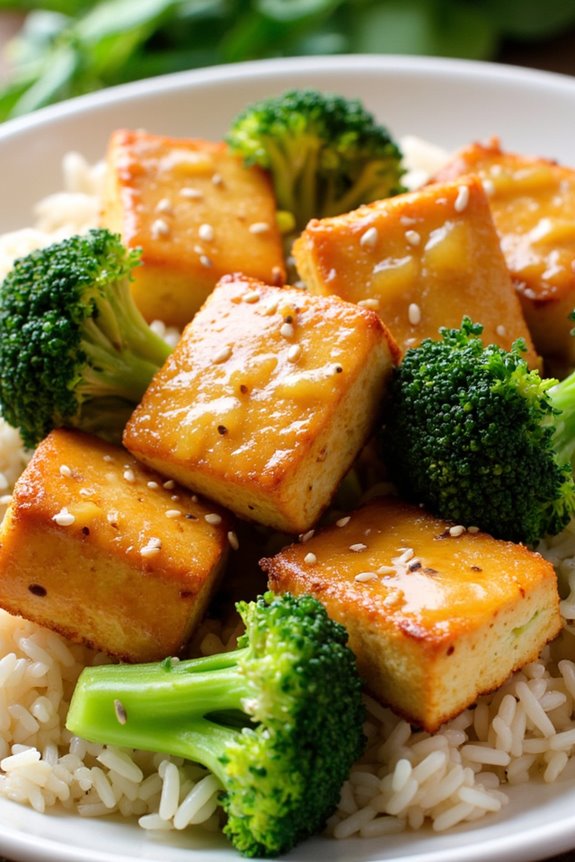
Lemon-Ginger Tofu with Broccoli is a delightful and nutritious dish that perfectly balances the zesty flavor of lemon with the warm, spicy notes of ginger. This recipe not only highlights the versatility of tofu but also incorporates vibrant broccoli, making it a healthy, plant-based option that can be enjoyed by everyone.
The combination of these ingredients creates a dish that’s both satisfying and invigorating, ideal for a weeknight dinner or as a meal prep option for the week ahead. This dish isn’t only quick to prepare but also packed with protein and essential vitamins.
The tofu is marinated in a zesty lemon-ginger sauce that infuses it with flavor, while the broccoli adds a crunchy texture that complements the softness of the tofu. Serve it over rice or quinoa for a complete meal that’s sure to please your family and friends.
Ingredients (serving size: 4-6 people)
- 1 block (14 oz) firm tofu, drained and pressed
- 2 cups broccoli florets
- 2 tablespoons olive oil
- 3 tablespoons soy sauce (or tamari for gluten-free)
- 2 tablespoons fresh lemon juice
- 1 tablespoon lemon zest
- 1 tablespoon fresh ginger, grated
- 2 cloves garlic, minced
- 1 tablespoon cornstarch
- Salt and pepper to taste
- Cooked rice or quinoa for serving (optional)
Cooking Instructions
- Prepare the Tofu: Start by draining the tofu and pressing it to remove excess moisture. This can be done by wrapping the tofu block in a clean kitchen towel and placing a heavy object on top for about 15-20 minutes. Once pressed, cut the tofu into bite-sized cubes.
- Make the Marinade: In a mixing bowl, combine the soy sauce, lemon juice, lemon zest, grated ginger, minced garlic, and cornstarch. Whisk the ingredients together until well mixed, ensuring that the cornstarch is fully dissolved. This marinade will give the tofu its flavor and help it achieve a nice coating.
- Marinate the Tofu: Place the cubed tofu in the marinade and gently toss to coat all sides. Allow the tofu to marinate for at least 15-20 minutes, or longer if you have time. This step is essential for enhancing the flavor of the tofu.
- Cook the Broccoli: While the tofu is marinating, bring a pot of water to a boil and blanch the broccoli florets for about 2-3 minutes until they’re bright green and slightly tender. Drain and immediately transfer them to an ice bath to stop the cooking process. This will help maintain their vibrant color and crisp texture.
- Sauté the Tofu: In a large skillet, heat the olive oil over medium-high heat. Once the oil is hot, add the marinated tofu cubes (reserving any leftover marinade) and cook for about 5-7 minutes, turning occasionally, until the tofu is golden brown and crispy on all sides.
- Combine Tofu and Broccoli: Add the blanched broccoli to the skillet with the tofu. Pour in the reserved marinade and stir to combine everything. Cook for an additional 2-3 minutes, allowing the sauce to thicken slightly and coat the tofu and broccoli.
- Serve: Remove from heat and season with salt and pepper to taste. Serve the Lemon-Ginger Tofu with Broccoli over cooked rice or quinoa if desired, and garnish with additional lemon zest or sesame seeds for extra flavor.
Extra Tips
To enhance the flavor of your Lemon-Ginger Tofu with Broccoli, consider adding other vegetables such as bell peppers, snap peas, or carrots to the mix.
You can also adjust the level of zestiness by adding more lemon juice or zest according to your taste preferences. For a spicier kick, feel free to incorporate some red pepper flakes or sriracha into the marinade.
Enjoy this healthy dish as a light lunch or dinner, and relish in the delicious flavors and health benefits it brings!
Spicy Garlic Shrimp With Asparagus
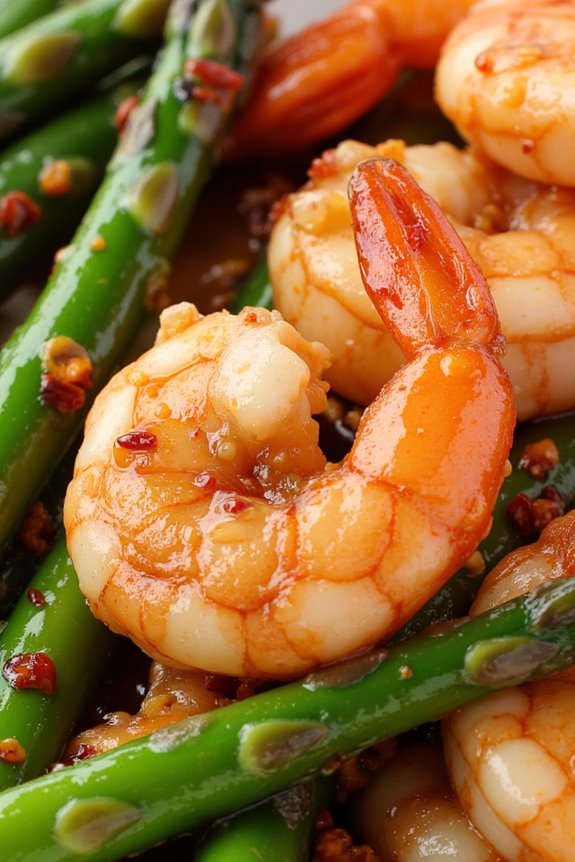
Spicy Garlic Shrimp With Asparagus is a delightful and nutritious dish that combines the succulent flavors of shrimp with the crispness of asparagus, all enhanced by a zesty garlic sauce. This dish isn’t only packed with protein and vitamins, but it also features a medley of spices that provide a satisfying kick without being overwhelming.
Perfect for a quick weeknight dinner or a special occasion, this recipe is sure to impress family and friends alike. This vibrant dish captures the essence of Chinese cuisine, combining fresh ingredients and bold flavors. The shrimp cooks quickly, making it an excellent option for busy cooks.
Asparagus adds a lovely crunch and a pop of color, while the garlic and chili flakes bring warmth and depth. Serve this dish over steamed rice or alongside a fresh salad for a complete meal that’s both healthy and delicious.
Ingredients (Serves 4-6):
- 1 pound large shrimp, peeled and deveined
- 1 bunch of asparagus, trimmed and cut into 2-inch pieces
- 4 cloves garlic, minced
- 2 tablespoons vegetable oil
- 1 tablespoon soy sauce
- 1 tablespoon oyster sauce
- 1 teaspoon chili flakes (adjust according to spice preference)
- 1 teaspoon fresh ginger, minced
- Salt and black pepper to taste
- Green onions, chopped (for garnish)
Cooking Instructions:
- Prepare the Shrimp: Start by cleaning the shrimp thoroughly under cold running water. Pat them dry with paper towels and season with a little salt and black pepper. This step helps to enhance the natural flavors of the shrimp.
- Prep the Asparagus: While the shrimp is marinating, wash and trim the asparagus. Cut it into 2-inch pieces to guarantee even cooking. This vegetable not only adds texture but also a vibrant color to the dish.
- Heat the Oil: In a large skillet or wok, heat the vegetable oil over medium-high heat. Confirm the oil is hot enough to sizzle when you add the ingredients. This step is essential for achieving a good sear on the shrimp.
- Sauté Garlic and Ginger: Once the oil is hot, add the minced garlic and ginger. Sauté for about 30 seconds until fragrant, being careful not to let them burn, as this can create a bitter taste.
- Cook the Shrimp: Add the seasoned shrimp to the skillet. Cook for 2-3 minutes on one side until they turn pink, then flip and cook for another 2 minutes. This quick cooking method guarantees the shrimp remains juicy and tender.
- Add the Asparagus: Once the shrimp is nearly cooked through, add the asparagus pieces to the skillet. Stir everything together and cook for an additional 3-4 minutes, allowing the asparagus to become tender-crisp.
- Incorporate Sauces and Spice: Pour in the soy sauce, oyster sauce, and sprinkle in the chili flakes. Toss everything together until the shrimp and asparagus are coated evenly in the sauce. Cook for an additional minute to meld the flavors.
- Final Touches: Taste the dish and adjust seasoning if necessary. Remove from heat and garnish with chopped green onions for a fresh finish.
Extra Tips:
To elevate the dish, consider marinating the shrimp for 15-30 minutes in a mixture of soy sauce, garlic, and ginger before cooking. This not only enhances the flavor but also tenderizes the shrimp.
Adjust the amount of chili flakes based on your spice tolerance, and feel free to add other vegetables such as bell peppers or snap peas for added variety. Serve immediately for the best texture and flavor!
Buddha Bowl With Brown Rice and Bok Choy
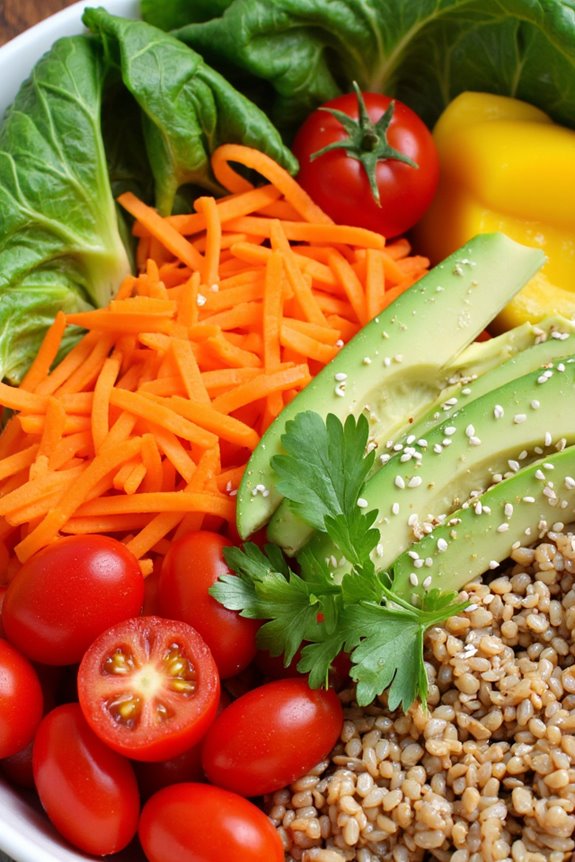
A Buddha Bowl is a nourishing dish that brings together a variety of ingredients, creating a colorful and satisfying meal. The combination of brown rice, bok choy, and other fresh vegetables offers a delightful balance of flavors and textures. Not only is it visually appealing, but it’s also packed with nutrients, making it an excellent choice for a healthy lunch or dinner. This recipe is designed to serve 4-6 people, so it’s perfect for family gatherings or meal prepping for the week ahead.
In this Buddha Bowl, the earthy flavors of brown rice complement the slightly bitter and crunchy bok choy, while the addition of other vegetables adds freshness and vibrancy. You can customize this dish by adding your favorite proteins or toppings, such as grilled chicken, tofu, or a drizzle of tahini dressing. The versatility of the Buddha Bowl makes it a fantastic way to use up leftover veggies in your fridge, ensuring that nothing goes to waste.
Ingredients (Serves 4-6):
- 2 cups brown rice
- 4 cups water (for cooking rice)
- 4 cups bok choy, chopped
- 1 cup shredded carrots
- 1 cup bell peppers, sliced (any color)
- 1 cup cucumber, sliced
- 1 cup cherry tomatoes, halved
- 1 avocado, sliced
- 1 tablespoon sesame oil
- 2 tablespoons soy sauce
- 1 tablespoon rice vinegar
- Salt and pepper to taste
- Optional toppings: sesame seeds, chopped green onions, or cilantro
Cooking Instructions:
- Cook the Brown Rice: Rinse the brown rice under cold running water to remove excess starch. In a medium pot, combine the rinsed rice and 4 cups of water. Bring to a boil, then reduce the heat to low, cover, and simmer for 40-45 minutes, or until the rice is tender and the water is absorbed. Once cooked, fluff the rice with a fork and set aside.
- Prepare the Vegetables: While the rice is cooking, wash and chop the bok choy, carrots, bell peppers, cucumber, and cherry tomatoes. Set aside the chopped vegetables in a large bowl.
- Sauté the Bok Choy: In a large skillet, heat the sesame oil over medium heat. Add the chopped bok choy and sauté for about 3-4 minutes until tender but still vibrant green. Season with a pinch of salt and pepper, then remove from heat.
- Assemble the Buddha Bowl: In each serving bowl, start with a base of brown rice. Arrange the sautéed bok choy, shredded carrots, bell peppers, cucumber, cherry tomatoes, and avocado on top of the rice in a visually appealing manner.
- Add Dressing: In a small bowl, whisk together the soy sauce and rice vinegar. Drizzle this dressing over each Buddha Bowl, ensuring all ingredients are lightly coated.
- Garnish and Serve: Finish the bowls with optional toppings like sesame seeds, chopped green onions, or cilantro for added flavor and presentation. Serve immediately.
Extra Tips:
For added protein, consider including grilled chicken, marinated tofu, or chickpeas to make the Buddha Bowl even more filling. You can also swap out vegetables based on what you have available or prefer.
This dish is best enjoyed fresh, but leftovers can be stored in an airtight container in the refrigerator for up to three days. When reheating, add a splash of water to the rice to prevent it from drying out.
Miso Glazed Eggplant
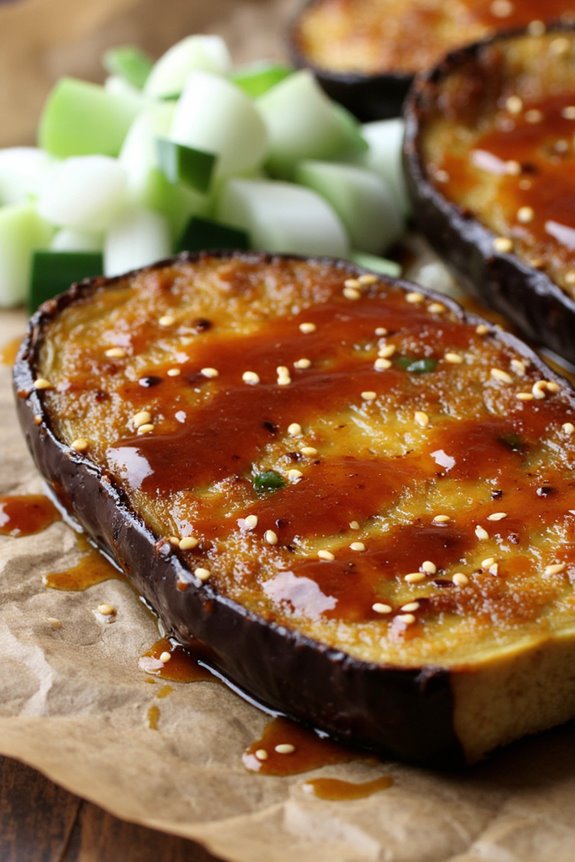
Miso Glazed Eggplant is a delightful dish that marries the umami flavors of miso with the tender, rich texture of eggplant. This recipe isn’t only simple to prepare but also offers a healthy alternative to traditional side dishes. The combination of sweet and savory notes in the glaze makes it a perfect companion to rice or as a standalone vegetarian option.
Its vibrant colors and satisfying taste will impress both your family and guests. This dish can be served as a main dish or a side, making it versatile for different occasions. With the right balance of ingredients, Miso Glazed Eggplant can elevate your dining experience while providing essential nutrients.
Whether you’re a seasoned chef or a novice in the kitchen, this recipe is straightforward and rewarding.
Ingredients (serving size: 4-6 people)
- 2 large eggplants
- 3 tablespoons white miso paste
- 2 tablespoons mirin (sweet rice wine)
- 1 tablespoon soy sauce
- 1 tablespoon sesame oil
- 1 tablespoon rice vinegar
- 1 tablespoon honey or maple syrup
- 2 tablespoons sesame seeds
- 2 green onions, chopped (for garnish)
Cooking Instructions
1. Prepare the Eggplant: Start by washing the eggplants thoroughly. Slice each eggplant in half lengthwise. Use a spoon to scoop out a small portion of the flesh, creating a shallow cavity; this helps the eggplant absorb the miso glaze better.
Sprinkle the insides lightly with salt and let them sit for about 15-20 minutes to draw out excess moisture. Rinse and pat dry.
2. Make the Miso Glaze: In a small bowl, combine the white miso paste, mirin, soy sauce, sesame oil, rice vinegar, and honey (or maple syrup). Mix thoroughly until you have a smooth and cohesive glaze.
Adjust the sweetness to your preference by adding more honey or syrup if desired.
3. Preheat the Oven: Preheat your oven to 400°F (200°C). This step is essential for achieving a caramelized finish on the eggplant.
4. Coat the Eggplant: Place the eggplant halves cut-side up on a baking sheet lined with parchment paper. Generously brush the miso glaze over the exposed flesh of the eggplants, ensuring they’re well-coated.
Reserve some glaze for later.
5. Roast the Eggplant: Place the baking sheet in the preheated oven and roast the eggplants for about 20-25 minutes, or until they’re tender and the tops are slightly browned.
Halfway through roasting, brush the eggplants with the reserved glaze for added flavor.
6. Garnish and Serve: Once cooked, remove the eggplants from the oven and sprinkle with sesame seeds and chopped green onions. The dish is now ready to be served warm, either as a main or a side dish.
Extra Tips
When preparing Miso Glazed Eggplant, make sure not to over-salt the eggplants during the initial step, as the miso paste itself contains salt.
You can also experiment with different types of eggplants, such as Japanese or Chinese varieties, for varied textures and flavors. If you prefer a smokier flavor, consider grilling the eggplant halves instead of roasting them.
Finally, this dish can be made ahead of time and reheated, making it a convenient option for meal prep.
Thai Basil Chicken Lettuce Wraps
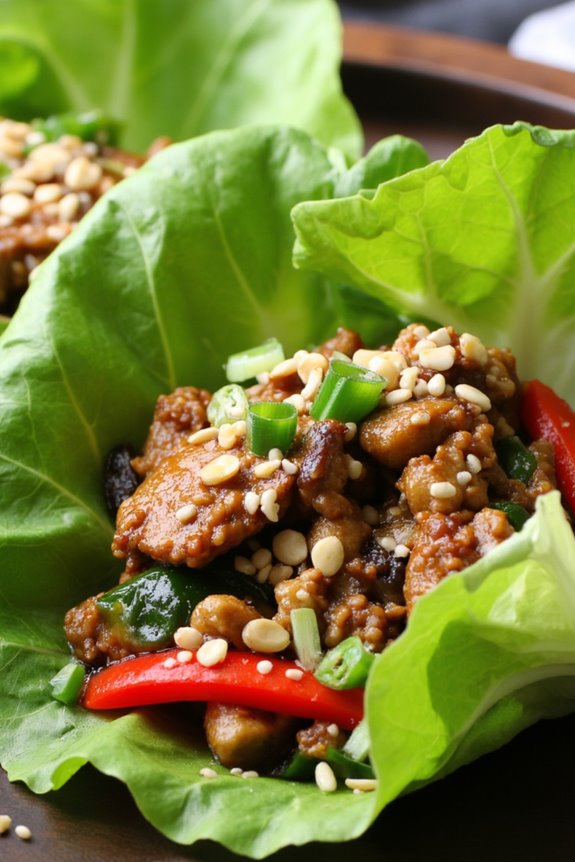
Thai Basil Chicken Lettuce Wraps are a vibrant and flavorful dish that brings together the delightful tastes of Thai cuisine in a healthy, low-carb format. This dish features tender chicken sautéed with aromatic garlic, fresh vegetables, and fragrant Thai basil, all wrapped in crisp lettuce leaves. It’s perfect for a light lunch or dinner and can easily impress guests with its presentation and taste.
The beauty of these wraps lies in their versatility; you can customize the filling with your favorite vegetables or proteins. The combination of savory, sweet, and spicy flavors, along with the crunch of the lettuce, creates a satisfying meal that’s both nutritious and delicious. Enjoy these wraps as an appetizer or a main dish that everyone at the table will love.
Ingredients (serving size: 4-6 people):
- 1 lb ground chicken
- 2 tablespoons vegetable oil
- 3 cloves garlic, minced
- 1 small onion, diced
- 1 bell pepper, diced
- 1 cup mushrooms, diced
- 1 tablespoon soy sauce
- 1 tablespoon oyster sauce
- 1 tablespoon fish sauce
- 1 tablespoon brown sugar
- 1 cup fresh Thai basil leaves
- Salt and pepper to taste
- 1 head of butter lettuce or iceberg lettuce, leaves separated
- Sliced green onions for garnish (optional)
- Chopped peanuts for garnish (optional)
Instructions:
- Prepare the ingredients: Start by washing the lettuce leaves thoroughly and patting them dry. Set aside. Dice the onion, bell pepper, and mushrooms, and mince the garlic. Having all your ingredients prepped will make the cooking process smoother.
- Cook the chicken: In a large skillet, heat the vegetable oil over medium-high heat. Add the ground chicken to the skillet and cook until it’s browned and cooked through, breaking it apart with a spatula as it cooks (about 5-7 minutes).
- Sauté the vegetables: Once the chicken is cooked, add the minced garlic and diced onion to the skillet. Sauté for 2-3 minutes until the onion becomes translucent. Then, add the bell pepper and mushrooms and cook for an additional 3-4 minutes until the vegetables are tender.
- Season the mixture: Stir in the soy sauce, oyster sauce, fish sauce, and brown sugar. Mix well to guarantee the chicken and vegetables are evenly coated with the sauces. Let it simmer for another 2-3 minutes to allow the flavors to meld.
- Add the basil: Remove the skillet from heat and fold in the fresh Thai basil leaves, stirring until they’re wilted and fragrant. Taste and season with salt and pepper as desired.
- Assemble the wraps: To serve, take a lettuce leaf and spoon a generous amount of the chicken mixture into the center. You can top it with sliced green onions and chopped peanuts for added texture and flavor. Fold the lettuce leaf around the filling and enjoy!
Extra Tips: To enhance the flavor profile, consider adding a splash of lime juice or a sprinkle of chili flakes if you prefer a bit of heat. You can also substitute ground chicken with ground turkey or tofu for a different twist.
These wraps are best enjoyed fresh, so prepare them just before serving to maintain the crispness of the lettuce. Leftover filling can be stored in an airtight container in the refrigerator for up to 2 days, and you can use it in stir-fries or salads.
Sweet and Sour Cauliflower

Sweet and Sour Cauliflower is a delightful vegetarian dish that combines the crispiness of battered cauliflower with a tangy sauce, making it an irresistible treat for both vegetarians and meat-lovers alike. This dish isn’t only simple to prepare but also offers a burst of flavors that can elevate any meal.
It’s perfect as an appetizer or a main dish served alongside steamed rice or noodles. The balance of sweetness and acidity in the sauce pairs perfectly with the crunchy texture of the cauliflower, creating a satisfying experience with each bite.
Preparing Sweet and Sour Cauliflower at home allows you to control the ingredients and adjust the flavors to your preference. It’s a great way to introduce more vegetables into your diet while enjoying the delicious taste of traditional Chinese cuisine. This recipe serves 4-6 people, making it ideal for family dinners or gatherings with friends.
Let’s immerse ourselves in the ingredients you’ll need and the steps to create this mouthwatering dish.
Ingredients
- 1 medium head of cauliflower, cut into florets
- 1 cup all-purpose flour
- 1 cup cornstarch
- 1 teaspoon baking powder
- 1 teaspoon salt
- 1 cup water (adjust as needed)
- Vegetable oil (for frying)
- 1/2 cup sugar
- 1/2 cup distilled white vinegar
- 1/4 cup soy sauce
- 1 tablespoon ketchup
- 1 tablespoon cornstarch mixed with 2 tablespoons water (for thickening)
- 1 bell pepper, diced (any color)
- 1 small onion, diced
- 2 cloves garlic, minced
- Sesame seeds (for garnish)
- Green onions, sliced (for garnish)
Cooking Instructions
1. Prepare the Cauliflower: Start by rinsing the cauliflower florets under cold water. Make sure to remove any dirt or impurities. After washing, pat them dry with a clean kitchen towel.
This step is essential to guarantee that the batter adheres well to the cauliflower and that the frying process is efficient.
2. Make the Batter: In a mixing bowl, combine the all-purpose flour, cornstarch, baking powder, and salt. Gradually add the water while whisking until you achieve a smooth batter.
The batter should be thick enough to coat the cauliflower florets. If it’s too thin, add a little more flour or cornstarch until the desired consistency is reached.
3. Fry the Cauliflower: In a deep skillet or frying pan, heat vegetable oil over medium-high heat. Once the oil is hot (around 350°F or 175°C), dip each cauliflower floret into the batter, allowing any excess to drip off, and carefully place them in the hot oil.
Fry the florets in batches until they’re golden brown and crispy, about 4-5 minutes. Remove them from the oil using a slotted spoon and place them on a paper towel-lined plate to absorb excess oil.
4. Prepare the Sauce: In a separate saucepan, combine the sugar, distilled white vinegar, soy sauce, ketchup, and minced garlic. Bring the mixture to a simmer over medium heat.
Once it starts to bubble, add the diced bell pepper and onion. Cook for about 3-4 minutes until the vegetables are slightly softened.
5. Thicken the Sauce: Stir in the cornstarch mixed with water into the sauce, and continue to cook for another 2-3 minutes until the sauce thickens.
Remove it from heat once it’s glossy and thickened to your liking.
6. Combine and Serve: Place the crispy cauliflower florets in a large mixing bowl, and pour the sweet and sour sauce over them. Toss gently to coat the florets evenly.
Serve hot, garnished with sesame seeds and sliced green onions.
Extra Tips
When preparing Sweet and Sour Cauliflower, consider using fresh ingredients for the best flavor.
If you want to make the dish even healthier, you can bake the battered cauliflower in the oven at 425°F (220°C) for about 25-30 minutes instead of frying. This method will still give you a nice crunch while reducing the oil content.
Additionally, feel free to customize the sauce by adding pineapple chunks for an extra tropical twist or adjusting the level of sweetness and acidity to suit your taste preferences.
Enjoy your homemade Sweet and Sour Cauliflower!
Herbal Chicken Soup With Goji Berries
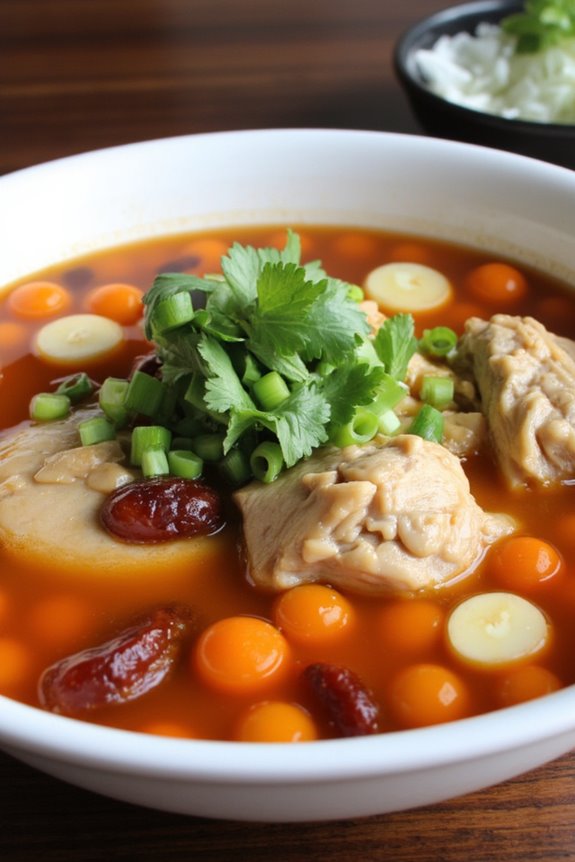
Herbal Chicken Soup With Goji Berries is a nourishing and flavorful dish that brings together the goodness of chicken and the health benefits of traditional Chinese herbs. This soup is particularly popular for its restorative properties and is often enjoyed during colder seasons or when one is feeling under the weather.
Goji berries, a staple in Chinese medicine, aren’t only rich in antioxidants but also add a slight sweetness to the dish, balancing the savory flavors of the chicken and herbs. This recipe is perfect for a family meal or a gathering, serving 4-6 people.
The combination of aromatic herbs like ginger and garlic with tender chicken creates a comforting bowl of soup that’s both delicious and healthful. As you prepare this dish, take your time to allow the flavors to meld together, resulting in a warm and inviting soup that everyone will love.
Ingredients
- 1 whole chicken (about 3-4 pounds), cleaned and cut into pieces
- 1/2 cup goji berries, rinsed and drained
- 6 cups water
- 2 slices ginger
- 4 cloves garlic, smashed
- 2-3 dried Chinese red dates (jujubes)
- 2-3 dried shiitake mushrooms (optional)
- 1 tablespoon soy sauce (optional)
- 1 teaspoon salt (or to taste)
- 2-3 green onions, chopped (for garnish)
- Fresh cilantro (for garnish)
Cooking Instructions
- Prepare the Chicken: Start by cleaning the chicken thoroughly. Remove any excess fat and pat it dry with paper towels. Cut the chicken into pieces to help it cook evenly and allow the flavors to penetrate the meat.
- Simmer the Broth: In a large pot, add the chicken pieces along with 6 cups of water. Bring to a boil over medium-high heat. Once boiling, reduce the heat to low and skim off any impurities or foam that rises to the surface. This will help achieve a clear broth.
- Add Aromatics and Herbs: With the heat still low, add the ginger slices, smashed garlic cloves, dried red dates, and shiitake mushrooms (if using) to the pot. These ingredients will infuse the broth with rich flavor. Cover the pot and let it simmer gently for about 30 minutes.
- Incorporate Goji Berries: After 30 minutes, add the rinsed goji berries to the pot. These berries won’t only enhance the soup’s sweetness but also contribute their nutritional benefits. Continue to simmer the soup for an additional 20-30 minutes until the chicken is fully cooked and tender.
- Season the Soup: Once the chicken is cooked, taste the broth and add salt and soy sauce (if using) according to your preference. Allow the soup to simmer for a few more minutes to meld the flavors together.
- Serve the Soup: Carefully ladle the soup into bowls, making sure to include pieces of chicken and goji berries in each serving. Garnish with chopped green onions and fresh cilantro for a burst of color and flavor.
Extra Tips
For a richer flavor, consider adding a splash of Shaoxing wine or a few slices of Chinese yam during the simmering process.
If you prefer a thicker broth, you can remove the chicken pieces after cooking, shred the meat, and return it to the soup before serving. Additionally, feel free to customize the soup with other herbs or vegetables, such as carrots or radishes, to suit your taste.
Always adjust the seasoning to your liking, and enjoy this wholesome herbal remedy that warms both the body and soul.