

I’ve found some amazing gluten-free Chinese recipes that make weeknight meals so much easier. Each one is filled with vibrant flavors and fresh ingredients, ensuring you can still enjoy your favorite dishes. From zesty stir-fries to hearty soups, these recipes are adaptable and quick to prepare. Curious about how to elevate your dinner routine with these tasty bowls? Let’s explore these delightful options together.
Gluten-Free Chicken and Broccoli Stir-Fry
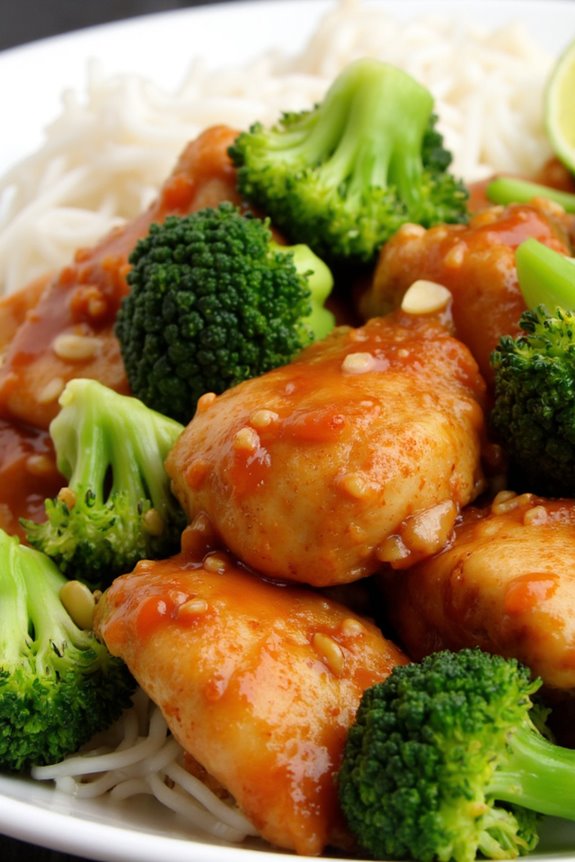
If you’re looking for a quick and delicious weeknight dinner that’s both gluten-free and packed with flavor, this Gluten-Free Chicken and Broccoli Stir-Fry is the perfect choice! This dish combines tender chicken breast with crisp broccoli florets and a savory sauce that’s bound to please the whole family.
It’s not only easy to make, but it also takes less than 30 minutes from start to finish, making it a fantastic option for busy evenings.
This stir-fry isn’t only healthy but also allows for some versatility with ingredients. You can add other vegetables like bell peppers or snow peas, or even adjust the sauce to suit your taste. The key to a great stir-fry is high heat and quick cooking, which helps to preserve the crunchiness of the vegetables and the juiciness of the chicken.
Serve it over rice or your favorite gluten-free noodles for a complete meal that everyone will love!
Ingredients (Serves 4-6):
- 1 pound boneless, skinless chicken breast, sliced thinly
- 3 cups broccoli florets
- 2 tablespoons gluten-free soy sauce
- 1 tablespoon oyster sauce (verify it’s gluten-free)
- 1 tablespoon cornstarch
- 2 teaspoons sesame oil
- 2 teaspoons minced garlic
- 1 teaspoon minced ginger
- 1 tablespoon vegetable oil
- Salt and pepper, to taste
- Cooked rice or gluten-free noodles, for serving
Cooking Instructions:
- Prepare the Chicken: Start by slicing the chicken breast into thin strips. This will help it cook quickly and evenly. Season the chicken with a pinch of salt and pepper, and toss it in cornstarch to coat lightly. The cornstarch will provide a nice texture when cooked.
- Blanch the Broccoli: In a large pot, bring water to a boil and add the broccoli florets. Blanch them for about 2 minutes until they turn bright green and are slightly tender. Immediately transfer the broccoli to a bowl of ice water to stop the cooking process, then drain and set aside.
- Make the Sauce: In a small bowl, combine the gluten-free soy sauce, oyster sauce, sesame oil, minced garlic, and minced ginger. Mix well and set aside. This sauce will infuse your stir-fry with flavor.
- Stir-Fry the Chicken: Heat vegetable oil in a large skillet or wok over medium-high heat. Once hot, add the sliced chicken in a single layer. Cook for about 3-4 minutes, stirring occasionally, until the chicken is cooked through and lightly browned.
- Add the Broccoli and Sauce: Once the chicken is fully cooked, add the blanched broccoli to the skillet. Pour the prepared sauce over the chicken and broccoli, stirring everything together. Cook for an additional 2-3 minutes, allowing the sauce to thicken slightly and coat the chicken and broccoli evenly.
- Serve: Remove the stir-fry from heat and serve immediately over cooked rice or gluten-free noodles. Enjoy your delicious and healthy Gluten-Free Chicken and Broccoli Stir-Fry!
Extra Tips:
To enhance the flavor of your stir-fry, consider marinating the chicken in the sauce for about 15-30 minutes before cooking. This will allow the chicken to absorb more flavor.
Additionally, make sure your cooking surface is hot enough before adding the ingredients; this will create a nice sear on the chicken and guarantee that the vegetables stay crisp.
Feel free to experiment with other vegetables or add some heat with red pepper flakes or sriracha if you enjoy a spicy kick!
Sweet and Sour Tofu With Bell Peppers
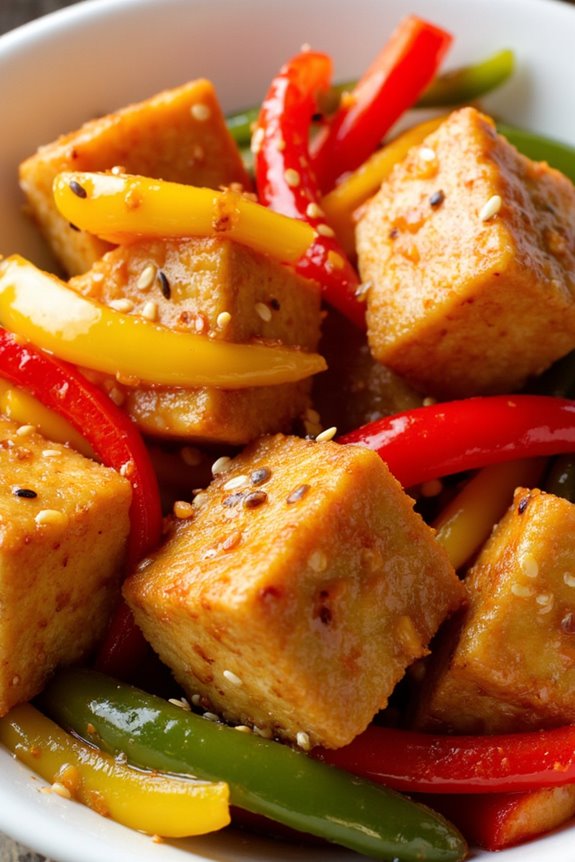
Sweet and Sour Tofu with Bell Peppers is a delightful and vibrant dish that brings together the flavors of tangy sweetness and savory goodness, making it a perfect centerpiece for any gluten-free meal. This dish pairs crispy tofu with colorful bell peppers, creating a visually appealing and delicious option for both vegans and gluten-free enthusiasts alike.
The combination of textures and flavors will surely impress your family and friends, and it’s simple enough for a weeknight dinner while being elegant enough for special occasions. This recipe not only highlights the deliciousness of tofu but also showcases the natural sweetness of bell peppers, bringing a burst of color to your plate.
The sweet and sour sauce ties everything together, creating a harmonious blend that’s both satisfying and nutritious. With a few easy steps and accessible ingredients, you can whip up this tantalizing dish in no time.
Ingredients (Serves 4-6):
- 14 oz firm tofu, drained and pressed
- 2 tablespoons cornstarch
- 2 tablespoons vegetable oil
- 1 red bell pepper, sliced
- 1 yellow bell pepper, sliced
- 1 green bell pepper, sliced
- 1 small onion, sliced
- 2 cloves garlic, minced
- 1/4 cup gluten-free soy sauce
- 1/4 cup rice vinegar
- 1/4 cup pineapple juice
- 1/4 cup brown sugar
- 1 tablespoon ketchup
- 1 teaspoon sesame oil
- 1 tablespoon sesame seeds (optional)
- Cooked rice or quinoa, for serving
Cooking Instructions:
- Prepare the Tofu: Begin by draining the firm tofu and pressing it to remove excess moisture. Wrap the tofu in a clean kitchen towel and place a heavy object on top for about 15-20 minutes. Once pressed, cut the tofu into bite-sized cubes.
- Coat the Tofu: Place the cubed tofu in a mixing bowl and sprinkle the cornstarch over it. Toss the tofu gently until all pieces are evenly coated with cornstarch. This will help achieve a crispy texture when sautéed.
- Cook the Tofu: In a large skillet or wok, heat 2 tablespoons of vegetable oil over medium-high heat. Once the oil is hot, add the tofu cubes in a single layer. Cook for about 5-7 minutes, turning occasionally, until the tofu is golden brown and crispy on all sides. Remove the tofu from the skillet and set it aside.
- Sauté the Vegetables: In the same skillet, add the sliced onions and bell peppers. Sauté for about 4-5 minutes, or until the vegetables are tender yet still crisp. Add the minced garlic and cook for an additional 1-2 minutes until fragrant.
- Prepare the Sauce: In a small bowl, whisk together the gluten-free soy sauce, rice vinegar, pineapple juice, brown sugar, ketchup, and sesame oil. Pour this sauce over the sautéed vegetables in the skillet, stirring to combine.
- Combine Tofu and Sauce: Return the crispy tofu to the skillet and gently toss everything together, making sure the tofu is well coated with the sauce. Cook for an additional 2-3 minutes, allowing the sauce to thicken slightly.
- Serve: Once everything is heated through and well mixed, remove from heat. Garnish with sesame seeds if desired. Serve the Sweet and Sour Tofu with Bell Peppers over a bed of cooked rice or quinoa for a complete meal.
Extra Tips:
For an even more flavorful dish, consider marinating the pressed tofu in a mixture of gluten-free soy sauce and a pinch of garlic powder for about 30 minutes before cooking. This will enhance the taste of the tofu.
Additionally, feel free to customize the vegetables based on your preferences or seasonal availability—snap peas, carrots, or broccoli can all be wonderful additions. Enjoy your culinary adventure with this gluten-free delight!
Shrimp Fried Rice With Cauliflower
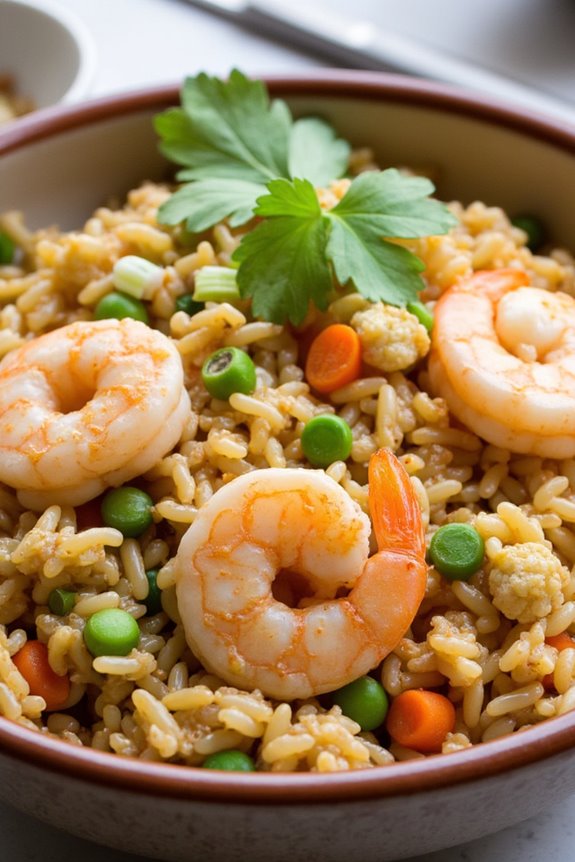
Gluten Free Shrimp Fried Rice with Cauliflower is a delightful and healthy twist on traditional fried rice. This dish combines the rich flavors of shrimp with the nutritious benefits of cauliflower, making it a perfect option for those looking to enjoy a gluten-free meal without sacrificing taste.
The cauliflower rice serves as a fantastic low-carb alternative to regular rice, absorbing the savory flavors of the soy sauce and garlic while providing a satisfying texture.
Cooking shrimp fried rice with cauliflower isn’t only simple but also quick, making it an ideal weeknight dinner. The colorful mix of vegetables adds both nutrition and visual appeal, while the shrimp provides a protein-packed punch.
This dish can be customized with your favorite vegetables and seasonings, making it versatile enough to suit any palate.
Ingredients (Serves 4-6)
- 1 lb shrimp, peeled and deveined
- 4 cups cauliflower rice (fresh or frozen)
- 2 tablespoons olive oil
- 3 cloves garlic, minced
- 1 cup peas and carrots (frozen mix is fine)
- 3 green onions, chopped
- 2 large eggs, beaten
- 3 tablespoons gluten-free soy sauce (or tamari)
- 1 teaspoon sesame oil
- Salt and pepper to taste
- Optional: fresh cilantro for garnish
Cooking Instructions
- Prepare the Cauliflower Rice: If using fresh cauliflower, cut it into florets and pulse in a food processor until it resembles rice. If using frozen cauliflower rice, simply measure out the amount needed. Set aside.
- Cook the Shrimp: In a large skillet or wok, heat 1 tablespoon of olive oil over medium-high heat. Add the shrimp and sauté for about 2-3 minutes until they turn pink and opaque. Remove the shrimp from the skillet and set aside.
- Sauté the Vegetables: In the same skillet, add another tablespoon of olive oil. Add the minced garlic and sauté for 30 seconds until fragrant. Then, add the peas and carrots mixture, cooking for 2-3 minutes until heated through.
- Add the Cauliflower Rice: Stir in the cauliflower rice and cook for another 5-7 minutes, stirring frequently, until the cauliflower rice is tender and slightly golden.
- Scramble the Eggs: Push the cauliflower rice and vegetable mixture to one side of the skillet. Pour the beaten eggs into the empty side and scramble until fully cooked. Once done, mix the eggs into the cauliflower rice mixture.
- Combine Ingredients: Return the cooked shrimp to the skillet. Add gluten-free soy sauce, sesame oil, salt, and pepper. Stir everything together until well combined and heated throughout.
- Finish and Serve: Remove the skillet from heat and stir in the chopped green onions. Taste and adjust seasoning if necessary. Serve hot, garnished with fresh cilantro if desired.
Extra Tips
To enhance the flavors of your Shrimp Fried Rice with Cauliflower, consider marinating the shrimp in a bit of gluten-free soy sauce and garlic for 15-20 minutes before cooking.
Additionally, feel free to customize the dish by adding other vegetables such as bell peppers, broccoli, or snap peas based on your preferences. For a bit of spice, a dash of chili sauce or crushed red pepper flakes can be added during the cooking process.
This dish not only provides a wholesome meal but also offers the opportunity to get creative in the kitchen!
Mongolian Beef With Zucchini Noodles
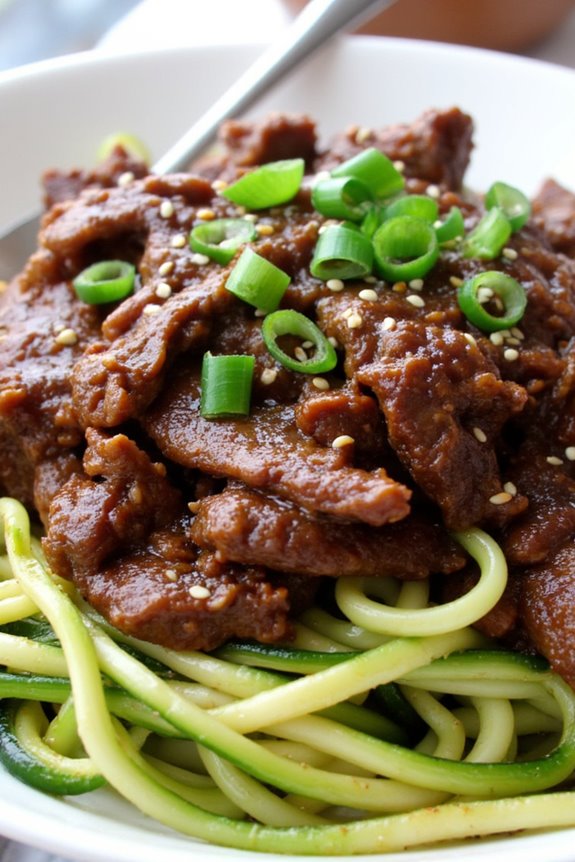
Mongolian Beef with Zucchini Noodles is a delightful and healthy twist on a classic takeout dish that brings bold flavors and vibrant colors to your table. This gluten-free recipe utilizes tender strips of beef, marinated in a savory sauce, and is served over fresh zucchini noodles instead of traditional wheat noodles. The combination of the sweet and savory sauce with the crisp texture of zucchini makes this dish not only delicious but also a lighter alternative that’s perfect for anyone looking to enjoy the flavors of Chinese cuisine without the gluten.
This dish isn’t only quick to prepare but also offers a wonderful balance of protein and vegetables, making it an ideal option for a family dinner or a weeknight meal. The zucchini noodles are easy to make and provide a wonderful base that absorbs the flavors of the Mongolian beef sauce. With just a few simple ingredients and steps, you can whip up a satisfying meal that everyone will love.
Ingredients (Serves 4-6)
- 1 pound flank steak, thinly sliced against the grain
- 1 tablespoon cornstarch
- 2 tablespoons gluten-free soy sauce
- 2 tablespoons oyster sauce (verify gluten-free)
- 1 tablespoon brown sugar
- 1 tablespoon rice vinegar
- 3 cloves garlic, minced
- 1 tablespoon ginger, minced
- 2 tablespoons vegetable oil
- 4 medium zucchinis, spiralized into noodles
- 3 green onions, chopped
- Sesame seeds, for garnish (optional)
Cooking Instructions
- Marinate the Beef: In a bowl, combine the sliced flank steak with gluten-free soy sauce, cornstarch, and brown sugar. Mix well to verify the beef is evenly coated. Let it marinate for at least 15-30 minutes. This step not only adds flavor but also helps tenderize the meat.
- Prepare the Sauce: In a small bowl, whisk together the oyster sauce, rice vinegar, minced garlic, and ginger. This mixture will add depth and a savory profile to your Mongolian beef.
- Cook the Beef: Heat vegetable oil in a large skillet or wok over medium-high heat. Once the oil is hot, add the marinated beef in a single layer. Sear for about 2-3 minutes until browned, flipping occasionally to verify even cooking. Avoid overcrowding the pan; cook in batches if necessary.
- Add the Sauce: Once the beef is browned, pour the sauce mixture over the beef in the skillet. Stir well to coat the beef in the sauce and allow it to simmer for another 2-3 minutes until the sauce thickens slightly. This step enhances the flavors and gives the beef a glossy finish.
- Prepare Zucchini Noodles: While the beef is cooking, spiralize the zucchinis into noodles. You can also use a vegetable peeler to create ribbon-like noodles if you don’t have a spiralizer. Lightly sauté the zucchini noodles in a separate pan with a bit of salt for about 2-3 minutes until just tender. Be careful not to overcook them, as they can become mushy.
- Combine and Serve: Once the zucchini noodles are cooked, place them on a serving platter. Top with the Mongolian beef and sauce. Garnish with chopped green onions and sesame seeds if desired. Serve immediately while hot.
Extra Tips
When making Mongolian Beef with Zucchini Noodles, be mindful of the cooking time for the zucchini to verify they maintain a bit of crunch and don’t become mushy.
You can also customize the dish by adding other vegetables like bell peppers or broccoli for added nutrition and color. Feel free to adjust the level of sweetness in the sauce by adding more or less brown sugar according to your preference. Enjoy your flavorful and gluten-free meal!
Spicy Sesame Garlic Noodles
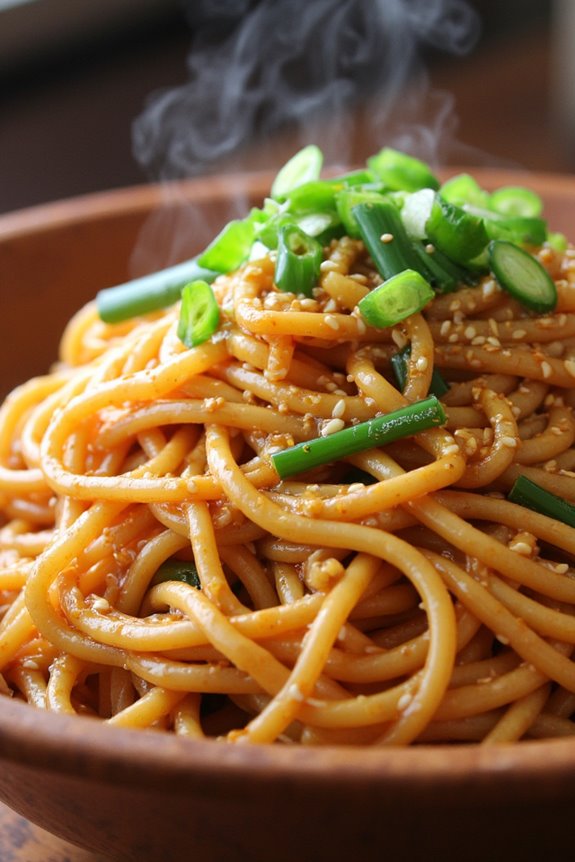
If you’re craving a delicious and satisfying meal that’s both gluten-free and packed with flavor, search no further than Spicy Sesame Garlic Noodles. This dish combines the nutty flavor of sesame oil with the robust taste of garlic and a kick of spice to create a mouthwatering noodle experience.
Not only is it easy to prepare, but it also highlights the vibrant flavors of Asian cuisine without the gluten. Perfect for a weeknight dinner or a gathering with friends, this recipe is sure to impress.
To make these Spicy Sesame Garlic Noodles, you’ll be using gluten-free noodles, which serve as the perfect base for the sauce. The combination of garlic, soy sauce, and chili paste creates a savory and spicy profile that’s both comforting and exciting.
Top it off with fresh green onions and sesame seeds for a delightful crunch and presentation. With just a few ingredients and simple steps, you can whip up this dish in no time!
Ingredients (Serves 4-6):
- 12 oz gluten-free noodles (such as rice noodles or quinoa noodles)
- 3 tablespoons sesame oil
- 4 cloves garlic, minced
- 2 tablespoons gluten-free soy sauce
- 1 tablespoon chili paste (adjust according to spice preference)
- 2 tablespoons rice vinegar
- 2 teaspoons sugar (or a sugar substitute)
- 3 green onions, chopped
- 2 tablespoons sesame seeds
- Salt and pepper to taste
Cooking Instructions:
1. Cook the Noodles: Begin by boiling a large pot of water. Once boiling, add the gluten-free noodles and cook according to package instructions until al dente. Be sure not to overcook them, as they can become mushy.
Once cooked, drain the noodles and rinse them under cold water to stop the cooking process. Set aside.
2. Prepare the Sauce: In a small bowl, combine the minced garlic, gluten-free soy sauce, chili paste, rice vinegar, and sugar. Stir well until the sugar is dissolved, creating a flavorful sauce that will coat the noodles.
3. Heat the Oil: In a large skillet or wok, heat the sesame oil over medium heat. Once hot, add the prepared garlic sauce and sauté for about 1-2 minutes, allowing the garlic to become fragrant but not browned.
4. Combine the Noodles and Sauce: Add the cooked noodles directly into the skillet with the sauce. Toss the noodles gently in the sauce, ensuring they’re evenly coated.
Continue to cook for an additional 2-3 minutes, allowing the noodles to absorb the flavors.
5. Add Final Touches: Once the noodles are heated through, remove them from the heat. Stir in the chopped green onions and adjust the seasoning with salt and pepper to taste.
6. Serve: Transfer the Spicy Sesame Garlic Noodles to a serving dish and sprinkle sesame seeds on top for garnish. Serve immediately while hot.
Extra Tips:
When preparing Spicy Sesame Garlic Noodles, feel free to customize the dish to your liking. You can add protein such as chicken, shrimp, or tofu for a more filling meal.
Additionally, if you prefer a milder flavor, reduce the amount of chili paste or add some vegetables like bell peppers or snap peas for added texture and nutrition. Enjoy your flavorful and gluten-free noodle experience!
Kung Pao Chicken With Peanuts
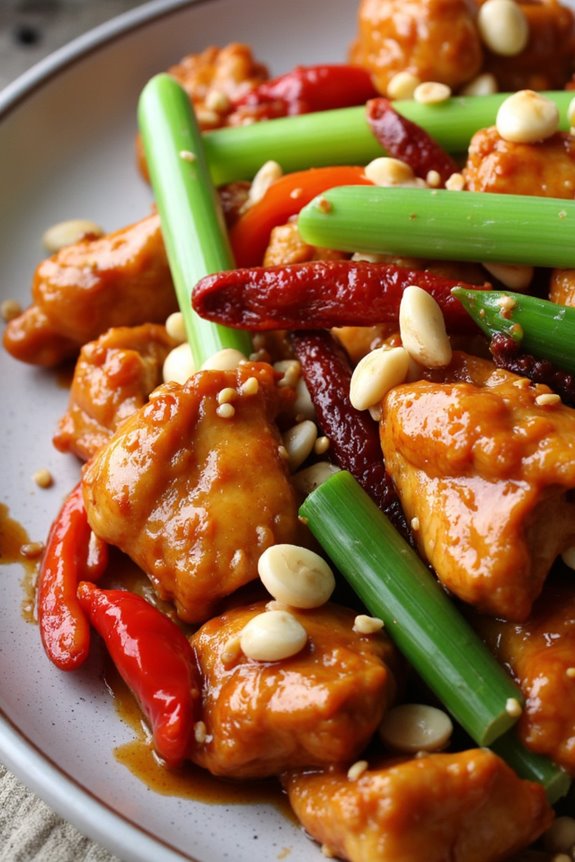
Kung Pao Chicken is a classic Chinese dish that has gained popularity around the world, and for good reason. This flavorful dish combines tender pieces of chicken with a medley of vegetables, peanuts, and a spicy, savory sauce. The traditional version contains soy sauce, which is typically made from wheat, making it unsuitable for those with gluten sensitivities.
However, with a few simple substitutions, you can enjoy a gluten-free version of this beloved dish without sacrificing any flavor.
In this gluten-free Kung Pao Chicken recipe, we use gluten-free soy sauce or tamari instead of regular soy sauce, and the result is a delightful balance of heat, sweetness, and crunch. The peanuts add a satisfying texture, while the vibrant vegetables contribute color and nutrition. This dish is perfect for a weeknight dinner or when entertaining guests, and it pairs beautifully with steamed rice or quinoa.
Ingredients (Serves 4-6):
- 1 pound boneless, skinless chicken breasts, diced into bite-sized pieces
- 1 tablespoon gluten-free soy sauce or tamari
- 1 tablespoon cornstarch
- 2 tablespoons vegetable oil
- 2-3 dried red chili peppers (adjust for desired spice level)
- 1 bell pepper, diced (red or green)
- 1 medium onion, diced
- 3 cloves garlic, minced
- 1 tablespoon fresh ginger, minced
- 1/2 cup unsalted peanuts
- 2 green onions, sliced
- 2 tablespoons rice vinegar
- 2 tablespoons sugar
- 1 tablespoon sesame oil
- Salt and pepper to taste
Cooking Instructions:
- Marinate the Chicken: In a medium bowl, combine the diced chicken with gluten-free soy sauce and cornstarch. Mix well to coat the chicken evenly. Allow it to marinate for about 15-20 minutes while you prepare the other ingredients.
- Prepare the Sauce: In a small bowl, whisk together the rice vinegar, sugar, and sesame oil. This mixture will serve as the sauce for your Kung Pao Chicken. Set it aside for later.
- Heat the Oil: In a large skillet or wok, heat the vegetable oil over medium-high heat. Once the oil is hot, add the dried red chili peppers. Stir-fry for about 30 seconds, allowing the peppers to infuse the oil with their flavor.
- Cook the Chicken: Add the marinated chicken to the skillet and cook for 5-7 minutes, stirring frequently, until the chicken is browned and cooked through. Remove the chicken from the skillet and set aside.
- Stir-Fry the Vegetables: In the same skillet, add the diced bell pepper, onion, garlic, and ginger. Stir-fry for about 3-4 minutes until the vegetables are tender but still crisp.
- Combine Everything: Return the cooked chicken to the skillet with the vegetables. Pour in the prepared sauce and toss everything together to coat evenly. Allow it to cook for an additional 2-3 minutes for the flavors to meld.
- Add Peanuts and Green Onions: Just before serving, stir in the unsalted peanuts and sliced green onions. Adjust seasoning with salt and pepper to taste.
- Serve: Remove from heat and serve your gluten-free Kung Pao Chicken hot, ideally over a bed of steamed rice or quinoa.
Extra Tips: To enhance the flavor of your Kung Pao Chicken, consider adding some crushed red pepper flakes for extra heat or a splash of lime juice for a revitalizing twist.
Feel free to customize the vegetables based on your preference or what you have on hand; broccoli, zucchini, or snap peas can all be great additions. Finally, be mindful of the spiciness level when using dried chili peppers, as they can vary in heat. Enjoy the cooking process and indulge in this delicious gluten-free dish!
Lemon Ginger Chicken Over Quinoa
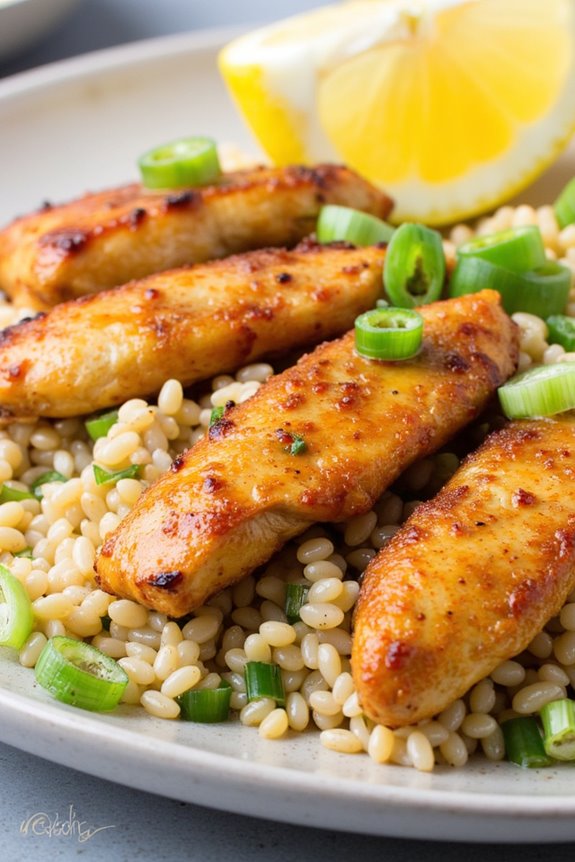
Lemon Ginger Chicken Over Quinoa is a delightful dish that perfectly marries the zesty flavors of lemon and the warm spices of ginger with tender chicken, all served on a bed of fluffy quinoa. This gluten-free recipe isn’t only wholesome but also incredibly quick to prepare, making it ideal for weeknight dinners or meal prep for the week ahead.
The lemon marinade infuses the chicken with a bright, invigorating flavor, while the ginger adds a subtle warmth that complements the dish beautifully. Quinoa, a nutrient-packed grain, serves as the perfect base for this meal, absorbing the delicious juices from the chicken and providing a satisfying texture.
This dish isn’t only gluten-free but also rich in protein, making it a great option for those looking for a healthy yet flavorful meal. The combination of these ingredients guarantees that you’ll enjoy a delicious and nutritious dish that everyone at the table will love.
Ingredients (Serves 4-6)
- 1.5 lbs boneless, skinless chicken breasts
- 1 cup quinoa
- 2 cups chicken broth (or water)
- 3 tablespoons fresh ginger, grated
- 4 tablespoons lemon juice (freshly squeezed)
- 2 tablespoons soy sauce (gluten-free)
- 2 tablespoons honey
- 3 tablespoons olive oil
- 3 cloves garlic, minced
- 1 teaspoon salt
- 1/2 teaspoon black pepper
- 1/4 cup green onions, chopped (for garnish)
- Lemon wedges (for serving)
Cooking Instructions
- Prepare the Marinade: In a medium bowl, combine the grated ginger, lemon juice, soy sauce, honey, olive oil, minced garlic, salt, and black pepper. Whisk the ingredients together until well blended. This marinade will infuse the chicken with flavor, so make sure to mix it thoroughly.
- Marinate the Chicken: Place the chicken breasts in a resealable plastic bag or a shallow dish and pour the marinade over the chicken. Seal the bag or cover the dish and refrigerate for at least 30 minutes, allowing the flavors to penetrate the meat. For best results, marinate for 2-4 hours.
- Cook the Quinoa: Rinse the quinoa under cold water in a fine mesh strainer to remove any bitterness. In a medium saucepan, bring the chicken broth (or water) to a boil. Add the rinsed quinoa, reduce the heat to low, cover, and simmer for about 15 minutes or until the quinoa is fluffy and the liquid is absorbed. Remove from heat and let it sit, covered, for 5 minutes before fluffing with a fork.
- Cook the Chicken: While the quinoa is cooking, heat a large skillet over medium-high heat. Remove the chicken from the marinade (reserving the marinade) and add it to the skillet. Cook for about 6-7 minutes on each side, or until the chicken is cooked through and no longer pink in the center. For added flavor, pour the reserved marinade into the skillet during the last few minutes of cooking, allowing it to thicken slightly.
- Serve the Dish: Once the chicken is done, slice it into strips. Serve the quinoa on plates or in bowls, topped with the sliced lemon ginger chicken. Drizzle any remaining sauce from the skillet over the chicken and quinoa. Garnish with chopped green onions and serve with lemon wedges on the side.
Extra Tips
For an added burst of flavor, consider incorporating vegetables such as bell peppers, snap peas, or broccoli into the dish. Simply sauté them in the same skillet after cooking the chicken, allowing them to absorb the marinade flavors.
Additionally, if you prefer a spicier kick, feel free to add a pinch of red pepper flakes to the marinade. This dish can also be easily adapted for meal prep; just store the components separately in airtight containers and assemble when ready to eat.
Mapo Tofu With Rice
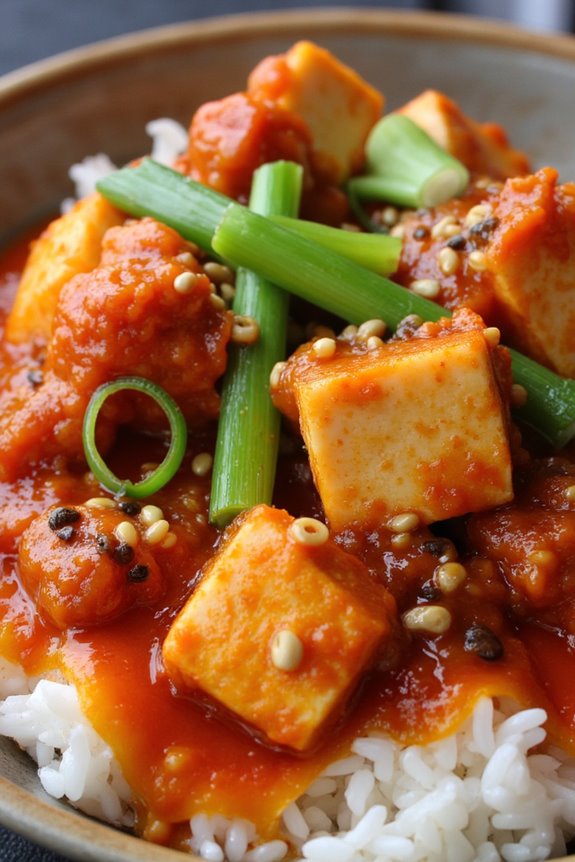
Mapo Tofu is a classic Chinese dish known for its bold flavors and comforting texture. This dish originates from the Sichuan province and features silky tofu cooked in a spicy, savory sauce made with fermented broad bean paste, Sichuan peppercorns, and a variety of aromatics.
When served over rice, it becomes a satisfying meal that isn’t only delicious but also gluten-free when using the right ingredients.
Preparing Mapo Tofu at home allows you to customize the spice levels and ingredients to suit your taste. Whether you prefer it mild or extra spicy, this dish is sure to impress your family and friends. Pair it with steamed rice to soak up the flavorful sauce and enhance the overall experience.
Ingredients (Serves 4-6):
- 1 pound firm tofu, drained and cubed
- 1 tablespoon vegetable oil
- 2 cloves garlic, minced
- 1-inch piece ginger, grated
- 1/2 pound ground pork or beef (optional for a vegetarian version)
- 3 tablespoons doubanjiang (fermented broad bean paste)
- 1 tablespoon soy sauce (ensure it’s gluten-free)
- 1 teaspoon sugar
- 1 cup vegetable or chicken broth
- 1 teaspoon Sichuan peppercorns
- 2 green onions, chopped (for garnish)
- Cooked rice, for serving
Cooking Instructions:
- Prepare the Tofu: Start by draining the tofu and cutting it into bite-sized cubes. If you’d like a firmer texture, you can press the tofu between paper towels to remove excess moisture. This will help it hold up better during cooking.
- Cook the Aromatics: In a large skillet or wok, heat the vegetable oil over medium heat. Once hot, add the minced garlic and grated ginger, sautéing for about 30 seconds until fragrant. Be careful not to let them burn, as this can impart a bitter taste.
- Brown the Meat: If you’re using ground pork or beef, add it to the skillet now. Cook it until it’s browned and fully cooked through, breaking it up into small pieces with a spatula. If you prefer a vegetarian dish, skip this step.
- Add the Sauce Ingredients: Stir in the doubanjiang, soy sauce, and sugar, mixing well to combine all the flavors. Allow this mixture to cook for another minute, letting the flavors meld together.
- Incorporate the Broth and Tofu: Pour in the vegetable or chicken broth and carefully add the cubed tofu to the skillet. Gently stir to avoid breaking the tofu, ensuring it’s coated with the sauce. Let it simmer for about 5-7 minutes, allowing the tofu to absorb the flavors.
- Finish with Sichuan Peppercorns: In the last minute of cooking, add the Sichuan peppercorns for an authentic flavor. If you prefer a milder dish, you can reduce the amount of peppercorns or omit them altogether.
- Serve: Once everything is heated through and nicely combined, remove the skillet from heat. Serve the Mapo Tofu hot, garnished with chopped green onions, over a bed of steaming rice.
Extra Tips:
For an extra layer of flavor, consider adding a splash of sesame oil before serving. If you want to adjust the spice level, you can add chili oil or fresh chopped chilies according to your preference.
This dish is even more delicious the next day, as the flavors have more time to develop, making it a great option for meal prep. Enjoy your flavorful and gluten-free Mapo Tofu!
Vegetable Lo Mein With Rice Noodles

Vegetable Lo Mein is a delightful and versatile dish that can be easily adapted to suit your dietary needs, and in this version, we use gluten-free rice noodles instead of the traditional wheat noodles. This dish is packed with colorful vegetables and a savory sauce that brings everything together harmoniously. It’s perfect for a quick weeknight dinner or a meal prep option that can be enjoyed throughout the week.
Making Vegetable Lo Mein with rice noodles isn’t only simple but also incredibly satisfying. The rice noodles provide a wonderful texture that absorbs the flavors of the sauce beautifully, while the mix of vegetables adds freshness and crunch. You can customize this recipe with your favorite vegetables or whatever you have on hand, making it a great way to clean out your fridge while enjoying a delicious meal.
Ingredients (Serves 4-6)
- 8 oz gluten-free rice noodles
- 2 tablespoons vegetable oil
- 1 cup bell peppers, sliced (red, yellow, or green)
- 1 cup broccoli florets
- 1 cup carrots, julienned
- 1 cup snap peas
- 3 green onions, chopped
- 4 cloves garlic, minced
- 2 tablespoons gluten-free soy sauce
- 2 tablespoons oyster sauce (or a gluten-free alternative)
- 1 tablespoon sesame oil
- 1 teaspoon ground ginger
- Salt and pepper to taste
- Sesame seeds for garnish (optional)
Cooking Instructions
- Cook the Rice Noodles: Start by bringing a large pot of water to a boil. Once boiling, add the gluten-free rice noodles and cook according to the package instructions. Typically, this will take about 4-6 minutes. Once cooked, drain the noodles and rinse them under cold water to stop the cooking process. Set aside.
- Prepare the Vegetables: While the noodles are cooking, wash and chop all the vegetables. Slice the bell peppers, julienne the carrots, and cut the broccoli into small florets. Confirm the snap peas are cleaned and trimmed. This prep work will make the cooking process go smoothly.
- Heat the Oil: In a large skillet or wok, heat the vegetable oil over medium-high heat. Allow the oil to get hot, but not smoking. This will ensure that the vegetables stir-fry quickly and evenly, retaining their color and crunch.
- Stir-Fry the Vegetables: Add the minced garlic to the hot oil and stir quickly for about 30 seconds until fragrant. Then, add the bell peppers, broccoli, carrots, and snap peas. Stir-fry the vegetables for about 4-5 minutes, or until they’re tender but still crisp. Stir occasionally to confirm even cooking.
- Combine Noodles and Sauce: Once the vegetables are cooked, add the cooked rice noodles to the skillet. In a small bowl, mix together the gluten-free soy sauce, oyster sauce, sesame oil, and ground ginger. Pour this sauce over the noodles and vegetables, tossing everything together gently to coat.
- Finish the Dish: Continue to stir-fry everything together for an additional 2-3 minutes, allowing the noodles to absorb the sauce and heat through. Taste and adjust seasoning with salt and pepper as needed.
- Serve: Once everything is well combined and heated, remove the skillet from heat. Serve the Vegetable Lo Mein in bowls, garnished with chopped green onions and sesame seeds if desired.
Extra Tips
For added protein, consider tossing in some cooked tofu or chicken that has been marinated in gluten-free soy sauce. You can also experiment with different vegetables like mushrooms, zucchini, or bok choy based on your preferences.
When storing leftovers, keep the noodles separate from the vegetables to prevent them from becoming mushy. Reheat in a skillet with a splash of water to keep everything moist and delicious! Enjoy your flavorful and healthy Vegetable Lo Mein!
Szechuan Shrimp With Broccoli
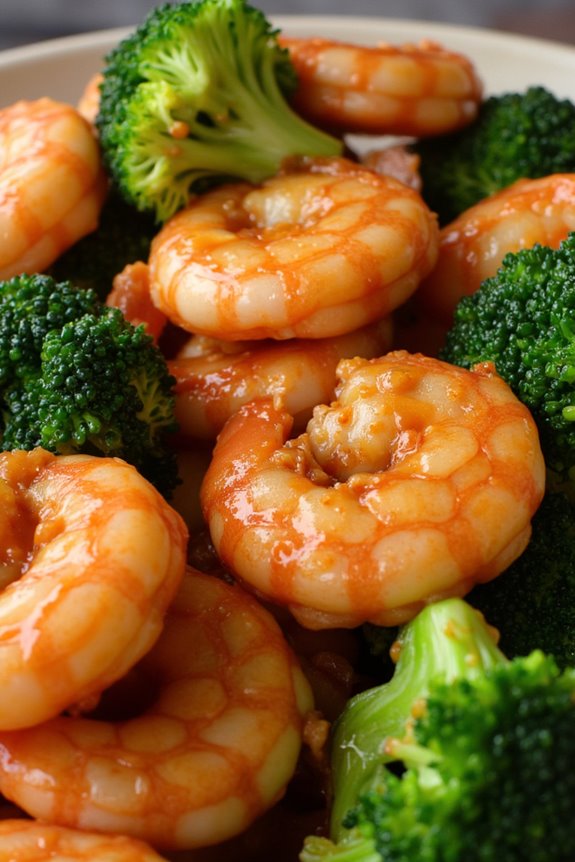
Szechuan Shrimp with Broccoli is a delightful dish that brings the bold and spicy flavors of Szechuan cuisine right to your kitchen, while also catering to those on a gluten-free diet. This recipe features succulent shrimp sautéed with vibrant broccoli florets, all tossed in a mouth-watering sauce made from gluten-free soy sauce, garlic, and zesty chili paste. The combination of fresh ingredients and aromatic spices makes this dish not only a feast for the palate but also a colorful addition to any dining table.
This dish is perfect for a family dinner or entertaining guests, with its vibrant colors and robust flavors making it a standout. It’s quick to prepare, making it a great option for busy weeknights or a special occasion. Serve it over a bed of fluffy rice or alongside gluten-free noodles to soak up the delicious sauce, and enjoy a taste of Szechuan cuisine without the gluten.
Ingredients (Serves 4-6)
- 1 pound large shrimp, peeled and deveined
- 2 cups broccoli florets
- 3 tablespoons gluten-free soy sauce
- 1 tablespoon Szechuan chili paste (adjust to taste)
- 2 cloves garlic, minced
- 1 tablespoon fresh ginger, minced
- 1 tablespoon cornstarch
- 2 tablespoons vegetable oil
- 1/2 cup chicken or vegetable broth (gluten-free)
- 1 teaspoon sesame oil
- Salt and pepper to taste
- Cooked rice or gluten-free noodles, for serving
Cooking Instructions
- Prep the Ingredients: Start by peeling and deveining the shrimp if not prepped already. Rinse the broccoli florets under cold water and chop them into bite-sized pieces. Mince the garlic and ginger, and set them aside. This step guarantees that all your ingredients are ready to go, which speeds up the cooking process.
- Make the Sauce: In a small bowl, combine the gluten-free soy sauce, Szechuan chili paste, cornstarch, and chicken or vegetable broth. Whisk everything together until smooth, making sure there are no lumps from the cornstarch. This sauce will add flavor and a nice thickness to the dish when cooked.
- Stir-Fry the Broccoli: Heat 1 tablespoon of vegetable oil in a large skillet or wok over medium-high heat. Add the broccoli florets and stir-fry for about 3-4 minutes until they’re bright green and slightly tender but still crisp. Remove the broccoli from the pan and set it aside. This step helps to maintain the broccoli’s nutrients and vibrant color.
- Cook the Shrimp: In the same skillet, add the remaining tablespoon of vegetable oil and increase the heat to high. Add the minced garlic and ginger, sautéing for about 30 seconds until fragrant. Then add the shrimp, cooking for about 2-3 minutes on each side until they turn pink and opaque. This guarantees the shrimp are perfectly cooked and infused with the flavors of garlic and ginger.
- Combine Everything: Once the shrimp is cooked, return the broccoli to the skillet and pour the sauce over the shrimp and broccoli. Stir everything together and cook for an additional 2-3 minutes until the sauce thickens and coats the shrimp and broccoli evenly. This step melds all the flavors together and guarantees everything is heated through.
- Finish and Serve: Drizzle the dish with sesame oil, and season with salt and pepper to taste. Serve hot over cooked rice or gluten-free noodles, and enjoy the wonderful flavors of Szechuan cuisine.
Extra Tips
When making Szechuan Shrimp with Broccoli, feel free to customize the level of spiciness by adjusting the amount of Szechuan chili paste you use. If you prefer less heat, start with a smaller amount and gradually add more to taste.
Additionally, you can substitute or add other vegetables such as bell peppers, snap peas, or carrots for added color and nutrition. Always serve the dish immediately after cooking to enjoy the freshest flavors and textures!
Teriyaki Salmon With Asparagus
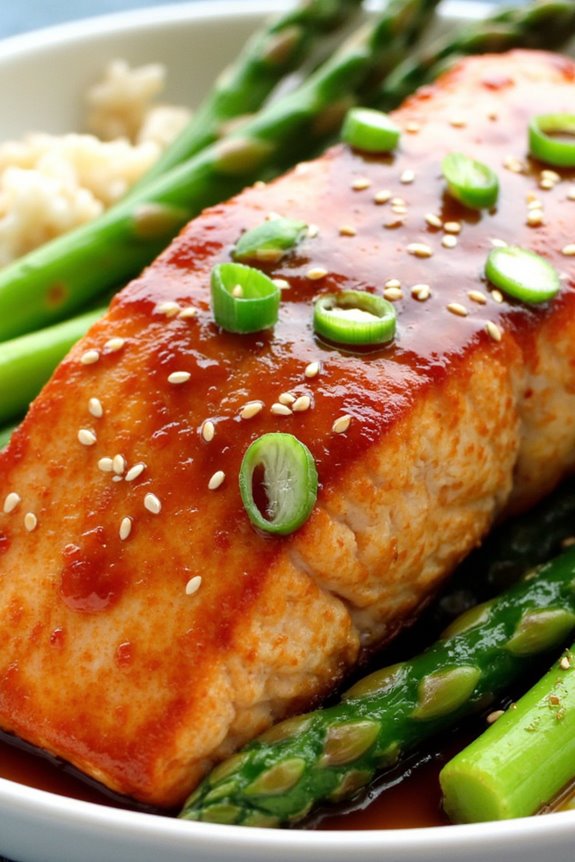
Teriyaki Salmon with Asparagus is a delightful fusion of flavors that brings a taste of the East to your dinner table, all while being gluten-free. This dish features tender, flaky salmon fillets glazed with a sweet and savory teriyaki sauce, complemented by crisp-tender asparagus. It’s not only healthy and packed with nutrients but also incredibly easy to prepare, making it perfect for a weeknight dinner or a special occasion.
The combination of the rich umami flavors from the salmon and the fresh crunch of asparagus creates a satisfying meal that everyone will love. This recipe is designed to serve 4-6 people, making it ideal for family gatherings or a dinner party with friends. The teriyaki sauce adds a beautiful glaze to the salmon, enhancing its natural flavors without overwhelming them.
Pair it with steamed rice or quinoa for a complete meal that’s sure to impress your guests and keep your family coming back for more.
Ingredients
- 4-6 salmon fillets (about 6 oz each)
- 1 lb asparagus, trimmed
- 1/4 cup gluten-free soy sauce
- 1/4 cup honey or maple syrup
- 2 tablespoons rice vinegar
- 1 tablespoon sesame oil
- 2 cloves garlic, minced
- 1 teaspoon fresh ginger, grated
- 1 tablespoon cornstarch
- 2 tablespoons water
- Sesame seeds for garnish
- Green onions, sliced for garnish
Cooking Instructions
- Prepare the Teriyaki Sauce: In a small saucepan over medium heat, combine the gluten-free soy sauce, honey (or maple syrup), rice vinegar, sesame oil, minced garlic, and grated ginger. Stir until well combined and bring to a gentle simmer.
- Thicken the Sauce: In a small bowl, mix the cornstarch and water to create a slurry. Gradually add this mixture to the saucepan while continuously stirring. Allow the sauce to simmer for an additional 2-3 minutes until it thickens. Remove from heat and set aside.
- Prepare the Salmon: Preheat your oven to 400°F (200°C). Line a baking sheet with parchment paper or lightly grease it. Place the salmon fillets on the baking sheet, skin-side down. Brush a generous amount of the teriyaki sauce over the salmon fillets.
- Prepare the Asparagus: Place the trimmed asparagus on the same baking sheet around the salmon. Drizzle with a little olive oil and season with salt and pepper. Toss the asparagus to confirm even coating.
- Bake the Dish: Place the baking sheet in the preheated oven and bake for 12-15 minutes, or until the salmon is cooked through and flakes easily with a fork, and the asparagus is tender yet still crisp.
- Serve: Once cooked, remove the salmon and asparagus from the oven. Drizzle any remaining teriyaki sauce over the salmon and asparagus. Garnish with sesame seeds and sliced green onions before serving.
Extra Tips
For an added layer of flavor, consider marinating the salmon in the teriyaki sauce for about 30 minutes prior to cooking. This will enhance the taste and allow the flavors to penetrate the fish.
Additionally, you can substitute the asparagus with other vegetables such as broccoli or bell peppers for a different twist. Serve with steamed rice or quinoa to soak up the delicious sauce, making for a satisfying and well-rounded meal. Enjoy your cooking experience!
Coconut Curry Chicken With Jasmine Rice
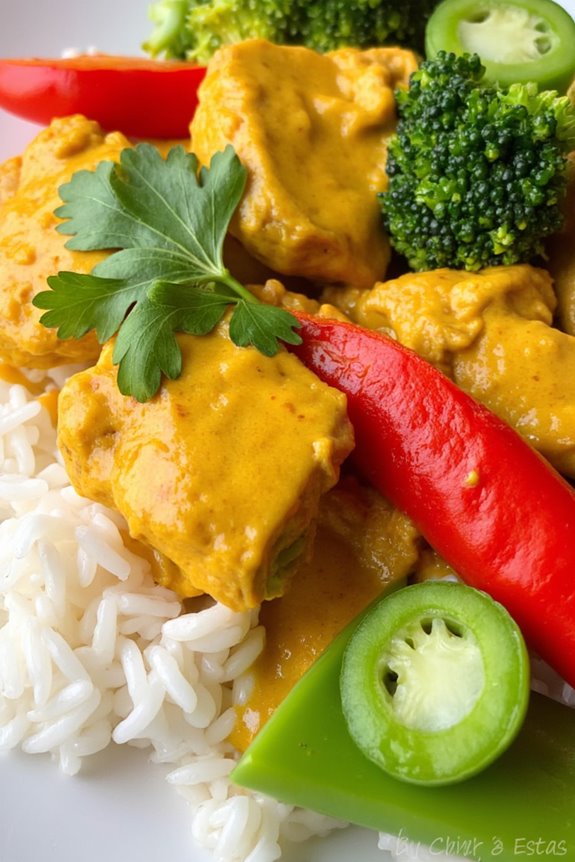
Coconut Curry Chicken with Jasmine Rice is a delightful and aromatic dish that brings the flavors of Southeast Asia right to your kitchen. This gluten-free recipe features tender chicken simmered in a rich, creamy coconut curry sauce, paired perfectly with fluffy jasmine rice. It’s a satisfying meal that isn’t only easy to make but also packed with vibrant flavors that will leave your taste buds wanting more.
This dish is perfect for family gatherings or a cozy dinner at home, making it a versatile option for any occasion. The combination of coconut milk, curry paste, and fresh vegetables creates a harmonious blend of taste and texture, while the jasmine rice serves as a fragrant base that complements the curry beautifully. In just a short time, you can create an impressive meal that everyone will love.
Ingredients (Serves 4-6)
- 1.5 lbs boneless, skinless chicken thighs, cut into bite-sized pieces
- 1 can (14 oz) coconut milk
- 2 tablespoons red curry paste
- 1 tablespoon gluten-free soy sauce
- 1 tablespoon fish sauce (optional)
- 1 tablespoon vegetable oil
- 1 medium onion, chopped
- 3 cloves garlic, minced
- 1 inch ginger, grated
- 1 red bell pepper, sliced
- 1 cup broccoli florets
- 1 cup snap peas
- 1 tablespoon lime juice
- Fresh cilantro for garnish
- 2 cups jasmine rice
- 4 cups water or chicken broth
Cooking Instructions
- Prepare the Jasmine Rice: Rinse the jasmine rice under cold water until the water runs clear. In a medium saucepan, combine the rinsed rice and water (or chicken broth) and bring to a boil. Once boiling, reduce the heat to low, cover, and let it simmer for about 15 minutes or until the rice is cooked and the liquid is absorbed. Remove from heat and let it sit covered for another 5 minutes before fluffing with a fork.
- Cook the Chicken: In a large skillet or wok, heat the vegetable oil over medium-high heat. Add the chopped onion and sauté for about 3-4 minutes, until it becomes translucent. Then add the garlic and ginger, cooking for an additional minute until fragrant.
- Add Curry Paste and Chicken: Stir in the red curry paste, mixing well with the onions, garlic, and ginger. Add the chicken pieces to the skillet, stirring to coat them in the curry mixture. Cook the chicken for about 5-7 minutes, until it’s browned on all sides.
- Incorporate Coconut Milk and Vegetables: Pour in the coconut milk, gluten-free soy sauce, and fish sauce (if using) into the skillet. Bring the mixture to a gentle simmer. Add the sliced red bell pepper, broccoli florets, and snap peas, stirring to combine. Allow the curry to cook for an additional 10-15 minutes, or until the chicken is fully cooked and the vegetables are tender.
- Finish the Dish: Once everything is cooked, remove the skillet from heat. Stir in the lime juice for a burst of freshness. Taste and adjust seasoning if necessary, adding more salt or curry paste according to your preference.
- Serve: To serve, spoon a generous amount of the coconut curry chicken over a bed of jasmine rice. Garnish with fresh cilantro for an added touch of flavor and color.
Extra Tips
When cooking Coconut Curry Chicken with Jasmine Rice, feel free to customize the recipe by adding your favorite vegetables or adjusting the spice level to your liking.
If you’re looking for extra creaminess, you can add more coconut milk or even a dollop of yogurt before serving. For a vegetarian version, substitute the chicken with tofu or chickpeas, and make sure to use vegetable broth instead of chicken broth.
Enjoy your cooking adventure!
Beef and Snow Pea Stir-Fry
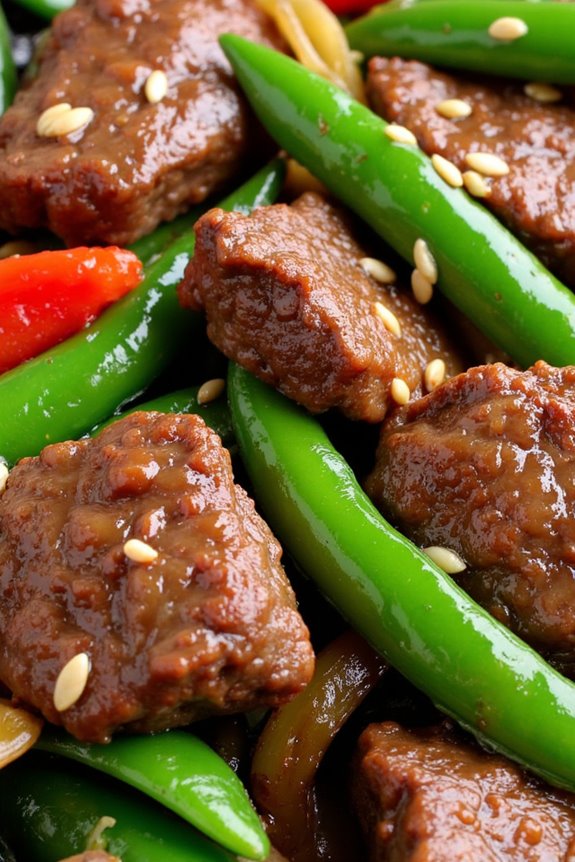
Beef and Snow Pea Stir-Fry is a vibrant and nutritious dish that showcases the delicate flavors of tender beef paired with the crispness of snow peas. This gluten-free recipe isn’t only quick to prepare but also packed with protein and vitamins, making it an ideal option for a weeknight dinner or a special gathering.
The combination of soy sauce, garlic, and ginger adds a savory depth that complements the ingredients beautifully, making certain that every bite is satisfying and delicious.
This dish is versatile and can be adjusted according to your taste preferences. You can use different vegetables like bell peppers or broccoli, or substitute the beef with chicken or tofu for a different spin.
The snow peas bring a delightful crunch and a pop of color to the dish, making it as pleasing to the eye as it’s to the palate. Serve it over steamed rice or quinoa for a wholesome meal that everyone will love.
Ingredients (Serves 4-6)
- 1 lb beef sirloin, thinly sliced against the grain
- 2 cups snow peas, trimmed
- 1 cup bell peppers, sliced (optional)
- 1 medium onion, sliced
- 3 cloves garlic, minced
- 1 inch piece of ginger, grated
- 1/4 cup gluten-free soy sauce
- 2 tablespoons oyster sauce (confirm gluten-free)
- 1 tablespoon cornstarch
- 2 tablespoons vegetable oil (for stir-frying)
- 1 tablespoon sesame oil
- Salt and pepper to taste
- Cooked rice or quinoa (for serving)
Cooking Instructions
- Prep the Ingredients: Begin by preparing all your ingredients. Thinly slice the beef sirloin against the grain to guarantee tenderness. Trim the snow peas and slice the bell peppers and onion. Mince the garlic and grate the ginger. Having everything prepped in advance will make cooking easier and faster.
- Marinate the Beef: In a bowl, combine the sliced beef with gluten-free soy sauce, oyster sauce, and cornstarch. Mix well to make sure the beef is evenly coated. Allow it to marinate for about 15-20 minutes. This step not only enhances the flavor but also helps to tenderize the meat.
- Heat the Wok or Skillet: Place a large wok or skillet over medium-high heat and add the vegetable oil. Once the oil is hot and shimmering, it’s ready for stir-frying. A well-heated pan is vital to achieving a good sear on the beef.
- Cook the Beef: Add the marinated beef to the hot skillet in a single layer. Let it sear for about 2-3 minutes without stirring to develop a nice brown crust. Then, stir-fry the beef for another 2-3 minutes until it’s cooked through. Remove the beef from the skillet and set it aside.
- Stir-Fry the Vegetables: In the same skillet, add a bit more oil if necessary, and then toss in the sliced onion, garlic, and ginger. Stir-fry for 1-2 minutes until fragrant and the onions start to soften. Next, add the snow peas and bell peppers, cooking for another 2-3 minutes until the vegetables are bright and tender-crisp.
- Combine and Finish: Return the beef to the skillet with the vegetables. Drizzle sesame oil over the mixture and toss everything together to combine. Allow it to heat through for another minute. Taste and adjust seasoning with salt and pepper if needed.
- Serve: Remove the stir-fry from heat and serve immediately over cooked rice or quinoa. Garnish with sesame seeds or chopped green onions if desired, and enjoy your delicious gluten-free Beef and Snow Pea Stir-Fry!
Extra Tips
When making Beef and Snow Pea Stir-Fry, it’s vital to maintain high heat throughout the cooking process to achieve that characteristic stir-fried flavor.
Be sure to prepare your ingredients beforehand, as stir-frying is a quick process. Additionally, try to cut the beef and vegetables into uniform sizes to guarantee even cooking.
Feel free to experiment with different vegetables or proteins based on what you have on hand, and always taste as you go to adjust the seasoning to your preference.
Thai Basil Chicken Lettuce Wraps
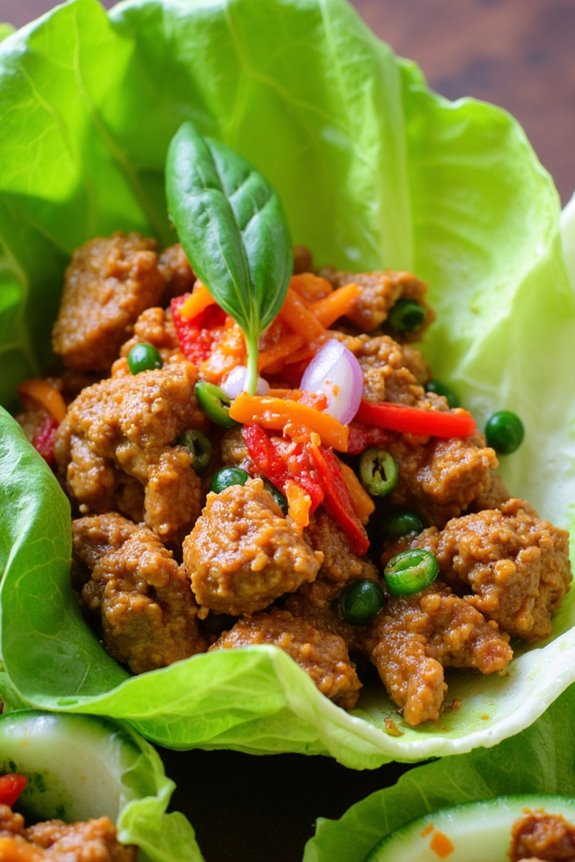
Thai Basil Chicken Lettuce Wraps are a delightful and healthy dish that brings the vibrant flavors of Thai cuisine right to your table. This gluten-free recipe isn’t only easy to prepare but also perfect for a light dinner or an appetizing appetizer for a gathering.
The combination of ground chicken, aromatic Thai basil, and fresh vegetables wrapped in crisp lettuce leaves creates a revitalizing and satisfying experience that everyone will love.
The secret to these wraps lies in the delicious sauce that coats the chicken and vegetables, infusing them with a burst of flavor. Using fresh Thai basil adds an aromatic touch that elevates the dish to new heights.
Whether you’re hosting a dinner party or simply looking for a quick weeknight meal, these Thai Basil Chicken Lettuce Wraps are sure to impress!
Ingredients (Serves 4-6):
- 1 lb ground chicken
- 1 cup finely chopped bell pepper (red or green)
- 1 cup finely chopped onion
- 3 cloves garlic, minced
- 2 tablespoons vegetable oil
- 2 tablespoons gluten-free soy sauce
- 1 tablespoon oyster sauce (verify it’s gluten-free)
- 1 tablespoon fish sauce
- 1 tablespoon sugar
- 1 teaspoon crushed red pepper flakes (optional)
- 1 cup fresh Thai basil leaves
- 1 head of butter lettuce or iceberg lettuce, leaves separated
- Sliced cucumbers and shredded carrots for garnish (optional)
Cooking Instructions:
- Prepare the Ingredients: Begin by washing the lettuce leaves thoroughly and patting them dry. Set aside. Chop the bell pepper and onion finely, and mince the garlic to verify all ingredients cook evenly.
- Cook the Chicken: In a large skillet or wok, heat the vegetable oil over medium-high heat. Once hot, add the ground chicken. Cook, breaking it apart with a spatula, until it’s browned and cooked through, about 5-7 minutes.
- Add Vegetables: Once the chicken is cooked, add the chopped onion, bell pepper, and minced garlic to the skillet. Stir-fry the mixture for another 2-3 minutes until the vegetables are softened and fragrant.
- Make the Sauce: In a small bowl, combine the gluten-free soy sauce, oyster sauce, fish sauce, sugar, and crushed red pepper flakes (if using). Mix well, then pour the sauce over the chicken and vegetable mixture. Stir to coat evenly and let it cook for an additional 2 minutes, allowing the flavors to meld.
- Add Fresh Basil: Remove the skillet from the heat and fold in the fresh Thai basil leaves. The residual heat will wilt the basil slightly, releasing its aromatic oils.
- Assemble the Wraps: To serve, spoon the chicken mixture into the center of a lettuce leaf. Add sliced cucumbers and shredded carrots if desired. Wrap the lettuce around the filling and enjoy your delicious Thai Basil Chicken Lettuce Wraps!
Extra Tips:
For an added layer of flavor, consider garnishing your wraps with chopped peanuts or sesame seeds before serving.
If you’re looking for a vegetarian option, you can substitute the ground chicken with crumbled tofu or tempeh.
Additionally, feel free to adjust the level of spice by adding more or less crushed red pepper flakes based on your preference. Enjoy experimenting with these wraps and make them your own!
Egg Drop Soup With Tofu and Greens
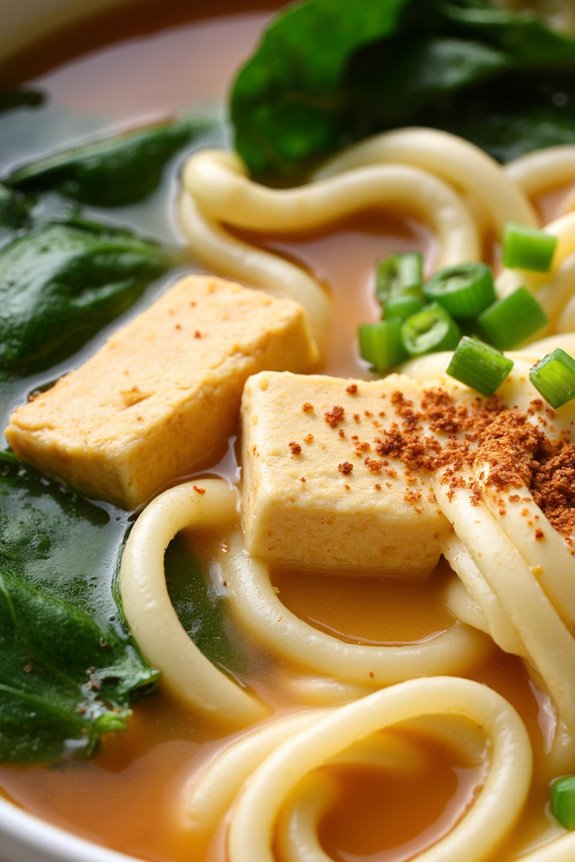
Egg Drop Soup is a classic Chinese dish known for its delicate texture and comforting flavors. This gluten-free version incorporates tofu and fresh greens, making it not only a hearty option but also a nutritious one. The silky smooth egg ribbons combined with soft tofu and vibrant greens create a harmonious blend of taste and nutrition, perfect for a light meal or an appetizer.
Making Egg Drop Soup with Tofu and Greens is a straightforward process that requires minimal ingredients and time. This dish is ideal for those who are looking for a quick yet satisfying meal. Whether you’re gluten intolerant or simply seeking a healthier alternative, this recipe delivers on flavor without compromising on dietary needs.
Ingredients (Serves 4-6):
- 4 cups gluten-free vegetable or chicken broth
- 1 block (14 oz) firm tofu, drained and cubed
- 2 cups fresh spinach or bok choy, chopped
- 3 large eggs
- 2 tablespoons gluten-free soy sauce
- 1 tablespoon cornstarch (optional, for thicker soup)
- 1 teaspoon sesame oil
- 2 green onions, chopped
- Salt and pepper to taste
- Crushed red pepper flakes (optional, for heat)
Cooking Instructions:
- Prepare the Broth: In a large pot, bring the gluten-free vegetable or chicken broth to a gentle boil over medium heat. This serves as the flavorful base for your soup.
- Add Tofu: Once the broth is boiling, carefully add the cubed tofu to the pot. Allow it to simmer for about 5 minutes, so the tofu can absorb some of the broth’s flavor and heat through.
- Incorporate Greens: Add the chopped spinach or bok choy to the soup. Let it cook for an additional 2-3 minutes until the greens are wilted and tender.
- Prepare the Eggs: In a separate bowl, beat the eggs lightly. This will allow you to create those characteristic silky ribbons in the soup.
- Create the Egg Ribbons: Slowly pour the beaten eggs into the simmering soup in a steady stream while stirring gently. This technique guarantees that the eggs will cook quickly and form delicate ribbons.
- Season the Soup: Stir in the gluten-free soy sauce, sesame oil, and season with salt and pepper to taste. If you prefer a thicker soup, mix the cornstarch with a little water to create a slurry, and add it to the pot, stirring until it thickens.
- Finish and Serve: Once everything is well combined and heated through, remove the pot from the heat. Garnish with chopped green onions and, if desired, a sprinkle of crushed red pepper flakes for a little heat. Serve hot.
Extra Tips:
When preparing Egg Drop Soup, it’s important to add the eggs in a slow, steady stream while stirring to achieve the desired ribbon-like texture.
If you prefer a richer flavor, consider using homemade broth or adding a splash of coconut aminos for a slightly different taste.
Feel free to customize the greens or add vegetables such as mushrooms or carrots for additional flavor and color. Enjoy your delicious gluten-free Egg Drop Soup with Tofu and Greens!