

Japanese cuisine is a feast for the eyes and the palate, and vegetarian recipes are no exception. I’ve been gathering a collection of vibrant, seasonal dishes that are perfect for creating beautiful and balanced bowls. From fresh vegetable sushi rolls to comforting miso soup, these recipes offer a fresh take on traditional favorites. Each dish is thoughtfully crafted to nourish your body while delighting your senses. Join me as we explore these colorful Japanese vegetarian recipes, perfect for your next culinary adventure.
Vegetable Sushi Rolls
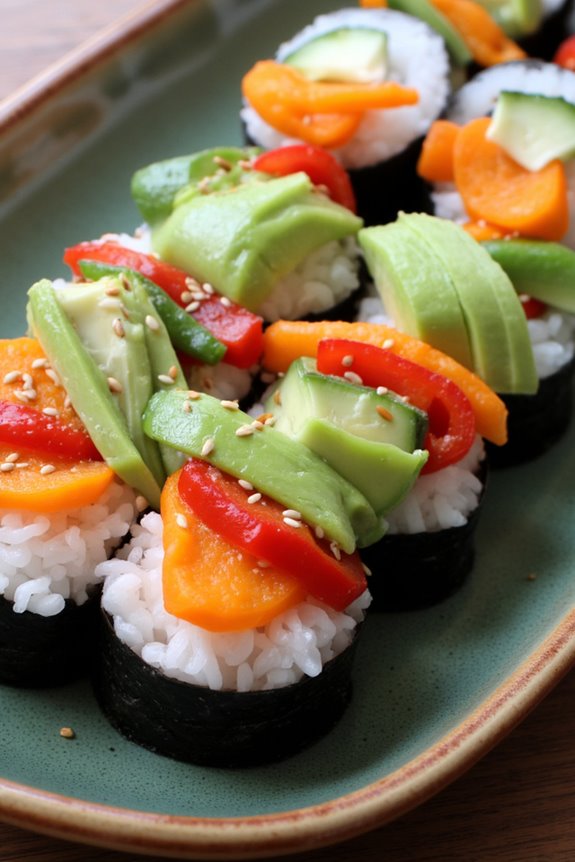
Vegetable sushi rolls are a delightful and healthy dish that brings a taste of Japan to your kitchen. These sushi rolls aren’t only visually appealing but also packed with fresh vegetables that provide a variety of textures and flavors. Perfect for a light meal or as an appetizer for a gathering, vegetable sushi is a fantastic option for vegetarians and anyone looking to incorporate more plant-based foods into their diet.
Making vegetable sushi rolls at home may seem intimidating, but with a little practice, you’ll be able to roll them like a pro. The key is to use fresh ingredients and to master the technique of rolling the sushi tightly without squashing it. Pair your sushi rolls with soy sauce, pickled ginger, and wasabi for a complete experience that will impress your family and friends.
Ingredients (Serves 4-6):
- 2 cups sushi rice
- 2 1/2 cups water
- 1/4 cup rice vinegar
- 1 tablespoon sugar
- 1 teaspoon salt
- 4 sheets of nori (seaweed)
- 1 cucumber, julienned
- 1 carrot, julienned
- 1 bell pepper, thinly sliced
- 1 avocado, sliced
- Sesame seeds (optional)
- Soy sauce, for serving
Cooking Instructions:
- Prepare the Sushi Rice: Rinse the sushi rice under cold water until the water runs clear. This removes excess starch and helps achieve the right texture. Combine the rinsed rice and water in a rice cooker or saucepan. If using a saucepan, bring to a boil, then reduce the heat to low, cover, and simmer for about 20 minutes, or until the rice is tender and all the water is absorbed. Once cooked, let the rice sit covered for 10 minutes.
- Season the Rice: While the rice is resting, mix the rice vinegar, sugar, and salt in a small bowl until dissolved. After the rice has rested, transfer it to a large bowl and gently fold in the vinegar mixture using a wooden spatula or spoon. Be careful not to mash the rice; you want to maintain its fluffy texture. Allow the seasoned rice to cool to room temperature.
- Prepare the Vegetables: While the rice cools, wash and prepare your vegetables. Julienne the cucumber and carrot, slice the bell pepper, and cut the avocado. Confirm all vegetables are cut into thin, manageable strips for easy rolling.
- Assemble the Sushi Rolls: Place a bamboo sushi mat on a flat surface and lay a sheet of nori, shiny side down, on the mat. With wet hands to prevent sticking, take a handful of sushi rice (about 1/2 cup) and evenly spread it across the nori, leaving about 1 inch at the top edge free of rice. Press the rice down gently but firmly.
- Add the Fillings: Arrange a few pieces of the prepared vegetables in a line across the center of the rice-covered nori. You can place them in any order you prefer, but try to keep the fillings relatively thin to allow for easier rolling.
- Roll the Sushi: Starting from the end closest to you, lift the bamboo mat and begin to roll the sushi away from you, tucking the filling in as you go. Roll it tightly but not too tight, as it can squish the fillings. Use the bamboo mat to help shape and compress the roll. Once rolled, wet the edge of the nori with a little water to seal it.
- Slice and Serve: Using a sharp, wet knife, slice the roll into 6-8 pieces. Wipe the knife with a damp cloth between cuts to keep the slices clean. Arrange the sushi rolls on a platter and sprinkle with sesame seeds if desired. Serve with soy sauce, pickled ginger, and wasabi on the side.
Extra Tips:
For the best results, confirm all your ingredients are fresh and at room temperature before starting. Experiment with different vegetables or add cooked tofu or tempeh for added protein.
If you find rolling sushi challenging, practice makes perfect, so don’t hesitate to try again! Additionally, you can use a sushi mat wrapped in plastic wrap for easier cleanup. Enjoy the process and feel free to get creative with the fillings!
Miso Soup With Tofu and Greens
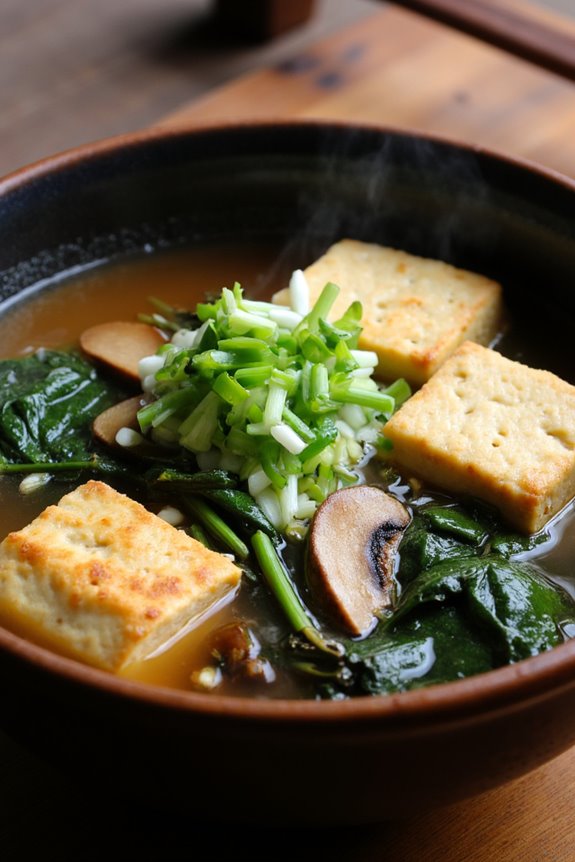
Miso Soup is a classic Japanese dish that embodies the essence of umami flavors while providing comfort and nourishment. This vegetarian version incorporates silken tofu and fresh greens, making it not only delicious but also packed with nutrients. The broth, made from dashi and miso paste, forms the heart of the soup, while the tofu adds creaminess and the greens contribute a vibrant color and texture. This dish is perfect as a starter or can be enjoyed as a light meal alongside rice and other sides.
Making Miso Soup is simple and quick, allowing you to enjoy a homemade bowl in just about 30 minutes. The key is to use high-quality miso paste and fresh ingredients to guarantee the best flavor. Feel free to customize the greens according to the season or your preferences. Spinach, bok choy, or seaweed are all great choices that can elevate this traditional soup into a delightful culinary experience.
Ingredients (Serves 4-6)
- 4 cups water
- 1/4 cup miso paste (white or yellow)
- 1 block (14 oz) silken tofu, cubed
- 2 cups fresh spinach or other leafy greens, chopped
- 1/4 cup green onions, chopped
- 1 cup mushrooms, sliced (shiitake or button mushrooms)
- 1 tablespoon soy sauce (optional)
- 1 teaspoon sesame oil (optional)
- Wakame seaweed (optional, for garnish)
Cooking Instructions
- Prepare the Dashi Broth: In a large pot, bring 4 cups of water to a gentle boil. If you’re using a dashi powder, you can add it to the water as it heats. Otherwise, simply use plain water for a lighter broth.
- Mix the Miso: In a small bowl, take a ladleful of the hot broth and mix in the miso paste until it dissolves completely. This step prevents clumps from forming in the soup and guarantees an even distribution of flavor.
- Add Tofu and Mushrooms: Once the broth is at a gentle simmer, gently add the cubed silken tofu and sliced mushrooms into the pot. Allow them to cook for about 5 minutes, so the mushrooms soften and the tofu warms through.
- Incorporate the Greens: After the mushrooms have cooked, add the chopped spinach or other leafy greens. Cook for an additional 2-3 minutes until the greens are wilted and tender.
- Final Seasoning: If desired, stir in soy sauce and sesame oil for added flavor. Taste the broth and adjust seasoning as necessary.
- Serve: Ladle the soup into bowls, garnish with chopped green onions and optional wakame seaweed, then serve hot. Enjoy your comforting bowl of Miso Soup with Tofu and Greens!
Extra Tips
To enhance the flavor of your Miso Soup, consider using homemade dashi made from kombu (dried kelp) and bonito flakes, or opt for a vegetarian dashi using shiitake mushrooms.
Additionally, be conservative with the miso paste, as it’s quite salty. Always start with less and add more to taste.
Finally, remember to serve the soup immediately after cooking, as miso can lose its flavor when reheated. Enjoy!
Zucchini Noodle Stir-Fry
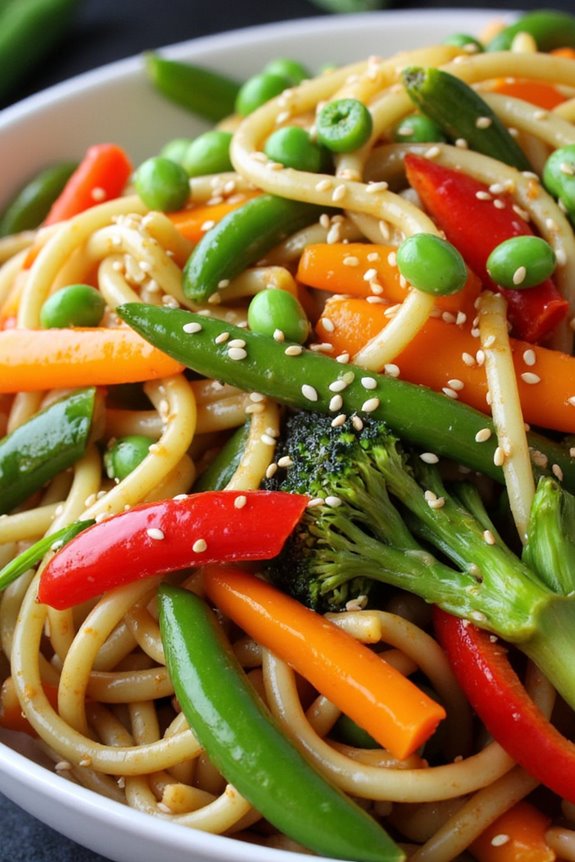
Zucchini Noodle Stir-Fry is a delightful and healthy vegetarian dish that brings a twist to the traditional stir-fry. By substituting traditional noodles with zucchini noodles, this recipe not only reduces carbohydrates but also adds a revitalizing crunch and vibrant color to the dish.
It’s packed with a variety of colorful vegetables and flavored with a savory sauce, making it a perfect meal for anyone looking for a nutritious and satisfying vegetarian option.
This quick and easy recipe can be prepared in under 30 minutes, making it an excellent choice for a busy weeknight dinner or a quick lunch. The combination of fresh vegetables and the lightness of zucchini noodles creates a satisfying meal that doesn’t weigh you down.
Whether you’re a long-time vegetarian or simply looking to incorporate more plant-based meals into your diet, this Zucchini Noodle Stir-Fry is sure to impress!
Ingredients (Serves 4-6):
- 4 medium zucchinis, spiralized into noodles
- 1 bell pepper, sliced (any color)
- 1 large carrot, julienned
- 1 cup snap peas, trimmed
- 1 cup broccoli florets
- 2 tablespoons vegetable oil
- 3 cloves garlic, minced
- 1 tablespoon fresh ginger, minced
- 3 tablespoons soy sauce (or tamari for gluten-free)
- 1 tablespoon sesame oil
- 1 tablespoon rice vinegar
- 1 teaspoon sugar (optional)
- Sesame seeds for garnish
- Green onions, sliced for garnish
Cooking Instructions:
- Prepare the Zucchini Noodles: Start by spiralizing the zucchinis into noodles using a spiralizer or a julienne peeler. Once done, place the zucchini noodles in a colander and sprinkle with a little salt. Let them sit for about 10-15 minutes to allow excess moisture to drain out, which helps prevent the stir-fry from becoming soggy.
- Chop the Vegetables: While the zucchini noodles are draining, prepare the other vegetables. Slice the bell pepper, julienne the carrot, trim the snap peas, and cut the broccoli into florets. Having all your vegetables prepped and ready will make the cooking process smoother.
- Make the Stir-Fry Sauce: In a small bowl, whisk together the soy sauce, sesame oil, rice vinegar, and sugar (if using). This sauce will infuse your stir-fry with a rich flavor. Adjust the ingredients according to your taste preferences, especially if you prefer a sweeter or saltier profile.
- Heat the Pan: In a large skillet or wok, heat the vegetable oil over medium-high heat. Once the oil is hot, add the minced garlic and ginger, sautéing for about 30 seconds until fragrant. Be careful not to burn them as it can affect the flavor.
- Stir-Fry the Vegetables: Add the bell pepper, carrot, snap peas, and broccoli to the pan. Stir-fry the vegetables for about 5-7 minutes until they’re tender-crisp. Make sure to stir frequently to ascertain even cooking.
- Add the Zucchini Noodles: Once the vegetables are cooked to your liking, add the zucchini noodles to the pan. Pour the stir-fry sauce over the mixture and toss everything together gently. Cook for an additional 2-3 minutes until the zucchini noodles are heated through but still slightly firm.
- Serve and Garnish: Remove the stir-fry from heat. Serve it hot, garnished with sesame seeds and sliced green onions for an added crunch and flavor. Enjoy your healthy Zucchini Noodle Stir-Fry!
Extra Tips:
When making Zucchini Noodle Stir-Fry, feel free to customize the vegetables based on what you have available or your personal preferences.
You can also add tofu or tempeh for extra protein. If you’re looking for a bit more heat, consider adding a dash of chili flakes or a drizzle of sriracha to the sauce.
Finally, remember to keep the cooking time short for the zucchini noodles to maintain their texture and prevent them from becoming mushy. Enjoy your healthy and colorful meal!
Colorful Chirashi Don
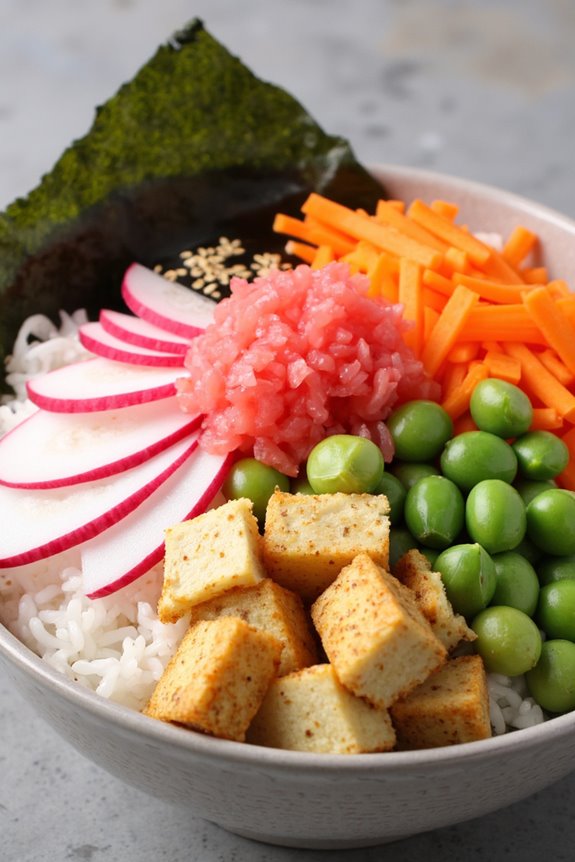
Chirashi Don, also known as “scattered sushi,” is a vibrant and visually appealing Japanese dish that features a bed of sushi rice topped with a colorful array of vegetables, pickles, and often seafood. In this vegetarian version, we’ll use a variety of fresh vegetables and tofu to create a delightful and satisfying meal. This dish isn’t only a feast for the eyes but also packed with flavors and textures that will leave you craving more.
The beauty of Chirashi Don lies in its versatility. You can mix and match your choice of toppings according to the season and your personal preference. This recipe focuses on a colorful assortment of ingredients that not only enhance the visual appeal but also provide a delicious medley of tastes and nutrients. Perfect for special occasions or a casual family dinner, Colorful Chirashi Don is sure to impress both you and your guests.
Ingredients (Serves 4-6)
- 2 cups sushi rice
- 2 1/2 cups water
- 1/4 cup rice vinegar
- 2 tablespoons sugar
- 1 teaspoon salt
- 1 cup sliced cucumber
- 1 cup shredded carrots
- 1 cup sliced radishes
- 1 cup edamame (shelled)
- 1 cup diced tofu (firm or extra firm)
- 1/2 cup pickled ginger
- 1/4 cup nori (seaweed), cut into strips
- 1/4 cup sesame seeds (toasted)
- Soy sauce (for serving)
Cooking Instructions
- Prepare the Sushi Rice: Rinse the sushi rice under cold water until the water runs clear. This helps to remove excess starch and guarantees a fluffy texture. Once rinsed, add the rice and water to a rice cooker or pot. If using a pot, bring the water to a boil, then reduce the heat to low, cover, and simmer for about 20 minutes or until the water is absorbed. Allow it to sit covered for an additional 10 minutes.
- Season the Rice: In a small saucepan, combine rice vinegar, sugar, and salt over low heat until the sugar and salt dissolve. Once the rice is done cooking, transfer it to a large bowl and gently fold in the vinegar mixture using a wooden spatula. Be careful not to mash the rice; you want it to remain fluffy. Allow the rice to cool to room temperature.
- Prepare the Toppings: While the rice is cooling, prepare your toppings. Slice the cucumber, shred the carrots, and slice the radishes into thin rounds. Cook the edamame according to package instructions, if frozen. For the tofu, you can either pan-fry or bake it for added texture. Simply cut the tofu into cubes, season with a sprinkle of salt, and sauté in a pan over medium heat until golden brown on all sides.
- Assemble the Chirashi Don: Once the rice has cooled, divide it evenly among serving bowls. Arrange the sliced cucumber, shredded carrots, sliced radishes, edamame, and diced tofu artistically on top of the rice. Add a few pieces of pickled ginger for an extra kick. Finally, sprinkle with nori strips and toasted sesame seeds to complete the dish.
- Serve: Serve the Chirashi Don with a side of soy sauce for drizzling or dipping. Enjoy the delightful combination of flavors and textures in every bite!
Extra Tips
For the best flavor, make sure to allow the sushi rice to cool completely before assembling the Chirashi Don. You can also experiment with different toppings such as avocado, bell peppers, or even marinated mushrooms to suit your taste.
If you’re making this dish for a special occasion, consider adding a drizzle of homemade sesame dressing for an extra layer of flavor. This dish can also be prepared in advance; simply store the components separately in the fridge and assemble them just before serving. Enjoy your colorful and nutritious Chirashi Don!
Edamame and Corn Salad

Edamame and Corn Salad is a vibrant, nutritious dish that brings the flavors of Japan to your table while being entirely vegetarian. This invigorating salad combines tender edamame beans with sweet corn, adding a delightful crunch and a pop of color. It’s perfect as a side dish for any meal or as a light main course on a warm day, making it a versatile addition to your cooking repertoire.
The combination of edamame and corn not only makes for a beautiful presentation but also packs a protein punch, making it an excellent choice for vegetarians and health-conscious eaters alike. The salad is typically dressed with a light sesame dressing that enhances the natural flavors of the ingredients without overpowering them. Serve it chilled or at room temperature, and your guests will be sure to enjoy its fresh and appealing taste.
Ingredients (Serves 4-6)
- 2 cups shelled edamame (fresh or frozen)
- 1 cup sweet corn (canned, frozen, or fresh)
- 1 red bell pepper, diced
- 1/4 cup green onions, sliced
- 1/4 cup fresh cilantro, chopped
- 2 tablespoons sesame oil
- 1 tablespoon rice vinegar
- 1 tablespoon soy sauce
- 1 teaspoon honey or agave syrup (optional)
- Salt and pepper to taste
- Sesame seeds for garnish (optional)
Cooking Instructions
- Prepare Edamame: If using frozen edamame, place it in a pot of boiling water and cook for about 3-5 minutes until tender. If using fresh edamame, steam it until the pods are bright green and tender. Drain and allow to cool before removing the beans from the pods.
- Cook Corn: If using fresh corn, you can either boil the corn on the cob for about 5-7 minutes until tender or grill it for a smoky flavor. For canned corn, simply drain and rinse it. If using frozen corn, cook according to package directions until heated through.
- Mix Vegetables: In a large mixing bowl, combine the cooked edamame, corn, diced red bell pepper, sliced green onions, and chopped cilantro. Toss gently to mix the ingredients without breaking the edamame.
- Prepare Dressing: In a small bowl, whisk together the sesame oil, rice vinegar, soy sauce, and honey or agave syrup if using. Season with salt and pepper to taste. Adjust the flavors according to your preference.
- Combine Salad and Dressing: Pour the dressing over the vegetable mixture and toss gently until everything is evenly coated in the dressing.
- Chill and Serve: Allow the salad to sit for about 15-30 minutes in the refrigerator to let the flavors meld. Serve chilled or at room temperature, garnished with sesame seeds if desired.
Extra Tips
When making Edamame and Corn Salad, feel free to customize the ingredients to your taste. Adding diced cucumber or avocado can elevate the salad’s texture and flavor.
For added heat, consider incorporating some diced jalapeño or a splash of sriracha in the dressing. This salad can be made a few hours in advance, allowing for a quick and easy option for gatherings or meal prep.
Just remember to give it a good toss before serving to redistribute the dressing!
Rainbow Vegetable Tempura
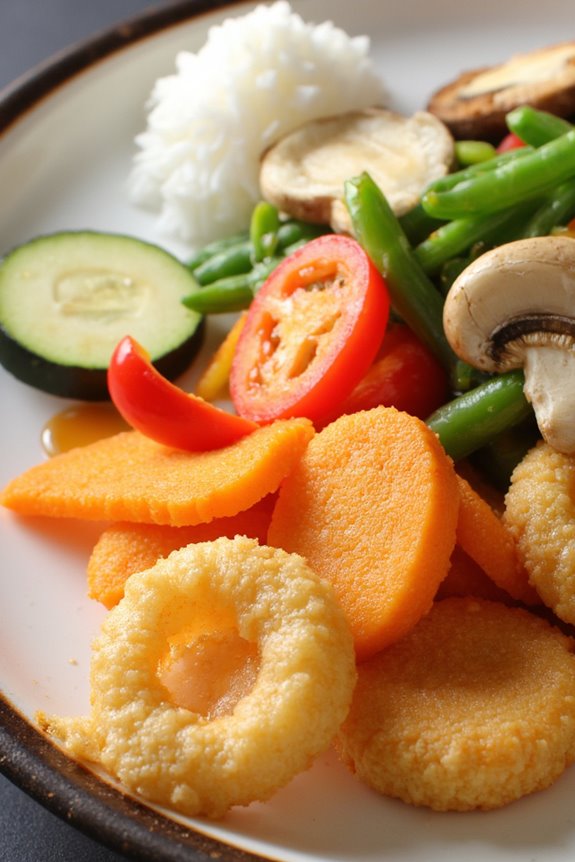
Rainbow Vegetable Tempura is a delightful and colorful dish that showcases a variety of vegetables, all lovingly coated in a light and crispy batter. This traditional Japanese dish not only offers an explosion of flavors but also brings a vibrant visual appeal to your dining table. The combination of seasonal vegetables provides a perfect opportunity to enjoy the natural sweetness and crunchiness of fresh produce, making it a fantastic choice for vegetarians and anyone looking to celebrate the bounty of nature.
The crispy nature of tempura comes from the unique batter made from flour, water, and sometimes cornstarch, which results in a delicate texture that beautifully encases the vegetables. You can customize the vegetable selection based on what you have available or what’s in season, making this dish versatile and appealing to all tastes. The dipping sauce, usually a simple soy-based mix, enhances the flavors of the tempura and provides a delightful contrast to the crispy texture.
Ingredients (Serves 4-6)
- 1 zucchini, sliced into thin rounds
- 1 sweet potato, peeled and sliced into thin rounds
- 1 red bell pepper, sliced into strips
- 1 carrot, sliced into thin rounds
- 1 cup green beans, trimmed
- 1 cup mushrooms, sliced
- 1 cup all-purpose flour
- 1/2 cup cornstarch
- 1 cup ice-cold water
- 1 egg (optional, for a richer batter)
- Vegetable oil (for frying)
- Soy sauce (for dipping)
- Grated daikon radish (optional, for serving)
Cooking Instructions
- Prepare the Vegetables: Begin by washing and slicing all the vegetables into uniform pieces to guarantee even cooking. Aim for thin slices or small pieces so that they cook quickly and absorb the batter nicely. Arrange them on a plate for easy access during frying.
- Make the Tempura Batter: In a large mixing bowl, combine the all-purpose flour and cornstarch. Gradually add the ice-cold water while gently stirring with chopsticks or a fork. If you choose to include an egg, beat it separately and add it to the mixture. Don’t overmix; the batter should be lumpy to achieve the best crispy texture.
- Heat the Oil: In a deep skillet or frying pan, pour enough vegetable oil to reach a depth of about 2 inches. Heat the oil over medium-high heat until it reaches around 350°F (175°C). You can test the oil’s readiness by dropping a small amount of batter into the oil; it should sizzle and float to the surface.
- Fry the Vegetables: Working in batches, dip each vegetable piece into the tempura batter, allowing any excess to drip off. Carefully place them in the hot oil, ensuring not to overcrowd the pan. Fry for about 2-3 minutes or until the batter is golden brown and crispy, turning occasionally for even cooking.
- Drain and Serve: Once cooked, remove the tempura from the oil using a slotted spoon and place them on a plate lined with paper towels to absorb excess oil. Repeat the frying process with the remaining vegetables. Serve the tempura hot, alongside soy sauce for dipping and grated daikon radish if desired.
Extra Tips
When preparing Rainbow Vegetable Tempura, it’s crucial to keep the batter as cold as possible for the crispiest results; consider chilling your mixing bowl before use. Additionally, you can experiment with different vegetables such as broccoli, asparagus, or eggplant for a unique twist.
Keep the fried tempura warm in a low oven while you finish cooking the remaining batches to guarantee they stay crispy for serving. Enjoy your tempura as a light snack or as part of a larger Japanese-inspired meal!
Spinach and Sesame Salad
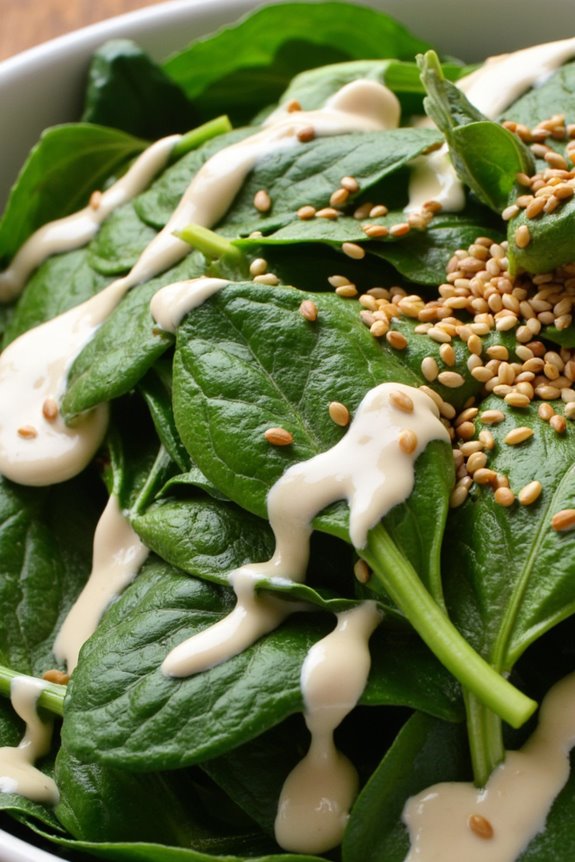
Spinach and Sesame Salad, or “Goma-ae” in Japanese, is a delightful and nutritious dish that showcases the vibrant flavors and textures of fresh spinach, complemented by a nutty sesame dressing. This simple yet elegant salad is a staple in Japanese cuisine, often served as a side dish during meals or as part of a larger spread. The combination of tender spinach and toasted sesame seeds creates a harmonious blend of taste and health benefits, making it a perfect addition to any vegetarian Japanese menu.
Preparing Spinach and Sesame Salad is quick and easy, making it an ideal choice for a light lunch or dinner accompaniment. The dressing, made from sesame paste (tahini), soy sauce, and a hint of sweetness, elevates the humble spinach into a flavorful dish that everyone will love. With just a handful of ingredients and a few simple steps, you can create this delicious salad that isn’t only visually appealing but also packed with nutrients.
Ingredients (Serves 4-6):
- 1 pound fresh spinach
- 3 tablespoons sesame seeds
- 2 tablespoons tahini (or toasted sesame paste)
- 1 tablespoon soy sauce
- 1 tablespoon mirin (or rice vinegar)
- 1 teaspoon sugar (optional)
- A pinch of salt
Cooking Instructions:
- Prepare the Spinach: Start by washing the spinach thoroughly under cold running water to remove any dirt or grit. Once cleaned, bring a large pot of water to a boil. Add the spinach to the boiling water and blanch it for about 1-2 minutes until it’s bright green and wilted. Immediately transfer the spinach to a bowl of ice water to stop the cooking process and preserve its vibrant color.
- Drain and Squeeze: Once the spinach has cooled in the ice water, drain it well. Gently squeeze out the excess water from the spinach to make sure it’s not soggy. You can do this by gathering the spinach in a clean kitchen towel or using your hands. After squeezing, chop the spinach into bite-sized pieces and set aside.
- Toast the Sesame Seeds: In a dry skillet over medium heat, add the sesame seeds. Toast them for 2-3 minutes, stirring frequently, until they’re golden brown and fragrant. Be careful not to burn them as they can turn bitter. Remove from heat and let them cool slightly.
- Prepare the Dressing: In a small mixing bowl, combine the tahini, soy sauce, mirin, and sugar (if using). Whisk together until smooth and well combined. Adjust the consistency by adding a small amount of water if it’s too thick. The dressing should be creamy but pourable.
- Combine the Ingredients: In a large mixing bowl, add the chopped spinach and pour the sesame dressing over it. Toss gently to coat the spinach evenly with the dressing. Add the toasted sesame seeds and a pinch of salt, then give it another gentle toss to incorporate.
- Serve: Transfer the Spinach and Sesame Salad to a serving dish. You can garnish with additional sesame seeds if desired. Enjoy it immediately or let it chill in the refrigerator for about 15-30 minutes to enhance the flavors before serving.
Extra Tips:
To enhance the flavor of your Spinach and Sesame Salad, consider adding a splash of citrus juice, such as lemon or yuzu, to the dressing for a rejuvenating twist.
You can also experiment with different leafy greens like kale or bok choy for a unique variation. Additionally, for a bit of spice, finely chopped chili pepper or a sprinkle of shichimi togarashi can add an interesting kick.
Remember to taste and adjust the seasoning as you go, making sure that the dressing complements the freshness of the spinach perfectly.
Sweet Potato and Avocado Rice Bowl
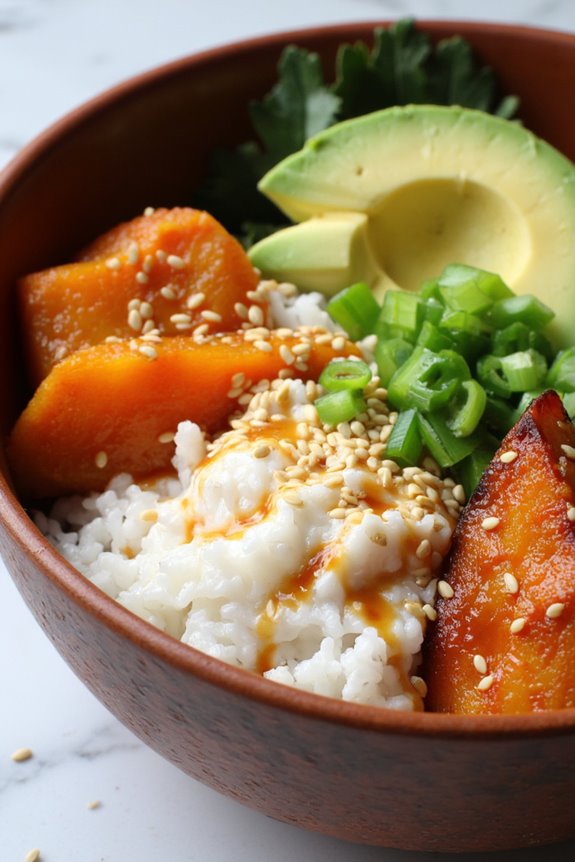
The Sweet Potato and Avocado Rice Bowl is a delightful and nutritious dish that combines the earthiness of sweet potatoes with the creaminess of ripe avocado, all served over a bed of fluffy rice. This vegetarian recipe not only showcases the vibrant flavors of Japanese cuisine but also emphasizes the importance of seasonal and wholesome ingredients.
It’s perfect for a light lunch or a satisfying dinner, providing a good balance of carbohydrates, healthy fats, and vitamins.
This colorful bowl isn’t only visually appealing but also highly versatile. You can customize it by adding your favorite vegetables or proteins like tofu or tempeh, or even a drizzle of your preferred dressing to enhance the flavors.
Whether you’re a seasoned cook or a beginner, this recipe is straightforward and rewarding to prepare, making it a great addition to your repertoire of vegetarian Japanese dishes.
Ingredients (Serves 4-6):
- 2 cups sushi rice
- 2 1/2 cups water
- 2 medium sweet potatoes, peeled and cubed
- 2 tablespoons olive oil
- Salt, to taste
- 1 ripe avocado, sliced
- 1 tablespoon sesame seeds (optional)
- 2 green onions, chopped
- Soy sauce or tamari, for drizzling
- Pickled ginger (optional, for serving)
Cooking Instructions:
1. Cook the Sushi Rice: Rinse the sushi rice under cold water until the water runs clear. This removes excess starch and helps achieve the desired texture.
Combine the rinsed rice and water in a rice cooker or a saucepan. If using a saucepan, bring to a boil over medium heat, then reduce to low, cover, and let it simmer for about 18-20 minutes or until the rice is tender and water is absorbed.
Once done, let it sit covered for 10 minutes before fluffing with a fork.
2. Prepare the Sweet Potatoes: Preheat your oven to 400°F (200°C). Toss the cubed sweet potatoes with olive oil and a pinch of salt in a mixing bowl.
Spread them out in a single layer on a baking sheet. Roast in the preheated oven for about 25-30 minutes, turning halfway through, until they’re tender and slightly caramelized.
3. Assemble the Bowl: Once the rice and sweet potatoes are ready, take a serving bowl for each person. Start by spooning a generous portion of sushi rice into the bottom of each bowl.
Layer the roasted sweet potatoes on top of the rice, followed by the sliced avocado.
4. Garnish and Serve: Sprinkle sesame seeds and chopped green onions over the top for added flavor and texture. Drizzle with soy sauce or tamari to taste.
If desired, serve with pickled ginger on the side for a revitalizing contrast.
Extra Tips:
For the best flavor and texture, make sure to use ripe avocados that yield slightly to pressure when squeezed.
You can also experiment with different toppings such as fresh herbs, sliced radishes, or even a sprinkle of furikake for an extra umami kick.
If you’re looking to add protein, consider incorporating marinated tofu or tempeh that complements the dish’s flavors.
Japanese Pickled Vegetables
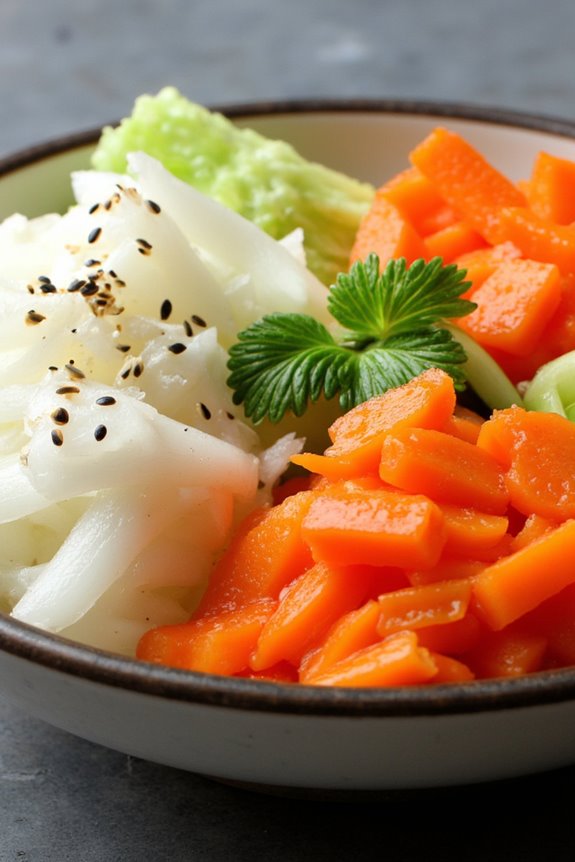
Japanese pickled vegetables, or “tsukemono,” are a delightful accompaniment to many meals in Japanese cuisine. These vibrant, tangy bites aren’t only flavorful but also loaded with nutrients, making them a perfect addition to a vegetarian diet. The pickling process enhances the natural flavors of the vegetables while preserving them, allowing you to enjoy them for weeks.
In this recipe, we’ll explore how to create a simple yet delicious assortment of pickled vegetables that can serve as a side dish or even a palate cleanser between courses. The beauty of tsukemono lies in its versatility—almost any vegetable can be pickled, and you can adjust the flavors to suit your taste. By using the right balance of salt, sugar, and vinegar, you’ll create a delightful dish that complements any vegetarian Japanese meal.
Ingredients (serves 4-6):
- 1 cup daikon radish, peeled and sliced
- 1 cup cucumbers, sliced
- 1 cup carrots, julienned
- 1 cup napa cabbage, chopped
- 1/2 cup rice vinegar
- 1/4 cup sugar
- 1 tablespoon salt
- 1 tablespoon soy sauce
- 1 teaspoon grated ginger
- 1 teaspoon sesame seeds (optional)
Cooking Instructions:
- Prepare the Vegetables: Start by washing and cutting your vegetables. Peel the daikon radish, then slice it into thin rounds. Slice the cucumbers into thin rounds or half-moons, and julienne the carrots. Chop the napa cabbage into bite-sized pieces. Make sure all vegetables are uniform in size for even pickling.
- Salt the Vegetables: Place all the prepared vegetables into a large bowl. Sprinkle the tablespoon of salt over the vegetables, and then mix well to guarantee that the salt is evenly distributed. Let the mixture sit for about 30 minutes. This process helps to draw out excess moisture from the vegetables, making them crunchier and enhancing their flavor.
- Make the Pickling Brine: While the vegetables are resting, prepare the pickling brine. In a small saucepan, combine the rice vinegar, sugar, soy sauce, and grated ginger. Heat the mixture over low heat, stirring until the sugar is completely dissolved. Once dissolved, remove from heat and let it cool to room temperature.
- Combine and Refrigerate: After the vegetables have rested, rinse them under cold water to remove excess salt. Drain well, and then place them in a clean jar or container. Pour the cooled pickling brine over the vegetables, making sure they’re fully submerged. Seal the container and refrigerate for at least 2 hours, preferably overnight, to allow the flavors to meld.
- Serve: After the pickling time, your Japanese pickled vegetables are ready to be served! You can enjoy them as a side dish, with rice, or as part of a bento box. If desired, sprinkle some sesame seeds over the top for added flavor and texture.
Extra Tips:
When making Japanese pickled vegetables, feel free to experiment with different vegetables like radishes, green beans, or even bell peppers.
Adjust the sugar and vinegar ratios to suit your taste preference, and consider adding spices like chili flakes or garlic for a unique twist.
For best results, allow the pickles to chill in the refrigerator for at least 24 hours before serving, as this gives the flavors time to deepen and develop. Enjoy your homemade tsukemono!
Tofu Katsu With Tonkatsu Sauce

Tofu Katsu is a delicious and satisfying vegetarian twist on the traditional Japanese pork katsu. This dish features crispy, breaded tofu cutlets that are pan-fried to golden perfection and served with a rich, tangy tonkatsu sauce. It not only embodies the essence of Japanese flavors but also provides a hearty and nutritious option for those looking to enjoy a meat-free meal.
The combination of textures and flavors in Tofu Katsu makes it a delightful choice for both vegetarians and meat-lovers alike. Preparing Tofu Katsu is a straightforward process that brings out the natural flavors of the tofu while adding a satisfying crunch from the panko breadcrumbs.
Pair it with a side of steamed rice and a fresh salad for a complete meal that will impress your family and friends. This recipe is perfect for serving 4-6 people, making it an excellent option for gatherings or weeknight dinners.
Ingredients (Serves 4-6):
- 14 oz firm tofu
- 1 cup all-purpose flour
- 2 large eggs (or 1/4 cup plant-based milk for a vegan option)
- 2 cups panko breadcrumbs
- 1 tsp salt
- 1/2 tsp black pepper
- 1/2 tsp garlic powder
- 1/2 tsp onion powder
- Vegetable oil (for frying)
For Tonkatsu Sauce:
- 1/4 cup ketchup
- 2 tbsp Worcestershire sauce (or vegan Worcestershire sauce)
- 1 tbsp soy sauce
- 1 tbsp sugar
- 1 tsp Dijon mustard
- 1/2 tsp garlic powder
Cooking Instructions:
- Prepare the Tofu: Start by draining the firm tofu and pressing it to remove excess moisture. Wrap the tofu block in a clean kitchen towel or paper towels and place a heavy object on top for about 15-20 minutes. This step helps the tofu absorb flavors and achieve a better texture.
- Slice the Tofu: Once pressed, cut the tofu into thick slices (about 1/2 inch each). You can also cut them into smaller pieces if you prefer bite-sized katsu.
- Set Up Breading Station: In three separate bowls, place flour in the first bowl, beaten eggs or plant-based milk in the second bowl, and panko breadcrumbs mixed with salt, pepper, garlic powder, and onion powder in the third bowl.
- Bread the Tofu: Dip each tofu slice into the flour, coating it lightly, then into the beaten eggs or plant-based milk, and finally into the panko breadcrumb mixture. Confirm each piece is well-coated in breadcrumbs for maximum crunch.
- Heat the Oil: In a large skillet, heat about 1/4 inch of vegetable oil over medium heat. Test the oil’s readiness by dropping a small piece of breadcrumb into it; if it sizzles, the oil is ready for frying.
- Fry the Tofu: Carefully place the breaded tofu slices in the hot oil. Fry them in batches, ensuring not to overcrowd the pan. Cook for about 3-4 minutes on each side or until they’re golden brown and crispy. Use tongs to flip them gently.
- Drain Excess Oil: Once cooked, transfer the tofu katsu to a plate lined with paper towels to absorb any excess oil. Repeat the frying process with the remaining tofu slices.
- Make the Tonkatsu Sauce: In a small bowl, combine ketchup, Worcestershire sauce, soy sauce, sugar, Dijon mustard, and garlic powder. Mix well until fully blended.
- Serve: Slice the crispy tofu katsu and serve it hot with the tonkatsu sauce drizzled over the top or on the side for dipping. Enjoy with steamed rice and a side of salad, if desired.
Extra Tips:
To achieve the ultimate crunch, make sure to use panko breadcrumbs, as they provide a lighter and crispier texture compared to regular breadcrumbs.
Additionally, experiment with the tonkatsu sauce by adjusting the ingredients to your taste; for a spicier kick, add a dash of hot sauce or some chili flakes. Serve this dish fresh for the best experience, as reheated katsu may lose its crunchiness. Enjoy your homemade Tofu Katsu with Tonkatsu Sauce!
Udon Noodle Salad With Peanut Dressing
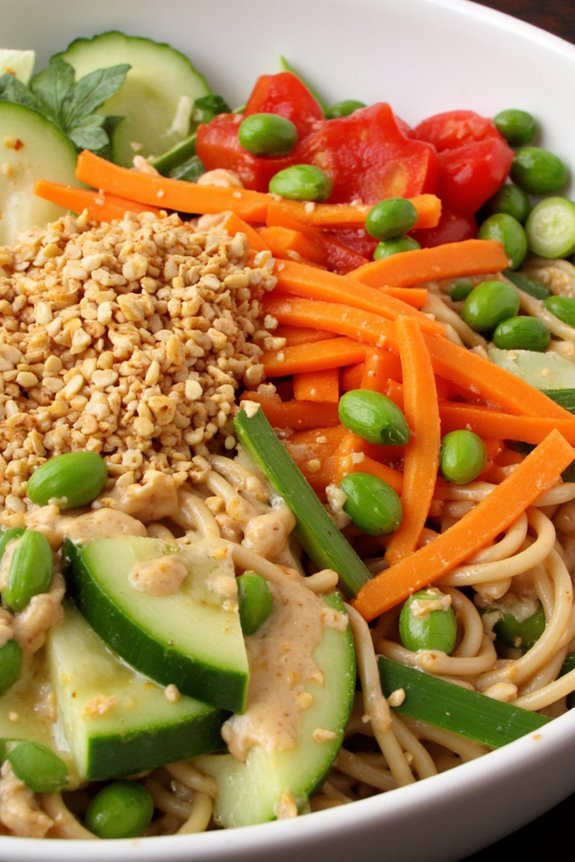
Udon Noodle Salad with Peanut Dressing is a delightful fusion of flavors and textures that brings together the chewy goodness of udon noodles, crisp vegetables, and a creamy, nutty dressing. This vibrant dish isn’t only visually appealing but also packed with nutrients, making it a perfect choice for a light lunch or dinner.
The combination of fresh ingredients and a rich peanut sauce will tantalize your taste buds and leave you feeling satisfied. This salad is incredibly versatile; you can customize it based on the vegetables you have on hand or your personal preferences.
It’s a fantastic way to showcase seasonal produce, and since it’s vegetarian, it caters to various dietary needs. Whether you’re enjoying it as a main dish or a side, Udon Noodle Salad with Peanut Dressing is sure to impress anyone at your table.
Ingredients (Serves 4-6):
- 12 ounces udon noodles
- 1 cup shredded carrots
- 1 cup cucumber, julienned
- 1 red bell pepper, thinly sliced
- 1 cup edamame (shelled)
- 1/4 cup green onions, sliced
- 1/4 cup cilantro, chopped
- 1/4 cup roasted peanuts, chopped (for garnish)
For the Peanut Dressing:
- 1/3 cup peanut butter
- 2 tablespoons soy sauce
- 2 tablespoons rice vinegar
- 1 tablespoon sesame oil
- 1 tablespoon honey or maple syrup
- 1-2 tablespoons water (to thin, if needed)
- 1 clove garlic, minced
- 1 teaspoon fresh ginger, grated
- Red pepper flakes (optional, to taste)
Cooking Instructions:
1. Cook the Udon Noodles: Start by boiling a large pot of water. Once boiling, add the udon noodles and cook according to the package instructions, usually about 8-10 minutes. Stir occasionally to prevent sticking.
Once done, drain the noodles and rinse them under cold water to stop the cooking process and cool them down. Set aside.
2. Prepare the Vegetables: While the noodles are cooking, wash and chop your vegetables. Shred the carrots, julienne the cucumber, and slice the red bell pepper.
Also, prepare the green onions and cilantro by slicing and chopping them respectively. Set all the vegetables aside.
3. Make the Peanut Dressing: In a medium bowl, combine the peanut butter, soy sauce, rice vinegar, sesame oil, honey (or maple syrup), minced garlic, grated ginger, and red pepper flakes if desired.
Whisk together until smooth. If the dressing is too thick, gradually add water, one tablespoon at a time, until you reach your desired consistency.
4. Combine the Ingredients: In a large mixing bowl, add the cooked udon noodles and all the prepared vegetables. Pour the peanut dressing over the salad and gently toss everything together until the noodles and vegetables are well coated in the dressing.
5. Serve and Garnish: Transfer the salad to a serving platter or individual bowls. Top with chopped roasted peanuts and additional cilantro or green onions as desired for a fresh finish.
Serve immediately, or chill in the refrigerator for 15-30 minutes for a invigorating cold salad.
Extra Tips:
For added flavor and nutrition, consider incorporating protein sources like tofu or tempeh. You can also experiment with different vegetables such as bell peppers, snap peas, or even cabbage for a crunchier texture.
If you prefer a bit of heat, add some chili oil or Sriracha to the dressing. This salad can be stored in the refrigerator for a couple of days, but it’s best enjoyed fresh to maintain the crispness of the vegetables.
Grilled Eggplant With Miso Glaze
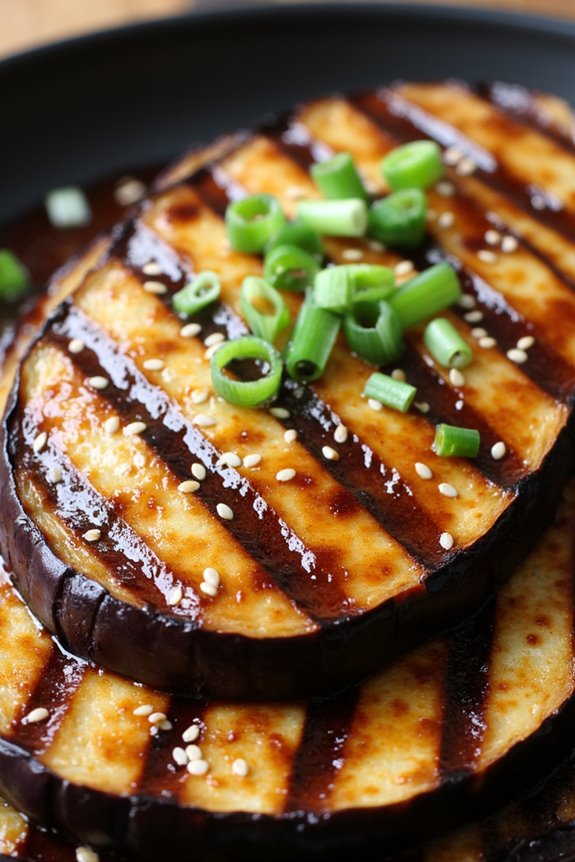
Grilled Eggplant with Miso Glaze is a delightful vegetarian dish that combines the rich umami flavors of miso with the smoky texture of grilled eggplant. This dish isn’t only simple to prepare but also offers a beautiful presentation, making it perfect for dinner parties or casual family meals. The miso glaze provides a savory and slightly sweet coating that enhances the natural flavor of the eggplant, creating a harmonious blend of tastes that’s both satisfying and delicious.
Eggplant, known as “nasu” in Japanese, is a staple ingredient in many Japanese dishes. When grilled, it takes on a wonderful charred flavor that pairs beautifully with the miso glaze, which is made from a mixture of miso paste, mirin, and sugar. This dish can be served as a side or as a main course, accompanied by rice or salad. Prepare to impress your friends and family with this vibrant and flavorful dish that showcases the best of vegetarian Japanese cuisine!
Ingredients (Serves 4-6):
- 2 medium eggplants
- 4 tablespoons white miso paste
- 2 tablespoons mirin
- 1 tablespoon sugar
- 1 tablespoon sesame oil
- 1 tablespoon soy sauce
- 1 tablespoon rice vinegar
- 1 tablespoon chopped green onions (for garnish)
- Sesame seeds (for garnish)
Cooking Instructions:
- Prepare the Eggplants: Start by washing the eggplants thoroughly. Cut them in half lengthwise, and then score the flesh in a crisscross pattern without cutting through the skin. This scoring will help the glaze penetrate and enhance the flavor during grilling.
- Make the Miso Glaze: In a small mixing bowl, combine the white miso paste, mirin, sugar, sesame oil, soy sauce, and rice vinegar. Whisk the ingredients together until they form a smooth and cohesive glaze. Adjust the sweetness or saltiness to your preference by adding more sugar or soy sauce if desired.
- Marinate the Eggplants: Brush the miso glaze generously over the cut sides of the eggplants, making sure to get it into the scored sections. Let them marinate for at least 20 minutes to allow the flavors to meld. If you have more time, marinating for up to an hour will yield even better results.
- Preheat the Grill: Preheat your grill or grill pan over medium heat. If using an outdoor grill, make certain the grates are clean and lightly oiled to prevent sticking.
- Grill the Eggplants: Once the grill is ready, place the eggplants cut-side down on the grill. Grill for about 5-7 minutes until the flesh is soft and has nice grill marks. Then flip the eggplants over and grill for an additional 3-5 minutes to heat through and develop a bit of char on the skin.
- Serve: Remove the grilled eggplants from the grill and transfer them to a serving platter. Drizzle any remaining miso glaze over the eggplants and garnish with chopped green onions and sesame seeds. Serve warm as a main dish or side.
Extra Tips:
When grilling eggplant, it’s important to choose medium-sized eggplants that are firm and shiny, as they’ll have the best flavor and texture. If you find that your eggplants are bitter, you can sprinkle them with salt and let them sit for about 30 minutes before rinsing, which helps draw out excess moisture and bitterness.
Additionally, feel free to experiment with the glaze by adding ingredients like ginger or garlic for an extra layer of flavor, or try using different types of miso for varied tastes. Enjoy your culinary adventure with this delicious grilled eggplant dish!
Matcha and Almond Chia Pudding
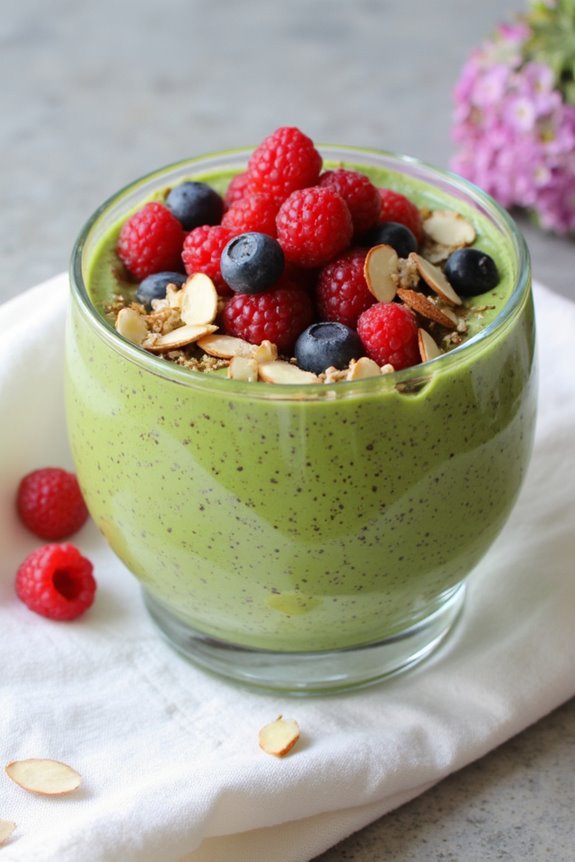
Indulging in a creamy, nutritious dessert doesn’t have to mean sacrificing your dietary preferences. This Matcha and Almond Chia Pudding combines the earthy flavors of matcha green tea with the rich, nutty taste of almond milk, creating a delightful treat that’s both satisfying and healthy.
Chia seeds are packed with fiber, protein, and omega-3 fatty acids, making this pudding not only delicious but also a powerhouse of nutrients. Whether you’re enjoying it as a breakfast option or a sweet evening snack, this recipe is sure to impress.
The vibrant green hue of matcha combined with the texture of chia seeds provides a visually appealing and deliciously unique dessert. It’s simple to prepare, requiring just a few hours of chilling time, making it a perfect make-ahead option for busy days.
With the additional benefits of almond milk, this vegan-friendly pudding can cater to various dietary restrictions while still satisfying your sweet tooth.
Ingredients (Serves 4-6):
- 1 cup almond milk (unsweetened)
- 1/4 cup chia seeds
- 2 tablespoons matcha green tea powder
- 2 tablespoons maple syrup (or agave syrup)
- 1 teaspoon vanilla extract
- A pinch of salt
- Fresh fruits (like berries or bananas) for topping (optional)
- Sliced almonds for garnish (optional)
Cooking Instructions:
- Combine the Dry Ingredients: In a mixing bowl, add the chia seeds, matcha green tea powder, and a pinch of salt. Whisk them together until well combined to guarantee the matcha is evenly distributed throughout the chia seeds.
- Mix the Wet Ingredients: In a separate bowl, whisk together the almond milk, maple syrup, and vanilla extract until the mixture is smooth and the syrup is fully dissolved. This step is essential as it guarantees that the pudding is sweetened evenly.
- Combine Wet and Dry Mixtures: Pour the wet mixture into the bowl with the dry ingredients. Stir well using a whisk or a spoon to combine everything. Make sure there are no lumps of matcha or chia seeds stuck together.
- Refrigerate: Cover the bowl with plastic wrap or transfer the mixture into individual serving containers. Refrigerate for at least 4 hours, or overnight if possible. This allows the chia seeds to absorb the liquid and swell, resulting in a thick pudding consistency.
- Serve: Once chilled and thickened, give the pudding a good stir before serving. It can be spooned into bowls or jars. Top with fresh fruits and sliced almonds for added texture and flavor if desired.
Extra Tips:
For an enhanced flavor profile, consider experimenting with different plant-based milk options, such as coconut or cashew milk, to give the pudding a unique twist.
You can also adjust the sweetness to your preference by adding more or less maple syrup. If you prefer a sweeter version, try adding a dash of cinnamon or nutmeg for extra warmth.
Enjoy your Matcha and Almond Chia Pudding as a versatile dish, perfect for breakfast, dessert, or a healthy snack!