

When the evening chill begins to settle, I find myself yearning for the warmth of a home-cooked Japanese meal. With its delightful umami flavors, Japanese cuisine offers a comforting touch perfect for cozy nights. From the heartiness of miso ramen to the savory delight of okonomiyaki, each dish promises a special dining experience. These recipes are sure to make any evening feel inviting and memorable. Which dish are you excited to try first?
Hearty Miso Ramen
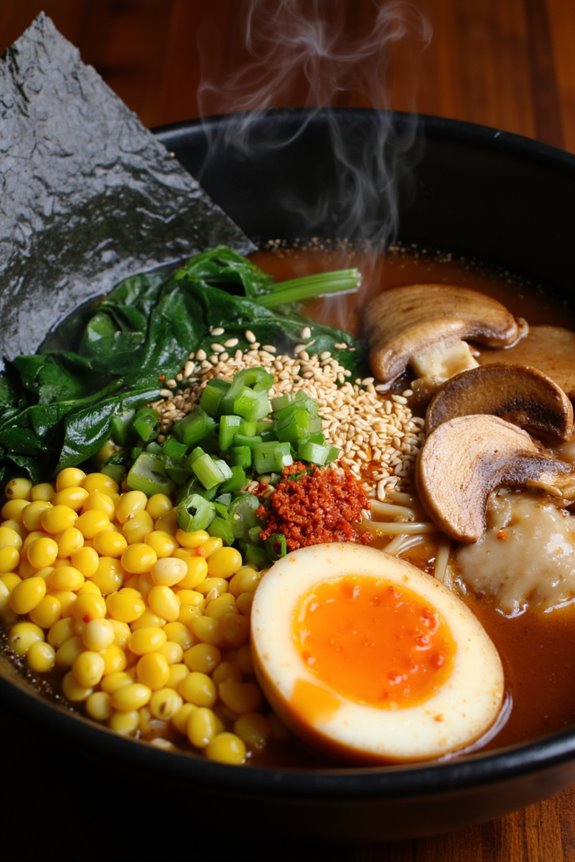
Hearty Miso Ramen is a comforting and flavorful Japanese dish, perfect for cold evenings or a cozy family dinner. This dish highlights the umami-rich flavor of miso, combined with tender noodles and a variety of toppings that make each bowl uniquely satisfying.
Whether you’re a novice cook or an experienced chef, this ramen recipe is accessible and can be customized to suit your taste. Miso ramen isn’t just a meal; it’s an experience that brings people together. The combination of miso paste, rich broth, and fresh ingredients creates a nourishing bowl that’s both hearty and delicious.
As you immerse yourself in the cooking process, you’ll enjoy the delightful aromas wafting through your kitchen, making it impossible to resist the final dish.
Ingredients (serving size: 4-6 people):
- 4 cups chicken or vegetable broth
- 4 cups water
- 2 tablespoons miso paste (white or red)
- 1 tablespoon soy sauce
- 2 teaspoons sesame oil
- 2 packs of fresh ramen noodles (approximately 14-16 oz)
- 2 cups sliced mushrooms (shiitake or button)
- 1 cup spinach or bok choy
- 2 green onions, chopped
- 4 soft-boiled eggs
- 1 cup corn kernels (fresh or frozen)
- Nori sheets (seaweed), for garnish
- Sesame seeds, for garnish
- Chili oil (optional), for serving
Cooking Instructions:
- Prepare the Broth: In a large pot, combine the chicken or vegetable broth and water. Bring it to a simmer over medium heat. This will serve as the base for your ramen and provide richness to the dish.
- Mix the Miso: In a small bowl, take a ladle of hot broth and add the miso paste to it. Stir until the miso is fully dissolved. This step guarantees that the miso integrates smoothly into your broth without clumping.
- Combine Broth and Miso: Once the broth is simmering, add the dissolved miso back into the pot. Stir in the soy sauce and sesame oil. Let it simmer for about 5-10 minutes, allowing all the flavors to meld together.
- Cook the Noodles: In a separate pot, bring water to a boil and cook the ramen noodles according to package instructions, usually around 3-4 minutes for fresh noodles. Drain and rinse under cold water to stop the cooking process. This prevents the noodles from becoming mushy.
- Sauté the Vegetables: In a skillet, add a touch of sesame oil and sauté the sliced mushrooms over medium heat until they’re golden and tender, about 5-7 minutes. Add the spinach or bok choy and cook until wilted. This adds depth and texture to your ramen.
- Assemble the Ramen Bowls: Divide the cooked noodles into bowls. Pour the hot miso broth over the noodles. Top each bowl with sautéed mushrooms, wilted greens, corn kernels, and half a soft-boiled egg.
- Garnish and Serve: Finish off each bowl with chopped green onions, nori sheets, sesame seeds, and a drizzle of chili oil if desired. Serve hot and enjoy your hearty miso ramen!
Extra Tips: To enrich the flavor of your ramen, consider adding different toppings such as bamboo shoots, sliced pork, or tofu for a vegetarian option.
Experiment with various types of miso to find your preferred taste, as white miso is milder while red miso has a stronger flavor. Additionally, soft-boiled eggs can be marinated in soy sauce for extra flavor. Prepare all your toppings in advance to make the assembly process quicker and more enjoyable!
Flavorful Chicken Teriyaki
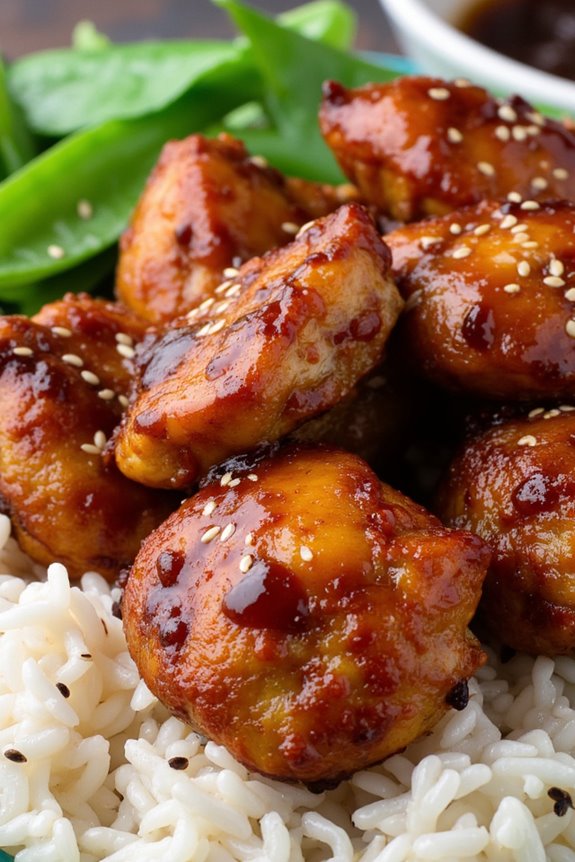
Chicken Teriyaki is a classic Japanese dish that combines the rich flavors of sweet soy sauce and tender chicken. The name “teriyaki” comes from the method of cooking, where the meat is glazed with a mixture of soy sauce, sake, mirin, and sugar, giving it a beautiful glossy finish and a mouthwatering taste.
This dish is perfect for a family dinner or a gathering with friends, as it appeals to a wide range of palates and can be paired with steamed rice and vegetables for a complete meal.
Making Chicken Teriyaki at home is easier than you might think! With just a few simple ingredients and steps, you can create a delicious and satisfying dish that will impress your guests. The marinade not only infuses the chicken with flavor but also helps to keep it juicy and tender as it cooks.
Once you’ve mastered this recipe, you can experiment with different proteins or add your favorite vegetables to the mix, making it a versatile addition to your dinner repertoire.
Ingredients (Serves 4-6):
- 1.5 lbs (680g) boneless, skinless chicken thighs or breasts
- 1/2 cup soy sauce
- 1/4 cup mirin (Japanese sweet rice wine)
- 1/4 cup sake (Japanese rice wine) or water
- 1/4 cup brown sugar
- 1 tablespoon grated fresh ginger
- 2 garlic cloves, minced
- 1 tablespoon vegetable oil
- Sesame seeds for garnish (optional)
- Chopped green onions for garnish (optional)
- Steamed rice and vegetables for serving
Cooking Instructions:
- Prepare the Marinade: In a mixing bowl, combine the soy sauce, mirin, sake, brown sugar, grated ginger, and minced garlic. Whisk the ingredients together until the sugar is dissolved and everything is well blended. This marinade will provide the signature teriyaki flavor to the chicken.
- Marinate the Chicken: Place the chicken thighs or breasts in a resealable plastic bag or a shallow dish. Pour the marinade over the chicken, ensuring each piece is well coated. Seal the bag or cover the dish with plastic wrap and refrigerate for at least 30 minutes, or up to 2 hours for deeper flavor.
- Cook the Chicken: Heat the vegetable oil in a large skillet or frying pan over medium-high heat. Once the oil is hot, remove the chicken from the marinade (reserving the marinade for later) and add it to the pan. Cook the chicken for about 5-7 minutes on each side, or until it reaches an internal temperature of 165°F (75°C) and is golden brown.
- Create the Sauce: After the chicken is cooked, pour the reserved marinade into the skillet. Bring it to a gentle boil, then reduce the heat to low. Let it simmer for about 5 minutes, allowing the sauce to thicken slightly and the flavors to meld.
- Glaze the Chicken: Return the cooked chicken to the skillet, turning it in the sauce to coat evenly. Cook for an additional 2-3 minutes, so the chicken absorbs more flavor and the sauce thickens to a glaze-like consistency.
- Serve: Once the chicken is well coated and the sauce has thickened, remove the skillet from the heat. Slice the chicken into bite-sized pieces and serve it over a bed of steamed rice with your choice of vegetables. Drizzle additional teriyaki sauce from the skillet over the top, and garnish with sesame seeds and chopped green onions if desired.
Extra Tips:
For the best results, try to marinate the chicken for a longer period to enhance the flavor. If you prefer a thicker sauce, you can mix a teaspoon of cornstarch with a tablespoon of water and stir it into the sauce during the simmering step.
Additionally, feel free to customize your Chicken Teriyaki by adding vegetables like bell peppers, broccoli, or snap peas during the cooking process for a more colorful and nutritious dish. Enjoy your homemade Chicken Teriyaki!
Comforting Gyudon (Beef Bowl)
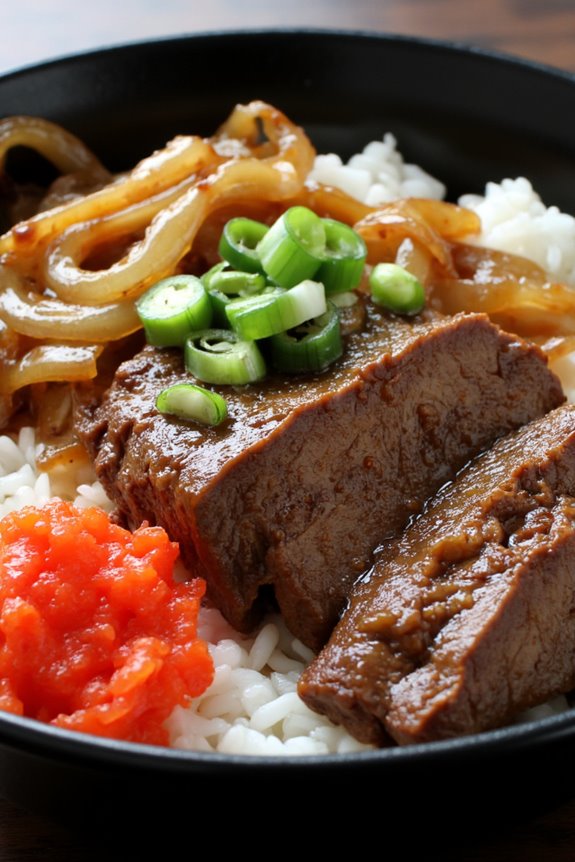
Gyudon, or beef bowl, is a classic Japanese comfort food that features thinly sliced beef simmered in a flavorful sauce made from soy sauce, mirin, and dashi, served over a bed of warm rice. This dish isn’t only quick and easy to prepare but also incredibly satisfying, making it a perfect weeknight dinner option.
With its tender beef and savory sauce, gyudon evokes the warmth and homeliness of Japanese cuisine, providing a comforting meal that’s bound to please the whole family.
To create the perfect gyudon, the key lies in using high-quality ingredients and preparing the beef just right. The meat should be thinly sliced, allowing it to absorb the flavors of the sauce while cooking quickly. Traditionally, gyudon is garnished with pickled ginger and green onions, adding texture and freshness to the dish. This recipe serves 4-6 people, making it an ideal choice for family gatherings or a cozy dinner with friends.
Ingredients (Serves 4-6):
- 1 lb (450g) thinly sliced beef (ribeye or sirloin)
- 2 large onions, thinly sliced
- 4 cups cooked white rice
- 1/2 cup soy sauce
- 1/4 cup mirin
- 1/4 cup dashi stock (or water)
- 2 tablespoons sugar
- 1 tablespoon vegetable oil
- 4-6 green onions, chopped (for garnish)
- Pickled ginger (for garnish)
Cooking Instructions:
- Prepare the rice: Begin by cooking the white rice according to your preferred method (rice cooker, stovetop, etc.). This will typically take about 20-30 minutes, so start this first to guarantee the rice is ready when the beef is done.
- Sauté the onions: In a large skillet or frying pan, heat the vegetable oil over medium heat. Add the thinly sliced onions and sauté for about 5-7 minutes, or until they become soft and translucent. This step helps to enhance the sweetness of the onions, which will complement the savory flavors of the beef.
- Add the beef: Once the onions are cooked, push them to the side of the pan and add the thinly sliced beef to the center. Cook the beef for about 2-3 minutes, stirring occasionally, until it starts to brown. Make sure not to overcrowd the pan; if necessary, cook the beef in batches.
- Make the sauce: In a small bowl, whisk together the soy sauce, mirin, dashi stock, and sugar until the sugar is dissolved. Pour this mixture over the beef and onions in the skillet. Stir everything together, making certain the beef is well-coated in the sauce.
- Simmer: Bring the mixture to a gentle simmer and let it cook for an additional 5-7 minutes. The sauce should reduce slightly, becoming thicker. Taste and adjust seasoning if necessary, adding a bit more soy sauce or sugar as desired.
- Serve: To serve, spoon a generous portion of the beef and onion mixture over a bowl of cooked rice. Garnish with chopped green onions and pickled ginger for added flavor and freshness.
Extra Tips:
When making gyudon, thinly slicing the beef is essential for achieving the right texture. If you’re having trouble slicing it thinly, try freezing the beef for about 30 minutes beforehand; this will firm it up and make it easier to slice.
Additionally, feel free to customize your gyudon by adding toppings such as a soft-boiled egg, sesame seeds, or even some sautéed vegetables for extra nutrition. Enjoy your comforting gyudon!
Savory Okonomiyaki (Japanese Pancake)
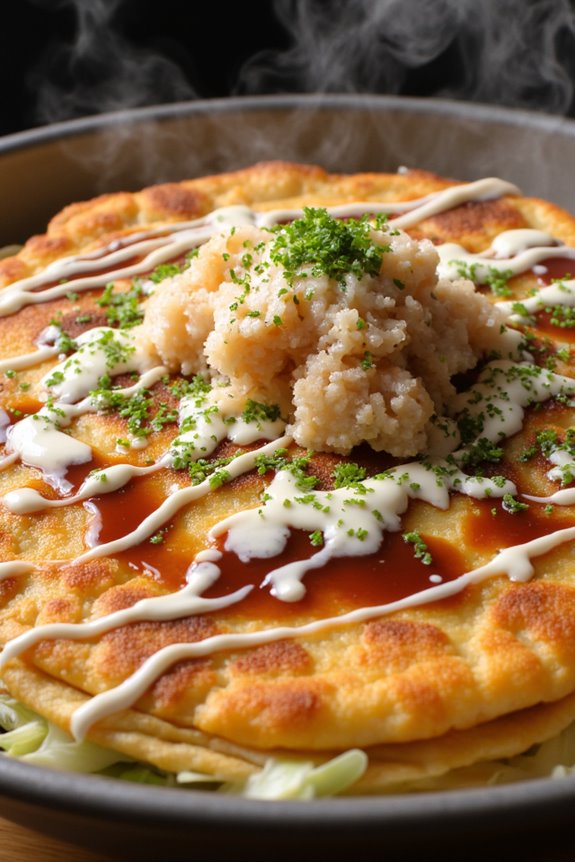
Okonomiyaki, often referred to as a Japanese pancake, is a delightful dish that originated in the streets of Japan and has become a beloved staple of Japanese cuisine. It’s a versatile dish that can be customized with a variety of ingredients, making it a perfect choice for both casual meals and special occasions. The name “okonomiyaki” translates to “grilled as you like it,” which reflects the dish’s adaptable nature.
Typically, it features a batter made from flour, eggs, shredded cabbage, and a variety of proteins and toppings, offering a satisfying blend of flavors and textures. The beauty of okonomiyaki lies in its simplicity and the freedom it gives to home cooks. You can personalize your pancake by adding meats like pork or shrimp, or even keeping it vegetarian with mushrooms and green onions.
Traditionally, these pancakes are cooked on a griddle, but they can also be made in a skillet at home. Once cooked, they’re often topped with a savory okonomiyaki sauce, mayonnaise, bonito flakes, and aonori (seaweed flakes), creating a stunning presentation and a mouthwatering taste that’s sure to captivate.
Ingredients (Serves 4-6):
- 2 cups all-purpose flour
- 1 1/2 cups dashi stock (or water)
- 3 large eggs
- 4 cups finely shredded cabbage
- 1 cup chopped green onions
- 1 cup cooked and chopped pork belly or bacon (optional)
- 1 cup shrimp, peeled and deveined (optional)
- 1/2 cup tenkasu (tempura scraps)
- 1/4 cup pickled ginger, chopped (optional)
- Vegetable oil for frying
- Okonomiyaki sauce (store-bought or homemade)
- Japanese mayonnaise
- Aonori (seaweed flakes)
- Bonito flakes (katsuobushi)
Cooking Instructions:
- Prepare the Batter: In a large mixing bowl, combine the flour and dashi stock (or water) to create a smooth batter. Stir in the eggs and mix until fully incorporated. The batter should be somewhat thick but pourable.
- Add Vegetables and Proteins: Gently fold in the shredded cabbage, green onions, cooked pork belly or bacon (if using), shrimp (if using), tenkasu, and pickled ginger, making certain that all ingredients are evenly distributed throughout the batter.
- Preheat the Cooking Surface: Heat a non-stick skillet or griddle over medium heat and add a drizzle of vegetable oil, making sure the surface is well-coated to prevent sticking.
- Cook the Pancakes: Pour a ladleful of the batter onto the skillet, shaping it into a thick pancake about 1 inch high. Use the back of the ladle to spread it out evenly. Cook for about 4-5 minutes on one side until the bottom is golden brown.
- Flip the Okonomiyaki: Carefully flip the pancake using a spatula. Cook for another 4-5 minutes on the other side. Verify the pancake is cooked through by checking the center; it should feel firm.
- Add Toppings and Serve: Once cooked, transfer the okonomiyaki to a serving plate. Drizzle with okonomiyaki sauce and Japanese mayonnaise, then sprinkle with aonori and bonito flakes for extra flavor and presentation.
- Repeat: Repeat the cooking process with the remaining batter, adding more oil to the skillet as necessary, until all pancakes are cooked.
Extra Tips:
When making okonomiyaki, the key to a great texture is to avoid overmixing the batter once the vegetables and proteins are added; a gentle fold is all it takes to combine the ingredients while preserving some air in the batter.
Additionally, feel free to experiment with different toppings and fillings according to your taste preferences—mushrooms, cheese, or even kimchi can add a unique twist to this traditional dish. For a truly authentic experience, consider using a hotplate to serve the okonomiyaki directly at the table, allowing everyone to customize their own pancakes with additional sauces and toppings.
Warm Udon Noodle Soup

Warm Udon Noodle Soup is a comforting and hearty dish that epitomizes the essence of Japanese cuisine. Udon noodles, known for their thick, chewy texture, are paired with a flavorful broth and a variety of toppings, making it a versatile and satisfying meal. This dish is perfect for chilly evenings or when you need a quick, nourishing option that’s easy to prepare. The beauty of this soup lies not only in its taste but also in its ability to bring warmth and comfort with each slurp.
The soup can be customized with various ingredients, allowing you to experiment with flavors and textures. Traditional toppings include scallions, mushrooms, and tofu, but feel free to add your favorite protein or vegetables. With a simple yet delicious broth made from dashi, soy sauce, and mirin, you’ll find that this Warm Udon Noodle Soup isn’t just a meal but an experience that brings the rich culinary heritage of Japan right into your kitchen.
Ingredients (serving size: 4-6 people):
- 1 pound udon noodles
- 6 cups dashi broth (can be store-bought or homemade)
- 1/4 cup soy sauce
- 2 tablespoons mirin
- 1 tablespoon sesame oil
- 1 cup sliced shiitake mushrooms
- 1 cup baby bok choy, chopped
- 1 cup green onions, sliced
- 1 block (14 oz) firm tofu, cubed
- 2 large eggs (optional)
- Nori sheets, cut into strips (for garnish)
- Sesame seeds (for garnish)
Cooking Instructions:
- Cook the Udon Noodles: Begin by boiling a large pot of water. Add the udon noodles and cook according to the package instructions, typically about 8-10 minutes, until they’re tender but still chewy. Drain the noodles and set them aside.
- Prepare the Broth: In a large pot, combine the dashi broth, soy sauce, mirin, and sesame oil. Bring the mixture to a gentle simmer over medium heat. This flavorful base will infuse the udon with rich umami notes.
- Add the Vegetables and Tofu: Once the broth is simmering, add the sliced shiitake mushrooms, chopped bok choy, and cubed tofu to the pot. Allow the mixture to simmer for about 5-7 minutes, or until the vegetables are tender and the tofu is heated through.
- Cook the Eggs (Optional): If you’d like to add eggs, crack them into a separate small bowl and gently slide them into the simmering broth, one at a time. Let them cook for about 3-4 minutes, or until the whites are set but the yolks remain runny. Alternatively, you can poach the eggs separately and add them later.
- Combine and Serve: Divide the cooked udon noodles among serving bowls. Ladle the hot broth and vegetable-tofu mixture over the noodles. Top each bowl with sliced green onions, nori strips, and a sprinkle of sesame seeds for garnish. Serve immediately while hot.
- Enjoy Your Creation: Invite family and friends to enjoy this delightful Warm Udon Noodle Soup together. The communal aspect of sharing a bowl can enhance the experience of this delicious dish.
Extra Tips:
When preparing Warm Udon Noodle Soup, feel free to get creative with your toppings. Fresh herbs like cilantro or basil can add a new dimension of flavor, while sliced carrots or snow peas can provide additional crunch.
If you prefer a spicier kick, consider adding a drizzle of chili oil or a sprinkle of shichimi togarashi. Finally, remember that the broth can be made in advance and stored in the refrigerator, making this an excellent option for meal prep or busy weeknights.
Satisfying Salmon Donburi
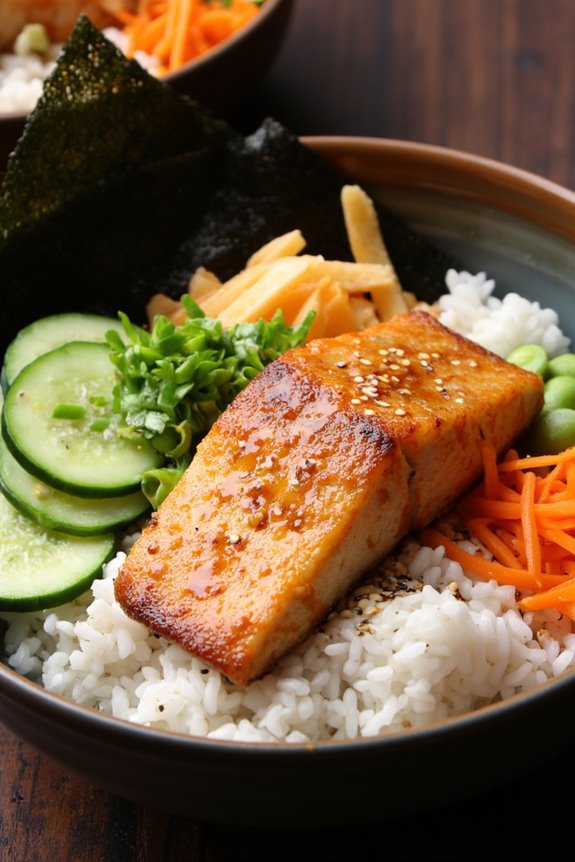
Satisfying Salmon Donburi is a delightful Japanese dish that combines succulent salmon with perfectly steamed rice, topped with fresh vegetables and a savory sauce. This meal isn’t only visually appealing but also incredibly fulfilling, making it an ideal dish for a family dinner or when entertaining guests. The flavors of the salmon pair wonderfully with the umami-rich sauce, while the colorful vegetables add a revitalizing crunch.
This dish is versatile and can be tailored to your taste preferences. Whether you prefer your salmon grilled, pan-seared, or baked, the Satisfying Salmon Donburi can accommodate various cooking methods. The combination of textures and flavors makes every bite an enjoyable experience, ensuring that this meal will become a favorite in your home.
Ingredients (Serves 4-6)
- 4 salmon fillets (about 6 ounces each)
- 3 cups of cooked Japanese short-grain rice
- 1 cup of sliced cucumbers
- 1 cup of shredded carrots
- 1 cup of edamame (shelled)
- 4 green onions, finely chopped
- 1 tablespoon sesame oil
- 4 tablespoons soy sauce
- 2 tablespoons mirin
- 1 tablespoon rice vinegar
- 1 tablespoon honey or sugar
- Sesame seeds for garnish
- Seaweed strips (nori) for garnish
Cooking Instructions
- Prepare the Rice: Begin by cooking the Japanese short-grain rice according to the package instructions. Rinse the rice under cold water until the water runs clear, then soak it for about 30 minutes. Cook the rice in a rice cooker or on the stovetop, following the instructions for your specific method. Once cooked, set it aside to keep warm.
- Prepare the Salmon: While the rice is cooking, season the salmon fillets with salt and pepper. Heat a non-stick skillet over medium heat and add the sesame oil. Once hot, place the salmon fillets skin-side down in the skillet. Cook for about 4-5 minutes, then carefully flip the salmon and cook for an additional 3-4 minutes or until the salmon is cooked through and flakes easily with a fork.
- Make the Sauce: In a small bowl, whisk together the soy sauce, mirin, rice vinegar, and honey (or sugar). This will create a delicious umami-packed sauce that will enhance the flavors of the salmon and vegetables.
- Prepare the Vegetables: While the salmon is cooking, prepare the vegetables. Slice the cucumbers, shred the carrots, and cook the edamame according to the package instructions. If you prefer, you can also blanch the carrots for a couple of minutes to soften them slightly.
- Assemble the Donburi: To assemble the bowls, start with a generous scoop of the warm rice at the bottom of each serving bowl. Place a salmon fillet on top of the rice. Arrange the cucumbers, carrots, and edamame around the salmon. Drizzle the prepared sauce over the top and sprinkle with chopped green onions and sesame seeds. Add seaweed strips for an additional touch.
- Serve: Serve the Satisfying Salmon Donburi immediately while the rice and salmon are warm. Enjoy this hearty and nutritious meal with your family or friends.
Extra Tips
When cooking Satisfying Salmon Donburi, feel free to customize the toppings based on seasonal vegetables or your personal preferences. You can also add pickled ginger or radish for an extra zing.
If you want to enhance the flavor of your salmon, marinating it in the sauce for 15-30 minutes before cooking can elevate the taste. Finally, consider serving a side of miso soup or pickles to complete the Japanese dining experience.
Delicious Tonkatsu (Breaded Pork Cutlet)

Tonkatsu is a beloved Japanese dish that features a breaded and deep-fried pork cutlet, typically served with shredded cabbage, rice, and a tangy tonkatsu sauce. This dish isn’t only satisfying but also a fantastic way to enjoy tender, juicy pork with a crispy exterior. The combination of textures and flavors makes tonkatsu a popular choice for both casual meals and special occasions.
To make the perfect tonkatsu, the key is to use high-quality pork loin or pork fillet, which will guarantee a tender and flavorful cutlet. The breading process is equally important, as it creates the crunchy crust that contrasts beautifully with the soft meat inside. Once cooked, tonkatsu is often accompanied by a drizzle of tonkatsu sauce, which adds a sweet and savory element to the dish. Let’s explore the ingredients and steps needed to create this delicious meal for 4-6 people.
Ingredients:
- 1 ½ pounds pork loin or pork fillet, cut into ½-inch thick cutlets
- Salt and pepper, to taste
- 1 cup all-purpose flour
- 2 large eggs, beaten
- 2 cups panko breadcrumbs
- Vegetable oil, for frying
- Tonkatsu sauce, for serving
- Shredded cabbage, for garnish
- Cooked white rice, for serving (optional)
Cooking Instructions:
- Prepare the Pork Cutlets: Start by placing the pork cutlets between two pieces of plastic wrap. Use a meat mallet or rolling pin to gently pound them to an even thickness of about ½ inch. This helps to tenderize the meat and guarantees even cooking. Season both sides of the cutlets with salt and pepper.
- Set Up the Breading Station: In three separate shallow dishes, place the all-purpose flour in the first, the beaten eggs in the second, and the panko breadcrumbs in the third. This setup will allow you to coat the pork cutlets sequentially, ensuring an even layer of breading.
- Bread the Cutlets: Take one pork cutlet and first coat it in the flour, shaking off any excess. Next, dip it into the beaten eggs, ensuring it’s fully coated. Finally, place the cutlet in the panko breadcrumbs and press down gently to adhere the breadcrumbs well. Repeat this process for all the cutlets.
- Heat the Oil: In a large, deep skillet or frying pan, pour in enough vegetable oil to cover the bottom of the pan by about ½ inch. Heat the oil over medium-high heat until it reaches around 350°F (175°C). You can test the oil’s readiness by dropping a small piece of panko in; it should sizzle and bubble immediately.
- Fry the Cutlets: Carefully add the breaded pork cutlets to the hot oil, being mindful not to overcrowd the pan. Fry for about 4-5 minutes on each side, or until they’re golden brown and cooked through. Use tongs to flip the cutlets halfway through for even cooking.
- Drain and Serve: Once cooked, transfer the tonkatsu to a paper towel-lined plate to drain excess oil. Allow them to rest for a few minutes before slicing them into strips. Serve with shredded cabbage, a side of cooked rice, and a generous drizzle of tonkatsu sauce over the cutlets.
Extra Tips:
To elevate your tonkatsu experience, consider making a homemade tonkatsu sauce by mixing ketchup, Worcestershire sauce, soy sauce, and a hint of sugar.
Additionally, make sure that your oil is at the right temperature when frying, as this will help achieve that perfect crispy texture without making the cutlets greasy.
Finally, serving tonkatsu with a side of pickled vegetables can add a delightful contrast and enhance the overall meal. Enjoy your cooking!
Cozy Chawanmushi (Savory Egg Custard)
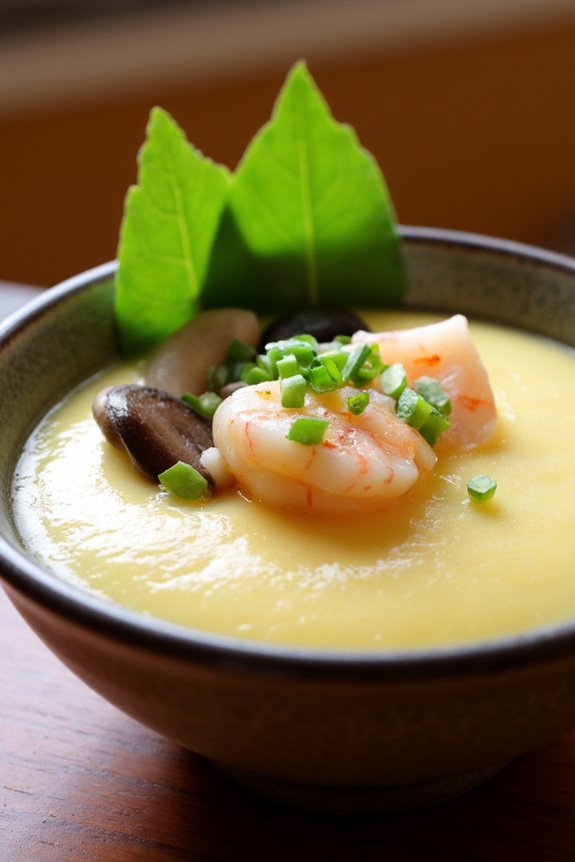
Chawanmushi is a traditional Japanese dish that showcases the delicate art of Japanese cooking. This savory egg custard is typically served warm in a small cup, making it a perfect comfort food for chilly evenings. The name “chawanmushi” translates to “steamed in a tea bowl,” which reflects the cooking method used to create this silky and smooth custard.
The dish is versatile, allowing for a variety of ingredients to be incorporated, such as seafood, vegetables, and mushrooms, which lend their flavors to the custard. Making chawanmushi is a delightful experience that brings together simple ingredients to create a heartwarming dish.
The key to achieving the perfect texture is to guarantee that the egg mixture is well-strained and gently steamed. This results in a custard that isn’t only creamy but also infused with umami flavors. Whether enjoyed as part of a larger Japanese meal or as a standalone dish, chawanmushi is sure to impress.
Ingredients (serving size: 4-6 people)
- 4 large eggs
- 2 cups dashi stock (can be made from instant dashi powder)
- 2 tablespoons soy sauce
- 1 tablespoon mirin
- 1/2 teaspoon salt
- 1/2 cup cooked chicken, diced
- 1/2 cup shiitake mushrooms, sliced
- 1/2 cup green onions, finely chopped
- 1/2 cup shrimp, peeled and deveined
- Optional: mitsuba or parsley for garnish
Cooking Instructions
- Prepare the Dashi Stock: If you’re making your own dashi stock, combine water with kombu (dried kelp) and bonito flakes in a pot. Bring to a simmer, then remove from heat and strain. Alternatively, use instant dashi powder mixed with water according to package instructions.
- Mix the Egg Mixture: In a large mixing bowl, gently whisk together the eggs, dashi stock, soy sauce, mirin, and salt. Be careful not to create too many bubbles, as this can affect the smooth texture of the custard.
- Strain the Mixture: Pour the egg mixture through a fine mesh strainer into another bowl or jug. This step removes any lumps or bubbles, guaranteeing a silky-smooth custard.
- Prepare the Steaming Cups: In each cup or small bowl, place a portion of the diced chicken, sliced shiitake mushrooms, green onions, and shrimp. Distribute the ingredients evenly among the cups.
- Add the Egg Mixture: Carefully pour the strained egg mixture over the ingredients in each cup, filling them about 80% full. Leave some space at the top to allow for expansion during steaming.
- Steam the Custard: Set up a steamer pot or a large pot with a steaming rack. Fill it with water to a depth that doesn’t touch the cups. Bring the water to a gentle simmer, then cover the pot with a lid. Steam the custards for about 15-20 minutes, or until the custard is set but still soft in the center. You can check for doneness by inserting a skewer; it should come out clean.
- Serve: Once cooked, carefully remove the cups from the steamer and let them cool slightly. Garnish with mitsuba or parsley if desired, and serve warm.
Extra Tips
To achieve the most delicate texture for your chawanmushi, take care when whisking the eggs; you want to incorporate the ingredients without introducing too much air.
Steaming over too high of a heat can lead to a curdled texture, so guarantee your pot maintains a gentle simmer. Additionally, feel free to customize the ingredients based on your preferences or what you have on hand; other protein options, such as tofu or fish, can be delicious additions.
Enjoy this comforting dish as part of your Japanese dinner experience!
Flavorful Nikujaga (Meat and Potato Stew)
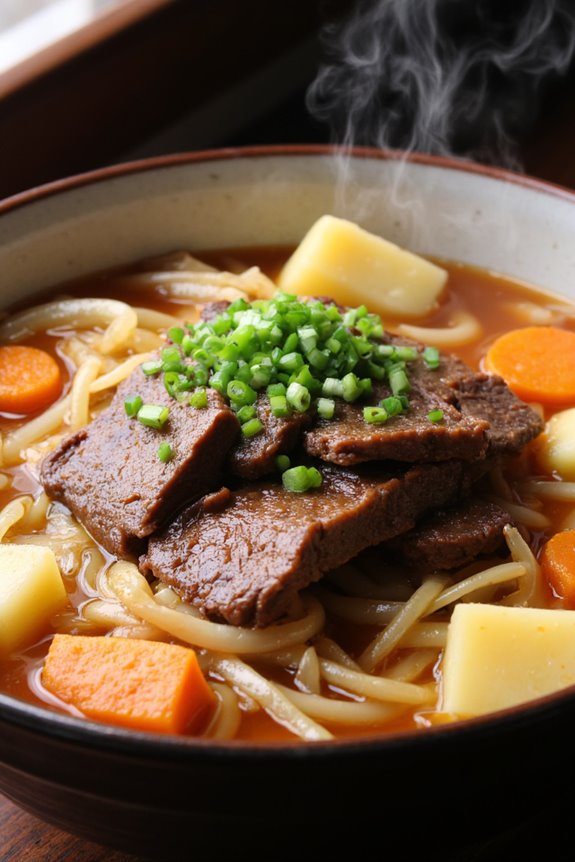
Nikujaga is a beloved Japanese comfort food that combines thinly sliced beef, potatoes, and onions in a sweet-savory broth. This hearty dish is perfect for family dinners, as it not only warms the soul but also brings everyone together around the table. Traditionally made with simple, wholesome ingredients, Nikujaga is easy to prepare and offers a delightful flavor profile that showcases the essence of home-cooked Japanese cuisine.
The dish gets its name from the Japanese words “niku” meaning meat and “jaga” derived from “jagaimo,” which means potato. The key to achieving the perfect Nikujaga lies in the balance of flavors from soy sauce, sugar, and mirin, which infuses the ingredients with a delightful, slightly sweet, and umami-rich taste. As the ingredients simmer together, the broth thickens and coats the meat and vegetables, creating a comforting stew that’s sure to satisfy your appetite.
Ingredients for Nikujaga (Serves 4-6):
- 300g (10.5 oz) thinly sliced beef (preferably ribeye or sirloin)
- 4 medium potatoes, peeled and cut into chunks
- 1 large onion, sliced
- 2 medium carrots, peeled and sliced
- 2 tablespoons vegetable oil
- 3 cups dashi broth (or water)
- 4 tablespoons soy sauce
- 2 tablespoons mirin
- 2 tablespoons sugar
- Salt and pepper to taste
- Chopped green onions (for garnish, optional)
Cooking Instructions:
- Prepare the Ingredients: Start by peeling and chopping the potatoes and carrots into bite-sized pieces. Slice the onion thinly and set aside. Make sure to have your beef ready, separated into smaller pieces if necessary.
- Sauté the Beef: In a large pot or deep skillet, heat the vegetable oil over medium heat. Once hot, add the sliced beef and cook it until it’s browned, stirring frequently. This step adds flavor to the dish and helps to sear the meat.
- Add the Onions: Once the beef is browned, add the sliced onions to the pot. Sauté them together with the beef for about 3-4 minutes or until the onions become translucent and fragrant.
- Incorporate the Vegetables: Add the potatoes and carrots to the pot. Stir everything together, ensuring that the vegetables are coated with the oil and juices from the beef.
- Pour in the Broth: Carefully pour in the dashi broth (or water) to cover the ingredients. Bring the mixture to a boil over high heat. Once boiling, reduce the heat to low to let it simmer.
- Season the Stew: Add the soy sauce, mirin, and sugar to the pot. Stir well to combine all the flavors. Allow the stew to simmer for about 20-30 minutes, or until the potatoes and carrots are tender. This simmering process allows the flavors to meld beautifully.
- Taste and Adjust: After the vegetables are cooked, taste the stew and adjust the seasoning if necessary. Add salt and pepper according to your preference.
- Serve: Once everything is cooked through, ladle the Nikujaga into bowls. Garnish with chopped green onions if desired, and serve hot with steamed rice.
Extra Tips:
To enhance the flavors of Nikujaga, consider marinating the beef in a bit of soy sauce and mirin for about 30 minutes before cooking. This extra step can bring even more depth to the dish.
Additionally, feel free to customize the vegetables according to what you have on hand; mushrooms or green beans can also make a great addition. For a richer flavor, you can substitute part of the water with a good-quality dashi stock. Enjoy your delicious Nikujaga!
Tasty Yakisoba (Fried Noodles)

Yakisoba is a beloved Japanese street food that features stir-fried noodles tossed with a medley of fresh vegetables and flavored with a savory, tangy sauce. Traditionally made with wheat noodles, this dish isn’t only satisfying but also incredibly versatile, allowing for a variety of proteins and vegetables based on personal preference.
The rich umami flavor of the sauce combined with the crunchy texture of the vegetables creates a delicious and hearty meal perfect for family gatherings or weeknight dinners.
In this recipe, we’ll prepare a delicious Yakisoba that serves 4-6 people, featuring tender yakisoba noodles, colorful vegetables, and your choice of protein. Whether you prefer chicken, pork, or tofu, this dish can be customized to suit your taste. With a few simple steps, you can bring the flavors of Japan right to your kitchen and enjoy a delightful homemade meal.
Ingredients:
- 12 oz yakisoba noodles (or ramen noodles)
- 2 tablespoons vegetable oil
- 1 cup sliced cabbage
- 1 cup sliced bell peppers (any color)
- 1 cup bean sprouts
- 1 medium onion, sliced
- 2 cloves garlic, minced
- 1 cup protein of choice (chicken, pork, or tofu)
- 4 tablespoons yakisoba sauce (or tonkatsu sauce)
- 1 tablespoon soy sauce
- Optional toppings: sliced green onions, pickled ginger, sesame seeds
Cooking Instructions:
- Prepare the Noodles: If using fresh yakisoba noodles, they may be ready to use straight from the package. If using dried noodles, cook according to package instructions until al dente, then drain and set aside. Rinse with cold water to stop the cooking process.
- Heat the Oil: In a large frying pan or wok, heat the vegetable oil over medium-high heat. Confirm the oil is hot enough that it shimmers, which will help to achieve a nice stir-fry.
- Cook the Protein: Add your choice of protein to the pan. Stir-fry until the protein is cooked through and has a nice golden color. This should take about 5-7 minutes. Remove the protein from the pan and set aside.
- Sauté the Vegetables: In the same pan, add the sliced onion and minced garlic. Stir-fry for about 1-2 minutes until fragrant. Then, add the cabbage and bell peppers, continuing to stir-fry for another 3-4 minutes until the vegetables are tender but still crisp.
- Combine Ingredients: Return the cooked protein to the pan with the vegetables. Add the cooked noodles, bean sprouts, yakisoba sauce, and soy sauce. Toss everything together gently to confirm the noodles and vegetables are evenly coated with the sauce. Cook for an additional 2-3 minutes, stirring frequently to heat through.
- Serve: Once everything is heated, remove from heat. Serve the yakisoba hot, garnished with green onions, pickled ginger, and sesame seeds if desired.
Extra Tips:
For an authentic Yakisoba experience, consider making your own yakisoba sauce by mixing Worcestershire sauce, soy sauce, ketchup, and a hint of sugar to taste.
You can also experiment with different vegetables such as carrots, mushrooms, or zucchini for added texture and flavor. If you prefer a spicier kick, feel free to add some chili paste or sriracha during the cooking process. Enjoy your homemade yakisoba!
Rich Curry Rice

Rich Curry Rice is a beloved dish in Japan, where the traditional curry has been adapted to include a delightful blend of flavors that cater to various palates. This hearty dish features a thick, savory sauce made from a mix of spices, vegetables, and protein, served over a bed of fluffy rice. It’s not only comforting but also versatile, allowing for various ingredients based on your preferences or what you have on hand.
Making Rich Curry Rice is a simple yet rewarding process, perfect for family dinners or gatherings. The combination of aromatic spices, tender meat, and fresh vegetables creates a meal that’s both satisfying and flavorful. Whether you’re a seasoned home cook or a beginner looking to try your hand at Japanese cuisine, this recipe is sure to impress.
Ingredients (Serves 4-6):
- 2 cups of Japanese short-grain rice
- 1 pound of chicken thighs or beef (cubed)
- 1 large onion (finely sliced)
- 2 medium carrots (sliced)
- 2 medium potatoes (cubed)
- 3 cloves of garlic (minced)
- 1 tablespoon of ginger (grated)
- 4 cups of water or chicken broth
- 1 package of Japanese curry roux (mild, medium, or hot depending on preference)
- 2 tablespoons of vegetable oil
- Salt and pepper to taste
- Optional: green peas or other vegetables for added nutrition
Cooking Instructions:
- Prepare the Rice: Rinse the short-grain rice under cold water until the water runs clear to remove excess starch. Drain it well and then cook it according to your rice cooker instructions or on the stovetop, using a 1:1.2 rice-to-water ratio. Once done, set aside and keep warm.
- Sauté the Aromatics: In a large pot or deep skillet, heat the vegetable oil over medium heat. Add the finely sliced onion and sauté until it becomes translucent and fragrant, about 5 minutes. This step builds a flavorful base for your curry.
- Brown the Meat: Add the cubed chicken or beef to the pot. Season with salt and pepper. Cook until the meat is browned on all sides, which should take about 5-7 minutes. This step adds depth to the dish by enhancing the meat’s flavor.
- Add the Vegetables: Toss in the sliced carrots, cubed potatoes, minced garlic, and grated ginger. Stir well to combine and cook for another 3-4 minutes, allowing the vegetables to start softening.
- Simmer the Curry: Pour in the water or chicken broth, ensuring all ingredients are submerged. Bring the mixture to a boil, then reduce to a simmer. Cover and cook for about 15-20 minutes, or until the vegetables are tender and the meat is cooked through.
- Incorporate the Curry Roux: Break the curry roux into pieces and add it to the pot, stirring until fully dissolved. Let it simmer for an additional 10 minutes, uncovered, until the sauce thickens to your desired consistency.
- Serve: Taste and adjust seasoning if necessary. Serve the rich curry over a generous scoop of warm rice. Optionally, garnish with green peas or any other vegetables you like.
Extra Tips:
When preparing Rich Curry Rice, feel free to customize it based on your dietary preferences or what you have available. You can substitute the protein with tofu for a vegetarian version or add in seasonal vegetables for added flavor and nutrition.
Additionally, letting the curry sit for a few hours or even overnight can enhance the flavors even more, making it a great dish for meal prep. Enjoy your culinary adventure into Japanese cuisine!
Classic Shabu-Shabu (Hot Pot)
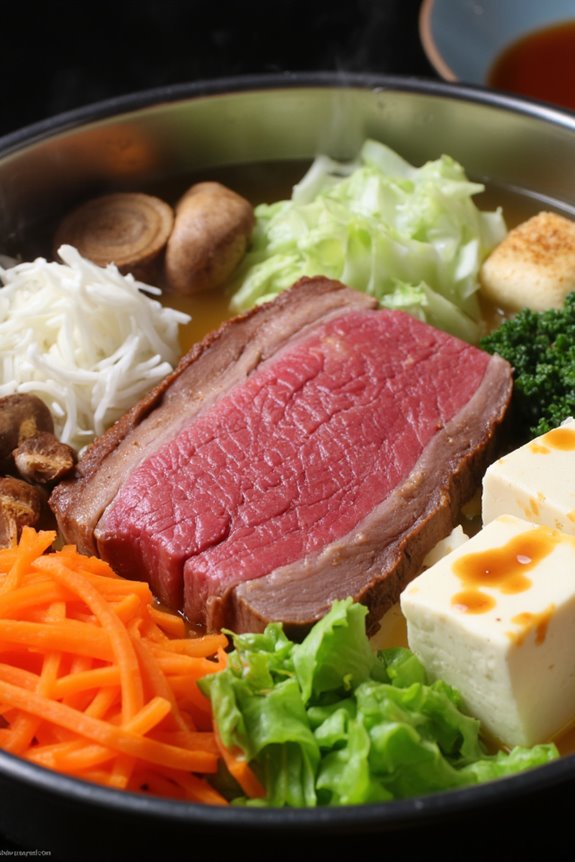
Shabu-Shabu is a traditional Japanese hot pot dish that’s perfect for gatherings and family meals. This interactive dining experience involves cooking thinly sliced meat and fresh vegetables in a flavorful broth right at the table. The name “shabu-shabu” translates to “swish-swish,” which refers to the motion of swishing the ingredients in the hot broth. The dish isn’t only delicious but also allows diners to customize their meal according to their tastes.
To enjoy the full experience of shabu-shabu, it’s crucial to use quality ingredients and a good broth. The basic components include thinly sliced beef or pork, a selection of fresh vegetables, and a dipping sauce like ponzu or sesame sauce. The beauty of shabu-shabu is in its simplicity; just gather your ingredients, heat the broth, and let everyone have fun cooking their meal right at the table.
Ingredients (Serves 4-6 People):
- 1 lb thinly sliced beef (ribeye or sirloin)
- 1 lb thinly sliced pork (shoulder or belly)
- 6 cups dashi broth (can be homemade or store-bought)
- 1 cup of napa cabbage, chopped
- 1 cup of shiitake mushrooms, sliced
- 1 cup of enoki mushrooms, trimmed
- 1 cup of carrots, julienned
- 1 cup of tofu, cut into cubes
- 1 cup of green onions, cut into 2-inch pieces
- 1 cup of bok choy, chopped
- Ponzu sauce or sesame sauce for dipping
- Cooked rice, for serving
Cooking Instructions:
- Prepare the Broth: In a large pot, heat the dashi broth over medium heat until it reaches a gentle simmer. This will be the base for your shabu-shabu and should be flavorful, so if using store-bought broth, consider enhancing it with a bit of soy sauce or mirin to taste.
- Slice the Ingredients: If not pre-sliced, verify that your meat is cut into thin slices for quick cooking. Also, prepare all your vegetables: chop the napa cabbage, slice the mushrooms, julienne the carrots, and cut the tofu into cubes. Arranging these ingredients neatly on a platter will make the cooking process more enjoyable.
- Set the Table: Place the pot of simmering broth in the center of the dining table along with the platter of sliced meat and vegetables. Provide each diner with chopsticks and small bowls for their dipping sauce.
- Cooking the Ingredients: Each person can use their chopsticks to swish the meat and vegetables in the hot broth. The thinly sliced meat should only take about 10-20 seconds to cook, while the vegetables may take a little longer depending on their size and type.
- Dipping and Enjoying: Once cooked, diners can lift the ingredients from the broth and dip them into ponzu or sesame sauce before enjoying. Encourage everyone to mix and match the ingredients to create their perfect bite.
- Serve with Rice: Offer cooked rice on the side to complement the meal. The rice can be used to soak up the flavorful broth at the end of the meal.
Extra Tips:
To enhance your shabu-shabu experience, consider adding a variety of dipping sauces or garnishes such as grated daikon, chopped scallions, or chili paste for an extra kick.
Additionally, encourage guests to try different combinations of meat and vegetables to discover new flavor profiles. Keeping the broth simmering throughout the meal guarantees that everyone can cook their ingredients to their desired doneness, resulting in a fun and interactive dining experience.