

As a mom, I’m always on the lookout for fun ways to make mealtime exciting for my little ones. Japanese cuisine is perfect for this, with its vibrant colors and creative dishes that bring joy to the kitchen. From assembling colorful sushi rolls to crafting whimsical bento boxes, these recipes not only please picky eaters but also promote healthy eating habits. Ready to explore some playful and delicious options that will brighten up your family’s meals? Let’s check out these 14 delightful recipes!
Colorful Sushi Rolls
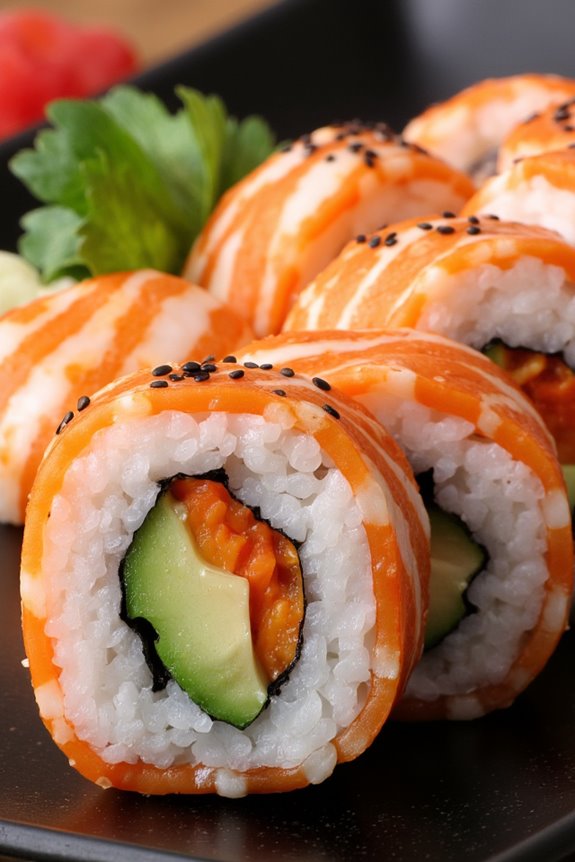
Making sushi at home can be a fun and creative activity for kids and their parents. Colorful sushi rolls aren’t only delicious but also visually appealing, making them perfect for little ones who may be more inclined to try new foods when they look exciting. This recipe allows children to explore their culinary skills while practicing fine motor skills through rolling and assembling the ingredients. Plus, you can customize the fillings to suit your family’s taste preferences!
In this recipe, kids will learn how to prepare sushi rice and roll colorful ingredients inside nori sheets, creating vibrant sushi rolls. This dish is a great way to introduce children to Japanese cuisine while encouraging them to eat healthy ingredients like vegetables and fish. As they create their own sushi rolls, they can experiment with different color combinations and fillings, making every roll unique and delicious.
Ingredients (serving size: 4-6 people)
- 2 cups sushi rice
- 2 ½ cups water
- ¼ cup rice vinegar
- 2 tablespoons sugar
- 1 teaspoon salt
- 4 sheets nori (seaweed)
- 1 small cucumber, thinly sliced
- 1 small carrot, julienned
- 1 avocado, sliced
- ½ pound cooked shrimp or imitation crab (optional)
- 2 tablespoons sesame seeds (optional)
- Soy sauce for dipping
- Pickled ginger for serving (optional)
Cooking Instructions
- Prepare the Sushi Rice: Rinse the sushi rice under cold water until the water runs clear. This helps remove excess starch. In a pot, combine the rinsed rice and water. Bring it to a boil over medium heat, then reduce to low, cover, and simmer for about 20 minutes or until the water is absorbed. Remove from heat and let sit for 10 minutes.
- Season the Rice: In a small saucepan, combine rice vinegar, sugar, and salt. Heat gently until the sugar dissolves. Once the sushi rice has rested, transfer it to a large bowl and gently mix in the vinegar mixture using a spatula. Allow the rice to cool to room temperature.
- Prepare the Fillings: While the rice is cooling, prepare your fillings. Thinly slice the cucumber, julienne the carrot, and slice the avocado. If using shrimp or imitation crab, cut it into strips. Arrange your fillings in an easily reachable spot.
- Assemble the Sushi Rolls: Place a bamboo sushi mat on a clean surface. Lay a sheet of nori shiny side down on the mat. Moisten your hands with water to prevent the rice from sticking, and take a handful of sushi rice (about ¾ cup) and spread it evenly over the nori, leaving a 1-inch border at the top edge.
- Add Fillings: Lay your desired fillings (cucumber, carrot, avocado, and shrimp or crab) in a line across the center of the rice. You can sprinkle sesame seeds over the fillings for extra flavor.
- Roll the Sushi: Starting from the bottom edge of the mat, carefully lift and roll the sushi away from you, tucking the fillings inside. Roll tightly but not too tight, as you don’t want to squeeze the fillings out. Use the mat to shape the roll into a round form. Wet the top edge of the nori with a bit of water to seal the roll.
- Slice and Serve: Using a sharp knife, slice the roll into 6-8 pieces. Wipe the knife with a damp cloth between cuts to guarantee clean slices. Arrange the sushi rolls on a plate and serve with soy sauce and pickled ginger.
Extra Tips
When making colorful sushi rolls, feel free to get creative with the fillings! You can use a variety of vegetables, fruits, or proteins to make them more enticing. For added fun, consider incorporating some edible colors or even using brightly colored rice by mixing in food coloring.
Always supervise children when using sharp knives and confirm that all ingredients are safe for them to eat. Enjoy the process of making sushi together and don’t forget to taste-test each creation!
Whimsical Bento Boxes
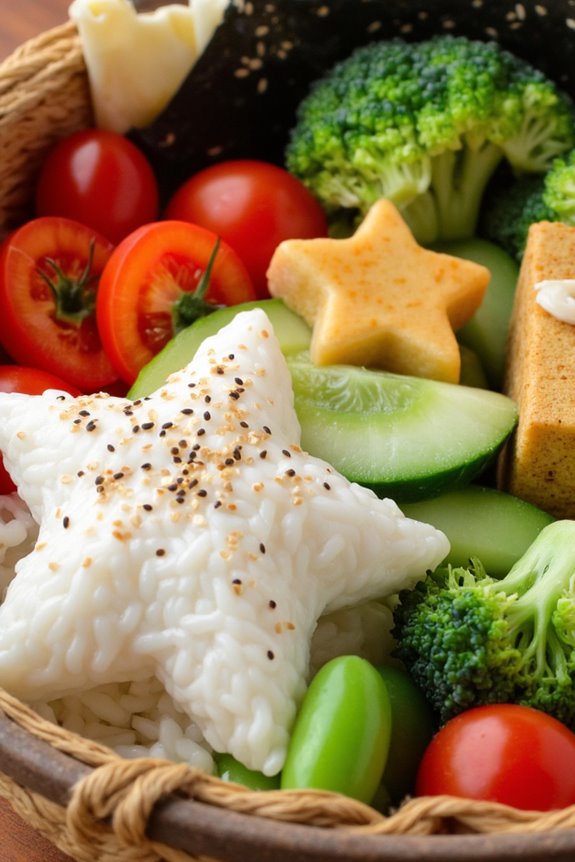
Creating whimsical bento boxes is a fun way to introduce kids to the joys of Japanese cuisine while encouraging healthy eating habits. These colorful lunch boxes can be filled with a variety of ingredients, making them not only visually appealing but also nutritious. The best part is that you can personalize the bento boxes according to your child’s preferences, incorporating their favorite proteins, vegetables, and grains. This interactive experience allows kids to explore flavors and shapes, making mealtime exciting.
Bento boxes aren’t just a meal; they’re a creative outlet for both kids and parents. By using cookie cutters to shape rice, vegetables, and fruits into fun designs, you can transform a simple lunch into an imaginative feast. In this recipe, we’ll guide you through the steps to create a delightful bento box that brings together tasty ingredients while also being a feast for the eyes. Gather your ingredients, release your creativity, and enjoy assembling these whimsical bento boxes together.
Ingredients (serving size: 4-6 people):
- 2 cups of cooked Japanese short-grain rice
- 1 cup of cooked and seasoned edamame
- 1 cup of cherry tomatoes
- 1 cup of cucumber, sliced into fun shapes
- 1 cup of cooked chicken or tofu, cut into bite-sized pieces
- 1 cup of steamed broccoli florets
- 1/2 cup of nori (seaweed) sheets
- 1/4 cup of soy sauce (for dipping)
- 1/4 cup of sesame seeds
- 2 tablespoons of pickled ginger (optional)
- 1-2 tablespoons of food-safe edible markers (for decoration)
Cooking Instructions:
- Prepare the Rice: Start by cooking the Japanese short-grain rice according to package instructions. Once cooked, let it cool slightly before shaping it. You can use a sushi mold or your hands to form the rice into fun shapes like hearts or stars.
- Cook the Protein: If you’re using chicken, grill or sauté it until fully cooked. For tofu, cube it and pan-fry until golden brown. Season with a little soy sauce or teriyaki sauce for added flavor. Allow it to cool before adding it to the bento box.
- Cut the Vegetables: Using cookie cutters, slice the cucumber into fun shapes. For the broccoli, simply steam it until tender but still bright green. The cherry tomatoes can be left whole or cut in half for easier eating.
- Assemble the Bento Boxes: Begin by placing a scoop of the shaped rice in one section of each bento box. Next, arrange the chicken or tofu, edamame, broccoli, cherry tomatoes, and cucumber in separate sections to create a colorful display.
- Add Decorative Touches: Cut the nori sheets into playful shapes or characters and place them on top of the rice. You can also use food-safe edible markers to draw faces or designs on the nori or rice to make it even more whimsical.
- Serve with Dipping Sauce: Place a small container of soy sauce in the bento box for dipping. Sprinkle sesame seeds over the vegetables and proteins for added texture and flavor. Add pickled ginger if desired for a zesty kick.
Extra Tips:
When preparing whimsical bento boxes, involve your kids in the process. Let them choose their favorite ingredients and help with the assembly to make the experience more enjoyable.
You can also set a theme for the bento box based on colors or characters to make it even more engaging. Keep in mind that presentation is key; use vibrant ingredients and playful shapes to capture your child’s imagination.
Finally, try to vary the ingredients weekly to keep mealtime exciting and introduce different flavors and textures.
Teriyaki Chicken Skewers
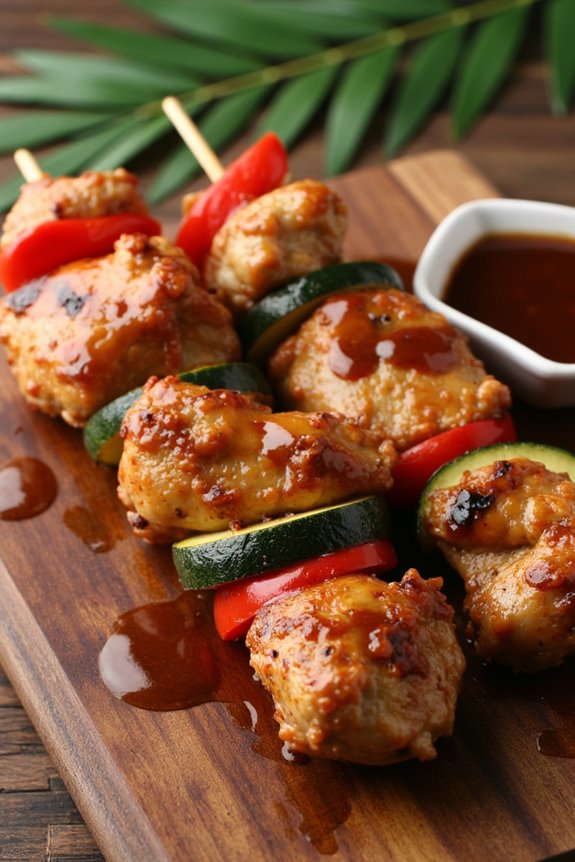
Teriyaki Chicken Skewers are a delightful dish that combines the sweetness of teriyaki sauce with the savory flavor of grilled chicken, making it a perfect choice for kids and adults alike.
These skewers aren’t only fun to eat but also allow little hands to help in the kitchen, making it an excellent family activity. Plus, the vibrant colors and delicious aroma will have everyone at the dinner table in no time!
This dish can be customized with various vegetables and can be served with rice or noodles for a complete meal. The marinade is easy to prepare and gives the chicken a rich flavor that’s sure to please even the pickiest of eaters.
Get ready to enjoy a fun and tasty night of cooking with your little ones as you whip up these tasty Teriyaki Chicken Skewers!
Ingredients (serving size: 4-6 people):
- 1.5 pounds boneless, skinless chicken thighs or breasts, cut into bite-sized pieces
- 1/4 cup soy sauce
- 1/4 cup brown sugar
- 2 tablespoons rice vinegar
- 2 tablespoons mirin (sweet rice wine)
- 2 cloves garlic, minced
- 1 teaspoon fresh ginger, minced
- 1 tablespoon sesame oil
- 1 bell pepper, cut into bite-sized pieces (optional)
- 1 zucchini, sliced (optional)
- Wooden or metal skewers
Cooking Instructions:
1. Prepare the Marinade: In a mixing bowl, combine the soy sauce, brown sugar, rice vinegar, mirin, minced garlic, minced ginger, and sesame oil. Whisk the ingredients together until the brown sugar is fully dissolved and the mixture is well combined.
This marinade will infuse the chicken with flavor and tenderness.
2. Marinate the Chicken: Place the chicken pieces in a large resealable plastic bag or a bowl. Pour the marinade over the chicken, making certain that each piece is well coated.
Seal the bag or cover the bowl with plastic wrap and refrigerate for at least 30 minutes, or up to 2 hours for more flavor. This step is essential for achieving the best taste.
3. Prepare the Skewers: If using wooden skewers, soak them in water for about 30 minutes to prevent them from burning on the grill. If you’re using metal skewers, you can skip this step.
Once ready, thread the marinated chicken pieces onto the skewers, alternating with pieces of bell pepper and zucchini if desired. Leave a little space between each piece to allow for even cooking.
4. Preheat the Grill: Preheat your grill or grill pan over medium heat. You want it hot enough to sear the chicken and create those delicious grill marks.
If using an oven, preheat to 400°F (200°C) and line a baking sheet with parchment paper.
5. Grill the Skewers: Place the skewers on the grill and cook for about 8-10 minutes, turning occasionally, until the chicken is cooked through and has nice grill marks.
If using an oven, bake for around 15-20 minutes, turning halfway through. Make sure the internal temperature of the chicken reaches 165°F (75°C).
6. Serve and Enjoy: Once the chicken skewers are cooked, remove them from the grill and let them rest for a couple of minutes.
Serve them with extra teriyaki sauce on the side for dipping and enjoy your delicious Teriyaki Chicken Skewers!
Extra Tips: Make sure to cut the chicken into evenly sized pieces to guarantee they cook uniformly.
Feel free to experiment with different vegetables or even add pineapple for a sweet twist. If you want a thicker teriyaki sauce, reserve some marinade before adding it to the chicken and heat it in a saucepan until it thickens.
This can be drizzled over the skewers before serving for added flavor.
Japanese Pancakes (Dorayaki)

Dorayaki is a delightful Japanese treat that consists of two fluffy pancakes filled with sweet red bean paste, typically made from adzuki beans. These pancakes aren’t only fun to make but also perfect for kids to enjoy both cooking and eating.
The soft, sponge-like texture of the dorayaki is achieved by using a special batter that incorporates whipped eggs, giving the pancakes their signature fluffiness. This recipe is simple enough for children to assist in preparation, making it a great family activity.
In addition to the traditional sweet red bean filling, you can customize dorayaki with various fillings such as Nutella, whipped cream, or fruits for a fun twist. This versatility makes dorayaki a favorite among kids and adults alike. Serve them as a delicious snack or a delightful dessert, and watch as everyone enjoys these tasty treats!
Ingredients (Serves 4-6)
- 1 cup all-purpose flour
- 1 teaspoon baking powder
- 1/4 cup sugar
- 2 large eggs
- 1/2 cup milk
- 1 tablespoon honey
- 1/2 cup red bean paste (anko) or other desired filling
- A pinch of salt
- Cooking oil (for frying)
Cooking Instructions
- Prepare the Batter: In a mixing bowl, combine the all-purpose flour, baking powder, sugar, and salt. In another bowl, whisk together the eggs, milk, and honey until well blended. Gradually add the wet ingredients to the dry ingredients, mixing until just combined. Be careful not to overmix; a few lumps are okay.
- Rest the Batter: Allow the batter to rest for about 10-15 minutes. This resting period helps the flour absorb the liquid, resulting in lighter pancakes.
- Heat the Pan: Heat a non-stick skillet or frying pan over medium-low heat. Lightly grease the surface with a small amount of cooking oil. It’s important to keep the heat low to confirm that the pancakes cook evenly without burning.
- Cook the Pancakes: Pour about 1/4 cup of batter onto the skillet for each pancake. Cook until small bubbles form on the surface (about 2-3 minutes), then flip carefully and cook for another 1-2 minutes until golden brown. Repeat with the remaining batter, adding more oil to the pan as needed.
- Assemble the Dorayaki: Once the pancakes are cooked, place one pancake on a plate, spoon a generous amount of red bean paste (or your chosen filling) onto the center, and top with another pancake. Gently press down to sandwich them together. Repeat with the remaining pancakes and filling.
- Serve and Enjoy: Your dorayaki is now ready to be enjoyed! Serve them warm or at room temperature. They can be cut in half for easy handling, especially for kids.
Extra Tips
When making dorayaki, verify that your pan is at the right temperature; too hot will burn the pancakes while too cool will result in flat, undercooked ones.
If you’re using a different filling, experiment with flavors like chocolate or fruit preserves to keep it exciting for kids. You can also add a dash of vanilla extract to the batter for added flavor.
Finally, consider letting the kids decorate their dorayaki with fruits or sprinkles for a fun, personalized touch!
Veggie Tempura
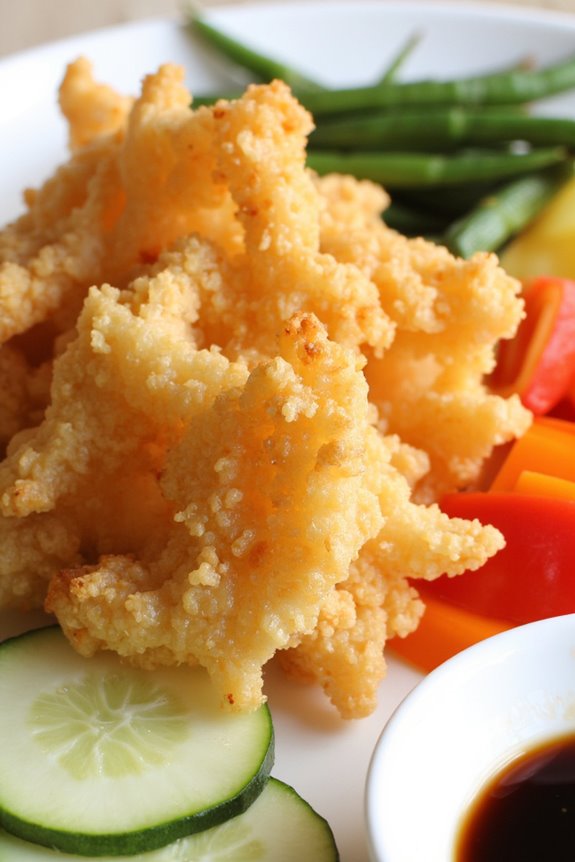
Veggie Tempura is a delightful Japanese dish that features a variety of vegetables, lightly battered and deep-fried to perfection. This dish isn’t only crispy and delicious but also a fun way to introduce kids to cooking and enjoying vegetables. The light, airy texture of the tempura batter makes it a favorite among children and adults alike.
Plus, it’s a great opportunity to encourage kids to try different vegetables, as they can choose their favorites to include in the dish. Making Veggie Tempura is an interactive cooking experience that can be enjoyed by the whole family. Kids can help with washing and preparing the vegetables, mixing the batter, and even dipping the veggies into the oil (with supervision).
Serve the tempura with a side of soy sauce or a dipping sauce of your choice for an authentic Japanese experience. This dish can be a fun starter or a side dish for any meal!
Ingredients (Serves 4-6):
- 1 medium zucchini, sliced into thin rounds
- 1 carrot, julienned
- 1 red bell pepper, sliced into strips
- 1 cup green beans, trimmed
- 1 cup all-purpose flour
- 1/2 cup cornstarch
- 1 teaspoon baking powder
- 1 cup ice-cold water
- Vegetable oil (for frying)
- Soy sauce (for dipping)
Cooking Instructions:
- Prepare the Vegetables: Begin by washing and cutting the vegetables into appropriate sizes. Zucchini should be sliced into thin rounds, carrots can be julienned, red bell pepper should be cut into strips, and green beans should be trimmed. This step is essential because uniform sizes guarantee even cooking.
- Make the Batter: In a mixing bowl, combine the all-purpose flour, cornstarch, and baking powder. Mix them well. Slowly add the ice-cold water to the dry ingredients, stirring gently until just combined. It’s important not to overmix; a lumpy batter yields a lighter texture when fried.
- Heat the Oil: In a deep frying pan or pot, pour enough vegetable oil to fill it about 2-3 inches deep. Heat the oil over medium-high heat until it reaches around 350°F (175°C). You can test the temperature by dropping a small amount of batter into the oil; it should sizzle and rise to the surface.
- Fry the Vegetables: Dip each piece of prepared vegetable into the batter, allowing excess batter to drip off. Carefully place the battered vegetables into the hot oil, a few at a time, to avoid overcrowding. Fry for about 2-3 minutes or until golden brown, flipping them halfway through for even cooking.
- Drain and Serve: Once cooked, use a slotted spoon to remove the tempura from the oil and place them on a plate lined with paper towels to drain any excess oil. Continue frying the remaining vegetables in batches. Serve warm with soy sauce or your choice of dipping sauce.
Extra Tips:
When making Veggie Tempura, make sure that your oil is hot enough before adding the vegetables, as this will help create a crispy texture. If you want to add more variety, consider using sweet potatoes, mushrooms, or broccoli florets.
Additionally, keep the batter cold by using ice-cold water, as this will help achieve that signature light and airy tempura coating. For a healthier twist, you can also experiment with baking the battered veggies in an oven instead of frying. Enjoy cooking and exploring with your kids!
Onigiri (Rice Balls)
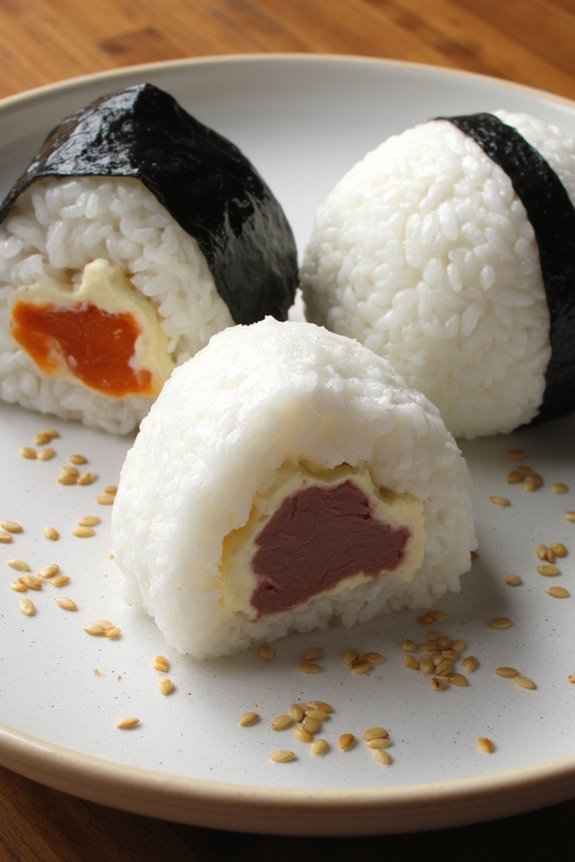
Onigiri, or Japanese rice balls, are a fun and versatile treat that kids will love to make and eat. These delightful bites consist of steamed rice shaped into triangles or balls and can be filled with various ingredients, giving them a unique flavor in every bite. They aren’t only delicious but also a great way to introduce children to Japanese cuisine.
Making onigiri can be a fantastic family activity, allowing everyone to participate in shaping the rice and choosing their favorite fillings.
The beauty of onigiri lies in its simplicity and the customization it offers. You can use different types of rice, fillings, and toppings to suit your family’s tastes. Whether you opt for a classic filling like umeboshi (pickled plum) or something more adventurous like tuna mayo, onigiri can be tailored to suit everyone’s preferences.
Plus, they make for a perfect snack or lunch option, packed with nutrients and flavor.
Ingredients (Serves 4-6 people):
- 2 cups sushi rice
- 2 1/2 cups water
- 1/2 teaspoon salt
- 1 tablespoon rice vinegar
- 1 teaspoon sugar
- Nori (seaweed sheets) for wrapping
- Fillings of your choice (e.g., umeboshi, tuna mayo, cooked salmon, or pickled vegetables)
- Sesame seeds (optional, for garnish)
Cooking Instructions:
- Rinse the Rice: Start by washing the sushi rice under cold water until the water runs clear. This removes excess starch, which helps the rice to cook properly and achieve the right texture. Drain well.
- Cook the Rice: In a medium saucepan, combine the rinsed rice and water. Bring to a boil over medium-high heat. Once boiling, cover the saucepan and reduce the heat to low. Allow the rice to simmer for about 18-20 minutes, or until all the water is absorbed and the rice is tender.
- Prepare Seasoning: While the rice is cooking, mix the rice vinegar, sugar, and salt in a small bowl. This mixture will add flavor to the rice. Stir until the sugar and salt are dissolved.
- Season the Rice: Once the rice is cooked, remove it from the heat and let it sit covered for 10 minutes. Then, transfer the rice to a large bowl and gently fold in the vinegar mixture using a wooden spatula. Be careful not to smash the rice grains; you want to keep them fluffy.
- Shape the Onigiri: Wet your hands with water to prevent the rice from sticking. Take a small amount of rice (about a handful) and flatten it slightly in your palm. Place a small amount of your chosen filling in the center, then mold the rice around the filling to form a triangle or ball shape. Confirm the filling is fully encased in rice.
- Wrap with Nori: If desired, cut the nori sheets into strips and wrap them around the base of each onigiri for added flavor and presentation. You can also serve the nori on the side for kids to wrap themselves.
Extra Tips:
When making onigiri, you can experiment with different shapes and fillings to keep things exciting. Kids will enjoy personalizing their rice balls, so encourage them to try various combinations.
If you’re preparing them for lunch, wrap them in plastic wrap to keep them fresh. Onigiri can also be stored in the fridge for up to a day, making them a great make-ahead option for busy days.
Miso Soup With Tofu
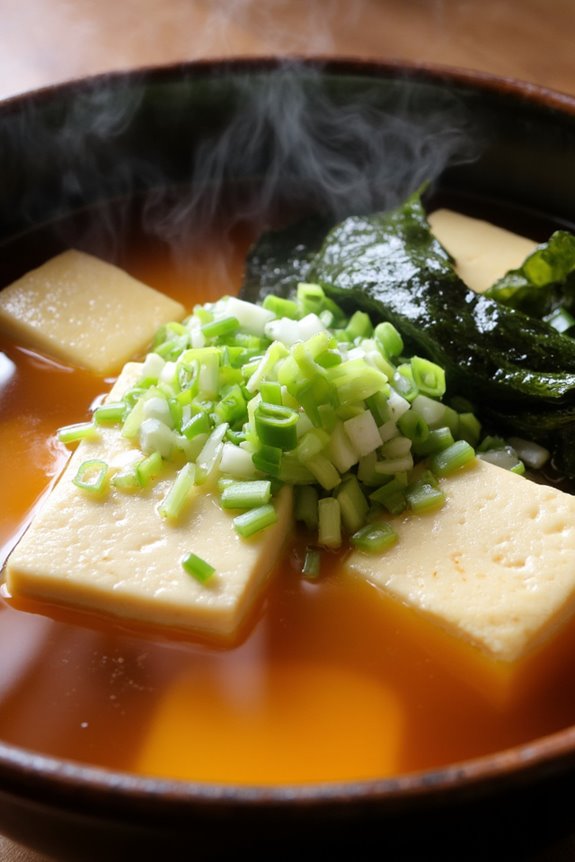
Miso Soup With Tofu is a delightful and nutritious dish that brings the essence of Japanese cuisine right into your kitchen. This comforting soup isn’t only easy to make but also a great way to introduce kids to the flavors and ingredients of Japanese cooking. The combination of miso paste, tofu, and seaweed creates a rich umami flavor that’s sure to please everyone’s palate.
Plus, it’s packed with nutrients, making it a healthy choice for a family meal. This recipe is particularly fun for kids to help with, as they can assist in measuring ingredients, stirring the soup, and even choosing their favorite vegetables to add.
Miso Soup With Tofu can be served as an appetizer or as part of a meal, and it can be easily customized to suit different tastes. With just a few simple ingredients and steps, you’ll have a warm bowl of deliciousness ready to enjoy in no time!
Ingredients (Serves 4-6):
- 6 cups dashi broth (or water)
- 4 tablespoons miso paste (white or red)
- 1 block (about 14 oz) firm tofu, cubed
- 1 cup sliced green onions
- 1 cup wakame seaweed (rehydrated if dried)
- Optional: 1 cup of additional vegetables (like mushrooms, spinach, or carrots)
Cooking Instructions:
1. Prepare the Dashi Broth: In a large pot, bring the dashi broth (or water) to a gentle simmer over medium heat. If you’re using instant dashi powder, dissolve it in the water according to the package instructions.
2. Add Tofu: Once the broth is simmering, carefully add the cubed tofu into the pot. Allow it to heat through for about 3-5 minutes, ensuring it doesn’t break apart too much while cooking.
3. Incorporate Wakame: Add the rehydrated wakame seaweed to the pot. If using dried wakame, soak it in water for about 10 minutes prior to adding it to the soup. Let the mixture simmer for another 2-3 minutes until the seaweed is tender.
4. Mix in the Miso Paste: In a small bowl, take a ladleful of the hot broth and mix it with the miso paste until smooth. This step helps to dissolve the miso without clumping. Slowly stir this mixture back into the pot of soup.
Make sure not to boil the soup after adding the miso, as high heat can diminish its flavor.
5. Add Green Onions and Optional Vegetables: Stir in the sliced green onions and any additional vegetables you’d like to include. Let the soup simmer for another 1-2 minutes until the vegetables are just tender.
6. Serve: Taste the soup and adjust the seasoning if necessary. Ladle the miso soup into bowls and serve warm. Enjoy your delicious Miso Soup With Tofu!
Extra Tips:
When making Miso Soup With Tofu, it’s important to choose high-quality miso paste for the best flavor. You can store any leftover soup in the refrigerator for up to three days, but keep in mind that the tofu may absorb more liquid over time, so it may need a splash of water or broth when reheating.
Additionally, feel free to experiment with different ingredients, such as adding a splash of soy sauce for extra depth or garnishing with sesame seeds for a nice touch.
Yakitori (Grilled Chicken)

Yakitori is a delightful Japanese dish that consists of skewered and grilled chicken, often served with a savory sauce. It’s a favorite among kids due to its tender meat and delicious flavor. Yakitori can be enjoyed as a meal or as an appetizer, making it a versatile option for family gatherings or casual dinners.
This dish isn’t only fun to eat but also a great way for kids to get involved in the kitchen by helping to assemble the skewers.
Cooking yakitori is relatively simple and can be tailored to suit your family’s taste preferences. You can choose different parts of the chicken, such as thighs or breasts, and even add vegetables to the skewers for a colorful presentation. The key to achieving authentic yakitori is to use a sweet and savory sauce called tare, which caramelizes beautifully when grilled.
This recipe is designed for a serving size of 4-6 people, making it perfect for family meals or small get-togethers.
Ingredients:
- 1 pound chicken thighs, boneless and skinless
- 1 pound chicken breast, boneless and skinless
- 1 green bell pepper, cut into chunks
- 1 red bell pepper, cut into chunks
- 1 small onion, cut into wedges
- 10 bamboo skewers, soaked in water for 30 minutes
- 1/4 cup soy sauce
- 1/4 cup mirin (sweet rice wine)
- 2 tablespoons sugar
- 1 tablespoon sake (optional)
- Salt and pepper to taste
Cooking Instructions:
- Prepare the Chicken: Start by cutting the chicken thighs and breasts into bite-sized pieces, around 1 to 1.5 inches in size. This will guarantee they cook evenly on the grill. Season the chicken pieces lightly with salt and pepper to enhance their flavor.
- Make the Tare Sauce: In a small saucepan, combine the soy sauce, mirin, sugar, and sake. Bring the mixture to a boil over medium heat, then reduce the heat to low and let it simmer for about 5-10 minutes until it thickens slightly. Set aside to cool.
- Assemble the Skewers: Take the soaked bamboo skewers and begin threading the chicken pieces onto them. Alternate with chunks of green and red bell peppers and onion wedges for variety. Leave a little space between each piece to allow for even cooking.
- Preheat the Grill: Preheat your grill to medium-high heat. If using a grill pan, heat it over medium heat and lightly coat with oil to prevent sticking.
- Grill the Skewers: Place the assembled skewers on the grill. Cook for about 4-5 minutes on each side, brushing with the tare sauce during the final couple of minutes of cooking. This will help to create a sticky, caramelized glaze on the chicken.
- Serve: Once the chicken is fully cooked and has nice grill marks, remove the skewers from the grill. Let them cool for a minute before serving. You can drizzle more tare sauce over the top or serve it on the side as a dipping sauce.
Extra Tips:
When making yakitori, feel free to experiment with different ingredients. You can include other vegetables like zucchini or mushrooms, or even substitute chicken with beef or tofu for variety.
Also, be cautious with the grilling time; verify the chicken is fully cooked but not overdone, as it can become dry. Finally, involving kids in the assembly process can make cooking yakitori a fun family activity!
Japanese Curry Rice

Japanese Curry Rice, or “Kare Raisu,” is a beloved comfort food in Japan that’s both delicious and easy to make. This dish features a rich, flavorful curry sauce that’s typically made with a blend of spices and a variety of vegetables. The curry is served over a bed of fluffy white rice, making it a complete and satisfying meal.
Not only is it a fantastic way to introduce kids to the flavors of Japanese cuisine, but it also allows for creativity with ingredients, making it a versatile choice for family dinners.
Making Japanese Curry Rice is a fun and interactive cooking experience for kids. They can help with washing vegetables, stirring the curry, and even plating the final dish. The mild flavor of the curry makes it suitable for young palates, while the addition of protein and vegetables provides essential nutrients.
This dish isn’t only easy to prepare but can also be made in large batches, making it perfect for meal prep or feeding a crowd.
Ingredients (Serves 4-6):
- 1 lb (450g) chicken breast or thighs, cut into bite-sized pieces
- 2 medium onions, chopped
- 2 medium carrots, sliced
- 2 medium potatoes, cubed
- 3 cups water
- 1 package (about 7 oz) Japanese curry roux (mild or medium)
- 2 tablespoons vegetable oil
- Salt and pepper, to taste
- Cooked white rice, for serving
- Optional: chopped green onions or pickled vegetables for garnish
Cooking Instructions:
- Prep the Vegetables and Chicken: Start by washing and cutting the onions, carrots, and potatoes into bite-sized pieces. Cut the chicken into small chunks. This step is important to guarantee that everything cooks evenly and is easy for kids to eat.
- Sauté the Chicken and Onions: In a large pot, heat the vegetable oil over medium heat. Add the chopped onions and sauté them for about 3-4 minutes until they become translucent. Then, add the chicken pieces and cook until they’re lightly browned on all sides. This step adds flavor to the base of the curry.
- Add Vegetables and Water: Once the chicken is browned, add the sliced carrots and cubed potatoes to the pot. Pour in the water and bring the mixture to a boil. Once boiling, reduce the heat to low, cover the pot, and let it simmer for about 15-20 minutes or until the vegetables are tender. This allows the flavors to meld beautifully.
- Stir in the Curry Roux: After the vegetables are tender, break the curry roux into pieces and add it to the pot. Stir well until it’s fully dissolved and incorporated into the mixture. The curry will start to thicken. Allow it to simmer for another 5-10 minutes, stirring occasionally. This step is vital for achieving the rich, creamy texture that Japanese curry is known for.
- Season and Serve: Taste the curry and adjust the seasoning with salt and pepper as needed. Once satisfied with the flavor, serve the curry over a bed of cooked white rice. You can garnish it with chopped green onions or pickled vegetables for an extra touch. This step brings the dish together and makes it visually appealing.
Extra Tips: When preparing Japanese Curry Rice, feel free to customize the ingredients based on your family’s preferences. You can substitute chicken with beef, pork, or even tofu for a vegetarian option.
Additionally, experimenting with different vegetables such as bell peppers, peas, or mushrooms can enhance the dish’s nutritional value and flavor. Remember to adjust the cooking time for vegetables that may cook faster or slower. Enjoy the cooking process together and have fun making this delightful dish!
Matcha Muffins

Matcha muffins are a delightful and healthy treat that kids will love to help make! This recipe combines the earthy flavor of matcha green tea with the sweetness of muffins, making for a delicious snack or breakfast option. Not only are these muffins visually appealing with their vibrant green color, but they also pack a nutritional punch thanks to the antioxidants found in matcha.
Baking together can be a fun way for kids to learn about measuring ingredients and following recipes, while also enjoying a tasty treat at the end.
In this recipe, we’ll assist you through the steps to create fluffy and moist matcha muffins. With a simple list of ingredients and straightforward instructions, your little chefs will be able to whip up these delightful muffins in no time. They can even personalize their muffins by adding chocolate chips or nuts, making the baking experience even more exciting!
Ingredients for Matcha Muffins (serving size: 4-6 people):
- 1 cup all-purpose flour
- 1 cup sugar
- 2 teaspoons matcha powder
- 1 teaspoon baking powder
- ½ teaspoon baking soda
- ¼ teaspoon salt
- 1 large egg
- ½ cup milk
- ⅓ cup vegetable oil
- 1 teaspoon vanilla extract
Cooking Instructions:
- Preheat the Oven: Begin by preheating your oven to 350°F (175°C). This guarantees that the muffins cook evenly and rise properly.
- Prepare Muffin Tin: Line a muffin tin with paper liners or lightly grease each cup with butter or cooking spray. This step prevents the muffins from sticking to the pan and makes for easier cleanup.
- Mix Dry Ingredients: In a large mixing bowl, whisk together the all-purpose flour, sugar, matcha powder, baking powder, baking soda, and salt until well combined. This helps to evenly distribute the matcha and leavening agents throughout the flour.
- Mix Wet Ingredients: In another bowl, beat the egg, and then add the milk, vegetable oil, and vanilla extract. Whisk these ingredients together until they’re well combined. This mixture will add moisture and flavor to the muffins.
- Combine Mixtures: Pour the wet ingredients into the bowl with the dry ingredients. Gently fold the mixtures together using a spatula or wooden spoon until just combined. Be careful not to overmix; it’s okay if there are a few lumps.
- Fill Muffin Cups: Using a spoon or ice cream scoop, fill each muffin cup about two-thirds full with the batter. This allows enough space for the muffins to rise without overflowing.
- Bake the Muffins: Place the muffin tin in the preheated oven and bake for 15-20 minutes, or until a toothpick inserted into the center of a muffin comes out clean. Keep an eye on them to avoid overbaking.
- Cool and Serve: Once baked, remove the muffins from the oven and allow them to cool in the tin for a few minutes before transferring them to a wire rack to cool completely. Enjoy your delicious matcha muffins warm or at room temperature!
Extra Tips: When making matcha muffins, it’s important to use high-quality matcha powder for the best flavor and color. If you want to experiment, consider adding some chocolate chips, nuts, or dried fruits to the batter before baking.
Additionally, you can store any leftovers in an airtight container at room temperature for a few days, or freeze them for a longer shelf life. Enjoy baking and sharing these vibrant treats with family and friends!
Edamame Hummus
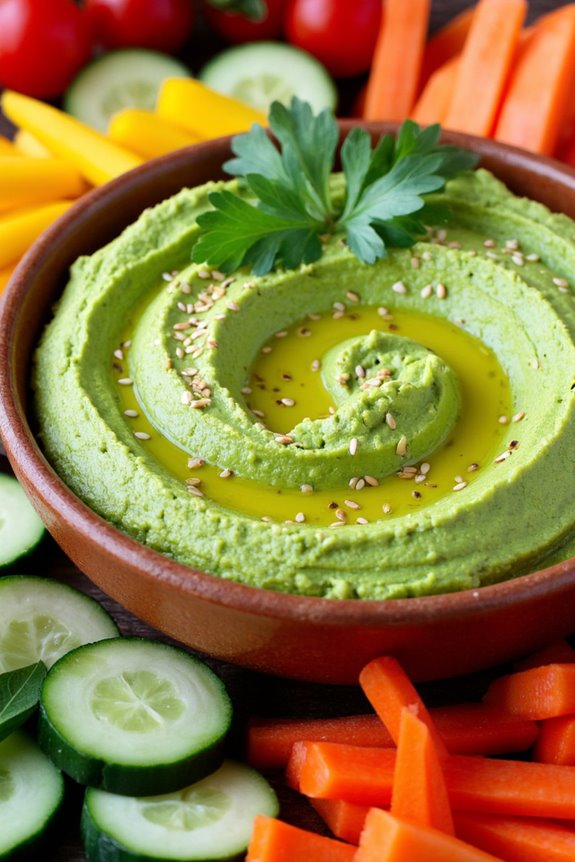
Edamame Hummus is a delicious and nutritious twist on traditional hummus that kids will love. This vibrant green spread is made from young soybeans, known as edamame, which are packed with protein and fiber. Perfect for dipping veggies or spreading on sandwiches, this dish introduces children to the flavors of Japanese cuisine while providing a healthy snack option.
It’s also simple enough for kids to help make, making it a fun family activity in the kitchen. This recipe isn’t only easy to prepare but also allows for customization. You can adjust the garlic and lemon to suit your family’s taste preferences.
Edamame Hummus can be served as an appetizer, snack, or even as part of a lunch box. With its creamy texture and delightful taste, it’s sure to become a favorite in your household!
Ingredients (Serves 4-6 people):
- 2 cups shelled edamame (fresh or frozen)
- 1/4 cup tahini
- 2 tablespoons olive oil
- 2 tablespoons lemon juice
- 1 garlic clove, minced
- 1/2 teaspoon salt
- 1/4 teaspoon black pepper
- 1/4 teaspoon ground cumin
- 2-3 tablespoons water (as needed)
Cooking Instructions:
- Prepare the Edamame: If using frozen edamame, bring a pot of water to a boil. Add the edamame and cook for about 3-5 minutes until tender. Drain and rinse under cold water to stop the cooking process. If using fresh edamame, simply shell the beans and prepare them in the same manner.
- Combine Ingredients: In a food processor, combine the shelled edamame, tahini, olive oil, lemon juice, minced garlic, salt, black pepper, and ground cumin. This mixture will form the base of your hummus and provide its rich flavor.
- Blend until Smooth: Pulse the food processor a few times to combine the ingredients, then blend continuously until the mixture is smooth. You may need to scrape down the sides of the bowl to guarantee everything is well incorporated.
- Adjust Consistency: If the hummus is too thick, add water one tablespoon at a time while blending until you reach your desired consistency. The hummus should be creamy and spreadable, but not runny.
- Taste and Adjust Flavor: After blending, taste your Edamame Hummus. If necessary, adjust the seasoning by adding more salt, lemon juice, or garlic according to your preference.
- Serve: Transfer the hummus to a serving bowl. You can drizzle a little extra olive oil on top for presentation and serve it with fresh vegetables, pita chips, or crackers.
Extra Tips:
For a fun variation, try adding different spices or herbs to the hummus, such as smoked paprika, sesame seeds, or fresh cilantro.
You can also serve the hummus with a variety of dippers, like carrot sticks, cucumber slices, or whole grain crackers, to make it a more interactive snack for kids. Additionally, Edamame Hummus can be stored in an airtight container in the refrigerator for up to a week, making it a great make-ahead option for busy days.
Ramen Noodle Salad
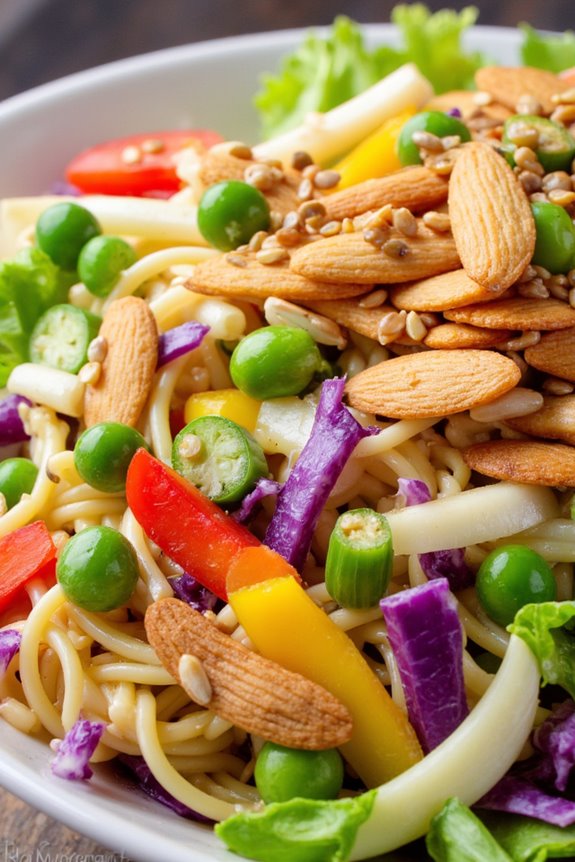
Ramen Noodle Salad is a delightful and colorful dish that combines crunchy vegetables with savory ramen noodles, making it a perfect choice for kids. This dish isn’t only fun to eat but also allows for creativity with ingredients, helping children engage in the cooking process.
The combination of textures and flavors in this salad can be adjusted based on personal preferences, making it a versatile dish that can be served as a side or a main meal.
This recipe is easy to prepare and can be made in less than 30 minutes, making it an ideal option for busy families. Plus, it requires no cooking of the ramen noodles, as they can be eaten straight from the package. This makes it a great opportunity for kids to learn about meal preparation while enjoying a delicious dish that combines both nutritious ingredients and fun flavors.
Ingredients (Serves 4-6):
- 2 packages of instant ramen noodles (any flavor)
- 2 cups of shredded cabbage (green or purple)
- 1 cup of shredded carrots
- 1 cup of chopped bell peppers (any color)
- 1/2 cup of sliced green onions
- 1/2 cup of shelled edamame (optional)
- 1/2 cup of sliced almonds or sesame seeds
- 1/4 cup of soy sauce
- 1/4 cup of vegetable oil
- 2 tablespoons of rice vinegar
- 1 tablespoon of sugar
- 1 teaspoon of garlic powder
- 1 teaspoon of ginger powder
- Salt and pepper to taste
Cooking Instructions:
- Prepare the Ramen Noodles: Start by breaking the ramen noodle blocks into smaller pieces (about 1-2 inches). You can do this by placing them in a zip-top bag and gently hitting them with a rolling pin or your hands. This will make it easier for kids to eat.
- Chop the Vegetables: Gather all the vegetables. Use a sharp knife or a vegetable peeler to shred the cabbage and carrots. Chop the bell peppers into bite-sized pieces and slice the green onions. If using, rinse the edamame under cold water to thaw.
- Mix the Dressing: In a small bowl, combine the soy sauce, vegetable oil, rice vinegar, sugar, garlic powder, ginger powder, salt, and pepper. Whisk until the sugar is dissolved and the dressing is well blended.
- Combine the Ingredients: In a large mixing bowl, add the broken ramen noodles, shredded cabbage, carrots, bell peppers, green onions, and edamame. Pour the dressing over the salad and toss everything together until the noodles and vegetables are well coated.
- Add Crunch: Finally, sprinkle the sliced almonds or sesame seeds on top of the salad for an extra crunch. Give the salad one last gentle toss to mix in the toppings.
- Chill and Serve: Let the salad sit for about 10 minutes to allow the flavors to meld. You can serve it immediately or chill in the refrigerator for a rejuvenating dish.
Extra Tips:
When preparing Ramen Noodle Salad, feel free to customize it by adding your child’s favorite vegetables or proteins like grilled chicken or tofu.
You can also swap out the dressing ingredients for a different flavor profile; for example, try adding some spicy sesame oil or a splash of lime juice for a zesty kick.
This salad can be made ahead of time, making it a great option for picnics or lunchboxes. Just be sure to keep the crunchy toppings separate until serving to maintain their texture!
Fruit Sushi
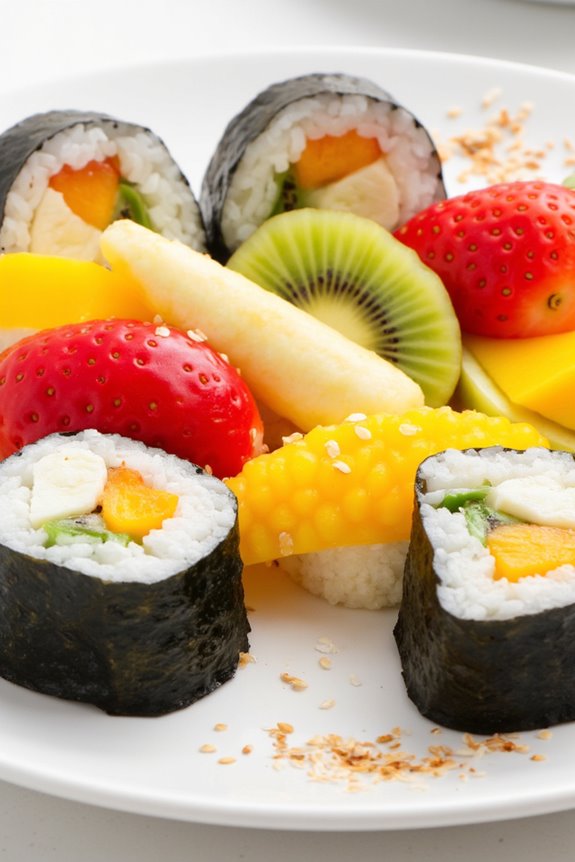
Fruit sushi is a fun and creative way to introduce kids to Japanese cuisine while keeping it healthy and colorful. This dish takes the concept of traditional sushi and transforms it into a delightful dessert or snack using fresh fruits and sweet rice. The vibrant colors and playful presentation make it an appealing treat for children, and the preparation process is simple enough for little hands to help out. With endless possibilities for fruit combinations, kids can enjoy customizing their sushi rolls according to their preferences.
To make fruit sushi, you’ll need sushi rice, which is typically sticky and sweet, allowing it to hold together well when rolled. The fruits you choose can vary based on seasonal availability or personal taste, but common options include strawberries, mangoes, and kiwis. This recipe not only allows children to enjoy delicious flavors but also encourages them to explore and experiment with different textures and colors in their food.
Ingredients (Serves 4-6)
- 1 cup sushi rice
- 1 ¼ cups water
- 2 tablespoons sugar
- 1 tablespoon rice vinegar
- ½ teaspoon salt
- 1 large banana
- 1 cup strawberries, hulled and sliced
- 1 cup mango, sliced
- 1 cup kiwi, peeled and sliced
- 4 sheets of nori (seaweed)
- Optional: coconut flakes or sesame seeds for garnish
Cooking Instructions
- Prepare the Sushi Rice: Rinse the sushi rice under cold water until the water runs clear. This removes excess starch and helps achieve the right texture. Combine the rinsed rice and water in a pot, cover, and bring to a boil. Once boiling, reduce the heat to low and let it simmer for about 15 minutes until the water is absorbed. Remove from heat and let it sit, covered, for an additional 10 minutes.
- Season the Rice: In a small bowl, mix the sugar, rice vinegar, and salt until dissolved. Once the rice has rested, transfer it to a large bowl and gently fold in the vinegar mixture while the rice is still warm. Allow the seasoned rice to cool to room temperature.
- Prepare the Fruits: While the rice is cooling, wash and slice the fruits of your choice into thin strips. Make certain that the pieces are manageable and easy for rolling. You can mix and match your favorite fruits or use those suggested in the ingredients list.
- Assemble the Fruit Sushi: Place a sheet of nori on a bamboo sushi mat or a clean cutting board, shiny side down. Wet your hands to prevent sticking and grab a handful of rice. Spread the rice evenly over the nori, leaving about an inch at the top free of rice.
- Add the Fruit: Lay your chosen fruit strips horizontally across the center of the rice-covered nori. You can create a colorful pattern with strawberries, mangoes, bananas, and kiwis.
- Roll the Sushi: Starting from the bottom edge of the nori, use the bamboo mat to lift and roll it tightly over the fruit. Apply gentle pressure to create a firm roll. Once rolled, wet the edge of the nori to seal the roll.
- Slice and Serve: Using a sharp knife, slice the roll into bite-sized pieces, wiping the knife with a damp cloth between cuts to maintain clean edges. Arrange the pieces on a serving platter and sprinkle with coconut flakes or sesame seeds if desired.
Extra Tips
When making fruit sushi, experimenting with different types of fruits can lead to exciting flavor combinations. Consider using seasonal fruits for the best taste or even adding a drizzle of honey or chocolate sauce for an extra touch of sweetness.
If you’re working with younger children, make sure to supervise them while using sharp utensils and let them be creative with their fruit choices and sushi shapes. Enjoy the fun of making and sharing this colorful dish!
Japanese Cheesecake

Japanese cheesecake is a delightful dessert that beautifully combines the lightness of a soufflé with the creaminess of traditional cheesecake. This airy treat is known for its fluffy texture and slightly tangy flavor, making it a perfect introduction to Japanese cuisine for kids. Not only is it delicious, but the process of making it can be a fun and engaging activity that young chefs will enjoy.
Gather your little helpers and watch as they marvel at the transformation of simple ingredients into a cloud-like cheesecake.
This recipe for Japanese cheesecake serves 4-6 people, which makes it great for family gatherings or playdates. The gentle folding technique helps incorporate air into the batter, resulting in the signature lightness. While the baking process may seem a bit longer than other desserts, the end result is well worth the wait. Let’s plunge into creating this charming dessert that’s sure to impress everyone at the table!
Ingredients:
- 1 cup cream cheese (softened)
- 1/4 cup unsalted butter (softened)
- 1/2 cup granulated sugar
- 1/4 cup milk
- 3 large eggs (separated)
- 1/2 cup all-purpose flour
- 1 tablespoon cornstarch
- 1 teaspoon vanilla extract
- 1/4 teaspoon cream of tartar
Cooking Instructions:
- Preheat the Oven: Begin by preheating your oven to 320°F (160°C). This guarantees that the cheesecake has the right environment to bake evenly and develop its fluffy texture.
- Prepare the Baking Pan: Line the bottom of an 8-inch round cake pan with parchment paper and lightly grease the sides. This prevents the cheesecake from sticking and makes it easier to remove once baked.
- Melt Cream Cheese and Butter: In a large mixing bowl, combine the softened cream cheese and butter. Using a microwave or a double boiler, gently melt them together until smooth. Stir in the milk until well combined.
- Mix in Egg Yolks: Add the egg yolks to the cream cheese mixture, one at a time, mixing well after each addition. Incorporate the vanilla extract to add flavor to your cheesecake batter.
- Sift and Combine Dry Ingredients: In a separate bowl, sift together the all-purpose flour and cornstarch. Gradually add this dry mixture to the wet ingredients, stirring until the batter is smooth and well combined.
- Whip Egg Whites: In another clean bowl, use an electric mixer to beat the egg whites and cream of tartar until stiff peaks form. This will add volume and airiness to your cheesecake.
- Fold in Egg Whites: Gently fold the whipped egg whites into the cheesecake batter in three additions. Be careful not to deflate the mixture; you want to maintain as much air as possible.
- Bake the Cheesecake: Pour the batter into the prepared cake pan. Place the pan in a larger baking dish and fill it with water to create a water bath. This helps the cheesecake bake evenly and prevents cracking. Bake for about 60 minutes or until the center is set and a toothpick inserted comes out clean.
- Cool Gradually: Once baked, turn off the oven and leave the cheesecake inside with the door slightly ajar for about 30 minutes. This gradual cooling helps prevent the cheesecake from collapsing.
- Chill and Serve: Remove the cheesecake from the oven and the water bath, then let it cool completely at room temperature. Refrigerate for at least 2 hours before serving. Dust with powdered sugar if desired, and enjoy!
Extra Tips:
When making Japanese cheesecake, the key to achieving its signature fluffiness lies in the technique of folding in the whipped egg whites. Be gentle and patient to avoid deflating the batter.
You can also experiment with flavors by adding a hint of lemon zest or matcha powder for a unique twist. Remember that the baking time may vary depending on your oven, so keep an eye on the cheesecake as it bakes to confirm it doesn’t overcook. Enjoy this delightful dessert with your family and friends!