

When it comes to organizing meals for the week, Japanese bento recipes are my go-to for a perfect mix of taste and nutrition. These colorful bento boxes not only make my meals look beautiful but also make planning ahead so much easier. From tasty teriyaki chicken rice bowls to bright and fresh vegetable sushi rolls, there’s a wonderful selection to explore. Want to upgrade your lunch routine? Check out these 13 handy recipes that will inspire your meal prep journey.
Teriyaki Chicken Rice Bowl
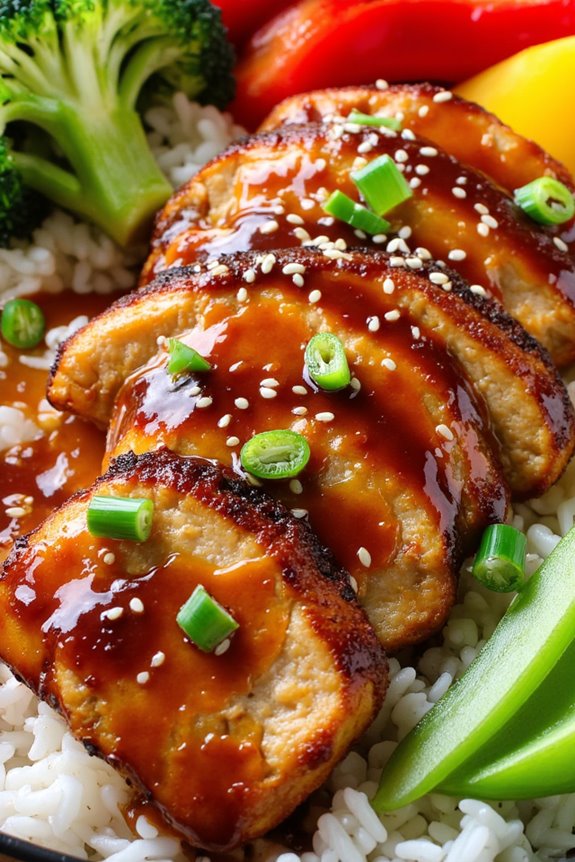
The Teriyaki Chicken Rice Bowl is a delightful and satisfying meal that combines succulent chicken, vibrant vegetables, and fluffy rice all drizzled with a sweet and savory teriyaki sauce. This dish isn’t only easy to prepare but also perfect for meal prepping, making it an ideal choice for busy weeknights or lunchboxes. Each bite is packed with flavor, and the colorful presentation is sure to please the eyes as much as the palate.
In this recipe, the chicken is marinated in a homemade teriyaki sauce, which infuses it with rich flavors before being grilled or sautéed to perfection. Served over a bed of rice and topped with steamed vegetables, this dish offers a balanced meal that’s both nutritious and delicious. Whether you’re a seasoned cook or a beginner, you’ll find that creating this Teriyaki Chicken Rice Bowl is a straightforward process that yields impressive results.
Ingredients (Serves 4-6):
- 1.5 pounds boneless, skinless chicken thighs
- 1 cup soy sauce
- ½ cup brown sugar
- 2 tablespoons rice vinegar
- 2 cloves garlic, minced
- 1 tablespoon fresh ginger, grated
- 2 tablespoons cornstarch
- 2 tablespoons water
- 4 cups cooked jasmine rice
- 2 cups broccoli florets
- 1 cup sliced bell peppers (any color)
- 1 cup snap peas
- 2 tablespoons sesame oil
- 1 tablespoon green onions, chopped (for garnish)
- Sesame seeds (for garnish)
Cooking Instructions:
- Prepare the Teriyaki Marinade: In a bowl, whisk together the soy sauce, brown sugar, rice vinegar, minced garlic, and grated ginger until the sugar is dissolved. This mixture will serve as the marinade for the chicken, giving it that signature teriyaki flavor.
- Marinate the Chicken: Place the chicken thighs in a large resealable plastic bag or a shallow dish and pour the teriyaki marinade over them. Seal the bag or cover the dish and refrigerate for at least 30 minutes, allowing the chicken to soak in the flavors. If you have more time, marinating for a few hours or overnight will enhance the taste even further.
- Cook the Chicken: Preheat a grill or a large skillet over medium-high heat. Remove the chicken from the marinade (reserving the marinade) and cook for about 6-7 minutes on each side, or until fully cooked and internal temperature reaches 165°F (75°C). Once cooked, remove the chicken from the grill and let it rest for a few minutes before slicing it into bite-sized pieces.
- Thicken the Marinade: While the chicken is resting, pour the reserved marinade into a saucepan and bring it to a boil. In a small bowl, mix the cornstarch and water together to create a slurry. Add the slurry to the boiling marinade and stir continuously until it thickens, about 2-3 minutes. This will create a luscious sauce to drizzle over the chicken later.
- Sauté the Vegetables: In the same skillet used for the chicken, add sesame oil and heat it over medium heat. Add the broccoli, bell peppers, and snap peas, and stir-fry for about 5-7 minutes until the vegetables are tender but still crisp. This step adds a lovely crunch and a burst of color to your rice bowl.
- Assemble the Rice Bowl: To assemble, divide the cooked jasmine rice among serving bowls. Top each bowl with sliced teriyaki chicken and sautéed vegetables. Drizzle the thickened teriyaki sauce over the top and garnish with chopped green onions and sesame seeds.
Extra Tips:
For an added layer of flavor, consider adding some toasted sesame oil to the cooking process or garnishing with additional fresh herbs like cilantro. If you’d like a bit of heat, feel free to include red pepper flakes or sriracha in the marinade.
This dish is highly versatile, so feel free to substitute the vegetables with your favorites or whatever you have on hand. Finally, if you’re preparing this for meal prep, store the components separately and combine them just before serving to keep everything fresh!
Vegetable Sushi Rolls
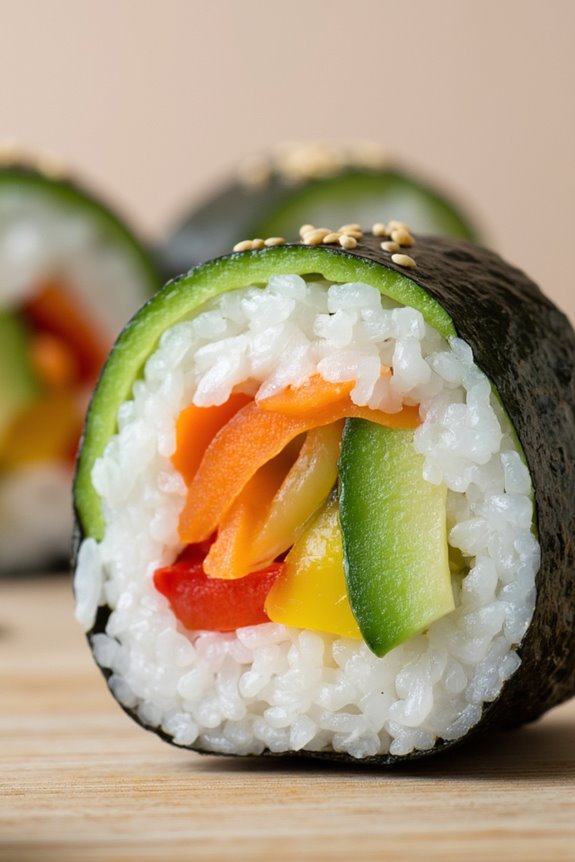
Vegetable sushi rolls are a delightful and healthy option for your bento meal prep. Packed with colorful, fresh vegetables and wrapped in sushi rice and nori, these rolls make for a vibrant and nutritious lunch or snack. Not only are they visually appealing, but they’re also a great way to incorporate more veggies into your diet.
The beauty of making vegetable sushi rolls lies in their versatility; you can customize the fillings based on your preferences or what you have on hand.
To prepare these sushi rolls, you’ll need sushi rice, a variety of fresh vegetables, and nori sheets. This recipe is easy to follow, making it perfect for beginners and seasoned chefs alike. Once you master the basic technique, you can experiment with different ingredients and even try adding sauces or garnishes for extra flavor. Preparing these rolls in advance will save you time during the week and guarantee you have a healthy meal ready to go.
Ingredients (Serves 4-6):
- 2 cups sushi rice
- 2 ½ cups water
- ¼ cup rice vinegar
- 2 tablespoons sugar
- 1 teaspoon salt
- 5 sheets nori
- 1 cucumber, julienned
- 1 carrot, julienned
- 1 bell pepper, thinly sliced
- 1 avocado, sliced
- Soy sauce, for serving
- Pickled ginger, for serving (optional)
- Sesame seeds, for garnish (optional)
Cooking Instructions:
1. Prepare the Sushi Rice: Rinse 2 cups of sushi rice under cold water until the water runs clear to remove excess starch. In a medium saucepan, combine the rinsed rice and 2 ½ cups of water. Bring to a boil over medium-high heat, then reduce to low, cover, and simmer for about 20 minutes or until the rice is tender and the water is absorbed.
Remove from heat and let it sit, covered, for another 10 minutes.
2. Season the Rice: In a small bowl, mix together ¼ cup rice vinegar, 2 tablespoons sugar, and 1 teaspoon salt until dissolved. Once the rice has rested, transfer it to a large bowl and gently fold in the vinegar mixture using a wooden spatula. Allow the rice to cool to room temperature while you prepare the vegetables.
3. Prepare the Vegetables: While the rice is cooling, wash and julienne the cucumber and carrot. Thinly slice the bell pepper and avocado. Arrange the vegetables on a platter for easy assembly.
4. Assemble the Sushi Rolls: Lay a bamboo sushi mat on a clean surface and place a sheet of nori, shiny side down, on the mat. With wet hands, spread a thin layer of sushi rice over the nori, leaving about 1 inch at the top edge. Press the rice down gently to make it stick but don’t pack it too tightly.
5. Add Fillings: Place a few strips of cucumber, carrot, bell pepper, and a couple of slices of avocado in a line across the center of the rice-covered nori.
6. Roll the Sushi: Starting from the end closest to you, lift the edge of the mat and begin to roll the sushi away from you, tucking the filling tightly as you go. Roll until you reach the edge of the nori. Moisten the top edge of the nori with a little water to seal the roll.
Use the mat to shape the roll gently, if needed.
7. Slice and Serve: Using a sharp knife, slice the roll into 6-8 pieces. Wipe the knife with a damp cloth after each cut to guarantee clean edges. Arrange the sushi rolls on a serving platter and sprinkle with sesame seeds if desired. Serve with soy sauce and pickled ginger on the side.
Extra Tips:
When preparing vegetable sushi rolls, feel free to experiment with different vegetables and textures. You can add ingredients like cooked sweet potato, bell peppers, or even sprouts for a crunch.
Additionally, make sure that your sushi rice isn’t too hot when you spread it on the nori, as this could cause the nori to become soggy. For a fun twist, consider adding a smear of wasabi or a drizzle of sriracha inside the rolls for a kick of flavor. Enjoy your homemade vegetable sushi rolls as part of your bento meal prep!
Beef and Broccoli Stir-Fry
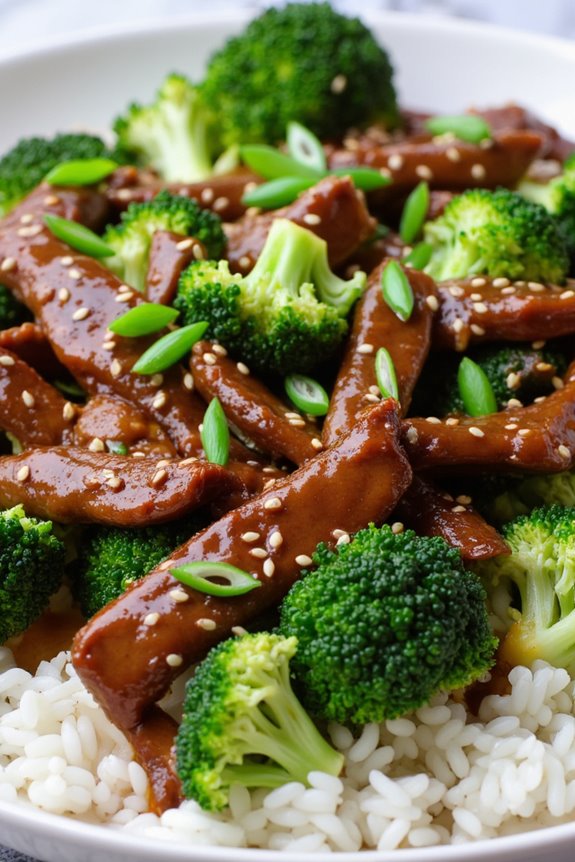
Beef and Broccoli Stir-Fry is a classic dish that combines tender strips of beef with vibrant broccoli florets, all coated in a savory sauce that packs a punch. This quick and easy meal is perfect for busy weeknights and can be prepared in just a matter of minutes, making it an ideal choice for meal prep.
Whether served over rice or noodles, the flavor and texture of this dish will leave your taste buds satisfied and your hunger at bay.
The beauty of Beef and Broccoli Stir-Fry lies in its versatility and the ability to customize it to suit your taste preferences. You can easily swap out the beef for chicken or tofu, and you can add other vegetables such as bell peppers or snap peas to bulk it up. This recipe is designed to serve 4-6 people, making it a fantastic option for family dinners or meal prep for the week ahead.
Ingredients (Serves 4-6):
- 1 pound flank steak, thinly sliced against the grain
- 4 cups broccoli florets
- 3 tablespoons vegetable oil, divided
- 4 cloves garlic, minced
- 1 tablespoon fresh ginger, minced
- 1/4 cup soy sauce
- 2 tablespoons oyster sauce
- 1 tablespoon cornstarch
- 1/2 cup beef broth
- 2 tablespoons sesame oil
- 1 tablespoon sugar
- Salt and pepper to taste
- Cooked rice or noodles, for serving
- Sesame seeds and sliced green onions, for garnish (optional)
Cooking Instructions:
- Prepare the Beef: Start by slicing the flank steak thinly against the grain. This helps to tenderize the meat and guarantees it cooks quickly. Pat the slices dry with paper towels and season with salt and pepper. Set aside.
- Blanch the Broccoli: Bring a pot of water to a boil and add the broccoli florets. Blanch for about 2-3 minutes until they’re bright green and tender-crisp. Drain and immediately transfer the broccoli to a bowl of ice water to stop the cooking process. Once cooled, drain again and set aside.
- Make the Sauce: In a small bowl, whisk together the soy sauce, oyster sauce, cornstarch, beef broth, sesame oil, and sugar until well combined. This sauce will give your stir-fry a rich flavor and help thicken the dish.
- Stir-Fry the Beef: In a large skillet or wok, heat 2 tablespoons of vegetable oil over medium-high heat. Add the sliced beef in a single layer and cook for about 2-3 minutes until browned. Avoid overcrowding the pan; you can work in batches if necessary. Remove the beef from the skillet and set aside.
- Cook the Aromatics: In the same skillet, add the remaining tablespoon of vegetable oil. Add the minced garlic and ginger, stirring for about 30 seconds until fragrant. Be careful not to burn them.
- Combine Ingredients: Return the cooked beef to the skillet and add the blanched broccoli. Pour the sauce over the beef and broccoli, stirring to coat everything evenly. Cook for another 2-3 minutes until the sauce thickens and everything is heated through.
- Serve: Remove the stir-fry from heat and serve immediately over cooked rice or noodles. Garnish with sesame seeds and sliced green onions if desired.
Extra Tips:
For the best results, make sure that your beef is sliced thinly and evenly for quick cooking. If you prefer a more tender beef, consider marinating it in a mixture of soy sauce and cornstarch for about 30 minutes before cooking.
Also, feel free to adjust the vegetable-to-meat ratio based on your preference, adding more broccoli or even other veggies. Finally, for a little kick, you can add red pepper flakes or a splash of chili sauce to the mix!
Miso Soup With Tofu and Seaweed
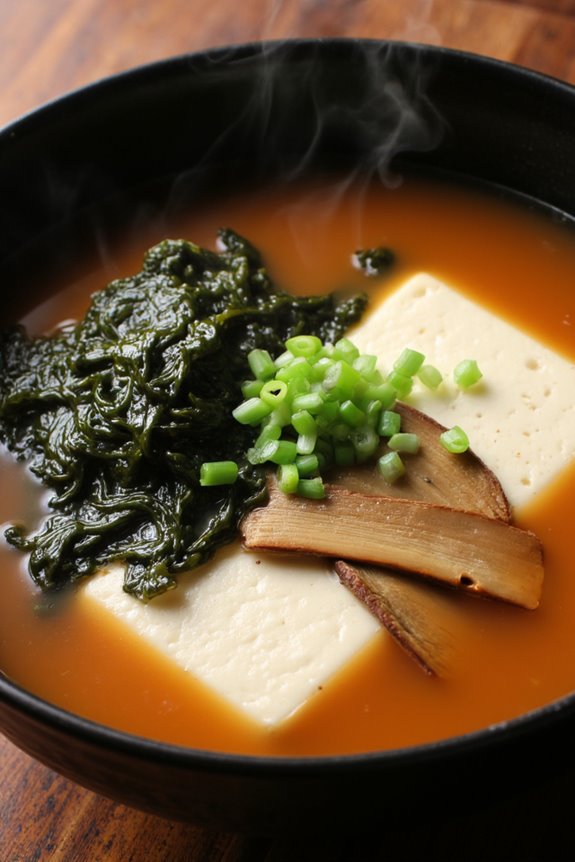
Miso Soup with Tofu and Seaweed is a classic Japanese dish that’s both comforting and nourishing. This savory soup is known for its umami-rich flavor, derived from miso paste, and it’s packed with protein thanks to the addition of tofu. The seaweed not only enhances the taste but also provides a wealth of nutrients, making this dish a healthy option for any meal.
Perfect for bento meal prep, Miso Soup is easily reheated and can be enjoyed on its own or as a side dish alongside rice and other accompaniments.
In this recipe, we’ll guide you through the process of making a delicious Miso Soup with Tofu and Seaweed that serves 4-6 people. Ideal for lunchboxes or as a cozy dinner, this soup can be prepared in advance and stored in the refrigerator, ensuring you have a wholesome meal ready when needed.
Let’s explore the ingredients and cooking instructions to create this delightful dish.
Ingredients (Serves 4-6):
- 6 cups dashi broth (or vegetable broth)
- 1 cup miso paste (white or red, depending on preference)
- 1 block (14 oz) firm tofu, cubed
- 1 cup dried seaweed (wakame works best)
- 2 green onions, finely sliced
- 1 cup mushrooms (shiitake or enoki), sliced
- 1 tablespoon soy sauce (optional)
- 1 teaspoon sesame oil (optional)
Cooking Instructions:
- Prepare the Dashi Broth: Begin by making the dashi broth if you aren’t using store-bought. Combine kombu (dried sea kelp) and bonito flakes in 6 cups of water. Heat over medium heat until it just begins to boil, then remove from heat and let steep for 10-15 minutes. Strain the broth into a pot and discard the solids.
- Rehydrate the Seaweed: In a small bowl, soak the dried seaweed in warm water for about 10 minutes until it expands and softens. Drain and chop it into bite-sized pieces.
- Combine Ingredients in the Pot: In the pot with the dashi broth, add the sliced mushrooms and bring the mixture to a gentle simmer. Let it cook for about 5 minutes until the mushrooms are tender.
- Add Tofu and Seaweed: Gently incorporate the cubed tofu and rehydrated seaweed into the pot. Allow the soup to simmer for an additional 2-3 minutes, ensuring the tofu is heated through.
- Mix in Miso Paste: In a separate bowl, take a ladleful of the hot broth and whisk it together with the miso paste until smooth. This helps in avoiding clumps. Add the miso mixture back into the pot, stirring gently to combine. Don’t boil the soup after adding the miso, as high heat can destroy its beneficial properties.
- Season and Serve: Taste the soup and adjust the seasoning with soy sauce or sesame oil if desired. Finally, garnish with finely sliced green onions before serving.
Extra Tips:
When preparing Miso Soup with Tofu and Seaweed, feel free to customize it by adding other vegetables like spinach or bok choy, or even proteins such as shrimp or chicken for added flavor.
Store any leftovers in an airtight container in the refrigerator, and reheat gently on the stove to preserve the flavors and texture. Remember not to boil the soup after adding miso to maintain its unique taste and health benefits.
Enjoy your comforting bowl of miso soup!
Spicy Tuna Onigiri
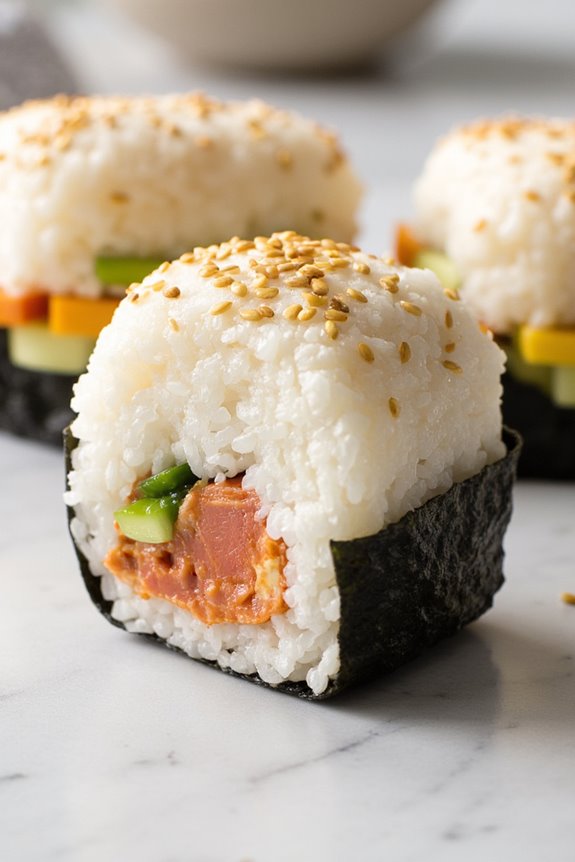
Spicy Tuna Onigiri is a delicious Japanese rice ball that packs a punch with its flavorful filling and is perfect for meal prep. This dish combines sushi rice with a spicy tuna mixture, encased in a triangular shape, making it not only tasty but also convenient for on-the-go meals. The combination of flavors and textures in this dish makes it a hit among both adults and kids, guaranteeing that everyone can enjoy a homemade Japanese treat.
Making Spicy Tuna Onigiri is also a wonderful way to experiment with different fillings and seasonings. While the classic version features spicy tuna, you can easily customize it with other ingredients such as avocado, cucumber, or even pickled vegetables. This versatility allows you to cater to different taste preferences, making it an excellent choice for bento meal prep or family gatherings.
Ingredients (serving size: 4-6 people):
- 2 cups sushi rice
- 2 1/2 cups water
- 1/4 cup rice vinegar
- 2 tablespoons sugar
- 1 teaspoon salt
- 1 can (5 oz) tuna in water, drained
- 2 tablespoons mayonnaise
- 1 tablespoon Sriracha sauce (adjust to taste)
- 1 green onion, finely chopped
- 1 sheet nori (seaweed), cut into strips
- Sesame seeds for garnish (optional)
Cooking Instructions:
- Cook the Sushi Rice: Rinse the sushi rice under cold water until the water runs clear. This helps remove excess starch. Combine the rinsed rice and water in a rice cooker or pot. Cook according to the rice cooker instructions or bring to a boil, then reduce to a simmer, cover, and cook for about 15 minutes. Once cooked, let it sit covered for another 10 minutes.
- Season the Rice: In a small saucepan, combine rice vinegar, sugar, and salt over medium heat. Stir until the sugar and salt dissolve, then remove from heat. Once the rice has rested, transfer it to a large bowl and gently fold in the vinegar mixture using a spatula. Allow the rice to cool to room temperature.
- Prepare the Spicy Tuna Filling: In a mixing bowl, combine the drained tuna, mayonnaise, Sriracha sauce, and chopped green onion. Mix well until all the ingredients are evenly incorporated. Taste and adjust the spice level with additional Sriracha if desired.
- Shape the Onigiri: With wet hands (to prevent sticking), take a handful of sushi rice (about 1/2 cup) and flatten it in your palm. Place a spoonful of the spicy tuna mixture in the center, then mold the rice around the filling, shaping it into a triangle or ball. Repeat this process until all the rice and filling are used.
- Wrap with Nori: Cut the nori into strips and wrap a piece around each onigiri. This adds flavor and makes the onigiri easier to hold. If desired, sprinkle sesame seeds on top for added texture and flavor.
- Serve or Store: You can serve the onigiri immediately or store them in an airtight container in the refrigerator for up to 3 days. If storing, wrap each onigiri in plastic wrap to maintain freshness.
Extra Tips: When making Spicy Tuna Onigiri, remember that your hands should be wet when shaping the rice to prevent it from sticking. If you want to make your onigiri even more flavorful, consider adding ingredients like chopped pickled vegetables or avocado to the filling. For a fun twist, you can also experiment with different sauces or marinades for the tuna. Always taste your filling before assembling to adjust the seasoning to your preference!
Japanese Potato Salad
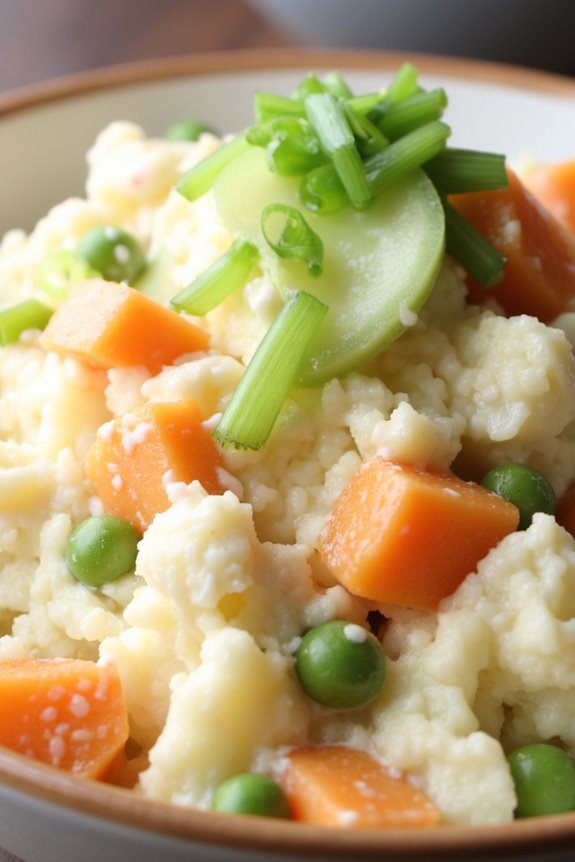
Japanese Potato Salad is a delightful and creamy side dish that has become a staple in bento boxes across Japan. This dish features a unique blend of flavors and textures, combining the sweetness of Japanese mayonnaise with crunchy vegetables and tender potatoes.
Unlike Western potato salads, which often lean heavily on mustard and vinegar, Japanese Potato Salad is known for its smooth, rich texture and subtle sweetness, making it a perfect complement to grilled meats, rice, or other dishes in your bento meal prep.
The beauty of Japanese Potato Salad lies in its versatility. You can customize it with various vegetables or even add proteins like boiled eggs or ham to suit your taste preferences. It’s also an excellent dish for meal prep, as it can be made in advance and stored in the refrigerator, allowing the flavors to meld together beautifully.
Whether you’re preparing a bento lunch for work or a family dinner, this creamy and satisfying potato salad is sure to be a hit.
Ingredients (Serves 4-6)
- 4 medium-sized potatoes (about 2 pounds)
- 1 medium carrot, peeled and diced
- 1/2 cucumber, thinly sliced
- 1/4 cup green peas (fresh or frozen)
- 1/2 cup Japanese mayonnaise
- 1 tablespoon rice vinegar
- 1 teaspoon sugar
- Salt and pepper to taste
- 1/4 cup chopped green onions (optional)
Cooking Instructions
- Prepare the Potatoes: Begin by washing and peeling the potatoes. Cut them into quarters and place them in a large pot filled with salted water. Bring the water to a boil and let the potatoes cook for about 15-20 minutes or until they’re fork-tender but not mushy. Drain the potatoes and set them aside to cool slightly.
- Cook the Carrots and Peas: While the potatoes are cooking, place the diced carrots and green peas in a small saucepan. Add enough water to cover the vegetables and bring it to a gentle boil. Cook for about 3-5 minutes until the carrots are tender but still crisp. Drain and rinse them under cold water to stop the cooking process, then set aside.
- Mash the Potatoes: Once the potatoes are cool enough to handle, transfer them to a large mixing bowl. Use a potato masher or fork to mash the potatoes until they’re smooth but still have some lumps for texture. Be careful not to over-mash, as you want to maintain a bit of chunkiness.
- Combine Ingredients: Add the cooled carrots, peas, and sliced cucumber to the mashed potatoes. In a separate small bowl, mix together the Japanese mayonnaise, rice vinegar, sugar, salt, and pepper. Pour this dressing over the potato mixture and gently fold everything together until well combined. Taste and adjust the seasoning if necessary.
- Chill and Serve: Cover the bowl with plastic wrap and refrigerate the potato salad for at least 30 minutes before serving. This allows the flavors to meld together nicely. When ready to serve, sprinkle with chopped green onions if desired, and enjoy your Japanese Potato Salad as part of your bento meal prep!
Extra Tips
For the best flavor experience, try using Japanese mayonnaise, which is richer and sweeter than regular mayonnaise. If you prefer a bit of crunch, you can add finely chopped bell peppers or even corn to the salad.
Additionally, feel free to experiment with different vegetables based on what you have on hand or your family’s preferences. This dish also pairs wonderfully with a variety of proteins, making it a versatile addition to any meal prep.
Ultimately, remember that Japanese Potato Salad can be made a day in advance, which enhances its flavor even further!
Grilled Salmon With Pickled Vegetables
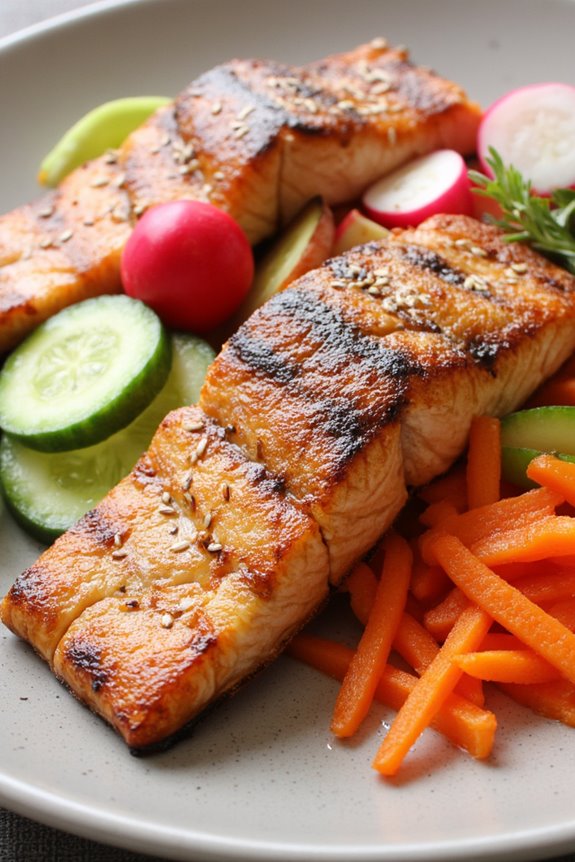
Grilled Salmon with Pickled Vegetables is a vibrant and nutritious dish that combines the rich flavors of grilled salmon with the tangy crunch of pickled vegetables. This light and healthy meal is perfect for bento meal prep, as it can be made in advance and stored for later use. The combination of the flaky, succulent salmon and the zesty pickled vegetables not only provides a delicious contrast in flavors and textures but also packs a punch of nutrients.
Preparing this dish is simple and straightforward, making it an ideal choice for both seasoned cooks and beginners alike. The pickling process infuses the vegetables with a zesty flavor that complements the grilled salmon beautifully. Serve it in a bento box along with some steamed rice or quinoa for a complete and satisfying meal that’s both delicious and visually appealing.
Ingredients (Serves 4-6):
- 4-6 salmon fillets (about 6 ounces each)
- 2 tablespoons olive oil
- Salt and pepper, to taste
- 1 teaspoon garlic powder
- 1 teaspoon smoked paprika
- 1 cup cucumber, thinly sliced
- 1 cup radishes, thinly sliced
- 1 cup carrots, julienned
- 1 cup rice vinegar
- 1 cup water
- 2 tablespoons sugar
- 1 teaspoon salt
- 1 teaspoon sesame seeds (optional, for garnish)
Cooking Instructions:
1. Prepare the Pickled Vegetables: In a medium saucepan, combine the rice vinegar, water, sugar, and salt. Bring the mixture to a simmer over medium heat, stirring until the sugar and salt are dissolved. Remove from heat and let it cool slightly.
Place the sliced cucumbers, radishes, and carrots in a clean glass jar or container. Pour the vinegar mixture over the vegetables, ensuring they’re fully submerged. Let the vegetables pickle for at least 30 minutes, or refrigerate for up to 24 hours for a more intense flavor.
2. Season the Salmon: While the pickled vegetables are preparing, preheat your grill or grill pan over medium-high heat. Pat the salmon fillets dry with paper towels and season both sides with olive oil, salt, pepper, garlic powder, and smoked paprika.
This seasoning will enhance the natural flavor of the salmon.
3. Grill the Salmon: Place the seasoned salmon fillets skin-side down on the grill. Cook for about 4-5 minutes, then carefully flip them over and grill for another 4-5 minutes, or until the salmon is cooked through and flakes easily with a fork.
The internal temperature should reach 145°F (63°C). Remove from the grill and let it rest for a few minutes.
4. Assemble the Dish: In bento boxes or serving plates, place a portion of grilled salmon alongside a generous serving of pickled vegetables. Sprinkle sesame seeds over the vegetables if desired for an added crunch and nuttiness.
Extra Tips:
When grilling the salmon, be mindful of the cooking time to avoid overcooking, which can make the fish dry.
If you’re meal prepping, you can store the grilled salmon and pickled vegetables separately to maintain freshness. Additionally, feel free to experiment with other vegetables for pickling, such as bell peppers or red onions, to create your own unique flavor combinations.
Enjoy your delicious and healthy Grilled Salmon with Pickled Vegetables!
Tamagoyaki (Japanese Omelette)

Tamagoyaki, a delightful Japanese omelette, is a staple in many bento boxes, adding both flavor and a pop of color. This dish is characterized by its slightly sweet, savory taste and its unique layered texture, achieved through a technique of rolling and folding the egg mixture as it cooks.
Whether served as a breakfast item or as part of a lunch, Tamagoyaki isn’t only delicious but also visually appealing, making it a favorite among both children and adults.
Preparing Tamagoyaki might seem challenging at first, but with a little practice, you can master this artful omelette. The key to a perfect Tamagoyaki lies in the balance of flavors and the technique of cooking the egg mixture in a rectangular pan. This recipe will guide you through the steps to create a beautiful, fluffy Tamagoyaki that can be enjoyed on its own or as a part of your bento meal prep.
Ingredients (Serves 4-6):
- 6 large eggs
- 2 tablespoons soy sauce
- 1 tablespoon mirin (Japanese sweet rice wine)
- 1 tablespoon sugar
- 1 tablespoon dashi stock (optional)
- 1 tablespoon vegetable oil
- Additional soy sauce for serving (optional)
Cooking Instructions:
- Prepare the Egg Mixture: In a large mixing bowl, crack open the eggs and whisk them thoroughly until the yolks and whites are fully combined. Then, add the soy sauce, mirin, sugar, and dashi stock if using. Whisk the mixture until everything is well blended, making sure that the sugar is dissolved.
- Heat the Pan: Place a rectangular or square non-stick frying pan (often used for Tamagoyaki) over medium heat. Add a small amount of vegetable oil, using a paper towel to spread it evenly across the surface of the pan. This will prevent the eggs from sticking and allow for easy rolling.
- Cook the First Layer: Pour a small amount of the egg mixture (about a quarter of the total) into the heated pan, tilting the pan to make sure the mixture spreads evenly. Cook for about 1-2 minutes, or until the surface is just set but still slightly runny.
- Roll the Omelette: Once the first layer is cooked, use chopsticks or a spatula to carefully roll the omelette away from you, creating a log shape. Push this rolled omelette to the back of the pan.
- Add More Mixture: Oil the pan again if needed, and pour another quarter of the egg mixture into the pan, lifting the rolled omelette slightly to allow the new mixture to flow underneath. Cook until set, then roll the existing omelette over the new layer, rolling it tightly.
- Repeat the Process: Continue this process of adding more egg mixture and rolling until all of the egg mixture is used. The final shape should be a thick, rolled omelette.
- Cool and Slice: Once cooked, remove the Tamagoyaki from the pan and let it cool slightly. Use a sharp knife to slice it into bite-sized pieces. You can either serve it warm or allow it to cool completely for inclusion in your bento box.
Extra Tips:
When making Tamagoyaki, practice is key! Don’t be discouraged if your first few attempts don’t turn out perfectly. The heat should be moderate, as cooking too fast can lead to uneven layers.
Experiment with the sweetness by adjusting the amount of sugar to suit your taste. For added flavor, consider incorporating ingredients like finely chopped green onions or cooked vegetables into the egg mixture.
Finally, using a rectangular Tamagoyaki pan will help achieve the traditional shape, but a round pan will work in a pinch as long as you adapt your rolling technique. Enjoy your homemade Tamagoyaki!
Yakisoba Noodle Salad
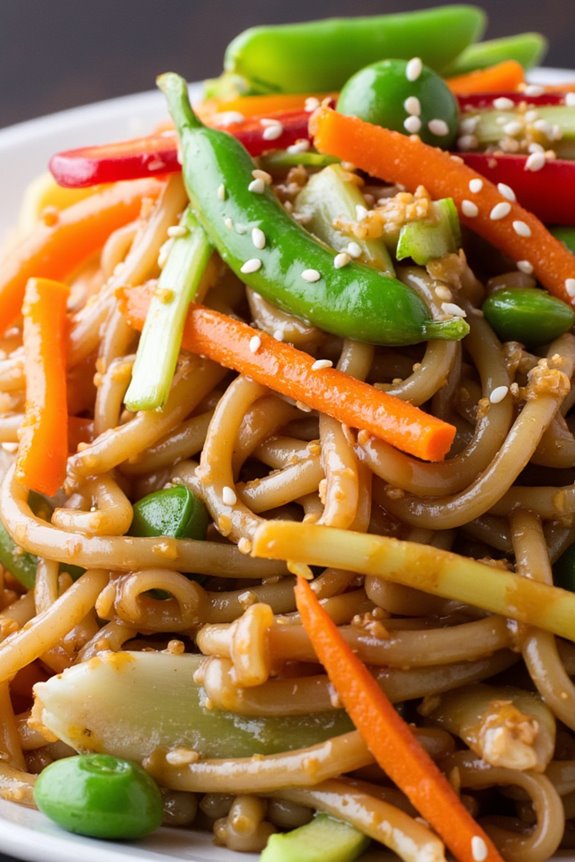
Yakisoba Noodle Salad is a vibrant and flavorful dish that combines stir-fried noodles with fresh vegetables and a tangy dressing, making it a perfect addition to your bento meal prep. Inspired by traditional Japanese yakisoba, this salad provides all the delicious flavors of the original dish but in a revitalizing, cold format that can be enjoyed at any time. The colorful vegetables and savory sauce create a harmonious balance that isn’t only visually appealing but also packed with nutrients.
This dish is incredibly versatile; you can easily customize it by adding your favorite proteins, such as grilled chicken, shrimp, or tofu, or by substituting seasonal vegetables for a fresh twist. Preparing Yakisoba Noodle Salad in advance is a great way to save time during the week while ensuring you have a healthy and satisfying meal ready to go. Serve it as a main dish or as a side to complement any Asian-inspired meal.
Ingredients (Serves 4-6):
- 8 oz yakisoba noodles (or soba noodles)
- 1 cup shredded cabbage
- 1 cup julienned carrots
- 1 bell pepper, thinly sliced (red or green)
- 1 cup snap peas, trimmed
- 3 green onions, chopped
- 1/4 cup soy sauce
- 2 tablespoons sesame oil
- 2 tablespoons rice vinegar
- 1 tablespoon sugar
- 1 teaspoon grated ginger
- 1 teaspoon minced garlic
- Sesame seeds for garnish (optional)
Cooking Instructions:
- Cook the Noodles: Bring a large pot of water to a boil. Add the yakisoba noodles and cook according to package instructions, usually around 3-5 minutes. Once cooked, drain and rinse under cold water to stop the cooking process. Set aside to cool.
- Prepare the Vegetables: While the noodles are cooking, prepare your vegetables. Shred the cabbage, julienne the carrots, slice the bell pepper, and trim the snap peas. Also, chop the green onions, separating the green tops from the white bottoms.
- Make the Dressing: In a small bowl, whisk together the soy sauce, sesame oil, rice vinegar, sugar, grated ginger, and minced garlic until the sugar is dissolved. This dressing will bring all the flavors together.
- Combine Ingredients: In a large mixing bowl, combine the cooled noodles with the shredded cabbage, carrots, bell pepper, snap peas, and the white parts of the green onions. Pour the dressing over the mixture and toss gently to coat all the ingredients evenly.
- Chill the Salad: Once everything is well combined, cover the bowl with plastic wrap or transfer the salad to an airtight container. Place it in the refrigerator for at least 30 minutes to allow the flavors to meld.
- Serve: Before serving, give the salad a good toss and adjust seasoning if needed. Garnish with the green tops of the green onions and a sprinkle of sesame seeds if desired.
Extra Tips:
For added protein, consider incorporating grilled chicken, shrimp, or tofu into the salad. You can also mix in other vegetables such as cucumbers or radishes for extra crunch.
This Yakisoba Noodle Salad can be stored in the refrigerator for up to 3 days, making it an excellent choice for meal prep. Just be sure to keep the dressing separate until ready to serve to maintain the freshness of the ingredients.
Edamame and Corn Salad
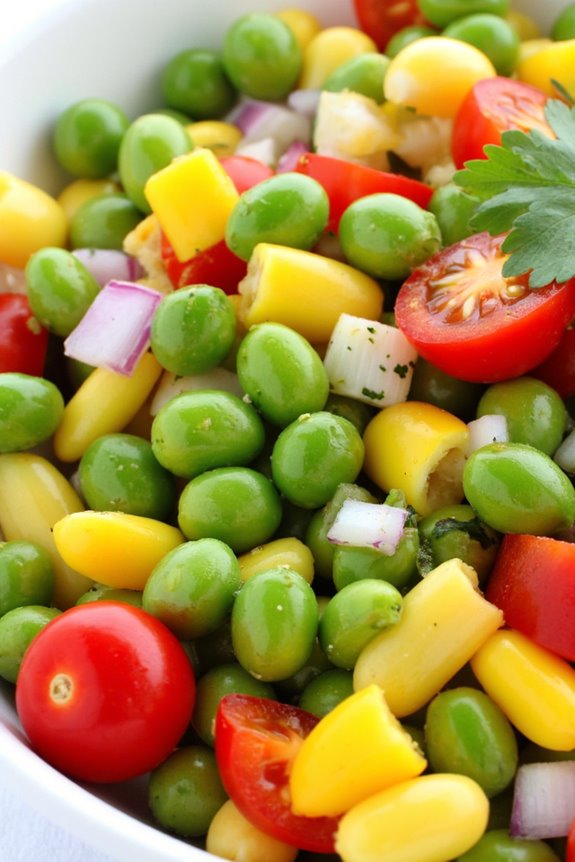
Edamame and Corn Salad is a revitalizing and vibrant dish that’s perfect for meal prep. This delightful salad combines the nutty flavor of edamame with the sweetness of corn, making it a nutritious and colorful addition to any bento box. Packed with protein, fiber, and a variety of vitamins, this salad isn’t just healthy; it’s also incredibly easy to prepare, making it a favorite among busy individuals looking for quick and delicious meal options.
The salad can be enjoyed on its own as a light lunch, served as a side dish at dinner, or added to a grain bowl for a more filling meal. With the right balance of flavors and textures, this Edamame and Corn Salad is sure to impress your family and friends. Plus, it keeps well in the fridge, so you can make it ahead of time and enjoy it throughout the week.
Ingredients (Serves 4-6)
- 2 cups shelled edamame (cooked and cooled)
- 2 cups corn kernels (fresh, frozen, or canned)
- 1 red bell pepper, diced
- 1 small red onion, finely chopped
- 1 cup cherry tomatoes, halved
- 1/4 cup fresh cilantro, chopped
- 1/4 cup olive oil
- 2 tablespoons lime juice
- 1 teaspoon honey or agave syrup
- Salt and pepper to taste
Cooking Instructions
- Prepare the Edamame: If using frozen edamame, bring a pot of water to a boil and cook the edamame for 5-7 minutes until tender. Drain and rinse under cold water to stop the cooking process. If using fresh edamame, simply steam them until tender. Set aside to cool.
- Cook the Corn: If using fresh corn, you can grill or boil the corn on the cob for about 5-7 minutes. Once cooled, cut the kernels off the cob. If using frozen corn, simply thaw it in a bowl of warm water, then drain well. For canned corn, drain and rinse before adding to the salad.
- Chop the Vegetables: While the edamame and corn are cooling, dice the red bell pepper, finely chop the red onion, and halve the cherry tomatoes. Make sure to chop the vegetables into bite-sized pieces for easy mixing and eating.
- Combine the Ingredients: In a large mixing bowl, combine the cooled edamame, corn, diced red bell pepper, chopped red onion, halved cherry tomatoes, and chopped cilantro. Gently toss the mixture to evenly distribute the ingredients.
- Make the Dressing: In a small bowl, whisk together the olive oil, lime juice, honey (or agave syrup), and a pinch of salt and pepper. Taste and adjust the seasoning if necessary.
- Dress the Salad: Pour the dressing over the salad and toss gently to coat all the ingredients evenly. Allow the salad to sit for about 10-15 minutes to let the flavors meld together before serving.
- Serve or Store: Serve immediately or store in an airtight container in the refrigerator for up to 3 days. This salad is great served chilled or at room temperature.
Extra Tips
For added flavor and texture, consider incorporating some avocado or diced cucumber into the salad. If you want a little kick, you can also add some diced jalapeño or a sprinkle of red pepper flakes.
This salad is incredibly versatile, so feel free to customize it with your favorite veggies or use leftover ingredients you have on hand. Enjoy your delicious and nutritious Edamame and Corn Salad!
Chicken Katsu With Cabbage Slaw
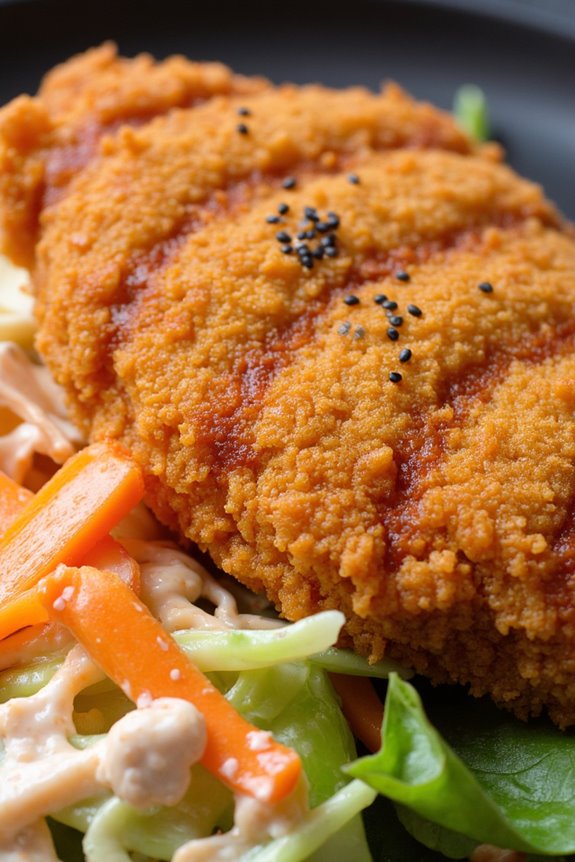
Chicken Katsu is a popular Japanese dish featuring breaded and deep-fried chicken cutlets, served with a side of tangy cabbage slaw. This meal isn’t only delicious but also versatile, making it a perfect candidate for meal prep. When prepared in advance, Chicken Katsu can be easily reheated, and the invigorating slaw adds a crunchy contrast to the crispy chicken, making each bite a delight.
Whether you’re packing lunches for the week or planning a family dinner, this dish is sure to impress.
The key to perfect Chicken Katsu lies in the technique of breading the chicken. The chicken is pounded to an even thickness, coated in flour, dipped in egg, and finally coated in panko breadcrumbs to guarantee a crispy outer layer.
Paired with a simple yet flavorful cabbage slaw, this meal isn’t only satisfying but also balanced with protein and vegetables. Let’s explore the ingredients and cooking process so you can enjoy this delightful dish!
Ingredients (serving size: 4-6 people)
- 4 boneless, skinless chicken breasts
- 1 cup all-purpose flour
- 2 large eggs
- 2 cups panko breadcrumbs
- Salt and pepper, to taste
- Vegetable oil, for frying
- 4 cups finely shredded cabbage
- 1 carrot, grated
- 1/4 cup mayonnaise
- 2 tablespoons rice vinegar
- 1 tablespoon sugar
- 1 teaspoon sesame oil
- Sesame seeds, for garnish (optional)
- Tonkatsu sauce, for serving (optional)
Cooking Instructions
- Prepare the Chicken: Start by placing the chicken breasts between two pieces of plastic wrap or parchment paper. Using a meat mallet or rolling pin, pound the chicken to about 1/2 inch thickness. This guarantees even cooking and tenderness. Season both sides with salt and pepper.
- Set Up Breading Station: In three separate shallow bowls, place the flour, beaten eggs, and panko breadcrumbs. Make sure to season the flour lightly with salt and pepper. This station will allow you to coat the chicken efficiently without creating a mess.
- Bread the Chicken: Take one chicken breast and dredge it in the flour, shaking off any excess. Next, dip it into the beaten eggs, allowing any excess to drip off, and finally coat it with panko breadcrumbs, pressing gently to guarantee the breadcrumbs adhere well. Repeat this process for all chicken breasts.
- Fry the Chicken: In a large skillet, heat about 1/2 inch of vegetable oil over medium-high heat. When the oil is hot (you can test it by dropping a few breadcrumbs into the oil; they should sizzle), carefully place the breaded chicken in the skillet. Fry for about 4-5 minutes on each side, or until golden brown and cooked through. Remove the chicken and drain on paper towels.
- Make the Cabbage Slaw: In a large bowl, combine the shredded cabbage and grated carrot. In a separate bowl, whisk together the mayonnaise, rice vinegar, sugar, and sesame oil until smooth. Pour the dressing over the cabbage mixture and toss to combine. Adjust seasoning with salt and pepper to taste.
- Serve: Slice the Chicken Katsu into strips and serve alongside a generous portion of cabbage slaw. Drizzle with tonkatsu sauce and sprinkle with sesame seeds, if desired.
Extra Tips
For an even crispier texture, you can double-bread the chicken by repeating the egg and panko steps. Additionally, if you’re preparing this meal ahead of time, consider storing the cooked chicken and slaw separately to maintain the crispiness of the chicken.
Reheat the chicken in an oven or air fryer for best results, guaranteeing it stays crunchy without becoming soggy. Enjoy your delicious Chicken Katsu with Cabbage Slaw!
Sesame Ginger Quinoa Bowl
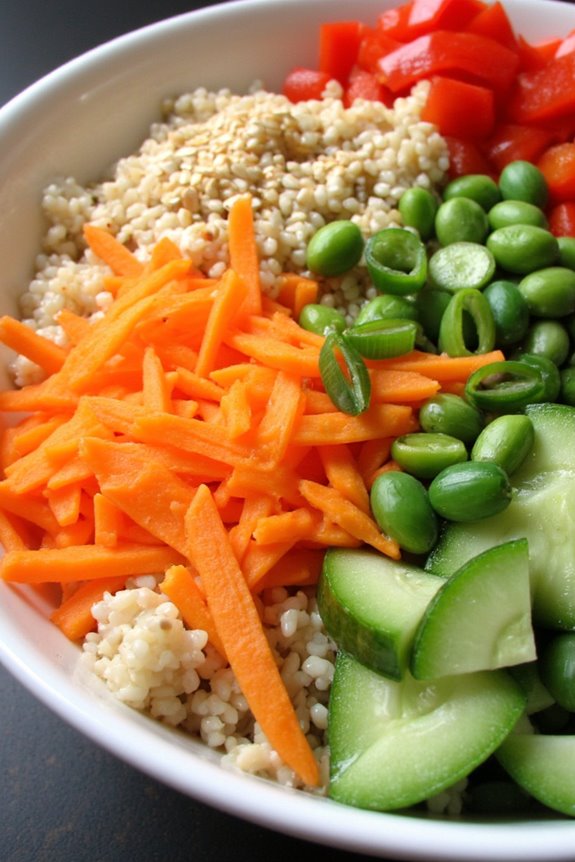
The Sesame Ginger Quinoa Bowl is a vibrant and nutritious dish that brings together the wholesome goodness of quinoa with a delightful blend of sesame and ginger flavors. This meal isn’t only easy to prepare but also perfect for meal prepping, making it an ideal choice for busy individuals looking to maintain a healthy diet.
Packed with fresh vegetables and a zesty dressing, this bowl can be customized to suit your taste preferences, ensuring that you never get bored with your meals. In addition to being delicious, the Sesame Ginger Quinoa Bowl is rich in protein, fiber, and essential nutrients.
The base of fluffy quinoa is complemented by a medley of colorful vegetables, while the sesame-ginger dressing ties everything together with a savory punch. Whether you enjoy it for lunch, dinner, or as a quick snack, this dish is sure to satisfy your cravings while keeping you nourished.
Ingredients (Serves 4-6):
- 1 cup quinoa
- 2 cups vegetable broth or water
- 1 cup shredded carrots
- 1 bell pepper, diced (any color)
- 1 cup cucumber, diced
- 1 cup edamame (shelled and cooked)
- 1/4 cup green onions, sliced
- 1/4 cup sesame seeds
- 1/4 cup soy sauce or tamari
- 3 tablespoons sesame oil
- 2 tablespoons fresh ginger, grated
- 2 tablespoons rice vinegar
- 1 tablespoon honey or maple syrup (optional)
- Salt and pepper to taste
Cooking Instructions:
1. Rinse the Quinoa: Place the quinoa in a fine-mesh strainer and rinse it under cold water for about 1-2 minutes. This step helps to remove any bitterness from the quinoa’s natural coating, known as saponin.
2. Cook the Quinoa: In a medium pot, combine the rinsed quinoa and vegetable broth (or water). Bring it to a boil over medium-high heat. Once boiling, reduce the heat to low, cover, and let it simmer for about 15 minutes or until the liquid is absorbed and the quinoa is fluffy.
Remove from heat and let it sit covered for 5 minutes, then fluff with a fork.
3. Prepare the Vegetables: While the quinoa is cooking, chop the bell pepper, cucumber, and green onions. Shred the carrots if they aren’t pre-shredded. You can also prepare your edamame if using frozen, by cooking it according to the package instructions.
4. Make the Dressing: In a small bowl, whisk together the soy sauce (or tamari), sesame oil, grated ginger, rice vinegar, and honey (if using). Taste and adjust seasoning as necessary with salt and pepper.
5. Combine the Ingredients: In a large mixing bowl, combine the cooked quinoa, shredded carrots, diced bell pepper, cucumber, edamame, and sliced green onions. Pour the dressing over the mixture and toss gently until everything is well coated.
6. Serve and Garnish****: Divide the quinoa bowl into serving bowls and sprinkle sesame seeds on top for garnish. You can also add additional toppings like avocado or sliced almonds if desired.
Extra Tips:
To enhance the flavors of your Sesame Ginger Quinoa Bowl, consider marinating the vegetables in the dressing for a short period before serving. This allows the ingredients to soak up the flavors more deeply.
Additionally, feel free to switch up the vegetables based on what you have on hand or what’s in season. This dish is versatile, so you can easily add proteins such as grilled chicken, tofu, or tempeh to make it a heartier meal.
Prepare a large batch and store individual portions in airtight containers for quick and easy lunches or dinners throughout the week.
Fruit and Yogurt Parfait
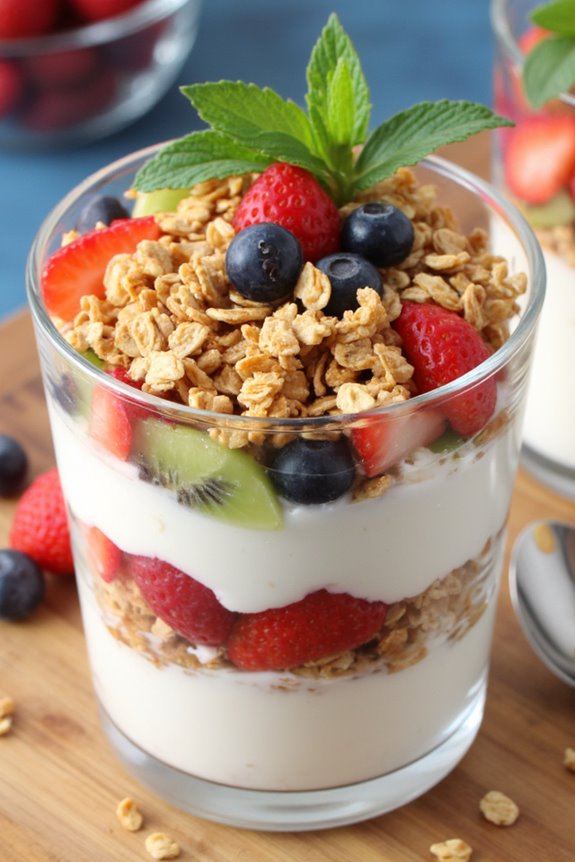
Fruit and yogurt parfaits are a delicious and nutritious addition to your bento meal prep repertoire. They combine creamy yogurt, fresh fruits, and crunchy granola to create a satisfying and balanced dish that can be enjoyed any time of the day. Perfect for breakfast, a snack, or even dessert, these parfaits aren’t only visually appealing but also customizable to suit your taste preferences and dietary needs.
In addition to being a healthy choice, fruit and yogurt parfaits are easy to prepare and can be made in advance, making them an excellent option for meal prepping. Layering the ingredients in jars or containers not only helps with portion control but also keeps the flavors fresh. With a variety of fruits to choose from, you can mix and match to create different flavor profiles, ensuring you never get bored of this delightful treat.
Ingredients (Serves 4-6)
- 4 cups of Greek yogurt (plain or flavored)
- 2 cups of granola
- 4 cups of mixed fresh fruits (e.g., strawberries, blueberries, bananas, kiwi)
- 2 tablespoons of honey or maple syrup (optional)
- 1 teaspoon of vanilla extract (optional)
- Fresh mint leaves for garnish (optional)
Cooking Instructions
- Prepare the Fruits: Start by washing and slicing your fresh fruits as necessary. For strawberries, hull and slice them; for bananas, peel and slice them into rounds; and for kiwi, peel and slice them into rounds or half-moons. Aim for a colorful mix of fruits to create an appealing parfait.
- Mix the Yogurt: If you choose to enhance the flavor of your yogurt, mix in the honey (or maple syrup) and vanilla extract in a bowl. Stir until well combined. This step is optional, as plain yogurt is delicious on its own, but it can add a touch of sweetness if desired.
- Layer the Ingredients: In clear glasses or containers, start layering your parfait. Begin with a layer of yogurt at the bottom, followed by a layer of granola, and then a layer of mixed fruits. Repeat the layering process until the containers are filled, finishing with a layer of fruit on top.
- Garnish and Serve: If desired, add a sprig of fresh mint on top of each parfait for a pop of color and freshness. Cover the parfaits with lids or plastic wrap if you’re meal prepping for later consumption.
- Refrigerate: If you aren’t serving the parfaits immediately, store them in the refrigerator. They can be kept for up to 2-3 days, but it’s best to add the granola just before serving to maintain its crunch.
Extra Tips
When preparing fruit and yogurt parfaits, consider varying the textures and flavors to keep things interesting. You can use different types of yogurt, such as dairy-free options or flavored varieties, based on your dietary preferences.
Additionally, feel free to substitute granola with nuts, seeds, or even crushed cookies for a different crunch. Experiment with seasonal fruits to make the most of what’s available and to keep your parfaits fresh and exciting!