

Exploring the world of Japanese cuisine is such a delightful experience, especially with the vibrant and crisp vegetable dishes that bring any meal to life. These recipes not only add a pop of color but also deliver a refreshing crunch that enhances your dining experience. From tangy pickles to perfectly grilled eggplant, each dish offers a unique charm and flavor. Let’s uncover these delightful sides that can transform your meals into something truly special. Whether you’re looking to brighten up a weeknight dinner or impress at your next gathering, these recipes are sure to inspire.
Tsukemono (Japanese Pickles)
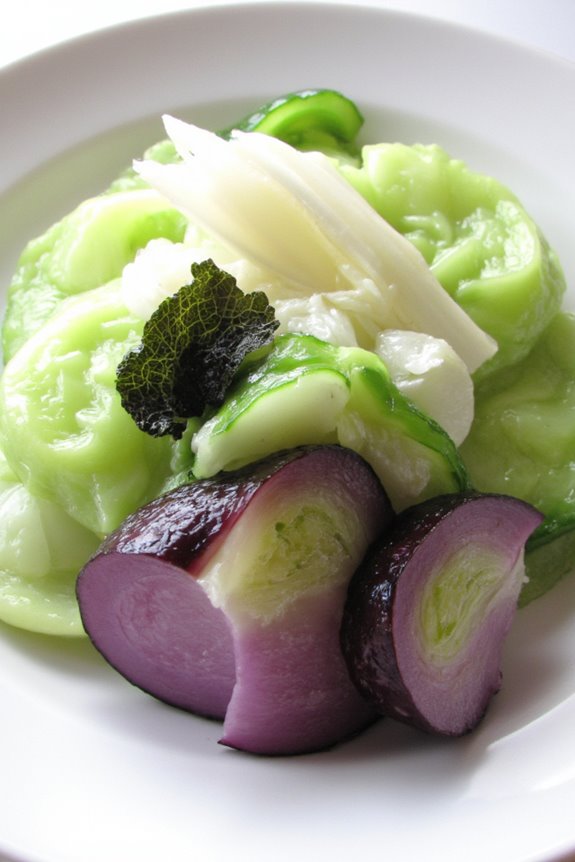
Tsukemono, or Japanese pickles, are a staple of Japanese cuisine, known for their vibrant colors and invigorating crunch. They not only enhance the flavor of rice and other dishes but also add a beautiful aesthetic to any meal.
The art of making Tsukemono involves various vegetables, each pickled in a unique way, allowing for a variety of tastes and textures. Popular vegetables for Tsukemono include daikon radish, cucumbers, and eggplant, which are often seasoned with salt, vinegar, and sometimes miso or soy sauce.
Making Tsukemono at home is surprisingly simple and requires only a few ingredients. The process of pickling vegetables can take from a few hours to a couple of days, depending on the method used. The result is a delightful array of pickled vegetables that can be served as a side dish, appetizer, or even a palate cleanser between courses.
Whether you enjoy them as a zesty accompaniment to your sushi or as a colorful addition to your bento box, homemade Tsukemono will surely elevate your Japanese culinary experience.
Ingredients (Serves 4-6):
- 1 medium daikon radish
- 2 cucumbers
- 1 small eggplant
- ½ cup salt
- 1 cup rice vinegar
- ½ cup sugar
- 1 tablespoon soy sauce (optional)
- 1 tablespoon chili flakes (optional)
- 1 piece of kombu (dried kelp, optional)
Cooking Instructions:
- Prepare the Vegetables: Begin by thoroughly washing the daikon radish, cucumbers, and eggplant. Peel the daikon and slice it into thin rounds or half-moons. For the cucumbers, cut off the ends and slice them into thin rounds or quarters. For the eggplant, slice it lengthwise into thin strips.
- Salting the Vegetables: In a large bowl, sprinkle the salt over the sliced vegetables. Toss the vegetables gently to make sure they’re evenly coated with salt. Let them sit for about 30 minutes. This process will draw out excess moisture from the vegetables, enhancing their crunchiness and flavor.
- Prepare the Pickling Liquid: In a separate bowl, combine the rice vinegar, sugar, soy sauce (if using), and chili flakes (if desired). Stir the mixture until the sugar is fully dissolved. This will be your pickling solution.
- Combine Vegetables and Pickling Liquid: After the vegetables have released some moisture, rinse them under cold water to remove excess salt. Drain well and then place them in a clean jar or container. Pour the pickling liquid over the vegetables, making sure they’re fully submerged. If using, add a piece of kombu for added flavor.
- Pickling Process: Seal the jar or container and let it sit at room temperature for 4 to 6 hours for a quick pickling method. For deeper flavors, refrigerate and let it pickle for at least 24 hours before serving. The longer you let them sit, the more intense the flavors will become.
Extra Tips:
When making Tsukemono, feel free to experiment with different vegetables and flavorings based on your preferences. Common additions can include carrots, radishes, or even fruits like plums.
Always make sure that the vegetables are fully submerged in the pickling liquid to prevent spoilage. Store any leftover Tsukemono in the refrigerator, where they can last for several weeks, allowing the flavors to deepen over time. Enjoy your homemade pickles with rice, sushi, or even as an invigorating snack!
Kyuuri No Sunomono (Cucumber Salad)
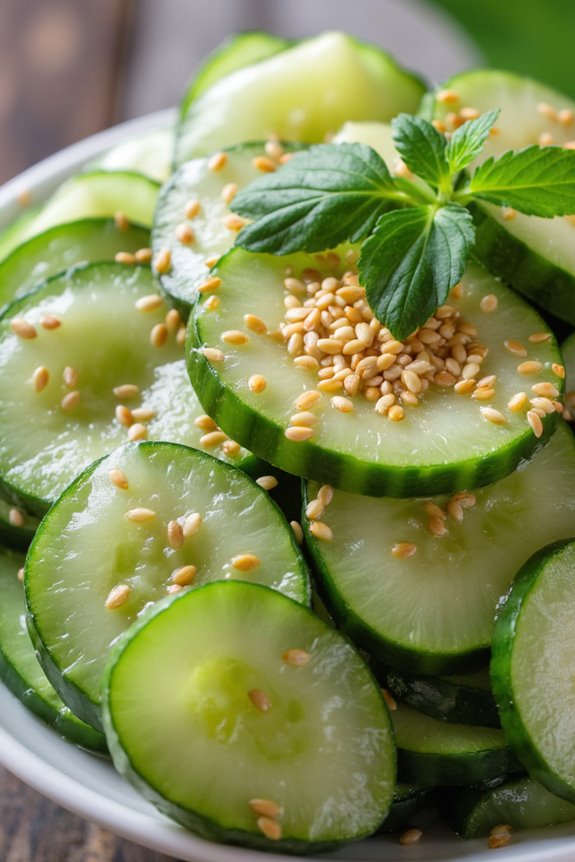
Kyuuri No Sunomono is a revitalizing Japanese cucumber salad that’s both simple to prepare and a delightful addition to any meal. This dish is characterized by its light and tangy flavor, which comes from the combination of rice vinegar, sugar, and soy sauce.
The crispness of the cucumbers, often enhanced with the addition of sesame seeds, creates an enjoyable texture that pairs perfectly with grilled meats or as a side dish to a larger Japanese feast.
This salad isn’t only quick to make but also versatile, allowing for variations with the addition of ingredients like wakame (seaweed) or radishes to enhance both the flavor and nutritional profile. Typically served chilled, Kyuuri No Sunomono is a perfect dish for hot summer days, providing a revitalizing crunch that balances out heavier dishes.
Ingredients (Serves 4-6):
- 2 large cucumbers
- 1 teaspoon salt
- 3 tablespoons rice vinegar
- 1 tablespoon sugar
- 1 tablespoon soy sauce
- 1 teaspoon sesame oil
- 1 tablespoon toasted sesame seeds
- Optional: wakame seaweed (rehydrated)
Cooking Instructions:
- Prepare the Cucumbers: Start by washing the cucumbers thoroughly. Using a vegetable peeler, peel the cucumbers if you prefer a milder flavor. Slice the cucumbers thinly, either into rounds or half-moons, depending on your preference.
- Salt the Cucumbers: Place the sliced cucumbers in a bowl and sprinkle them with salt. Toss them gently to make sure that the salt is evenly distributed. Let them sit for about 10-15 minutes. This process helps to draw out excess moisture from the cucumbers, making them crunchier and enhancing their flavor.
- Make the Dressing: In a separate bowl, whisk together the rice vinegar, sugar, soy sauce, and sesame oil until the sugar is completely dissolved. This mixture will serve as the dressing for your salad, providing a balance of sweet and tangy flavors.
- Combine the Ingredients: After the cucumbers have rested, gently squeeze them to remove any excess water. Add the cucumbers to the bowl with the dressing. If you’re using rehydrated wakame, add it at this stage. Toss everything together until the cucumbers are well coated in the dressing.
- Garnish and Serve: Transfer the salad to a serving dish and sprinkle the toasted sesame seeds on top for added flavor and texture. For the best experience, let the salad chill in the refrigerator for at least 30 minutes before serving, allowing the flavors to meld together.
Extra Tips:
For the best taste, use fresh, firm cucumbers, as they provide a satisfying crunch. You can also experiment with different types of cucumbers, such as Japanese cucumbers, which are thinner and have fewer seeds.
If you prefer a little heat, consider adding a sprinkle of shichimi togarashi (a Japanese spice blend) for a spicy kick. Adjust the sweetness and acidity of the dressing to match your personal taste, and feel free to add other vegetables like sliced radishes or carrots for additional color and flavor.
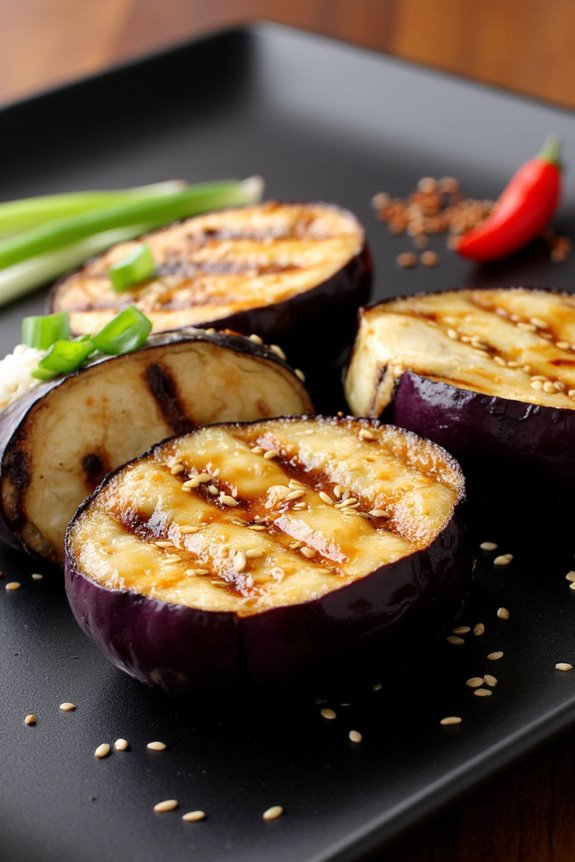
Nasu No Dengaku (Miso Glazed Eggplant)

Nasu No Dengaku is a traditional Japanese dish that highlights the delicate flavors of eggplant, enhanced by a rich and savory miso glaze. This dish, which translates to “eggplant with miso,” is particularly popular in summer, as it takes advantage of the eggplant’s peak season. The combination of the smoky, grilled eggplant and the sweet-salty miso glaze creates a delightful balance of flavors that can be enjoyed as a side dish or as a vegetarian main course.
To prepare Nasu No Dengaku, the eggplants are typically sliced in half and grilled to perfection. The grilling process not only adds a smoky flavor but also enhances the natural sweetness of the eggplant. Once they’re tender, they’re generously brushed with a miso mixture that includes ingredients like mirin and sugar, then broiled until the glaze is caramelized. This dish isn’t only tasty but also visually appealing, making it a great addition to any meal.
Ingredients (Serves 4-6):
- 4 medium-sized eggplants
- 1/2 cup white miso paste
- 1/4 cup mirin
- 2 tablespoons sugar
- 1 tablespoon sake (optional)
- 1 tablespoon sesame oil
- 2 green onions, finely chopped (for garnish)
- Sesame seeds (for garnish)
Cooking Instructions:
- Prepare the Eggplants: Start by rinsing the eggplants under cold water and then patting them dry with a towel. Cut each eggplant in half lengthwise, and make several diagonal slits in the flesh, being careful not to cut through the skin. This helps the eggplants cook evenly and allows the glaze to penetrate better.
- Grill the Eggplants: Preheat a grill or grill pan over medium heat. Brush the cut sides of the eggplants with sesame oil, then place them cut-side down on the grill. Grill for about 5-7 minutes, or until the eggplants are tender and have nice grill marks. Flip them over and grill the skin side for an additional 2-3 minutes.
- Make the Miso Glaze: In a small bowl, mix together the white miso paste, mirin, sugar, and sake (if using). Stir until the mixture is smooth and well combined. The glaze should be thick but spreadable; adjust the consistency by adding a bit more mirin or water if necessary.
- Apply the Miso Glaze: Once the eggplants are grilled and softened, remove them from the heat and place them on a baking sheet. Using a brush or a spoon, generously coat the cut sides of the eggplants with the miso glaze.
- Broil the Eggplants: Preheat your oven’s broiler. Place the baking sheet with the glazed eggplants under the broiler for about 3-5 minutes, or until the glaze is bubbling and caramelized. Keep a close eye on them to prevent burning.
- Serve and Garnish: Remove the eggplants from the oven and let them cool slightly. Transfer to a serving dish and sprinkle with finely chopped green onions and sesame seeds for garnish.
Extra Tips:
When preparing Nasu No Dengaku, using high-quality miso can greatly enhance the flavor of the dish. White miso is typically sweeter and milder, but you can experiment with yellow or red miso for a different depth of flavor.
Additionally, if you prefer a smokier taste, consider using a charcoal grill or adding a few drops of liquid smoke to your miso glaze. For a more complex flavor, you can also incorporate minced garlic or ginger into the glaze. Enjoy this dish warm or at room temperature!
Goma-ae (Sesame Spinach Salad)
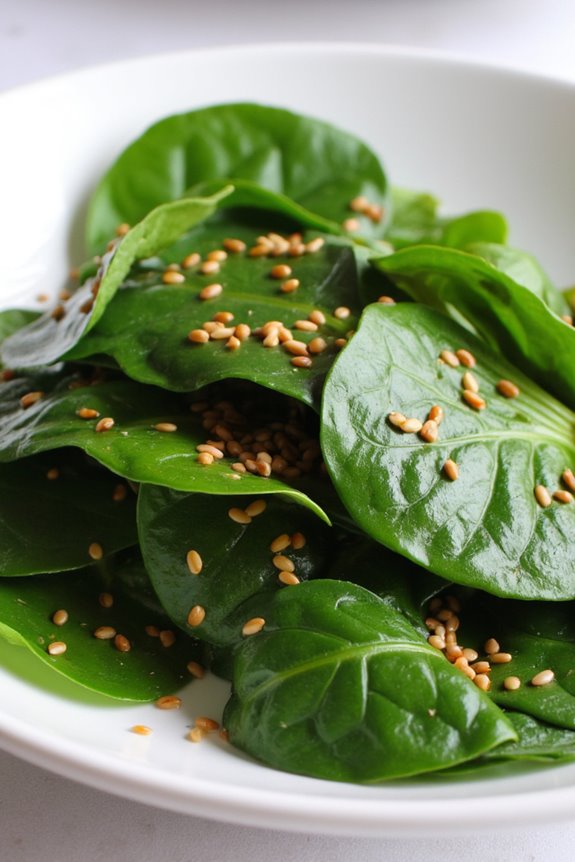
Goma-ae is a classic Japanese side dish that features spinach dressed in a rich and nutty sesame sauce. This simple yet flavorful salad isn’t only a delightful addition to any meal but also packs a nutritional punch, being rich in vitamins and minerals. The combination of fresh, tender spinach and the aromatic sesame paste creates a harmonious blend that enhances the natural flavors of the greens.
Traditionally served chilled or at room temperature, Goma-ae is perfect for complementing grilled meats or rice dishes.
Preparing Goma-ae is quick and straightforward, making it an ideal dish for busy weeknights or fancy dinner parties alike. The key to this recipe is the quality of the sesame paste (tahini or ground sesame seeds), as it greatly influences the flavor profile of the salad. With just a handful of ingredients, you can whip up a delicious and healthy Goma-ae that will impress your family and friends.
Ingredients (Serves 4-6)
- 1 pound fresh spinach
- 3 tablespoons sesame seeds (white or black)
- 2 tablespoons soy sauce
- 1 tablespoon mirin (sweet rice wine)
- 1 tablespoon sugar
- 1 teaspoon sesame oil
- Optional: 1 teaspoon ground sesame seeds for garnish
Cooking Instructions
- Prepare the Spinach: Begin by washing the fresh spinach thoroughly under cold running water to remove any dirt or grit. Once cleaned, bring a large pot of water to a boil. Add the spinach and blanch for about 1-2 minutes until just wilted. Be careful not to overcook the spinach; it should retain its vibrant green color.
- Cool the Spinach: After blanching, immediately transfer the spinach to a bowl of ice water. This shock will stop the cooking process and help preserve the bright color and crisp texture of the spinach. Allow it to cool for a few minutes, then drain well and gently squeeze out excess water.
- Toast the Sesame Seeds: In a dry skillet over medium heat, add the sesame seeds. Toast them for about 3-5 minutes, stirring frequently, until they’re golden brown and fragrant. Be cautious not to burn them. Once toasted, remove from heat and let them cool slightly.
- Make the Dressing: In a small bowl, combine the toasted sesame seeds (reserve a teaspoon for garnish), soy sauce, mirin, sugar, and sesame oil. Use a pestle or the back of a spoon to mash the sesame seeds into the mixture, creating a smooth paste. Adjust the flavor to your liking by adding more soy sauce or sugar if desired.
- Combine Spinach and Dressing: In a large mixing bowl, add the drained spinach and pour the sesame dressing over it. Gently toss to coat the spinach evenly with the dressing, being careful not to break the leaves.
- Serve: Transfer the Goma-ae to a serving platter or individual bowls. Garnish with the reserved toasted sesame seeds on top for added texture and presentation. Serve immediately or chill in the refrigerator for about 30 minutes before serving to enhance the flavors.
Extra Tips
For an extra layer of flavor, feel free to add finely chopped garlic or ginger to the dressing for a bit of zing. If you’re looking for a variation, you can substitute spinach with other leafy greens like kale or bok choy.
Additionally, for a more authentic taste, consider using freshly ground sesame seeds instead of pre-packaged sesame paste. Always taste the dressing before adding it to the spinach to confirm it’s balanced to your liking!
Yaki Nasu (Grilled Eggplant)
Yaki Nasu, or grilled eggplant, is a delightful Japanese dish that showcases the natural sweetness and umami of eggplants. This simple yet flavorful preparation is often served as a side dish or appetizer, allowing the rich taste of grilled eggplant to shine through. The dish is typically seasoned with a combination of soy sauce, mirin, and sesame oil, which enhances the eggplant’s flavor and gives it a lovely caramelized exterior when grilled.
Grilling the eggplant not only imparts a smoky flavor but also creates a tender, creamy texture that pairs beautifully with rice or can be enjoyed on its own. Yaki Nasu is a versatile dish that can be enjoyed hot off the grill or served at room temperature, making it a perfect addition to any Japanese meal or summer barbecue. Whether you’re a fan of eggplant or trying it for the first time, this dish is sure to impress!
Ingredients (Serves 4-6)
- 2 large Japanese eggplants
- 2 tablespoons soy sauce
- 1 tablespoon mirin
- 1 tablespoon sesame oil
- 1 teaspoon sugar
- 1 tablespoon sesame seeds (toasted)
- 2 green onions (finely chopped)
- Optional: chili flakes for garnish
Cooking Instructions
- Prepare the Eggplants: Start by washing and drying the eggplants. Cut them in half lengthwise, and then make shallow diagonal cuts on the flesh side of each half. This will help the eggplant absorb the marinade and allow for better grilling.
- Make the Marinade: In a small bowl, whisk together the soy sauce, mirin, sesame oil, and sugar until the sugar is dissolved. This marinade will flavor the eggplant and add depth to the dish.
- Marinate the Eggplants: Place the eggplant halves in a shallow dish, flesh side up. Pour the marinade over them, making certain they’re well coated. Allow them to marinate for at least 15-30 minutes, turning them occasionally to guarantee even flavor absorption.
- Preheat the Grill: Preheat your grill or grill pan over medium heat. If using a grill pan, lightly grease it with oil to prevent sticking.
- Grill the Eggplants: Once the grill is hot, place the marinated eggplant halves, flesh side down, onto the grill. Cook for about 5-7 minutes, or until the flesh is tender and you see nice grill marks. Flip them over and grill the skin side for an additional 3-5 minutes.
- Garnish and Serve: Remove the grilled eggplants from the grill and place them on a serving platter. Drizzle any remaining marinade over the top, then sprinkle with toasted sesame seeds and finely chopped green onions. Add chili flakes for a bit of heat if desired.
Extra Tips
When grilling eggplant, it’s essential to choose the right variety; Japanese eggplants are preferred for their sweetness and tender texture. If you can only find larger globe eggplants, consider salting them beforehand to draw out excess moisture and bitterness.
Additionally, experimenting with different marinades or adding toppings like grated daikon radish can elevate the dish even further. Enjoy your Yaki Nasu as a warm side dish or a revitalizing appetizer at any gathering!
Kinpira Gobo (Braised Burdock Root)
Kinpira Gobo is a traditional Japanese side dish that highlights the earthy flavor and unique crunch of burdock root, also known as gobo. This dish isn’t only healthy but also offers a delightful combination of sweet and savory flavors. Typically, it’s prepared with a mix of soy sauce, mirin, and sesame oil, which helps to enhance the natural taste of the burdock.
Kinpira Gobo is often served as part of a bento box or alongside rice, making it a staple in Japanese home cooking. To prepare Kinpira Gobo, the burdock root is first julienned, then sautéed with carrots, and finally simmered in a flavorful sauce. The dish is garnished with sesame seeds to add an extra layer of texture.
This simple yet delicious recipe can be enjoyed warm or at room temperature, making it versatile for any meal. The vibrant colors and appealing crunch make it a favorite among both kids and adults alike.
Ingredients (Serves 4-6):
- 1 medium burdock root (gobo)
- 1 medium carrot
- 2 tablespoons sesame oil
- 4 tablespoons soy sauce
- 2 tablespoons mirin
- 1 tablespoon sugar
- 1 tablespoon sake (optional)
- 1 tablespoon sesame seeds (for garnish)
- 1 teaspoon chili flakes (optional, for added spice)
Cooking Instructions:
1. Prepare the Vegetables: Begin by thoroughly washing the burdock root under running water to remove any dirt. Using a vegetable peeler, peel the outer skin of the burdock. Cut it into thin matchstick-sized pieces (julienne).
To prevent browning, soak the cut burdock in a bowl of water with a bit of vinegar while you prepare the other ingredients. Next, peel and julienne the carrot in the same way.
2. Sauté the Vegetables: Heat the sesame oil in a large skillet or wok over medium heat. Once hot, drain the burdock root and add it to the skillet along with the julienned carrot. Sauté the vegetables for about 5-7 minutes until they begin to soften and become fragrant.
3. Add Seasonings: In a small bowl, mix together the soy sauce, mirin, sugar, and sake (if using). Pour this mixture over the sautéed vegetables in the skillet. Stir well to guarantee that the burdock and carrot are evenly coated with the sauce.
4. Simmer: Allow the mixture to simmer for an additional 5-10 minutes, stirring occasionally until the liquid has reduced and the vegetables have absorbed the flavors. The burdock should be tender but still have some crunch.
5. Garnish and Serve: Once cooked, transfer the Kinpira Gobo to a serving dish. Sprinkle sesame seeds on top for garnish, and if desired, add chili flakes for a spicy kick. Serve warm or at room temperature as a side dish.
Extra Tips:
When cooking Kinpira Gobo, try to source fresh burdock root for the best flavor and texture. If you can’t find fresh burdock, you can use pre-packaged burdock root, which is sometimes available in Asian grocery stores.
Be mindful not to overcook the vegetables; they should remain crisp to retain their texture. Additionally, you can customize this dish by adding other vegetables such as bell peppers or snow peas for more color and flavor. Enjoy your cooking experience!
Itame Yasai (Stir-Fried Vegetables)

Itame Yasai, or stir-fried vegetables, is a delicious and healthy dish that’s a staple in Japanese cuisine. It’s an excellent way to enjoy a variety of fresh vegetables while capturing the essence of Japanese flavors. This dish isn’t only colorful and appealing but also quick and easy to prepare, making it perfect for busy weeknights or as a side dish for a larger meal.
The vegetables are typically crisp-tender, sautéed in a light sauce that enhances their natural sweetness and allows their vibrant colors to shine.
The beauty of Itame Yasai lies in its versatility; you can use a mix of your favorite vegetables, and the dish can be easily adapted to suit different dietary preferences. Commonly used vegetables include bell peppers, carrots, broccoli, and snow peas, but feel free to experiment with seasonal produce.
The simple preparation method guarantees that the nutrients and flavors are preserved, making it a wholesome addition to any meal.
Ingredients (Serves 4-6):
- 2 cups broccoli florets
- 1 cup sliced bell peppers (red, yellow, or green)
- 1 cup sliced carrots
- 1 cup snap peas or snow peas
- 1 cup sliced shiitake mushrooms
- 3 tablespoons vegetable oil
- 2 cloves garlic, minced
- 1 tablespoon soy sauce
- 1 tablespoon oyster sauce (optional)
- 1 teaspoon sesame oil
- Salt and pepper to taste
- Sesame seeds for garnish (optional)
Cooking Instructions:
1. Prepare the Vegetables: Wash and chop all the vegetables into uniform sizes to guarantee even cooking. Cut the broccoli into bite-sized florets, slice the bell peppers and carrots into thin strips, and trim the ends of the snap peas. Clean and slice the shiitake mushrooms. Having everything prepped will make the cooking process smoother and quicker.
2. Heat the Oil: In a large wok or frying pan, heat the vegetable oil over medium-high heat. Allow the oil to become hot but not smoking, which will help in achieving a good stir-fry and prevent the vegetables from steaming.
3. Add Garlic: Once the oil is hot, add the minced garlic and sauté for about 30 seconds until fragrant. Be careful not to burn the garlic, as it can become bitter and affect the flavor of the dish.
4. Stir-Fry the Vegetables: Add the broccoli, bell peppers, and carrots to the pan. Stir-fry for about 2-3 minutes, continuously tossing the vegetables in the oil to make sure they’re evenly coated and cooked.
Next, add the snap peas and shiitake mushrooms, continuing to stir-fry for another 2-3 minutes or until all the vegetables are tender-crisp.
5. Add Sauces: Once the vegetables are cooked to your liking, drizzle the soy sauce, oyster sauce (if using), and sesame oil over the vegetables. Toss everything together to make sure the sauce evenly coats the vegetables. Season with salt and pepper to taste.
6. Serve: Remove the stir-fried vegetables from the heat and transfer them to a serving platter. If desired, sprinkle sesame seeds on top for an added crunch and garnish.
Extra Tips:
For the best flavor and texture, make sure not to overcrowd the pan while stir-frying, as this can lead to steaming rather than frying. If you have too many vegetables, it’s better to cook them in batches.
Additionally, feel free to customize the recipe by adding protein such as tofu, chicken, or beef for a more substantial meal. Enjoy your Itame Yasai with steamed rice or noodles for a delicious and complete dish!
Shiraae (Tofu Salad)
Shiraae is a traditional Japanese dish that beautifully combines the creamy texture of tofu with a medley of fresh vegetables and a flavorful dressing. This dish isn’t only delicious but also packed with nutrients, making it a great addition to any meal.
The preparation involves mashing silken tofu with a blend of miso, sesame seeds, and other ingredients to create a rich dressing that envelops the crisp vegetables, offering a delightful balance of flavors and textures.
This tofu salad can be served as a side dish or a light main course, and it’s particularly popular during the warmer months. With its invigorating taste and vibrant colors, Shiraae is sure to impress your family and friends.
Let’s plunge into the ingredients and cooking instructions to create this delightful dish for 4-6 people.
Ingredients:
- 300g silken tofu
- 2 tablespoons white miso paste
- 1 tablespoon sesame paste (tahini)
- 1 tablespoon soy sauce
- 1 tablespoon rice vinegar
- 1 tablespoon mirin (sweet rice wine)
- 2 tablespoons roasted sesame seeds
- 1 carrot, julienned
- 1 cucumber, julienned
- 100g daikon radish, julienned
- 100g spinach, blanched and chopped
- 2 green onions, finely chopped
Cooking Instructions:
- Prepare the Tofu: Start by draining the silken tofu and wrapping it in a clean kitchen towel or paper towel. Place a weight (like a plate) on top to press out excess water for about 15-20 minutes. This will give the tofu a firmer texture for the salad.
- Make the Dressing: In a mixing bowl, combine the white miso paste, sesame paste, soy sauce, rice vinegar, and mirin. Use a whisk or fork to mix the ingredients until smooth and well combined. If the mixture is too thick, you can add a little water to reach your desired consistency.
- Mash the Tofu: Once the tofu has been pressed, place it in a separate mixing bowl. Use a fork or a potato masher to gently mash the tofu until it’s smooth yet slightly chunky. Be careful not to over-mash, as a bit of texture adds to the dish.
- Combine Ingredients: Add the dressing you prepared to the mashed tofu, mixing gently to confirm it’s evenly incorporated. Then, fold in the julienned carrot, cucumber, daikon radish, blanched spinach, and chopped green onions. Mix until all the vegetables are coated with the tofu dressing.
- Serve: Transfer the Shiraae to a serving platter or individual bowls. Sprinkle roasted sesame seeds on top for an added crunch and garnish. You can also chill it in the refrigerator for about 30 minutes for a cooler salad, which is especially rejuvenating in warm weather.
Extra Tips:
For an extra layer of flavor, consider adding other vegetables like blanched asparagus or bell peppers to your Shiraae.
You can also experiment with different types of miso paste, such as red or barley miso, to cater to your taste preferences.
Keep the salad covered in the refrigerator if you aren’t serving it immediately, but consume it within a day for the best texture and flavor. Enjoy your homemade Shiraae!
Tofu and Vegetable Stir-Fry
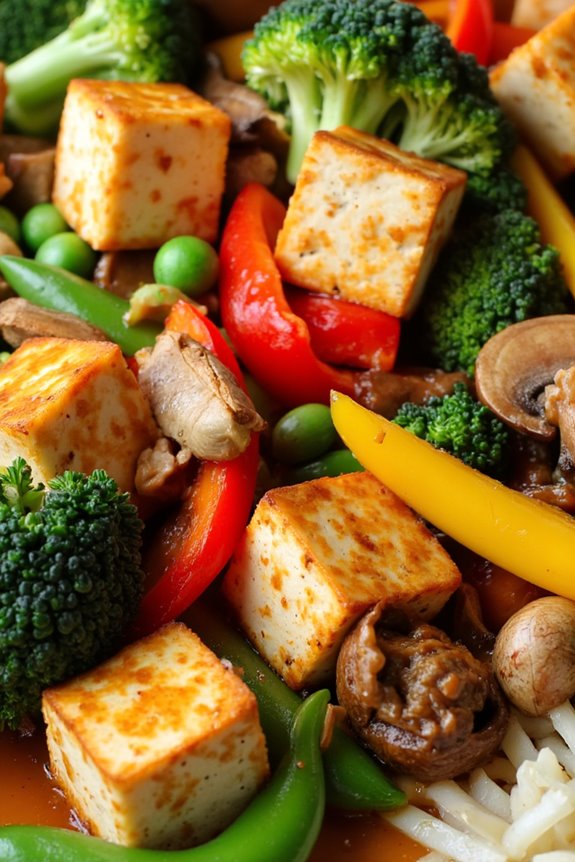
Tofu and Vegetable Stir-Fry is a delightful and nutritious dish that showcases the vibrant flavors of fresh vegetables combined with the protein-packed goodness of tofu. This Japanese-inspired recipe isn’t only easy to prepare but also versatile, allowing you to use any seasonal vegetables you have on hand.
The dish is perfect for a quick weeknight dinner or as a colorful addition to a larger meal spread. This stir-fry isn’t only delicious but also offers a great way to incorporate plant-based ingredients into your diet. The combination of crisp vegetables and tender tofu, all tossed in a savory sauce, makes for a satisfying and healthful dish.
With its rich flavors and appealing presentation, Tofu and Vegetable Stir-Fry is sure to become a favorite in your kitchen.
Ingredients (serves 4-6):
- 1 block (14 oz) firm tofu, drained and pressed
- 2 tablespoons vegetable oil
- 2 cups broccoli florets
- 1 bell pepper, sliced (any color)
- 1 medium carrot, julienned
- 1 cup snap peas
- 1 cup shiitake mushrooms, sliced
- 3 cloves garlic, minced
- 1 tablespoon ginger, grated
- 3 tablespoons soy sauce
- 1 tablespoon sesame oil
- 1 tablespoon rice vinegar
- 1 tablespoon cornstarch (optional, for thickening)
- Salt and pepper to taste
- Cooked rice or noodles for serving
Cooking Instructions:
- Prepare the Tofu: Begin by cutting the pressed tofu into bite-sized cubes. Heat 1 tablespoon of vegetable oil in a large non-stick skillet or wok over medium-high heat. Once the oil is hot, add the tofu cubes and sauté until they’re golden brown on all sides, about 6-8 minutes. Remove the tofu from the pan and set it aside.
- Sauté the Aromatics: In the same pan, add the remaining tablespoon of vegetable oil. Once heated, add the minced garlic and grated ginger. Stir-fry for about 30 seconds until fragrant, being careful not to let them burn.
- Cook the Vegetables: Add the broccoli florets, sliced bell pepper, julienned carrot, snap peas, and shiitake mushrooms to the pan. Stir-fry the vegetables for about 5-7 minutes until they’re tender-crisp.
- Combine Tofu and Sauce: Once the vegetables are cooked, return the tofu to the pan. In a small bowl, mix together the soy sauce, sesame oil, rice vinegar, and cornstarch (if using). Pour this sauce over the tofu and vegetables, stirring well to coat everything evenly. Cook for an additional 2-3 minutes until the sauce thickens and everything is heated through.
- Season and Serve: Taste the stir-fry and season with salt and pepper as desired. Serve the Tofu and Vegetable Stir-Fry over cooked rice or noodles for a complete meal.
Extra Tips: When making Tofu and Vegetable Stir-Fry, feel free to customize the vegetables based on your preference or what you have available.
For added flavor, consider garnishing with sesame seeds or sliced green onions before serving. If you prefer a spicier kick, a dash of chili sauce or fresh chili can elevate the dish. Enjoy experimenting with different sauces or marinades to make this dish your own!
Agedashi Tofu (Fried Tofu)
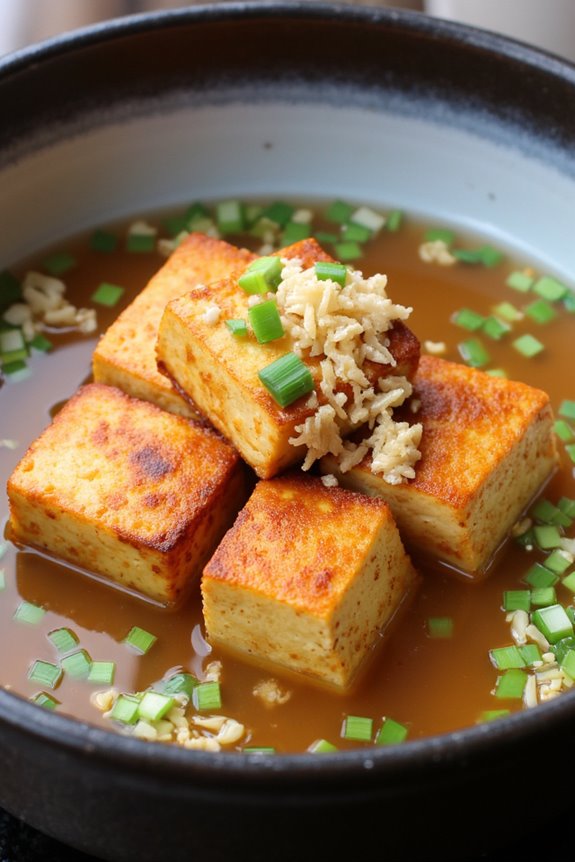
Agedashi Tofu is a popular Japanese dish featuring deep-fried silken tofu served in a flavorful dashi broth. The contrast of the crispy exterior and the soft, silky interior of the tofu creates a delightful texture that’s both comforting and satisfying.
Often garnished with green onions, grated daikon, and katsuobushi (dried bonito flakes), this dish embodies the essence of Japanese cuisine, which emphasizes simplicity and the natural flavor of ingredients.
Making Agedashi Tofu at home is quite straightforward, requiring just a few key ingredients. The tofu is gently pressed to remove excess moisture before being coated in potato starch and fried to golden perfection. It’s then served in a warm dashi broth, which enhances the dish’s umami flavor.
This dish is perfect as an appetizer or as part of a larger meal, and it’s a fantastic way to introduce tofu to those who may be hesitant about trying it.
Ingredients (serving size: 4-6 people)
- 1 block (14 oz) silken tofu
- 1/2 cup potato starch (or cornstarch)
- Vegetable oil (for frying)
- 1 cup dashi stock
- 2 tablespoons soy sauce
- 1 tablespoon mirin
- 1 green onion (finely chopped, for garnish)
- 1/2 cup grated daikon radish (for garnish)
- Katsuobushi (dried bonito flakes, for garnish)
Cooking Instructions
- Prepare the Tofu: Start by removing the silken tofu from its packaging. Gently wrap the tofu in a clean kitchen towel or paper towels to absorb excess moisture. Place a heavy object on top (like a skillet) and let it sit for about 15-20 minutes to press out the water.
- Cut the Tofu: Once pressed, carefully cut the tofu into even cubes, about 1-1.5 inches in size. This will help guarantee that they cook evenly and maintain their shape during frying.
- Coat the Tofu: Place the potato starch in a shallow dish. Gently roll each tofu cube in the potato starch, making sure that all sides are coated. Shake off any excess starch to prevent clumping.
- Heat the Oil: In a deep skillet or frying pan, pour enough vegetable oil to cover the bottom (about 1-2 inches deep) and heat over medium-high heat until the oil reaches about 350°F (175°C). You can test if the oil is ready by dropping a small piece of tofu in; it should sizzle immediately.
- Fry the Tofu: Carefully add the coated tofu cubes to the hot oil in batches, ensuring not to overcrowd the pan. Fry for about 3-4 minutes on each side until they’re golden brown and crispy. Use a slotted spoon to transfer the fried tofu to a paper towel-lined plate to drain excess oil.
- Prepare the Dashi Broth: In a separate saucepan, combine the dashi stock, soy sauce, and mirin over low heat. Stir well and bring to a gentle simmer. Allow it to heat through for a few minutes.
- Serve the Dish: Once the broth is ready, place the fried tofu cubes in a serving bowl. Pour the warm dashi broth over the tofu and garnish with chopped green onions, grated daikon, and katsuobushi flakes.
Extra Tips
When making Agedashi Tofu, it’s crucial to choose high-quality silken tofu for the best texture. If you prefer a firmer tofu, opt for medium or firm tofu, but adjust the cooking time accordingly.
Additionally, confirm that the oil is hot enough before frying to achieve that perfect crispiness. You can also customize the garnishes according to your taste; adding a sprinkle of sesame seeds or a dash of chili oil can enhance the flavor profile even further.
Enjoy your delicious homemade Agedashi Tofu!
Japanese Potato Salad

Japanese Potato Salad is a delightful twist on the classic potato salad, incorporating a creamy texture and a variety of flavors that make it a staple in Japanese cuisine. This dish is often served cold and can be enjoyed as a side dish to complement various Japanese meals.
With its subtle sweetness from the mayonnaise and crunch from the vegetables, this salad isn’t only satisfying but also quite versatile, making it perfect for picnics, barbecues, or simply as a part of your everyday meal.
The key to achieving the perfect Japanese Potato Salad lies in selecting the right type of potatoes and balancing the flavors. Typically, Japanese Waxy potatoes, such as the “May Queen” variety, are preferred for their creamy consistency once cooked.
Along with the potatoes, a mix of fresh vegetables like cucumbers and carrots add a revitalizing crunch. The addition of Japanese mayonnaise, which is richer and creamier than regular mayonnaise, contributes to the distinct taste that sets this salad apart from its Western counterparts.
Ingredients (Serves 4-6):
- 4 medium-sized waxy potatoes
- 1 medium cucumber
- 1 medium carrot
- 1/2 cup Japanese mayonnaise
- 1 tablespoon rice vinegar
- 1 teaspoon sugar
- Salt, to taste
- Black pepper, to taste
- Optional: 2-3 tablespoons cooked ham or bacon, diced (for added flavor)
Cooking Instructions:
1. Prepare the Potatoes: Start by peeling the potatoes and cutting them into quarters. Place them in a pot of cold water, ensuring they’re fully submerged. Bring the water to a boil and then reduce the heat to simmer for about 15-20 minutes, or until the potatoes are fork-tender.
Drain the potatoes and let them cool slightly before mashing them in a large bowl.
2. Chop the Vegetables: While the potatoes are cooling, wash the cucumber and carrot. For the cucumber, slice it thinly and sprinkle with a little salt, allowing it to sit for about 5-10 minutes to draw out excess moisture.
For the carrot, peel it and cut it into small cubes. You can steam the carrots for about 5 minutes to soften them slightly, or leave them raw for extra crunch.
3. Combine Ingredients: Once the potatoes have cooled and are mashed to your desired consistency, add the chopped cucumber and carrots to the bowl. If you’re using diced ham or bacon, add it at this stage.
4. Make the Dressing: In a separate small bowl, mix together the Japanese mayonnaise, rice vinegar, sugar, salt, and black pepper. Adjust the quantities of each ingredient to suit your taste preferences.
5. Mix Everything Together: Pour the dressing over the potato and vegetable mixture. Gently fold the ingredients together until everything is well-coated with the dressing.
Be careful not to over-mix, as you want to maintain some texture in the potatoes.
6. Chill and Serve: Transfer the potato salad to a serving dish and cover it with plastic wrap. Refrigerate for at least 30 minutes before serving to allow the flavors to meld together. Serve cold as a side dish.
Extra Tips:
When preparing Japanese Potato Salad, feel free to get creative with the ingredients. You can add other vegetables like peas or bell peppers for additional color and taste.
Adjust the seasoning according to your preference, and if you prefer a creamier texture, simply add more mayonnaise. For a touch of umami, consider incorporating a small amount of sesame oil or finely chopped green onions. Enjoy your homemade Japanese Potato Salad as a revitalizing accompaniment to your favorite dishes!
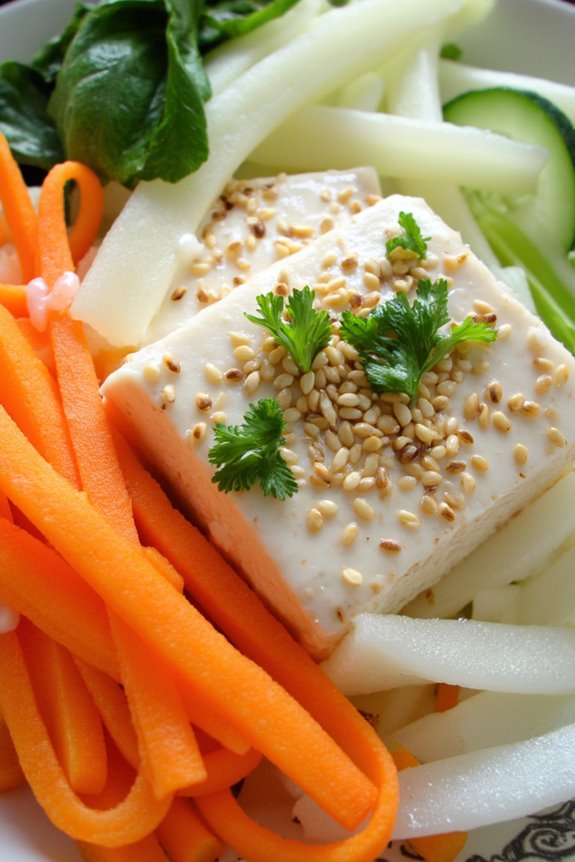
Hiyayakko (Chilled Tofu)
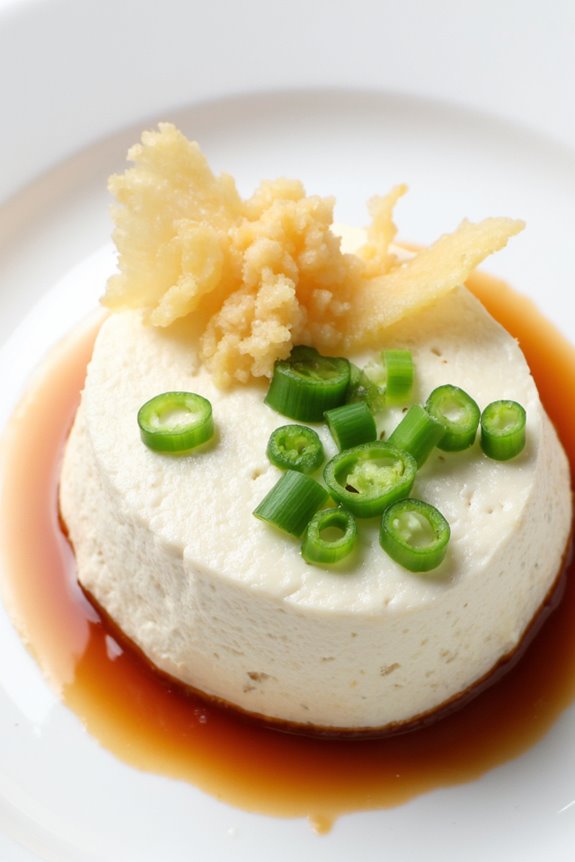
Hiyayakko is a revitalizing Japanese dish that highlights the delicate flavor and smooth texture of fresh tofu. This chilled tofu dish is often served as a side or appetizer during hot summer months, offering a light and nutritious option packed with protein.
It’s traditionally garnished with a selection of toppings, making it not only delicious but also visually appealing. The simplicity of Hiyayakko allows the natural flavors of the ingredients to shine, and it can be customized to suit individual tastes.
Making Hiyayakko is incredibly straightforward, requiring minimal cooking skills and just a few quality ingredients. The key to a perfect Hiyayakko lies in using fresh, high-quality silken tofu.
The dish is typically served cold, allowing the tofu to maintain its silky texture while being paired with various toppings such as green onions, ginger, and soy sauce. This makes Hiyayakko a versatile dish that can be enjoyed as a light snack, appetizer, or alongside a larger Japanese meal.
Ingredients (Serves 4-6)
- 2 blocks of silken tofu (about 14 ounces each)
- 1/4 cup of green onions, finely chopped
- 1/4 cup of grated ginger
- 1/4 cup of bonito flakes (katsuobushi)
- 1/4 cup of soy sauce
- 1 tablespoon of sesame oil
- Optional: Shiso leaves or perilla leaves for garnish
- Optional: Chili oil for a spicy kick
Cooking Instructions
- Prepare the Tofu: Start by carefully removing the silken tofu from the package. Gently drain any excess water without breaking the tofu. To enhance the cooling effect, you can place the tofu in the refrigerator for about 30 minutes before serving.
- Prepare the Toppings: While the tofu is chilling, prepare your toppings. Finely chop the green onions and set them aside. Grate the ginger using a microplane or a fine grater, and set that aside as well. If using shiso leaves, wash and pat them dry.
- Plate the Tofu: Once the tofu is chilled, slice each block into cubes or serve them whole on individual plates. Arrange the tofu in a way that it looks appealing and allows space for the toppings.
- Add the Toppings: Generously sprinkle the finely chopped green onions and grated ginger over the tofu. Follow with a sprinkle of bonito flakes for added umami flavor. If you’re using shiso leaves, place one or two on top of each tofu portion for an aromatic touch.
- Drizzle with Soy Sauce and Sesame Oil: Just before serving, drizzle a small amount of soy sauce over each portion of tofu. Add a few drops of sesame oil for extra flavor, and if desired, a few drops of chili oil for a spicy twist.
- Serve and Enjoy: Serve the Hiyayakko immediately while it’s chilled, and enjoy it as part of your meal or as a revitalizing snack.
Extra Tips
When preparing Hiyayakko, be sure to choose the freshest silken tofu you can find, as this greatly impacts the dish’s overall flavor and texture.
You can also experiment with different toppings based on your personal preference; for instance, try adding grated daikon radish, chopped herbs, or even a sprinkle of sesame seeds.
For an added depth of flavor, consider using homemade soy sauce or high-quality artisanal varieties. Enjoy the delightful simplicity of this dish as a perfect complement to any Japanese meal.
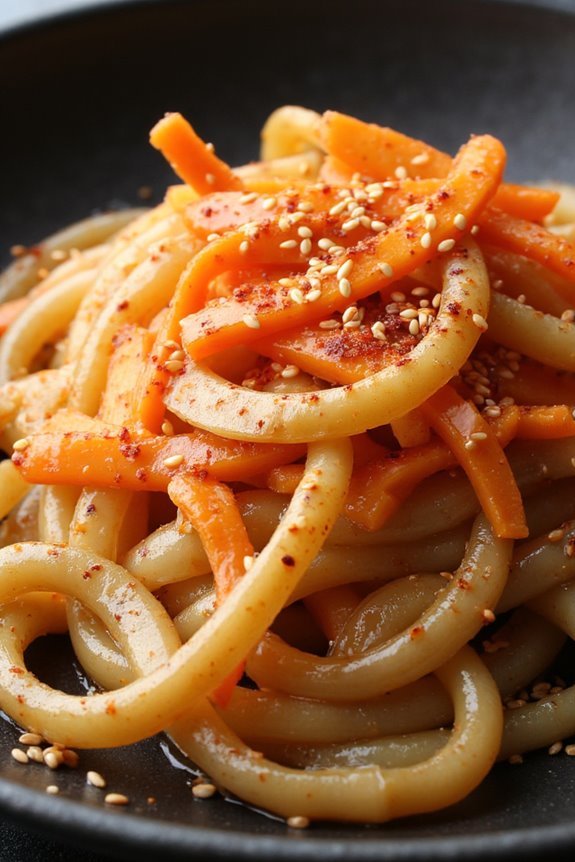
Negi (Scallion) and Daikon Salad

Negi (scallion) and daikon salad is a revitalizing and vibrant dish that highlights the crisp textures and subtle flavors of these two Japanese vegetables. This salad isn’t only easy to prepare but also packed with nutrients, making it a perfect side dish for any meal or a light snack on its own. The combination of the peppery scallions and the sweet, crunchy daikon radish creates a delightful contrast that’s sure to please your palate.
This salad is versatile and can be enjoyed in various ways, whether as a standalone dish or paired with grilled meats or fish. The simple dressing, typically made with soy sauce and rice vinegar, enhances the natural flavors of the vegetables without overpowering them. With just a few ingredients, you can whip up this delightful salad in no time, making it an excellent addition to any Japanese-inspired meal.
Ingredients (serving size: 4-6 people)
- 1 medium daikon radish, peeled and julienned
- 4-5 scallions (negi), finely sliced
- 1 tablespoon sesame oil
- 2 tablespoons soy sauce
- 1 tablespoon rice vinegar
- 1 teaspoon sugar
- 1 tablespoon toasted sesame seeds
- Fresh cilantro (optional, for garnish)
Cooking Instructions
- Prepare the Vegetables: Start by peeling the daikon radish and cutting it into thin julienne strips. You can use a mandoline slicer for even cuts, which will enhance the texture of the salad. Rinse the scallions under cold water to remove any dirt, then finely slice them on the diagonal for a beautiful presentation. Place both the daikon and scallions in a large mixing bowl.
- Make the Dressing: In a small bowl, combine the sesame oil, soy sauce, rice vinegar, and sugar. Whisk the ingredients together until the sugar is dissolved, creating a smooth and flavorful dressing. This dressing will provide a balance of savory and tangy flavors to complement the fresh vegetables.
- Combine the Ingredients: Pour the dressing over the julienned daikon and sliced scallions in the mixing bowl. Gently toss all the ingredients together using your hands or a pair of tongs, ensuring that the dressing evenly coats the vegetables. Be careful not to bruise the vegetables while mixing.
- Garnish and Serve: Once the salad is well mixed, transfer it to a serving platter or individual bowls. Sprinkle the toasted sesame seeds over the top for added flavor and crunch. If desired, garnish with fresh cilantro leaves for an extra pop of color and taste.
- Chill (Optional): For a more revitalizing experience, you can let the salad chill in the refrigerator for about 15-30 minutes before serving. This allows the flavors to meld together, making for a more cohesive dish.
Extra Tips
When preparing negi and daikon salad, freshness is key. Look for firm, crisp daikon and vibrant green scallions at your local market.
If you want to add a bit of spice, consider incorporating sliced chili peppers or a dash of chili oil to the dressing. Additionally, this salad can be customized with other ingredients like cucumber, carrot, or even avocado for added texture and flavor.
Enjoy this salad as a side dish or as part of a larger meal to experience the delightful tastes of Japanese cuisine.
Takikomi Gohan (Seasoned Rice With Vegetables)
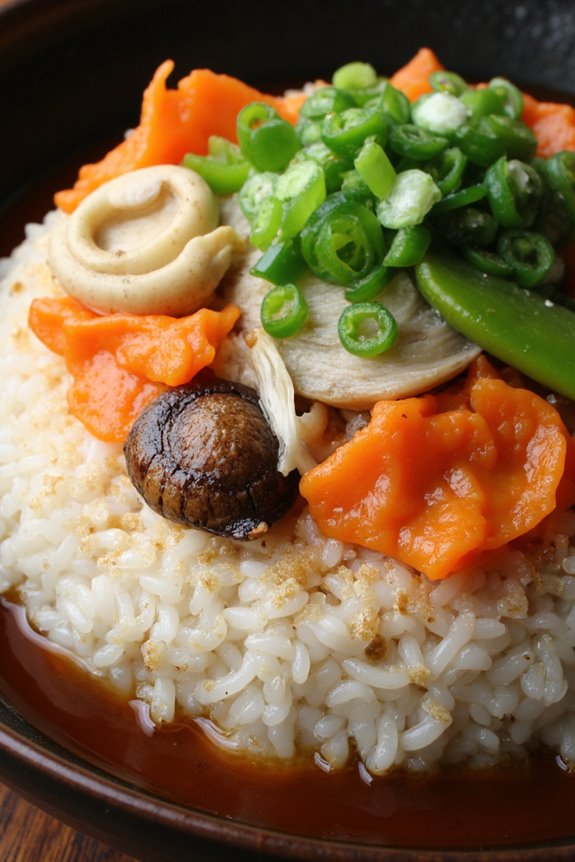
Takikomi Gohan is a traditional Japanese dish that beautifully marries seasoned rice with a medley of vegetables, creating a comforting, flavorful meal that can be enjoyed on its own or as a side dish.
This versatile recipe showcases the natural sweetness of seasonal vegetables, making it a delightful option for those looking to incorporate more plant-based meals into their diet. The dish not only highlights the umami flavors characteristic of Japanese cuisine but also offers a visually appealing presentation with its vibrant colors.
To prepare Takikomi Gohan, you’ll be cooking rice in a savory broth alongside an assortment of vegetables, which infuses the grains with rich flavors. This dish is perfect for family gatherings or casual dinners, serving 4 to 6 people. You can customize the vegetables based on your preference or what’s in season, making it an adaptable recipe for any time of the year.
Ingredients (Serves 4-6):
- 2 cups short-grain rice
- 2 ½ cups dashi stock (or water)
- 2 tablespoons soy sauce
- 1 tablespoon mirin
- 1 tablespoon sake
- 1 medium carrot, sliced thinly
- 1 cup shiitake mushrooms, sliced
- 1 cup snow peas, trimmed and cut in half
- ½ cup burdock root (gobo), sliced thinly (optional)
- ½ cup bamboo shoots, sliced (optional)
- 2 green onions, chopped for garnish
Cooking Instructions:
- Rinse the Rice: Begin by rinsing the short-grain rice under cold running water until the water runs clear. This step removes excess starch, preventing the rice from becoming gummy. Drain the rice well and set it aside.
- Prepare the Dashi Stock: If you’re using dashi stock, prepare it according to package instructions, or you can make it from scratch by simmering kombu (dried kelp) and bonito flakes in water. If you prefer, you can simply use water, though dashi adds a deeper umami flavor.
- Combine Ingredients: In a large rice cooker or a heavy-bottomed pot, combine the rinsed rice, dashi stock, soy sauce, mirin, and sake. Stir gently to evenly distribute the seasonings.
- Add the Vegetables: Layer the sliced carrot, shiitake mushrooms, snow peas, burdock root, and bamboo shoots on top of the rice mixture. Don’t stir; let the vegetables sit on top to maintain their texture during cooking.
- Cook the Rice: If using a rice cooker, select the appropriate setting for cooking white rice. If using a pot, cover it with a tight-fitting lid and bring the mixture to a boil over medium-high heat. Once boiling, reduce the heat to low and let it simmer for about 20 minutes without lifting the lid.
- Rest the Rice: After the cooking time is complete, turn off the heat and let the rice rest for another 10-15 minutes without removing the lid. This resting period allows the rice to finish cooking and absorb any remaining moisture.
- Fluff and Serve: Carefully remove the lid and fluff the rice with a rice paddle or fork, mixing in the vegetables gently. Serve the Takikomi Gohan warm, garnished with chopped green onions.
Extra Tips:
For an extra burst of flavor, consider adding a small piece of konbu to the rice during cooking; just remember to remove it before serving.
You can also experiment with different vegetables based on what you have available, such as zucchini, bell peppers, or even leafy greens. The key to great Takikomi Gohan is to balance the flavors of the vegetables with the rice, so feel free to adjust the seasoning to suit your taste preferences.
Sweet Potato Tempura

Sweet Potato Tempura is a delightful Japanese dish that showcases the natural sweetness and creamy texture of sweet potatoes, all encased in a light, crispy batter. The contrast between the tender sweet potato and the crunchy exterior makes it a favorite among tempura lovers. This dish is perfect as an appetizer, side dish, or even a main course when paired with rice and dipping sauce.
The beauty of Sweet Potato Tempura lies in its simplicity. With just a few ingredients, you can create a visually appealing and delicious dish that’s bound to impress your family and friends. This recipe will guide you through the steps of making a perfectly crispy tempura that retains the sweet flavor of the sweet potatoes, making it a popular choice for any meal.
Ingredients (Serves 4-6):
- 2 large sweet potatoes
- 1 cup all-purpose flour
- 1/2 cup cornstarch
- 1 teaspoon baking powder
- 1 cup cold water
- 1/2 teaspoon salt
- Vegetable oil (for frying)
Cooking Instructions:
- Prepare the Sweet Potatoes: Start by peeling the sweet potatoes and cutting them into approximately 1/4-inch thick slices or batons. This will guarantee even cooking and a nice texture in the final dish. Soak the cut sweet potatoes in cold water for about 10 minutes to remove excess starch and help them maintain their shape while frying.
- Make the Tempura Batter: In a mixing bowl, combine the all-purpose flour, cornstarch, baking powder, and salt. Gently whisk these dry ingredients together. Next, slowly add the cold water while mixing with chopsticks or a fork. Be careful not to overmix; it’s okay if there are a few lumps in the batter, as this will help create a light and crispy texture when fried.
- Heat the Oil: In a deep frying pan or pot, pour enough vegetable oil to submerge the sweet potato pieces (approximately 2-3 inches deep). Heat the oil over medium-high heat until it reaches around 340°F (170°C). You can test the oil by dropping a small amount of batter in; it should sizzle and float to the top.
- Fry the Sweet Potatoes: Take the soaked sweet potato slices and dip them into the tempura batter, coating them evenly. Carefully place them into the hot oil, a few at a time, ensuring not to overcrowd the pan. Fry each batch for about 3-4 minutes, or until they turn golden brown and crispy. Use a slotted spoon to turn them occasionally for even cooking.
- Drain and Serve: Once golden and crispy, remove the sweet potato tempura from the oil and place them on a plate lined with paper towels to absorb excess oil. Serve immediately with a dipping sauce, such as tentsuyu (a mixture of soy sauce, mirin, and dashi), or simply with a sprinkle of salt.
Extra Tips:
To achieve the best results, make sure the water you use for the batter is very cold, as this helps to create a light and crispy texture. Additionally, frying in small batches prevents the temperature of the oil from dropping too much, which can lead to soggy tempura.
If you’re feeling adventurous, consider adding other vegetables like zucchini or bell peppers to the tempura mix for a colorful and varied dish. Enjoy your Sweet Potato Tempura hot and fresh for the ultimate experience!