

When it comes to Filipino celebrations, desserts always steal the show. From the rich and creamy Leche Flan to the vibrant layers of Halo-Halo, each treat is a delicious slice of culture and tradition. These sweet delights not only satisfy cravings but also bring everyone closer together. Let’s explore these festive recipes that are sure to add a sweet touch to your next gathering.
Leche Flan
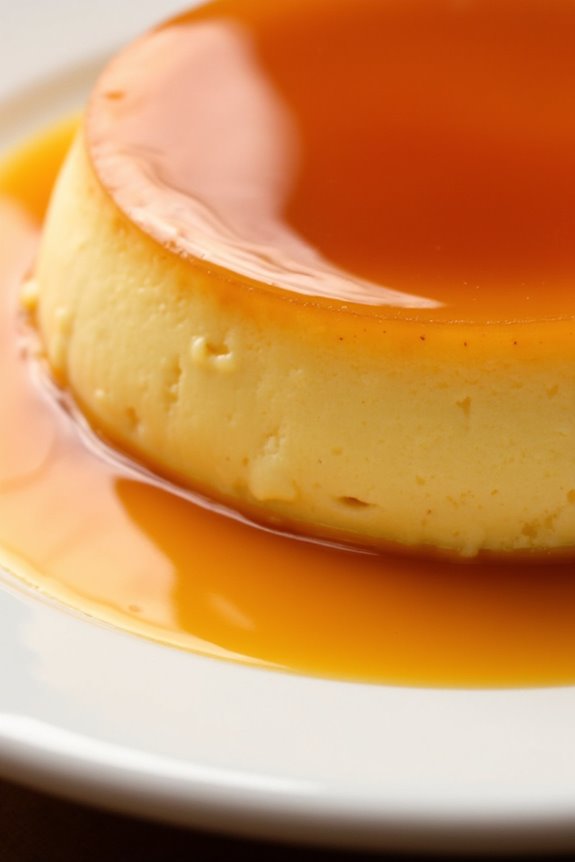
Leche Flan, also known as caramel custard, is a beloved Filipino dessert that’s rich, creamy, and decadently smooth. This traditional delicacy is often served during special occasions, family gatherings, and festive celebrations. The combination of sweetened condensed milk, evaporated milk, and egg yolks creates a velvety texture that melts in your mouth, while the caramel topping adds a delightful sweetness that perfectly complements the custard base.
The origins of Leche Flan can be traced back to Spanish colonization, where it was introduced as part of the culinary heritage that has been embraced and adapted by the Filipino culture. Making Leche Flan may seem intimidating at first, but with the right ingredients and careful cooking techniques, you can create an impressive dessert that will surely impress your family and friends.
Ingredients (Serves 4-6):
- 1 cup granulated sugar (for caramel)
- 6 large egg yolks
- 1 can (14 oz) sweetened condensed milk
- 1 can (12 oz) evaporated milk
- 1 teaspoon vanilla extract
- A pinch of salt
Cooking Instructions:
- Prepare the Caramel: In a saucepan over medium heat, add the granulated sugar. Allow it to melt without stirring until it turns a golden amber color. Once melted, quickly pour the caramel into a round baking dish or individual ramekins, tilting to coat the bottom evenly. Set aside to cool and harden.
- Mix the Custard: In a mixing bowl, combine the egg yolks, sweetened condensed milk, evaporated milk, vanilla extract, and a pinch of salt. Whisk gently until well blended, making sure not to incorporate too much air.
- Strain the Mixture: To guarantee a smooth custard, strain the mixture through a fine sieve into another bowl or directly into the prepared caramel-coated baking dish. This will help remove any lumps and create a silky texture.
- Prepare for Steaming: Preheat your steamer or prepare a large pot with a steaming rack. If you don’t have a steamer, you can also use a large pot with a lid. Make sure that the water level is below the top of the flan dish to prevent it from getting watery.
- Steam the Flan: Place the flan dish in the steamer or on the steaming rack in the pot. Cover with a lid and steam for about 30-40 minutes, or until the flan is set and a toothpick inserted in the center comes out clean. Check the water level occasionally and add more water if necessary.
- Cool and Refrigerate: Once cooked, remove the flan from the steamer and let it cool at room temperature. Once cooled, refrigerate for at least 4 hours or overnight to allow it to set completely.
- Serve: To serve, run a knife around the edges of the flan to loosen it. Invert the flan onto a serving platter, allowing the caramel to drizzle over the top. Slice and enjoy your delicious Leche Flan!
Extra Tips: When making Leche Flan, be certain the caramel isn’t burnt, as it can impart a bitter taste to the dessert. For an added depth of flavor, consider infusing the milk with citrus zest or a hint of coconut milk for a unique twist. Always allow the flan to cool completely before refrigerating, as this will help it set properly and enhance its smooth texture. Enjoy your delightful creation!
Bibingka

Bibingka is a traditional Filipino rice cake that’s often enjoyed during the holiday season, particularly during the Christmas festivities. This delightful dessert is made from rice flour, coconut milk, and sugar, resulting in a soft and fluffy cake that’s typically baked in clay pots lined with banana leaves. The unique combination of flavors and textures, enhanced with toppings such as salted egg and cheese, makes bibingka a beloved treat that evokes nostalgia for many Filipinos.
The preparation of bibingka isn’t only about following a recipe; it’s a celebration of culture and tradition. The aroma of the cake baking and the vibrant colors of the ingredients come together to create a feast for the senses. Whether served warm with butter or on its own, bibingka is certain to bring joy to any gathering.
Ingredients (Serves 4-6)
- 2 cups rice flour
- 1 cup coconut milk
- 1 cup water
- 1/2 cup sugar
- 2 teaspoons baking powder
- 1/4 teaspoon salt
- 2 tablespoons melted butter
- 2 salted eggs, sliced
- Grated cheese (preferably Edam or cheddar)
- Banana leaves (for lining)
Cooking Instructions
- Prepare the banana leaves: Soak the banana leaves in hot water for a few minutes to make them pliable. This will help prevent them from tearing when you line your baking dish. Once softened, cut the leaves to fit your baking dish and line the bottom and sides.
- Mix the dry ingredients: In a large mixing bowl, combine the rice flour, sugar, baking powder, and salt. Stir them together until they’re evenly mixed. This guarantees that the leavening agent is distributed throughout the flour, which will help the bibingka rise properly.
- Combine wet ingredients: In a separate bowl, mix the coconut milk, water, and melted butter. Whisk the mixture until well blended. This combination of liquids adds flavor and moisture to the bibingka, making it rich and creamy.
- Combine wet and dry mixtures: Gradually add the wet ingredients to the dry ingredients, stirring continuously until you achieve a smooth batter. Be careful not to overmix, as this can lead to a denser texture.
- Preheat the oven: Preheat your oven to 350°F (175°C) while you finish preparing the bibingka. This guarantees that the cake bakes evenly and rises properly.
- Pour the batter into the prepared dish: Pour the bibingka batter into the lined baking dish, filling it about halfway to allow space for rising.
- Add toppings: Gently place the slices of salted egg and sprinkle grated cheese on top of the batter. This adds flavor and a beautiful presentation to your bibingka.
- Bake the bibingka: Place the baking dish in the preheated oven and bake for about 30-40 minutes, or until the cake is set and a toothpick inserted into the center comes out clean. The top should be slightly golden brown.
- Cool and serve: Once baked, remove the bibingka from the oven and let it cool for a few minutes. Cut into squares or wedges and serve warm, optionally with a pat of butter or coconut cream on top.
Extra Tips
When making bibingka, feel free to experiment with different toppings such as grated coconut or muscovado sugar for added sweetness. If you have access to clay pots, using them will give your bibingka an authentic texture and flavor.
Additionally, verify your oven is properly preheated and avoid opening the oven door frequently during baking to maintain a consistent temperature. Enjoy this delightful treat with family and friends, and embrace the rich traditions that come with it!
Puto

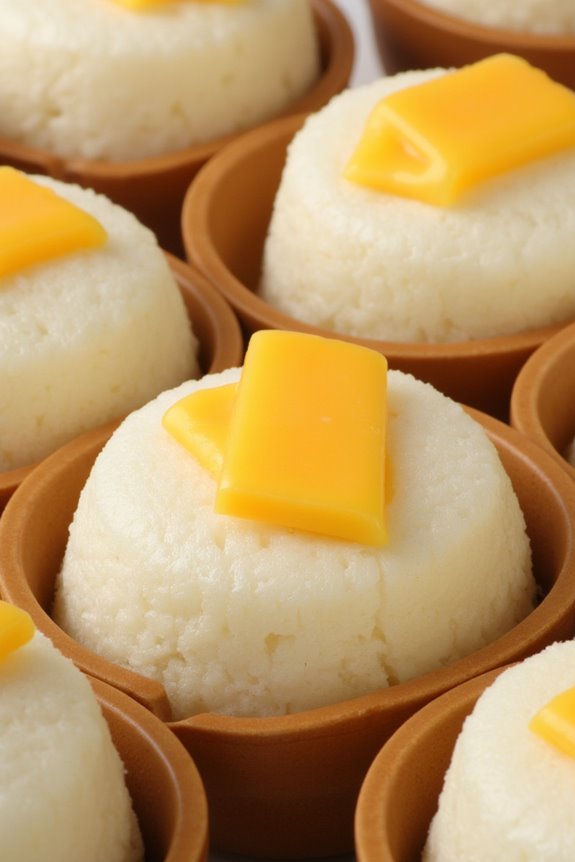
Puto is a beloved Filipino steamed rice cake that’s often served as a side dish or dessert. Known for its light and fluffy texture, this delightful treat can be enjoyed plain or topped with various ingredients such as cheese or salted eggs. The traditional recipe uses rice flour, giving it a unique flavor and making it a popular choice during celebrations and gatherings.
Whether you’re new to Filipino cuisine or looking to expand your culinary repertoire, making puto at home is a rewarding experience. This dish isn’t only simple to prepare but also requires minimal ingredients. The steaming process is key to achieving the perfect texture, resulting in a light and airy cake that pairs wonderfully with savory dishes or can be enjoyed on its own.
By following this recipe, you’ll be able to impress your family and friends with your homemade puto, showcasing the rich culinary tradition of the Philippines.
Ingredients (Serves 4-6):
- 2 cups rice flour
- 1 cup granulated sugar
- 1 tablespoon baking powder
- 1 ½ cups coconut milk
- 1 teaspoon vanilla extract
- ¼ teaspoon salt
- Cheese or salted eggs (optional, for topping)
Cooking Instructions:
- Prepare the Steamer: Fill a steamer pot with water and bring it to a boil over medium heat. Make sure to have a steamer basket or a mold that fits inside the pot. If you don’t have a steamer, you can use a large pot with a lid and place a heatproof dish inside.
- Mix Dry Ingredients: In a large mixing bowl, combine the rice flour, granulated sugar, baking powder, and salt. Whisk the dry ingredients together until they’re well combined, guaranteeing there are no lumps.
- Add Wet Ingredients: Gradually pour in the coconut milk and vanilla extract to the dry mixture. Stir the batter until it’s smooth and free of lumps. The batter should be thick but pourable.
- Prepare the Molds: Lightly grease your puto molds or any heatproof cups with cooking oil to prevent sticking. Alternatively, you can line them with cupcake liners.
- Pour the Batter: Fill each prepared mold about 2/3 full with the batter. If you’re using toppings like cheese or salted eggs, place a small piece on top of the batter in each mold.
- Steam the Puto: Carefully place the molds in the steamer basket, ensuring they aren’t touching each other. Cover the steamer with a lid and steam for about 20-25 minutes. You can check for doneness by inserting a toothpick into the center of the puto; it should come out clean when fully cooked.
- Cool and Serve: Once cooked, carefully remove the molds from the steamer and let them cool for a few minutes. Once they’re cool enough to handle, gently remove the puto from the molds. Serve warm or at room temperature.
Extra Tips:
For an added punch of flavor, consider incorporating pandan extract into the batter for a fragrant twist. You can also experiment with different toppings, such as grated coconut or colorful sprinkles, to make your puto visually appealing.
If you want to make a larger batch, simply double the ingredients and steam in batches. Always guarantee that you have enough water in the steamer throughout the cooking process to avoid drying out the puto. Enjoy your homemade puto as a delightful treat or a unique addition to your meal!
Ube Halaya
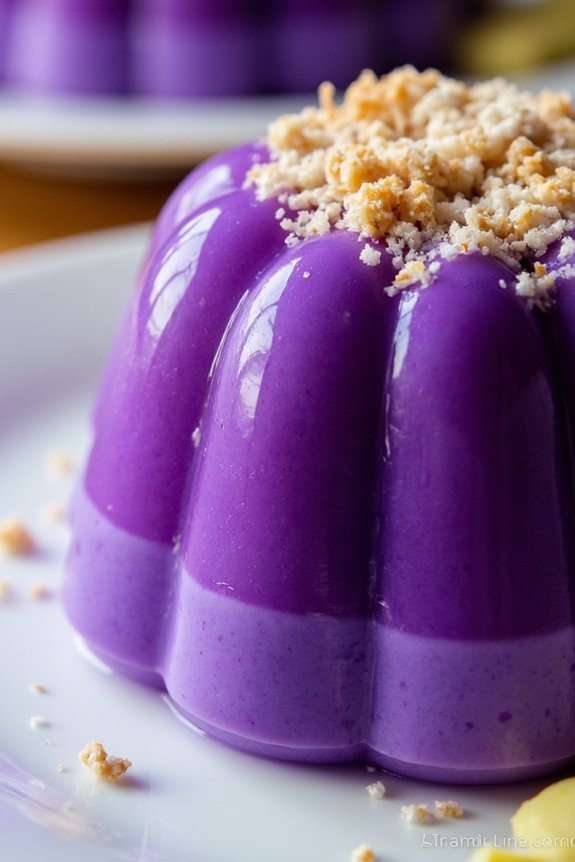
Ube Halaya, also known as Purple Yam Jam, is a beloved Filipino dessert that celebrates the vibrant and unique flavor of ube, a purple yam native to the Philippines. This decadent treat isn’t only visually striking with its rich purple hue but also rich in taste, making it a perfect dessert for any occasion.
Traditionally served during fiestas or special gatherings, Ube Halaya can also be enjoyed on its own, as a topping for ice cream, or as a filling in pastries.
Making Ube Halaya is a straightforward process that requires just a few ingredients, yet it results in a delightful and creamy dessert that’s guaranteed to impress family and friends. The key to a perfect Ube Halaya is using freshly cooked and mashed ube, which provides the best flavor and texture.
Whether you’re familiar with this dish or trying it for the first time, this recipe will guide you to create a delicious Ube Halaya that serves 4-6 people.
Ingredients:
- 2 cups of grated fresh ube (or 1 cup of ube powder)
- 1 can (14 oz) of coconut milk
- 1 can (14 oz) of condensed milk
- ½ cup of granulated sugar (adjust according to your taste)
- ¼ cup of butter (unsalted)
- 1 teaspoon of vanilla extract
- A pinch of salt
Cooking Instructions:
1. Prepare the Ube: If using fresh ube, peel, wash, and cut it into cubes. Boil the cubes in water until they’re soft (about 30 minutes). Once cooked, drain the water and mash the ube using a fork or potato masher until you achieve a smooth consistency.
If using ube powder, mix it with water according to package instructions to rehydrate it.
2. Combine Ingredients: In a large saucepan, combine the mashed ube, coconut milk, condensed milk, sugar, butter, vanilla extract, and a pinch of salt. Stir well to guarantee all ingredients are mixed thoroughly.
3. Cook the Mixture: Place the saucepan over medium heat. Continuously stir the mixture to prevent it from sticking to the bottom. As the mixture heats up, it will begin to thicken. This process should take about 15-20 minutes.
4. Check Consistency: When the mixture is thick enough to hold its shape and pulls away from the sides of the pan, it’s done. You should be able to see the bottom of the pan when you stir the mixture. Remove it from the heat.
5. Transfer and Set: Pour the Ube Halaya into a greased mold or dish. Use a spatula to smooth out the top. Let it cool at room temperature for a few minutes before transferring it to the refrigerator to set for at least 2 hours.
6. Serve: Once set, you can cut the Ube Halaya into squares or scoop it out with a spoon. Serve it chilled, and enjoy!
Extra Tips:
For an even richer flavor, consider adding a sprinkle of grated cheese on top before serving, as it pairs beautifully with the sweetness of the Ube Halaya.
You can also enhance its presentation by garnishing with toasted grated coconut or crushed nuts. If you prefer a smoother texture, blend the mixture in a food processor before cooking it.
Remember to adjust the sweetness to your liking and feel free to experiment with the proportions of coconut milk and condensed milk for a creamier consistency.
Halo-Halo
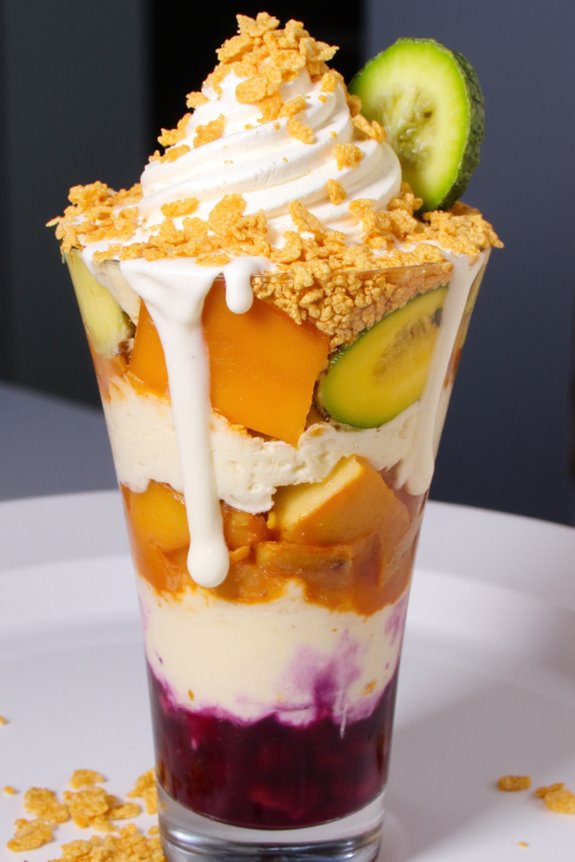
Halo-Halo is a popular Filipino dessert that perfectly embodies the vibrant and diverse flavors of the Philippines. Its name translates to “mix-mix” in English, which aptly describes the way various ingredients are layered and mixed together to create a delightful medley of tastes and textures. This invigorating treat is especially enjoyed during the hot summer months, but it’s loved year-round for its unique combination of sweet and creamy elements.
To make Halo-Halo, you’ll find a colorful assortment of ingredients, ranging from sweetened fruits to creamy toppings, all piled high in a tall glass or bowl, making it as visually appealing as it’s delicious. The traditional version features ingredients like shaved ice, evaporated milk, and a variety of sweet toppings, creating a delightful experience as you dig in and mix everything together for a burst of flavor in every bite.
Ingredients (Serves 4-6)
- 2 cups crushed ice
- 1 cup sweetened red beans (adzuki beans or kidney beans)
- 1 cup sweetened jackfruit (langka), sliced
- 1 cup sweetened banana (saba), sliced
- 1 cup sweetened coconut (macapuno), shredded
- 1 cup leche flan (Filipino custard), sliced
- 1 cup ube halaya (purple yam jam)
- 1 cup evaporated milk
- 1/2 cup sugar (optional, adjust to taste)
- 1 cup cornflakes or crushed graham crackers for topping (optional)
Cooking Instructions
1. Prepare the Ingredients: Begin by gathering all the ingredients you’ll need. Make sure the sweetened fruits and beans are cooked and ready to use. For fresh ingredients, you can steam or boil them with sugar to achieve the desired sweetness.
The key to a successful Halo-Halo is having a variety of textures and flavors, so don’t hesitate to include your favorite fruits and toppings.
2. Layer the Ingredients: In tall glasses or bowls, start layering the ingredients. Begin with a generous scoop of sweetened red beans at the bottom. Next, add a portion of the sweetened banana, followed by the sweetened jackfruit, and then the shredded coconut.
Each layer should be distinct to show the colorful variety of ingredients.
3. Add the Creamy Components****: Once you’ve added the fruits and beans, it’s time for the creamy elements. Place a slice of leche flan on top of your layered fruits, followed by a scoop of ube halaya.
These creamy components will add richness to the dessert.
4. Top with Shaved Ice: Fill the glass or bowl with crushed ice, creating a mountain-like peak. Make sure to pack the ice tightly so it holds its shape.
This will also help keep the dessert cold and invigorating.
5. Drizzle with Evaporated Milk: Pour a generous amount of evaporated milk over the crushed ice. This will seep down through the layers, adding creaminess to the entire dessert.
You may also sprinkle sugar on top if you like it sweeter.
6. Finish with Optional Toppings****: If you desire, sprinkle some cornflakes or crushed graham crackers on top for added crunch.
This step is optional but can enhance the texture of the Halo-Halo.
7. Serve and Enjoy: Serve immediately with a long spoon or straw. Encourage everyone to mix their Halo-Halo before eating to combine all the flavors and textures.
Enjoy this delightful Filipino classic!
Extra Tips
When making Halo-Halo, feel free to customize the ingredients based on your preferences or what you have on hand. Common additions include sweetened plantains, mango, or even ice cream for an extra indulgence.
Remember to adjust the sweetness of the dessert to your liking, as some ingredients can be quite sweet on their own.
Finally, for the best experience, always serve Halo-Halo immediately after preparation to enjoy the combination of cold, creamy, and sweet flavors at their peak!
Kakanin (Rice Cakes)
Kakanin, a traditional Filipino dessert, is a delightful group of rice cakes that come in various forms and flavors. These sweet treats are made primarily from glutinous rice, coconut milk, and sugar, giving them a rich and satisfying taste. Kakanin is often enjoyed during festive occasions, family gatherings, and even as a simple afternoon snack.
Each region in the Philippines has its own unique twist on these rice cakes, making them a beloved and versatile part of Filipino cuisine.
One of the most popular kakanin is “puto,” a steamed rice cake that’s soft, fluffy, and mildly sweet. Puto is often served with a variety of toppings such as cheese or salted egg, making it a perfect complement to savory dishes. Preparing puto at home isn’t only simple but also a fun way to introduce the rich culinary heritage of the Philippines to your family and friends.
Ingredients (Serves 4-6 people):
- 2 cups glutinous rice flour
- 1 cup coconut milk
- 1 cup water
- 1 cup sugar
- 1 tablespoon baking powder
- 1/4 teaspoon salt
- Cheese or salted egg slices for topping (optional)
Cooking Instructions:
- Prepare the Steamer: Start by filling a steamer pot with water and bring it to a boil. Make certain the steamer basket is lined with cheesecloth or lightly greased to prevent the rice cakes from sticking.
- Mix the Dry Ingredients: In a large mixing bowl, combine the glutinous rice flour, sugar, baking powder, and salt. Mix well until all the dry ingredients are evenly distributed.
- Combine Wet Ingredients: In a separate bowl, mix together the coconut milk and water. Slowly pour this mixture into the dry ingredients while stirring continuously until you achieve a smooth batter.
- Fill the Molds: Using small molds (like muffin tins or silicone molds), fill each mold about three-quarters full with the batter. If desired, place a slice of cheese or salted egg on top of each batter-filled mold.
- Steam the Rice Cakes: Carefully place the filled molds into the steamer basket. Cover with a lid and steam for about 25-30 minutes, or until a toothpick inserted into the center comes out clean.
- Cool and Serve: Once cooked, remove the molds from the steamer and let them cool for a few minutes. Gently remove the puto from the molds and serve warm or at room temperature.
Extra Tips:
For best results, verify that the water in the steamer is boiling before placing the molds inside. This helps the puto rise properly and become fluffy.
You can also experiment with flavors by adding pandan extract or ube (purple yam) for a unique twist. Additionally, if you prefer a richer taste, substitute some of the water with more coconut milk. Enjoy your homemade kakanin!
Sans Rival

Sans Rival is a classic Filipino dessert that delights the senses with its rich layers of meringue, buttercream, and toasted cashews. This decadent cake is renowned for its unique texture and flavor, making it a staple in celebrations and gatherings. Its name, which translates to “without rival,” perfectly captures the dessert’s exceptional quality and taste, setting it apart from other sweet treats.
Each bite reveals a harmonious balance of sweetness and nuttiness, leaving a lasting impression on anyone who tries it. The process of making Sans Rival might seem intricate, but with patience and attention to detail, you can recreate this beloved delicacy in your own kitchen.
The key to a perfect Sans Rival lies in the meringue layers, which should be crisp on the outside and chewy on the inside, paired with a creamy and luscious buttercream that binds everything together. Whether you’re preparing it for a special occasion or simply indulging yourself, Sans Rival is sure to impress both your taste buds and your guests.
Ingredients (Serves 4-6)
- 6 large egg whites
- 1 ½ cups granulated sugar
- 1 teaspoon vanilla extract
- 1 ½ cups ground cashews (toasted)
- 1 cup unsalted butter (softened)
- 1 cup confectioners’ sugar
- 4 large egg yolks
- 2 tablespoons milk
Cooking Instructions
- Prepare the Meringue Layers: Preheat your oven to 250°F (120°C). In a clean, dry mixing bowl, beat the egg whites until foamy. Gradually add the granulated sugar, continuing to beat until the mixture reaches stiff peaks and becomes glossy. Stir in the vanilla extract. Gently fold in the ground cashews until evenly distributed.
- Bake the Meringue: Line three baking sheets with parchment paper. Divide the meringue mixture evenly among the sheets, spreading it out into rectangular shapes about 1/2 inch thick. Bake in the preheated oven for about 1 hour or until the meringues are dry and can be easily lifted off the parchment. Allow them to cool completely before assembling.
- Make the Buttercream: In a separate mixing bowl, beat the softened butter until creamy. Gradually add the confectioners’ sugar, continuing to beat until smooth. In another bowl, whisk the egg yolks and milk together, then add to the butter mixture. Beat until well combined and fluffy.
- Assemble the Sans Rival: Once the meringue layers have cooled, place one layer on a serving plate. Spread a generous layer of buttercream on top, then place another meringue layer on top of the buttercream. Repeat this process with the remaining meringue layers and buttercream, finishing with a layer of buttercream on top.
- Decorate and Chill: Use any remaining buttercream to cover the sides of the cake. Sprinkle the top and sides with additional toasted cashews for decoration. Refrigerate the Sans Rival for at least 4 hours (or overnight) to allow the flavors to meld and the cake to set before serving.
Extra Tips
When making Sans Rival, it’s important to ascertain that the mixing bowl and beaters are completely clean and free of any grease to achieve the perfect meringue. Additionally, using room temperature eggs can help achieve better volume when whipping egg whites.
Be patient during the baking process, as meringue requires gentle heat to dry out properly. Ultimately, feel free to experiment with different nuts or even add a hint of chocolate to the buttercream for a unique twist on this traditional dessert. Enjoy your homemade Sans Rival, and don’t forget to share with friends and family!
Biko
Biko is a traditional Filipino rice cake that’s loved for its sweet and sticky texture. Made primarily from glutinous rice and coconut milk, this delightful dessert is typically enjoyed during special occasions and festive celebrations. The rich, sweet flavor of Biko, combined with its chewy consistency, makes it an irresistible treat for many.
Often topped with latik, which is made from coconut milk, Biko isn’t just a dessert but a beloved part of Filipino culinary culture.
The process of making Biko is relatively simple, but it does require a bit of patience and care to achieve the perfect consistency. The key to a delicious Biko lies in using the right ratio of ingredients and cooking the mixture to the right stage. Once you master the technique, you’ll find that this dish is a wonderful addition to any gathering or family meal.
Ingredients for Biko (Serving Size: 4-6 people)
- 2 cups glutinous rice
- 1 cup coconut milk (for the rice)
- 1 cup coconut milk (for the topping)
- 1 cup brown sugar
- 1/4 teaspoon salt
- 1/2 cup latik (coconut curds) for topping (optional)
Cooking Instructions
- Prepare the Glutinous Rice: Rinse the glutinous rice in cold water until the water runs clear. This helps remove excess starch. After rinsing, soak the rice in water for about 4 hours or overnight for best results. Drain the soaked rice and set aside.
- Cook the Rice: In a steamer basket lined with cheesecloth or a clean kitchen towel, place the soaked glutinous rice. Steam the rice for about 30-40 minutes or until it becomes tender and fully cooked. Remove from the steamer and set aside.
- Mix Coconut Milk and Sugar: In a large saucepan over medium heat, combine the cooked rice, 1 cup of coconut milk, brown sugar, and salt. Stir well to guarantee the sugar dissolves completely and is evenly distributed throughout the mixture.
- Cook the Mixture: Continue cooking the mixture over medium heat, stirring frequently to prevent it from sticking to the bottom of the pan. Cook until the mixture thickens and starts to pull away from the sides of the pan, about 15-20 minutes.
- Transfer to a Dish: Once the mixture is thick and sticky, transfer it to a greased rectangular or square baking dish. Use a spatula or the back of a spoon to flatten and smooth the top evenly.
- Prepare the Topping (Latik): In a separate saucepan, combine the remaining 1 cup of coconut milk and cook over medium heat. Stir continuously until the coconut milk reduces and curds form, turning golden brown. This process usually takes about 10-15 minutes.
- Add Latik to Biko: Once the latik is ready, pour it over the top of the Biko evenly. Allow the Biko to cool at room temperature before slicing into squares or rectangles for serving.
Extra Tips
When making Biko, it’s vital to keep an eye on the mixture while it cooks to avoid burning. If you prefer a richer coconut flavor, feel free to use freshly grated coconut in place of store-bought coconut milk.
Additionally, Biko can be stored in an airtight container in the refrigerator for up to a week, making it a great make-ahead dessert for gatherings. Enjoy your delicious homemade Biko!
Turon
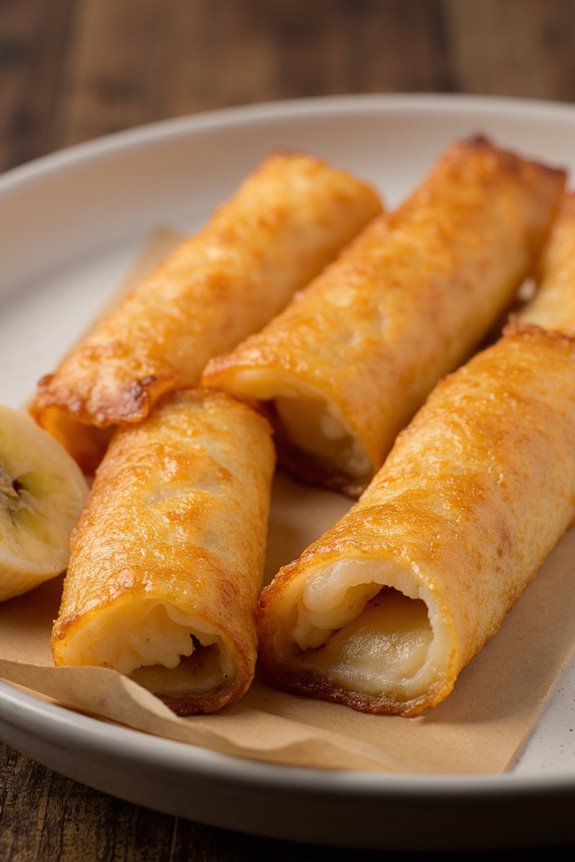
Turon, also known as banana lumpia, is a popular Filipino snack or dessert that combines the sweetness of ripe bananas with the delightful crunch of a fried wrapper. Traditionally, this treat is made with saba bananas, a variety that’s firm and sweet, perfect for frying. The bananas are wrapped in a spring roll wrapper, coated in caramelized sugar, and then fried until golden brown.
This snack is beloved not just for its flavor but also for its satisfying texture, making it a favorite among both adults and children. Making turon is relatively simple and can be a fun activity for the whole family. The combination of flavors and textures creates a delightful experience that captures the essence of Filipino cuisine.
Whether you’re serving it at a party or enjoying it as an afternoon snack, turon is sure to impress. Let’s explore the ingredients and the steps to create this delicious dessert!
Ingredients (Serves 4-6)
- 6 ripe saba bananas (or any firm variety of banana)
- 12 spring roll wrappers
- 1 cup brown sugar
- 1 cup cooking oil (for frying)
- Optional: jackfruit slices (for added flavor)
Cooking Instructions
1. Prepare the Bananas: Peel the saba bananas and cut them in half lengthwise. If you like, you can also slice the jackfruit into strips to add an extra layer of flavor to your turon.
2. Assemble the Turon: Lay one spring roll wrapper on a flat surface, with one corner facing you. Place half a banana (and a piece of jackfruit if using) on the wrapper, about 1 inch from the corner. Fold the corner over the banana, then fold in the sides, and roll it up tightly to form a cylinder. Seal the edge with a bit of water to guarantee it stays closed.
Repeat this step for the remaining wrappers and bananas.
3. Prepare the Sugar Coating****: In a shallow dish, pour the brown sugar. Roll each wrapped banana in the sugar, ensuring they’re fully coated. This will create a sweet caramel crust when fried.
4. Heat the Oil: In a deep frying pan or pot, heat the cooking oil over medium heat. You can test if the oil is hot enough by dropping a small piece of wrapper into it; if it sizzles, it’s ready.
5. Fry the Turon: Carefully place the coated turon in the hot oil, ensuring not to overcrowd the pan. Fry them until they’re golden brown and crispy, which usually takes about 3-5 minutes on each side. Use a slotted spoon to turn them as needed for even cooking.
6. Drain and Cool: Once the turon is golden brown, remove them from the oil and place them on a plate lined with paper towels to absorb excess oil. Allow them to cool slightly before serving.
Extra Tips
When making turon, make sure to keep the oil at the right temperature; too hot can burn the sugar coating, while too cool can make the turon greasy. Additionally, using ripe but firm bananas is key to achieving the perfect texture.
You can also experiment with different fillings, such as adding a slice of cheese for a sweet-savory twist. Enjoy your homemade turon fresh for the best taste, or you can store any leftovers in an airtight container for a later treat!
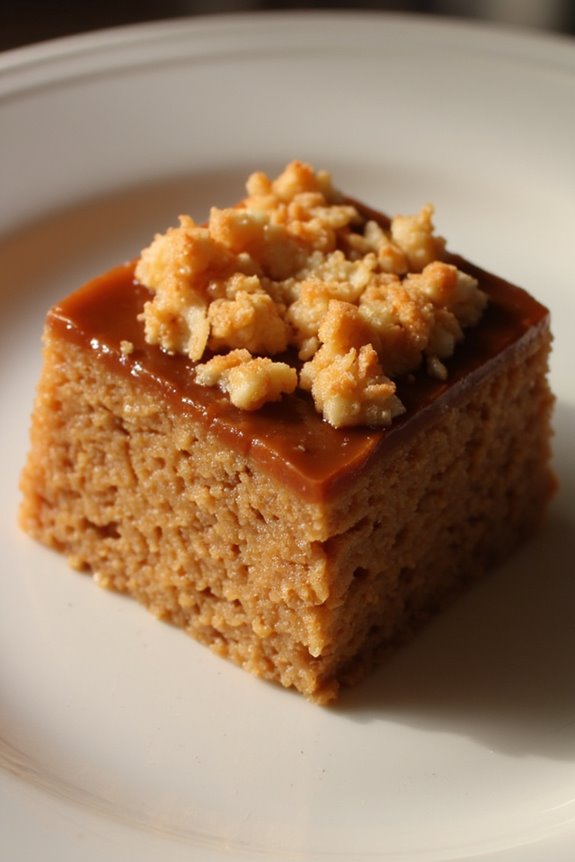
Cassava Cake

Cassava Cake is a beloved Filipino dessert that showcases the versatility of cassava, a starchy root vegetable native to South America but widely used in tropical countries. This cake is known for its rich and creamy texture, with a hint of coconut flavor and a delightful sweetness that makes it a perfect treat for any occasion.
Whether served at family gatherings, fiestas, or simply enjoyed as an afternoon snack, Cassava Cake is sure to be a crowd-pleaser.
The base of this dessert consists of grated cassava, which is combined with coconut milk, sugar, eggs, and a few other ingredients to create a moist and flavorful cake. It’s baked in the oven until golden brown and can be topped with a layer of coconut custard for added indulgence.
This recipe is simple yet satisfying, making it an excellent choice for both novice and experienced bakers alike.
Ingredients (Serves 4-6):
- 2 cups grated cassava (fresh or frozen)
- 1 cup coconut milk
- 1 cup sugar
- 3 large eggs
- 1/2 cup condensed milk
- 1/2 teaspoon baking powder
- 1/4 teaspoon salt
- 1/2 cup grated cheese (optional, for topping)
- 1/2 cup coconut flakes (optional, for topping)
Cooking Instructions:
- Preheat the Oven: Begin by preheating your oven to 350°F (175°C). This guarantees that the cake bakes evenly and achieves the perfect texture.
- Prepare the Batter: In a large mixing bowl, combine the grated cassava, coconut milk, sugar, eggs, condensed milk, baking powder, and salt. Use a whisk to mix until all ingredients are well incorporated and the mixture is smooth.
- Transfer to Baking Dish: Grease a 9×9 inch baking dish or a similarly sized pan with butter or cooking spray. Pour the cassava mixture into the prepared baking dish, spreading it evenly to promote uniform cooking.
- Bake the Cake: Place the baking dish in the preheated oven and bake for about 45-50 minutes, or until the top is golden brown and a toothpick inserted in the center comes out clean. If you like a slightly firmer texture, you can bake it for an additional 10 minutes.
- Add Toppings (Optional): If you’re using cheese or coconut flakes, sprinkle them over the top of the cake during the last 10 minutes of baking. This will allow them to melt and create a delicious topping.
- Cool and Serve: Once baked, remove the cake from the oven and let it cool in the pan for about 10 minutes. Then, carefully transfer it to a wire rack to cool completely. Once cooled, cut into squares and serve.
Extra Tips:
When preparing Cassava Cake, it’s important to verify that the cassava is properly grated and not too wet, as excess moisture can affect the texture of the cake.
If using frozen cassava, thaw and drain it thoroughly before use. For an extra touch of flavor, you can add a dash of vanilla extract to the batter.
This dessert is best enjoyed chilled, so consider refrigerating it for a few hours before serving to enhance its flavors and texture.
Maja Blanca
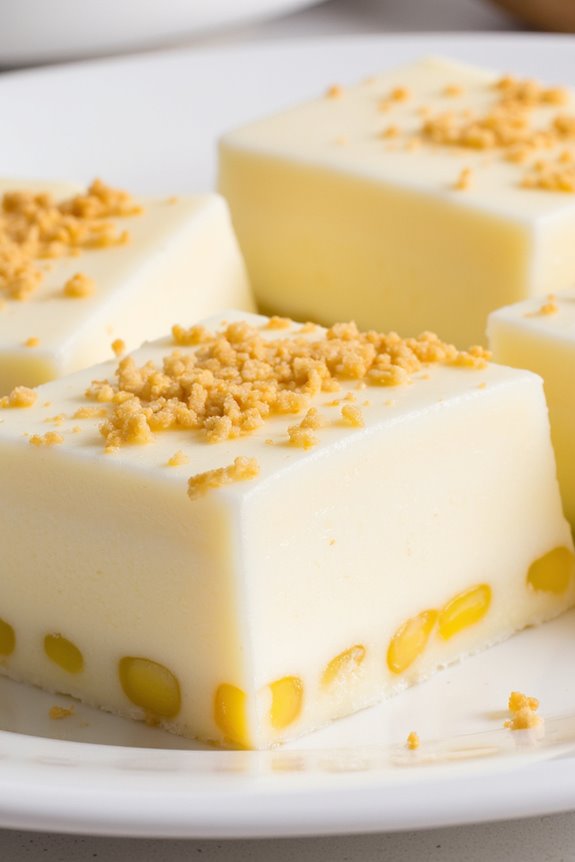
Maja Blanca is a traditional Filipino dessert that captures the essence of coconut and the creamy texture of cornstarch. This delightful treat is often enjoyed during special occasions and celebrations, making it a beloved favorite among Filipinos. The dish is simple to prepare, yet it offers a rich flavor profile that’s truly satisfying. Its main ingredients include coconut milk, corn, and sugar, which blend harmoniously to create a smooth and luscious treat.
In addition to its delicious taste, Maja Blanca is typically garnished with latik, which is made from coconut cream, adding a crunchy texture and additional flavor. This dessert isn’t only a feast for the palate but also a visual delight, often served in a rectangular mold and cut into squares or diamonds. Whether served at a festive gathering or enjoyed as a sweet snack, Maja Blanca is sure to bring warmth and happiness to any table.
Ingredients (Serves 4-6)
- 2 cups coconut milk
- 1 cup fresh or canned corn kernels
- 1 cup water
- 1 cup cornstarch
- 3/4 cup sugar
- 1/2 teaspoon salt
- 1/4 cup latik (optional, for garnish)
Cooking Instructions
- Prepare the Molds: Choose a rectangular or square mold to pour the Maja Blanca mixture into. Lightly grease the mold with a bit of coconut oil or cooking spray to prevent sticking. Set aside.
- Combine Ingredients: In a mixing bowl, combine the cornstarch, sugar, and salt. Slowly pour in the water while stirring until the mixture is smooth and free of lumps.
- Heat the Mixture: In a saucepan, combine the coconut milk and corn kernels. Heat over medium flame until it begins to simmer. Stir occasionally to prevent sticking.
- Mix in the Cornstarch Mixture: Once the coconut milk mixture is simmering, gradually pour in the cornstarch mixture while continuously stirring. This will help to thicken the mixture. Keep stirring until the mixture becomes thick and smooth, usually taking about 5-7 minutes.
- Pour into the Mold: Once thickened, remove the mixture from heat and pour it into the prepared mold. Use a spatula to smooth the top for an even finish.
- Chill and Set: Allow the Maja Blanca to cool at room temperature for about 30 minutes, then refrigerate for at least 2 hours to set completely.
- Serve: Once set, remove the Maja Blanca from the mold by gently pulling the edges away. Cut into squares or diamonds and serve cold, garnished with latik if desired.
Extra Tips
When making Maja Blanca, feel free to experiment with the flavors by adding ingredients such as grated cheese or other fruits like mango or sweetened condensed milk for added sweetness.
It’s important to stir the mixture continuously while cooking to achieve a smooth consistency and avoid lumps. If you want a more pronounced coconut flavor, you can use freshly squeezed coconut milk instead of canned.
Enjoy this delightful dessert chilled for the best experience!