

When it comes to Filipino street food, I’m instantly reminded of bustling markets filled with irresistible aromas and vibrant flavors. These 10 fired-up recipes perfectly capture that experience, offering a delightful mix of textures and tastes. From the crispy bites of kwek-kwek to the smoky allure of chicken isaw, each dish has its own story to tell. If you’re curious about bringing these lively flavors to your kitchen, let’s explore what makes these snacks truly special.
Fish Balls With Sweet and Spicy Sauce

Fish balls are a beloved street food in the Philippines, cherished for their chewy texture and adaptability to various flavors. Typically made from a mixture of fish paste, starch, and seasonings, these delightful morsels are deep-fried to a golden brown and served with an array of dipping sauces. One of the most popular accompaniments is a sweet and spicy sauce that perfectly balances the savory taste of the fish balls, making it an irresistible snack for people of all ages.
Creating fish balls with sweet and spicy sauce at home is a straightforward process that can bring the authentic taste of Filipino street food right to your kitchen. Whether you’re preparing for a party, a family gathering, or simply satisfying a craving, this dish is sure to impress. With a few essential ingredients and simple cooking techniques, you can enjoy this culinary delight any time you desire.
Ingredients (Serves 4-6)
- 500g fish balls (store-bought or homemade)
- Oil for frying
For the Sweet and Spicy Sauce:
- 1/2 cup water
- 1/4 cup vinegar
- 1/4 cup sugar
- 2 tablespoons soy sauce
- 1 tablespoon chili sauce (adjust to taste)
- 1 tablespoon cornstarch
- 1 tablespoon water (for cornstarch slurry)
- 1 clove garlic, minced
- 1 teaspoon ginger, minced
Cooking Instructions
- Prepare the Sweet and Spicy Sauce: In a saucepan, combine water, vinegar, sugar, soy sauce, chili sauce, minced garlic, and minced ginger. Stir the mixture over medium heat until the sugar dissolves completely.
- Thicken the Sauce: In a small bowl, mix the cornstarch with 1 tablespoon of water to create a slurry. Once the sauce in the saucepan starts to simmer, add the cornstarch slurry gradually while continuously stirring. Cook for an additional 2-3 minutes until the sauce thickens to a syrupy consistency. Remove from heat and set aside.
- Fry the Fish Balls: In a deep frying pan or wok, heat oil over medium-high heat. Once the oil is hot (approximately 350°F or 180°C), carefully add the fish balls in batches, ensuring not to overcrowd the pan. Fry them for about 4-5 minutes or until they turn golden brown and crispy. Use a slotted spoon to remove the fish balls and drain them on paper towels.
- Serve: Arrange the fried fish balls on a serving plate. Drizzle the sweet and spicy sauce over the fish balls or serve it on the side as a dipping sauce. Garnish with chopped green onions or sesame seeds if desired.
Extra Tips
When making fish balls with sweet and spicy sauce, feel free to customize the sauce to your taste. You can adjust the sweetness by adding more sugar or enhance the spiciness by increasing the amount of chili sauce.
Additionally, if you prefer a smoother sauce, consider blending all the sauce ingredients before cooking. For a healthier alternative, you can also bake the fish balls instead of frying them, though they may not have the same crispy texture. Enjoy your homemade Filipino street food experience!
Chicken Isaw (Grilled Chicken Intestines)

Chicken Isaw is a beloved street food in the Philippines that brings a delightful smoky flavor and unique texture to the palate. This dish features chicken intestines that are marinated and then grilled to perfection, making it a popular snack or appetizer among locals and tourists alike. The preparation may seem challenging, but with the right ingredients and a bit of patience, you can recreate this iconic Filipino delicacy in the comfort of your home.
The key to a great Chicken Isaw lies in the marinade, which infuses the intestines with robust flavors. The combination of vinegar, soy sauce, garlic, and spices not only tenderizes the meat but also adds a zesty kick that complements the charred exterior. Grilling is the traditional method of cooking Chicken Isaw, as it enhances the smoky flavor and gives it that sought-after crispy texture. Whether served with a spicy vinegar dipping sauce or enjoyed plain, Chicken Isaw is sure to satisfy your cravings for authentic Filipino street food.
Ingredients (Serves 4-6):
- 1 pound chicken intestines (cleaned and trimmed)
- 1/4 cup soy sauce
- 1/4 cup vinegar (preferably cane vinegar)
- 3 cloves garlic (minced)
- 1 teaspoon black pepper
- 1 teaspoon salt
- 1 tablespoon sugar
- 1 tablespoon vegetable oil (for brushing)
- Bamboo skewers (soaked in water for 30 minutes)
Cooking Instructions:
- Clean the Chicken Intestines: Start by thoroughly cleaning the chicken intestines. Rinse them under cold water, then use a mixture of salt and vinegar to scrub them gently. This step is vital to remove any unwanted odors and guarantee they’re safe to eat.
- Prepare the Marinade: In a mixing bowl, combine the soy sauce, vinegar, minced garlic, black pepper, salt, and sugar. Stir the ingredients together until the sugar is dissolved. This marinade will impart flavor and tenderness to the intestines.
- Marinate the Intestines: Place the cleaned chicken intestines into the marinade, making sure they’re fully submerged. Cover the bowl with plastic wrap and refrigerate for at least 1 hour, or preferably overnight. The longer you marinate, the more flavor will develop.
- Skewer the Intestines: After marinating, remove the intestines from the marinade and thread them onto the soaked bamboo skewers. Each skewer can hold about 3-4 intestines, depending on their size. Make sure to leave some space between each piece for even cooking.
- Preheat the Grill: Preheat your grill to medium-high heat. If using a charcoal grill, make sure the coals are evenly distributed and glowing. If using a gas grill, confirm the burners are evenly heated.
- Grill the Chicken Isaw: Once the grill is ready, place the skewered intestines on the grates. Grill for about 5-7 minutes on each side, basting with vegetable oil occasionally. Look for a charred appearance and confirm they’re cooked through.
- Serve Hot: Once cooked, remove the Chicken Isaw from the grill and let them rest for a minute. Serve hot, accompanied by a side of spicy vinegar dipping sauce for an extra kick.
Extra Tips:
When making Chicken Isaw, it’s essential to use fresh chicken intestines for the best flavor and texture. Don’t rush the marinating process; allowing the intestines to soak in the marinade overnight enhances the taste considerably.
For an added twist, consider experimenting with different spices or citrus juices in your marinade. Finally, confirm your grill is adequately preheated to achieve that perfect char without drying out the intestines. Enjoy your homemade Chicken Isaw!
Kwek-Kwek (Quail Eggs in Orange Batter)

Kwek-Kwek is a beloved Filipino street food snack that features quail eggs coated in a vibrant orange batter and deep-fried to a crispy perfection. This delightful treat is often served with a tangy vinegar dipping sauce or a sweet and spicy sauce, making it a popular choice among food enthusiasts.
The crunchy exterior paired with the tender quail egg inside creates a satisfying contrast that keeps people coming back for more. Whether you’re looking to impress guests at a gathering or simply indulge in a flavorful snack, Kwek-Kwek is certain to delight.
Making Kwek-Kwek at home is easier than you might think, and the ingredients are generally easy to find. The key to achieving that signature orange color lies in the use of annatto powder, which also lends a subtle earthiness to the batter. In this recipe, we’ll guide you through each step to guarantee your Kwek-Kwek turns out perfectly crispy and delicious.
Ingredients (Serves 4-6):
- 12-15 quail eggs
- 1 cup all-purpose flour
- 1/2 cup cornstarch
- 1 teaspoon baking powder
- 1 teaspoon salt
- 1-2 teaspoons annatto powder
- 1 cup water (adjust for consistency)
- Cooking oil (for deep frying)
Cooking Instructions:
1. Boil the Quail Eggs: Start by bringing a pot of water to a boil. Gently add the quail eggs and let them boil for about 4-5 minutes.
Once cooked, remove them from the pot and place them in a bowl of ice water to cool. This will make peeling the eggs easier.
2. Peel the Eggs: After the eggs have cooled, carefully peel the shells off. Rinse the peeled eggs under cold water to remove any shell fragments.
Set them aside on a paper towel to absorb any excess moisture.
3. Prepare the Batter: In a mixing bowl, combine the all-purpose flour, cornstarch, baking powder, salt, and annatto powder. Gradually add water while whisking until you achieve a smooth batter that’s thick enough to coat the back of a spoon.
If the batter is too thick, add a little more water.
4. Heat the Oil: In a deep frying pan or pot, heat cooking oil over medium heat. The oil should be hot enough that when you drop a small amount of batter into it, it sizzles and floats to the surface.
5. Coat the Eggs: Dip each peeled quail egg into the batter, ensuring it’s well coated. Allow any excess batter to drip off.
6. Fry the Kwek-Kwek: Carefully place the battered quail eggs into the hot oil, a few at a time, to avoid overcrowding. Fry them for about 3-4 minutes, or until they’re golden brown and crispy.
Use a slotted spoon to turn them occasionally for even cooking.
7. Drain Excess Oil: Once cooked, remove the Kwek-Kwek from the oil and place them on a plate lined with paper towels to soak up excess oil.
Repeat the process until all quail eggs are fried.
8. Serve and Enjoy: Serve your Kwek-Kwek hot, accompanied by your choice of dipping sauce, such as vinegar, sweet chili sauce, or a spicy soy sauce mixture.
Extra Tips:
When making Kwek-Kwek, it’s important to keep the oil at the right temperature to achieve a crispy texture without burning the batter.
If you find that the batter isn’t sticking well to the eggs, you can lightly dust the peeled quail eggs with flour before dipping them into the batter. This will help the batter adhere better.
Additionally, feel free to experiment with spices or seasonings in the batter to customize the flavor to your liking!
Lumpiang Shanghai (Filipino Spring Rolls)

Lumpiang Shanghai is one of the most beloved Filipino street foods, known for its crispy exterior and flavorful filling. These spring rolls are often filled with a mixture of ground pork, vegetables, and seasonings, then deep-fried to golden perfection. They’re a staple during celebrations, family gatherings, and even as a delicious snack enjoyed any time of the day.
The combination of textures and flavors makes Lumpiang Shanghai a crowd-pleaser that can be enjoyed with a sweet and sour dipping sauce or a spicy vinegar dip.
Making Lumpiang Shanghai is a straightforward process that allows you to customize the filling according to your preferences. While the traditional recipe often uses ground pork, you can also use chicken, shrimp, or even a combination of proteins.
Wrapping the filling in the thin spring roll wrappers requires a bit of practice, but with patience, you’ll master the art of rolling these delightful treats. Prepare to impress your family and friends with this delightful Filipino classic!
Ingredients (Serves 4-6 people):
- 1 lb ground pork
- 1 cup finely chopped carrots
- 1 cup finely chopped green beans
- 1/2 cup minced onion
- 3 cloves garlic, minced
- 1/4 cup soy sauce
- 1/2 tsp ground black pepper
- 1/4 tsp salt
- 1 pack spring roll wrappers
- Oil for frying
Cooking Instructions:
1. Prepare the Filling: In a large mixing bowl, combine the ground pork, chopped carrots, green beans, minced onion, minced garlic, soy sauce, black pepper, and salt. Mix well until all ingredients are evenly distributed. This mixture will serve as the flavorful filling for your spring rolls.
2. Wrap the Spring Rolls: Take a spring roll wrapper and lay it flat on a clean surface or cutting board. Spoon about 1-2 tablespoons of the filling onto the lower portion of the wrapper. Fold the sides inward and then roll it up tightly from the bottom to the top, sealing the edge with a little water.
Repeat this process until all the filling is used.
3. Heat the Oil: In a deep frying pan or a wok, pour enough oil to submerge the spring rolls (about 2-3 inches deep). Heat the Oil over medium-high heat until it reaches approximately 350°F (175°C). This temperature is ideal for achieving a crispy texture.
4. Fry the Spring Rolls: Carefully place a few spring rolls in the hot oil, making sure not to overcrowd the pan. Fry them for about 4-5 minutes or until they’re golden brown and crispy, turning occasionally for even cooking.
Use a slotted spoon to remove the spring rolls and place them on a plate lined with paper towels to absorb excess oil.
5. Serve: Once all the spring rolls are cooked, arrange them on a serving platter. They can be served hot with your choice of dipping sauces such as sweet and sour sauce or spicy vinegar.
Extra Tips:
When making Lumpiang Shanghai, make certain that your filling isn’t too wet, as this can cause the wrappers to become soggy and difficult to fry. You can achieve a drier filling by squeezing out excess moisture from the vegetables before mixing them with the meat.
If you want to prepare the dish ahead of time, you can assemble the spring rolls and freeze them. Just fry them straight from the freezer when you’re ready to enjoy them, adding a couple of extra minutes to the frying time for best results.
Turon (Banana Lumpia)

Turon, also known as Banana Lumpia, is a beloved Filipino street food that features sweet, ripe bananas wrapped in a crispy shell and fried to golden perfection. The combination of the natural sweetness of the bananas and the satisfying crunch of the lumpia wrapper makes this treat irresistible.
Often enjoyed as a snack or dessert, Turon is commonly sold by street vendors across the Philippines, bringing a touch of nostalgia to many who grew up with this delightful dish.
Making Turon at home is a fun and rewarding culinary adventure. With just a few simple ingredients, you can recreate this popular street food in your own kitchen. The process involves wrapping slices of banana with lumpia wrappers, rolling them in sugar, and frying until crispy. Serve them warm and enjoy the delicious contrast of textures and flavors that Turon offers.
Ingredients for Turon (Serving Size: 4-6 people):
- 6 ripe saba bananas (or any cooking bananas)
- 12 pieces lumpia wrappers
- 1 cup brown sugar
- 1 cup cooking oil (for frying)
- Optional: jackfruit slices for added flavor
Cooking Instructions:
1. Prepare the Bananas: Begin by peeling the saba bananas and cutting them in half lengthwise, or you can leave them whole if they’re small enough. If you’re using jackfruit, cut it into thin slices.
2. Wrap the Bananas: Take a lumpia wrapper and lay it flat on a clean surface. Place one piece of banana (and a slice of jackfruit, if using) near the edge of the wrapper. Fold the sides over the banana and roll it tightly, sealing the edges with a little water to guarantee they stay closed.
Repeat this process for all bananas.
3. Coat with Sugar: Once all the bananas are wrapped, pour the brown sugar onto a shallow plate. Roll each wrapped banana in the sugar to coat it evenly, guaranteeing a sweet, crunchy exterior when fried.
4. Heat the Oil: In a large frying pan, heat the cooking oil over medium heat. You can test if the oil is hot enough by dropping a small piece of lumpia wrapper into the oil; if it bubbles immediately, it’s ready.
5. Fry the Turon: Carefully place the coated banana lumpia into the hot oil, frying them in batches to avoid overcrowding the pan. Fry for about 2-3 minutes on each side, or until they turn golden brown and crispy.
Use a slotted spoon to remove them from the oil and drain on paper towels.
6. Serve and Enjoy: Allow the Turon to cool slightly before serving. They can be enjoyed warm as a snack or dessert, and feel free to drizzle with honey or serve with ice cream for an extra treat!
Extra Tips: To achieve the best results, confirm that your oil is at the right temperature before frying; too hot can burn the wrappers while too cold can make them soggy.
If you prefer a healthier version, you can bake the wrapped bananas instead of frying them—just brush them lightly with oil and bake at 375°F (190°C) for about 15-20 minutes until golden. Enjoy experimenting with fillings, such as adding a slice of cheese or different fruits to customize your Turon!
Taho (Silken Tofu With Syrup)
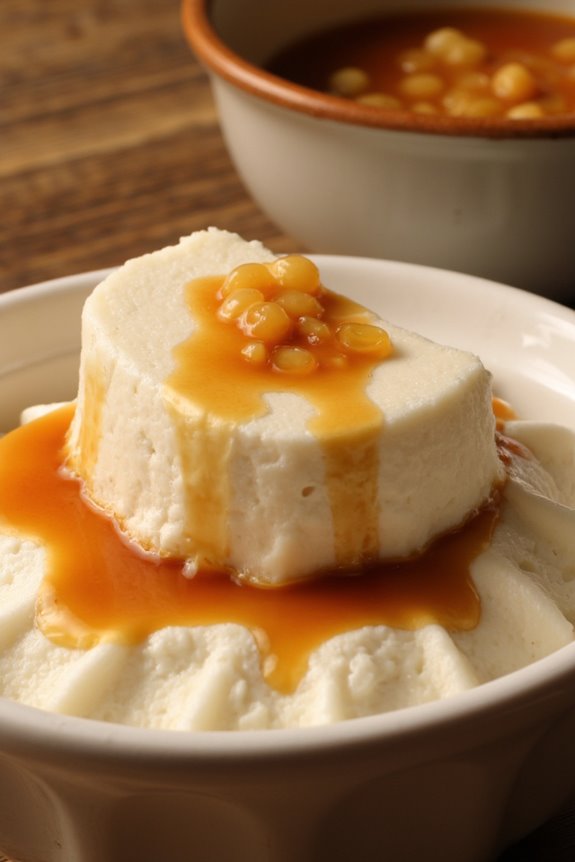
Taho is a beloved Filipino street food that combines the creamy texture of silken tofu with sweet syrup and sago pearls, making it a delightful treat for breakfast or as a snack. Often sold by street vendors, this comforting dish isn’t only satisfying but also easy to prepare at home.
The combination of soft tofu, sweet caramel-like syrup known as arnibal, and chewy tapioca pearls creates a delightful contrast of textures and flavors that will surely please anyone who tries it.
The beauty of taho lies in its simplicity, yet it packs a punch with its flavors. The syrup is typically made from brown sugar, giving it a rich color and sweet taste that complements the blandness of the tofu perfectly. This dish is versatile as you can adjust the sweetness to your preference and even add flavors like vanilla or pandan for an extra twist. It’s a wonderful introduction to the delightful world of Filipino street food.
Ingredients (Serves 4-6)
- 500g silken tofu
- 1 cup brown sugar
- 1 cup water
- 1/2 cup sago pearls (tapioca pearls)
- 1 teaspoon vanilla extract (optional)
- A pinch of salt
Cooking Instructions
- Prepare the Sago Pearls: Begin by boiling a pot of water and adding the sago pearls. Cook them for about 20 minutes or until they become translucent and chewy. Stir occasionally to prevent sticking. Once cooked, drain the pearls and rinse them under cold water to stop the cooking process. Set aside.
- Make the Syrup (Arnibal): In a small saucepan, combine the brown sugar and water over medium heat. Stir continuously until the sugar dissolves completely. Once it begins to simmer, reduce the heat and let it cook for about 5-10 minutes or until it thickens slightly. If desired, add vanilla extract for extra flavor. Remove from heat and let it cool.
- Prepare the Silken Tofu: While the syrup is cooling, prepare the silken tofu. Gently unwrap the tofu and cut it into cubes or slices, depending on your preference. To warm it up, you can steam the tofu for about 5 minutes or microwave it in a bowl for 1-2 minutes until heated through.
- Assemble the Taho: In serving bowls, layer the warm silken tofu at the bottom. Add a generous amount of cooked sago pearls on top of the tofu. Drizzle the arnibal syrup over the tofu and pearls, making sure to cover them well. You can add more syrup according to your taste preference.
- Serve and Enjoy: Serve the taho warm, and enjoy it as a comforting snack or breakfast treat. You can provide additional syrup on the side for those who prefer it sweeter.
Extra Tips
When making taho, it’s important to use fresh silken tofu for the best texture and taste. If you’re short on time, you can purchase ready-made syrup from Asian grocery stores.
Additionally, feel free to experiment with flavors by adding ingredients like coconut milk or using different types of sugar for the syrup. Taho can also be enjoyed cold, so don’t hesitate to refrigerate any leftovers and serve them chilled the next day!
Balut (Fertile Duck Egg)
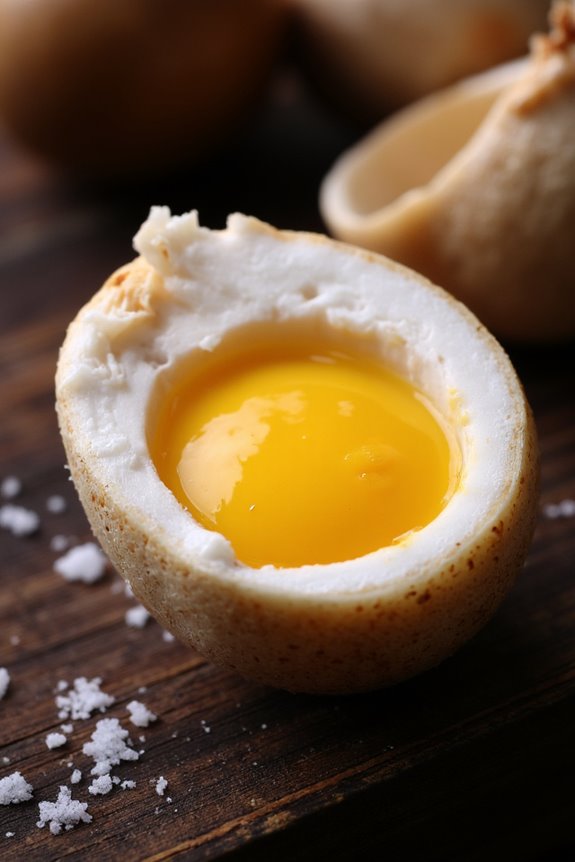
Balut is a popular Filipino street food that has garnered both intrigue and delight among food lovers. This delicacy consists of a fertilized duck egg that’s incubated for about 14 to 21 days, after which it’s boiled and served warm. The experience of eating balut is unique, as it allows you to savor not only the rich flavor of the egg but also the developing embryo inside.
Often enjoyed with a sprinkle of salt or a dash of vinegar, balut is cherished for its bold taste and cultural significance in the Philippines.
Cooking balut requires a bit of preparation, but it’s relatively straightforward. The key is to guarantee that the eggs are cooked perfectly to allow the flavors to meld seamlessly. When prepared correctly, balut can be a delightful treat that offers a taste of authentic Filipino cuisine. Whether you’re a seasoned food enthusiast or trying something new, making balut at home can be a rewarding experience.
Ingredients (Serves 4-6)
- 12 fertilized duck eggs (balut)
- Water (enough to cover the eggs in a pot)
- Salt (for serving)
- Vinegar (for serving)
Cooking Instructions
- Select Quality Eggs: Begin by sourcing fresh fertilized duck eggs from a reliable vendor. Confirm that the eggs are clean and intact before you proceed to cooking. The quality of the eggs greatly affects the taste of the balut.
- Prepare the Pot: Fill a large pot with enough water to fully submerge the eggs. Place the pot on the stove and bring the water to a gentle boil over medium heat. This will help in cooking the eggs evenly.
- Boil the Eggs: Once the water is boiling, carefully add the fertilized duck eggs to the pot using a slotted spoon. It’s essential to lower the eggs gently to prevent them from cracking. Boil the eggs for about 30-35 minutes. This cooking time guarantees that the embryo is cooked thoroughly while still maintaining a soft yolk.
- Cool and Serve: After the cooking time is complete, remove the eggs from the boiling water and transfer them to a bowl of cold water to halt the cooking process. Let them sit for a few minutes until they’re cool enough to handle.
- Peel and Enjoy: To eat balut, gently tap the wider end of the egg to crack the shell, then peel it away. Sprinkle a pinch of salt over the exposed egg or drizzle with vinegar for added flavor. Savor the rich taste, starting with the broth before enjoying the yolk and the embryo.
Extra Tips
When preparing balut, it’s important to have the right incubation period for the eggs, as the age of the embryo greatly influences the flavor and texture.
If you want to experiment, try different dipping sauces like chili vinegar or soy sauce to complement the taste. Additionally, balut is best enjoyed fresh, so aim to cook them shortly before serving.
Puto (Filipino Rice Cakes)

Puto, a beloved Filipino delicacy, is a type of steamed rice cake that’s soft, fluffy, and slightly sweet. Traditionally made from rice flour, puto is a staple during celebrations and gatherings, often served as a side dish or dessert. Its versatility allows for various toppings, like cheese or salted eggs, making it not just a treat but also a delightful accompaniment to savory dishes like dinuguan (blood stew).
Making puto at home is a simple process that requires minimal ingredients but yields delicious results. To achieve the perfect texture and flavor, it’s important to use the right kind of rice flour, preferably the fine and glutinous type. You can easily find this in Asian grocery stores. The steaming process is vital as it helps the puto rise and become airy, so be certain to use a steamer or a pot with a steaming rack. With a few easy steps, you can whip up a batch of puto that will impress your family and friends.
Ingredients (serving size: 4-6 people)
- 2 cups rice flour
- 1 cup sugar
- 1 tablespoon baking powder
- 1 ½ cups coconut milk
- 1 teaspoon vanilla extract
- ¼ teaspoon salt
- Optional: cheese slices or salted eggs for topping
Cooking Instructions
- Prepare the Steamer: Fill a steamer pot with water and bring it to a boil. Make sure to use a steamer that fits your mold or muffin pan, as this will be where you steam the puto.
- Mix Dry Ingredients: In a large mixing bowl, combine the rice flour, sugar, baking powder, and salt. Stir these dry ingredients together until they’re evenly mixed.
- Combine Wet Ingredients: In another bowl, mix the coconut milk and vanilla extract. Once combined, slowly pour this wet mixture into the bowl with the dry ingredients. Stir well until you achieve a smooth batter without lumps.
- Prepare the Mold: Lightly grease your puto molds or muffin cups with oil or cooking spray to prevent sticking. You can use mini muffin pans or silicone molds for easy removal.
- Fill the Molds: Pour the batter into the prepared molds, filling them about ¾ full to allow space for the puto to rise during steaming. If you’re using toppings like cheese or salted eggs, place them on top of the batter before steaming.
- Steam the Puto: Once the water is boiling, carefully place the filled molds into the steamer. Cover with a lid and steam for about 20-25 minutes or until a toothpick inserted in the center comes out clean.
- Cool and Serve: Once cooked, remove the molds from the steamer and allow the puto to cool for a few minutes. Carefully remove them from the molds and serve warm or at room temperature.
Extra Tips
When making puto, confirm that the steaming process is done correctly; a tightly sealed lid helps create the necessary steam for rising. If you notice your puto isn’t rising as expected, check that your baking powder is fresh.
For added flavor, you can experiment with different toppings or mix-ins, such as ube (purple yam) or pandan extract, to create unique variations of this classic treat. Enjoy your homemade puto with a cup of coffee or as part of a festive meal!
Buko Juice (Fresh Coconut Juice)
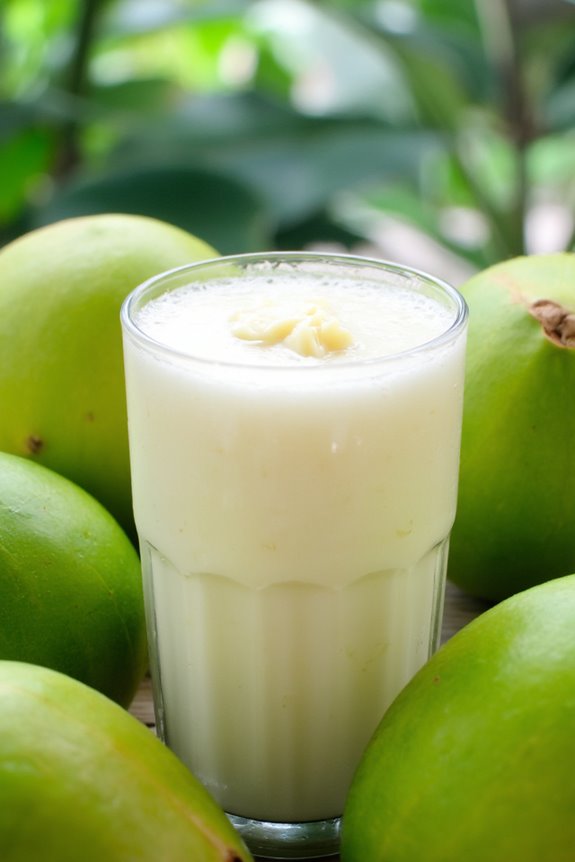
Buko Juice, or fresh coconut juice, is a popular and revitalizing beverage enjoyed throughout the Philippines. Typically sipped straight from the coconut, this drink not only quenches thirst but also boasts numerous health benefits, including hydration and essential electrolytes. The sweet, subtle flavor of the coconut water perfectly complements the tropical ambiance of Filipino street food culture, making it a must-try for anyone exploring these culinary delights.
Making Buko Juice is a delightful process that allows you to experience the freshness of young coconuts. When selecting coconuts, opt for those that are young and green, as they contain the most flavorful and revitalizing water. This drink isn’t only simple to prepare but also provides a wonderful way to connect with the vibrant flavors of the Philippines, whether you’re enjoying it at a bustling street market or in the comfort of your home.
Ingredients (Serves 4-6):
- 4 young green coconuts
- 2 tablespoons of sugar (optional)
- 1 teaspoon of fresh lime or lemon juice (optional)
- Ice cubes (optional)
- Fresh coconut meat (optional, for serving)
Instructions:
- Choose and Prepare the Coconuts: Select 4 young green coconuts from your local market. Look for coconuts that feel heavy for their size and have a smooth surface. Use a sharp knife to carefully cut off the top of each coconut, creating a hole large enough for sipping. Be cautious while handling the knife to avoid any accidents.
- Extract the Juice: Once the tops are removed, you can either sip the juice directly from the coconut or pour it into a large pitcher. If you prefer, you can strain the juice to remove any impurities or bits of coconut shell that may have fallen in during the cutting process.
- Sweeten to Taste: If you like your Buko Juice on the sweeter side, add 2 tablespoons of sugar to the juice and stir until it dissolves completely. For a zesty twist, you can also mix in 1 teaspoon of fresh lime or lemon juice, which complements the natural sweetness of the coconut water.
- Serve: If desired, add ice cubes to the pitcher or directly into each coconut for a chilled experience. For an added texture and flavor, scoop out some of the fresh coconut meat from the inside of the coconut and serve it alongside the juice.
- Enjoy: Serve the Buko Juice in the coconuts or in glasses, and enjoy this revitalizing drink with friends and family. It’s best enjoyed immediately while the juice is fresh and chilled.
Extra Tips:
When preparing Buko Juice, always choose young coconuts for the best flavor and hydration benefits. If you’re unsure how to open a coconut, there are many tutorials available online that can guide you.
Additionally, feel free to experiment with the sweetness and acidity by adjusting the sugar and lime or lemon juice to match your taste preferences. For a fun variation, consider blending the coconut water with other tropical fruits, such as pineapple or mango, for a delicious fruit smoothie.
Street-Style BBQ Skewers

Filipino Street-Style BBQ Skewers are a popular street food delight that captures the essence of Filipino flavors in every bite. These marinated skewers are typically made with pork, chicken, or even tofu, then grilled to perfection over an open flame. The result is a smoky, sweet, and savory treat that’s perfect for gatherings, picnics, or simply enjoying a delicious meal at home.
The marinade is a key component that gives these skewers their unique flavor, combining soy sauce, vinegar, and a blend of spices that reflect the diverse culinary culture of the Philippines.
To make the experience even more authentic, these BBQ skewers are often served with a side of vinegar dipping sauce and grilled vegetables. The preparation is simple and requires minimal cooking skills, making it an accessible dish for anyone looking to indulge in Filipino street food. Gather your friends and family, fire up the grill, and enjoy this feast that’s sure to captivate.
Ingredients (Serves 4-6):
- 1.5 lbs pork shoulder or chicken thighs, cut into 1-inch cubes
- 1/2 cup soy sauce
- 1/4 cup white vinegar
- 1/4 cup brown sugar
- 1 tablespoon minced garlic
- 1 teaspoon ground black pepper
- 1 teaspoon paprika
- 1 tablespoon vegetable oil
- 1/2 teaspoon salt
- Bamboo skewers (soaked in water for 30 minutes)
- Optional: chopped green onions and lemon wedges for garnish
Cooking Instructions:
- Prepare the Marinade: In a large bowl, combine the soy sauce, white vinegar, brown sugar, minced garlic, ground black pepper, paprika, vegetable oil, and salt. Whisk the mixture together until the sugar is dissolved and the ingredients are well incorporated.
- Marinate the Protein: Add the cubed pork or chicken to the marinade, making sure each piece is coated evenly. Cover the bowl with plastic wrap or transfer the contents to a resealable plastic bag. Allow it to marinate in the refrigerator for at least 1 hour, or preferably overnight for maximum flavor.
- Preheat the Grill: When ready to cook, preheat your grill to medium-high heat. If using a charcoal grill, make sure the coals are glowing and evenly distributed for a consistent cooking temperature.
- Skewer the Meat: Take the marinated pork or chicken from the refrigerator and thread the pieces onto the soaked bamboo skewers, leaving a little space between each piece to allow for even cooking.
- Grill the Skewers: Place the skewers on the preheated grill. Cook for about 10-15 minutes, turning occasionally, until the meat is cooked through and has nice grill marks. Confirm the internal temperature reaches 165°F (75°C) for chicken and 145°F (63°C) for pork.
- Serve: Once cooked, remove the skewers from the grill and let them rest for a few minutes. Serve hot with a side of vinegar dipping sauce and garnish with chopped green onions and lemon wedges if desired.
Extra Tips:
For an added layer of flavor, consider adding pineapple or bell pepper chunks to the skewers for a sweet and savory combination.
If you prefer a spicier kick, you can also add chili flakes or sliced chili peppers to the marinade. Always keep an eye on the skewers while grilling to prevent burning, and remember to let them rest before serving for juicier meat.
Enjoy your Street-Style BBQ Skewers with friends and family for a truly delightful Filipino street food experience!