

When I think of Korean cuisine, vibrant colors and bold flavors come to mind. I’ve found 15 gluten-free recipes that satisfy cravings while bringing balance to our meals. From savory bulgogi to crunchy kimbap, each dish has its own story. Curious about how these simple recipes can enhance your dining experience? Let’s explore these delightful options together.
Korean Beef Bulgogi
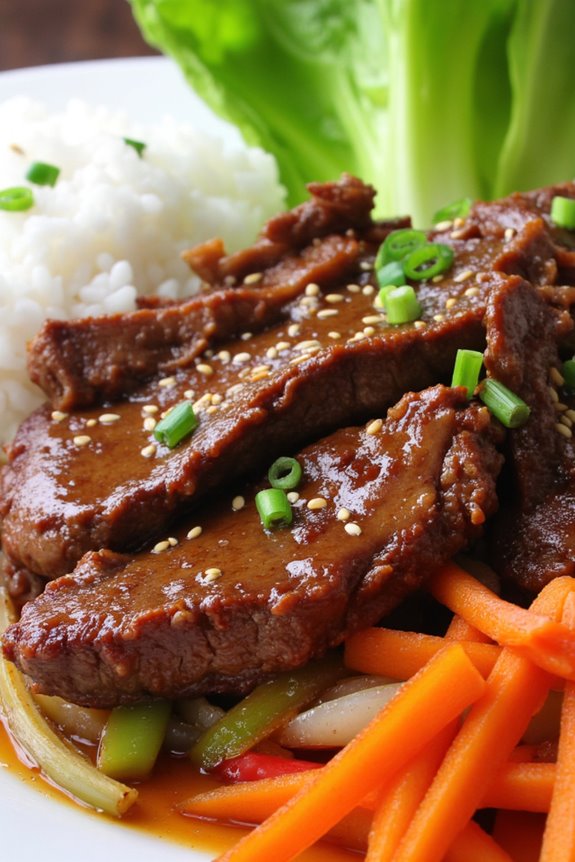
Korean Beef Bulgogi is a delicious and savory dish that perfectly embodies the vibrant flavors of Korean cuisine. Traditionally made with marinated beef, this gluten-free version guarantees that everyone can enjoy this delightful dish without the worry of gluten-related issues. The marinade, which includes soy sauce alternatives and a blend of spices, infuses the beef with a sweet and savory flavor that’s hard to resist.
Whether served over rice, wrapped in lettuce leaves, or enjoyed on its own, Beef Bulgogi is a crowd-pleaser that can be made quickly and easily. This dish isn’t only packed with flavor, but it also offers a wonderful balance of protein and vegetables. When prepared correctly, the beef becomes tender and juicy, while the marinated vegetables add a fresh crunch.
Perfect for a family dinner or a get-together with friends, Gluten Free Korean Beef Bulgogi is sure to impress your guests and leave them asking for the recipe.
Ingredients (Serves 4-6):
- 1.5 lbs beef sirloin or ribeye, thinly sliced
- 1/4 cup gluten-free soy sauce or tamari
- 2 tablespoons sesame oil
- 2 tablespoons honey or maple syrup
- 4 cloves garlic, minced
- 1 inch ginger, grated
- 1/4 cup green onions, chopped
- 1 tablespoon sesame seeds
- 1/2 teaspoon black pepper
- 1/4 cup rice wine or mirin (gluten-free)
- 1/2 onion, thinly sliced
- 1 carrot, julienned
- 1 bell pepper, thinly sliced (optional)
- Lettuce leaves for serving (optional)
- Cooked rice for serving (optional)
Cooking Instructions:
- Prepare the Marinade: In a large mixing bowl, combine the gluten-free soy sauce or tamari, sesame oil, honey or maple syrup, minced garlic, grated ginger, chopped green onions, sesame seeds, black pepper, and rice wine or mirin. Mix well to make certain all the ingredients are fully combined.
- Marinate the Beef: Add the thinly sliced beef to the marinade, making sure each piece is well-coated. Cover the bowl with plastic wrap and let it marinate in the refrigerator for at least 30 minutes, or up to 4 hours for a deeper flavor.
- Prepare the Vegetables: While the beef is marinating, slice the onion, julienne the carrot, and thinly slice the bell pepper if using. Set aside.
- Cook the Beef: Heat a large skillet or grill pan over medium-high heat. Once hot, add the marinated beef to the pan in a single layer. Cook for about 3-4 minutes on each side, or until the beef is browned and cooked through. Avoid overcrowding the pan; cook in batches if necessary.
- Add the Vegetables: After removing the cooked beef from the pan, add the sliced onion, carrot, and bell pepper to the same pan. Stir-fry for about 2-3 minutes, or until the vegetables are tender but still crisp.
- Combine and Serve: Return the cooked beef to the pan with the vegetables and toss everything together to combine. Cook for an additional minute to heat through. Serve the Beef Bulgogi hot, garnished with extra sesame seeds and green onions, alongside lettuce leaves and cooked rice if desired.
Extra Tips:
For the best results, use a meat tenderizer or freeze the beef for 30 minutes before slicing; this will make it easier to achieve thin, even slices.
Feel free to customize the vegetables according to your preference or what you have on hand. You can also adjust the sweetness of the marinade by adding more or less honey or maple syrup, according to your taste.
If you want to elevate the dish further, consider adding some chili flakes for a spicy kick!
Spicy Kimchi Stew (Kimchi Jjigae)

Spicy Kimchi Stew, or Kimchi Jjigae, is a beloved Korean comfort food that warms the soul and tantalizes the taste buds. This hearty stew is made with fermented kimchi, which gives it a distinctive tang and spice that’s both satisfying and invigorating.
The dish is versatile, allowing for various ingredients such as tofu, pork, or even seafood, making it a staple in many Korean households. Not only is it delicious, but it’s also an excellent way to utilize leftover kimchi, transforming it into a new, flavorful dish.
This stew is perfect for sharing with family and friends, as it serves 4-6 people. The combination of robust flavors from the kimchi and the savory broth creates an irresistible dish that pairs beautifully with steamed rice.
Whether you’re a seasoned cook or a beginner, making Kimchi Jjigae is straightforward and rewarding. Let’s explore the ingredients and cooking instructions to bring this traditional Korean dish to your table.
Ingredients (Serves 4-6):
- 2 cups aged kimchi (chopped)
- 1 cup pork belly or tofu (cubed)
- 1 medium onion (sliced)
- 2 green onions (chopped)
- 2 tablespoons gochugaru (Korean red pepper flakes)
- 1 tablespoon gochujang (Korean red pepper paste)
- 4 cups water or anchovy stock
- 1 tablespoon soy sauce
- 1 teaspoon sesame oil
- 1 block of firm tofu (optional, cubed)
- Salt to taste
Cooking Instructions:
- Prepare the Ingredients: Begin by gathering all your ingredients. If you’re using pork belly, cut it into bite-sized cubes. Chop the kimchi into smaller pieces if necessary, and slice the onion and green onions. If you plan to use tofu, cut it into cubes as well.
- Sauté the Pork Belly: In a large pot, heat the sesame oil over medium heat. Add the cubed pork belly and sauté until it’s browned and the fat has rendered, which should take about 5-7 minutes. This step adds depth to the stew’s flavor.
- Add the Kimchi and Onion: Once the pork is browned, add the chopped kimchi and sliced onion to the pot. Stir everything together and cook for another 5 minutes. This allows the kimchi to slightly caramelize and enhances its flavors.
- Stir in the Spices: Add the gochugaru and gochujang to the pot, mixing well to coat the kimchi and pork evenly. Let it cook for about 2 minutes to release the spices’ aroma.
- Add the Liquid: Pour in the water or anchovy stock, and bring the mixture to a boil. Once boiling, reduce the heat to low and let it simmer for about 10-15 minutes. This helps meld the flavors together.
- Include Tofu and Season: If you’re using tofu, gently add it to the pot after the stew has simmered for a while. Season with soy sauce and salt to taste. Let it cook for an additional 5-10 minutes, allowing the tofu to absorb the flavors.
- Finish with Green Onions: Just before serving, stir in the chopped green onions. This adds a fresh element to the stew and enhances its presentation.
- Serve: Ladle the hot Kimchi Jjigae into bowls and serve it with steamed rice and additional side dishes if desired.
Extra Tips:
When making Kimchi Jjigae, the age of the kimchi plays a vital role in the stew’s flavor; older kimchi tends to have a stronger taste, which is ideal for stewing.
If you prefer a milder flavor, feel free to adjust the amount of gochugaru and gochujang according to your spice tolerance. Additionally, you can customize the stew by adding other vegetables like zucchini or mushrooms. Enjoy your homemade Spicy Kimchi Stew!
Bibimbap With Tofu
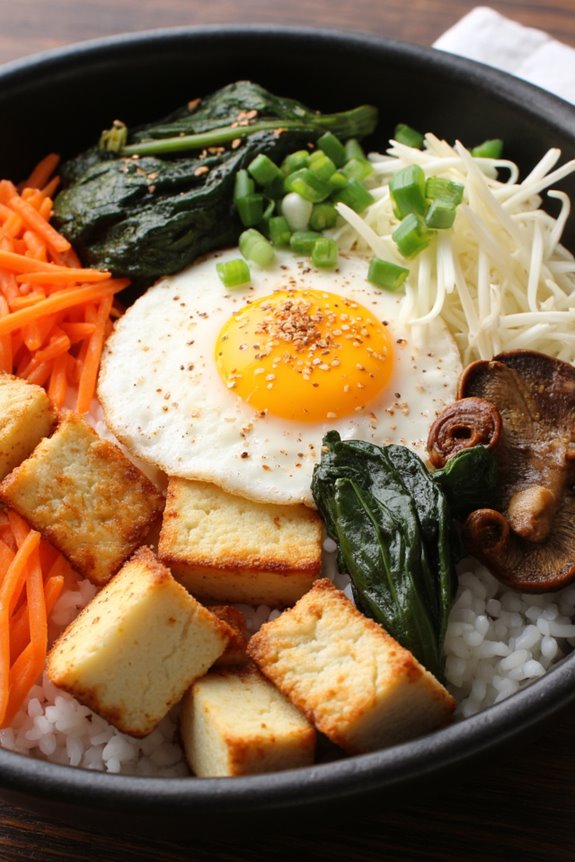
Bibimbap is a traditional Korean dish that translates to “mixed rice.” It’s a beautifully colorful bowl filled with a variety of sautéed and seasoned vegetables, rice, and often topped with a protein such as tofu, beef, or egg. This version focuses on tofu, making it not only gluten-free but also a delicious vegetarian option.
Each ingredient in bibimbap can be prepared in advance, making it a great choice for meal prep or a leisurely weekend dinner. The beauty of bibimbap lies in its versatility; you can customize it according to your preferences or what you have on hand. The key components are the seasoned vegetables, the gochujang (Korean chili paste), and the perfectly cooked rice that serves as the base.
When mixed together just before serving, the flavors meld beautifully, creating a dish that’s both satisfying and nutritious.
Ingredients (Serves 4-6):
- 2 cups of cooked white or brown rice
- 1 block (14 oz) of firm tofu, drained and pressed
- 2 tablespoons soy sauce (or tamari for gluten-free)
- 1 tablespoon sesame oil
- 1 cup of spinach, blanched
- 1 carrot, julienned
- 1 zucchini, julienned
- 1 cup of shiitake mushrooms, sliced
- 1 cup of bean sprouts
- 2 tablespoons vegetable oil (for frying)
- 2 teaspoons of gochugaru (Korean red pepper flakes)
- 4-6 fried eggs (optional for serving)
- Sesame seeds for garnish
- Sliced green onions for garnish
- Gochujang (Korean chili paste) for serving
Cooking Instructions:
1. Prepare the tofu: Begin by cutting the pressed tofu into bite-sized cubes. Heat a non-stick skillet over medium heat and add the vegetable oil. Once hot, add the tofu cubes and fry for about 5-7 minutes, turning occasionally until golden brown on all sides. Once cooked, remove from the skillet and set aside.
2. Sauté the vegetables: In the same skillet, add the julienned carrots and zucchini. Sauté for about 3-4 minutes until they start to soften. Next, add the sliced shiitake mushrooms and bean sprouts. Cook for an additional 2-3 minutes until all the vegetables are tender but still crisp.
Finally, mix in the blanched spinach and season with a little soy sauce and gochugaru. Remove the skillet from the heat.
3. Prepare the rice: If you haven’t already, cook the rice according to package instructions. You can use a rice cooker or stovetop method. Once cooked, fluff the rice with a fork and set aside.
4. Assemble the bibimbap: In serving bowls, place a generous scoop of rice at the bottom. Arrange the sautéed vegetables and fried tofu on top of the rice in a circular pattern for a beautiful presentation. If you’re using fried eggs, place one on top of each bowl.
5. Garnish and serve: Drizzle a little sesame oil over the top, sprinkle with sesame seeds and sliced green onions. Serve with gochujang on the side, allowing each person to mix in as much as they prefer for spice.
Extra Tips:
When making bibimbap, feel free to experiment with different vegetables based on what’s in season or what you enjoy. You can also add a splash of vinegar to the sautéed vegetables for extra flavor.
To save time, prepare the vegetables and tofu in advance, and simply heat them up before serving. Finally, don’t skip the gochujang; it adds an essential layer of flavor that brings the dish together!
Korean BBQ Chicken
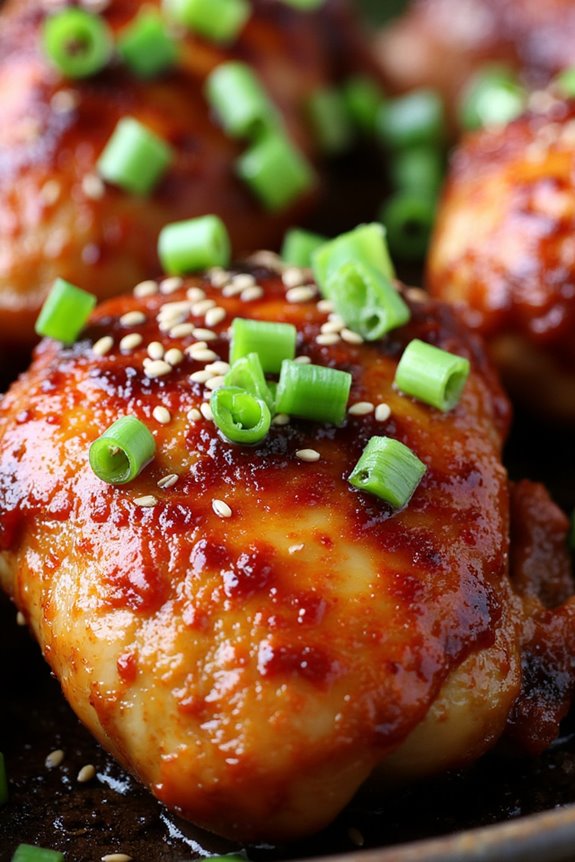
Korean BBQ Chicken is a delicious and savory dish that brings the vibrant flavors of Korean cuisine right to your kitchen. This dish is perfect for gatherings, family dinners, or simply a special night in. The chicken is marinated in a flavorful blend of soy sauce, garlic, ginger, and sesame oil, guaranteeing each bite is packed with taste.
Plus, with the right ingredients, you can easily make this dish gluten-free, allowing everyone to enjoy its mouthwatering goodness.
Cooking Korean BBQ Chicken isn’t only straightforward, but it also allows you to customize the flavors to your liking. Whether you prefer it grilled, baked, or pan-fried, this recipe offers versatility while maintaining that authentic Korean flavor.
Serve it with a side of steamed rice, kimchi, or a fresh salad to complete your meal. Get ready to impress your family and friends with this simple yet delicious dish!
Ingredients (Serves 4-6)
- 2 lbs chicken thighs or drumsticks (bone-in, skin-on for more flavor)
- 1/4 cup gluten-free soy sauce
- 2 tablespoons honey or maple syrup
- 2 tablespoons sesame oil
- 4 cloves garlic, minced
- 1 tablespoon fresh ginger, minced
- 1 tablespoon rice vinegar
- 1 teaspoon black pepper
- 2 green onions, chopped (for garnish)
- Sesame seeds (for garnish)
Cooking Instructions
1. Prepare the Marinade: In a large mixing bowl, combine the gluten-free soy sauce, honey or maple syrup, sesame oil, minced garlic, minced ginger, rice vinegar, and black pepper. Whisk the mixture until well combined; this will be the marinade for the chicken.
2. Marinate the Chicken: Add the chicken pieces to the marinade, making sure that each piece is thoroughly coated. Cover the bowl with plastic wrap or transfer the chicken and marinade to a resealable plastic bag. Refrigerate for at least 1 hour, or ideally overnight, to allow the flavors to penetrate the chicken.
3. Preheat the Grill or Oven: If you’re grilling, preheat your grill to medium-high heat. If you’re baking, preheat your oven to 400°F (200°C). Make sure the grill grates or baking sheet are lightly greased to prevent sticking.
4. Cook the Chicken: For grilling, place the marinated chicken pieces on the grill and cook for about 25-30 minutes, turning occasionally, until the internal temperature reaches 165°F (75°C) and the chicken has a nice char.
For baking, place the chicken on a lined baking sheet and bake for about 35-40 minutes, flipping halfway through, until fully cooked.
5. Garnish and Serve: Once the chicken is cooked, remove it from the grill or oven and let it rest for a few minutes. Garnish with chopped green onions and a sprinkle of sesame seeds before serving. Enjoy your delicious Korean BBQ Chicken with your favorite sides!
Extra Tips
For enhanced flavor, consider adding a splash of gochujang (Korean chili paste) to the marinade for a spicy kick.
You can also experiment with different types of chicken, such as boneless breasts or wings, depending on your preference. If grilling, make sure the chicken pieces aren’t overcrowded on the grill to guarantee even cooking and a nice sear.
Additionally, marinating for longer will deepen the flavors, so planning ahead is always a good idea!
Japchae (Sweet Potato Noodle Stir-Fry)
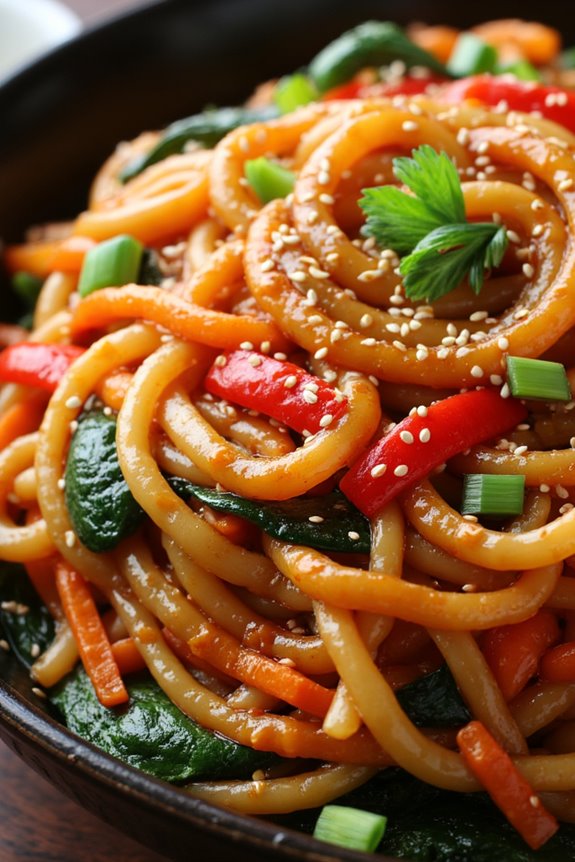
Japchae is a beloved Korean dish known for its delightful combination of chewy sweet potato noodles, colorful vegetables, and a savory-sweet sauce. This gluten-free version allows everyone to enjoy this classic without the worry of gluten, making it perfect for those with dietary restrictions. The dish isn’t only visually appealing but also packed with flavor, making it a popular choice for gatherings and special occasions.
The foundation of Japchae lies in its unique sweet potato noodles, called dangmyeon, which are naturally gluten-free. The noodles are stir-fried along with a variety of vegetables such as bell peppers, carrots, and spinach, creating a vibrant and nutritious meal. The dish is typically seasoned with a mixture of soy sauce, sesame oil, and sugar, giving it a distinctive taste that will transport you straight to Korea with every bite.
Ingredients (Serves 4-6):
- 8 oz sweet potato noodles (dangmyeon)
- 2 tablespoons sesame oil
- 1 tablespoon vegetable oil
- 1 medium onion, thinly sliced
- 2 cloves garlic, minced
- 1 medium carrot, julienned
- 1 bell pepper (red or green), julienned
- 1 cup spinach, washed and chopped
- 2 green onions, chopped
- 3 tablespoons gluten-free soy sauce
- 1 tablespoon sugar (or honey)
- Toasted sesame seeds (for garnish)
- Salt and pepper to taste
Cooking Instructions:
1. Prepare the Sweet Potato Noodles: Begin by soaking the sweet potato noodles in hot water for about 30 minutes or until they soften. Drain them and set aside. This step guarantees the noodles will be perfectly chewy when cooked.
2. Cook the Vegetables: In a large frying pan or wok, heat the vegetable oil over medium-high heat. Add the sliced onions and minced garlic, and stir-fry for about 2-3 minutes until the onions become translucent.
Next, add the julienned carrots and bell pepper, cooking for another 3-4 minutes until they’re tender yet still crisp.
3. Add the Spinach: Once the other vegetables are cooked, add the chopped spinach to the pan. Stir and cook for 1-2 minutes until the spinach wilts down. This adds a nice color and nutritional boost to the dish.
4. Combine Noodles and Sauce: Add the soaked and drained sweet potato noodles to the pan with the vegetables. In a small bowl, mix the gluten-free soy sauce, sugar, and sesame oil.
Pour this sauce over the noodles and vegetables, tossing everything together to confirm the noodles are evenly coated. Cook for another 3-5 minutes, stirring frequently, until everything is heated through.
5. Finish and Serve: Finally, add the chopped green onions and season with salt and pepper to taste. Toss to combine once more, then transfer the Japchae to a serving platter. Garnish with toasted sesame seeds for an extra touch of flavor and presentation.
Extra Tips:
For an added depth of flavor, consider marinating the vegetables in a bit of soy sauce and sesame oil for 10 minutes before cooking.
You can also customize this dish by adding proteins like sliced beef, chicken, or tofu, which can be cooked alongside the vegetables. If you prefer a bit of heat, feel free to sprinkle in some red pepper flakes or add sliced fresh chili peppers to amp up the spice level. Enjoy your homemade Japchae!
Korean Vegetable Pancakes (Jeon)

Korean Vegetable Pancakes, or Jeon, are a delightful dish that showcases the vibrant flavors and textures of various vegetables. Traditionally served as a side dish or snack, these savory pancakes are crispy on the outside and tender on the inside. Making them gluten-free allows those with dietary restrictions to enjoy this beloved Korean treat without compromising on taste.
The beauty of Jeon lies in its versatility; you can use a mix of vegetables based on what you have available, guaranteeing a fresh and wholesome meal. This recipe is perfect for serving 4-6 people, making it ideal for family gatherings or a cozy dinner with friends. With the right combination of fresh vegetables and a gluten-free batter, these pancakes will be a hit at your table. So let’s explore the ingredients and cooking process, and soon you’ll be enjoying this deliciously crispy dish.
Ingredients:
- 1 cup gluten-free all-purpose flour
- 1/2 cup water
- 2 large eggs
- 1/2 teaspoon salt
- 1 cup shredded carrots
- 1 cup chopped green onions
- 1 cup chopped zucchini
- 1/2 cup bell peppers (any color), chopped
- 1/4 cup corn kernels (fresh or frozen)
- Oil for frying (vegetable or sesame oil)
Cooking Instructions:
- Prepare the Batter: In a large mixing bowl, whisk together the gluten-free all-purpose flour, water, eggs, and salt until you have a smooth batter. The consistency should be thick enough to coat the vegetables but not too thick that it becomes doughy. This will be the base for your pancakes.
- Chop the Vegetables: Prepare your vegetables by washing and chopping them into small, bite-sized pieces. This is essential for even cooking and guarantees that each bite of the pancake is packed with flavor. Place the chopped vegetables into the batter and gently fold to combine, making sure everything is evenly coated.
- Heat the Pan: In a large non-stick skillet or frying pan, heat about 2 tablespoons of oil over medium heat. You want the oil to be hot enough that it shimmers but not smoking. A properly heated pan will give the pancakes a nice crispy edge.
- Cook the Pancakes: Once the oil is hot, scoop about 1/4 cup of the vegetable batter into the pan for each pancake. Flatten it slightly with the back of the spatula to achieve a round shape. Cook for about 3-4 minutes on one side or until it turns golden brown and crispy, then flip and cook for another 3-4 minutes on the other side.
- Drain and Serve: After cooking, transfer the pancakes to a plate lined with paper towels to absorb any excess oil. Continue the process until all the batter is used, adding more oil as needed for frying. Serve the pancakes warm with a dipping sauce of soy sauce mixed with a touch of vinegar and sesame oil, or enjoy them plain.
Extra Tips: When making Korean Vegetable Pancakes, feel free to customize the vegetables based on your preferences or seasonal availability. Fresh herbs like cilantro or perilla leaves can also add a wonderful aroma and taste.
For an extra kick, consider adding thinly sliced jalapeños or a dash of gochugaru (Korean red pepper flakes) to the batter. Make sure to keep the heat at medium to prevent burning, and enjoy experimenting with different combinations to find your perfect Jeon!
Tofu and Vegetable Stir-Fry
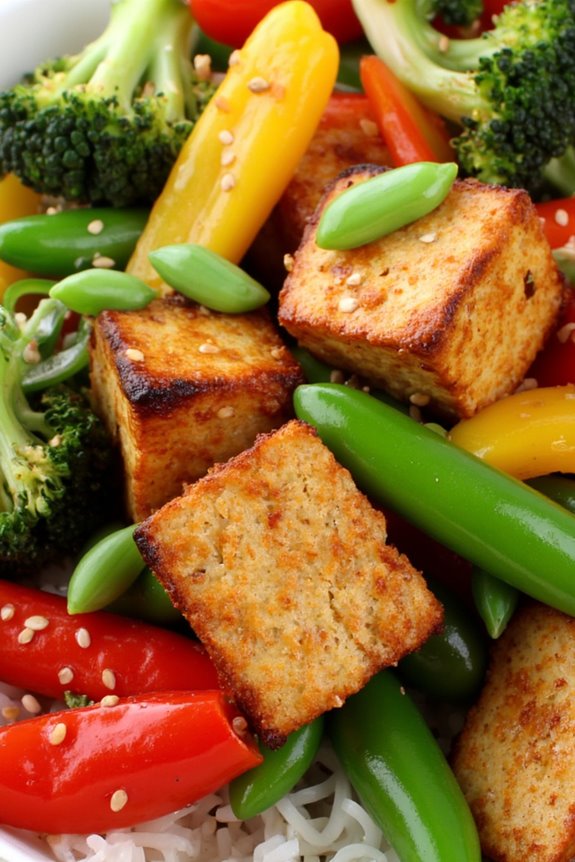
Tofu and Vegetable Stir-Fry is a delicious and nutritious dish that combines the hearty texture of tofu with a vibrant mix of colorful vegetables. This gluten-free recipe is perfect for those looking to enjoy a satisfying meal without the addition of gluten. Packed with protein from the tofu and a variety of vitamins and minerals from the vegetables, this stir-fry isn’t only healthy but also quick to prepare, making it an ideal weeknight dinner option.
In addition to being gluten-free, this Tofu and Vegetable Stir-Fry can easily be customized based on your preferences or what you have on hand. Whether you choose to use bell peppers, broccoli, carrots, or snap peas, the combination of fresh vegetables will enhance the overall flavor of the dish. Serve it over rice or quinoa for a complete meal that will please everyone at the table.
Ingredients (Serves 4-6)
- 1 block (14 oz) firm tofu, drained and pressed
- 2 tablespoons cornstarch
- 2 tablespoons vegetable oil (divided)
- 1 red bell pepper, sliced
- 1 yellow bell pepper, sliced
- 1 cup broccoli florets
- 1 cup snap peas
- 2 cloves garlic, minced
- 1-inch piece ginger, minced
- 3 tablespoons gluten-free soy sauce
- 1 tablespoon sesame oil
- 1 tablespoon rice vinegar
- 1 tablespoon honey or maple syrup (optional)
- Sesame seeds for garnish
- Green onions, sliced for garnish
Cooking Instructions
- Prepare the Tofu: Start by draining the tofu and pressing it to remove excess moisture. Wrap the tofu block in a clean kitchen towel and place a heavy object on top for about 15-20 minutes. Once pressed, cut the tofu into 1-inch cubes.
- Coat the Tofu: In a mixing bowl, toss the cubed tofu with cornstarch until evenly coated. This will help create a crispy texture when the tofu is cooked.
- Cook the Tofu: Heat 1 tablespoon of vegetable oil in a large skillet or wok over medium-high heat. Once hot, add the tofu cubes in a single layer and cook for about 4-5 minutes on each side or until golden brown and crispy. Remove the tofu from the skillet and set aside.
- Sauté the Vegetables: In the same skillet, add the remaining tablespoon of vegetable oil. Add the minced garlic and ginger and sauté for about 30 seconds until fragrant. Then, add the sliced bell peppers, broccoli florets, and snap peas. Stir-fry the vegetables for about 5-7 minutes, or until they’re tender-crisp.
- Combine Tofu and Sauce: Once the vegetables are cooked, return the crispy tofu to the skillet. In a small bowl, whisk together the gluten-free soy sauce, sesame oil, rice vinegar, and honey (if using). Pour the sauce over the tofu and vegetables, tossing everything to confirm it’s well coated. Cook for an additional 2 minutes to heat through.
- Serve: Remove from heat and transfer the stir-fry to a serving dish. Garnish with sesame seeds and sliced green onions before serving.
Extra Tips
For the best flavor, make sure to use fresh vegetables and adjust the cooking time based on their size and thickness. If you’re a fan of spice, consider adding some red pepper flakes or sriracha to the sauce for an extra kick.
Additionally, you can experiment with different vegetables or add in some mushrooms or zucchini for variation. Always remember to taste and adjust the seasoning to your preference, making sure for a delicious and personalized stir-fry experience!
Korean Fried Rice (Bokkeumbap)
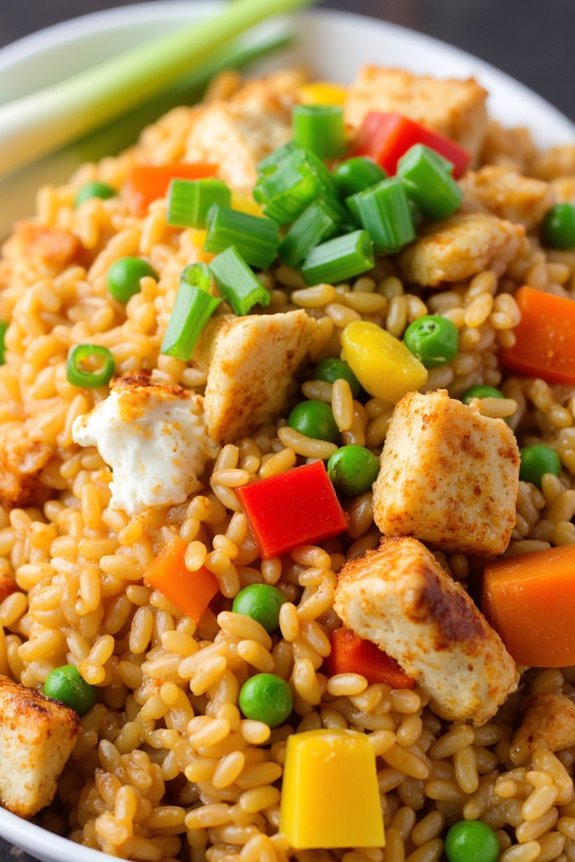
Korean Fried Rice, or Bokkeumbap, is a versatile and delicious dish that can be customized to suit any palate. Traditionally made with leftover rice, it’s a quick and easy way to utilize ingredients you already have on hand, making it perfect for a weeknight dinner or a satisfying lunch.
The beauty of this dish lies in its adaptability; you can incorporate various vegetables, proteins, and sauces to create a meal that’s both flavorful and gluten-free.
In this recipe, we’ll be using gluten-free soy sauce and a medley of vibrant vegetables to create a colorful and nutritious Bokkeumbap. This dish isn’t only filling but also packed with nutrients, making it a great option for families.
Whether you’re a seasoned cook or trying your hand at Korean cuisine for the first time, this recipe will guide you through the process step by step.
Ingredients (Serves 4-6):
- 4 cups cooked and cooled rice (preferably day-old)
- 1 tablespoon vegetable oil
- 1 small onion, diced
- 2 cloves garlic, minced
- 1 cup carrots, diced
- 1 cup bell peppers (any color), diced
- 1 cup frozen peas
- 2 eggs, beaten
- 3 tablespoons gluten-free soy sauce
- 1 tablespoon sesame oil
- 2 green onions, chopped
- Salt and pepper to taste
- Optional: cooked chicken, shrimp, or tofu for added protein
Cooking Instructions:
- Prepare the Ingredients: Before you start cooking, verify all your ingredients are prepped. Dice the onions, carrots, and bell peppers, and mince the garlic. Having everything ready will make the cooking process smoother and faster.
- Heat the Oil: In a large skillet or wok, heat the vegetable oil over medium-high heat. You want the pan to be hot enough that when you add the ingredients, they sizzle immediately. This helps to create a nice stir-fry effect.
- Sauté the Aromatics: Add the diced onion and minced garlic to the hot oil. Stir them frequently until the onions become translucent, about 2-3 minutes. This step builds a flavorful base for your fried rice.
- Add the Vegetables: Toss in the diced carrots and bell peppers, followed by the frozen peas. Stir-fry these vegetables for about 4-5 minutes until they’re tender but still crisp. This adds color and texture to your dish.
- Incorporate the Eggs: Push the vegetable mixture to one side of the skillet. Pour the beaten eggs into the empty side and scramble them until fully cooked, about 1-2 minutes. Once the eggs are cooked, mix them into the vegetable mixture.
- Add the Rice: Add the cooked rice to the skillet, breaking up any clumps with a spatula. Stir everything together, verifying the rice is evenly mixed with the vegetables and eggs.
- Season the Rice: Pour the gluten-free soy sauce and sesame oil over the rice, stirring well to combine. Season with salt and pepper to taste. Continue to stir-fry for another 3-4 minutes, allowing the flavors to meld and the rice to get slightly crispy.
- Finish with Green Onions: Finally, add the chopped green onions and any optional protein (like cooked chicken, shrimp, or tofu). Stir everything together for an additional minute to warm through.
Extra Tips:
When making Korean Fried Rice, using day-old rice is ideal because it has dried out a bit, which prevents the dish from becoming mushy. If you only have freshly cooked rice, spread it out on a baking sheet to cool for about 30 minutes before using.
Additionally, feel free to experiment with different vegetables or proteins based on what you have available. Adding a sprinkle of sesame seeds or a drizzle of sriracha can also elevate the dish, giving it an extra kick!
Spicy Pork Stir-Fry (Dwaejigogi Bokkeum)
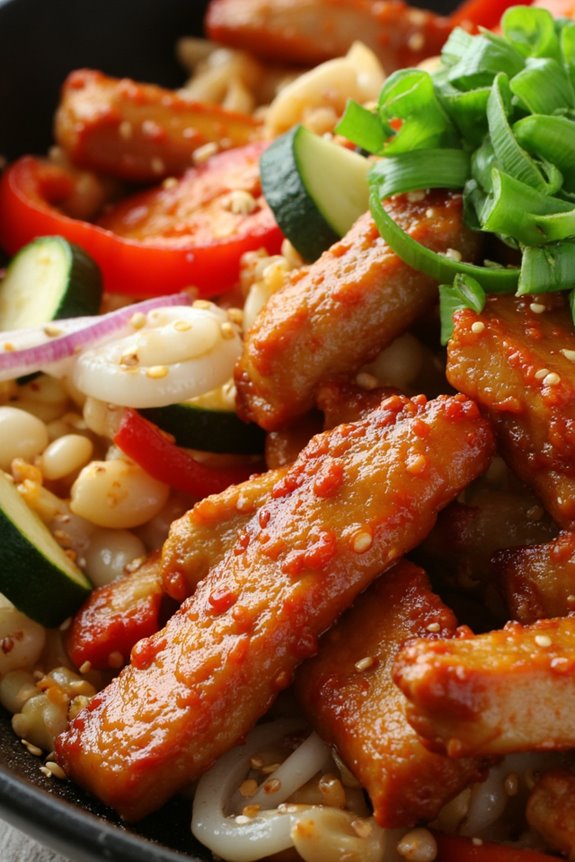
Spicy Pork Stir-Fry, known as Dwaejigogi Bokkeum in Korean, is a flavorful and vibrant dish that combines tender strips of pork with a mix of fresh vegetables and a spicy, savory sauce. This dish isn’t only quick to prepare but also gluten-free, making it an excellent choice for those with dietary restrictions.
The unique blend of Korean spices and sauces gives it a signature taste that’s sure to impress anyone at your dinner table. This stir-fry is perfect for a weeknight meal or a weekend gathering. It can be served with steamed rice or wrapped in lettuce leaves for a rejuvenating bite.
With a preparation time of about 15 minutes and a cooking time of about 10 minutes, Dwaejigogi Bokkeum is an ideal dish for those who want a delicious meal without spending hours in the kitchen.
Ingredients (Serves 4-6):
- 1 lb (450g) pork shoulder or pork belly, thinly sliced
- 2 tablespoons gochujang (Korean chili paste)
- 1 tablespoon gochugaru (Korean chili flakes)
- 2 tablespoons soy sauce (gluten-free)
- 1 tablespoon sesame oil
- 2 tablespoons sugar
- 1 tablespoon minced garlic
- 1 teaspoon grated ginger
- 1 medium onion, thinly sliced
- 1 bell pepper (red or green), thinly sliced
- 1 medium zucchini, sliced into half-moons
- 2 green onions, chopped
- 1 tablespoon vegetable oil for frying
- Sesame seeds for garnish (optional)
Cooking Instructions:
- Marinate the Pork: In a large bowl, combine the thinly sliced pork with gochujang, gochugaru, soy sauce, sesame oil, sugar, minced garlic, and grated ginger. Mix well until the pork is evenly coated in the marinade. Let it sit for at least 10 minutes to absorb the flavors.
- Prepare the Vegetables: While the pork is marinating, prepare your vegetables. Slice the onion, bell pepper, and zucchini into thin strips or half-moons. Chop the green onions and set them aside for garnishing later.
- Heat the Pan: In a large skillet or wok, heat the vegetable oil over medium-high heat. Make sure the oil is hot before adding the pork, as this will help achieve a nice sear.
- Cook the Pork: Add the marinated pork to the hot skillet in a single layer. Sauté for about 4-5 minutes until the pork is cooked through and slightly caramelized, stirring occasionally to prevent sticking.
- Add the Vegetables: Once the pork is cooked, add the sliced onion, bell pepper, and zucchini to the skillet. Stir-fry for an additional 3-4 minutes, or until the vegetables are tender but still crisp.
- Final Touches: Sprinkle the chopped green onions over the stir-fry and give it a quick toss to combine everything. If desired, sprinkle sesame seeds on top for added flavor and crunch.
- Serve: Remove from heat and serve the spicy pork stir-fry hot, either on a bed of rice or wrapped in lettuce leaves.
Extra Tips:
For an extra kick, feel free to adjust the amount of gochujang and gochugaru according to your spice preference.
If you’re looking to add more vegetables, consider incorporating mushrooms, carrots, or bok choy for added texture and nutrition. This dish is also versatile enough to be served as leftovers; simply reheat it in a skillet and enjoy!
Seaweed Soup (Miyeok-guk)
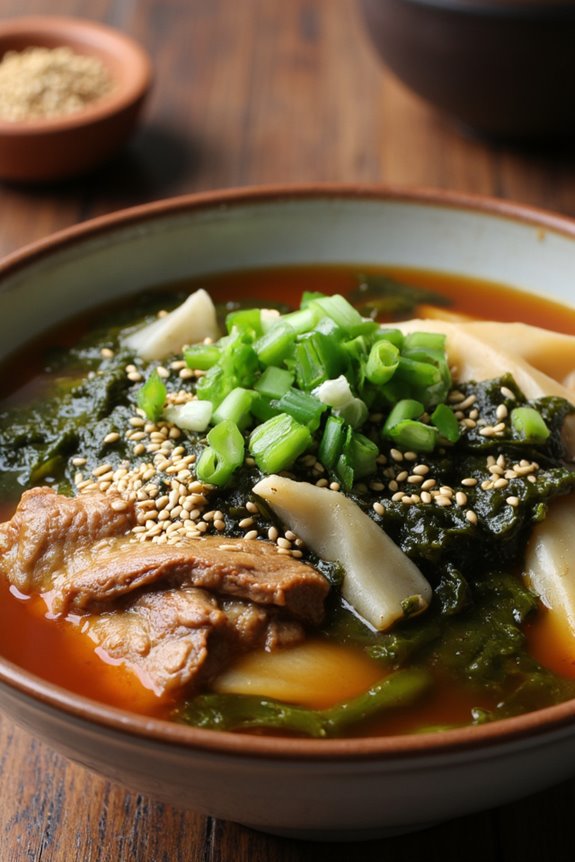
Seaweed Soup, known as Miyeok-guk in Korean, is a traditional dish often served to celebrate birthdays and new mothers in Korea. This nutritious soup is made primarily with dried seaweed, which is rich in vitamins and minerals, making it not only a comforting dish but also a healthy choice.
The delicate flavors of the seaweed are enhanced by a savory broth, usually made with beef or anchovy, but can easily be adapted to suit a gluten-free diet without compromising taste.
Preparing Miyeok-guk is straightforward and can be a fulfilling experience. The key to making a great seaweed soup lies in the quality of the seaweed and the broth. When cooked properly, the seaweed becomes tender and absorbs all the rich flavors of the broth.
Whether you’re enjoying it as a light meal or as part of a larger feast, Miyeok-guk is sure to nourish both body and soul.
Ingredients (Serves 4-6):
- 1 cup dried miyeok (seaweed)
- 8 cups water
- 1 pound beef brisket (or 1 cup anchovy for seafood version)
- 4 cloves garlic, minced
- 2 tablespoons gluten-free soy sauce
- 1 tablespoon sesame oil
- Salt to taste
- 1 tablespoon sesame seeds (optional, for garnish)
- 3 green onions, chopped (for garnish)
Cooking Instructions:
1. Soak the Seaweed: Begin by placing the dried miyeok in a large bowl and covering it with cold water. Allow it to soak for about 30 minutes to an hour, until it has expanded and softened. Once done, drain the seaweed and rinse it under cold water. Cut it into bite-sized pieces and set aside.
2. Prepare the Broth: In a large pot, add the 8 cups of water and the beef brisket (if using). Bring the water to a boil over medium-high heat. Once boiling, reduce the heat to a simmer and let it cook for about 30 minutes, skimming any foam that rises to the surface.
If you prefer to use anchovy for a seafood version, skip this step and prepare the broth in the next step.
3. Add Seaweed and Seasoning****: After the broth has simmered with the beef, add the soaked and cut seaweed to the pot. Stir in the minced garlic, gluten-free soy sauce, and sesame oil. If using anchovy, you can add it at this stage instead of using beef.
Allow the soup to simmer for another 15-20 minutes, enabling the flavors to meld together.
4. Adjust Seasoning: Taste the soup and adjust the seasoning with salt as needed. If using beef, remove it from the pot, shred it, and return it to the soup for added texture and flavor.
5. Serve: Ladle the Miyeok-guk into bowls and garnish with chopped green onions and sesame seeds if desired. Serve hot and enjoy!
Extra Tips:
To enhance the flavor of your Miyeok-guk, consider using homemade beef broth or adding a piece of kombu (dried kelp) while simmering the broth. This will infuse additional umami flavors into the soup.
If you prefer a vegetarian version, use vegetable broth and skip the meat altogether, while still enjoying the nutritious benefits of the seaweed. Always check the labels of your soy sauce and any other condiments to verify they’re gluten-free.
Korean Grilled Salmon
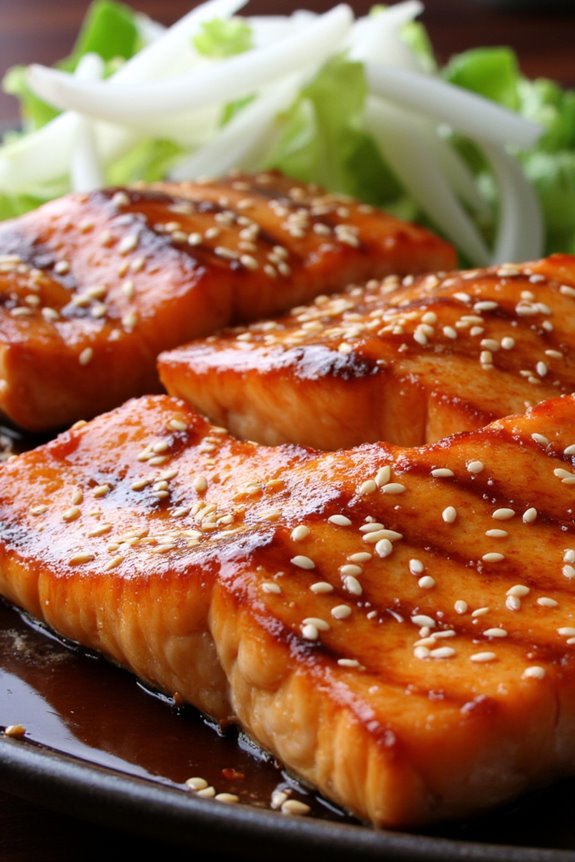
Korean Grilled Salmon is a delightful fusion of flavors that showcases the rich culinary traditions of Korea while accommodating those who are gluten-free. This dish isn’t only simple to prepare but also brings together the savory notes of soy sauce (or tamari for a gluten-free option), sesame oil, and a hint of sweetness from honey or maple syrup.
The grilling process enhances the natural flavors of the salmon, giving it a smoky, charred exterior while keeping the inside moist and tender. Serve it with a side of steamed vegetables or a fresh salad to complete your meal.
This recipe is perfect for family gatherings or special occasions, as it can serve 4 to 6 people. The marinade is quick to whip up, and the salmon fillets can be marinated ahead of time for deeper flavor absorption.
With its vibrant taste and appealing presentation, Korean Grilled Salmon is sure to impress your guests and become a regular dish in your gluten-free repertoire.
Ingredients:
- 4-6 salmon fillets (about 6 oz each)
- 1/4 cup gluten-free soy sauce or tamari
- 2 tablespoons sesame oil
- 2 tablespoons honey or maple syrup
- 2 cloves garlic, minced
- 1 teaspoon fresh ginger, grated
- 1 tablespoon rice vinegar
- 1 teaspoon sesame seeds (for garnish)
- 2 green onions, chopped (for garnish)
Cooking Instructions:
- Prepare the Marinade: In a medium bowl, whisk together the gluten-free soy sauce or tamari, sesame oil, honey or maple syrup, minced garlic, grated ginger, and rice vinegar until combined. This marinade will provide a flavorful base for the salmon.
- Marinate the Salmon: Place the salmon fillets in a shallow dish or a resealable plastic bag. Pour the marinade over the salmon, making sure each piece is well-coated. Cover the dish or seal the bag and refrigerate for at least 30 minutes, or up to 2 hours for a stronger flavor.
- Preheat the Grill: About 10-15 minutes before you’re ready to cook, preheat your grill to medium-high heat. This guarantees that the salmon gets a nice sear and prevents sticking.
- Grill the Salmon: Remove the salmon from the marinade, letting any excess marinade drip off. Place the fillets skin-side down on the grill. Cook for about 4-6 minutes per side, depending on the thickness of the fillets, until the salmon flakes easily with a fork and has grill marks. Avoid flipping the salmon too early to prevent it from breaking apart.
- Garnish and Serve: Once cooked, transfer the salmon to a serving platter. Sprinkle with sesame seeds and chopped green onions for added flavor and a pop of color. Serve immediately with your choice of sides.
Extra Tips: For an added depth of flavor, consider adding a splash of citrus juice, such as lemon or lime, to the marinade. If you don’t have a grill, you can also broil the salmon in the oven or use a grill pan on the stovetop.
Just remember to monitor the cooking time closely to avoid overcooking. Enjoy your Korean Grilled Salmon with a side of rice or quinoa for a complete gluten-free meal!
Galbi (Korean Short Ribs)
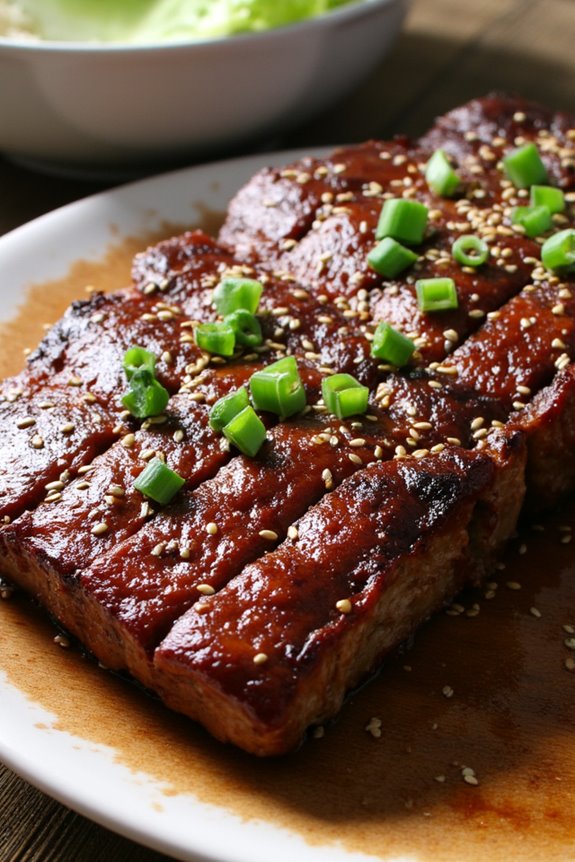
Galbi, or Korean short ribs, is a beloved dish known for its rich flavor and tender texture. Traditionally marinated in a savory-sweet sauce, these ribs are grilled to perfection, making them a popular choice for gatherings and celebrations in Korean cuisine. The gluten-free version of this recipe allows everyone to enjoy the delicious taste without compromising dietary restrictions.
Whether you’re hosting a barbecue or simply looking to indulge in Korean flavors at home, this Galbi recipe is sure to impress your family and friends.
The marinade is the heart of this dish, combining ingredients like soy sauce, garlic, and sugar to create a mouthwatering experience. The key to succulent Galbi is in the marination process—allowing the short ribs to soak up the flavors will result in tender, juicy meat that falls off the bone.
With the right balance of sweetness and umami, these gluten-free Korean short ribs can be served alongside rice, vegetables, or enjoyed on their own as a standout dish.
Ingredients (Serves 4-6):
- 3 lbs beef short ribs (flanken style)
- ½ cup gluten-free soy sauce
- ¼ cup brown sugar
- 2 tablespoons sesame oil
- 1 tablespoon rice vinegar
- 1 tablespoon minced garlic (about 4 cloves)
- 1 tablespoon minced ginger
- 2 green onions, chopped (plus more for garnish)
- 1 tablespoon sesame seeds (for garnish)
- Freshly ground black pepper, to taste
Cooking Instructions:
- Prepare the Marinade: In a large mixing bowl, combine the gluten-free soy sauce, brown sugar, sesame oil, rice vinegar, minced garlic, minced ginger, and chopped green onions. Whisk the ingredients together until the sugar is fully dissolved and the marinade is well blended.
- Marinate the Short Ribs: Place the beef short ribs in a large resealable plastic bag or a shallow dish. Pour the marinade over the ribs, ensuring they’re well coated. Seal the bag or cover the dish with plastic wrap. Refrigerate for at least 4 hours, preferably overnight, to allow the flavors to penetrate the meat.
- Preheat the Grill: When you’re ready to cook, preheat your grill to medium-high heat. If you’re using a charcoal grill, allow the coals to reach an even heat. For a gas grill, preheat for about 10-15 minutes.
- Grill the Ribs: Remove the short ribs from the marinade, letting any excess marinade drip off. Place the ribs on the grill and cook for about 5-7 minutes per side, or until they’re caramelized and have nice grill marks. The internal temperature should reach at least 145°F for medium-rare.
- Rest and Serve: Once the ribs are grilled to your desired doneness, remove them from the grill and let them rest for a few minutes. This allows the juices to redistribute within the meat. Slice the ribs between the bones and serve warm, garnished with sesame seeds and additional chopped green onions.
Extra Tips:
For an enhanced flavor, consider adding a splash of pineapple juice to the marinade, as it contains bromelain, which helps tenderize the meat even further.
If you prefer to cook indoors, you can use a grill pan on the stovetop or broil the short ribs in the oven. Just be mindful of the cooking time, as broiling can cook them faster. Always keep an eye on them to prevent burning, as the sugars in the marinade can caramelize quickly.
Enjoy your delicious gluten-free Galbi with a side of rice or lettuce wraps for a complete meal!
Kimchi Fried Quinoa
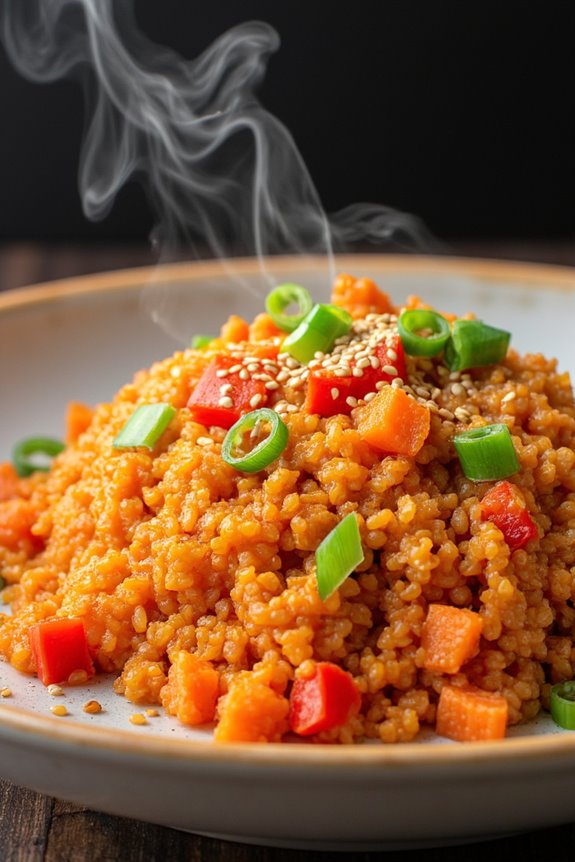
Kimchi Fried Quinoa is a delightful Korean-inspired dish that perfectly marries the flavors of traditional kimchi with the wholesome goodness of quinoa, making it a nutritious and satisfying meal. This gluten-free recipe isn’t only easy to prepare but also packs a punch with its bold flavors and colorful presentation.
It’s a great way to use up leftover kimchi and can be customized with various vegetables and proteins to suit your taste. This dish is ideal for a quick weeknight dinner or a weekend lunch, offering a vibrant and delicious option for both those who follow a gluten-free diet and anyone looking to try something new.
The spicy and tangy notes from the kimchi combined with the nutty flavor of quinoa create a harmonious blend that will leave your taste buds craving more.
Ingredients (Serves 4-6):
- 1 cup quinoa, rinsed
- 2 cups vegetable broth or water
- 1 cup kimchi, chopped
- 1 tablespoon sesame oil
- 2 tablespoons vegetable oil
- 1 small onion, diced
- 2 cloves garlic, minced
- 1 carrot, diced
- 1 bell pepper, diced
- 2 green onions, sliced
- 2 large eggs (optional)
- 2 tablespoons soy sauce or tamari (for gluten-free)
- Salt and pepper to taste
- Sesame seeds for garnish
Cooking Instructions:
1. Cook the Quinoa: In a medium saucepan, combine the rinsed quinoa and vegetable broth (or water). Bring to a boil, then reduce heat to low, cover, and let simmer for about 15 minutes or until all the liquid is absorbed. Remove from heat and let it sit, covered, for 5 minutes. Fluff with a fork and set aside.
2. Prepare the Vegetables: While the quinoa is cooking, heat the sesame oil and vegetable oil in a large skillet or wok over medium heat. Add the diced onion and sauté for 2-3 minutes until it becomes translucent.
Then, add the minced garlic and cook for an additional 30 seconds until fragrant.
3. Add Carrots and Bell Peppers: Next, add the diced carrot and bell pepper to the skillet. Stir-fry the vegetables for about 5-7 minutes, or until they’re tender but still crisp. You want them to maintain some texture for a satisfying crunch.
4. Incorporate the Kimchi: Once the vegetables are cooked, add the chopped kimchi to the skillet. Stir well and cook for another 2-3 minutes to heat the kimchi through and allow the flavors to meld.
5. Combine with Quinoa: Add the cooked quinoa to the skillet, along with the soy sauce or tamari. Mix everything together, ensuring that the quinoa is evenly coated with the kimchi and vegetables. Taste and adjust seasoning with salt and pepper as needed.
6. Cook the Eggs (Optional): If you’re adding eggs, push the quinoa mixture to one side of the skillet. Crack the eggs into the empty side and scramble them until fully cooked. Once done, mix the scrambled eggs into the quinoa mixture.
7. Finish with Green Onions: Finally, stir in the sliced green onions and remove the skillet from heat. Transfer the Kimchi Fried Quinoa to a serving dish and garnish with sesame seeds before serving.
Extra Tips:
For an extra layer of flavor, consider adding some protein such as diced tofu, cooked chicken, or shrimp to the dish. You can also customize the vegetables based on what you have on hand or your personal preferences.
If you prefer a spicier kick, feel free to add chili flakes or a drizzle of sriracha before serving. This dish isn’t only a fantastic meal on its own but can also serve as a side dish to complement other Korean-inspired recipes. Enjoy your cooking adventure!
Korean Sweet Potato Soup
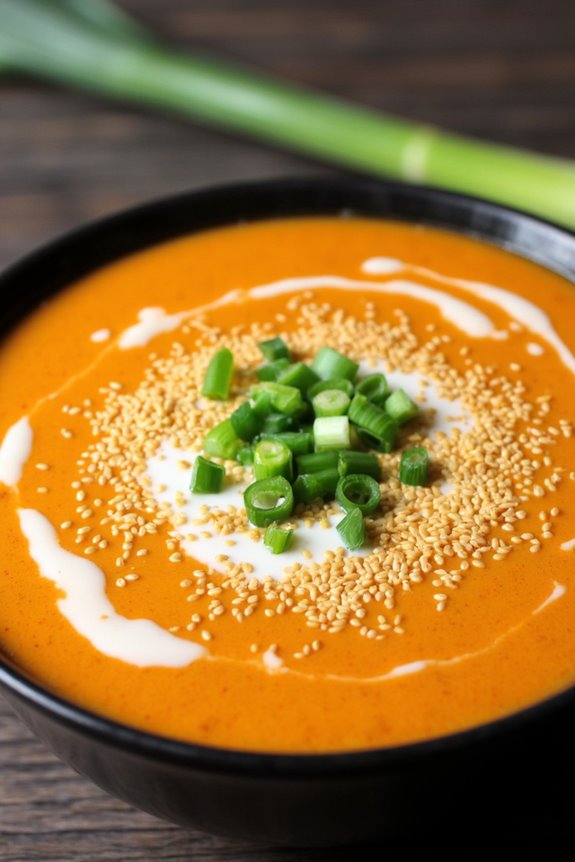
Korean Sweet Potato Soup, known as “Goguma Juk,” is a comforting and nourishing dish that highlights the natural sweetness of Korean sweet potatoes. This velvety soup isn’t only gluten-free but is also packed with vitamins and minerals, making it a perfect choice for a wholesome meal. The creamy texture combined with the subtle sweetness makes it a delightful dish that can be enjoyed at any time of the day.
This hearty soup is simple to prepare and can be made with just a few ingredients, making it a great option for busy weeknights or when you’re craving something warm and filling. The addition of coconut milk adds a rich creaminess, while the optional toppings provide a crunchy contrast to the smooth soup. Whether you’re following a gluten-free diet or just looking to try something new, this Korean Sweet Potato Soup will warm your heart and satisfy your taste buds.
Ingredients (Serves 4-6)
- 4 medium Korean sweet potatoes (about 1.5 pounds)
- 4 cups water or vegetable broth
- 1 can (13.5 oz) coconut milk
- 1 tablespoon sesame oil
- 1 tablespoon sugar (or honey for a natural sweetener)
- 1 teaspoon salt (to taste)
- 1/4 teaspoon black pepper
- 2 green onions, chopped (for garnish)
- 1 tablespoon toasted sesame seeds (for garnish)
Cooking Instructions
- Prepare the Sweet Potatoes: Begin by washing the Korean sweet potatoes thoroughly under running water to remove any dirt. Peel the sweet potatoes using a vegetable peeler and cut them into small cubes, about 1-inch in size. This will help them cook evenly and blend smoothly in the soup.
- Cook the Sweet Potatoes: In a large pot, add the cubed sweet potatoes and pour in the water or vegetable broth. Bring the pot to a boil over medium-high heat. Once boiling, lower the heat to a simmer and let the sweet potatoes cook for about 15-20 minutes, or until they’re tender and easily pierced with a fork.
- Blend the Soup: After the sweet potatoes are cooked, remove the pot from the heat. Using an immersion blender, carefully blend the sweet potatoes and broth until the mixture is smooth and creamy. If you don’t have an immersion blender, you can carefully transfer the soup in batches to a regular blender, but be cautious with the hot liquid.
- Add Coconut Milk and Seasonings: Return the blended sweet potato soup to the pot (if using a regular blender) and stir in the coconut milk, sesame oil, sugar (or honey), salt, and black pepper. Mix well to combine all the ingredients and allow the soup to heat through on low heat for about 5 minutes. Taste and adjust the seasoning if needed.
- Serve and Garnish: Once heated, ladle the soup into bowls. Garnish each serving with chopped green onions and a sprinkle of toasted sesame seeds for added flavor and texture. Enjoy your warm and comforting bowl of Korean Sweet Potato Soup!
Extra Tips
For an extra layer of flavor, consider adding a pinch of ginger or a splash of lime juice to the soup while it simmers. This will enhance the natural sweetness of the sweet potatoes and add a revitalizing twist.
If you prefer a thicker soup, feel free to reduce the amount of broth or add more sweet potatoes to your desired consistency. You can also experiment with different toppings such as crushed nuts or seeds for added crunch. Enjoy your culinary adventure with this delightful Korean dish!
Vegetable Kimbap
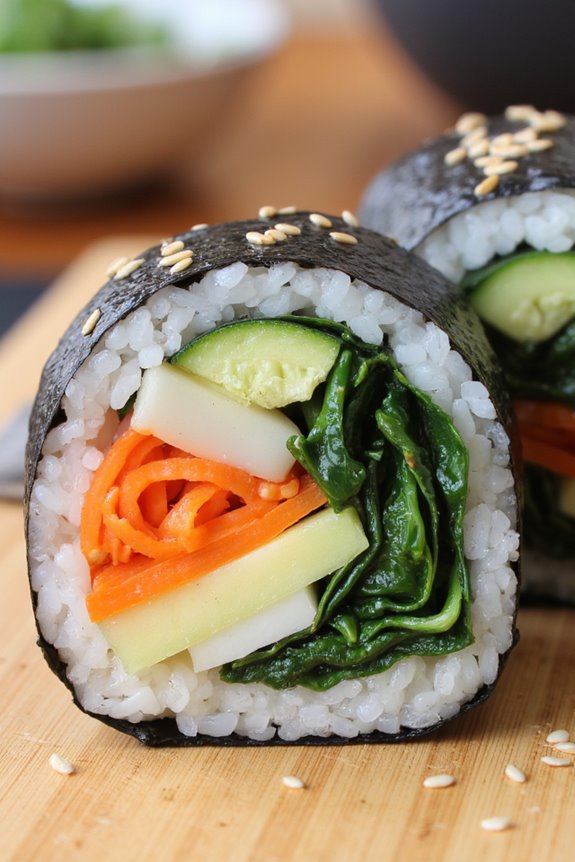
Vegetable Kimbap is a vibrant and delicious dish that isn’t only gluten-free but also packed with healthy ingredients. This Korean delicacy is often enjoyed as a snack or light meal and features rice and an assortment of colorful vegetables rolled in seaweed. The best part about Kimbap is its versatility, allowing you to customize the fillings based on your preferences or the vegetables you have on hand.
Whether you’re making them for a picnic, lunch, or a party, Vegetable Kimbap is sure to impress with its beautiful presentation and delightful flavors.
Preparing Vegetable Kimbap might seem intimidating at first, but it’s quite straightforward once you gather all the necessary ingredients and follow the steps. The key is to guarantee that all the vegetables are cooked and seasoned properly, and the rice is sticky enough to hold everything together while rolling.
With practice, you’ll be able to roll these Kimbaps like a pro, making it a fun and interactive meal that everyone can enjoy.
Ingredients (Serves 4-6)
- 2 cups sushi rice (or short-grain rice)
- 2 ½ cups water
- 4 sheets of nori (seaweed)
- 1 medium carrot, julienned
- 1 cucumber, julienned
- 1 small zucchini, julienned
- 1 cup spinach, blanched and squeezed dry
- 4 radishes, thinly sliced
- 2 tablespoons sesame oil
- Salt, to taste
- Sesame seeds, for garnish
Cooking Instructions
1. Prepare the Rice: Rinse the sushi rice under cold water until the water runs clear. This helps remove excess starch. Add the rinsed rice and 2 ½ cups of water to a rice cooker or pot and cook according to the rice cooker instructions, or bring to a boil, then reduce to a simmer, cover, and cook for about 15 minutes until the water is absorbed.
Once cooked, let it sit covered for an additional 10 minutes.
2. Season the Rice: After the rice has rested, transfer it to a large mixing bowl. Drizzle in 1 tablespoon of sesame oil and sprinkle with salt to taste. Mix gently with a wooden spoon or spatula to guarantee the rice is well-coated and slightly sticky. Allow the rice to cool to room temperature.
3. Prepare the Vegetables: In a medium skillet, heat a little oil over medium heat. Sauté the julienned carrots and zucchini separately until they’re tender but still vibrant in color—about 2-3 minutes for each. Remove from heat and let them cool.
Blanch the spinach in boiling water for about 1 minute, then immediately transfer it to an ice bath. Squeeze out excess moisture and set aside.
4. Assemble the Kimbap: Place a sheet of nori on a bamboo sushi mat, shiny side down. With wet hands, take a handful of rice and spread it evenly over the nori, leaving about 1-2 inches at the top edge. Arrange a line of each vegetable (carrots, cucumber, zucchini, spinach, and radishes) horizontally across the rice, about 1/3 of the way up from the bottom.
5. Roll the Kimbap: Starting from the bottom, carefully lift the bamboo mat to begin rolling the Kimbap away from you, tucking the filling in as you go. Continue rolling until you reach the exposed edge of the nori.
Wet your fingers with water and moisten the edge to seal the roll. Use a sharp knife to slice the roll into bite-sized pieces, wiping the knife with a damp cloth between cuts for clean edges.
6. Garnish and Serve: Arrange the Kimbap pieces on a serving platter and sprinkle sesame seeds on top for added flavor and garnish. Serve with soy sauce or your favorite dipping sauce if desired.
Extra Tips
When making Vegetable Kimbap, feel free to experiment with different vegetables based on what you have available. Bell peppers, pickled radish, or even avocado can be excellent additions.
To achieve the perfect roll, make sure to apply even pressure and maintain a tight roll while using the bamboo mat. Additionally, to keep the Kimbap fresh and prevent the nori from becoming soggy, it’s best to consume them shortly after making them or store them in an airtight container until ready to serve.
Enjoy your delightful and healthy Vegetable Kimbap!