

When I think of Japanese cuisine, the vibrant flavors of seafood immediately come to mind. Each dish tells a story of the ocean’s bounty, from the delicate slices of sashimi to the comforting warmth of udon noodle soup. These recipes evoke a sense of rejuvenation and nourishment. If you’re curious about how to bring these ocean-inspired delights to your kitchen, you’re in for a treat. Let’s explore these invigorating recipes together.
Sashimi Platter: A Celebration of Fresh Fish

Sashimi is a quintessential Japanese dish that showcases the delicate flavors and textures of raw fish. Typically served with soy sauce, wasabi, and pickled ginger, sashimi isn’t just a meal but an experience that highlights the freshness and quality of the seafood. A well-prepared sashimi platter can impress any guest and is perfect for special occasions or casual gatherings. The key to a successful sashimi platter lies in sourcing the freshest fish, preparing it with care, and presenting it beautifully.
When assembling your sashimi platter, consider a variety of fish to engage the palate. The most common types of fish used for sashimi include tuna, salmon, and yellowtail, but you can also experiment with other seafood like octopus, mackerel, or even scallops. Each type of fish brings its own unique flavor profile and texture, making the platter visually appealing and a delight to taste. Additionally, garnishing with edible flowers, shiso leaves, or thinly sliced daikon radish can elevate your presentation and add a creative touch.
Ingredients (Serves 4-6):
- 200g fresh tuna (sashimi-grade)
- 200g fresh salmon (sashimi-grade)
- 200g fresh yellowtail (sashimi-grade)
- 100g fresh octopus (sashimi-grade)
- 100g fresh scallops (sashimi-grade)
- 1 cup soy sauce
- 2 tbsp wasabi
- 1 cup pickled ginger
- Shiso leaves (for garnishing)
- Edible flowers (for garnishing)
- Daikon radish (thinly sliced, for garnishing)
Cooking Instructions:
- Select Fresh Fish: Start by sourcing high-quality, sashimi-grade fish from a reputable fish market or grocery store. Look for fish that’s bright in color, has a fresh ocean smell, and is firm to the touch. Verify that the fish is kept at the appropriate temperature to maintain its freshness.
- Prepare the Fish: Once you have your fish, place it on a clean cutting board. Using a sharp knife, slice the tuna, salmon, yellowtail, octopus, and scallops into thin, even pieces. The ideal thickness for sashimi is around 1/4 inch. Make sure to slice against the grain for the best texture.
- Arrange the Platter: Take a large serving platter and begin to artfully arrange the sliced fish. You can create a fan shape with the slices or layer them in sections. For visual appeal, alternate the types of fish and try to create a colorful display.
- Add Garnishes: Once the fish is arranged, garnish the platter with shiso leaves, thinly sliced daikon radish, and edible flowers. This adds both flavor and beauty to your presentation. Scatter small piles of wasabi and pickled ginger around the platter for easy access.
- Serve with Dipping Sauces: In small bowls, serve soy sauce alongside the sashimi platter. This allows guests to dip their sashimi as they enjoy it. If desired, you can also add a small amount of wasabi directly into the soy sauce for an extra kick.
Extra Tips: When making a sashimi platter, always prioritize freshness and quality. It’s vital to keep the fish chilled until serving time to ascertain it remains safe to eat. Additionally, invest in a high-quality, sharp knife for precise cuts, as this will enhance the overall presentation and texture. If you’re unsure about your knife skills, practice on less expensive fish before your main event. Finally, don’t hesitate to ask your fishmonger for recommendations on the best fish for sashimi; they can provide valuable insight on seasonal selections.
Grilled Miso Black Cod
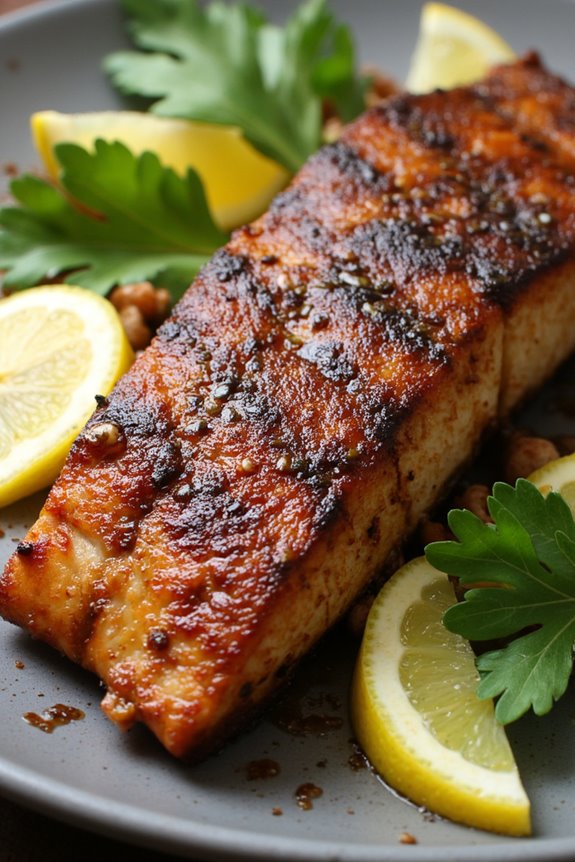
Grilled Miso Black Cod is a delectable Japanese dish that showcases the rich flavors of marinated black cod. Known for its buttery texture and subtle sweetness, black cod absorbs the umami-rich miso marinade beautifully, creating a dish that’s both savory and satisfying.
This recipe isn’t only simple to prepare but also elevates your dining experience with its elegant presentation and exquisite taste. Whether you’re hosting a dinner party or enjoying a cozy night in, this dish is sure to impress.
The key to achieving the perfect Grilled Miso Black Cod lies in the marinating process. Allowing the fish to soak in the miso mixture overnight enhances its flavor and tenderness, making every bite a delightful experience.
This recipe serves 4-6 people, making it an ideal choice for family gatherings or special occasions. Let’s explore the ingredients and cooking instructions to create this mouthwatering dish.
Ingredients (Serves 4-6):
- 2 pounds black cod fillets
- ½ cup white miso paste
- ⅓ cup sake
- ⅓ cup mirin
- ¼ cup sugar
- 2 tablespoons soy sauce
- 2 tablespoons vegetable oil (for grilling)
- Lemon wedges (for serving)
- Fresh herbs (such as shiso or parsley, for garnish)
Cooking Instructions:
1. Prepare the Marinade: In a medium bowl, whisk together the white miso paste, sake, mirin, sugar, and soy sauce until smooth and well combined. This marinade will infuse the black cod with rich flavors, so make sure all ingredients are thoroughly blended.
2. Marinate the Black Cod: Place the black cod fillets in a shallow dish or resealable plastic bag. Pour the miso marinade over the fish, making sure each piece is well coated. Cover the dish or seal the bag, then refrigerate for at least 6 hours, or overnight for the best results.
This step is vital as it allows the fish to absorb the flavors.
3. Preheat the Grill: When you’re ready to cook, preheat your grill to medium-high heat. If using a charcoal grill, ensure the coals are evenly distributed. A hot grill is important to achieve a nice char on the fish.
4. Prepare the Grill Grates: Brush the grill grates with vegetable oil to prevent the fish from sticking. This step is significant to maintain the integrity of the delicate black cod fillets during grilling.
5. Grill the Black Cod: Remove the black cod from the marinade, letting any excess marinade drip off. Place the fillets skin-side down on the grill. Grill for about 5-7 minutes per side, or until the fish is cooked through and has nice grill marks.
The fish should be flaky and tender when done.
6. Serve: Once the black cod is grilled to perfection, transfer it to a serving platter. Garnish with fresh herbs and serve with lemon wedges on the side.
The brightness of the lemon will complement the rich flavors of the fish beautifully.
Extra Tips:
When preparing Grilled Miso Black Cod, it’s important to use fresh, high-quality black cod to achieve the best results. If you can’t find black cod, you can substitute it with another oily fish, such as salmon or sablefish.
Additionally, keep an eye on the grilling time, as black cod can cook quickly due to its high fat content. If you prefer a more caramelized exterior, consider finishing the fish under a broiler for a minute or two after grilling.
Enjoy the dish with steamed rice and sautéed vegetables for a complete meal!
Seafood Udon Noodle Soup
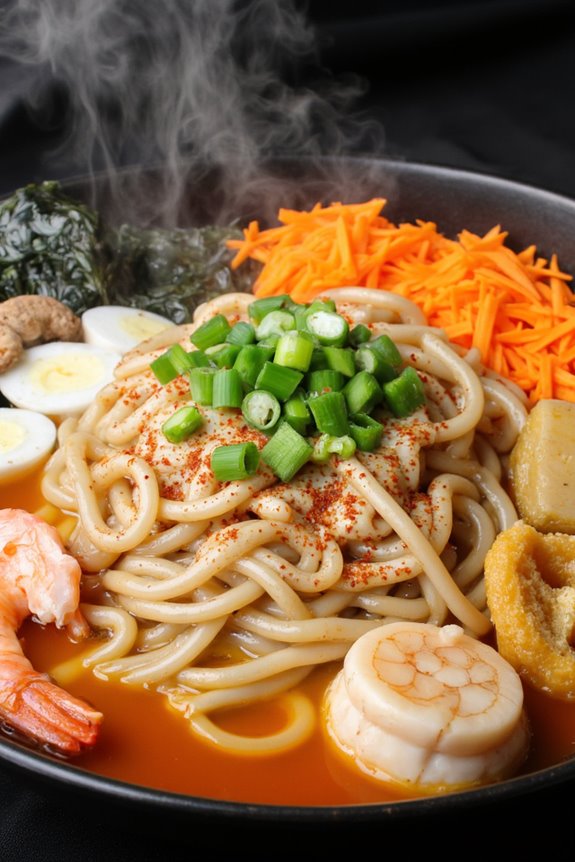
Seafood Udon Noodle Soup is a delicious and comforting dish that brings the vibrant flavors of Japanese cuisine straight to your kitchen. Rich, savory broth infused with dashi and soy sauce serves as the perfect base for thick, chewy udon noodles, while an assortment of fresh seafood adds depth and excitement to each bowl.
This dish is perfect for a family dinner or a cozy night in, as it’s warm, filling, and full of umami flavor that everyone will enjoy. In this recipe, you’ll learn how to create a delightful Seafood Udon Noodle Soup that can serve 4-6 people. The balance of flavors in this dish is essential, and the fresh ingredients work together harmoniously to create a satisfying meal.
Prepare to impress your family and friends with this delectable Japanese favorite that’s both easy to make and incredibly rewarding.
Ingredients:
- 400g udon noodles
- 1 liter dashi broth (homemade or store-bought)
- 3 tablespoons soy sauce
- 2 tablespoons mirin
- 200g shrimp, peeled and deveined
- 200g scallops, cleaned
- 200g squid, cleaned and cut into rings
- 100g mushrooms (shiitake or enoki), sliced
- 2 green onions, chopped
- 1 small carrot, julienned
- 2 teaspoons sesame oil
- 1 tablespoon vegetable oil
- Seaweed (nori or wakame) for garnish
- Optional: chili flakes or fresh chili for heat
Cooking Instructions:
- Prepare the Udon Noodles: Begin by cooking the udon noodles according to the package instructions. This typically involves boiling them in water for about 8-10 minutes until they’re tender but still chewy. Once cooked, drain the noodles and rinse them under cold water to stop the cooking process. Set them aside.
- Make the Broth: In a large pot, combine the dashi broth, soy sauce, and mirin. Bring the mixture to a gentle simmer over medium heat. This flavorful broth will serve as the base of your soup. Taste and adjust the seasoning if needed, adding more soy sauce for saltiness or mirin for sweetness.
- Sauté the Vegetables: In a separate pan, heat the vegetable oil over medium heat. Add the sliced mushrooms and julienned carrots, cooking them for about 3-4 minutes until they’re tender. This step enhances their flavor and adds a nice texture to the soup.
- Add the Seafood: Once the vegetables are cooked, add the shrimp, scallops, and squid into the pot with the simmering broth. Cook for an additional 3-5 minutes, or until the seafood is cooked through and opaque. Be careful not to overcook the seafood, as it can become tough.
- Combine Noodles and Broth: Add the cooked udon noodles to the pot with the seafood and broth. Gently stir to combine, allowing the noodles to soak up the flavorful broth for about 2 minutes.
- Finish and Serve: Drizzle the sesame oil into the soup and stir well. Ladle the Seafood Udon Noodle Soup into bowls, garnishing each serving with chopped green onions and pieces of seaweed. If desired, sprinkle chili flakes or add fresh chili for an extra kick.
Extra Tips: When making Seafood Udon Noodle Soup, feel free to customize the seafood based on your preferences or what’s available. You can include ingredients like fish fillets or other shellfish like mussels or clams.
Additionally, for an even richer broth, consider adding a dash of sake or a piece of kombu while simmering the dashi. Always taste the broth before serving to ascertain it’s seasoned to your liking, and enjoy the warm comforting flavors of this delightful dish!
Tempura Shrimp and Vegetables
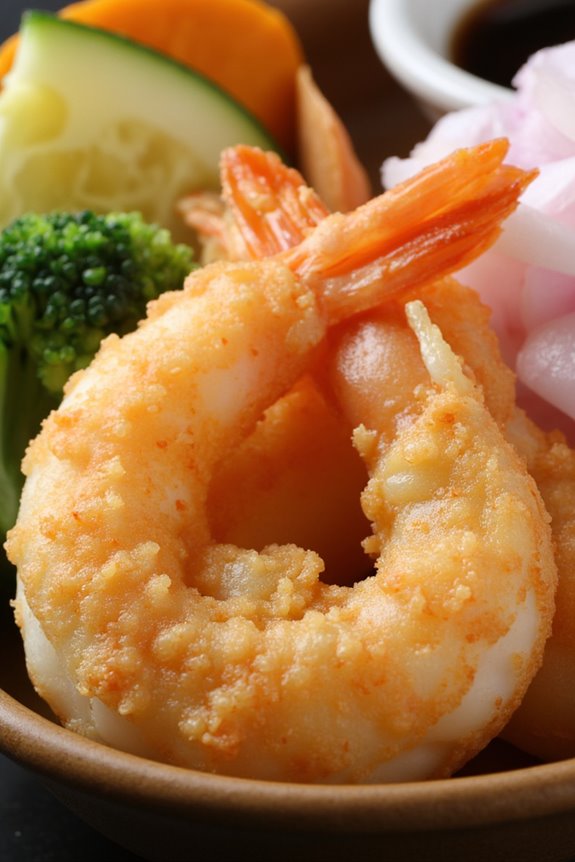
Tempura is a traditional Japanese dish that features a variety of seafood and vegetables lightly battered and deep-fried to achieve a crispy, golden exterior. Tempura shrimp and vegetables is a delightful combination that not only brings out the natural flavors of the ingredients but also provides a satisfying crunch with each bite. This dish is often served with a dipping sauce and can be enjoyed as an appetizer or a main course.
Preparing tempura requires a delicate balance of batter consistency and frying temperature to guarantee the best results. The key is to keep the batter cold and the oil hot, which helps create the light and airy texture that tempura is known for. With some practice, you’ll be able to perfect this classic dish and impress your family and friends with your culinary skills.
Ingredients (Serves 4-6):
- 1 lb large shrimp, peeled and deveined
- 1 cup all-purpose flour
- 1/2 cup cornstarch
- 1 tsp baking powder
- 1 cup ice-cold water
- 1 medium zucchini, sliced into thin rounds
- 1 medium sweet potato, sliced into thin rounds
- 1 cup broccoli florets
- 1 cup vegetable oil (for frying)
- Soy sauce or tentsuyu (tempura dipping sauce) for serving
- Optional: grated daikon radish for garnish
Cooking Instructions:
- Prepare the Ingredients: Begin by prepping all the vegetables and shrimp. Peel and devein the shrimp, and make sure they’re dry. Slice the zucchini and sweet potato into thin rounds, and break the broccoli into small florets. This will guarantee even cooking and a pleasing presentation.
- Make the Tempura Batter: In a mixing bowl, combine the all-purpose flour, cornstarch, and baking powder. Gradually add the ice-cold water while gently mixing with chopsticks or a fork. Be careful not to overmix; the batter should be lumpy and cold for the best crunch.
- Heat the Oil: In a deep frying pan or a large pot, pour in the vegetable oil to a depth of about 2 inches. Heat the oil over medium-high heat until it reaches 350°F (175°C). You can test the oil by dropping a small amount of batter into it; if it bubbles and rises to the surface, the oil is ready.
- Fry the Shrimp and Vegetables: Dip the shrimp and vegetable slices into the batter, allowing any excess to drip off. Carefully place them in the hot oil, frying in batches to avoid overcrowding. Fry for about 2-3 minutes or until golden brown, turning occasionally for even cooking.
- Drain and Serve: Once the tempura is cooked, use a slotted spoon to transfer the pieces to a plate lined with paper towels to drain excess oil. Serve hot with soy sauce or tentsuyu for dipping, and garnish with grated daikon radish if desired.
Extra Tips: To achieve the perfect tempura, confirm that all ingredients, including the water, are very cold. This helps create the light and crispy texture that’s characteristic of tempura. Additionally, don’t overcrowd the frying pan when cooking; this will lower the oil temperature and result in soggy tempura. Finally, serve the tempura immediately after frying for the best taste and texture. Enjoy your homemade tempura shrimp and vegetables!
Spicy Tuna Poke Bowl

Spicy Tuna Poke Bowl is a vibrant and flavorful dish that showcases the fresh, delicate taste of tuna combined with a spicy kick. Originating from Hawaii, poke bowls have gained worldwide popularity due to their customizable nature and healthy ingredients. This dish isn’t only visually appealing but also packed with nutrients, making it a perfect choice for a light lunch or dinner.
The combination of marinated tuna, fluffy rice, and colorful toppings creates a delightful harmony of textures and flavors that will leave your taste buds singing.
Preparing a Spicy Tuna Poke Bowl is a simple and enjoyable process. The key to a successful poke bowl lies in the quality of the ingredients, particularly the tuna, which should be sushi-grade for the best flavor and safety. In this recipe, we’ll guide you through marinating the tuna, preparing the rice, and artfully arranging the toppings to create a stunning and delicious meal for 4-6 people.
Ingredients (Serves 4-6):
- 1 pound sushi-grade tuna, diced into bite-sized cubes
- 1/4 cup soy sauce
- 2 tablespoons sesame oil
- 1 tablespoon Sriracha (adjust to taste)
- 1 tablespoon rice vinegar
- 2 teaspoons honey or agave syrup
- 3 cups cooked sushi rice
- 1 avocado, sliced
- 1 cup edamame, shelled and cooked
- 1 cucumber, thinly sliced
- 1/2 cup shredded carrots
- 1/4 cup green onions, chopped
- 1 tablespoon sesame seeds
- Nori strips (optional, for garnish)
- Pickled ginger (optional, for serving)
Cooking Instructions:
- Prepare the Tuna Marinade: In a medium-sized bowl, combine the soy sauce, sesame oil, Sriracha, rice vinegar, and honey. Whisk until well blended. Add the diced tuna to the bowl, gently folding to coat all the pieces evenly with the marinade. Cover and refrigerate for about 15-30 minutes to allow the flavors to meld.
- Cook the Sushi Rice: If not already prepared, rinse 1.5 cups of sushi rice under cold water until the water runs clear. Cook the rice according to the package instructions or using a rice cooker. Once cooked, let it cool slightly before fluffing with a fork. You can also mix in a splash of rice vinegar for added flavor.
- Prepare the Toppings: While the tuna is marinating and the rice is cooling, prepare your toppings. Slice the avocado, cucumber, and green onions. Cook the edamame according to package instructions if not already done. Shred the carrots if using whole ones.
- Assemble the Poke Bowls: Start by placing a generous serving of sushi rice at the bottom of each bowl. Top the rice with the marinated tuna, and then artfully arrange the avocado, edamame, cucumber, shredded carrots, and green onions around the tuna. Sprinkle sesame seeds on top for added crunch.
- Garnish and Serve: If desired, add nori strips for garnish and serve with pickled ginger on the side. Drizzle any remaining marinade over the top of the bowls if you like extra flavor.
Extra Tips:
When making your Spicy Tuna Poke Bowl, feel free to customize the toppings to your liking. You can include other ingredients such as radishes, seaweed salad, or mango for a twist.
Additionally, always verify that the tuna is fresh and sushi-grade to guarantee safety and flavor. If you’re preparing this for a gathering, consider setting up a poke bowl bar, allowing guests to build their own bowls with their favorite toppings and sauces.
Enjoy your culinary adventure with this delightful dish!
Clam Miso Soup
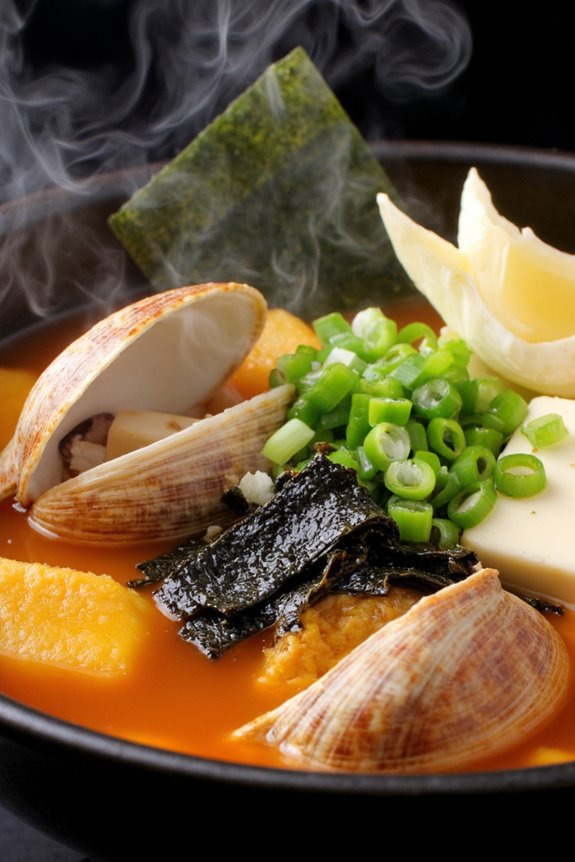
Clam Miso Soup is a delightful and comforting Japanese dish that showcases the umami flavors of clams paired with the rich, savory taste of miso. This dish isn’t only delicious but also healthy, packed with protein and minerals from the clams, making it a perfect choice for a light meal or appetizer.
The combination of miso, seaweed, and fresh clams creates a harmonious balance of flavors that warms the soul, ideal for chilly evenings or when you’re seeking a taste of the coast in your kitchen.
Making Clam Miso Soup is straightforward and can be prepared in under an hour. The key to a successful soup lies in using fresh clams, which infuse the broth with a briny depth. It’s crucial to clean the clams properly and allow them to purge any sand before cooking. This not only enhances the flavor but also guarantees a pleasant dining experience without gritty surprises.
Gather your ingredients and get ready to enjoy a bowl of this aromatic soup!
Ingredients (Serves 4-6):
- 1 pound fresh clams (such as Manila or littleneck)
- 4 cups dashi broth (you can use instant dashi powder or make your own)
- 1/2 cup miso paste (white or yellow)
- 1 cup silken tofu, cut into small cubes
- 1/4 cup green onions, finely chopped
- 1 sheet nori seaweed, cut into strips
- 1 tablespoon soy sauce
- 1 teaspoon sesame oil (optional)
- Fresh ginger, thinly sliced (optional, for garnish)
Cooking Instructions:
- Purge the Clams: Place the fresh clams in a bowl of cold water. Let them soak for about 30 minutes to an hour, allowing them to expel any sand. Rinse them thoroughly under running water to confirm they’re clean.
- Prepare the Dashi Broth: In a large pot, bring 4 cups of dashi broth to a gentle simmer over medium heat. If using instant dashi powder, follow the package instructions to achieve the desired flavor.
- Add the Clams: Once the broth is simmering, add the cleaned clams to the pot. Cover and let them cook for about 5-7 minutes or until the clams have opened up. Discard any clams that remain closed after cooking.
- Mix the Miso: In a small bowl, take a ladleful of the hot dashi broth and whisk in the miso paste until smooth. This helps to dissolve the miso without clumping.
- Combine Ingredients: Slowly pour the miso mixture back into the pot, stirring gently to combine. Be careful not to boil the soup after adding the miso, as high heat can diminish its flavor.
- Add Tofu and Seasoning: Gently add the cubed tofu to the soup, allowing it to warm through for about 2-3 minutes. Add soy sauce and sesame oil (if using) to enhance the flavor, then remove the pot from heat.
- Garnish and Serve: Serve the soup in bowls, garnishing with chopped green onions and strips of nori seaweed. For an extra touch, add thin slices of fresh ginger on top for a hint of spice.
Extra Tips: When preparing Clam Miso Soup, it’s important to use the best quality ingredients you can find. Opt for fresh clams from a reliable source, as frozen clams won’t provide the same flavor.
Additionally, feel free to customize the soup by adding other ingredients like mushrooms, spinach, or daikon radish for added texture and nutrition. Remember to always taste the broth before serving; you may want to adjust the seasoning with more soy sauce or miso to fit your preference.
Enjoy your delicious and heartwarming bowl of Clam Miso Soup!
Shrimp and Vegetable Donburi
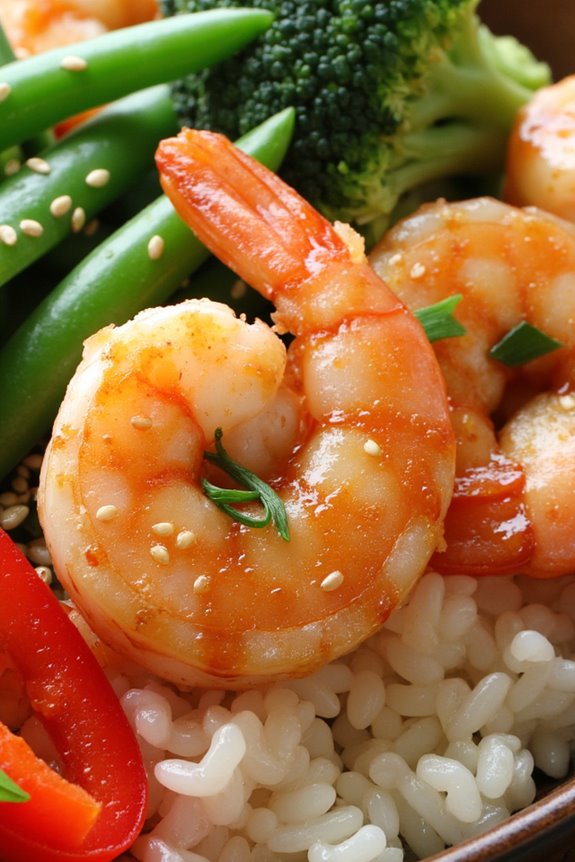
Shrimp and Vegetable Donburi is a delightful Japanese rice bowl dish that combines succulent shrimp with a medley of colorful vegetables, all simmered in a savory sauce. This dish isn’t only visually appealing but also packed with flavor and nutrients.
The word “donburi” refers to a bowl of rice topped with various ingredients, making it a versatile meal option for any time of the day. Traditionally served as a comfort food, this donburi is easy to prepare and can be customized with seasonal vegetables or your choice of protein.
In this recipe, we’ll guide you through creating a delicious Shrimp and Vegetable Donburi that serves 4-6 people. The combination of fresh shrimp, crisp vegetables, and a rich sauce creates a satisfying meal that can be enjoyed by the whole family.
Whether you’re hosting a dinner party or simply looking for a weeknight meal, this dish is sure to impress.
Ingredients (Serves 4-6):
- 1 lb (450g) large shrimp, peeled and deveined
- 2 cups cooked Japanese short-grain rice
- 1 cup broccoli florets
- 1 cup snap peas
- 1 bell pepper, sliced (any color)
- 1 medium carrot, julienned
- 2 cloves garlic, minced
- 2 tablespoons vegetable oil
- 3 tablespoons soy sauce
- 2 tablespoons mirin
- 1 tablespoon sake (optional)
- 1 teaspoon sugar
- 1 tablespoon sesame oil
- 2 green onions, sliced (for garnish)
- Sesame seeds (for garnish)
Cooking Instructions:
1. Prepare the Rice: Begin by cooking the Japanese short-grain rice according to package instructions. Typically, this involves rinsing the rice until the water runs clear, then cooking it with the appropriate amount of water until tender. Once cooked, keep it warm while you prepare the shrimp and vegetables.
2. Sauté the Vegetables: In a large skillet or wok, heat the vegetable oil over medium-high heat. Add the minced garlic and sauté for about 30 seconds until fragrant.
Then, add the broccoli florets, snap peas, sliced bell pepper, and julienned carrot. Stir-fry the vegetables for about 4-5 minutes until they’re tender-crisp.
3. Cook the Shrimp: Push the vegetables to one side of the skillet and add the shrimp to the other side. Cook the shrimp for 2-3 minutes on each side until they turn pink and opaque.
Make sure to stir occasionally to mix the shrimp with the vegetables.
4. Combine and Add Sauce: In a small bowl, mix together the soy sauce, mirin, sake (if using), and sugar. Pour this sauce over the shrimp and vegetables, stirring everything together to guarantee all the ingredients are well coated.
Allow it to simmer for an additional 2 minutes to let the flavors meld.
5. Serve: To serve, place a generous portion of cooked rice in each bowl. Top the rice with the shrimp and vegetable mixture, ensuring an even distribution.
Drizzle with sesame oil and garnish with sliced green onions and sesame seeds for added flavor and texture.
Extra Tips:
For an even more flavorful dish, consider marinating the shrimp in a mixture of soy sauce, mirin, and garlic for about 15-30 minutes before cooking. This will enhance the shrimp’s natural sweetness and make them even more delicious.
Additionally, feel free to swap out the vegetables based on what’s in season or what you have on hand; mushrooms, zucchini, or bok choy can also be great additions to this dish. Enjoy your cooking!
Salmon Teriyaki With Rice
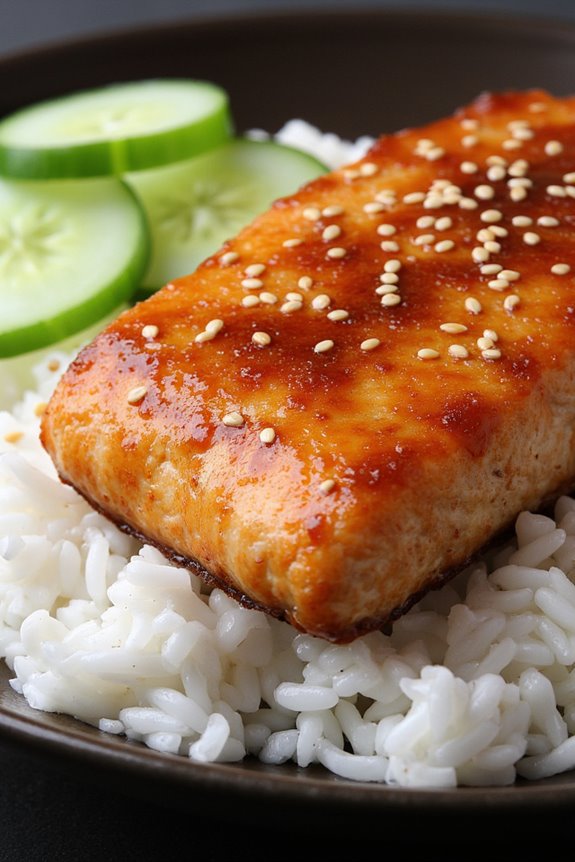
Salmon Teriyaki With Rice is a delightful dish that showcases the rich flavors of the Pacific Northwest combined with traditional Japanese cooking techniques. The sweetness of the teriyaki sauce perfectly complements the natural richness of the salmon, making it a favorite among seafood lovers. Serve it over a bed of fluffy white rice, and you’ve got a meal that isn’t only tasty but also visually appealing.
Cooking this dish is relatively straightforward, making it an excellent option for both novice cooks and seasoned chefs. The key to a successful Salmon Teriyaki lies in marinating the salmon to infuse it with the teriyaki flavors and ensuring that the rice is cooked to perfection.
Whether you’re preparing it for a family dinner or a special occasion, this dish is sure to impress your guests and leave them craving more.
Ingredients (Serves 4-6)
- 4-6 salmon fillets (approximately 6 ounces each)
- 1/2 cup soy sauce
- 1/4 cup mirin (sweet rice wine)
- 1/4 cup sake (Japanese rice wine)
- 2 tablespoons brown sugar
- 1 tablespoon grated fresh ginger
- 1 tablespoon minced garlic
- 2 tablespoons vegetable oil
- 2 cups uncooked white rice
- 4 cups water
- 2 green onions, finely sliced (for garnish)
- Sesame seeds (for garnish)
Cooking Instructions
- Prepare the Marinade: In a medium bowl, whisk together the soy sauce, mirin, sake, brown sugar, grated ginger, and minced garlic until the sugar is fully dissolved. This marinade will add depth and flavor to the salmon.
- Marinate the Salmon: Place the salmon fillets in a shallow dish or a resealable plastic bag. Pour the marinade over the salmon, ensuring that each piece is fully coated. Cover the dish or seal the bag and refrigerate for at least 30 minutes, or up to 2 hours for a more intense flavor.
- Cook the Rice: Rinse the uncooked rice under cold water until the water runs clear. In a medium saucepan, combine the rinsed rice and water. Bring to a boil over high heat, then reduce the heat to low, cover, and simmer for about 18-20 minutes, or until the rice is tender and the water has been absorbed. Remove from heat and let it sit, covered, for an additional 10 minutes.
- Cook the Salmon: Heat the vegetable oil in a large skillet over medium-high heat. Remove the salmon from the marinade (reserve the marinade) and place the fillets skin-side down in the skillet. Cook for about 4-5 minutes, until the skin is crispy and golden. Gently flip the salmon and cook for another 3-4 minutes, until it’s cooked through.
- Make the Teriyaki Sauce: While the salmon is cooking, pour the reserved marinade into a small saucepan. Bring it to a simmer over medium heat and let it cook for about 5-7 minutes, or until it thickens slightly. This will be your teriyaki sauce to drizzle over the finished dish.
- Serve: Fluff the cooked rice with a fork and divide it among serving plates. Top each portion of rice with a salmon fillet and drizzle with the teriyaki sauce. Garnish with sliced green onions and sesame seeds for added flavor and presentation.
Extra Tips
For an extra layer of flavor, consider adding a splash of citrus juice, such as lemon or lime, to the teriyaki sauce as it simmers. Additionally, you can customize the dish by adding steamed vegetables like broccoli or bok choy on the side for a complete meal.
If you prefer a healthier option, bake the salmon in the oven instead of pan-searing it, which will also keep it moist and flavorful. Enjoy your culinary journey into Japanese cuisine with this delicious Salmon Teriyaki With Rice!
Crab Sushi Rolls
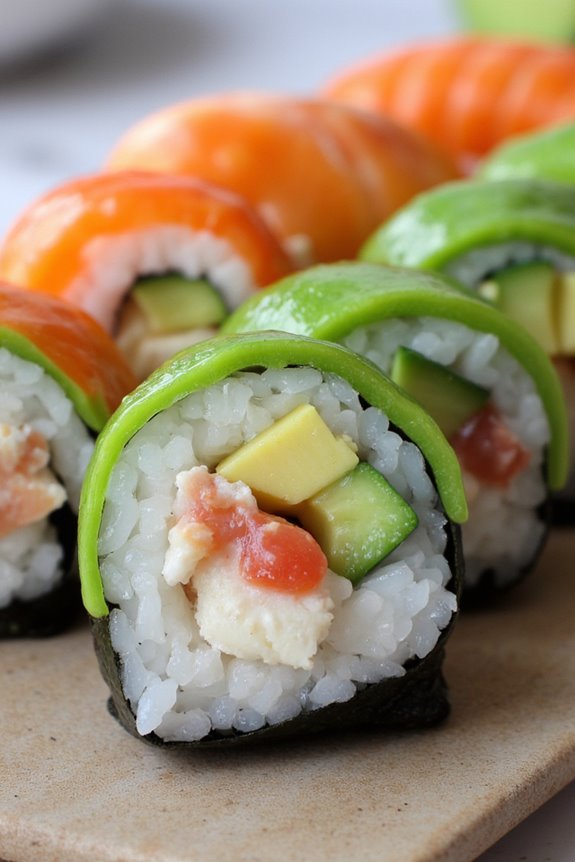
Crab sushi rolls, also known as “California rolls,” are a delightful introduction to sushi-making at home. These rolls combine the delicate flavor of crab with fresh vegetables and perfectly seasoned rice, all wrapped in a sheet of nori (seaweed). Not only are they delicious, but they also offer a fun and interactive way to bring family and friends together in the kitchen. With a little patience and practice, you can create restaurant-quality sushi rolls right in your own home.
Making crab sushi rolls is an enjoyable experience that allows you to customize your ingredients to suit your taste. The key to a successful roll is the preparation of the sushi rice, which should be sticky enough to hold the ingredients together while being light and fluffy. Whether you choose to use real crab meat or imitation crab, this recipe offers a simple yet satisfying way to enjoy a taste of Japan.
Ingredients (Serves 4-6)
- 2 cups sushi rice
- 2 ½ cups water
- ¼ cup rice vinegar
- 2 tablespoons sugar
- 1 teaspoon salt
- 4 sheets nori (seaweed)
- 1 cup cooked crab meat (or imitation crab)
- 1 avocado, sliced
- 1 cucumber, julienned
- Soy sauce, for serving
- Pickled ginger, for serving
- Wasabi, for serving
Cooking Instructions
- Prepare the Sushi Rice: Rinse the sushi rice under cold water until the water runs clear to remove excess starch. Combine the rinsed rice and water in a rice cooker or pot, and cook according to the manufacturer’s instructions or until the water is absorbed and the rice is tender.
- Once cooked, let it sit covered for about 10 minutes.
- Season the Rice: In a small saucepan, combine the rice vinegar, sugar, and salt over low heat until dissolved. Once the rice has rested, transfer it to a large bowl and gently fold in the vinegar mixture using a wooden spoon or rice paddle. Allow the rice to cool to room temperature.
- Prepare the Fillings: While the rice is cooling, slice the avocado and julienne the cucumber into thin strips. If using imitation crab, shred it into bite-sized pieces.
- Assemble the Sushi Rolls: Place a bamboo sushi mat on a clean surface and lay a sheet of nori, shiny side down, on the mat. Wet your hands with water to prevent sticking, then take a handful of sushi rice (about ¾ cup) and spread it evenly over the nori, leaving about an inch at the top edge.
- Add the Fillings: In the center of the rice-covered nori, arrange a line of crab meat, avocado slices, and cucumber strips. Be careful not to overfill, as this can make rolling difficult.
- Roll the Sushi: Starting from the edge closest to you, use the bamboo mat to lift the edge of the nori and roll it away from you, tucking the filling in as you go. Continue rolling until you reach the exposed edge of the nori. To seal the roll, wet the edge with a little water and press gently.
- Slice the Roll: Using a sharp knife, slice the roll into 6-8 pieces, wiping the knife with a damp cloth between cuts to guarantee clean edges.
- Serve: Arrange the sushi rolls on a platter and serve with soy sauce, pickled ginger, and wasabi on the side.
Extra Tips
When making crab sushi rolls, verify your ingredients are as fresh as possible for the best flavor. You can experiment with different fillings like carrots, bell peppers, or even cream cheese to tailor the rolls to your liking.
Additionally, practice makes perfect; don’t worry if your first rolls aren’t perfect – with time and experience, your technique will improve. Finally, consider investing in a bamboo sushi mat for easier rolling and presentation. Enjoy your homemade sushi-making adventure!
Japanese Seafood Pancakes (Okonomiyaki)
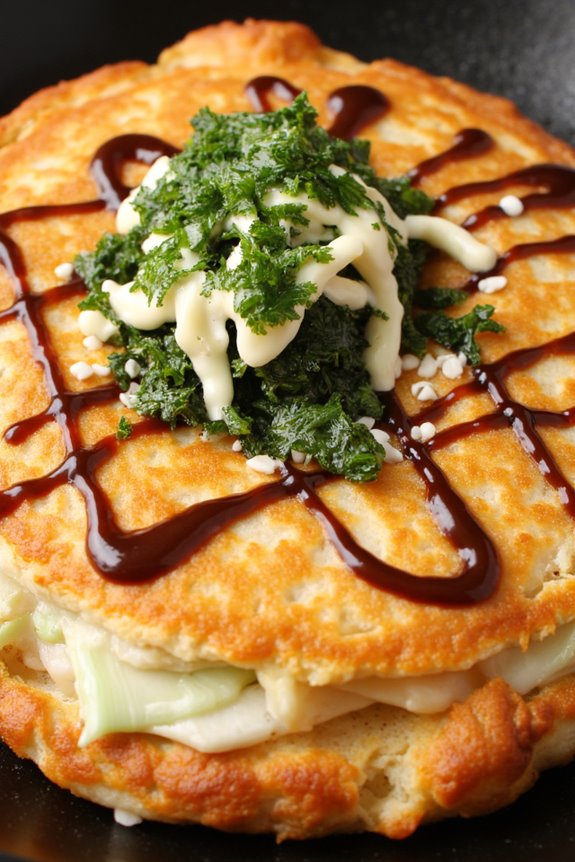
Japanese Seafood Pancakes, or Okonomiyaki, are savory pancakes that are a beloved dish in Japan. They’re often referred to as “Japanese savory pancakes” and can be customized with a variety of ingredients, but seafood is a popular choice. This dish isn’t only delicious but also offers a fun and interactive cooking experience. Traditionally cooked on a griddle, Okonomiyaki is loaded with fresh seafood, vegetables, and a unique batter, resulting in a hearty meal that’s perfect for sharing.
The beauty of Okonomiyaki lies in its versatility. You can adjust the ingredients to suit your taste or what you have on hand. Common seafood additions include shrimp, squid, and scallops, which add a wonderful umami flavor. This dish is often garnished with mayonnaise, okonomiyaki sauce, and bonito flakes, making it visually appealing as well as tasty. Whether you’re hosting a gathering or cooking for family, these pancakes are sure to captivate.
Ingredients (Serves 4-6):
- 2 cups all-purpose flour
- 1 ½ cups dashi stock (or water)
- 2 large eggs
- 2 cups finely shredded cabbage
- 1 cup chopped green onions
- 1 cup mixed seafood (shrimp, squid, scallops)
- ½ cup shredded carrots (optional)
- ¼ cup pickled ginger (optional)
- Salt and pepper to taste
- Vegetable oil for frying
- Okonomiyaki sauce (for drizzling)
- Japanese mayonnaise (for drizzling)
- Bonito flakes (for garnish)
- Seaweed flakes (for garnish)
Cooking Instructions:
- Prepare the Batter: In a large mixing bowl, combine the all-purpose flour and dashi stock until smooth. Then, add the eggs and mix well until fully incorporated. This batter will serve as the base for your Okonomiyaki.
- Add Vegetables and Seafood: To the batter, gently fold in the shredded cabbage, green onions, mixed seafood, and optional ingredients like carrots and pickled ginger. Season the mixture with salt and pepper to taste, making sure everything is well combined.
- Heat the Pan: Heat a non-stick skillet or griddle over medium heat and add a tablespoon of vegetable oil. Make sure the oil is evenly coated across the surface to prevent sticking.
- Cook the Pancakes: Pour a ladleful of the batter mixture onto the hot skillet, forming a pancake that’s about ½ inch thick. Cook for about 4-5 minutes until the bottom is golden brown and the top begins to set.
- Flip the Pancake: Carefully flip the pancake using a spatula. Cook for another 4-5 minutes on the other side until golden brown and cooked through. Repeat this process for the remaining batter, adding more oil as necessary.
- Garnish and Serve: Once cooked, transfer the Okonomiyaki to a serving plate. Drizzle with okonomiyaki sauce and Japanese mayonnaise, then sprinkle with bonito flakes and seaweed flakes for extra flavor and presentation.
Extra Tips:
For an authentic touch, consider using a special Okonomiyaki sauce, which is thicker and sweeter than regular Worcestershire sauce. Additionally, you can customize your Okonomiyaki by adding other toppings, such as cheese or different vegetables, to suit your preferences.
Cooking this dish on a hot griddle can be a fun activity, so encourage friends or family to join in and create their own personalized pancakes!
Seaweed Salad With Sesame Dressing

Seaweed salad is a revitalizing and nutritious dish that has become increasingly popular beyond Japan. This vibrant salad isn’t only rich in flavor but also packed with nutrients, making it a perfect accompaniment to any seafood meal. The combination of various seaweeds, bright vegetables, and a nutty sesame dressing creates an explosion of taste and texture that will delight your palate.
Simple to prepare yet full of umami, this dish is a wonderful way to incorporate the health benefits of seaweed into your diet.
In this recipe, we combine wakame, a type of edible seaweed, with crunchy cucumbers and carrots, all tossed in a flavorful sesame dressing. The dressing, made from sesame oil, soy sauce, and rice vinegar, perfectly complements the flavors of the seaweed and vegetables. This salad isn’t only a great side dish but can also be served as a light main course. Whether you’re hosting a dinner party or simply enjoying a meal at home, this Seaweed Salad with Sesame Dressing is sure to impress.
Ingredients (serves 4-6 people):
- 1 cup dried wakame seaweed
- 1 medium cucumber, thinly sliced
- 1 medium carrot, julienned
- 2 tablespoons sesame seeds, toasted
- 3 tablespoons soy sauce
- 2 tablespoons rice vinegar
- 2 tablespoons sesame oil
- 1 tablespoon sugar
- 1 teaspoon grated fresh ginger (optional)
- 1 green onion, thinly sliced (for garnish)
Cooking Instructions:
- Rehydrate the Seaweed: Place the dried wakame seaweed in a bowl and cover it with warm water. Allow it to soak for about 10-15 minutes until it expands and softens. Once rehydrated, drain the seaweed and gently squeeze out any excess water. Chop into bite-sized pieces if desired.
- Prepare the Vegetables: While the seaweed is soaking, wash and slice the cucumber into thin rounds. Julienne the carrot into thin strips. This will add a nice crunch and color to your salad.
- Make the Dressing: In a separate small bowl, combine the soy sauce, rice vinegar, sesame oil, sugar, and grated ginger (if using). Whisk the ingredients together until the sugar is dissolved and the dressing is well combined.
- Assemble the Salad: In a large mixing bowl, combine the rehydrated wakame, sliced cucumber, and julienned carrot. Pour the sesame dressing over the vegetables and toss gently to coat everything evenly.
- Add the Finishing Touches: Sprinkle the toasted sesame seeds over the salad and give it a final toss. Garnish with sliced green onions for added flavor and presentation.
- Serve: Transfer the seaweed salad to a serving dish or individual bowls. You can serve it immediately or let it chill in the refrigerator for about 15 minutes to enhance the flavors.
Extra Tips: When making seaweed salad, feel free to experiment with different types of seaweed, such as dulse or kombu, for varied flavors and textures. Additionally, you can add other vegetables like radishes or bell peppers for extra crunch.
Remember to toast the sesame seeds to enhance their nutty flavor, and adjust the seasoning of the dressing according to your taste preferences. Enjoy your delicious and healthy Seaweed Salad with Sesame Dressing!