

The holiday season in the Philippines is a time of warmth, laughter, and a delightful spread of traditional dishes. Each recipe on the table, from crispy lechon to sweet bibingka, holds a special place in our hearts and brings a sense of togetherness. These festive flavors create an inviting atmosphere that welcomes family and friends with open arms. Let’s take a look at 14 celebratory Filipino Christmas recipes that add joy and abundance to every gathering. Join me in exploring these wonderful dishes that make the holiday season truly memorable.
Lechon: The Star of the Feast
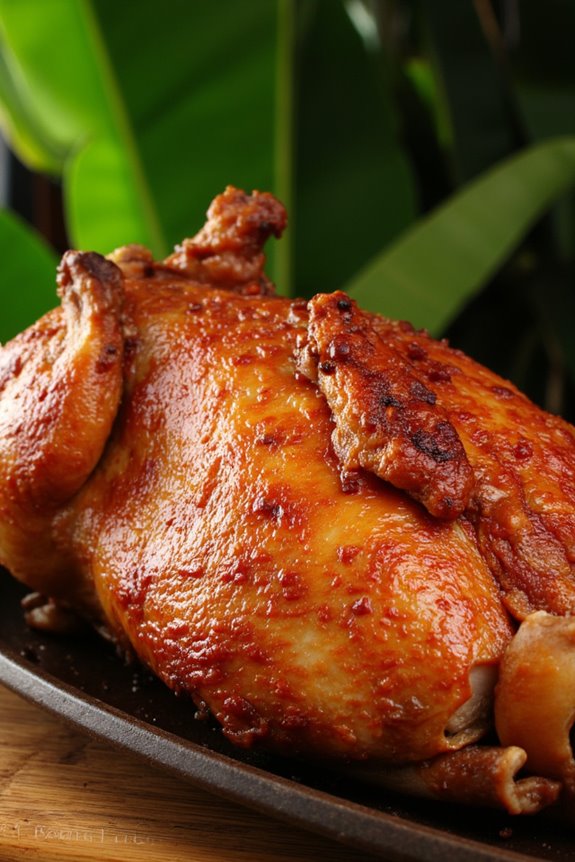
Lechon, a whole roasted pig, is a beloved dish in Filipino culture, often served during special occasions and festive gatherings. Its crispy, golden skin and tender, flavorful meat make it the centerpiece of any celebration. The preparation of lechon is a labor of love, requiring careful attention to marination, cooking technique, and timing to achieve that perfect balance of texture and taste.
While traditional lechon is cooked over an open flame, modern adaptations often use ovens or rotisserie methods, making it more accessible for home cooks. To truly appreciate the flavors of lechon, marination is key. The pig is typically seasoned with a blend of spices, herbs, and citrus, allowing the flavors to penetrate the meat. The cooking process can take several hours, but the result is an unforgettable dish that embodies the spirit of Filipino hospitality.
Whether enjoyed at Christmas gatherings or family reunions, lechon isn’t just a meal; it’s a celebration of Filipino culture and tradition.
Ingredients (Serves 4-6 People)
- 1 whole pig (about 10-12 pounds)
- 1 cup soy sauce
- 1 cup vinegar
- 1 head of garlic, minced
- 1 tablespoon black peppercorns
- 2 tablespoons salt
- 3-4 bay leaves
- 2 cups lemongrass, chopped (or 1 stalk of whole lemongrass)
- 1 large onion, quartered
- 2-3 oranges, juiced (or 1 cup calamansi juice)
- 1 tablespoon sesame oil
- 1 tablespoon five-spice powder
- Banana leaves for wrapping (optional)
Cooking Instructions
- Prepare the Pig: Clean the pig thoroughly, removing any hairs and insides. Rinse it under cold water and pat dry with paper towels. This will guarantee a clean and hygienic cooking process.
- Marinate the Pig: In a large bowl, combine soy sauce, vinegar, minced garlic, black peppercorns, salt, bay leaves, chopped lemongrass, onion, orange juice, sesame oil, and five-spice powder. Rub this marinade all over the pig, making sure to get it inside the cavity as well. Allow it to marinate for at least 4 hours, preferably overnight in the refrigerator for maximum flavor.
- Prepare for Cooking: Preheat your rotisserie or oven to 250°F (120°C). If using a rotisserie, secure the pig properly on the spit to guarantee even cooking. If using an oven, place the pig on a roasting rack and cover it with banana leaves to keep the moisture in.
- Cook the Pig: Roast the pig for approximately 6-8 hours, depending on its size, until the internal temperature reaches 160°F (71°C). If using a rotisserie, turn it continuously for even cooking. Baste it with its own juices every hour to keep the skin moist and flavorful.
- Crisp the Skin: In the final 30 minutes of cooking, increase the heat to 375°F (190°C) to achieve that crispy skin. Keep a close eye on it to prevent burning. The skin should turn a beautiful golden brown.
- Rest and Serve: Once cooked, remove the lechon from the heat and let it rest for about 20-30 minutes. This allows the juices to redistribute throughout the meat. Carve the lechon and serve with a dipping sauce made from vinegar, soy sauce, and chopped chili.
Extra Tips
When making lechon, patience is key. The longer the pig marinates, the more flavorful it will be. If you have access to a traditional lechon pit or a charcoal grill, consider using that for an authentic smoky flavor.
Always monitor the cooking temperature closely to avoid overcooking or burning the skin, and remember that the fat under the skin contributes to the overall flavor and texture. Finally, don’t forget to prepare a delicious dipping sauce to complement the rich flavors of the roasted pig!
Bibingka: Traditional Rice Cake

Bibingka is a beloved Filipino delicacy traditionally enjoyed during the Christmas season, often sold in street markets and served at family gatherings. This delightful rice cake is made from rice flour and coconut milk, giving it a rich flavor and a unique texture.
Often topped with salted eggs and cheese, bibingka carries the festive spirit of the Philippines and brings warmth to the holiday celebrations. Each bite of this sweet and savory treat is reminiscent of family traditions and joyous holiday cheer.
The process of making bibingka is a labor of love, combining simple ingredients to create a dish that’s both comforting and satisfying. It’s traditionally baked in clay pots lined with banana leaves, which impart a subtle aroma and flavor to the cake.
Whether enjoyed as a snack or dessert, bibingka is sure to bring smiles and nostalgia to those who partake in this festive treat.
Ingredients (Serves 4-6):
- 2 cups rice flour
- 1 cup coconut milk
- 1 cup water
- 1 cup sugar
- 2 teaspoons baking powder
- 1/2 teaspoon salt
- 2 eggs
- 1/4 cup melted butter
- 1/4 cup grated cheese (preferably Edam or cheddar)
- 1-2 salted egg, sliced
- Banana leaves (for lining the baking dish)
Cooking Instructions:
- Preheat the Oven: Begin by preheating your oven to 375°F (190°C). This guarantees that the bibingka will bake evenly and achieve a nice golden color when cooked.
- Prepare the Banana Leaves: While the oven is preheating, prepare the banana leaves by cutting them into pieces large enough to line your baking dish. If using fresh leaves, pass them over an open flame briefly to make them more pliable, which will help them fit into the dish easily.
- Mix Dry Ingredients: In a large mixing bowl, combine the rice flour, sugar, baking powder, and salt. Whisk these dry ingredients together until they’re well blended, confirming that the baking powder is evenly distributed for proper rising.
- Combine Wet Ingredients: In a separate bowl, whisk together the coconut milk, water, and eggs. Add the melted butter to this mixture and stir until fully combined. This will create a smooth batter once mixed with the dry ingredients.
- Combine Batter: Gradually pour the wet mixture into the dry ingredients while stirring continuously. Mix until you achieve a smooth batter, confirming there are no lumps.
- Pour into Baking Dish: Line your baking dish with the prepared banana leaves, making sure they cover the sides as well. Pour in about half of the bibingka batter into the lined dish, spreading it evenly.
- Add Toppings: Sprinkle half of the grated cheese over the batter, and place slices of salted eggs on top. This adds a savory touch to the sweet cake and creates a delightful contrast in flavors.
- Bake the Bibingka: Pour the remaining batter over the toppings, ensuring they’re covered. Bake in the preheated oven for about 25-30 minutes, or until the top is golden brown and a toothpick inserted into the center comes out clean.
- Final Toppings: Once out of the oven, sprinkle the remaining cheese on top while the bibingka is still hot, allowing it to melt slightly. Allow the cake to cool for a few minutes before serving.
- Serve and Enjoy: Cut the bibingka into squares or wedges and serve warm, optionally with additional toppings such as butter or grated coconut.
Extra Tips:
For a more authentic flavor, consider using freshly grated coconut instead of canned coconut milk if available.
Additionally, experiment with different toppings such as grated coconut or a sprinkle of sugar on top for added sweetness. Bibingka is best enjoyed fresh but can be stored in an airtight container for a couple of days. Reheat in the oven or microwave before serving for the best taste!
Puto Bumbong: Purple Rice Delicacy
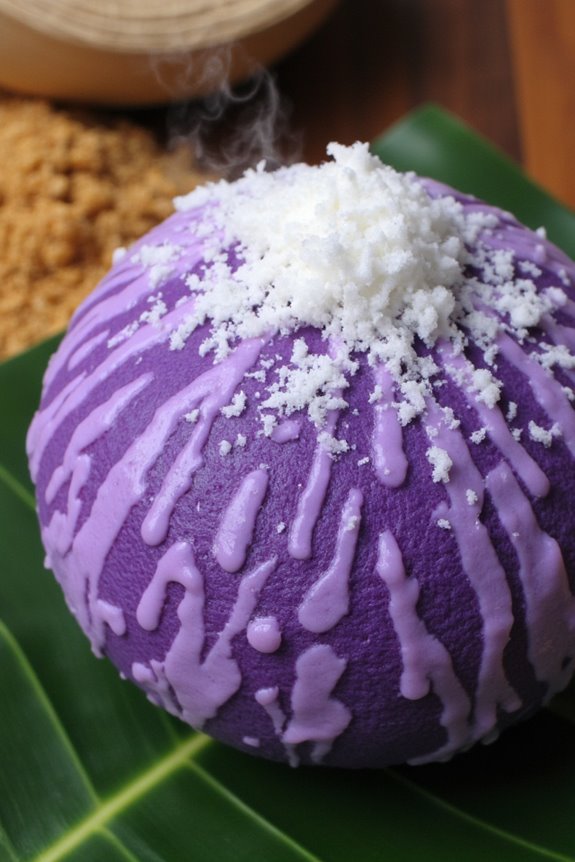
Puto Bumbong is a traditional Filipino delicacy that’s especially popular during the Christmas season. This delicious treat is made from glutinous rice flour mixed with purple yam (ube) and steamed in bamboo tubes, giving it a unique shape and flavor. The name “puto bumbong” literally translates to “bamboo puto,” referring to the bamboo tubes used for steaming the rice mixture.
The dish is often served with grated coconut and muscovado sugar, making it a delightful and festive addition to any holiday gathering.
Preparing Puto Bumbong at home can be a fun and rewarding experience, allowing you to enjoy the rich flavors and textures of this cherished Filipino treat. While the steaming process may require some special equipment, the steps are straightforward and easy to follow.
Whether you’re sharing it with family or serving it at a holiday party, Puto Bumbong is sure to be a hit and bring the joys of Filipino Christmas traditions to your table.
Ingredients (Serves 4-6):
- 2 cups glutinous rice flour
- 1 cup coconut milk
- 1 cup water
- 1/2 cup ube halaya (purple yam jam)
- 1/4 cup sugar
- 1/2 teaspoon salt
- Grated coconut (for topping)
- Muscovado sugar (for topping)
- Banana leaves or parchment paper (for lining bamboo tubes)
Cooking Instructions:
- Prepare the Bamboo Tubes: Start by cleaning the bamboo tubes thoroughly. You can use a brush to remove any residue from previous use. Once clean, soak the bamboo tubes in water for about 30 minutes to prevent them from cracking during steaming.
- Mix the Batter: In a large mixing bowl, combine the glutinous rice flour, sugar, and salt. Gradually add the coconut milk and water while mixing until you achieve a smooth batter. Once mixed, divide the batter into two portions. To one portion, add the ube halaya and mix until well-combined, creating a purple batter.
- Line the Bamboo Tubes: Cut banana leaves or parchment paper into rectangular pieces large enough to line the inside of the bamboo tubes. This will prevent the batter from sticking and make it easier to remove after steaming.
- Fill the Bamboo Tubes: Using a spoon, fill each lined bamboo tube with alternating layers of the plain and ube batter. Leave some space at the top for the batter to expand during cooking.
- Steam the Puto Bumbong: Place the filled bamboo tubes upright in a steamer. If you don’t have a bamboo steamer, you can use a regular steamer with a rack. Steam for about 20-25 minutes, or until the batter is cooked through. You can check by inserting a toothpick into the center; if it comes out clean, they’re ready.
- Serve: Carefully remove the bamboo tubes from the steamer and let them cool slightly. Once cooled, gently push the cooked puto bumbong out of the tubes. Serve warm and top with grated coconut and muscovado sugar.
Extra Tips:
When preparing Puto Bumbong, using high-quality glutinous rice flour and fresh ingredients can greatly enhance the flavor and texture of the delicacy.
If you don’t have bamboo tubes, you can also use small ramekins or cups for steaming. Additionally, feel free to experiment with toppings such as sweetened condensed milk or shredded cheese to give your Puto Bumbong a modern twist.
Enjoy making this festive treat and sharing it with loved ones during the holiday season!
Hamón: Sweet Christmas Ham
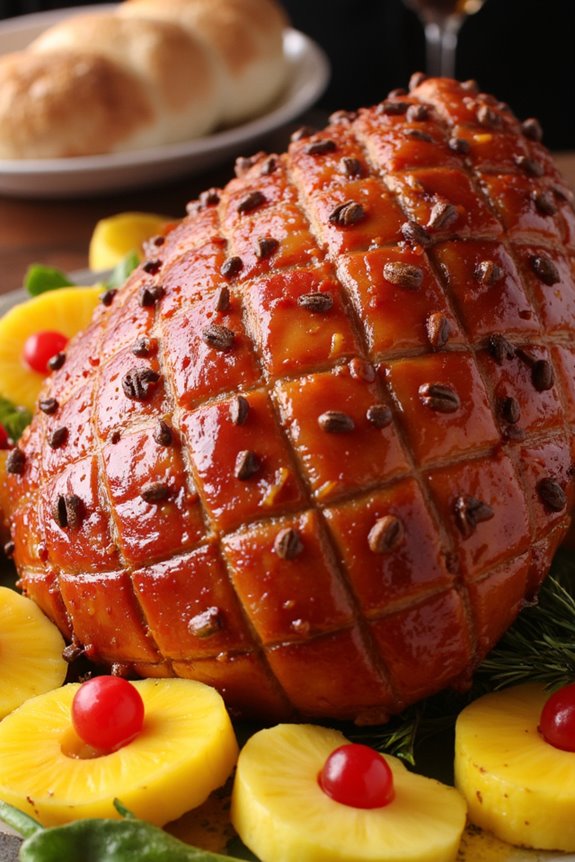
During the festive season in the Philippines, no celebration is complete without the centerpiece of the Noche Buena spread—Hamón. This sweet Christmas ham is a delightful combination of flavors and textures, making it a beloved dish among Filipino families. Traditionally, it’s made from a whole leg of pork that’s cured and then glazed with a sweet mixture, often featuring pineapple and brown sugar, giving it a unique flavor profile that pairs perfectly with rice and other holiday dishes.
Making Hamón isn’t just about the taste; it’s a ritual that brings families together. The preparation can be a bit time-consuming, but the result is a succulent, juicy ham that will have everyone coming back for seconds. Whether served hot or cold, this dish embodies the spirit of Filipino Christmas and is sure to create lasting memories around the dining table.
Ingredients (serving size: 4-6 people)
- 1 whole leg of pork (about 4-5 kg)
- 2 cups pineapple juice
- 1 cup brown sugar
- 1 cup honey
- 1 cup soy sauce
- 1 cup Dijon mustard
- 1 teaspoon ground cloves
- 1 teaspoon black pepper
- 1 teaspoon garlic powder
- 1 cup pineapple slices (for garnish)
- Whole cloves (for studding the ham)
- Maraschino cherries (for garnish)
Cooking Instructions
- Prepare the Pork: Start by rinsing the whole leg of pork under cold water. Pat it dry with paper towels. Using a sharp knife, score the surface of the pork in a diamond pattern, being careful not to cut too deeply. This will help the glaze penetrate the meat and enhance its flavor.
- Marinate the Pork: In a large bowl, combine pineapple juice, soy sauce, Dijon mustard, brown sugar, honey, ground cloves, black pepper, and garlic powder. Mix well until the sugar is dissolved. Place the pork in a large resealable plastic bag or a deep dish and pour the marinade over it. Seal the bag or cover the dish and refrigerate for at least 24 hours, turning occasionally to guarantee even marination.
- Preheat the Oven: On the day of cooking, preheat your oven to 160°C (320°F). Remove the pork from the marinade and reserve the marinade for later use. Place the pork in a roasting pan, and stud the scored surface with whole cloves for added flavor and presentation.
- Bake the Ham: Cover the pork loosely with aluminum foil and bake it in the preheated oven for about 2.5 to 3 hours, basting it with the reserved marinade every 30 minutes. This will keep the ham moist and infuse it with flavor.
- Glaze the Ham: After the initial baking, remove the foil and increase the oven temperature to 180°C (350°F). Brush the ham with additional honey and sprinkle with brown sugar to create a caramelized glaze. Bake uncovered for another 30 minutes, or until the surface is golden brown and crispy.
- Serve: Once cooked, remove the ham from the oven and let it rest for at least 15-20 minutes before slicing. Garnish with pineapple slices and maraschino cherries for a festive touch. Serve warm or allow it to cool and serve it cold as part of your holiday spread.
Extra Tips
When cooking Hamón, it’s important to allow enough time for marination to enhance the flavor of the meat. Using a meat thermometer can help ascertain that the ham is cooked through without being dried out; the internal temperature should reach at least 70°C (160°F).
Additionally, feel free to adjust the sweetness of the glaze to your preference by adding more or less sugar or honey. Leftover ham can be used in sandwiches or as an ingredient in other dishes, making it a versatile addition to your holiday meals.
Queso De Bola: Edam Cheese Delight
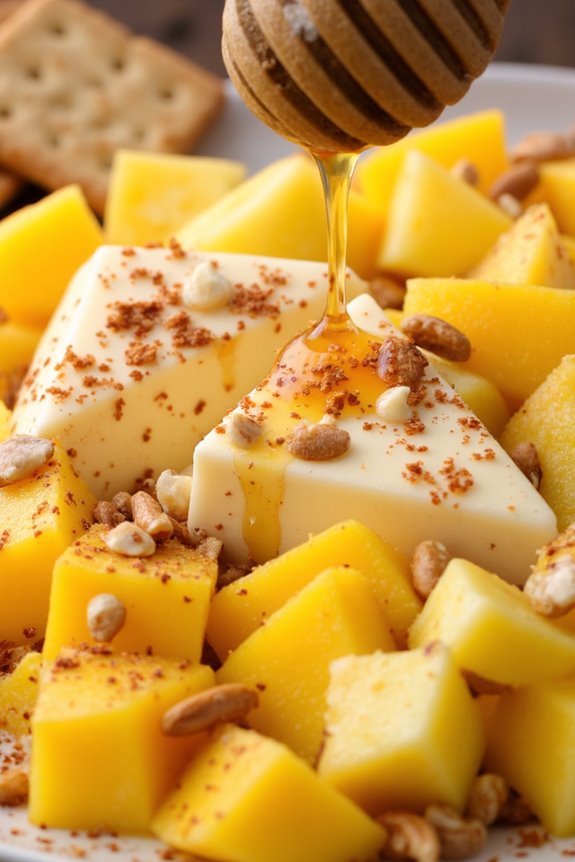
Queso De Bola, or Edam Cheese Delight, is a beloved Filipino holiday staple that symbolizes prosperity and good fortune. Traditionally, this cheese is round in shape and covered with a bright red wax coating, making it not only a delicious treat but also a festive centerpiece on the dining table during Christmas celebrations.
Families often enjoy it with a variety of accompaniments such as fruits, nuts, and local delicacies, making it a versatile addition to any holiday feast. This delightful cheese is often sliced and served as part of the Noche Buena spread, a grand feast held on Christmas Eve.
The creamy texture and slightly nutty flavor of Edam cheese pair wonderfully with sweet and savory flavors, making it a favorite among both children and adults. Whether enjoyed on its own or as a complement to other dishes, Queso De Bola embodies the joy and warmth of Filipino Christmas traditions.
Ingredients (Serves 4-6):
- 1 round Queso De Bola (Edam cheese)
- 1 cup sweet mangoes, diced
- 1 cup ripe pineapple, diced
- 1 cup nuts (cashews or almonds), roughly chopped
- 1 tablespoon honey (optional)
- 1 tablespoon chili flakes (optional for a spicy kick)
- Assorted crackers or bread, for serving
Cooking Instructions:
- Prepare the Cheese: Remove the wax coating from the Queso De Bola. Using a sharp knife, slice the cheese into wedges or cubes, depending on your preference. Make sure to be careful while cutting to maintain the shape of the cheese for presentation.
- Prepare the Fruits: Dice the sweet mangoes and ripe pineapple into bite-sized pieces. Confirm that the fruits are fresh and ripe for the best flavor. Place them in a mixing bowl and gently toss to combine.
- Prepare the Nuts: Roughly chop the cashews or almonds. You can either use them raw or lightly toast them in a pan for a few minutes until they’re golden brown. Toasting enhances their flavor and adds a nice crunch to the dish.
- Combine Ingredients: In a serving platter, arrange the sliced Queso De Bola in the center. Surround it with the diced fruits and sprinkle the chopped nuts on top. If desired, drizzle honey over the fruits for added sweetness and sprinkle chili flakes for a hint of spice.
- Serve: Accompany the cheese and fruit platter with assorted crackers or slices of bread, allowing guests to create their own bites. This interactive element adds a fun aspect to the dining experience.
Extra Tips:
When preparing Queso De Bola, consider the balance of flavors and textures. Sweet fruits like mangoes and pineapples complement the creamy cheese beautifully, while nuts add a delightful crunch.
Feel free to experiment with different fruits or add a touch of your favorite seasoning to personalize the dish. For gatherings, serve the cheese at room temperature for peak flavor, and consider creating a beautiful arrangement on a large platter to impress your guests.
Kare-Kare: Oxtail and Peanut Stew
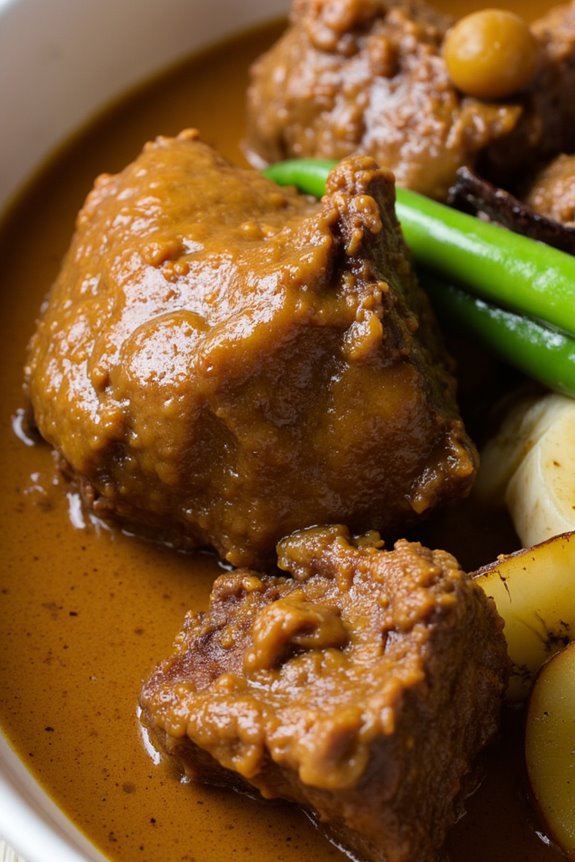
Kare-Kare is a beloved Filipino dish that showcases the rich and robust flavors of oxtail simmered in a creamy peanut sauce. Traditionally served with a side of bagoong (fermented shrimp paste), this hearty stew is often enjoyed during festive occasions, including Christmas celebrations.
With its unique combination of ingredients and textures, Kare-Kare brings a warm and comforting element to any holiday feast. The dish isn’t only a reflection of Filipino culinary heritage but also a delightful way to gather friends and family around the table.
Cooking Kare-Kare requires patience and love, as the oxtail needs to be tenderized and the peanut sauce perfected. Once you master this classic recipe, you’ll be able to impress your guests and create lasting memories with each serving.
Ingredients (Serves 4-6):
- 2 pounds oxtail, cut into pieces
- 1 cup peanut butter
- 1/4 cup rice flour (or ground rice)
- 1 large onion, chopped
- 4 cloves garlic, minced
- 1 tablespoon fish sauce
- 6 cups water
- 1 banana heart, sliced (optional)
- 1 cup eggplant, sliced
- 1 cup green beans, trimmed
- Salt and pepper, to taste
- Bagoong (fermented shrimp paste), for serving
Cooking Instructions:
- Prepare the Oxtail: In a large pot, place the oxtail and cover it with water. Bring to a boil and let it cook for about 10 minutes. This step helps to remove impurities. After boiling, drain and rinse the oxtail in cold water to guarantee a clean base for your stew.
- Simmer the Oxtail: Return the oxtail to the pot and add 6 cups of fresh water along with the chopped onion, minced garlic, and fish sauce. Bring the mixture to a boil, then reduce the heat to low and let it simmer for approximately 2-3 hours or until the oxtail is tender. Stir occasionally and skim off any foam that forms on the surface.
- Make the Peanut Sauce: In a separate bowl, mix the peanut butter with 1 cup of the broth from the oxtail. Whisk in the rice flour, making sure there are no lumps. This will create a smooth peanut sauce that will thicken as it cooks.
- Combine Ingredients: Once the oxtail is tender, add the peanut butter mixture into the pot. Stir well to combine, and let it simmer for another 10-15 minutes. This allows the flavors to meld together while thickening the sauce.
- Add Vegetables: Add the banana heart, eggplant, and green beans into the pot. Cook for an additional 5-10 minutes until the vegetables are tender but still crisp. Taste the stew and season with salt and pepper as needed.
- Serve: Once everything is cooked to perfection, transfer the Kare-Kare to a serving bowl. Serve it hot with a side of bagoong, allowing each guest to add their preferred amount to enhance the flavors.
Extra Tips:
When making Kare-Kare, it’s vital to choose quality oxtail for the best flavor and tenderness. If you prefer a thicker sauce, you can adjust the amount of peanut butter and rice flour based on your desired consistency.
Additionally, feel free to incorporate other vegetables such as cabbage or sitaw (string beans) for added texture and flavor. Finally, letting the dish sit for a few hours or overnight in the refrigerator will enhance its taste, making it even more delicious when reheated.
Pancit Malabon: Noodle Dish With Seafood
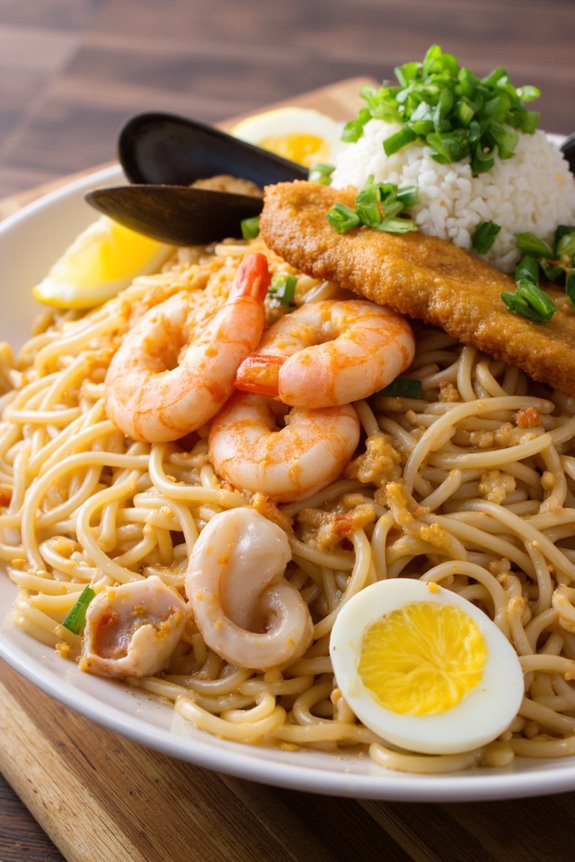
Pancit Malabon is a beloved Filipino noodle dish that originates from the coastal town of Malabon, known for its rich seafood offerings. This vibrant dish is characterized by its thick rice noodles, a flavorful shrimp sauce, and an assortment of fresh seafood, making it a festive centerpiece for any holiday gathering.
Traditionally served during Filipino celebrations, Pancit Malabon not only delights the palate but also symbolizes long life and good fortune, adding to the spirit of Christmas festivities.
The preparation of Pancit Malabon involves creating a savory sauce infused with shrimp and spices, then tossing it with the noodles along with various toppings such as boiled eggs, vegetables, and seafood. While it may seem complex, the process can be broken down into manageable steps, allowing you to impress your family and friends with this exquisite dish.
Ingredients (Serves 4-6 People)
- 400g thick rice noodles (bihon or malabon noodles)
- 1 cup shrimp (peeled and deveined)
- 1 cup squid (cleaned and sliced)
- 1 cup fish (such as bangus or tilapia, flaked)
- 1 cup mussels (cleaned)
- 1/2 cup pork (sliced thinly)
- 1/2 cup shrimp paste (bagoong)
- 1/2 cup water
- 1/4 cup soy sauce
- 1 onion (chopped)
- 4 cloves garlic (minced)
- 2-3 tablespoons vegetable oil
- 1/2 teaspoon ground black pepper
- 2 hard-boiled eggs (sliced for garnish)
- 1/2 cup green onions (chopped for garnish)
- Lemon or calamansi wedges (for serving)
Cooking Instructions
1. Prepare the Noodles: Begin by soaking the thick rice noodles in warm water for about 30 minutes or until softened. Drain and set aside. This step guarantees that the noodles will be ready to absorb the flavors of the sauce and other ingredients when cooked.
2. Cook the Seafood: In a large skillet or wok, heat the vegetable oil over medium heat. Add the chopped onion and minced garlic, sautéing until fragrant and the onions are translucent.
Next, add the shrimp and cook until they turn pink, followed by the squid and mussels. Stir-fry until the mussels open up. Remove the seafood and set aside, leaving the oil and juices in the pan.
3. Make the Sauce: In the same skillet, add the shrimp paste and stir it into the oil. Pour in the water and soy sauce, mixing well. Allow the sauce to simmer for about 3-5 minutes until it thickens slightly. This creates a rich and flavorful base for the noodles.
4. Combine the Ingredients: Add the soaked noodles to the skillet, tossing them in the sauce to guarantee they’re well-coated. Add the cooked pork and flaked fish, stirring everything together until heated through.
Season with ground black pepper to taste. This step is essential as it allows the noodles to absorb the savory sauce.
5. Plate and Garnish: Once everything is well-mixed and heated, transfer the Pancit Malabon to a serving platter. Arrange the sliced hard-boiled eggs and chopped green onions on top for garnish.
Serve with lemon or calamansi wedges on the side, allowing guests to squeeze fresh citrus over their servings.
Extra Tips
When preparing Pancit Malabon, feel free to customize the seafood based on what’s available or your personal preferences. You can also add vegetables like cabbage or carrots for added color and nutrition.
For a more intense flavor, consider using homemade shrimp broth instead of water in the sauce. Finally, remember that Pancit Malabon is best enjoyed fresh, but you can store leftovers in the refrigerator for a day or two, reheating gently before serving.
Lumpiang Shanghai: Crispy Spring Rolls

Lumpiang Shanghai is a beloved Filipino dish that brings a delightful crunch and savory flavor to any holiday feast. These crispy spring rolls are often filled with a combination of ground pork, vegetables, and seasonings, making them a favorite appetizer for family gatherings and Christmas celebrations. Their golden-brown exterior and satisfying crunch are certain to please both young and old, turning any meal into a festive occasion.
The beauty of Lumpiang Shanghai lies not only in its taste but also in its versatility. You can easily customize the filling according to your preferences, substituting or adding ingredients like shrimp, chicken, or even tofu for a vegetarian option. Whether served with a sweet and sour dipping sauce or a spicy vinegar dip, these spring rolls are a must-have on your Christmas table.
Ingredients (Serves 4-6):
- 1 pound ground pork
- 1 cup carrots, finely grated
- 1 cup green onions, chopped
- 1/2 cup water chestnuts, finely chopped
- 1/4 cup soy sauce
- 2 tablespoons garlic, minced
- 1 teaspoon salt
- 1/2 teaspoon pepper
- 1 package lumpia wrappers (about 20 pieces)
- Oil for frying
Cooking Instructions:
- Prepare the Filling: In a large mixing bowl, combine the ground pork, grated carrots, chopped green onions, chopped water chestnuts, soy sauce, minced garlic, salt, and pepper. Mix all the ingredients thoroughly until they’re evenly incorporated. This mixture will form the flavorful filling for your spring rolls.
- Wrap the Lumpia: Take one lumpia wrapper and place it on a clean surface with one corner facing you (like a diamond shape). Spoon about 2 tablespoons of the filling onto the lower part of the wrapper. Fold the bottom corner over the filling, then fold in the sides, and roll it up tightly to enclose the filling. Seal the top corner with a dab of water to make sure it sticks. Repeat this process until all the filling is used.
- Heat the Oil: In a deep frying pan or wok, heat about 2 inches of oil over medium heat. To check if the oil is hot enough, drop a small piece of the wrapper into the oil; it should sizzle immediately.
- Fry the Spring Rolls: Carefully add a few spring rolls to the hot oil, making sure not to overcrowd the pan. Fry them for about 3-4 minutes or until they’re golden brown and crispy, turning occasionally to make sure of even cooking. Remove them from the oil and drain on paper towels to absorb excess oil.
- Serve: Arrange the crispy Lumpiang Shanghai on a serving platter. They can be served hot or at room temperature with your choice of dipping sauces, such as sweet and sour sauce or vinegar with chili.
Extra Tips:
When making Lumpiang Shanghai, it’s important to keep the wrappers covered with a damp cloth while you work to prevent them from drying out. If you have leftover filling, you can store it in the refrigerator for a day or two or use it in other dishes.
Additionally, for a healthier option, you can bake the wrapped spring rolls in the oven at 375°F (190°C) for about 20-25 minutes, turning halfway through, until they’re golden and crisp. Enjoy this festive favorite and share the joy of Filipino cuisine with your loved ones!
Morcon: Beef Roll With Eggs and Sausages

Morcon is a traditional Filipino dish that often graces the holiday table, especially during Christmas celebrations. This savory beef roll is filled with a delicious mixture of eggs, sausages, and vegetables, making it a festive centerpiece that’s both flavorful and visually appealing.
The preparation involves marinating the beef, rolling it up with the filling, and then cooking it slowly until tender. This dish isn’t only a treat for the taste buds but also a wonderful way to bring family and friends together during the holiday season.
To make Morcon, you’ll need a good cut of beef, typically flank or round, which can be pounded and rolled to create a delightful package of flavors. The combination of the juicy meat and the savory fillings of hard-boiled eggs, sausages, and vegetables creates a contrast in textures that’s simply irresistible.
Once cooked, the morcon is sliced into pinwheels, revealing the colorful filling inside, making it a stunning addition to your holiday feast.
Ingredients (Serves 4-6)
- 1.5 lbs beef flank or round, thinly sliced
- 1/4 cup soy sauce
- 2 tablespoons vinegar
- 1 teaspoon ground black pepper
- 4 pieces hard-boiled eggs, peeled
- 4 pieces hotdogs or sausages, cut into strips
- 1/2 cup carrots, cut into strips
- 1/2 cup bell pepper, cut into strips
- 1/4 cup raisins (optional)
- 1/2 cup cheese, cut into strips (optional)
- 3 tablespoons cooking oil
- 1 onion, chopped
- 2 cups beef broth
- Salt to taste
- Toothpicks or kitchen twine for securing the rolls
Cooking Instructions
- Marinate the Beef: In a bowl, combine soy sauce, vinegar, and ground black pepper. Add the thinly sliced beef and make sure each piece is well coated. Allow it to marinate for at least 30 minutes to an hour for better flavor.
- Prepare the Filling: While the beef is marinating, prepare the filling. Boil the eggs, peel them, and set them aside. Cut the sausages, carrots, bell peppers, and cheese into strips. If using raisins, set them aside as well.
- Assemble the Morcon: Lay a slice of beef on a clean surface. Place a strip of hard-boiled egg, sausage, carrots, bell peppers, and cheese in the center. Carefully roll the beef around the filling, tucking in the sides. Secure the roll with toothpicks or kitchen twine to hold the shape.
- Brown the Rolls: In a large skillet, heat the cooking oil over medium heat. Add the assembled beef rolls and brown them on all sides for about 3-5 minutes. This step enhances the flavor and color of the morcon.
- Sauté the Onions: Remove the browned rolls from the skillet and set them aside. In the same skillet, add the chopped onion and sauté until translucent, about 2-3 minutes.
- Cook the Morcon: Return the morcon rolls to the skillet and pour in the beef broth. Bring to a gentle boil, then reduce the heat to low. Cover and simmer for about 1-1.5 hours, or until the beef is tender, turning the rolls occasionally.
- Final Touches: Once the beef is tender, remove the rolls from the broth and let them cool slightly. You can thicken the broth if desired by simmering it longer. Slice the morcon into pinwheels, serve it on a platter, and drizzle with the sauce.
Extra Tips
When preparing Morcon, it’s essential to choose the right cut of beef for tenderness. Flank or round cuts work best, but you can also use tenderloin if preferred.
Additionally, feel free to customize the filling according to your taste; you can add mushrooms, pickles, or even bacon for a richer flavor. Make sure to secure the rolls tightly to prevent the filling from spilling out during cooking, and serve the dish with a side of steamed rice or mashed potatoes to soak up the delicious sauce.
Enjoy this festive dish and share the joy of Filipino Christmas traditions with your loved ones!
Puto: Steamed Rice Cakes
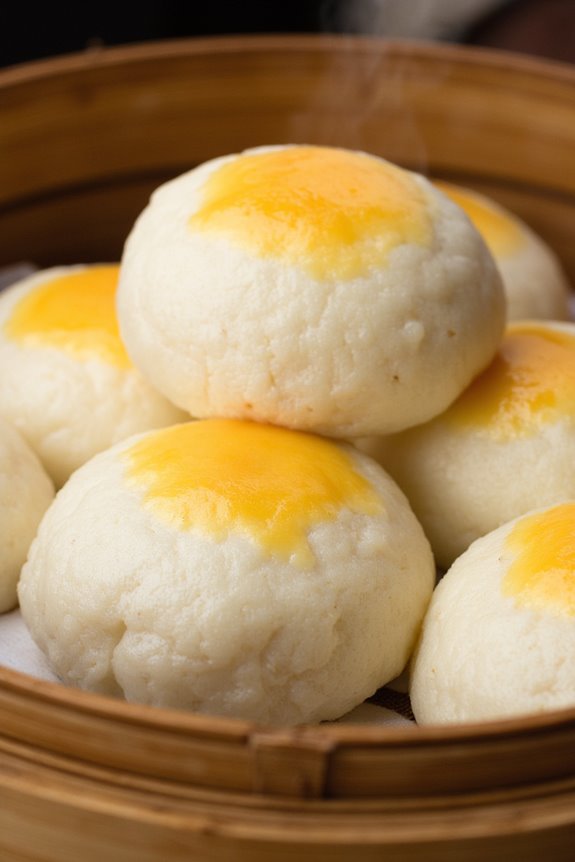
Puto is a beloved traditional Filipino delicacy that showcases the unique flavors and textures of rice. These soft, fluffy rice cakes are often enjoyed during festive occasions, especially Christmas, where they’re usually served alongside savory dishes like dinuguan (pork blood stew) or simply enjoyed on their own as a delightful snack.
The preparation of puto can vary, with different regions adding their own twists, but the classic version remains a favorite for its simplicity and deliciousness. Making puto isn’t only an enjoyable culinary experience but also an opportunity to bond with family and friends in the kitchen.
With just a few key ingredients, you can create these steamed treats that are certain to impress your guests. The process involves mixing the ingredients, pouring them into molds, and steaming them until perfectly cooked. Whether enjoyed fresh or topped with cheese for added flavor, puto is a must-try dish that captures the essence of Filipino Christmas celebrations.
Ingredients (Serves 4-6 people)
- 2 cups rice flour
- 1 cup sugar
- 1 tablespoon baking powder
- 1 cup coconut milk
- 1 cup water
- 1 teaspoon vanilla extract
- Optional: cheese slices or salted egg for topping
Cooking Instructions
- Prepare the Steamer: Begin by filling your steamer pot with water and bringing it to a boil. Make sure to line your steaming tray or molds with parchment paper to prevent the puto from sticking. If you don’t have a steaming tray, you can use muffin tins or silicone molds.
- Mix Dry Ingredients: In a large mixing bowl, combine the rice flour, sugar, and baking powder. Whisk these ingredients together until they’re well blended. This guarantees that the sugar and baking powder are evenly distributed throughout the flour.
- Combine Wet Ingredients: In another bowl, mix together the coconut milk, water, and vanilla extract. Stir well to combine the liquids thoroughly. The coconut milk adds a rich flavor that complements the rice cake perfectly.
- Combine Mixtures: Gradually pour the wet mixture into the dry mixture, stirring continuously until you achieve a smooth batter. Be careful not to overmix, as this can affect the texture of the puto.
- Pour into Molds: Using a ladle or measuring cup, pour the batter into the prepared molds, filling them about 2/3 full to allow for rising as they steam. If using cheese or salted egg for topping, place a slice on top of each filled mold.
- Steam the Puto: Carefully place the molds in the steamer, making sure the water is boiling. Cover the steamer with a lid, and steam the puto for about 20-25 minutes or until a toothpick inserted into the center comes out clean.
- Cool and Serve: Once cooked, remove the puto from the steamer and let them cool slightly before taking them out of the molds. Serve warm or at room temperature, and enjoy your homemade puto!
Extra Tips
For the best results, make sure your ingredients are at room temperature before mixing, as this helps create a smoother batter. If you want to experiment with flavors, consider adding a bit of pandan extract or food coloring to the batter for a festive appearance.
Additionally, if you’re steaming multiple batches, keep the water at a steady boil and cover the steamer tightly to maintain the temperature. Enjoy your puto with a side of butter or a drizzle of sweetened coconut cream for an extra special treat!
Leche Flan: Creamy Caramel Custard

Leche Flan, a beloved dessert in the Philippines, is known for its rich, silky texture and the perfect balance of sweetness. This creamy caramel custard is often served during special occasions, especially during Christmas festivities, where it steals the spotlight at family gatherings. With its golden caramel topping and decadent custard base, Leche Flan is a delightful treat that evokes nostalgia and warmth.
Making Leche Flan might seem intimidating, but with a few simple ingredients and careful techniques, you can create this impressive dessert that’s certain to please your family and friends. The combination of eggs, sweetened condensed milk, and evaporated milk creates a luscious custard that melts in your mouth, while the caramel adds a rich flavor that elevates this dish to new heights. Follow this recipe to make your own Leche Flan, and experience a taste of Filipino tradition.
Ingredients (Serves 4-6):
- 1 cup granulated sugar
- 1/4 cup water
- 6 large eggs
- 1 can (14 oz) sweetened condensed milk
- 1 can (12 oz) evaporated milk
- 1 teaspoon vanilla extract
Cooking Instructions:
1. Prepare the Caramel: In a saucepan, combine the granulated sugar and water over medium heat. Stir until the sugar dissolves, then stop stirring and allow the mixture to boil until it turns a deep amber color. This will take about 8-10 minutes.
Once ready, quickly pour the caramel into a round 9-inch flan mold or individual ramekins, swirling to coat the bottom evenly before it hardens.
2. Make the Custard Mixture: In a mixing bowl, whisk the eggs gently until blended. Avoid over-whisking to prevent excess air. Add the sweetened condensed milk, evaporated milk, and vanilla extract to the eggs.
Mix until all ingredients are well combined, making sure not to create bubbles in the mixture.
3. Strain the Custard: To achieve a smooth texture, pour the custard mixture through a fine-mesh sieve into the prepared caramel-coated mold. This step removes any egg chalaza and creates a silky custard.
4. Steam the Flan: Prepare a steamer pot or a large pot with a steaming rack. Fill it with water, making certain that the water doesn’t touch the flan mold. Cover with a lid and bring the water to a gentle simmer.
Place the flan mold into the steamer and steam for about 30-40 minutes or until a toothpick inserted in the center comes out clean.
5. Cool and Unmold: Once cooked, remove the flan from the steamer and let it cool to room temperature. After cooling, refrigerate for at least 4 hours, preferably overnight.
To serve, run a knife around the edges of the flan, then carefully invert it onto a serving platter to let the caramel drizzle over the custard.
Extra Tips:
When making Leche Flan, it’s important to monitor the caramel closely to prevent burning, as it can quickly turn from perfectly caramelized to burnt.
Additionally, you can use a water bath during the steaming process to help regulate the temperature and guarantee even cooking. If you want to add a twist, consider infusing the milk with citrus zest or making a coconut version by substituting some of the evaporated milk with coconut milk for a tropical flavor.
Enjoy your homemade Leche Flan and the smiles it brings!
Buko Pandan Salad: Coconut and Pandan Dessert
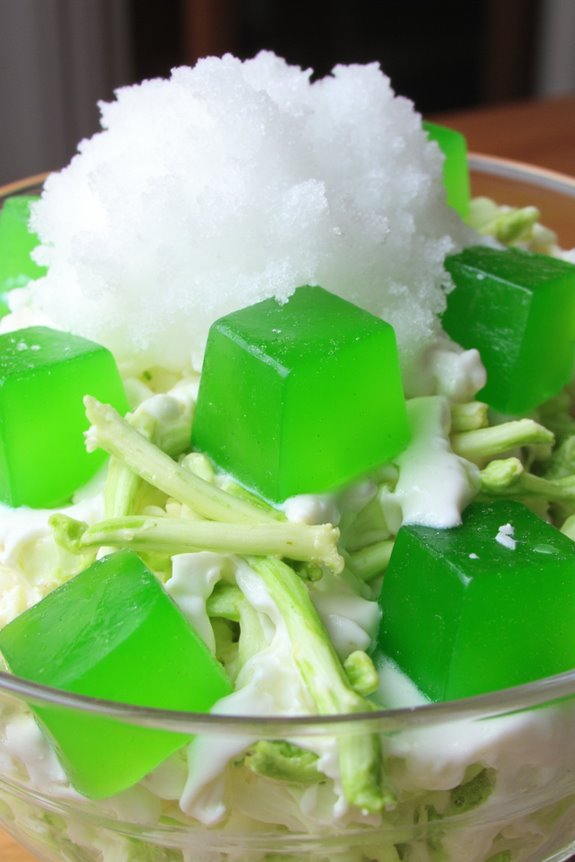
Buko Pandan Salad is a beloved Filipino dessert that combines the delightful flavors of young coconut (buko) and the fragrant pandan leaf. This invigorating treat is often served during festive occasions, particularly during Christmas celebrations, where it adds a vibrant touch to any gathering.
The dish isn’t only visually appealing, with its striking green hue from the pandan, but also offers a delightful mix of textures from the soft coconut, creamy dressing, and chewy jelly. The sweetness of the dish comes from a combination of sweetened cream and condensed milk, which complements the natural flavors of the coconut and pandan perfectly.
This dessert is versatile and can easily be adjusted to accommodate personal preferences, making it a staple for family gatherings and celebrations.
Ingredients (Serves 4-6)
- 2 cups young coconut meat, shredded
- 1 cup pandan-flavored gelatin (cut into cubes)
- 1 cup sweetened condensed milk
- 1 cup all-purpose cream
- 1 cup coconut water
- 1 teaspoon pandan extract (optional)
- 1/4 cup sugar (optional, adjust to taste)
- 1/2 cup crushed ice (for serving)
Cooking Instructions
- Prepare the Pandan Gelatin: If you’re using store-bought pandan-flavored gelatin, simply follow the package instructions to prepare it. If you’re making it from scratch, dissolve gelatin powder in boiling water and add pandan extract for flavor. Pour it into a mold and let it set in the refrigerator until firm. Once set, cut it into small cubes.
- Combine the Cream Mixture: In a large mixing bowl, combine the sweetened condensed milk and all-purpose cream. Whisk them together until well-blended and creamy. If desired, add the pandan extract for an extra layer of flavor. Taste the mixture and add sugar if additional sweetness is needed.
- Mix in the Coconut and Gelatin: Add the shredded young coconut and the pandan gelatin cubes to the cream mixture. Gently fold the ingredients together, ensuring that the coconut and gelatin are evenly distributed throughout the creamy base.
- Add Coconut Water: Pour in the coconut water and mix gently. The coconut water will help to lighten the salad and add an invigorating touch. Make sure everything is well combined but avoid over-mixing.
- Chill the Salad: Transfer the mixture into a serving bowl or individual cups. Cover it with plastic wrap or a lid, and refrigerate for at least 2 hours or until the salad is thoroughly chilled and set.
- Serve: When ready to serve, scoop out the Buko Pandan Salad into bowls, adding crushed ice on top for an invigorating twist. Enjoy it cold as a delightful dessert!
Extra Tips
For an added texture and flavor, consider incorporating fruits such as diced mango or pineapple into the salad.
You can also adjust the sweetness level according to your preference; if you prefer a less sweet dessert, reduce the amount of condensed milk or use fresh coconut water instead.
Experimenting with different types of cream, such as coconut cream, can also enhance the coconut flavor of the dish. Enjoy your Buko Pandan Salad, and don’t be afraid to get creative with the ingredients!
Turrón De Manila: Sweet Banana Rolls
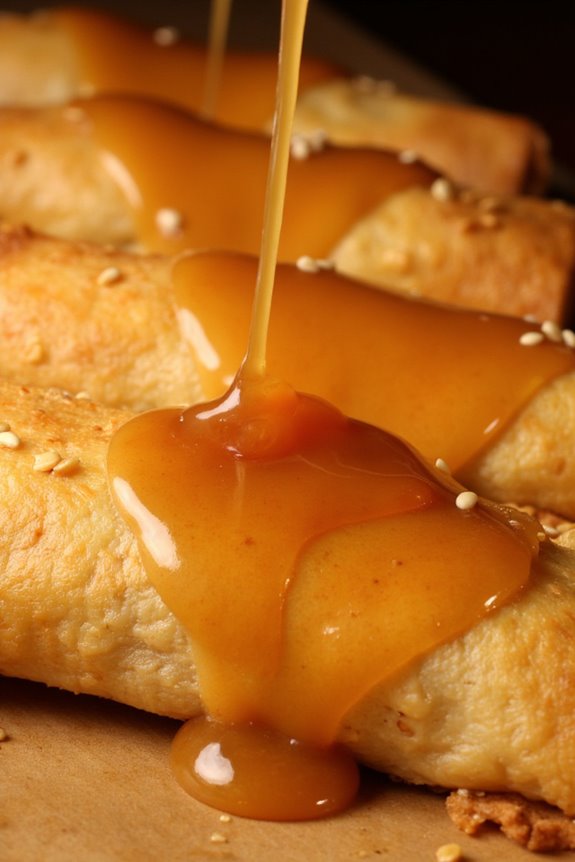
Turrón De Manila, or sweet banana rolls, is a beloved Filipino treat that brings a delightful sweetness to any holiday gathering. This dessert features ripe bananas wrapped in a thin layer of spring roll wrapper, deep-fried to achieve a crispy exterior, and then coated with a sweet caramel sauce.
Originating from the Philippines, these rolls aren’t only simple to make but also a crowd-pleaser, perfect for festive occasions or as an afternoon snack.
The beauty of Turrón De Manila lies in its versatility; you can use various fillings, but the classic version focuses on the rich flavor of ripe saba bananas. When paired with a sprinkle of sesame seeds, it adds an extra crunch and nuttiness that complements the sweetness.
This recipe is designed to serve 4-6 people, making it an ideal treat for family gatherings or holiday celebrations.
Ingredients:
- 6 pieces ripe saba bananas (or any sweet banana)
- 6-8 pieces spring roll wrappers
- 1 cup brown sugar
- 1 cup water
- 1 tablespoon sesame seeds (optional)
- Oil for frying
Cooking Instructions:
- Prepare the Bananas: Start by peeling the ripe saba bananas. Cut each banana lengthwise into halves or quarters, depending on their size and your preference for thicker or thinner rolls. The bananas should be sweet and ripe enough to provide natural sweetness to the dish.
- Assemble the Rolls: Lay a spring roll wrapper on a flat surface, with one corner facing you. Place a piece of the cut banana at the center of the wrapper. If using, sprinkle a few sesame seeds over the banana for added texture. Fold the bottom corner of the wrapper over the banana, then fold the two side corners inward, and roll it up tightly to enclose the filling. Seal the edge with a little water or egg wash to guarantee it stays closed during frying.
- Heat the Oil: In a deep frying pan, heat enough oil over medium heat to submerge the rolls. To check if the oil is ready, you can drop in a small piece of wrapper; if it sizzles, the oil is hot enough for frying.
- Fry the Rolls: Carefully add the prepared rolls to the hot oil, a few at a time, to avoid overcrowding. Fry them until they turn golden brown and crispy, which should take about 2-3 minutes per side. Once done, remove the rolls from the oil and drain them on paper towels to remove excess oil.
- Make the Caramel Sauce: In another pan, combine the brown sugar and water over medium heat. Stir until the sugar dissolves and the mixture begins to thicken, forming a syrup. This process should take about 5-7 minutes. Once the desired consistency is reached, remove from heat.
- Serve: Drizzle the warm caramel sauce over the fried banana rolls. You can also serve the rolls with a side of the caramel for dipping, and if desired, sprinkle additional sesame seeds on top for garnish.
Extra Tips:
For the best results, use ripe saba bananas as they’ve the perfect sweetness and texture for this dish. If you can’t find saba bananas, any sweet variety will do, but adjust the sugar in the caramel sauce to your taste.
When frying, guarantee the oil is at the right temperature to achieve that perfect crispy exterior without burning the rolls. You can also experiment by adding a little cinnamon or nutmeg to the brown sugar for a warm spice flavor.
Enjoy your Turrón De Manila fresh for the best taste!
Tsokolate: Filipino Hot Chocolate

Tsokolate, also known as Filipino hot chocolate, is a traditional drink that warms the heart and soul, especially during the festive Christmas season. This rich and velvety beverage is made using tablea, which are pure cocoa tablets that provide an authentic chocolate flavor. Unlike the conventional hot chocolate that often uses powdered cocoa, this recipe celebrates the unique taste of cacao that’s deeply rooted in Filipino culture.
Traditionally served in small cups, Tsokolate is often enjoyed with a side of pan de sal or other pastries, making it a delightful treat for gatherings and family celebrations.
The preparation of Tsokolate is a simple yet engaging ritual that embodies the spirit of Filipino hospitality. The process of melting the tablea and whisking it by hand creates a frothy texture that elevates the drinking experience. Whether you enjoy it plain or with added spices, Tsokolate is a must-try during the Christmas season and can easily be made at home to share with family and friends.
Ingredients (Serves 4-6):
- 200g tablea (Filipino cacao tablets)
- 4 cups water
- 1 cup milk (whole or evaporated, based on preference)
- 1/4 cup sugar (adjust to taste)
- 1 teaspoon vanilla extract (optional)
- A pinch of salt
- Ground cinnamon or nutmeg (optional, for garnish)
Cooking Instructions:
- Prepare the Ingredients: Gather all your ingredients and equipment. You’ll need a saucepan, a wooden spoon or whisk, and a heat source. This preparation guarantees that you have everything at hand and can maintain a smooth cooking process.
- Boil the Water: In a medium saucepan, bring 4 cups of water to a boil over medium heat. This is the base for your Tsokolate, and boiling the water will help dissolve the tablea more effectively.
- Add the Tablea: Once the water is boiling, add the 200g of tablea to the pot. Allow it to simmer for a few minutes, stirring occasionally to help the tablea dissolve completely. This step is essential as it assures the chocolate flavor is fully infused into the water.
- Incorporate Milk and Sugar: After the tablea has fully dissolved, add 1 cup of milk and 1/4 cup of sugar to the mixture. Stir well until the sugar is dissolved and the mixture is combined. This will give your Tsokolate a creamy and sweet flavor, balancing the bitterness of the cacao.
- Add Flavorings: If desired, add 1 teaspoon of vanilla extract and a pinch of salt to enhance the flavor. Stir these ingredients in, allowing them to meld with the chocolate. For an extra touch, you can also sprinkle in some ground cinnamon or nutmeg for a festive twist.
- Whisk to Froth: Remove the saucepan from heat and use a whisk or a traditional “batu” (wooden stirring stick) to whisk the Tsokolate vigorously until frothy. This step adds a delightful texture to the drink and makes it even more enjoyable.
- Serve and Enjoy: Pour the Tsokolate into small cups and serve warm. You can garnish with a sprinkle of cinnamon or nutmeg if desired. Enjoy your delicious Filipino hot chocolate with some pan de sal or your favorite holiday snacks.
Extra Tips:
For the best flavor, use high-quality tablea, which can be found at Filipino markets or online. If you like your Tsokolate richer, you can substitute some of the water with additional milk.
Experimenting with flavors is also encouraged; consider adding a dash of chili powder for a spicy kick or trying different sweeteners like honey or condensed milk. This beverage can be made in larger batches and kept warm in a slow cooker for holiday gatherings, guaranteeing that your guests can enjoy it throughout the celebration!