

When it comes to cozy nights, nothing beats the comfort of a homemade meal. Think steaming bowls of wonton noodle soup and the delightful aroma of beef and broccoli stir-fry filling your kitchen. These recipes are more than just food; they’re like a warm hug after a busy day. If you’re in need of some soothing flavors, I’ve gathered a collection of recipes that will bring the essence of your favorite Chinese takeout right to your home. Get ready for some delicious inspiration that will make your evenings extra special.
Wonton Noodle Soup
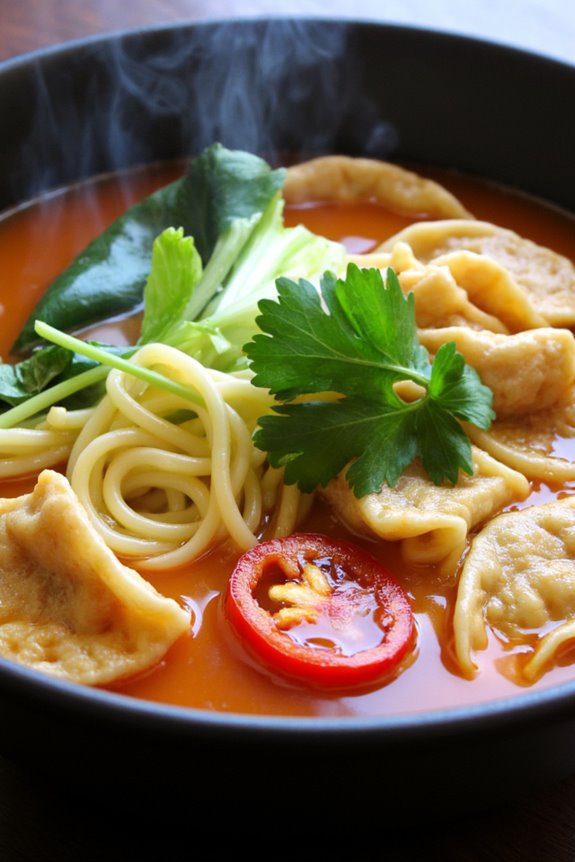
Wonton Noodle Soup is a comforting and flavorful dish that embodies the essence of Chinese cuisine. It’s a delightful combination of tender wontons, savory broth, and springy noodles that will warm your heart and satisfy your hunger. The beauty of this dish lies in its versatility; you can customize the fillings of the wontons and adjust the broth to your liking.
Perfect for chilly evenings or when you need a pick-me-up, this soup is a classic that never fails to impress. To make the wonton noodle soup even more special, consider garnishing it with fresh herbs, scallions, or even a splash of sesame oil for an added depth of flavor. This recipe isn’t only delicious but also a fun and engaging project to undertake in the kitchen, making it a wonderful dish to share with family and friends.
Whether you’re an experienced cook or a beginner, you’ll find joy in creating this delightful meal.
Ingredients (Serves 4-6):
- 1 package (12 ounces) wonton wrappers
- 1 pound ground pork
- 1/4 cup chopped green onions
- 2 tablespoons soy sauce
- 1 tablespoon sesame oil
- 1 teaspoon grated ginger
- 1 teaspoon garlic, minced
- 6 cups chicken broth
- 8 ounces egg noodles
- 2 cups baby bok choy or spinach
- Salt and pepper to taste
- Fresh cilantro, for garnish
- Sliced chili peppers, for garnish (optional)
Instructions:
1. Prepare the Wontons: In a large mixing bowl, combine the ground pork, chopped green onions, soy sauce, sesame oil, grated ginger, minced garlic, and a pinch of salt and pepper. Mix well until all ingredients are thoroughly combined.
Place a teaspoon of the filling in the center of each wonton wrapper. Moisten the edges with water, fold the wrapper over to form a triangle, and press to seal. Then, bring the two corners of the triangle together and pinch to secure. Repeat until all wontons are filled.
2. Make the Broth: In a large pot, bring the chicken broth to a boil over medium heat. Once boiling, reduce the heat to low and let it simmer for about 10 minutes to develop the flavor. You can add additional seasonings such as more soy sauce or salt to taste if needed.
3. Cook the Noodles: While the broth is simmering, bring a separate pot of water to boil. Add the egg noodles and cook according to package instructions until they’re al dente. Drain and rinse under cold water to stop the cooking process. Set aside.
4. Cook the Wontons: Once the broth is simmering, gently add the wontons to the pot. Cook them for about 5-7 minutes or until they float to the top and are cooked through. Use a slotted spoon to carefully remove the wontons and set them aside.
5. Add the Vegetables: In the same broth, add the baby bok choy or spinach and let it cook for about 2-3 minutes until wilted and tender.
6. Assemble the Soup: To serve, place a portion of cooked noodles in each bowl, followed by a few wontons. Ladle the hot broth and vegetables over the top. Garnish with fresh cilantro and sliced chili peppers if desired.
Extra Tips:
When making wonton noodle soup, feel free to experiment with the filling ingredients. You can use shrimp, chicken, or even vegetables for a meatless version.
Additionally, if you prefer a richer broth, consider adding a splash of soy sauce or a dash of fish sauce for depth. This soup is best enjoyed fresh, but you can store leftovers in the refrigerator for a day or two—just reheat gently on the stove. Enjoy your homemade wonton noodle soup!
Beef and Broccoli Stir-Fry
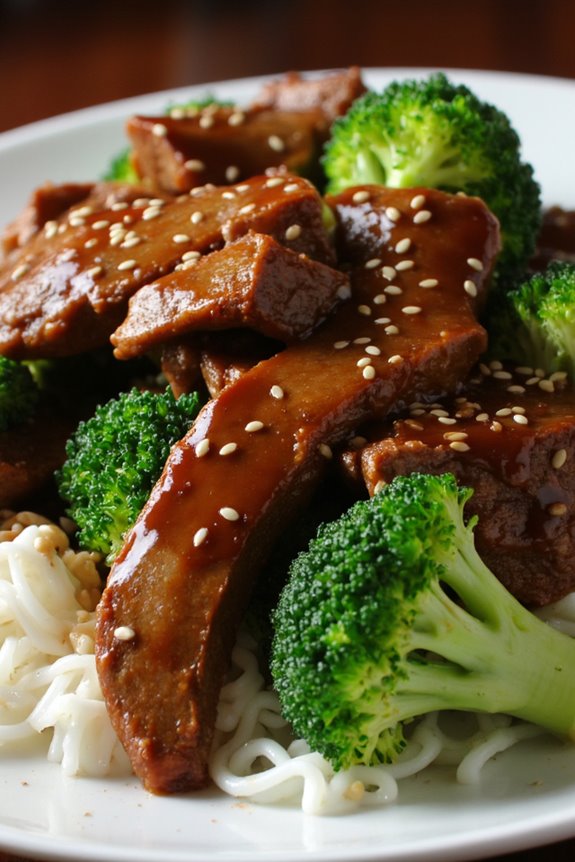
Beef and Broccoli Stir-Fry is a classic Chinese dish that brings together tender strips of beef and vibrant, crunchy broccoli in a savory sauce. This dish isn’t only quick to prepare but also packed with flavor and nutrients, making it a perfect choice for a cozy dinner. The combination of beef and broccoli isn’t only delicious but also provides a well-balanced meal that can be served over rice or noodles for a satisfying experience.
To make this dish, you’ll want to select high-quality beef, such as flank steak or sirloin, for maximum tenderness. The key to a successful stir-fry is to cook the ingredients quickly over high heat, allowing the meat to sear while keeping the vegetables crisp. With a few simple ingredients and easy steps, you can create a delightful Beef and Broccoli Stir-Fry that will impress your family and friends.
Ingredients (Serves 4-6):
- 1 pound flank steak or sirloin, thinly sliced against the grain
- 4 cups broccoli florets
- 1 tablespoon vegetable oil
- 3 cloves garlic, minced
- 1 tablespoon ginger, minced
- 1/4 cup soy sauce
- 2 tablespoons oyster sauce
- 1 tablespoon cornstarch
- 1/2 cup beef broth
- 1 tablespoon sesame oil
- Cooked rice or noodles for serving
- Sesame seeds for garnish (optional)
Cooking Instructions:
- Prepare the Beef: Begin by thinly slicing the flank steak or sirloin against the grain to promote tenderness. This step is significant as it helps to break down the muscle fibers, making the beef easier to chew. Once sliced, set it aside in a mixing bowl.
- Marinate the Beef: In the mixing bowl with the sliced beef, add the soy sauce, oyster sauce, and cornstarch. Mix well to coat the meat evenly and let it marinate for about 15 minutes. This will enhance the flavors and help tenderize the beef.
- Blanch the Broccoli: While the beef is marinating, bring a pot of water to a boil. Add the broccoli florets and blanch them for about 2-3 minutes until they turn bright green and are slightly tender. Drain and immediately transfer them to a bowl of ice water to stop the cooking process. This helps retain the vibrant color and crunchiness of the broccoli.
- Stir-Fry the Beef: In a large skillet or wok, heat the vegetable oil over medium-high heat. Once the oil is hot, add the marinated beef in a single layer, allowing it to sear without overcrowding the pan. Cook for about 2-3 minutes until the beef is browned, then remove it from the skillet and set aside.
- Cook the Aromatics: In the same skillet, add the minced garlic and ginger. Sauté for about 30 seconds until fragrant, being careful not to burn them. This step infuses the oil with flavor and forms the base of your stir-fry.
- Combine Ingredients: Return the cooked beef to the skillet along with the blanched broccoli. Stir everything together to combine. In a separate bowl, mix the beef broth and sesame oil, then pour this mixture over the beef and broccoli. Stir well to coat everything in the sauce.
- Finish Cooking: Continue to cook for another 2-3 minutes, allowing the sauce to thicken slightly and coat the beef and broccoli. Taste and adjust seasoning if necessary.
- Serve: Remove from heat and serve the Beef and Broccoli Stir-Fry over cooked rice or noodles. Garnish with sesame seeds if desired for an extra touch.
Extra Tips:
When making Beef and Broccoli Stir-Fry, it’s important to have all your ingredients prepped and ready to go before you start cooking, as the process moves quickly.
For added flavor, consider using marbled beef for a richer taste or adding a splash of rice wine or a bit of chili paste for some heat. Additionally, feel free to customize the recipe by including other vegetables such as bell peppers or carrots, which can add color and nutrition to your dish.
Enjoy your cozy dinner!
Chicken Lo Mein
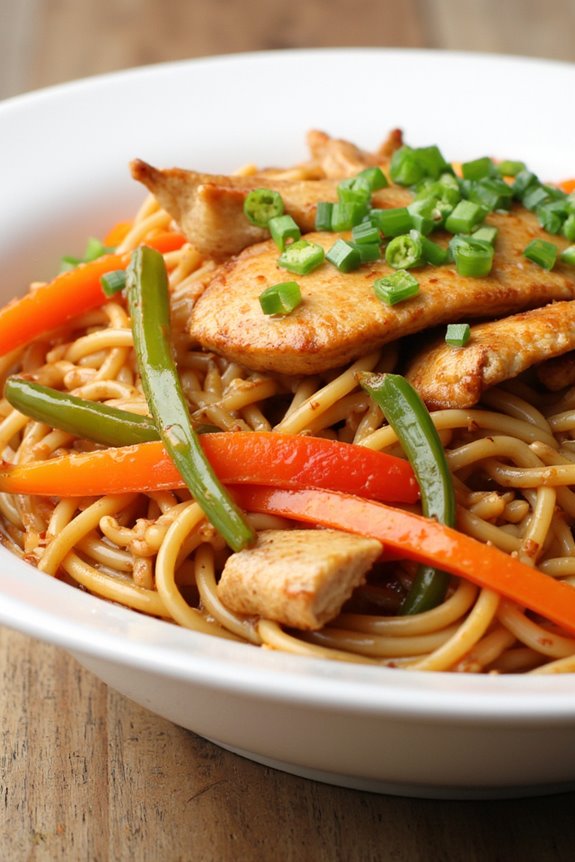
Chicken Lo Mein is a classic Chinese dish that brings together tender chicken, fresh vegetables, and chewy noodles in a savory sauce. It’s a favorite for many due to its comforting flavors and vibrant colors. This dish isn’t only easy to prepare but also a great way to enjoy a hearty meal that feels like dining out right in the comfort of your home.
Whether you’re cooking for a family dinner or entertaining friends, Chicken Lo Mein is sure to impress with its delicious taste and appealing presentation.
Making Chicken Lo Mein is a straightforward process, perfect for both novice and experienced cooks. With a few simple ingredients and a little bit of time, you can whip up a delightful dish that showcases the best of Chinese cuisine.
The key to achieving the perfect Lo Mein lies in the balance of flavors and the cooking technique, guaranteeing that the noodles are coated in the savory sauce and that the chicken and vegetables are cooked to perfection.
Ingredients (Serves 4-6):
- 12 oz. Lo Mein noodles
- 1 lb. boneless, skinless chicken breast, thinly sliced
- 2 tablespoons vegetable oil
- 2 cups mixed vegetables (such as bell peppers, carrots, and snap peas)
- 3 cloves garlic, minced
- 2 green onions, chopped
- ¼ cup soy sauce
- 2 tablespoons oyster sauce
- 1 tablespoon sesame oil
- 1 tablespoon cornstarch
- 1 tablespoon water
- Salt and pepper to taste
Cooking Instructions:
- Cook the Lo Mein Noodles: Begin by boiling a large pot of water. Add the Lo Mein noodles and cook according to the package instructions, usually around 4-5 minutes until al dente. Drain and rinse under cold water to stop the cooking process. This also prevents the noodles from sticking together.
- Prepare the Chicken: While the noodles are cooking, slice the chicken breast into thin strips. Season with salt and pepper. This step is essential as it enhances the flavor of the chicken, making it more delicious once cooked.
- Stir-Fry the Chicken: In a large skillet or wok, heat 2 tablespoons of vegetable oil over medium-high heat. Add the sliced chicken and cook for about 5-7 minutes until it’s browned and cooked through. Remove the chicken from the skillet and set aside. This technique guarantees that the chicken is juicy and flavorful.
- Sauté the Vegetables: In the same skillet, add a bit more oil if necessary, then toss in the minced garlic and mixed vegetables. Stir-fry for about 3-4 minutes until the vegetables are tender but still crisp. This step adds freshness and color to the dish while preserving the nutrients in the vegetables.
- Combine Everything: Return the cooked chicken to the skillet with the vegetables. Add the cooked Lo Mein noodles. In a small bowl, mix the soy sauce, oyster sauce, sesame oil, cornstarch, and water together to create a sauce. Pour this sauce over the noodle mixture and toss everything together until well coated. This guarantees that every ingredient is flavored perfectly.
- Finish with Green Onions: Finally, add the chopped green onions and stir everything together for an additional minute. This step adds a lovely crunch and fresh flavor to the dish.
Extra Tips:
When making Chicken Lo Mein, feel free to customize the dish with your favorite vegetables or even add some cooked shrimp or tofu for variety.
Confirm that your ingredients are prepped before you start cooking, as stir-frying is a quick process. Also, for an extra kick, consider adding a dash of chili sauce or red pepper flakes to the sauce mixture.
This dish is best enjoyed fresh, but leftovers can be stored in the refrigerator for up to 2 days—just reheat gently. Enjoy your homemade Chicken Lo Mein!
Hot and Sour Soup
Hot and Sour Soup is a classic Chinese dish known for its bold flavors and comforting warmth. This soup is a perfect balance of heat from white pepper and tanginess from vinegar, making it a delightful starter or a meal on its own. Traditionally made with a variety of ingredients, including mushrooms, tofu, and bamboo shoots, this soup isn’t only delicious but also packed with nutrients.
Preparing Hot and Sour Soup at home is quite simple, and with a few basic ingredients, you can create a flavorful bowl that rivals those from your favorite Chinese restaurant. The combination of textures, from the silky tofu to the crunchy bamboo shoots, makes every spoonful a satisfying experience.
Whether you’re hosting a cozy dinner or enjoying a quiet night in, this soup is sure to warm your heart and soul.
Ingredients (Serves 4-6)
- 6 cups chicken or vegetable broth
- 1 cup sliced shiitake mushrooms
- 1 cup firm tofu, diced
- 1 cup bamboo shoots, julienned
- 1 cup shredded carrots
- 2 tablespoons soy sauce
- 2 tablespoons rice vinegar
- 1 tablespoon cornstarch mixed with 2 tablespoons water
- 1 teaspoon white pepper
- 2 large eggs, lightly beaten
- 2 green onions, chopped
- Salt to taste
- Optional: chili oil for serving
Cooking Instructions
- Prepare the Broth: In a large pot, bring the chicken or vegetable broth to a boil over medium-high heat. This base will be the foundation of your soup and should be flavorful, so choose a good quality broth.
- Add Vegetables: Once the broth is boiling, add the sliced shiitake mushrooms, bamboo shoots, and shredded carrots. Reduce the heat to medium and let the vegetables cook for about 5 minutes, allowing them to soften and infuse their flavors into the broth.
- Incorporate Tofu: Gently stir in the diced tofu and let it simmer for an additional 3-4 minutes. Tofu is delicate, so be careful to avoid breaking it apart too much. This step helps the tofu absorb the soup’s flavors.
- Season the Soup: Stir in the soy sauce, rice vinegar, and white pepper. The vinegar will provide that signature tanginess, while the white pepper adds the necessary heat. Taste the broth and adjust the seasoning with salt if needed.
- Thicken the Soup: Slowly add the cornstarch mixture to the pot while stirring continuously. This will thicken the soup just enough to give it a nice, velvety texture. Let it simmer on low for another 2-3 minutes until it reaches your desired consistency.
- Add the Eggs: Slowly pour the beaten eggs into the soup while stirring gently. This will create beautiful, delicate strands of egg throughout the soup. Allow it to cook for another minute until the eggs are fully cooked.
- Garnish and Serve: Finally, stir in the chopped green onions just before serving. Ladle the soup into bowls and offer chili oil on the side for those who like a little extra heat.
Extra Tips
To enhance the flavor of your Hot and Sour Soup, consider adding a few drops of sesame oil just before serving for an extra layer of depth. Additionally, you can adjust the balance of hot and sour by modifying the amount of white pepper and vinegar according to your taste preference.
If you prefer a heartier soup, feel free to add proteins like shredded chicken or shrimp. Enjoy your cozy dinner!
Kung Pao Chicken
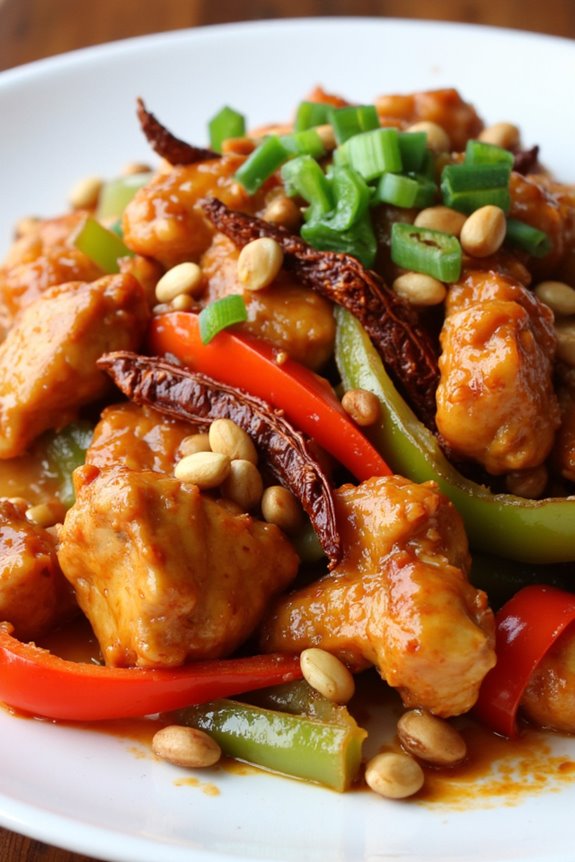
Kung Pao Chicken is a classic Sichuan dish that perfectly balances flavors of savory, spicy, and slightly sweet, making it a favorite in Chinese cuisine. This dish features tender chicken pieces stir-fried with peanuts, vegetables, and a delicious sauce that includes soy sauce, rice vinegar, and hoisin sauce. A hallmark of Kung Pao Chicken is its vibrant colors and textures, making it not only a delight to the palate but also pleasing to the eye.
To create an authentic Kung Pao Chicken at home, you’ll want to gather all your ingredients beforehand and have everything prepped, as stir-frying is a quick cooking method. The key to achieving the best flavor is to marinate the chicken and prepare the sauce before you begin cooking. This allows the chicken to absorb all those wonderful flavors, resulting in a dish that’s both aromatic and satisfying.
Ingredients (Serves 4-6):
- 1 lb boneless, skinless chicken breasts, diced into bite-sized pieces
- 3 tablespoons soy sauce
- 2 tablespoons rice vinegar
- 1 tablespoon hoisin sauce
- 1 tablespoon cornstarch
- 2 tablespoons vegetable oil
- 1 red bell pepper, diced
- 1 green bell pepper, diced
- 1 small onion, diced
- 3 cloves garlic, minced
- 1 inch ginger, minced
- 1/2 cup unsalted roasted peanuts
- 2-3 dried red chilies (adjust to taste)
- 1/4 cup scallions, chopped (for garnish)
- Salt and pepper, to taste
Cooking Instructions:
- Marinate the Chicken: In a mixing bowl, combine the diced chicken with 2 tablespoons of soy sauce, 1 tablespoon of rice vinegar, and 1 tablespoon of cornstarch. Mix well to coat the chicken evenly. Cover the bowl and let it marinate for at least 20 minutes while you prepare the other ingredients.
- Prepare the Sauce: In a small bowl, whisk together the remaining 1 tablespoon of soy sauce, 1 tablespoon of rice vinegar, and 1 tablespoon of hoisin sauce. Set aside. This sauce will give your dish its distinct flavor.
- Heat the Oil: In a large wok or skillet, heat 2 tablespoons of vegetable oil over medium-high heat. Make sure the oil is hot but not smoking, as you want to achieve a nice sear on the chicken.
- Cook the Chicken: Add the marinated chicken to the hot oil in a single layer. Sauté for about 5-7 minutes until the chicken is golden brown and cooked through. Make sure to stir occasionally for even cooking. Once cooked, remove the chicken from the pan and set it aside.
- Stir-fry the Vegetables: In the same wok, add the diced red and green bell peppers, onion, garlic, and ginger. Stir-fry for about 3-4 minutes until the vegetables are tender but still crisp.
- Combine Ingredients: Return the cooked chicken to the wok with the vegetables. Add the dried red chilies and the prepared sauce. Toss everything together over high heat for another 2-3 minutes, ensuring that the chicken and vegetables are well-coated with the sauce.
- Add Peanuts and Garnish: Stir in the roasted peanuts and mix until well combined. Taste and adjust seasoning with salt and pepper if necessary. Remove from heat and garnish with chopped scallions.
- Serve: Transfer the Kung Pao Chicken to a serving dish and serve hot over steamed rice or noodles.
Extra Tips:
For an authentic taste, consider using Sichuan peppercorns in addition to or instead of the dried red chilies, which will add a unique numbing spice that’s characteristic of Sichuan cuisine.
Additionally, feel free to customize the vegetables based on your preference or what you have on hand. Broccoli or snap peas can be great additions.
Finally, to enhance the flavor, let the dish sit for a few minutes after cooking; this allows the flavors to meld together beautifully. Enjoy your homemade Kung Pao Chicken!
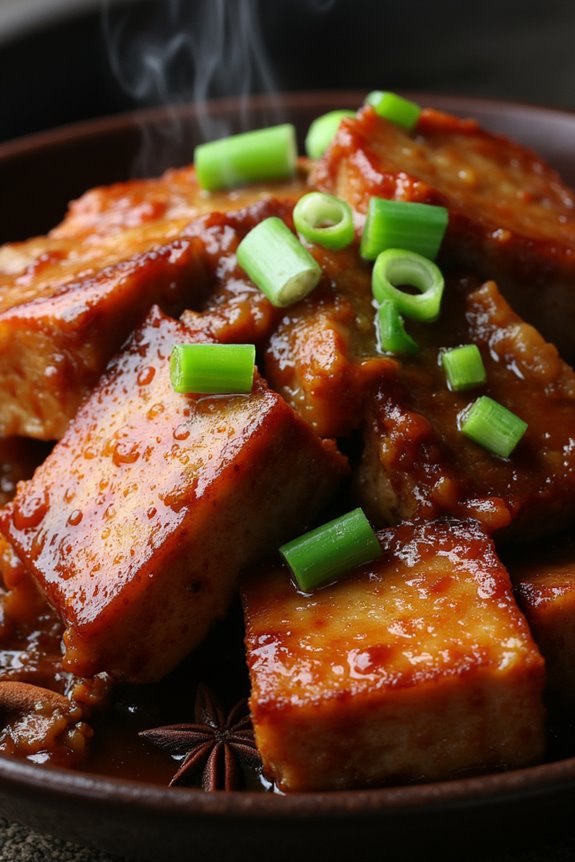
Mapo Tofu
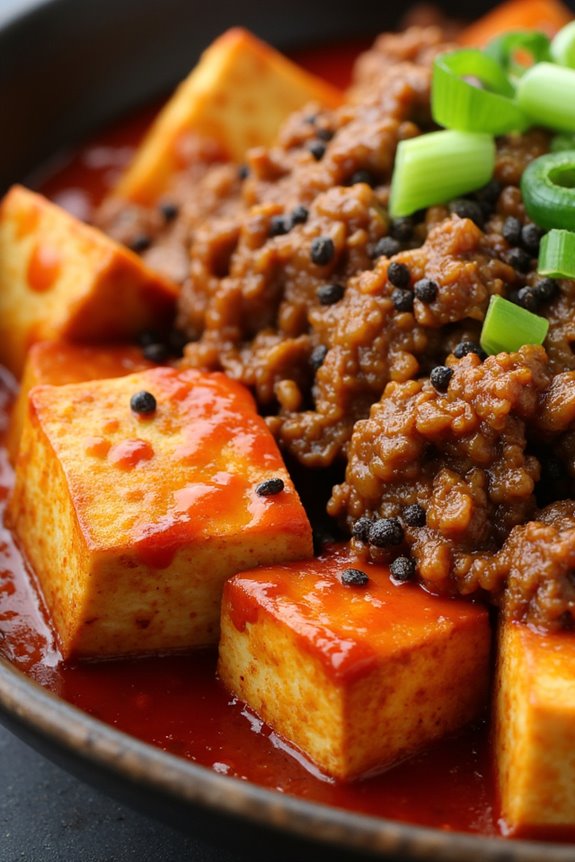
Mapo Tofu is a beloved dish from Sichuan cuisine that combines the silky texture of tofu with a spicy, flavorful sauce. The dish is known for its characteristic numbing heat, which comes from Sichuan peppercorns, and is often cooked with ground pork or beef, making it a hearty and satisfying option for dinner.
The combination of flavors and textures makes Mapo Tofu a star in any cozy Chinese dinner spread, perfect for family gatherings or intimate meals with friends. This dish isn’t only flavorful but also quick to prepare, making it an ideal choice for busy weeknights.
With the right ingredients and a few simple steps, you can create a delicious Mapo Tofu that will impress your guests and warm your heart. The key to a great Mapo Tofu lies in the balance of spices and the quality of the tofu, so be sure to use fresh ingredients for the best results.
Ingredients (Serves 4-6)
- 14 oz (400g) firm tofu
- ½ lb (225g) ground pork (or beef, optional)
- 2 tablespoons vegetable oil
- 2 tablespoons doubanjiang (Sichuan chili bean paste)
- 1 tablespoon douchi (fermented black beans), rinsed and chopped
- 1 tablespoon soy sauce
- 1 tablespoon rice wine (Shaoxing wine)
- 2 teaspoons sugar
- 1 teaspoon Sichuan peppercorns, crushed
- 2 cloves garlic, minced
- 1-inch piece ginger, minced
- 1 cup chicken or vegetable broth
- 1 tablespoon cornstarch mixed with 2 tablespoons water
- 3 green onions, chopped (for garnish)
- Cooked rice (for serving)
Cooking Instructions
- Prepare the tofu: Start by draining the firm tofu and cutting it into bite-sized cubes. To enhance the texture and flavor, you can blanch the tofu in boiling water for about 2-3 minutes. This step helps to firm it up and remove any excess moisture. Once blanched, drain the tofu and set it aside.
- Cook the ground meat: In a large skillet or wok, heat the vegetable oil over medium-high heat. Add the ground pork (or beef if using) and cook until it’s browned and cooked through, breaking it apart with a spatula as it cooks. This should take about 5-7 minutes.
- Add aromatics and seasonings: Once the meat is browned, add the minced garlic, ginger, and crushed Sichuan peppercorns to the skillet. Stir-fry for about 30 seconds until fragrant. Then, mix in the doubanjiang and douchi, stirring well to coat the meat and release their flavors.
- Incorporate liquids: Add the soy sauce, rice wine, and sugar to the skillet, followed by the chicken or vegetable broth. Bring the mixture to a gentle simmer, allowing the flavors to meld together for about 5 minutes.
- Add the tofu: Gently add the prepared tofu cubes to the skillet, being careful not to break them. Stir gently to coat the tofu in the sauce and allow it to simmer for another 5 minutes, letting the tofu absorb the flavors.
- Thicken the sauce: After simmering, stir in the cornstarch mixture to the skillet. This will help thicken the sauce. Cook for an additional 2-3 minutes until the sauce reaches your desired consistency.
- Garnish and serve: Once the sauce has thickened, remove the skillet from heat. Garnish the Mapo Tofu with chopped green onions. Serve hot, alongside steamed rice to soak up the delicious sauce.
Extra Tips
When preparing Mapo Tofu, feel free to adjust the level of spiciness to suit your taste. If you prefer a milder dish, reduce the amount of doubanjiang.
For a more authentic flavor, consider using freshly ground Sichuan peppercorns and high-quality tofu. Additionally, this dish can be made vegetarian by omitting the meat and using mushrooms as a substitute, ensuring that all flavors are balanced.
Enjoy your cooking adventure and savor the warmth of this delightful dish!
Egg Drop Soup
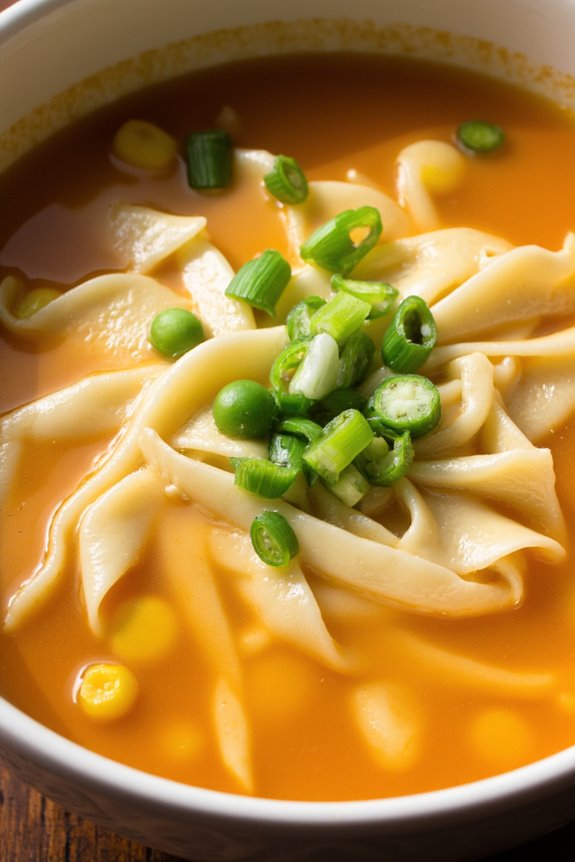
Egg Drop Soup is a classic Chinese dish that’s both comforting and easy to prepare. This velvety soup is known for its delicate strands of egg floating in a light, flavorful broth. Traditionally served as a starter in Chinese restaurants, it’s perfect for a cozy dinner at home. The ingredients are simple and typically include chicken broth, cornstarch, and eggs, which come together in a matter of minutes to create a dish that warms both the belly and the spirit.
Making Egg Drop Soup is a straightforward process, making it an excellent option for those new to Chinese cooking or anyone looking for a quick meal. The beauty of this recipe lies in its versatility; you can customize it by adding vegetables like peas, corn, or scallions for added flavor and nutrition. Whether enjoyed on a chilly evening or as a light appetizer, this Egg Drop Soup is sure to please.
Ingredients (Serves 4-6):
- 4 cups chicken broth
- 2 tablespoons cornstarch
- 2 tablespoons water
- 3 large eggs
- 1 teaspoon soy sauce
- ½ teaspoon sesame oil
- ¼ teaspoon white pepper (or to taste)
- 2 green onions, chopped (for garnish)
- Optional: ½ cup frozen peas or corn
Cooking Instructions:
1. Prepare the Broth:
In a medium saucepan, bring 4 cups of chicken broth to a gentle boil over medium heat. This serves as the base of your soup, providing rich flavor.
2. Mix Cornstarch Slurry:
In a small bowl, combine 2 tablespoons of cornstarch with 2 tablespoons of water. Stir until smooth. This mixture will help thicken your soup, giving it a lovely texture.
3. Thicken the Broth:
Once the broth is boiling, slowly pour in the cornstarch slurry while continuously stirring. This will prevent lumps from forming. Allow the broth to simmer for about 2 minutes until it thickens slightly.
4. Add Seasonings:
Stir in the soy sauce, sesame oil, and white pepper. These ingredients enhance the flavor of the broth and add a lovely depth to the soup.
5. Create the Egg Ribbons:
In a separate bowl, beat the 3 large eggs lightly. Reduce the heat to low and slowly drizzle the beaten eggs into the simmering broth while stirring gently in a circular motion. This will create beautiful egg ribbons.
6. Add Optional Vegetables:
If desired, add ½ cup of frozen peas or corn to the soup for added color, texture, and nutrition. Allow it to heat through for an additional 1-2 minutes.
7. Garnish and Serve:
Remove the soup from heat and ladle it into bowls. Garnish with chopped green onions before serving to add a fresh, vibrant touch.
Extra Tips:
When preparing Egg Drop Soup, it’s essential to add the beaten eggs slowly and stir gently to achieve those signature ribbons.
If you prefer a richer flavor, consider using homemade chicken broth or adding a small amount of minced ginger while heating the broth.
Additionally, adjusting the seasonings like soy sauce and white pepper allows you to cater the soup to your personal taste preferences.
Enjoy experimenting with additional ingredients, such as tofu or mushrooms, to make this dish your own!
Mongolian Beef
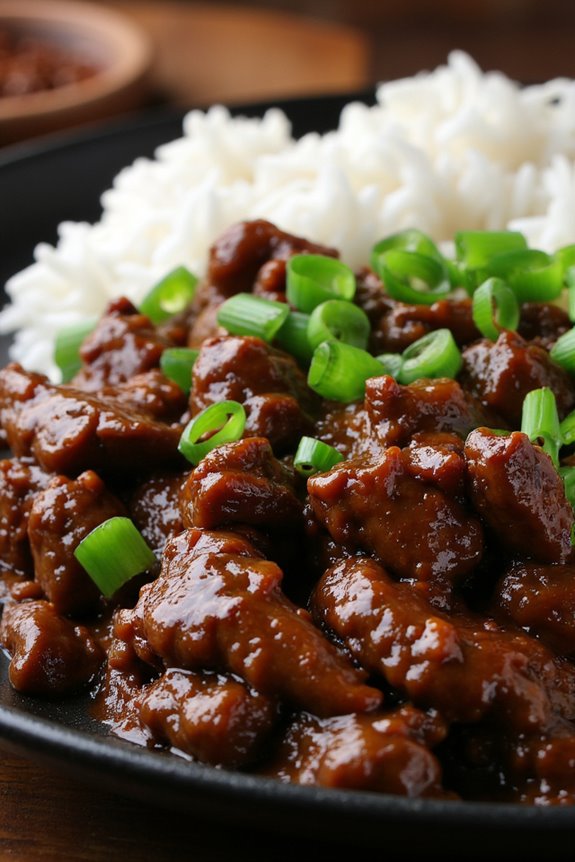
Mongolian Beef is a savory and slightly sweet dish that has become a favorite in many Chinese-American restaurants. This recipe features tender strips of beef that are marinated and stir-fried to perfection, then tossed with green onions in a rich sauce. The combination of soy sauce, brown sugar, and ginger gives the dish its distinct flavor, making it a cozy and satisfying meal for any occasion.
Whether served over a bed of steaming rice or alongside some crispy vegetables, Mongolian Beef is sure to please your family and friends.
To achieve the perfect balance of flavors and textures, it’s crucial to select the right cut of beef and to marinate it properly. Flank steak or sirloin are excellent choices due to their tenderness and ability to absorb the marinade. The quick cooking method ensures that the beef remains juicy while creating a delectable sauce that coats each piece. This recipe serves 4-6 people, making it a great option for family dinners or gatherings.
Ingredients:
- 1 ½ pounds flank steak, thinly sliced against the grain
- ¼ cup soy sauce
- ¼ cup brown sugar
- 1 tablespoon cornstarch
- 2 tablespoons vegetable oil
- 3-4 green onions, chopped
- 3 cloves garlic, minced
- 1 teaspoon fresh ginger, minced
- 1 tablespoon sesame oil
- ½ teaspoon black pepper
- Cooked rice for serving
Cooking Instructions:
- Marinate the Beef: In a mixing bowl, combine the sliced flank steak, soy sauce, brown sugar, and black pepper. Toss to coat the beef evenly and allow it to marinate for 30 minutes to 1 hour. This step infuses the beef with flavor and tenderizes it.
- Prepare the Cornstarch: After marinating, sprinkle the cornstarch over the beef and mix well until each piece is lightly coated. This will help create a nice crust on the beef when stir-frying and will thicken the sauce.
- Heat the Oil: In a large skillet or wok, heat the vegetable oil over medium-high heat. Confirm the oil is hot before adding the beef, as this will help to sear the meat and lock in its juices.
- Stir-Fry the Beef: Add the marinated and coated beef to the hot skillet in a single layer. Allow it to cook without stirring for about 1-2 minutes to develop a nice sear. Then stir-fry for an additional 3-4 minutes until the beef is browned and cooked through.
- Add Aromatics: Once the beef is cooked, add the minced garlic, ginger, and half of the chopped green onions to the skillet. Stir-fry for another minute until fragrant, being careful not to burn the garlic.
- Finish the Sauce: Drizzle the sesame oil over the beef mixture and stir well to combine. If desired, you can add a splash of water or additional soy sauce to create more sauce for the dish.
- Serve: Remove the skillet from heat and transfer the Mongolian Beef to a serving platter. Garnish with the remaining chopped green onions and serve hot over cooked rice.
Extra Tips:
For an even more authentic flavor, consider adding a splash of rice vinegar to the sauce for a hint of acidity. You can also customize the dish by incorporating vegetables such as bell peppers or broccoli for added nutrition and color.
If you have leftovers, store them in an airtight container in the refrigerator for up to three days; simply reheat in the microwave or skillet before serving again. Enjoy your cozy Mongolian Beef dinner!
Vegetable Fried Rice
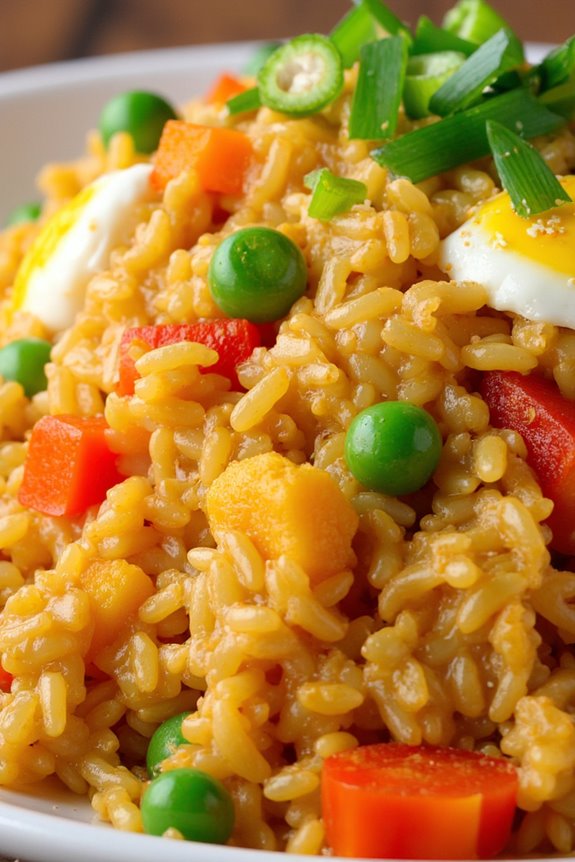
Vegetable Fried Rice is a delightful and versatile dish that brings together the wonderful flavors of fresh vegetables and perfectly cooked rice, all tossed together in a savory sauce. This dish isn’t only a fantastic way to use up leftover rice, but it also makes for a quick, satisfying meal that’s perfect for busy weeknights or cozy family dinners.
With its vibrant colors and textures, Vegetable Fried Rice is sure to please vegetarians and meat-lovers alike. In addition to being delicious, Vegetable Fried Rice is incredibly customizable. You can easily adapt the recipe to include whatever vegetables you have on hand or prefer, making it an ideal dish for using up seasonal produce or leftovers from your fridge.
Paired with soy sauce and sesame oil, this dish brings out the natural flavors of the vegetables while creating a rich and comforting meal that satisfies any craving.
Ingredients (serving size: 4-6 people)
- 4 cups cooked rice (preferably day-old)
- 2 tablespoons vegetable oil
- 1 cup diced carrots
- 1 cup frozen peas
- 1 cup bell peppers, diced (any color)
- 1 cup green onions, chopped
- 3 cloves garlic, minced
- 2 tablespoons soy sauce
- 1 tablespoon sesame oil
- Salt and pepper, to taste
- Optional: 2 eggs, beaten (for added protein)
Cooking Instructions
- Prepare the Rice: If you haven’t done so already, cook your rice according to package instructions and let it cool, preferably in the refrigerator overnight. Day-old rice works best as it’s drier and less sticky, which helps achieve that perfect fried rice texture.
- Heat the Oil: In a large wok or non-stick skillet, heat the vegetable oil over medium-high heat. Allow the oil to become hot but not smoking, which is vital for a nice stir-fry.
- Sauté the Aromatics: Add the minced garlic to the hot oil and sauté for about 30 seconds until fragrant, stirring constantly to prevent burning. This will infuse the oil with a delicious garlic flavor.
- Cook the Vegetables: Add the diced carrots and bell peppers to the wok. Stir-fry for about 3-4 minutes until they start to soften. Then, add the frozen peas and continue to stir-fry for another 2 minutes. This step guarantees that all the vegetables are cooked evenly while maintaining some crunch.
- Add the Rice: Once the vegetables are tender, add the cooked rice to the skillet. Use a spatula to break up any clumps and mix everything together thoroughly. Stir-fry for about 3-5 minutes, allowing the rice to heat through and absorb the flavors of the vegetables.
- Season the Dish: Drizzle the soy sauce and sesame oil over the rice mixture, stirring well to coat evenly. Taste and add salt and pepper as needed. If you want to include eggs, push the rice mixture to one side of the pan, pour the beaten eggs into the empty side, and scramble them until fully cooked, then mix into the rice.
- Finish and Serve: Once everything is well combined and heated through, remove the skillet from the heat. Garnish with chopped green onions before serving.
Extra Tips
For the best flavor and texture, always use day-old rice, as freshly cooked rice can become mushy when fried. You can experiment with different vegetables based on your preference or seasonal availability—broccoli, zucchini, and bean sprouts are great additions.
Additionally, feel free to customize your sauce by adding a splash of oyster sauce, hoisin sauce, or a pinch of chili flakes for some heat. Don’t forget to serve your Vegetable Fried Rice with extra soy sauce or chili sauce on the side for those who enjoy a little extra flavor!
Sweet and Sour Pork
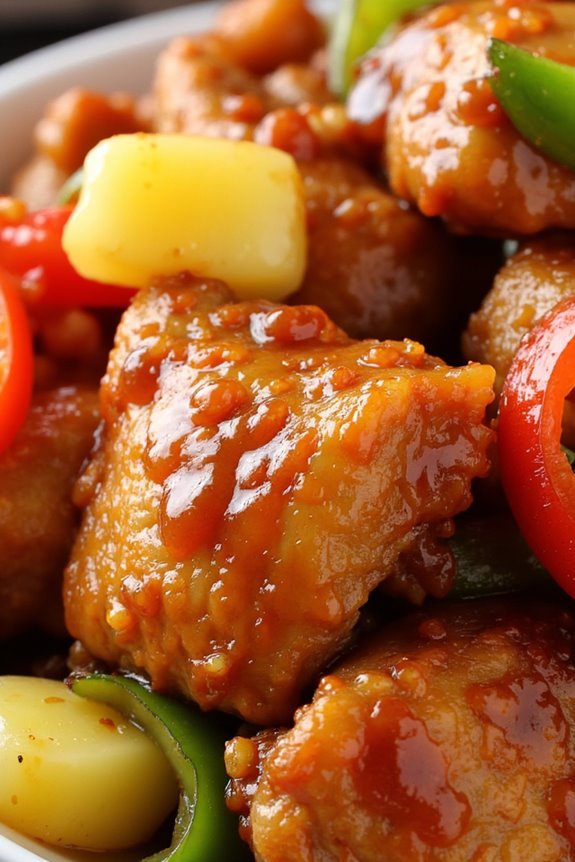
Sweet and Sour Pork is a classic Chinese dish that tantalizes the taste buds with its vibrant colors and a perfect balance of flavors. The dish features succulent pieces of pork that are coated in a light batter, deep-fried to a crispy golden brown, and then tossed in a tangy sweet and sour sauce made with pineapple, bell peppers, and onions.
This dish isn’t only a feast for the eyes but also a wonderful addition to any cozy dinner table, offering a delightful contrast of textures and tastes that everyone will love.
Making Sweet and Sour Pork at home is easier than you might think, and it brings a sense of authenticity to your dining experience. The key to achieving that restaurant-quality flavor lies in marinating the pork and ensuring that the sauce is perfectly balanced.
Whether you’re cooking for family or hosting friends, this dish is sure to impress and will leave everyone craving for more.
Ingredients (serves 4-6):
- 1 pound pork tenderloin, cut into bite-sized pieces
- 1/4 cup cornstarch
- 1/4 cup all-purpose flour
- 1 egg, beaten
- 1/2 cup vegetable oil (for frying)
- 1 bell pepper (red or green), diced
- 1 onion, diced
- 1 cup pineapple chunks (fresh or canned)
- 1/4 cup sugar
- 1/4 cup vinegar (white or rice vinegar)
- 1/4 cup ketchup
- 1 tablespoon soy sauce
- Salt and pepper to taste
Cooking Instructions:
- Marinate the Pork: In a bowl, place the bite-sized pieces of pork tenderloin. Add a pinch of salt and pepper to season, then let it sit for about 15-20 minutes to absorb the flavors. This step enhances the taste of the pork.
- Prepare the Batter: In a separate bowl, mix the cornstarch and flour together. Dip each piece of marinated pork into the beaten egg, allowing any excess to drip off, then coat it thoroughly in the cornstarch and flour mixture. This batter will give the pork a crispy texture when fried.
- Fry the Pork: Heat the vegetable oil in a large skillet or wok over medium-high heat. Once the oil is hot, carefully add the coated pork pieces in batches, making sure not to overcrowd the pan. Fry until golden brown and crispy, around 4-5 minutes per batch. Use a slotted spoon to remove the pork and drain it on paper towels.
- Stir-Fry the Vegetables: In the same skillet, remove excess oil, leaving about 1 tablespoon. Add the diced bell pepper and onion to the pan. Stir-fry for about 3-4 minutes until they’re slightly tender but still crisp. This adds flavor and texture to the dish.
- Make the Sauce: In a small bowl, combine the pineapple chunks, sugar, vinegar, ketchup, and soy sauce. Mix well until the sugar dissolves. Pour the sauce into the skillet with the vegetables and stir to combine. Let it simmer for a couple of minutes to thicken the sauce.
- Combine Everything: Add the fried pork back into the skillet. Toss everything together, ensuring that the pork is well coated with the sweet and sour sauce. Cook for another 2-3 minutes to heat through.
- Serve: Transfer the Sweet and Sour Pork to a serving dish and enjoy it hot, garnished with additional pineapple or sesame seeds if desired.
Extra Tips:
To make your Sweet and Sour Pork even more delightful, you can add additional vegetables such as snap peas or carrots for added crunch and nutrition.
If you prefer a thicker sauce, you can mix a teaspoon of cornstarch with a tablespoon of water and stir it into the sauce while simmering. Additionally, feel free to adjust the sweetness or sourness to your liking by varying the amounts of sugar and vinegar in the sauce.
Enjoy your cooking adventure!
Chinese Braised Pork Belly
Chinese Braised Pork Belly, also known as “Hong Shao Rou,” is a beloved dish in Chinese cuisine that showcases the rich and savory flavors of slow-cooked pork. The tender, melt-in-your-mouth pork belly is bathed in a luscious sauce made from soy sauce, sugar, and aromatic spices. This dish is perfect for a cozy dinner with family or friends, as it pairs beautifully with steamed rice and vegetables, making it a comforting and satisfying meal.
The secret to an unforgettable Braised Pork Belly lies in the careful balance of flavors and the slow cooking process, which allows the meat to absorb the delicious sauce fully. The dish not only highlights the natural sweetness of the pork but also delivers a depth of flavor that comes from braising it with ginger, garlic, and star anise. This comforting recipe is sure to warm your heart and satisfy your taste buds.
Ingredients (Serves 4-6):
- 2 lbs pork belly, cut into 1-inch cubes
- 2 tablespoons vegetable oil
- 4 slices ginger
- 4 cloves garlic, smashed
- 2 tablespoons sugar (preferably rock sugar)
- 1/4 cup soy sauce
- 1/4 cup dark soy sauce
- 1/2 cup Shaoxing wine (Chinese cooking wine)
- 2 cups water
- 2 star anise
- 1 cinnamon stick
- 2 green onions, chopped (for garnish)
Cooking Instructions:
- Prepare the Pork Belly: Start by cutting the pork belly into 1-inch cubes. This size allows for even cooking and guarantees that the flavors penetrate the meat effectively. Rinse the pork pieces under cold water and pat them dry with paper towels to remove excess moisture.
- Sear the Pork: In a large, heavy-bottomed pot or Dutch oven, heat the vegetable oil over medium-high heat. Once the oil is hot, add the pork belly cubes in a single layer, making sure not to overcrowd the pot. Sear the pork for about 5-7 minutes until the edges are browned and crispy. This step adds depth of flavor through caramelization.
- Add Aromatics: Once the pork is seared, add the ginger and garlic to the pot. Stir-fry for about 1-2 minutes until fragrant. This will infuse the dish with aromatic flavors that complement the richness of the pork.
- Incorporate Sugar and Sauces: Sprinkle the sugar over the pork and stir well to combine. Allow the sugar to melt and caramelize slightly, which will enhance the sauce’s sweetness. Then, pour in the soy sauce, dark soy sauce, and Shaoxing wine, stirring to coat the pork evenly.
- Add Liquid and Spices: Pour in the water until the pork is just covered. Add the star anise and cinnamon stick, which will contribute a warm, aromatic note to the dish. Bring the mixture to a boil, then reduce the heat to low.
- Braise the Pork: Cover the pot and let the pork simmer gently for about 1.5 to 2 hours. Stir occasionally to guarantee even cooking and prevent sticking. The low and slow cooking method allows the pork to become tender and absorb all the flavors.
- Final Adjustments: After the braising time, check the sauce’s consistency. If it’s too thin, remove the lid and cook on medium heat for an additional 15-20 minutes to reduce the sauce to your desired thickness. Taste and adjust seasoning if necessary.
- Serve: Once the pork belly is tender and the sauce has thickened, remove from heat. Serve hot, garnished with chopped green onions, alongside steamed rice or vegetables to soak up the delicious sauce.
Extra Tips: For an even richer flavor, consider using a mix of both light and dark soy sauce to achieve a beautiful color and depth in taste. Be sure to keep an eye on the pot while braising to prevent it from drying out; if necessary, add a bit more water to maintain the liquid level. Leftovers, if you have any, taste even better the next day as the flavors continue to meld together!
Scallion Pancakes

Scallion pancakes, also known as Cong You Bing, are a delightful staple in Chinese cuisine, characterized by their flaky texture and savory flavor. The process of creating these crispy, golden-brown pancakes involves layering dough with fresh scallions, which infuses each bite with a burst of aromatic taste. Ideal as an appetizer or side dish, scallion pancakes can also be enjoyed with a simple dipping sauce for an added flavor kick.
Making scallion pancakes at home is a rewarding experience that allows you to enjoy a restaurant-quality dish right from your kitchen. With just a few ingredients, you can create a comforting and satisfying dish that’s perfect for sharing with family and friends. Whether you’re a seasoned cook or a novice in the kitchen, this recipe will guide you through the steps to achieve the perfect scallion pancakes.
Ingredients (serving size: 4-6 people):
- 2 cups all-purpose flour
- 3/4 cup boiling water
- 1/2 teaspoon salt
- 1/4 cup vegetable oil (for frying)
- 1/2 cup scallions, finely chopped
- Additional salt, to taste
Cooking Instructions:
1. Make the Dough:
In a mixing bowl, combine 2 cups of all-purpose flour and 1/2 teaspoon of salt. Gradually add 3/4 cup of boiling water to the flour mixture while stirring with a fork or chopsticks. Once the dough starts to come together, use your hands to knead it until it’s smooth and elastic, about 5-7 minutes.
Cover the dough with a damp cloth and let it rest for at least 30 minutes. This resting period allows the gluten to relax, making the dough easier to roll out.
2. Prepare the Filling:
While the dough is resting, finely chop 1/2 cup of scallions. Set them aside to be used later as the filling for the pancakes. If desired, sprinkle a little additional salt over the scallions to enhance their flavor.
3. Roll Out the Dough:
After the resting period, divide the dough into 4 equal portions. On a clean, floured surface, take one portion and roll it out into a thin circle, approximately 8-10 inches in diameter. The thinner you roll it, the flakier your pancakes will be.
4. Add the Scallions:
Brush the rolled-out dough with a thin layer of vegetable oil, then evenly sprinkle a portion of the chopped scallions over the surface. Starting from one edge, roll the dough tightly into a log.
Once rolled, coil the log into a spiral shape, tucking the end underneath. Gently flatten the spiral with your palm, then roll it out again into a circle, about 1/2 inch thick.
5. Fry the Pancakes:
In a large skillet or frying pan, heat 1/4 cup of vegetable oil over medium heat. Once hot, carefully place one pancake in the skillet. Fry for about 3-4 minutes on each side, or until it’s golden brown and crispy.
Repeat this process with the remaining pancakes, adding more oil as needed.
6. Serve:
Once cooked, remove the pancakes from the pan and place them on a paper towel to absorb excess oil. Cut each pancake into wedges and serve warm with a dipping sauce made of soy sauce, rice vinegar, and a hint of sesame oil if desired.
Extra Tips:
For the best texture, make sure to use boiling water when preparing the dough, as it helps create a softer and more pliable consistency. You can also experiment with different fillings, such as sesame seeds or spices, to add your unique flair.
If you have leftover pancakes, they can be stored in an airtight container in the refrigerator and reheated in a skillet for a quick snack. Enjoy the process and don’t hesitate to make adjustments based on your taste preferences!