

When it comes to comfort food, Filipino rice recipes always hold a special place in my heart. They’re more than just meals; they’re experiences that bring everyone together. From the fragrant Sinangag to the rich and hearty Arroz Caldo, each dish has a unique charm. If you’re looking to elevate your daily meals with something truly satisfying, you’re in for a treat. Let’s explore these delightful recipes that beautifully capture the essence of Filipino flavors and traditions.
Sinangag (Garlic Fried Rice)
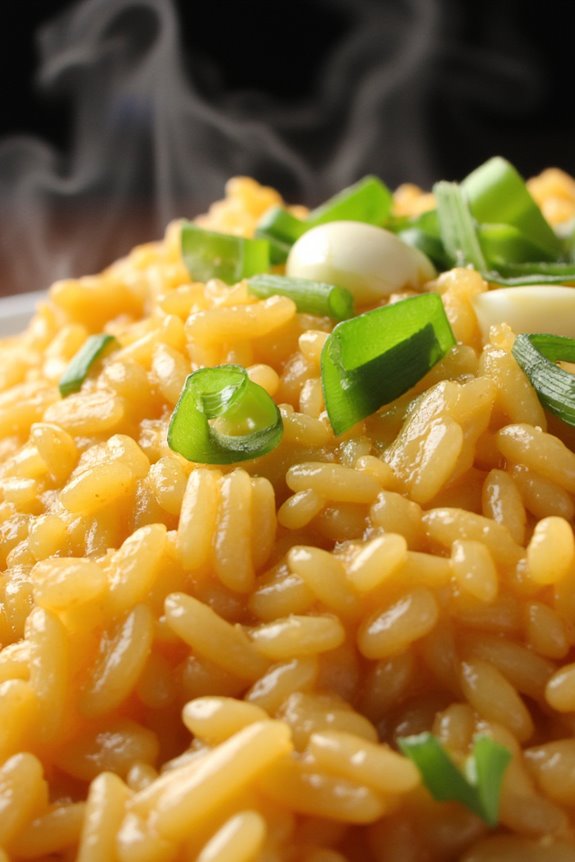
Sinangag, or Garlic Fried Rice, is a beloved staple in Filipino cuisine, often served as a side dish for breakfast alongside eggs, tocino, longganisa, or other protein-rich meals. This fragrant and flavorful rice dish is typically made from leftover rice, making it a practical way to avoid food waste while transforming plain rice into something irresistible.
The star of the dish is, of course, the garlic, which infuses the rice with its aromatic essence and adds a delightful crunch when sautéed to perfection. The beauty of Sinangag lies in its simplicity and versatility. While the basic recipe calls for just a handful of ingredients, feel free to customize it by adding vegetables, meats, or even spices to suit your taste.
Whether enjoyed as a hearty breakfast or a comforting side dish, Sinangag is sure to satisfy and bring a taste of the Philippines to your table.
Ingredients (serving size: 4-6 people):
- 4 cups cooked jasmine rice (preferably day-old)
- 6-8 cloves garlic, minced
- 2-3 tablespoons vegetable oil
- Salt, to taste
- Pepper, to taste
- 2 green onions, chopped (optional, for garnish)
Cooking Instructions:
- Prepare the Rice: If using leftover rice, break up any clumps to guarantee even cooking. If using freshly cooked rice, allow it to cool and dry out slightly before using. Day-old rice is ideal since it has less moisture, making it less sticky.
- Heat the Oil: In a large skillet or wok, heat the vegetable oil over medium heat. Confirm the oil is hot enough before adding the garlic to make sure it fries and becomes golden without burning.
- Sauté the Garlic: Add the minced garlic to the hot oil. Stir constantly for about 1-2 minutes, or until the garlic is golden brown and fragrant. Be careful not to let it burn, as burnt garlic can impart a bitter flavor to the dish.
- Add the Rice: Once the garlic is ready, add the cooked rice to the skillet. Use a spatula to break apart any remaining clumps and mix the rice thoroughly with the garlic and oil.
- Season the Rice: Sprinkle salt and pepper over the rice to taste. Continue to sauté for about 5-7 minutes, stirring occasionally, until the rice is heated through and slightly crispy.
- Garnish and Serve: If desired, add the chopped green onions for a fresh garnish. Serve hot as a side dish or enjoy it on its own.
Extra Tips:
For an extra layer of flavor, consider adding a splash of soy sauce or oyster sauce while sautéing the rice. You can also incorporate leftover meats or vegetables to make it a complete meal.
Be sure to adjust the seasoning according to your preferences, and always taste as you go to achieve the perfect balance of flavors. Enjoy your Sinangag as part of a traditional Filipino breakfast or any time you crave a delicious and comforting dish!
Arroz Caldo (Chicken Rice Porridge)

Arroz Caldo, a comforting Filipino rice porridge, is a beloved dish often enjoyed during cold weather or when someone is feeling under the weather. This hearty meal features tender chicken simmered in a savory broth, combined with glutinous rice that thickens to create a creamy consistency.
Traditionally served with a garnish of fried garlic, green onions, and a squeeze of lime or calamansi, this dish is both nourishing and satisfying. The roots of Arroz Caldo can be traced back to the Chinese congee, showcasing the fusion of culinary traditions in Filipino cuisine.
It’s often enhanced with various toppings, allowing each cook to personalize their version. Whether enjoyed as a breakfast staple or a comforting dinner, Arroz Caldo warms both the body and soul, making it a staple in many Filipino households.
Ingredients (Serves 4-6):
- 1 cup glutinous rice
- 1 lb chicken (cut into pieces)
- 6 cups chicken broth or water
- 1 medium onion (finely chopped)
- 4 cloves garlic (minced)
- 1 thumb-sized ginger (sliced into strips)
- 2 tablespoons fish sauce
- 2 tablespoons cooking oil
- Salt and pepper to taste
- 2 green onions (chopped, for garnish)
- Fried garlic (for garnish)
- Lime or calamansi (for serving)
Cooking Instructions:
- Prepare the Rice: Rinse the glutinous rice under cold water until the water runs clear. This helps remove excess starch and prevents the rice from becoming overly sticky. Drain well and set aside.
- Sauté Aromatics: In a large pot, heat the cooking oil over medium heat. Add the chopped onions, minced garlic, and sliced ginger. Sauté until the onions become translucent and fragrant, about 3-5 minutes. This step builds a flavorful base for your porridge.
- Cook the Chicken: Add the chicken pieces to the pot and stir to combine with the sautéed aromatics. Cook until the chicken is no longer pink, about 5 minutes. Season with fish sauce, salt, and pepper to enhance the chicken’s flavor.
- Add Liquid and Rice: Pour in the chicken broth (or water) and bring to a boil. Once boiling, add the rinsed glutinous rice. Stir well to prevent the rice from sticking to the bottom of the pot.
- Simmer: Reduce the heat to low, cover the pot, and let it simmer for about 30-40 minutes, stirring occasionally. The rice will absorb the liquid and thicken the porridge. If it becomes too thick, you can add more broth or water to reach your desired consistency.
- Adjust Seasoning: Taste the Arroz Caldo and adjust the seasoning with additional salt and pepper if needed. Once the chicken is tender and the porridge has reached your desired thickness, it’s ready to serve.
- Serve and Garnish: Ladle the Arroz Caldo into bowls and garnish with chopped green onions and fried garlic. Serve with lime or calamansi on the side for squeezing over the porridge for a fresh, zesty flavor.
Extra Tips:
For an extra layer of flavor, consider adding additional toppings such as hard-boiled eggs or fried tofu. You can also customize the spice level by adding a bit of chili or pepper flakes according to your preference.
If you have leftover Arroz Caldo, it can be refrigerated and reheated, but you may need to add a splash of water or broth to loosen it up since it thickens as it cools. Enjoy this warm and hearty dish any time you crave comfort food!
Lomi (Filipino Egg Noodle Soup)

Lomi is a beloved Filipino comfort food that’s perfect for any occasion. This hearty egg noodle soup isn’t only filling but also packed with flavors from a medley of ingredients including meat, vegetables, and a savory broth.
Originating from the Chinese influence in the Philippines, Lomi has evolved over the years to incorporate local tastes and ingredients, making it a staple dish that can be found in many Filipino households and restaurants.
The beauty of Lomi lies in its versatility; you can customize it to your liking by adding different types of meats or vegetables. The thick, rich sauce coats the egg noodles perfectly, creating a satisfying meal that’s both delicious and comforting.
Whether enjoyed on a rainy day or served at a family gathering, Lomi is sure to warm your heart and satisfy your hunger.
Ingredients (Serves 4-6):
- 300g egg noodles
- 200g chicken breast, diced
- 200g pork belly, sliced into thin strips
- 1 cup shrimp, peeled and deveined
- 4 cups chicken broth
- 2 tablespoons soy sauce
- 2 tablespoons oyster sauce
- 1 tablespoon cornstarch, dissolved in 2 tablespoons water
- 1 medium onion, chopped
- 3 cloves garlic, minced
- 1 medium carrot, julienned
- 1 cup cabbage, shredded
- 2 green onions, chopped
- Salt and pepper to taste
- Cooking oil for sautéing
Cooking Instructions:
- Prepare the Noodles: Cook the egg noodles according to package instructions. Drain and set aside. This step guarantees that the noodles are ready to absorb the flavors of the broth later on.
- Sauté the Aromatics: In a large pot, heat a tablespoon of cooking oil over medium heat. Add the chopped onion and minced garlic, sautéing until they become fragrant and the onion is translucent. This step builds the base flavor for the soup.
- Cook the Meats: Add the diced chicken breast and sliced pork belly to the pot. Cook until the meats are browned and cooked through, about 5-7 minutes. This helps to lock in the flavors of the meat before adding the broth.
- Add the Shrimp: Stir in the shrimp and cook for another 2-3 minutes until they turn pink. This step adds a seafood element to the dish, enhancing the overall flavor profile.
- Pour in the Broth: Add the chicken broth to the pot, along with soy sauce and oyster sauce. Bring the mixture to a boil, then reduce the heat and let it simmer for about 10 minutes. This allows the flavors to meld together beautifully.
- Thicken the Sauce: Slowly stir in the cornstarch mixture to the soup while continuously stirring. This will help thicken the broth to the desired consistency, making it more sauce-like.
- Add Vegetables: Add the julienned carrots and shredded cabbage to the pot. Simmer for another 5 minutes until the vegetables are tender but still crisp. This adds color, nutrition, and texture to the dish.
- Combine with Noodles: Finally, add the cooked egg noodles to the pot and stir to combine everything well. Allow it to heat through for a couple of minutes. This step guarantees that the noodles are well coated with the flavorful broth.
- Season and Serve: Taste the soup and adjust the seasoning with salt and pepper as needed. Garnish with chopped green onions before serving. Enjoy your homemade Lomi!
Extra Tips:
For an extra depth of flavor, consider adding a splash of fish sauce or a pinch of white pepper to the broth.
If you prefer a spicier kick, feel free to toss in some sliced chili peppers or a dash of hot sauce. Lomi can also be made ahead of time; just reheat gently before serving, as the noodles may absorb some of the broth.
Enjoy your delicious bowl of Lomi!
Biko (Sweet Rice Cake)
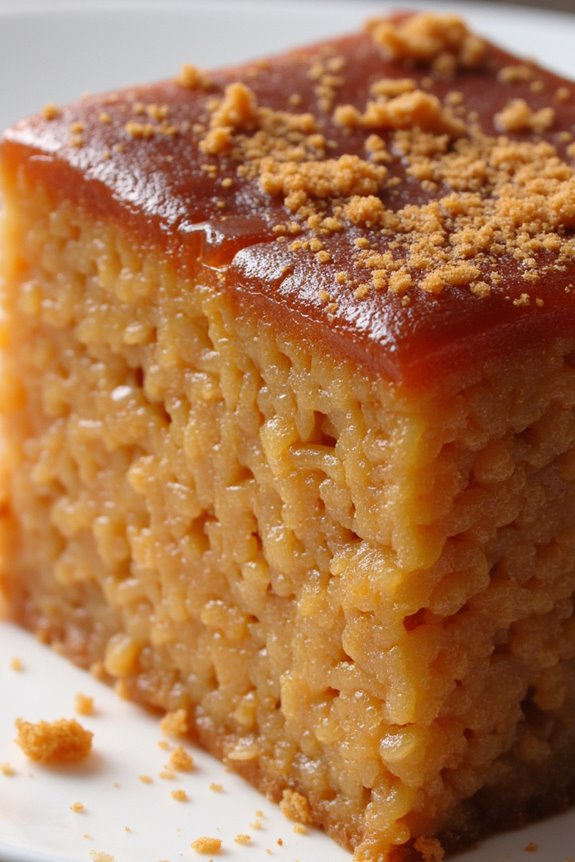
Biko, a traditional Filipino sweet rice cake, is a beloved dessert that showcases the rich flavors of glutinous rice, coconut milk, and brown sugar. This delectable treat is often served during special occasions, family gatherings, or simply enjoyed as a snack. Its sticky, chewy texture and sweet, rich taste make it a favorite among both children and adults alike.
Often topped with latik, which is made from coconut cream, Biko not only satisfies your sweet tooth but also offers a glimpse into Filipino culinary traditions.
Making Biko is a straightforward process, but it requires some patience as you’ll need to cook the rice properly and allow it to set. The combination of glutinous rice and coconut milk gives the dish its unique flavor and texture, while the brown sugar provides a deep sweetness that complements the creaminess of the coconut. Once you master this recipe, you can enjoy homemade Biko anytime, bringing a taste of the Philippines right to your kitchen.
Ingredients (Serves 4-6):
- 2 cups glutinous rice
- 1 can (400ml) coconut milk
- 1 cup brown sugar
- 1/2 teaspoon salt
- 1/2 cup water
- 1/2 cup latik (optional, for topping)
Cooking Instructions:
- Prepare the Glutinous Rice: Rinse the glutinous rice thoroughly under cold water until the water runs clear. This removes excess starch and guarantees the rice cooks evenly. After rinsing, soak the rice in water for at least 4 hours or overnight for best results. Drain before cooking.
- Cook the Rice: In a large pot or rice cooker, combine the soaked glutinous rice and 1/2 cup of water. Cook according to your rice cooker’s instructions, or if using a pot, bring to a boil, then reduce to low heat. Cover and simmer until the rice is fully cooked and the water is absorbed, about 20-25 minutes. Fluff the rice with a fork once done.
- Make the Coconut Mixture: In a separate saucepan, combine the coconut milk, brown sugar, and salt. Cook over medium heat, stirring constantly until the sugar dissolves, and the mixture starts to thicken slightly, about 10-15 minutes. Be careful not to let it boil over.
- Combine Rice and Coconut Mixture: Once the coconut mixture is ready, add the cooked glutinous rice to the saucepan. Stir well to combine the rice and coconut mixture, assuring that the rice is evenly coated. Cook for an additional 5-10 minutes, stirring occasionally until the mixture becomes thick and sticky.
- Transfer to a Baking Dish: Grease a square or rectangular baking dish with a bit of coconut oil or butter. Pour the Biko mixture into the dish, spreading it evenly with a spatula. Smooth the top with the spatula to create a flat surface.
- Cool and Serve: Allow the Biko to cool at room temperature for about 30 minutes. If you’re using latik, sprinkle it on top before serving. Cut into squares or rectangles and serve warm or at room temperature.
Extra Tips:
When making Biko, using freshly grated coconut can enhance the flavor even more, but if that’s not available, canned coconut milk works perfectly.
Adjust the sweetness to your liking by adding more or less brown sugar. Additionally, for a unique twist, consider adding toppings like toasted sesame seeds or shredded coconut.
Store any leftovers in an airtight container in the refrigerator and reheat before serving for the best taste and texture. Enjoy your homemade Biko!
Sinigang Na Baboy (Pork Sinigang With Rice)
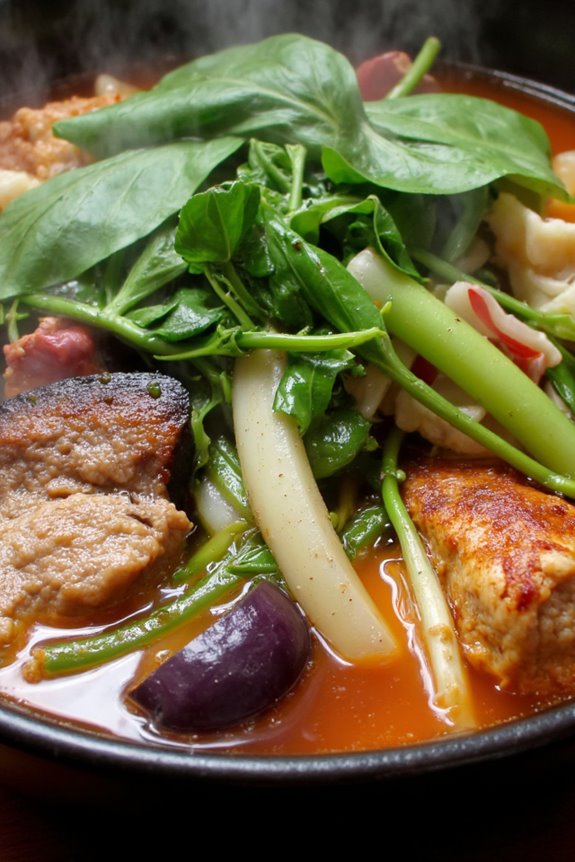
Sinigang na Baboy, or Pork Sinigang, is a beloved Filipino sour soup characterized by its savory and tangy flavor profile. This dish is traditionally made with pork, a variety of vegetables, and a souring agent such as tamarind or kamias. Served over steamed rice, Sinigang is a comforting meal that warms the heart and soul. The combination of tender pork, fresh vegetables, and a sour broth makes it a staple in Filipino households, often enjoyed during family gatherings or rainy days.
The beauty of Sinigang lies in its versatility; you can customize it by adding your favorite vegetables or adjusting the sourness to your liking. While the classic version utilizes tamarind, some variations may use other souring agents like green mango or calamansi. This recipe will guide you through making a delicious Pork Sinigang served with rice, perfect for 4-6 people.
Ingredients:
- 1.5 lbs pork belly or pork ribs
- 8 cups water
- 1 medium onion, quartered
- 2 medium tomatoes, quartered
- 1 cup tamarind paste or 1-2 cups fresh tamarind (if using fresh, adjust quantity based on desired sourness)
- 1-2 green chili peppers (optional)
- 1 radish (labanos), sliced
- 1 cup eggplant, sliced
- 1 cup long green beans (sitaw), cut into 2-inch pieces
- 1 cup water spinach (kangkong) or other leafy greens
- Salt and pepper to taste
- Steamed white rice, for serving
Cooking Instructions:
- Prepare the Pork: In a large pot, combine the pork and water. Bring it to a boil over medium-high heat. Skim off any foam that rises to the surface to guarantee a clear broth. This initial step helps in creating a clean and flavorful base for your Sinigang.
- Add Aromatics: Once the broth is boiling and the foam is removed, add the quartered onions and tomatoes to the pot. These ingredients will impart a rich flavor to the broth as they simmer. Lower the heat and let it simmer for about 30 minutes or until the pork is tender.
- Incorporate the Tamarind: If using fresh tamarind, you should first boil the tamarind in a separate pot with water until soft, then strain it to extract the juice. If using tamarind paste, stir it directly into the simmering broth. Adjust the sourness according to your preference. Allow it to simmer for an additional 10 minutes to blend the flavors.
- Add Vegetables: Add the radish, eggplant, and long green beans to the pot. Continue to simmer for about 5-7 minutes, or until the vegetables are tender but still crisp. If you prefer, you can add green chili peppers at this stage for a hint of spice.
- Finish with Leafy Greens: Finally, stir in the water spinach or other leafy greens. Cook for an additional 2-3 minutes until the greens are wilted and tender. Season with salt and pepper to taste.
- Serve: Ladle the Sinigang into bowls and serve hot over steamed white rice. Enjoy the comforting and savory flavors of this classic Filipino dish!
Extra Tips: When making Sinigang, feel free to experiment with different types of vegetables based on what’s in season or available in your pantry. Other great additions include taro (gabi), okra, or even adding a splash of fish sauce for added depth of flavor.
Pinakbet Rice (Vegetable Rice Dish)
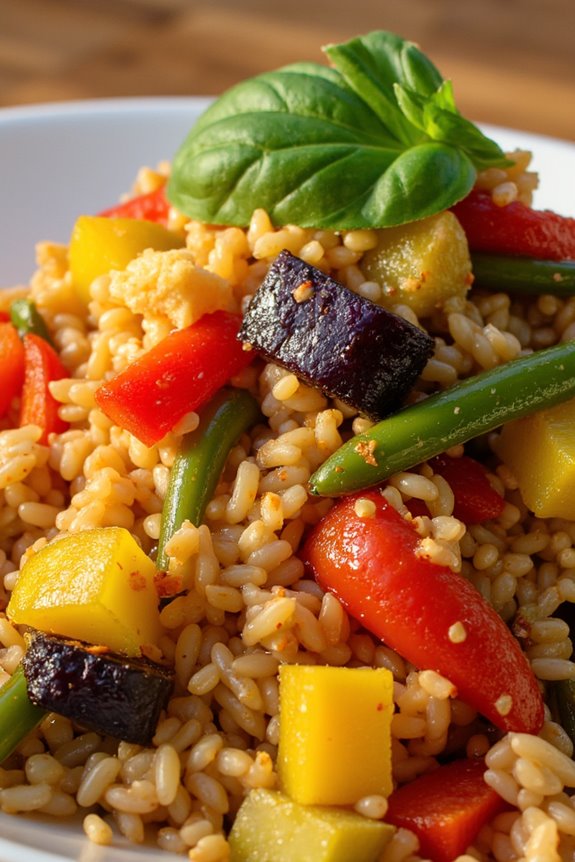
Pinakbet Rice is a vibrant and hearty Filipino dish that showcases the rich flavors of various vegetables, combined with the comforting texture of rice. This dish is rooted in the traditional Filipino recipe known as Pinakbet, which typically features an assortment of vegetables such as eggplant, bitter melon, and squash, all simmered together with meat and shrimp paste. In this variation, we transform the classic Pinakbet into a rice dish that isn’t only filling but also packed with nutrients and flavor, making it perfect for family meals or gatherings.
Cooking Pinakbet Rice is a delightful experience that brings together the essence of Filipino cuisine. The combination of fresh vegetables, aromatic spices, and the satisfying taste of rice creates a comforting meal that can stand on its own or be served alongside grilled meats. This dish is particularly great for those looking to incorporate more vegetables into their diet while enjoying the heartwarming flavors of the Philippines.
Ingredients (Serves 4-6)
- 2 cups uncooked jasmine rice
- 4 cups water or vegetable broth
- 1 medium onion, chopped
- 3 cloves garlic, minced
- 1 medium tomato, diced
- 1 cup sliced eggplant
- 1 cup diced squash (kalabasa)
- 1 cup sliced bitter melon (ampalaya)
- 1 cup string beans, cut into 2-inch pieces
- 1 cup diced bell pepper
- 1 cup shrimp paste (bagoong)
- 2 tablespoons vegetable oil
- Salt and pepper to taste
- Fresh basil or parsley for garnish (optional)
Cooking Instructions
- Prepare the Rice: Rinse the jasmine rice under cold water until the water runs clear. This helps remove excess starch and prevents the rice from becoming sticky. Drain and set aside.
- Sauté Aromatics: In a large pot, heat the vegetable oil over medium heat. Add the chopped onion and minced garlic, sautéing until the onion becomes translucent and fragrant. This step adds depth to the dish and enhances the overall flavor profile.
- Cook the Tomato: Add the diced tomato to the pot and cook for about 3-4 minutes until it softens and releases its juices. The tomatoes will add a slight acidity that balances the richness of the other ingredients.
- Add Vegetables: Stir in the sliced eggplant, diced squash, sliced bitter melon, and string beans. Cook for about 5-7 minutes, allowing the vegetables to soften slightly. This step guarantees that all the vegetables are evenly cooked and infused with the flavors from the aromatics.
- Incorporate Rice and Broth: Add the rinsed rice to the pot, stirring to combine it well with the sautéed vegetables. Pour in the water or vegetable broth, and bring the mixture to a boil. The broth adds richness and flavor to the rice.
- Simmer: Once boiling, reduce the heat to low, cover the pot, and let it simmer for about 15-20 minutes, or until the rice is cooked and has absorbed all the liquid. Avoid lifting the lid during this time to guarantee even cooking.
- Mix in Shrimp Paste: Once the rice is cooked, gently fluff it with a fork and fold in the shrimp paste. Adjust seasoning with salt and pepper to taste. The shrimp paste adds a savory umami flavor that’s characteristic of traditional Pinakbet.
- Serve: Transfer the Pinakbet Rice to a serving platter. Garnish with fresh basil or parsley if desired. Serve warm as a main dish or as a side to grilled meats.
Extra Tips
When making Pinakbet Rice, feel free to customize the vegetables based on what you have on hand or your personal preferences. Other great additions include carrots, zucchini, or even leafy greens like spinach.
For a vegetarian version, simply omit the shrimp paste or replace it with a vegan alternative. Finally, if you prefer a more pronounced flavor, consider adding some cooked pork or chicken to the vegetable mixture for extra heartiness.
Chicken Adobo Rice Bowl

The Chicken Adobo Rice Bowl is a delightful fusion of flavors that brings the beloved Filipino dish, Chicken Adobo, together with a hearty bowl of rice. This dish showcases tender chicken pieces marinated in a savory mixture of soy sauce, vinegar, garlic, and bay leaves, simmered to perfection. Served over steaming, fluffy rice, this meal isn’t only satisfying but also embodies the rich culinary heritage of the Philippines.
This recipe is perfect for family dinners or gatherings, as it serves 4-6 people. The combination of the tangy and aromatic chicken with the warm rice creates a comforting experience that’s sure to please everyone at the table. Whether you’re preparing this dish for a special occasion or a casual weeknight meal, the Chicken Adobo Rice Bowl offers a taste of home that’s both nostalgic and delicious.
Ingredients (Serves 4-6)
- 2 lbs chicken thighs or drumsticks, skinless
- 1/2 cup soy sauce
- 1/2 cup vinegar (preferably cane vinegar or white vinegar)
- 1 cup water
- 6 cloves garlic, minced
- 2 bay leaves
- 1 teaspoon black peppercorns
- 2 tablespoons vegetable oil
- 2 cups jasmine rice
- 4 cups water (for cooking rice)
- Salt to taste
- Chopped green onions or parsley for garnish (optional)
Cooking Instructions
- Marinate the Chicken: In a large bowl, combine the chicken, soy sauce, vinegar, minced garlic, bay leaves, and black peppercorns. Mix well to guarantee the chicken is fully coated. Cover and let it marinate in the refrigerator for at least 30 minutes, or up to overnight for deeper flavor.
- Cook the Rice: Rinse the jasmine rice under cold water until the water runs clear. In a medium pot, bring 4 cups of water to a boil. Add the rinsed rice and a pinch of salt. Stir once, cover, and reduce the heat to low. Cook for about 15-18 minutes or until the rice is tender and all the water is absorbed. Remove from heat and let it sit covered for an additional 5 minutes before fluffing with a fork.
- Sauté the Chicken: In a large skillet or pot, heat the vegetable oil over medium-high heat. Remove the chicken from the marinade (keeping the marinade for later) and sear the chicken pieces in the hot oil for about 5-7 minutes, turning occasionally until they’re browned on all sides.
- Simmer the Chicken: Pour the reserved marinade and 1 cup of water into the skillet with the browned chicken. Bring to a boil, then reduce the heat to low. Cover and let it simmer for about 30-35 minutes until the chicken is tender and fully cooked. Stir occasionally and adjust seasoning with salt if necessary.
- Serve the Dish: In serving bowls, place a generous scoop of the cooked jasmine rice at the bottom. Top it with the simmered chicken and a few spoonfuls of the flavorful sauce. Garnish with chopped green onions or parsley if desired.
Extra Tips
When preparing the Chicken Adobo Rice Bowl, feel free to customize the dish by adding vegetables such as bell peppers or carrots to the simmering chicken for added nutrition and flavor.
Additionally, if you prefer a thicker sauce, you can let the marinade reduce uncovered for a few additional minutes. Pair this dish with a side of pickled vegetables to add a revitalizing contrast to the savory chicken and rice.
Enjoy your cooking experience and the delicious meal that awaits!
Lechon Kawali With Rice
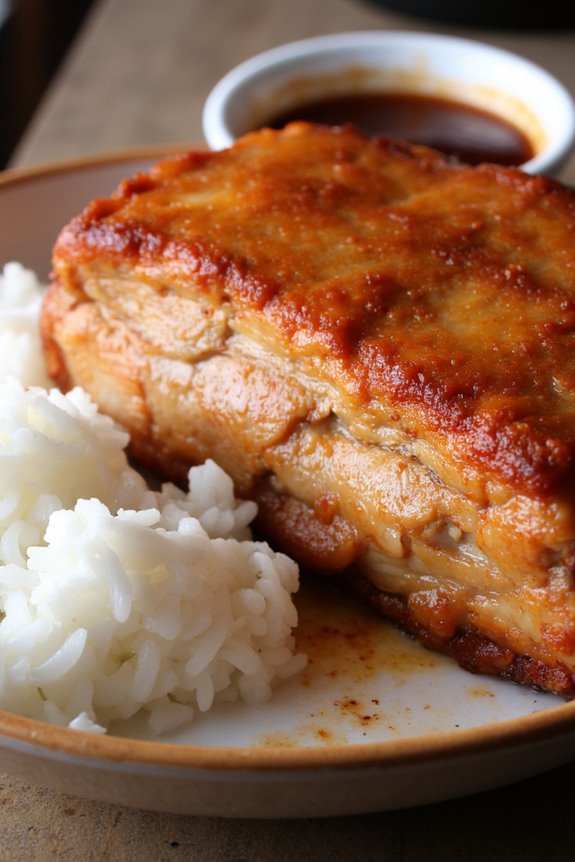
Lechon Kawali is a beloved Filipino dish known for its crispy, golden skin and tender meat. Traditionally, this dish features deep-fried pork belly, which is cooked until it reaches that perfect crunch. Served alongside a generous portion of steamed rice, it creates a delightful combination that showcases the rich flavors of Filipino cuisine. With its savory taste and satisfying texture, Lechon Kawali is a favorite for family gatherings, celebrations, or simply a hearty meal.
Cooking Lechon Kawali may seem intimidating, but with the right approach, you can achieve that restaurant-quality crunch right in your own kitchen. The key to a perfect Lechon Kawali is in the preparation and the cooking method, which involves boiling the pork belly before frying it to guarantee maximum tenderness and flavor. Pair it with a side of rice and a dipping sauce made from vinegar or soy sauce, and you have a meal that’s sure to impress your family and friends.
Ingredients (Serves 4-6):
- 2 pounds pork belly
- 1 tablespoon salt
- 1 teaspoon black pepper
- 1 tablespoon garlic powder
- 1 bay leaf
- 4 cups water (for boiling)
- Vegetable oil (for deep frying)
- Steamed rice (for serving)
- Dipping sauce (vinegar or soy sauce with chili, optional)
Cooking Instructions:
- Prepare the Pork Belly: Start by rinsing the pork belly under cold water to remove any impurities. Pat it dry with paper towels. This step is essential for getting a crispy skin later on.
- Season and Boil: In a large pot, combine the pork belly, salt, black pepper, garlic powder, bay leaf, and water. Bring the mixture to a boil over medium-high heat. Once boiling, reduce the heat to low and let it simmer for about 45 minutes to 1 hour, or until the pork is tender but not falling apart. This process allows the flavors to infuse into the meat.
- Cool and Dry: Remove the pork belly from the pot and place it on a wire rack or cutting board to cool. Once cooled, pat the skin dry with paper towels. This step is vital as moisture can prevent the skin from becoming crispy when frying.
- Heat the Oil: In a deep frying pan or pot, heat vegetable oil over medium-high heat. You’ll need enough oil to fully submerge the pork belly. Test the oil by dropping a small piece of the meat; if it sizzles, the oil is ready.
- Fry the Pork Belly: Carefully place the pork belly into the hot oil, skin side down. Fry it for about 10-15 minutes, or until the skin is golden brown and crispy. You may need to adjust the heat to prevent burning. Once crispy, flip the pork belly to fry the other side for an additional 5-10 minutes.
- Drain and Serve: Once the pork belly is cooked to your liking, remove it from the oil and let it drain on a plate lined with paper towels. Let it rest for a few minutes before slicing it into bite-sized pieces. Serve with steamed rice and your choice of dipping sauce.
Extra Tips:
To guarantee extra crispiness, some cooks let the boiled pork belly rest in the refrigerator uncovered overnight before frying. This helps to dry out the skin even more, leading to a crunchier texture.
Additionally, be cautious when frying, as hot oil can splatter; using a splatter guard can help keep your cooking area clean and safe. Enjoy your delicious Lechon Kawali with a side of flavorful rice and dipping sauce for a truly authentic Filipino meal!
Fried Rice With Longganisa (Filipino Sausage)

Fried Rice with Longganisa is a beloved Filipino dish that combines the savory flavors of the traditional longganisa sausage with aromatic garlic fried rice. This dish isn’t only a great way to use leftover rice but also an easy and satisfying meal that can be enjoyed any time of the day. Longganisa, a sweet and garlicky sausage made from ground pork, is a staple in Filipino cuisine and adds a unique flavor profile to the fried rice.
In this recipe, we’ll guide you through the steps to create a delicious plate of Fried Rice with Longganisa that can serve 4-6 people. The dish is versatile and can be customized with your choice of vegetables or even topped with a fried egg. Perfect for breakfast, lunch, or dinner, this dish will surely impress your family and friends with its delightful taste and aroma.
Ingredients (Serves 4-6)
- 2 cups cooked jasmine rice (preferably day-old)
- 4 pieces longganisa (Filipino sausage)
- 3 tablespoons vegetable oil
- 4 cloves garlic, minced
- 2 eggs, beaten
- 1 medium onion, chopped
- 1 cup mixed vegetables (carrots, peas, and corn)
- 3 tablespoons soy sauce
- 1 teaspoon oyster sauce (optional)
- Salt and pepper to taste
- 2 green onions, chopped (for garnish)
Cooking Instructions
- Prepare the Longganisa: Start by removing the casing of the longganisa sausages. You can do this by slicing the sausage lengthwise and peeling off the skin. Once peeled, crumble the sausage into small pieces. Set aside.
- Heat the Oil: In a large skillet or wok, heat the vegetable oil over medium heat. Make sure the oil is hot enough to sauté the ingredients, which will enhance the flavors of the dish.
- Sauté Garlic and Onions: Add the minced garlic and chopped onions to the skillet. Sauté them for about 2-3 minutes or until the onions become translucent and the garlic is fragrant. This step builds the base flavor for your fried rice.
- Cook the Longganisa: Add the crumbled longganisa to the skillet. Cook for about 5-7 minutes, stirring occasionally, until the sausage is browned and cooked through. The fat from the sausage will render out, adding flavor to the rice.
- Add the Vegetables: Stir in the mixed vegetables and cook for an additional 2-3 minutes, allowing them to soften slightly. This adds color and nutrition to your dish.
- Incorporate the Rice: Add the day-old cooked jasmine rice to the skillet. Break up any clumps of rice with a spatula and mix thoroughly with the sausage and vegetables. Stir-fry the mixture for about 5 minutes, allowing the rice to heat through and absorb the flavors.
- Season the Rice: Drizzle the soy sauce and oyster sauce (if using) over the rice. Mix well to evenly coat all the rice. Season with salt and pepper to taste, adjusting according to your preference.
- Add the Eggs: Push the rice mixture to one side of the skillet and pour the beaten eggs into the empty side. Scramble the eggs until fully cooked, then mix them into the rice. This adds richness and a delightful texture to the dish.
- Garnish and Serve: Turn off the heat and garnish the fried rice with chopped green onions. Serve immediately, either on its own or with a side of your favorite dipping sauce.
Extra Tips
When making Fried Rice with Longganisa, using day-old rice is ideal because it has dried out slightly, preventing the fried rice from becoming mushy. If you don’t have day-old rice, you can spread freshly cooked rice on a baking sheet and let it cool for 30 minutes to an hour before using.
Additionally, feel free to customize the dish by adding your favorite vegetables or proteins, such as shrimp or chicken, to make it even more satisfying. Enjoy your cooking!
Kare-Kare Rice (Peanut Stew With Rice)
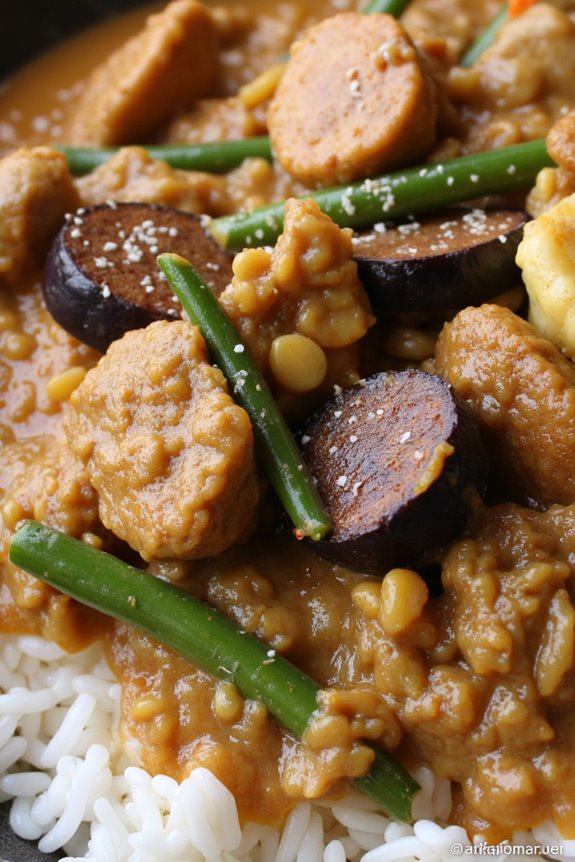
Kare-Kare is a beloved Filipino dish known for its rich and creamy peanut sauce, often served with oxtail, tripe, or vegetables. This delectable stew is a staple during family gatherings and special occasions, making it a comforting meal that evokes nostalgia. The dish is typically accompanied by bagoong (fermented shrimp paste) to enhance its flavors, and when served with rice, it creates a satisfying and hearty experience.
To create an authentic Kare-Kare Rice, it’s crucial to use high-quality ingredients that contribute to the richness of the sauce. The combination of peanut butter with ground rice or ground peanuts provides a velvety texture, while the variety of vegetables adds freshness and color to the dish. Whether you’re preparing it for a festive celebration or a cozy family dinner, Kare-Kare Rice is sure to be a crowd-pleaser.
Ingredients (Serves 4-6)
- 1 lb oxtail, cut into pieces
- 1/2 lb tripe, cut into pieces (optional)
- 1/2 cup peanut butter
- 1/4 cup ground rice or ground peanuts
- 4 cups water
- 1 large eggplant, sliced
- 1 cup string beans, cut into 2-inch pieces
- 1 cup banana heart (puso ng saging), sliced (optional)
- 1 onion, chopped
- 4 cloves garlic, minced
- 3 tablespoons fish sauce (patis)
- Salt and pepper to taste
- 3 tablespoons vegetable oil
- Cooked rice, for serving
- Bagoong (fermented shrimp paste), for serving
Cooking Instructions
- Prepare the Meat: In a large pot, add the oxtail and tripe (if using) along with the water. Bring to a boil, then reduce to a simmer. Cook for about 1.5 to 2 hours or until the meat is tender. Skim off any scum that rises to the surface for a clearer broth.
- Sauté Aromatics: In a separate pan, heat the vegetable oil over medium heat. Add the chopped onion and sauté until translucent. Then, add the minced garlic and cook until fragrant, about 1-2 minutes.
- Combine Ingredients: Once the meat is tender, strain the broth and reserve it. In the pot with the sautéed onions and garlic, add the cooked oxtail and tripe. Pour in about 4 cups of the reserved broth and stir to combine.
- Add Peanut Sauce: Stir in the peanut butter and ground rice (or ground peanuts) into the meat mixture. Mix well until the sauce is smooth and well-blended. Allow it to simmer for another 10-15 minutes, stirring occasionally to prevent sticking.
- Incorporate Vegetables: Add the sliced eggplant, string beans, and banana heart (if using) into the pot. Cook for an additional 5-10 minutes until the vegetables are tender but not mushy. Season with fish sauce, salt, and pepper to taste.
- Serve: Once everything is well combined and cooked through, transfer the Kare-Kare to a serving dish. Serve hot alongside steamed rice and a side of bagoong for an authentic Filipino experience.
Extra Tips
When making Kare-Kare, using a combination of meats can enhance the dish’s flavor profile. If you prefer a vegetarian version, you can substitute the meat with hearty vegetables like eggplant, cauliflower, and tofu.
Additionally, the key to a great Kare-Kare is balancing the richness of the peanut sauce with the salty umami of the bagoong, so adjust the seasoning to your preference. Enjoy the cooking process and take your time to savor all the delicious flavors that come together in this classic Filipino dish!
Tapsilog (Beef Tapa With Rice)
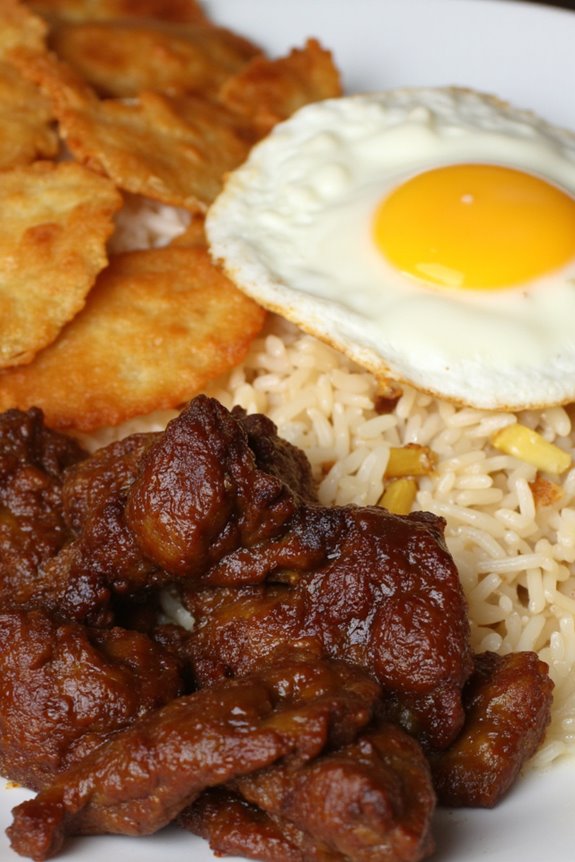
Tapsilog is a beloved Filipino breakfast dish that combines savory marinated beef tapa, garlic fried rice, and a fried egg, creating a delightful and satisfying meal. The name “tapsilog” is a portmanteau of the three components: “tapa” referring to the cured beef, “sinangag” for the garlic fried rice, and “itlog” meaning egg.
It’s a staple in many Filipino households and is often enjoyed any time of day, not just for breakfast. The tender beef, aromatic garlic rice, and perfectly cooked egg come together to create a mouthwatering experience that’s sure to please anyone’s palate.
Making Tapsilog at home is quite simple and requires just a few ingredients. The key to a great tapa is the marinade, which usually includes soy sauce, vinegar, garlic, and a touch of sugar. This combination infuses the beef with flavor while helping to tenderize it.
Serve the dish with a side of vinegar dipping sauce for an extra burst of flavor. Whether you’re cooking for family or hosting friends, Tapsilog is a delicious way to celebrate Filipino cuisine.
Ingredients (Serves 4-6)
- 1.5 lbs beef sirloin or flank steak, sliced thinly
- 1/4 cup soy sauce
- 1/4 cup vinegar (cane vinegar is preferred)
- 4 cloves garlic, minced
- 2 tablespoons brown sugar
- 1 teaspoon black pepper
- 4 cups cooked rice (preferably day-old rice)
- 4-6 eggs
- 2 tablespoons vegetable oil (for frying)
- Salt to taste
- 1/4 cup vinegar (for dipping sauce, optional)
Cooking Instructions
- Marinate the Beef: In a large bowl, combine soy sauce, vinegar, minced garlic, brown sugar, and black pepper. Add the thinly sliced beef, ensuring that each piece is well coated with the marinade. Cover and refrigerate for at least 1 hour, or preferably overnight, to allow the flavors to meld.
- Prepare the Garlic Rice: Heat a tablespoon of oil in a large skillet over medium heat. Add the cooked rice, breaking up any clumps. Stir in minced garlic and sauté for about 2-3 minutes until fragrant and the rice is heated through. Season with a pinch of salt to taste. Once ready, set aside and keep warm.
- Cook the Beef Tapa: In the same skillet, add another tablespoon of oil over medium-high heat. Remove the beef from the marinade, allowing excess liquid to drip off. Fry the beef in batches to avoid overcrowding the pan. Cook for about 3-4 minutes on each side until caramelized and cooked through. Remove from the skillet and keep warm.
- Fry the Eggs: In the same skillet, crack the eggs and fry them sunny-side up or to your desired doneness. This should take about 2-3 minutes. Season with salt as needed.
- Assemble the Tapsilog: To serve, plate a portion of garlic rice, add the cooked beef tapa on top, and finish with a fried egg. You can serve the dish with a small bowl of vinegar for dipping on the side if desired.
Extra Tips
For the best results, use day-old rice for the garlic fried rice, as it’s drier and will fry better than freshly cooked rice.
If you want to add more flavor options, consider incorporating chopped green onions or a squeeze of calamansi juice over the finished dish. Additionally, feel free to adjust the marinade ingredients to suit your taste preferences, such as adding a pinch of chili flakes for a bit of heat.
Enjoy your homemade Tapsilog with family and friends for a taste of authentic Filipino comfort food!
Champorado (Chocolate Rice Porridge)
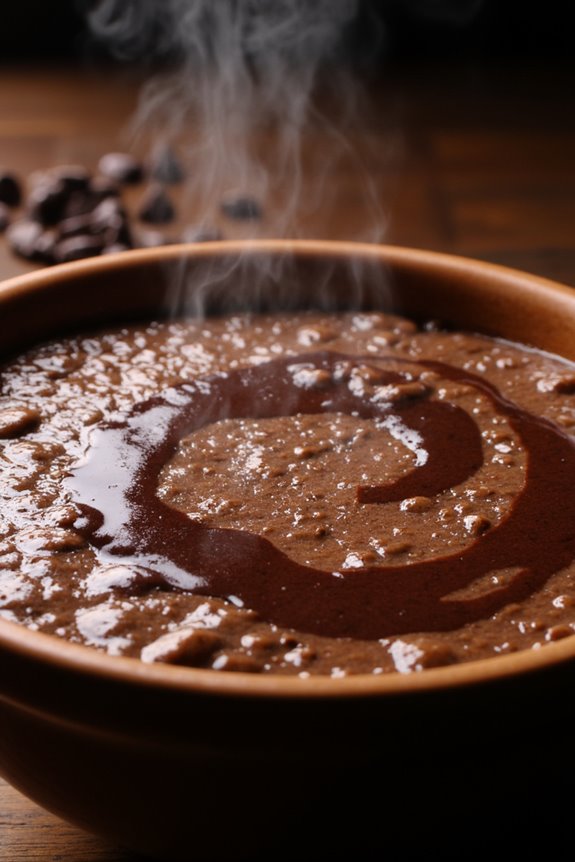
Champorado is a beloved Filipino breakfast dish that combines the comforting texture of rice porridge with the rich, sweet flavor of chocolate. Traditionally made with glutinous rice and cocoa powder, this delightful dish is often enjoyed with a drizzle of condensed milk or evaporated milk, making it a perfect way to start your day. The combination of chocolate and rice creates a unique and satisfying experience that warms the heart and soul.
This dish isn’t only delicious but also incredibly versatile. You can serve it as a sweet breakfast, a snack, or even a dessert. Whether you prefer it thick and creamy or a bit more soupy, champorado can be adjusted to suit your taste. With just a few simple ingredients and some easy-to-follow steps, you can whip up this delightful treat for the whole family in no time.
Ingredients (Serves 4-6):
- 1 cup glutinous rice (sweet rice)
- 4 cups water
- 1/2 cup cocoa powder
- 1 cup sugar (adjust to taste)
- 1/4 teaspoon salt
- 1 cup evaporated milk or condensed milk (for serving)
- Optional: 1/2 cup chocolate chips or tablea (Filipino chocolate) for added richness
Cooking Instructions:
- Rinse the Rice: Begin by rinsing the glutinous rice under cold running water until the water runs clear. This step helps remove excess starch, which can make the porridge overly sticky.
- Boil Water: In a large pot, bring 4 cups of water to a boil over medium-high heat. Once boiling, add the rinsed rice to the pot.
- Cook the Rice: Lower the heat to a simmer and cover the pot. Cook the rice for about 25-30 minutes, stirring occasionally to prevent sticking. You want the rice to become soft and creamy.
- Add Cocoa and Sugar: Once the rice is cooked, add the cocoa powder, sugar, and salt to the pot. Stir well to combine, ensuring that the cocoa and sugar dissolve completely into the mixture. Cook for an additional 5-10 minutes, allowing the flavors to meld and the champorado to thicken to your desired consistency.
- Adjust Consistency: If the champorado is too thick for your preference, you can add a little more water or milk at this stage. Stir well and let it simmer for a few more minutes.
- Serve: Ladle the champorado into bowls and serve hot. Drizzle with evaporated milk or condensed milk on top for added creaminess and sweetness. You can also sprinkle some chocolate chips or serve with a side of dried fish (tuyo) for a traditional pairing.
Extra Tips:
For an even richer flavor, consider using tablea, which is a type of Filipino chocolate made from cacao beans. You can melt the tablea in water before adding it to the rice for a more authentic taste.
Additionally, feel free to adjust the sweetness level according to your preference, as some may prefer a more chocolatey or less sweet champorado. Leftovers can be stored in the refrigerator and reheated with a splash of milk for a delightful treat later on.
Puto (Steamed Rice Cake)

Puto is a beloved Filipino delicacy that’s often enjoyed as a snack or dessert. These fluffy and mildly sweet steamed rice cakes are made from rice flour, coconut milk, and sugar, resulting in a delightful treat that complements savory dishes like dinuguan (pork blood stew) or is enjoyed on their own.
With their vibrant colors and soft texture, puto is a staple at Filipino celebrations and gatherings, making it a popular choice for birthdays, fiestas, and family reunions.
The preparation of puto is relatively simple and can be done using basic kitchen equipment like a steamer or a large pot with a lid. The rice batter is poured into small molds and then steamed until perfectly cooked, resulting in individual servings that are both visually appealing and delicious.
Whether you’re making them for a special occasion or just to satisfy your sweet tooth, learning how to make puto can be a rewarding culinary experience.
Ingredients (Serves 4-6):
- 2 cups rice flour
- 1 cup sugar
- 1 tablespoon baking powder
- 1 cup coconut milk
- 1 cup water
- 1/4 cup melted butter or margarine
- 1 teaspoon vanilla extract (optional)
- Food coloring (optional, for coloring the batter)
- Cheese or salted egg slices (for topping, optional)
Cooking Instructions:
- Prepare the Steamer: Fill a pot or steamer with water and bring it to a boil. Make sure to have a steaming rack or a trivet at the bottom to keep the molds above the water level. Line your puto molds or small ramekins with parchment paper or grease them lightly with butter to prevent sticking.
- Mix Dry Ingredients: In a mixing bowl, combine the rice flour, sugar, and baking powder. Whisk the dry ingredients together until they’re well combined.
- Combine Wet Ingredients: In another bowl, mix the coconut milk, water, melted butter, and vanilla extract (if using). Stir until the ingredients are well blended.
- Combine Mixtures: Gradually add the wet mixture to the bowl of dry ingredients, stirring continuously to avoid lumps. If you want to add colors, you can mix in a few drops of food coloring at this stage to create a vibrant effect.
- Pour Into Molds: Carefully pour the batter into the prepared molds, filling them about 3/4 full to allow room for rising. If you’re using cheese or salted egg slices, place a piece on top of each filled mold.
- Steam the Puto: Once the water is boiling, lower the heat to medium, and place the molds in the steamer. Cover the steamer with a lid and steam for about 20-25 minutes, or until a toothpick inserted into the center comes out clean.
- Cool and Serve: Carefully remove the molds from the steamer and let them cool for a few minutes before unmolding. Serve warm or at room temperature as a delightful treat.
Extra Tips:
For the best results, guarantee that your steamer is preheated and the water is boiling before placing the molds inside. This helps achieve the perfect texture for your puto.
You can experiment with different flavors by incorporating cocoa powder for chocolate puto or adding grated cheese for a savory twist. Remember to adjust the steaming time based on the size of your molds, as smaller molds may cook faster than larger ones.
Enjoy your homemade puto with a cup of tea or coffee for a delightful snack!