

Korean street food is a burst of bold flavors and vibrant colors that makes my heart sing. From tteokbokki’s spicy chewiness to hotteok’s sweet indulgence, every dish is a delightful story on a plate. If you’re ready to bring a touch of Korea into your home, you’re in for a treat. I’ve gathered some favorite recipes that capture the essence of bustling Korean streets. Let’s explore these mouthwatering creations together.
Tteokbokki: Spicy Rice Cakes
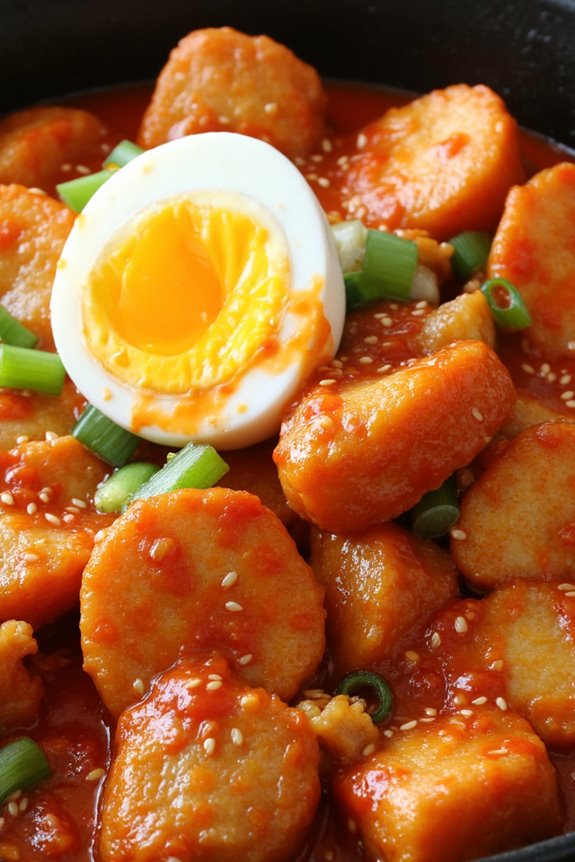
Tteokbokki is a beloved Korean street food that combines chewy rice cakes with a spicy, sweet sauce. Often enjoyed as a snack or quick meal, this dish isn’t only delicious but also easy to make at home. The key to a great Tteokbokki lies in the perfect balance of spice and sweetness, along with the chewy texture of the rice cakes. It’s a dish that brings warmth and comfort, making it a favorite among food lovers of all ages.
Preparing Tteokbokki is a delightful experience, and you can customize it with various ingredients to suit your taste. Traditionally, this dish features fish cakes, scallions, and boiled eggs, but feel free to get creative by adding vegetables or proteins of your choice. Whether you’re enjoying it on a chilly day or serving it at a gathering, Tteokbokki is sure to impress with its vibrant flavors and satisfying texture.
Ingredients (Serves 4-6):
- 1 pound (450g) Korean rice cakes (tteok)
- 4 cups water
- 2 tablespoons gochujang (Korean red chili paste)
- 1 tablespoon gochugaru (Korean red chili flakes)
- 1 tablespoon sugar
- 1 tablespoon soy sauce
- 1 tablespoon minced garlic
- 1/2 teaspoon sesame oil
- 1 cup fish cakes, sliced
- 2 green onions, chopped
- 2 boiled eggs, halved (optional)
- Sesame seeds for garnish (optional)
Instructions:
- Soak the Rice Cakes: If using dried rice cakes, soak them in warm water for about 30 minutes to soften. If you’re using fresh or frozen rice cakes, rinse them under cold water and set aside.
- Prepare the Sauce: In a large pot, add 4 cups of water and bring it to a boil. Once boiling, add gochujang, gochugaru, sugar, soy sauce, minced garlic, and sesame oil. Stir well until the sauce is fully combined and the gochujang is dissolved.
- Cook the Rice Cakes: Add the soaked rice cakes to the boiling sauce. Reduce the heat to medium and let it simmer for about 5-10 minutes, stirring occasionally. The rice cakes will absorb the sauce and become tender.
- Add Fish Cakes and Green Onions: Once the rice cakes are soft, add the sliced fish cakes and chopped green onions to the pot. Continue cooking for another 5 minutes until the fish cakes are heated through and the sauce thickens.
- Serve and Garnish: If desired, place boiled egg halves on top of the Tteokbokki when serving. Sprinkle with sesame seeds for added flavor and presentation. Serve hot and enjoy!
Extra Tips:
When making Tteokbokki, the level of spiciness can be adjusted according to your preference. You can add more gochugaru for extra heat or reduce it for a milder flavor. Additionally, if you prefer a richer taste, consider adding a splash of anchovy broth instead of water for a deeper umami flavor.
Finally, be sure to stir frequently while cooking to prevent the rice cakes from sticking to the pot. Enjoy your culinary journey with this delightful Korean street food!
Hotteok: Sweet Korean Pancakes

Hotteok is a traditional Korean street food that has won the hearts of many with its delightful combination of a crispy outer layer and a warm, gooey filling. Often enjoyed during the colder months, these sweet pancakes are filled with a mixture of brown sugar, cinnamon, and nuts, making them the perfect comfort food.
The dough is soft and slightly chewy, lending itself beautifully to the sweet filling that melts as the pancakes cook, creating an irresistible treat that can be enjoyed any time of the day.
Making Hotteok at home is a fun and rewarding experience. While it may seem a bit challenging at first, the process is straightforward and the end result is definitely worth it. With just a few simple ingredients, you can whip up a batch of these delicious pancakes that are bound to impress family and friends.
Serve them warm and watch as everyone savors the delightful flavors and textures that Hotteok has to offer.
Ingredients (Serves 4-6 people):
- 2 cups all-purpose flour
- 2 tablespoons sugar
- 1 teaspoon active dry yeast
- 1 cup warm water (about 110°F or 43°C)
- 1/2 teaspoon salt
- 2 tablespoons vegetable oil (plus more for cooking)
- 1/2 cup brown sugar
- 1 teaspoon ground cinnamon
- 1/4 cup chopped walnuts or peanuts (optional)
Cooking Instructions:
1. Prepare the Dough: In a large mixing bowl, combine the warm water, sugar, and yeast. Let it sit for about 5-10 minutes until it becomes frothy. This indicates that the yeast is activated.
Next, add the flour and salt to the mixture, and mix until a soft dough forms. Knead the dough on a floured surface for about 5-7 minutes until it’s smooth and elastic.
2. Let the Dough Rise: Place the kneaded dough in a lightly oiled bowl, cover it with a damp cloth, and let it rise in a warm place for about 1 hour or until it has doubled in size. This is important as it helps develop the texture of the pancakes.
3. Prepare the Filling: While the dough is rising, mix the brown sugar, cinnamon, and chopped nuts in a small bowl. This filling will be used later to create the sweet center of the Hotteok.
4. Shape the Pancakes: Once the dough has risen, punch it down to release the air. Divide the dough into 8 equal pieces. Take one piece and flatten it in your palm.
Place a tablespoon of the filling mixture in the center, then carefully fold the edges of the dough over the filling and pinch to seal it. Roll it into a ball and repeat with the remaining pieces.
5. Cook the Hotteok: Heat a non-stick skillet over medium heat and add a small amount of vegetable oil. Place the filled dough balls seam side down in the skillet.
Flatten each ball slightly with a spatula to form a pancake shape. Cook for about 2-3 minutes until the bottom is golden brown, then flip and cook the other side for an additional 2-3 minutes. You may need to adjust the heat to prevent burning.
6. Serve and Enjoy: Once cooked, remove the Hotteok from the skillet and serve them warm. Enjoy the sweet, gooey filling as it oozes out with each bite!
Extra Tips:
When making Hotteok, it’s vital to keep the cooking temperature moderate to guarantee even cooking without burning the exterior.
If you find that some of the filling leaks out while cooking, don’t worry—this is quite common and adds to the charm of homemade Hotteok! Additionally, for a twist on the traditional recipe, consider experimenting with different fillings like chocolate or fruit.
Enjoy your homemade Hotteok as a delightful snack or dessert!
Kimbap: Korean Sushi Rolls
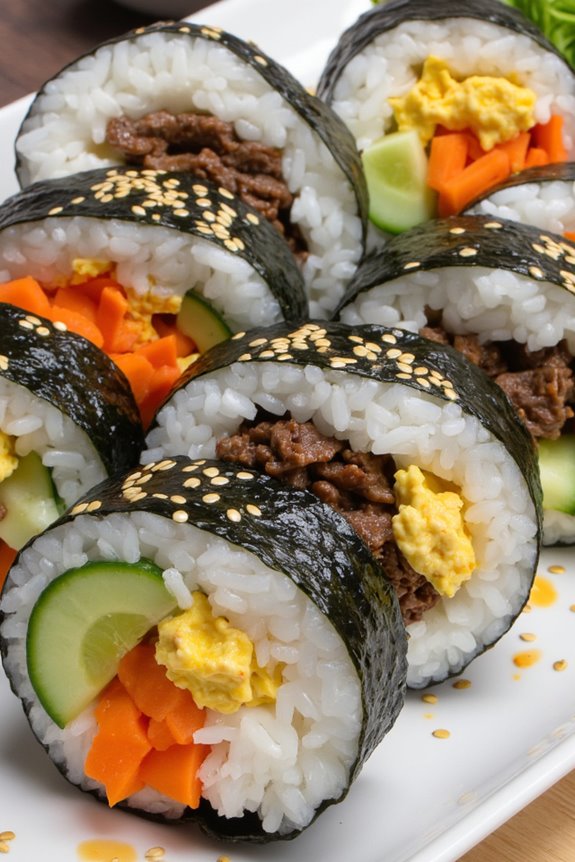
Kimbap, often referred to as Korean sushi rolls, is a delightful and versatile dish that combines seasoned rice with a variety of fillings, all rolled up in a sheet of seaweed. This popular street food isn’t only easy to prepare but also highly customizable, making it a perfect option for picnics, lunch boxes, or a light dinner.
The key to a perfect kimbap is the balance of flavors and textures, from the nutty taste of sesame oil in the rice to the crunchiness of fresh vegetables and the savory notes of protein.
To make kimbap, you’ll need to gather your ingredients and prepare them ahead of time. This process involves cooking and seasoning your rice, slicing your vegetables, and optionally preparing proteins like beef, crab sticks, or eggs. Once everything is ready, the assembly is straightforward and can be a fun activity to share with family and friends.
Kimbap isn’t only delicious but also visually appealing, making it a feast for the eyes as well.
Ingredients (serving size: 4-6 people)
- 2 cups of short-grain rice
- 2 ½ cups of water
- 1 tablespoon of sesame oil
- 1 tablespoon of salt
- 4-5 sheets of seaweed (nori)
- 1 medium cucumber, julienned
- 1 medium carrot, julienned
- 4-5 pickled radish strips (danmuji)
- 3-4 cooked eggs, scrambled and seasoned
- 1 cup of cooked beef (or any protein of choice), sliced thinly
- 1 tablespoon of sesame seeds (for garnish)
- Soy sauce (for dipping)
Cooking Instructions
1. Prepare the Rice: Rinse the short-grain rice under cold water until the water runs clear to remove excess starch. This helps achieve the perfect sticky texture. Combine the rinsed rice with 2 ½ cups of water in a rice cooker or pot and cook according to the rice cooker instructions or bring to a boil, then simmer on low heat for about 15-20 minutes until cooked.
Once done, let it sit for 10 minutes to steam.
2. Season the Rice: After the rice has cooled slightly, transfer it to a large mixing bowl. Add in the sesame oil and salt, stirring gently to incorporate the seasoning evenly throughout the rice. Allow the rice to cool completely before rolling.
3. Prepare the Fillings: While the rice is cooling, prepare your fillings. Julienne the cucumber and carrot into thin strips. If using beef, cook it in a pan with a bit of soy sauce, garlic, and sesame oil until fully cooked. Scramble the eggs in a separate pan and season lightly with salt and pepper.
4. Assemble the Kimbap: Place a bamboo sushi mat on a clean surface and lay a sheet of seaweed shiny side down on the mat. With wet hands to prevent sticking, take a handful of the seasoned rice and spread it evenly over the seaweed, leaving about 1 inch at the top edge.
Layer your fillings (cucumber, carrot, pickled radish, eggs, and beef) across the center of the rice.
5. Roll the Kimbap: Starting from the bottom, carefully lift the edge of the mat and roll it away from you, pressing gently but firmly to create a tight roll. Continue rolling until you reach the edge of the seaweed. Use a bit of water to seal the edge of the nori.
Repeat the process with the remaining sheets and fillings.
6. Slice and Serve**: Using a sharp knife, slice** the rolled kimbap into bite-sized pieces, making sure to wipe the knife with a damp cloth between cuts to maintain clean slices. Arrange the kimbap on a serving platter, sprinkle with sesame seeds, and serve with soy sauce on the side for dipping.
Extra Tips
When making kimbap, feel free to get creative with your fillings! You can include other ingredients such as avocado, spinach, or even tofu for a vegetarian option.
Remember to keep your hands wet while handling the rice to prevent it from sticking, and be sure to slice with a sharp knife to achieve clean edges. Kimbap can be stored in the refrigerator for a short time, but it’s best enjoyed fresh to maintain the texture of the seaweed and the fillings.
Mandu: Korean Dumplings

Mandu, or Korean dumplings, are a delightful and versatile dish that can be enjoyed steamed, boiled, or pan-fried. These little pockets of flavor are usually filled with a mixture of ground meat, vegetables, and spices, and they make for a perfect appetizer or snack. Not only are they delicious, but they also provide a fun cooking experience, as you can get creative with the filling and shape of the dumplings.
With this recipe, you’ll be able to create your own batch of mandu that can feed 4-6 people, making it an excellent choice for sharing with family and friends. The beauty of mandu lies in its adaptability. You can customize the filling according to your preferences, whether you prefer beef, pork, chicken, or even a vegetarian option with tofu and mushrooms.
Once you master the folding technique, you can experiment with different shapes and sizes. Serve your mandu with a soy dipping sauce or a spicy gochujang sauce for an extra kick. Let’s plunge into the ingredients and cooking instructions for making these delightful Korean dumplings!
Ingredients (Serves 4-6 people):
- 1 cup ground pork (or ground beef/chicken)
- 1 cup napa cabbage, finely chopped
- 1 cup shiitake mushrooms, finely chopped
- 1/2 cup green onions, chopped
- 1/2 cup carrots, grated
- 2 cloves garlic, minced
- 1 tablespoon ginger, minced
- 2 tablespoons soy sauce
- 1 tablespoon sesame oil
- 1 teaspoon salt
- 1/2 teaspoon black pepper
- 1 pack of mandu wrappers (about 30-40 wrappers)
- Water (for sealing the wrappers)
- Oil (for frying, if pan-frying)
Cooking Instructions:
1. Prepare the Filling: In a large mixing bowl, combine the ground pork, chopped napa cabbage, shiitake mushrooms, green onions, grated carrots, minced garlic, and minced ginger. Mix thoroughly to guarantee all the ingredients are well incorporated.
2. Season the Mixture: Add the soy sauce, sesame oil, salt, and black pepper to the filling mixture. Stir well to combine all the flavors. Taste the mixture and adjust seasoning if necessary.
3. Assemble the Mandu: Take a mandu wrapper and place about 1 tablespoon of the filling in the center. Using your finger, moisten the edges of the wrapper with a little water. Fold the wrapper in half to create a half-moon shape, then pinch the edges to seal. For a decorative touch, you can pleat the edges by folding and pinching. Repeat until all the filling is used.
4. Cook the Mandu: Choose your preferred cooking method:
- Steaming: Line a steamer basket with parchment paper and steam the mandu for about 10-12 minutes until cooked through.
- Boiling: Bring a pot of water to a boil and gently add the mandu. Boil for about 6-8 minutes until they float to the top and are fully cooked.
- Pan-frying: Heat a skillet over medium heat and add a little oil. Place the mandu in the skillet and fry until the bottom is golden brown, about 3-4 minutes. Then, add a splash of water and cover the skillet to steam for an additional 5 minutes.
5. Serve: Once cooked, remove the mandu from the heat and serve them hot, accompanied by your choice of dipping sauce.
Extra Tips:
When making mandu, be mindful of the moisture content in your filling. If the mixture is too wet, it may cause the wrappers to break during cooking.
You can also freeze uncooked mandu for later use; simply place them on a baking sheet to freeze individually, then transfer to a freezer bag. When you’re ready to cook, you can steam or boil them directly from frozen, adding a few extra minutes to the cooking time. Enjoy your homemade mandu!
Gyeran-ppang: Korean Egg Bread

Gyeran-ppang, or Korean egg bread, is a delightful street food that captures the essence of Korean cuisine with its unique blend of flavors and textures. Often found in bustling markets, this fluffy bread envelops a perfectly cooked egg, creating a comforting and satisfying meal. The exterior is slightly crispy while the inside remains soft and custardy, making it a perfect snack or breakfast option that can be enjoyed on-the-go.
This dish requires minimal ingredients and can be made easily at home, allowing you to experience a taste of Korea without needing to travel. Whether you’re a seasoned cook or a beginner in the kitchen, Gyeran-ppang is simple to prepare and sure to impress your family and friends. The combination of warm bread and rich egg is a hearty treat that can be customized with additional ingredients like cheese or green onions for added flavor.
Ingredients (Serves 4-6)
- 2 cups all-purpose flour
- 2 tablespoons sugar
- 1 tablespoon baking powder
- ½ teaspoon salt
- 2 large eggs
- 1 ½ cups milk
- 4 tablespoons unsalted butter, melted
- 4-6 large eggs (one for each bread)
- Optional: sliced green onions, cheese, or ham
Cooking Instructions
- Prepare the Batter: In a large mixing bowl, combine the all-purpose flour, sugar, baking powder, and salt. Whisk together until evenly mixed. In another bowl, beat the 2 large eggs and then stir in the milk and melted butter until fully combined. Gradually add the wet ingredients to the dry ingredients, mixing until just combined. Be careful not to overmix; some lumps are okay.
- Preheat the Pan: Heat a non-stick or cast-iron skillet over medium heat. If you prefer, you can lightly grease the pan with cooking spray or a small amount of butter to prevent sticking.
- Pour the Batter: Once the pan is hot, ladle about ½ cup of the batter into the center of the skillet. You want to create a small round shape, similar to a pancake.
- Add the Egg: Immediately crack one egg directly onto the batter in the skillet. You can gently break the yolk if you prefer it mixed in, or leave it whole for a sunny-side-up effect. If desired, sprinkle additional ingredients like cheese or green onions around the egg.
- Cook the Gyeran-ppang: Allow the bread to cook for about 3-4 minutes, or until the edges start to brown and the top begins to bubble. Carefully flip the bread using a spatula and cook for an additional 1-2 minutes until the other side is golden brown and the egg is cooked to your liking.
- Serve and Enjoy: Once cooked, remove the Gyeran-ppang from the skillet and let it cool slightly before serving. You can serve it warm as is or with a side of soy sauce or ketchup for dipping.
Extra Tips
When making Gyeran-ppang, be mindful of the cooking temperature; too high can burn the bread before the egg is fully cooked. If you’re trying this recipe for the first time, consider starting with just one or two servings to adjust the cooking time and ingredients to your preference.
Feel free to experiment with the additions; herbs, spices, or even different types of cheese can add interesting flavors to your egg bread. Enjoy your homemade Gyeran-ppang!
Eomuk: Korean Fish Cakes

Eomuk, also known as Korean fish cakes, is a beloved street food that has captivated the hearts and taste buds of many. These delicious cakes are made from fish paste and can be enjoyed on their own or served in a warm broth, making them a versatile dish perfect for any occasion.
Eomuk can be found at street stalls throughout Korea, where they’re often skewered and served with a side of spicy dipping sauce. The process of making eomuk at home may seem intimidating, but with a few simple ingredients and steps, you can recreate this delightful dish in your own kitchen.
The texture of eomuk is both chewy and tender, and the flavor is mild yet satisfying, making it an excellent addition to soups, salads, or enjoyed as a snack. Traditionally, eomuk is made with a variety of fish, but you can easily customize the recipe by adding vegetables or other seasonings.
Whether you’re looking for a quick bite or a hearty meal, eomuk is sure to become a favorite in your household.
Ingredients (Serves 4-6)
- 500g white fish fillets (e.g., cod, haddock)
- 100g potato starch
- 1 medium onion, finely chopped
- 2 green onions, chopped
- 2 tablespoons soy sauce
- 1 tablespoon sugar
- 1 teaspoon salt
- 1 teaspoon black pepper
- 1 tablespoon sesame oil
- 1 egg, beaten
- Oil for frying
- Skewers (if desired)
Cooking Instructions
- Prepare the Fish Paste: Begin by rinsing the white fish fillets under cold water. Pat them dry with a paper towel and remove any bones or skin. Using a food processor, blend the fish until it reaches a smooth paste consistency. This step is essential as it forms the base of your eomuk.
- Mix Ingredients: In a large mixing bowl, combine the fish paste with the finely chopped onion, green onions, soy sauce, sugar, salt, black pepper, sesame oil, and beaten egg. Mix everything thoroughly until well combined. The egg acts as a binding agent, helping to hold the eomuk together.
- Shape the Fish Cakes: With your hands, take a portion of the fish mixture and shape it into small oval cakes, about 1-2 inches in size. If you prefer, you can also mold them around skewers to make them easier to grill or fry.
- Fry the Eomuk: In a large frying pan, heat a generous amount of oil over medium heat. Once the oil is hot, carefully place the shaped fish cakes into the pan, being careful not to overcrowd them. Fry each side for about 3-4 minutes or until they turn golden brown and crispy. Flip them gently to guarantee even cooking.
- Drain and Serve: Once cooked, remove the eomuk from the pan and place them on a plate lined with paper towels to absorb excess oil. Serve warm with your favorite dipping sauce or in a hot broth for a comforting meal.
Extra Tips
When making eomuk, feel free to experiment with additional ingredients such as minced vegetables, crab meat, or even kimchi for a unique twist.
Confirm your frying oil is adequately heated to achieve that perfect crispy texture, and avoid overcrowding the pan to maintain even cooking. Eomuk can also be frozen for later use; simply reheat them in a skillet or microwave when you’re ready to enjoy.
Ddeokki: Grilled Rice Cake Skewers

Ddeokki, or grilled rice cake skewers, is a popular Korean street food that showcases the delightful chewiness of rice cakes, known as “tteok.” This dish isn’t only satisfying but also incredibly versatile, allowing for a variety of dipping sauces and toppings to enhance the flavor.
Traditionally enjoyed at street stalls, ddeokki can be made right at home, bringing a taste of Korea to your kitchen. The simple yet flavorful combination of rice cakes, gochujang (Korean chili paste), and sesame oil creates a mouthwatering experience that can please any palate.
Making ddeokki is a straightforward process that requires minimal ingredients and time. The key is to guarantee that the rice cakes are grilled to a perfect golden brown and that the sauce adheres beautifully to each skewer.
Whether you’re preparing them for a casual snack, a party appetizer, or a fun family dinner, these grilled rice cake skewers are sure to impress. Let’s immerse ourselves in the recipe and enjoy this delectable Korean treat!
Ingredients (Serving Size: 4-6 People)
- 400g (14 oz) of Korean rice cakes (tteok)
- 2 tablespoons of vegetable oil
- 4 tablespoons of gochujang (Korean chili paste)
- 2 tablespoons of honey or sugar
- 1 tablespoon of soy sauce
- 1 tablespoon of sesame oil
- 2 green onions, finely chopped
- Sesame seeds for garnish
- Bamboo skewers (soaked in water for 30 minutes)
Cooking Instructions
- Prepare the Rice Cakes: If using frozen rice cakes, guarantee they’re fully thawed. If they’re hard, soak them in warm water for about 30 minutes to soften. Once softened, drain well and set aside.
- Make the Sauce: In a mixing bowl, combine gochujang, honey (or sugar), soy sauce, and sesame oil. Stir until the mixture is well combined and smooth. This sauce will give the rice cakes a delicious spicy-sweet flavor.
- Skewer the Rice Cakes: Take the soaked bamboo skewers and thread the rice cakes onto them. You can place 3-4 rice cakes on each skewer, leaving some space between them for even grilling.
- Preheat the Grill or Pan: Heat a grill or a non-stick frying pan over medium heat. Add the vegetable oil and allow it to warm up. The oil helps to achieve that crispy exterior on the rice cakes.
- Grill the Skewers: Place the skewered rice cakes on the grill or pan. Cook for about 2-3 minutes on each side, or until they’re golden brown and slightly crispy. Make sure to turn them occasionally to guarantee even cooking.
- Coat with Sauce: Once the rice cakes are grilled, brush the sauce over the skewers generously, allowing it to coat the rice cakes. You can also reserve some sauce to serve on the side for dipping.
- Garnish and Serve: After coating with the sauce, sprinkle the finely chopped green onions and sesame seeds over the skewers for added flavor and garnish. Serve hot and enjoy!
Extra Tips
When making ddeokki, feel free to customize the skewers by adding vegetables like bell peppers or zucchini along with the rice cakes. This not only adds color but also enhances the nutritional value of the dish.
Additionally, don’t hesitate to adjust the spice level of the sauce according to your taste preference; you can add more gochujang for extra heat or reduce it for a milder flavor. Enjoy experimenting with different dipping sauces, such as a simple soy sauce or a sweet chili sauce, to find your perfect pairing!
Bungeoppang: Fish-shaped Pastries

Bungeoppang, a beloved Korean street food, is a delightful treat that resembles a fish and is typically filled with sweet red bean paste. Originating from the bustling streets of Korea, this iconic pastry offers a warm, crispy exterior with a soft, sweet filling that’s perfect for snacking or dessert. The name “bungeoppang” translates to “carp bread,” and these pastries are often enjoyed during the colder months, making them a popular comfort food among locals and tourists alike.
Making bungeoppang at home can be a rewarding experience, as you can customize the filling to your liking. While red bean paste is traditional, feel free to experiment with other fillings like custard, chocolate, or sweet potato. The key to achieving the perfect bungeoppang is to guarantee that the batter is poured evenly into the fish-shaped molds and that they’re cooked just long enough to achieve that desirable golden-brown color. With a little practice, you’ll be able to recreate this delightful street food right in your own kitchen.
Ingredients (Serves 4-6)
- 2 cups all-purpose flour
- 1 cup water
- 1/4 cup granulated sugar
- 1 tablespoon baking powder
- 1/2 teaspoon salt
- 1 teaspoon vanilla extract
- 1 cup sweet red bean paste (or your preferred filling)
- Vegetable oil (for greasing the molds)
Cooking Instructions
- Prepare the Batter: In a mixing bowl, combine the all-purpose flour, granulated sugar, baking powder, and salt. Whisk together until well mixed. Then, gradually add the water and vanilla extract while stirring continuously until the batter is smooth and free of lumps. This will create a light and fluffy texture for the bungeoppang.
- Preheat the Bungeoppang Mold: Place your fish-shaped bungeoppang mold on medium heat and lightly grease it with vegetable oil using a brush or paper towel. Preheating the mold is essential for achieving that golden-brown crust on the pastries.
- Pour the Batter: Once the mold is heated, pour a small amount of batter into the bottom half of the mold, making sure to cover the surface evenly. Be careful not to overfill, as the batter will expand while cooking.
- Add the Filling: Place a spoonful of sweet red bean paste (or your chosen filling) in the center of the batter. Make sure it’s not too close to the edges to prevent overflowing.
- Seal and Cook: Pour a bit more batter over the filling to cover it completely. Close the mold and cook for about 3-4 minutes on each side, or until the bungeoppang are golden brown and crispy. Flip the mold halfway through to guarantee even cooking.
- Remove and Cool: Once cooked, carefully open the mold to release the bungeoppang. Use a fork or a spatula to help if needed. Place the pastries on a wire rack to cool slightly before serving.
Extra Tips
When making bungeoppang, guarantee that your batter isn’t too thick, as this can result in a dense texture. Experiment with different fillings to find your favorite combination, and don’t hesitate to adjust the sweetness to your preference.
If you find that the pastries stick to the mold, try increasing the amount of oil used for greasing. Enjoy your bungeoppang hot, and savor the delicious combination of crispy pastry and sweet filling!
Jeon: Savory Korean Pancakes

Jeon, a beloved Korean dish, refers to a variety of savory pancakes that can be made with an assortment of ingredients including vegetables, seafood, or meats. These savory delights are often enjoyed as a snack, appetizer, or even a main dish, making them versatile and perfect for any occasion.
The batter is typically made from a simple mixture of flour and water, which is then combined with the chosen ingredients and pan-fried to a golden crisp. Each bite offers a delightful contrast of textures, with the crispy exterior giving way to a tender, flavorful interior.
While there are many variations of jeon, one of the most popular types is the vegetable jeon, made with fresh vegetables like zucchini, carrots, and scallions. This version not only showcases the vibrant colors and flavors of the vegetables but also provides a healthier option.
Served hot with a dipping sauce, jeon is sure to impress your family and friends, making it a must-try dish when exploring Korean street food recipes.
Ingredients (Serves 4-6)
- 1 cup all-purpose flour
- 1 cup water
- 1/2 teaspoon salt
- 1 medium zucchini, julienned
- 1 medium carrot, julienned
- 3 scallions, chopped
- 1/2 cup kimchi, chopped (optional)
- Vegetable oil for frying
- Soy sauce for dipping (optional)
- Sesame oil for dipping (optional)
Cooking Instructions
- Prepare the Batter: In a large mixing bowl, combine the all-purpose flour and salt. Gradually add the water while stirring until you achieve a smooth batter that’s free of lumps. The consistency should be similar to pancake batter—thick but pourable.
- Add the Vegetables: Fold in the julienned zucchini, carrot, and chopped scallions into the batter. If you’re using kimchi, add it at this stage as well. Mix well until all the vegetables are evenly coated with the batter.
- Heat the Pan: Place a large frying pan over medium heat and add about 2 tablespoons of vegetable oil. Allow the oil to heat up until it’s shimmering but not smoking. You can test the heat by dropping a small amount of batter into the pan; it should sizzle immediately.
- Cook the Jeon: Pour a ladleful of the batter mixture into the hot pan, spreading it out to form a circle about 1/4 inch thick. Cook for about 3-4 minutes or until the edges start to turn golden brown.
- Flip the Pancake: Carefully flip the pancake using a spatula and cook for another 3-4 minutes on the other side until it’s golden and crispy. Repeat this step with the remaining batter, adding more oil to the pan as necessary.
- Serve: Once all the pancakes are cooked, transfer them to a serving plate. Cut them into wedges and serve hot, accompanied by soy sauce and sesame oil for dipping if desired.
Extra Tips
For the best results, make sure the vegetables are well-drained and not too watery before adding them to the batter, as excess moisture can make the pancakes soggy.
You can also experiment with different ingredients, such as adding seafood (like shrimp or squid) or other vegetables like bell peppers or mushrooms. Additionally, serving the jeon with a sprinkle of sesame seeds on top or garnishing with fresh herbs can elevate the presentation.
Enjoy your homemade savory pancakes!
Odeng: Fish Cake Soup
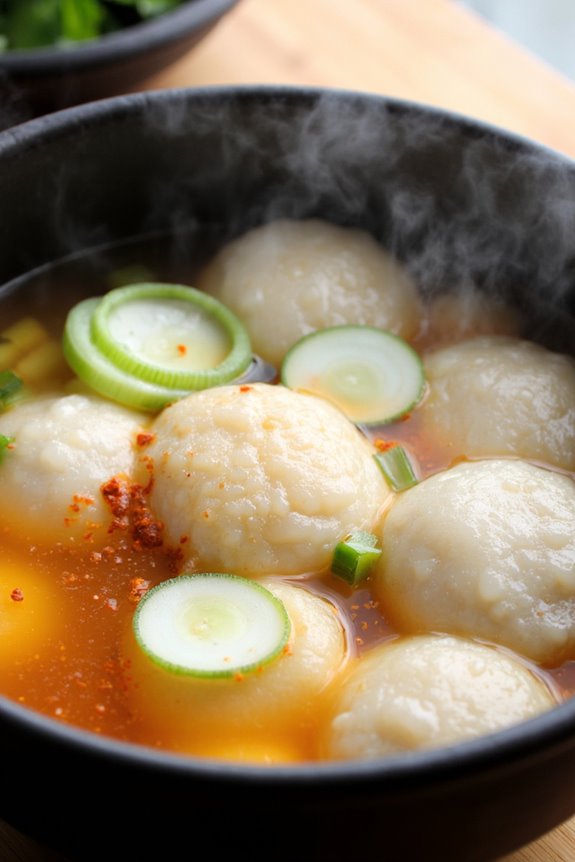
Odeng, or Korean fish cake soup, is a beloved street food that embodies the heart and soul of Korean cuisine. This delightful dish consists of fish cakes simmered in a savory broth, often served with a side of spicy dipping sauce. It’s a warm, comforting meal that’s especially popular during the colder months, and it can easily be enjoyed as a quick snack or a light dinner. The soup isn’t only delicious but also incredibly versatile, allowing for variations in ingredients according to personal taste.
Preparing Odeng is a straightforward process that showcases the beautiful balance of flavors typical of Korean street food. The base of the soup is made with a rich broth, often flavored with ingredients like kelp and anchovies, which impart a deep umami taste. The fish cakes, made from minced fish and seasonings, add a chewy texture that contrasts perfectly with the light, warm broth. This dish not only satisfies the palate but also fills the kitchen with enticing aromas, making it a wonderful addition to any meal.
Ingredients (Serves 4-6):
- 300g fish cake (odeng)
- 1 liter of water
- 1 piece of kelp (about 10cm)
- 5-6 dried anchovies
- 1 medium onion, sliced
- 2-3 green onions, chopped
- 2 cloves of garlic, minced
- 2 tablespoons soy sauce
- 1 tablespoon gochugaru (Korean red pepper flakes, optional for spice)
- Salt and pepper to taste
- Optional: hard-boiled eggs, sliced radish, or any preferred vegetables
Cooking Instructions:
- Prepare the Broth: In a large pot, add 1 liter of water, the piece of kelp, and the dried anchovies. Bring it to a boil over medium heat. Allow it to simmer for about 10-15 minutes to extract the flavors from the kelp and anchovies. After simmering, remove the kelp and anchovies using a slotted spoon.
- Add Aromatics: To the strained broth, add the sliced onion and minced garlic. Continue to simmer the broth for another 5-10 minutes until the onion becomes translucent and aromatic.
- Incorporate Fish Cakes: Add the fish cakes to the pot and let them cook in the broth for about 5 minutes. This allows the fish cakes to absorb the flavors of the broth while heating through.
- Season the Soup: Stir in the soy sauce, and if desired, add gochugaru for a touch of heat. Taste the soup and adjust the seasoning with salt and pepper as needed. If you like, you can also add sliced radish or other vegetables at this stage.
- Finish with Green Onions: Just before serving, stir in the chopped green onions for a fresh burst of flavor. Allow the soup to simmer for an additional minute to infuse the green onions’ aroma into the broth.
- Serve: Ladle the hot fish cake soup into bowls. Optionally, you can garnish with additional green onions or serve with hard-boiled eggs on the side. Enjoy it with a dipping sauce made from soy sauce and gochugaru for an added layer of flavor.
Extra Tips:
For an even richer flavor, you can let the broth sit longer with the kelp and anchovies before removing them. If you want to customize your Odeng, feel free to add other ingredients like mushrooms, tofu, or any leftover vegetables you have on hand.
The soup is also excellent for meal prep, as it can be stored in the refrigerator for a couple of days and reheated when needed.
Chimaek: Korean Fried Chicken and Beer

Chimaek, a delightful pairing of crispy Korean fried chicken and chilled beer, is a beloved street food combination in South Korea. It’s more than just a meal; it’s a cultural experience that brings friends and family together. The chicken is seasoned and fried to perfection, creating a crunchy exterior that contrasts beautifully with its juicy and tender interior.
Often enjoyed during outdoor gatherings, Chimaek has become synonymous with summer nights and celebrations, making it a must-try for anyone looking to experience authentic Korean cuisine.
The beauty of Chimaek lies in its versatility. You can customize the flavors of the fried chicken by using different marinades or sauces, such as sweet and spicy gochujang or a classic soy garlic sauce. Pairing this delectable dish with your favorite beer enhances the flavors and elevates the dining experience.
Whether you enjoy it with friends on a rooftop or during a cozy night in, Chimaek is sure to satisfy your cravings for something crispy, savory, and utterly delicious.
Ingredients (Serves 4-6)
- 2 pounds chicken wings or drumsticks
- 1 cup all-purpose flour
- 1 cup cornstarch
- 1 teaspoon baking powder
- 1 teaspoon garlic powder
- 1 teaspoon onion powder
- 1 teaspoon black pepper
- 1 teaspoon salt
- 1 cup buttermilk
- Oil for frying
- 1 cup beer (for serving)
- Fresh cilantro or green onions (for garnish, optional)
Cooking Instructions
- Prepare the Chicken: Rinse the chicken pieces thoroughly under cold water and pat them dry with paper towels. This step is essential for achieving a crispy texture. If using wings, you may want to separate them into two parts (drumette and wingette) for even cooking.
- Marinate the Chicken: In a large bowl, combine the buttermilk with a pinch of salt and pepper. Add the chicken pieces to the bowl, making sure they’re well coated. Cover and refrigerate for at least 1 hour (or overnight for maximum flavor). This marination helps tenderize the chicken and infuses it with flavor.
- Prepare the Breading: In another bowl, mix together the all-purpose flour, cornstarch, baking powder, garlic powder, onion powder, black pepper, and salt. This combination will create a light and crispy coating for the chicken.
- Coat the Chicken: Remove the marinated chicken from the refrigerator. One piece at a time, dredge the chicken in the flour mixture, making sure of an even coating. Shake off any excess flour and place the coated chicken on a wire rack. Let it sit for about 10-15 minutes; this helps the coating adhere better during frying.
- Heat the Oil: In a large pot or deep fryer, heat oil to 350°F (175°C). You can test if the oil is ready by dropping a small amount of batter into the oil; it should sizzle and rise to the surface. Be careful not to overcrowd the pot, as this can lower the oil’s temperature.
- Fry the Chicken: Carefully add the coated chicken pieces to the hot oil in batches, ensuring they’ve enough room to fry properly. Fry for about 10-15 minutes, turning occasionally until golden brown and cooked through. Use a meat thermometer to make sure the internal temperature reaches 165°F (74°C).
- Drain and Serve: Once the chicken is cooked, remove it from the oil and place it on a plate lined with paper towels to absorb excess oil. Allow to cool slightly before serving. Garnish with fresh cilantro or green onions if desired. Serve hot with chilled beer on the side.
Extra Tips
For an extra crunch, you can double fry the chicken. Fry it once, let it rest for a few minutes, and then fry it again for a couple of minutes until it’s extra crispy.
Additionally, experiment with different sauces after frying, such as a sweet soy glaze or spicy gochujang sauce, to enhance the flavor profile of your Chimaek. Enjoying your homemade Chimaek with a light lager or pale ale will complement the dish perfectly!