

I’ve always adored the rich flavors and delightful textures of Korean cuisine. When it comes to high-protein dishes, these recipes truly stand out. From the comforting warmth of Spicy Korean Beef Stew to the vibrant crunch of Tofu Stir-Fry, each dish offers something special. If you’re looking to add strength and flavor to your meals, these hearty options are just what you need. Get ready to energize your dining experience with these satisfying Korean-inspired dishes.
Spicy Korean Beef Stew (Galbitang)
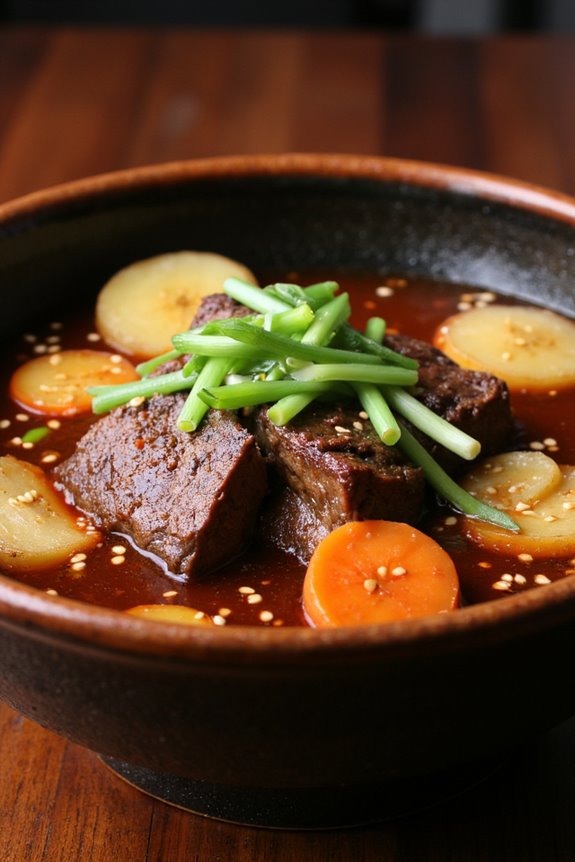
Spicy Korean Beef Stew, known as Galbitang, is a heartwarming dish that exemplifies the bold flavors and comforting nature of Korean cuisine. This stew features tender beef short ribs simmered in a rich broth infused with spices, garlic, and green onions, resulting in a savory and slightly spicy flavor profile that’s perfect for any occasion.
Galbitang isn’t only delicious but also packed with protein, making it a great addition to any high-protein meal plan. The dish typically serves 4-6 people, making it ideal for family gatherings or meal prep for the week. The preparation may take some time, but the result is a flavorful stew that warms both the body and soul.
Pair it with a bowl of steamed rice and some pickled vegetables for a complete and satisfying meal.
Ingredients:
- 2 lbs beef short ribs
- 8 cups water
- 1 medium onion, quartered
- 4 cloves garlic, minced
- 1-inch piece of ginger, sliced
- 2 tablespoons soy sauce
- 1 tablespoon gochugaru (Korean red pepper flakes)
- 2 tablespoons sesame oil
- 2 green onions, chopped (plus extra for garnish)
- 1 tablespoon salt (adjust to taste)
- 1 tablespoon black pepper
- 2 medium potatoes, peeled and cubed
- 2 carrots, sliced
- Optional: sesame seeds for garnish
Cooking Instructions:
- Prepare the Beef Short Ribs: Begin by rinsing the beef short ribs under cold water to remove any impurities. Pat them dry with paper towels. If the ribs are particularly fatty, you can trim some of the excess fat, but keep enough to guarantee a rich flavor.
- Blanch the Ribs: In a large pot, bring 8 cups of water to a boil. Add the beef short ribs and blanch for about 5 minutes. This step helps to remove any impurities and excess fat. After blanching, drain the ribs and rinse them under cold water again.
- Make the Broth: In the same pot, add the blanched ribs back in along with 8 cups of fresh water. Add the quartered onion, minced garlic, sliced ginger, and bring it to a boil over high heat.
- Add Seasonings: Once boiling, reduce the heat to medium-low. Stir in the soy sauce, gochugaru, sesame oil, salt, and black pepper. Allow the stew to simmer for about 1.5 to 2 hours, or until the beef becomes tender and the flavors meld together.
- Incorporate Vegetables: After the beef has reached tenderness, add the cubed potatoes and sliced carrots to the pot. Continue to simmer for an additional 30 minutes, or until the vegetables are cooked through but still firm.
- Finish and Serve: Once the vegetables are tender, taste the stew and adjust seasoning if necessary. Stir in the chopped green onions just before serving. Ladle the stew into bowls, garnishing with additional green onions and sesame seeds if desired.
Extra Tips:
When making Galbitang, the quality of the beef short ribs greatly influences the flavor of the stew. Look for well-marbled ribs for the best taste and tenderness.
Additionally, for a richer broth, consider simmering the stew for longer and skimming off any excess fat that rises to the surface. This dish can also be made a day in advance; the flavors deepen as it sits, making it even more delicious when reheated.
Enjoy your Galbitang with a side of steamed rice and some pickled vegetables for a complete Korean dining experience!
Korean BBQ Chicken (Dak Galbi)
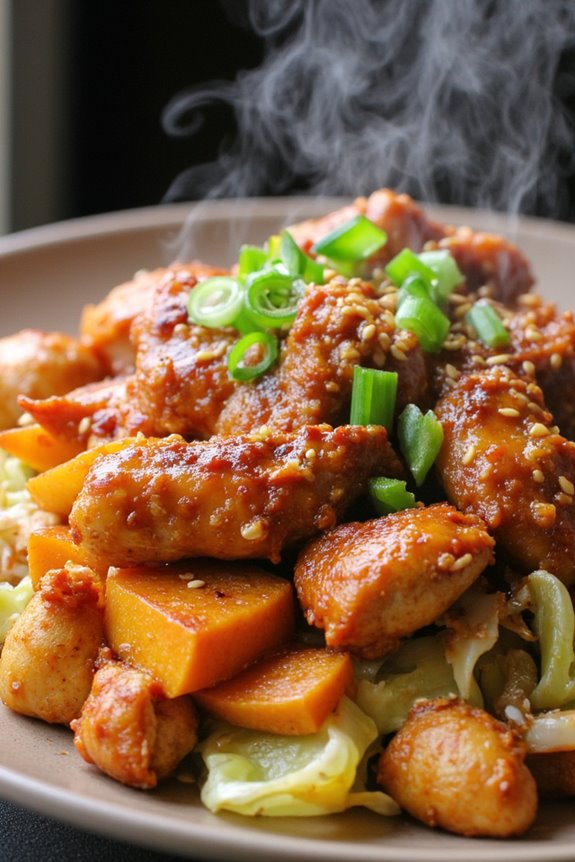
Korean BBQ Chicken, or Dak Galbi, is a vibrant and flavorful dish that’s guaranteed to satisfy your cravings while providing a healthy dose of protein. This dish features marinated chicken pieces stir-fried with a colorful array of vegetables, including cabbage, sweet potatoes, and scallions, all coated in a spicy and savory sauce. Traditionally served on a sizzling plate, Dak Galbi is often enjoyed with a side of rice, making it a hearty and fulfilling meal.
What sets Dak Galbi apart is its balance of flavors and textures. The marinated chicken becomes tender and juicy, while the vegetables add crunch and freshness. The spicy sauce, made from gochujang (Korean chili paste), soy sauce, and other seasonings, brings everything together with a delightful kick. This dish isn’t only delicious but also a great option for those looking to incorporate more protein into their diet, as chicken is a lean source of protein that complements the nutritious vegetables.
Ingredients (Serves 4-6):
- 1.5 pounds boneless, skinless chicken thighs, cut into bite-sized pieces
- 1/4 cup gochujang (Korean chili paste)
- 2 tablespoons soy sauce
- 2 tablespoons sesame oil
- 2 tablespoons honey or sugar
- 1 tablespoon garlic, minced
- 1 tablespoon ginger, grated
- 1/2 teaspoon black pepper
- 2 cups cabbage, chopped
- 1 medium sweet potato, peeled and sliced thinly
- 1 cup scallions, chopped
- 1 tablespoon sesame seeds (for garnish)
- Cooked rice (for serving)
Cooking Instructions:
- Marinate the Chicken: In a large bowl, combine the gochujang, soy sauce, sesame oil, honey or sugar, minced garlic, grated ginger, and black pepper. Add the chicken pieces to the bowl and mix well to ascertain all the chicken is coated in the marinade. Cover and let marinate for at least 30 minutes (or up to 2 hours in the refrigerator for deeper flavor).
- Prepare the Vegetables: While the chicken is marinating, prepare your vegetables. Chop the cabbage, slice the sweet potato thinly, and chop the scallions. Having these ready will make the cooking process smoother.
- Cook the Chicken: Heat a large skillet or wok over medium-high heat. Once hot, add the marinated chicken along with all the marinade. Stir-fry for about 5-7 minutes, or until the chicken is cooked through and starts to brown slightly.
- Add the Vegetables: Add the chopped cabbage and sweet potato slices to the skillet. Stir well to combine all the ingredients, allowing the vegetables to cook alongside the chicken. Continue to stir-fry for another 5-10 minutes, or until the sweet potatoes are tender and the cabbage is wilted.
- Finish with Scallions: Once the chicken and vegetables are cooked, add the chopped scallions and give everything a final stir. Cook for an additional 1-2 minutes to warm the scallions.
- Serve: Transfer the Dak Galbi to a serving platter, sprinkle with sesame seeds, and serve hot alongside cooked rice. Enjoy the savory, spicy flavors of your homemade Korean BBQ Chicken!
Extra Tips:
When preparing Dak Galbi, feel free to customize the vegetables based on what you have on hand or your personal preferences. Bell peppers, zucchini, or even mushrooms can make excellent additions.
Additionally, if you prefer a milder flavor, you can adjust the amount of gochujang in the marinade. Finally, for an authentic experience, consider serving the dish with lettuce leaves, allowing diners to wrap the chicken and vegetables for a fun, interactive meal.
Tofu Stir-Fry With Vegetables
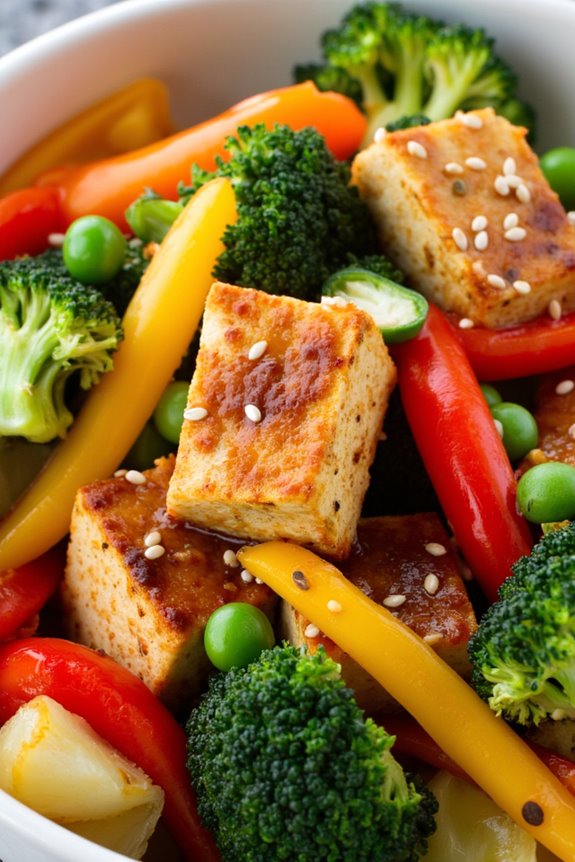
Tofu Stir-Fry with Vegetables is a delicious and nutritious dish that’s perfect for anyone looking to increase their protein intake while enjoying vibrant flavors. This recipe highlights the versatility of tofu, a staple in Korean cuisine, and pairs it with an assortment of colorful vegetables. The combination not only satisfies the palate but also provides a healthy dose of nutrients, making it an ideal choice for both vegetarians and meat-eaters alike.
The beauty of this dish lies in its simplicity and adaptability. You can customize the vegetables based on what you have on hand, and the stir-fry sauce can be adjusted to suit your taste preferences. Whether you serve it over a bed of rice or enjoy it on its own, this Tofu Stir-Fry with Vegetables is sure to become a favorite in your household.
Ingredients (Serves 4-6)
- 14 oz. firm tofu, drained and pressed
- 2 tablespoons vegetable oil
- 1 red bell pepper, sliced
- 1 yellow bell pepper, sliced
- 1 cup broccoli florets
- 1 cup snap peas
- 2 carrots, julienned
- 4 green onions, chopped
- 3 cloves garlic, minced
- 2 tablespoons soy sauce
- 1 tablespoon sesame oil
- 1 tablespoon rice vinegar
- 1 teaspoon ginger, grated
- 1 teaspoon cornstarch (optional, for thickening)
- Sesame seeds for garnish
Cooking Instructions
- Prepare the Tofu: Start by cutting the drained tofu into bite-sized cubes. For a firmer texture, you can press the tofu between paper towels or a clean kitchen towel for about 15 minutes to remove excess moisture. This will help the tofu absorb flavors and achieve a nice golden crust when cooked.
- Heat the Oil: In a large non-stick skillet or wok, heat the vegetable oil over medium-high heat. Confirm the oil is hot before adding the tofu, as this will help in achieving a crispy texture.
- Cook the Tofu: Add the tofu cubes to the skillet in a single layer. Allow them to cook without stirring for about 4-5 minutes until they’re golden brown on one side. Then use a spatula to gently turn the tofu and cook for an additional 3-4 minutes on the other sides until all pieces are golden and crispy. Remove the tofu from the skillet and set aside.
- Sauté the Vegetables: In the same skillet, add a bit more oil if needed and toss in the minced garlic and grated ginger. Sauté for about 30 seconds until fragrant, then add the sliced bell peppers, broccoli florets, snap peas, and julienned carrots. Stir-fry the vegetables for about 5-7 minutes until they’re tender-crisp.
- Combine Ingredients: Return the cooked tofu to the skillet with the vegetables. In a small bowl, mix together the soy sauce, sesame oil, rice vinegar, and cornstarch (if using). Pour the sauce over the tofu and vegetables, stirring well to combine. Cook for an additional 2-3 minutes to heat through and allow the flavors to meld.
- Finish and Serve: Remove the skillet from heat and stir in the chopped green onions. Serve the Tofu Stir-Fry hot, garnished with sesame seeds. This dish can be enjoyed on its own or served over a bed of rice or noodles.
Extra Tips
For enhanced flavor, consider marinating the tofu in the soy sauce mixture for about 30 minutes before cooking. This will infuse the tofu with more depth and taste.
You can also experiment with different vegetables based on the season or your personal preferences, such as bok choy, zucchini, or mushrooms.
Finally, if you enjoy a bit of heat, feel free to add some red pepper flakes or sliced chili peppers to the stir-fry for an extra kick!
Korean Lentil Soup
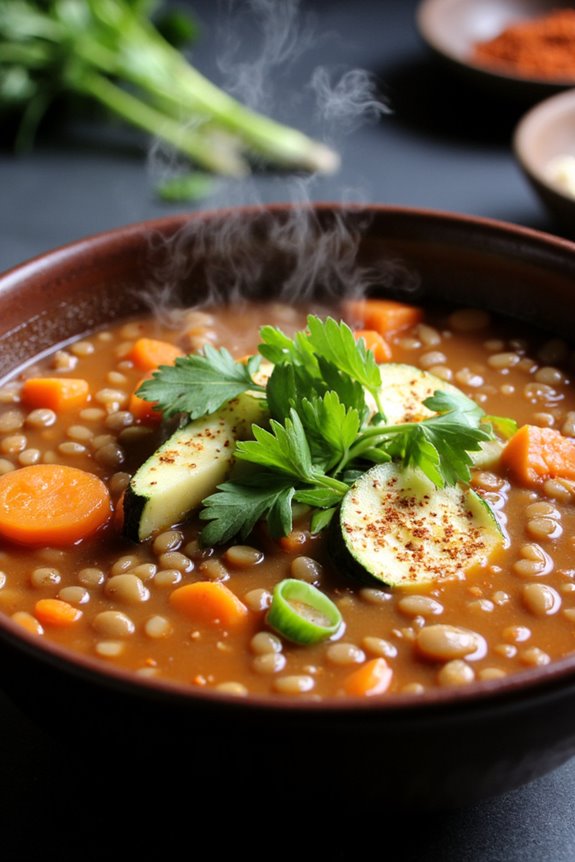
Korean Lentil Soup is a nourishing and hearty dish that combines the earthy flavors of lentils with traditional Korean ingredients. This recipe not only provides a plant-based protein source but also brings a wealth of nutritional benefits, making it an ideal meal for anyone looking to enjoy a healthy and filling dish.
The combination of spices, vegetables, and lentils creates a comforting soup perfect for any occasion, whether it’s a chilly day or a cozy gathering with friends and family. In Korea, lentils aren’t as commonly used as in other global cuisines, but this soup offers a unique twist that highlights their versatility.
The addition of gochugaru (Korean red pepper flakes) and soy sauce infuses the dish with a delightful umami taste, while the fresh vegetables add color and texture. This Korean Lentil Soup is easy to prepare and can be made in about an hour, ensuring that you can whip up a healthy meal without too much hassle.
Ingredients (serving size: 4-6 people):
- 1 cup green or brown lentils, rinsed and drained
- 1 tablespoon vegetable oil
- 1 medium onion, diced
- 2 cloves garlic, minced
- 1 medium carrot, diced
- 1 medium zucchini, diced
- 1 teaspoon ginger, minced
- 4 cups vegetable broth
- 2 tablespoons soy sauce
- 1 tablespoon gochugaru (Korean red pepper flakes)
- 1 teaspoon sesame oil
- Salt and pepper to taste
- 2 green onions, chopped (for garnish)
- Fresh cilantro (optional, for garnish)
Cooking Instructions:
- Prepare the Lentils: Begin by rinsing the lentils under cold water in a fine mesh strainer. This helps remove any debris or impurities. Once rinsed, set the lentils aside.
- Sauté the Aromatics: In a large pot, heat the vegetable oil over medium heat. Add the diced onion and sauté for about 3-4 minutes until translucent. Then, add the minced garlic and ginger, stirring for an additional minute until fragrant.
- Add Vegetables: Next, add the diced carrot and zucchini to the pot. Sauté for another 5 minutes until the vegetables begin to soften, stirring occasionally to prevent sticking.
- Combine Ingredients: Add the rinsed lentils to the pot along with the vegetable broth. Stir in the soy sauce, gochugaru, and sesame oil. Bring the mixture to a boil, then reduce the heat to low.
- Simmer the Soup: Cover the pot and let the soup simmer for about 30-35 minutes or until the lentils are tender. Stir occasionally and check for the desired consistency. If the soup is too thick, you can add a bit more broth or water.
- Season and Serve: Once the lentils are cooked, taste the soup and season with salt and pepper as needed. Ladle the soup into bowls, and garnish with chopped green onions and fresh cilantro if desired.
Extra Tips: When cooking Korean Lentil Soup, feel free to customize the vegetables based on what you have on hand or what’s in season. Spinach, kale, or bell peppers can be excellent additions.
Additionally, if you prefer a spicier soup, increase the amount of gochugaru to suit your taste. This dish can also be made in advance and stored in the refrigerator for up to three days, allowing the flavors to meld beautifully!
Spicy Pork Bulgogi
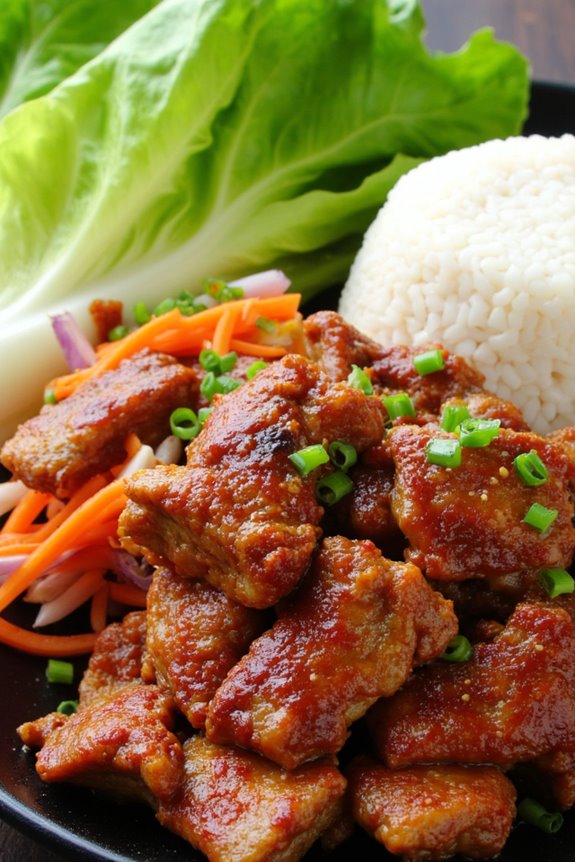
Spicy Pork Bulgogi is a delectable Korean dish that features tender marinated pork stir-fried to perfection. Traditionally, Bulgogi refers to marinated meat that’s grilled or stir-fried, and in this variation, the pork is infused with a spicy and savory marinade that elevates its flavor profile. This dish isn’t only delicious but also packed with protein, making it a great choice for those looking to incorporate more protein into their meals.
The beauty of Spicy Pork Bulgogi lies in its versatility. It can be served with a side of steamed rice, wrapped in lettuce leaves, or even as a filling for tacos. The marinade typically includes ingredients like gochujang (Korean red chili paste), soy sauce, garlic, and ginger, which work together to create a flavorful and aromatic dish.
Whether you’re hosting a dinner party or simply craving a comforting meal, Spicy Pork Bulgogi is sure to impress.
Ingredients (Serves 4-6)
- 1 lb (450g) pork shoulder, thinly sliced
- 1/4 cup soy sauce
- 2 tablespoons gochujang (Korean red chili paste)
- 2 tablespoons sesame oil
- 1 tablespoon sugar
- 4 cloves garlic, minced
- 1 tablespoon ginger, minced
- 1 teaspoon black pepper
- 1 tablespoon rice wine (optional)
- 1 medium onion, thinly sliced
- 1 medium carrot, julienned
- 3 green onions, chopped
- Lettuce leaves (for serving)
- Cooked rice (for serving)
Cooking Instructions
- Prepare the Marinade: In a large bowl, combine soy sauce, gochujang, sesame oil, sugar, minced garlic, minced ginger, black pepper, and rice wine (if using). Whisk together until the sugar is dissolved and the mixture is well combined. This marinade will infuse the pork with rich flavors.
- Marinate the Pork: Add the thinly sliced pork shoulder to the marinade. Make sure all the pieces are evenly coated. Cover the bowl with plastic wrap or transfer the mixture to a zip-top bag and refrigerate for at least 30 minutes, or up to 4 hours for maximum flavor. This step is essential for tenderizing the meat and enhancing the overall taste.
- Prepare the Vegetables: While the pork is marinating, slice the onion and julienne the carrot. Chop the green onions for garnish. These vegetables will add texture and freshness to the dish.
- Cook the Pork: Heat a large skillet or wok over medium-high heat. Once hot, add the marinated pork along with the marinade to the skillet. Stir-fry the pork for about 5-7 minutes, or until it’s cooked through and slightly caramelized. The high heat helps to achieve a nice sear on the meat.
- Add the Vegetables: Once the pork is nearly cooked, add the sliced onion and julienned carrot to the skillet. Stir-fry for an additional 2-3 minutes, until the vegetables are tender yet crisp. This step incorporates freshness and crunch into the dish.
- Serve: Remove the skillet from heat and garnish the dish with the chopped green onions. Serve the Spicy Pork Bulgogi on a platter alongside lettuce leaves and a bowl of cooked rice. Encourage diners to wrap the pork and vegetables in lettuce for a delicious bite.
Extra Tips
For an extra kick, feel free to adjust the amount of gochujang in the marinade according to your heat preference. Additionally, you can add sliced bell peppers or mushrooms to the stir-fry for added flavor and texture.
If you have leftovers, Spicy Pork Bulgogi can be stored in an airtight container in the refrigerator for up to 3 days, making it a perfect meal prep option. Enjoy this flavorful dish with your favorite sides for a complete Korean dining experience!
Kimchi Fried Rice With Eggs
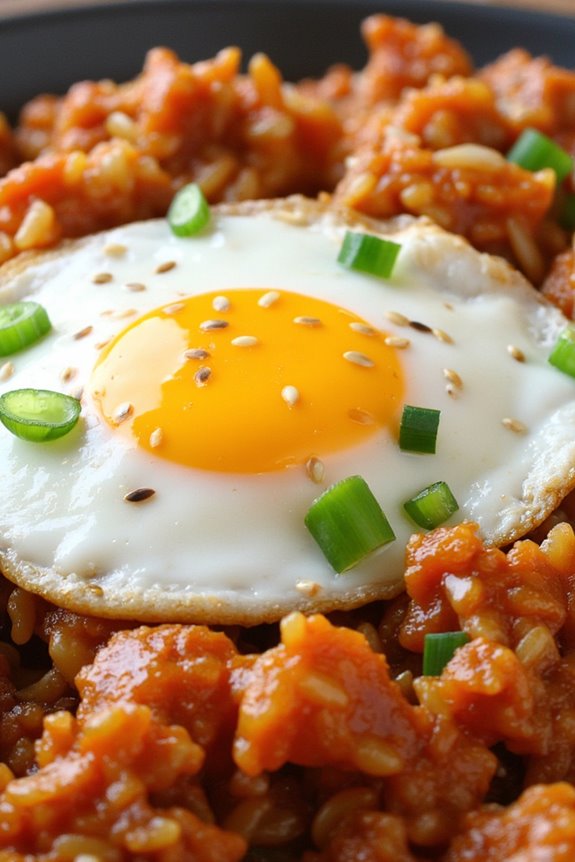
Kimchi Fried Rice, known as “Kimchi Bokkeumbap” in Korean, is a beloved comfort food that brings together the robust flavors of fermented kimchi and perfectly cooked rice. This dish isn’t only quick to prepare but is also a great way to use leftover rice and kimchi. The addition of eggs adds a rich texture and boosts the protein content, making it a satisfying meal for any time of the day. Whether you enjoy it for breakfast, lunch, or dinner, this dish is sure to please your taste buds.
Creating the perfect Kimchi Fried Rice requires a balance of flavors and textures. The key to a delicious fried rice lies in using day-old rice, as it helps to achieve the ideal consistency without becoming mushy. As you stir-fry the ingredients, the kimchi releases its tangy flavor, infusing the rice with a delightful kick. Topped with sunny-side-up or scrambled eggs, this dish is a complete meal that’s both hearty and nutritious.
Ingredients (Serves 4-6):
- 4 cups cooked jasmine rice (preferably day-old)
- 1 cup kimchi, chopped
- 2 tbsp vegetable oil
- 1 medium onion, diced
- 2-3 green onions, sliced
- 3 cloves garlic, minced
- 2 tbsp soy sauce
- 1 tbsp gochujang (Korean red chili paste)
- 4-6 large eggs
- Salt and pepper, to taste
- Sesame seeds (for garnish)
Cooking Instructions:
- Prepare the Ingredients: Begin by gathering all your ingredients and ensuring the rice is cold and clumped together. Chop the kimchi into small pieces, and dice the onion and garlic. Slice the green onions and set aside for garnishing later.
- Sauté the Aromatics: Heat the vegetable oil in a large skillet or wok over medium-high heat. Add the diced onion and sauté for 2-3 minutes until they become translucent. Then, add the minced garlic and cook for an additional 30 seconds until fragrant.
- Add the Kimchi: Stir in the chopped kimchi and cook for about 3-4 minutes, allowing the kimchi to caramelize slightly. This step enhances the flavor and adds depth to the dish.
- Incorporate the Rice: Add the cooked rice to the skillet, breaking apart any clumps with a spatula. Pour in the soy sauce and gochujang, mixing everything thoroughly. Continue to stir-fry the rice for about 5-7 minutes, ensuring it’s heated through and well combined with the kimchi.
- Season to Taste: Taste the fried rice and season with salt and pepper, as needed. If you prefer a spicier kick, you can add more gochujang at this stage.
- Cook the Eggs: In a separate non-stick pan, fry the eggs sunny-side up or scramble them, depending on your preference. Cook until the whites are set and the yolks are still runny for the sunny-side-up method.
- Serve and Garnish: Once the fried rice is ready, transfer it to a serving platter or individual bowls. Top each serving with a fried egg and sprinkle with sliced green onions and sesame seeds for garnish.
Extra Tips:
For an added layer of flavor, consider incorporating some protein such as diced tofu, cooked chicken, or shrimp into your Kimchi Fried Rice.
You can also adjust the level of spiciness by varying the amount of gochujang or adding some gochugaru (Korean chili flakes) for extra heat. If you don’t have day-old rice, spread freshly cooked rice on a baking sheet and refrigerate it for about 30 minutes to cool before using.
Enjoy your culinary adventure with this delightful Korean dish!
Grilled Mackerel With Soy Sauce
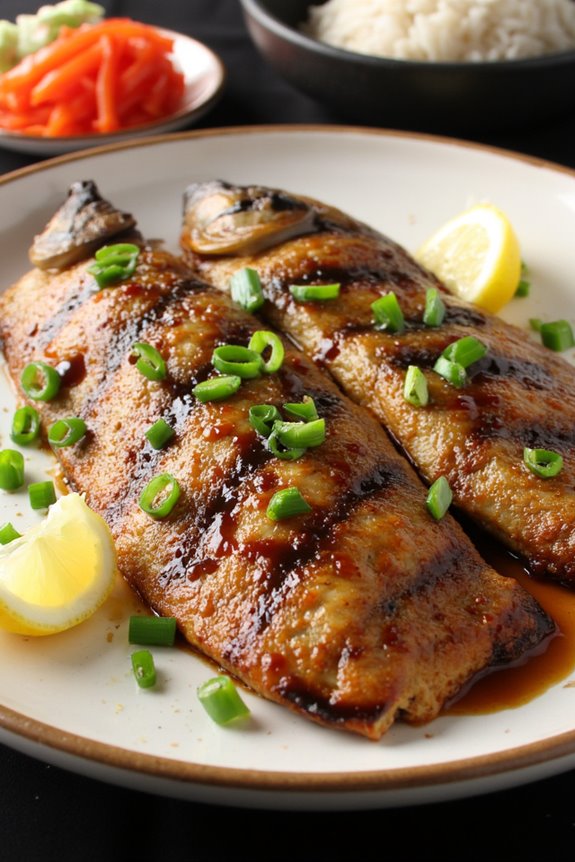
Grilled Mackerel With Soy Sauce is a delicious and healthful dish that embodies the umami flavors of Korean cuisine. This recipe highlights the rich, flavorful profile of mackerel, a fish high in protein and omega-3 fatty acids. The soy sauce marinade adds depth and enhances the natural taste of the fish, making it a perfect addition to any meal. Served with a side of steamed rice and vegetables, this dish isn’t only nutritious but also incredibly satisfying.
Preparing Grilled Mackerel With Soy Sauce is straightforward and can be made in under 30 minutes, making it an ideal choice for busy weeknights or an impressive dinner for guests. The key to achieving a perfectly grilled mackerel lies in the marination process, which allows the fish to absorb the savory flavors of the soy sauce, garlic, and ginger. Follow this easy recipe to enjoy a delightful meal that will leave everyone asking for seconds.
Ingredients (Serves 4-6):
- 4 whole mackerel, cleaned and scaled
- 1/4 cup soy sauce
- 2 tablespoons sesame oil
- 2 tablespoons rice vinegar
- 2 tablespoons honey or sugar
- 4 cloves garlic, minced
- 1 tablespoon fresh ginger, grated
- 1 teaspoon black pepper
- 2 green onions, chopped (for garnish)
- Lemon wedges (for serving)
Cooking Instructions:
- Prepare the Marinade: In a medium bowl, combine the soy sauce, sesame oil, rice vinegar, honey (or sugar), minced garlic, grated ginger, and black pepper. Whisk the ingredients together until well mixed. This marinade will infuse the mackerel with rich flavors.
- Marinate the Mackerel: Place the cleaned mackerel in a large resealable plastic bag or a shallow dish. Pour the marinade over the fish, making sure it’s well-coated. Seal the bag or cover the dish, and refrigerate for at least 15 minutes, or up to 1 hour for a stronger flavor. This step is essential for achieving a flavorful grilled fish.
- Preheat the Grill: While the mackerel is marinating, preheat your grill to medium-high heat (about 375°F to 400°F). If using a charcoal grill, confirm that the coals are evenly distributed for consistent heating. A well-heated grill will give the fish a nice sear.
- Grill the Mackerel: Remove the mackerel from the marinade and let any excess drip off. Place the fish on the grill, skin-side down. Grill for about 4-5 minutes on one side, then carefully flip the fish using a spatula or grilling tongs. Grill for an additional 4-5 minutes on the other side until the fish is cooked through and has grill marks.
- Serve the Dish: Once cooked, transfer the grilled mackerel to a serving platter. Garnish with chopped green onions and serve with lemon wedges on the side. The lemon adds a revitalizing brightness to the dish.
Extra Tips:
When grilling mackerel, it’s important to keep an eye on the cooking time to avoid overcooking, which can cause the fish to become dry. If you’re concerned about sticking, you can lightly oil the grill grates before placing the mackerel on them.
Additionally, consider serving the fish with a side of pickled vegetables or a simple salad to balance the richness of the mackerel. Enjoy your meal!
Korean Beef and Broccoli
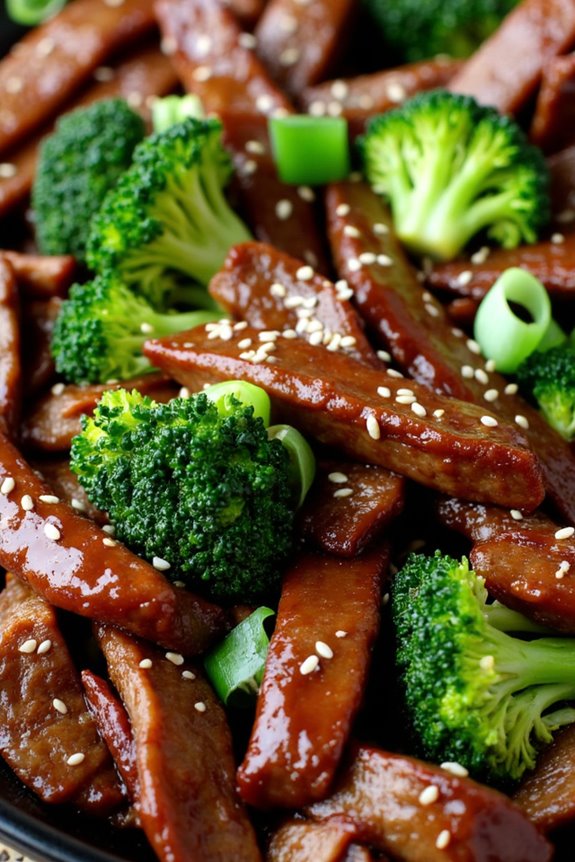
Korean Beef and Broccoli is a delightful dish that combines tender beef strips with vibrant broccoli florets, all coated in a savory and slightly sweet Korean-inspired sauce. This dish isn’t only packed with flavor but also offers a generous amount of protein, making it a perfect option for those looking to maintain a healthy diet while enjoying delicious food.
The combination of sesame oil, soy sauce, and garlic creates a mouthwatering glaze that elevates the simple ingredients into a harmonious meal. This recipe is straightforward and quick to prepare, making it ideal for busy weeknights or when you want to impress your guests with a flavorful Asian-inspired dish.
Served over steamed rice or quinoa, Korean Beef and Broccoli is sure to become a family favorite. With a perfect balance of textures and flavors, this dish isn’t only satisfying but also nutritious.
Ingredients (Serves 4-6)
- 1 pound of flank steak, thinly sliced against the grain
- 4 cups of broccoli florets
- 3 tablespoons of soy sauce
- 2 tablespoons of brown sugar
- 2 tablespoons of sesame oil
- 3 cloves of garlic, minced
- 1 tablespoon of fresh ginger, minced
- 1 tablespoon of cornstarch
- ½ cup of water
- 2 tablespoons of vegetable oil
- 2 tablespoons of sesame seeds (for garnish)
- 3 green onions, chopped (for garnish)
Cooking Instructions
- Prepare the Beef: Start by slicing the flank steak against the grain into thin strips. This will guarantee the beef remains tender during cooking. If the meat is slightly frozen, it will be easier to cut.
- Marinate the Beef: In a medium bowl, combine the soy sauce, brown sugar, sesame oil, minced garlic, and minced ginger. Add the sliced beef to the marinade and let it sit for at least 15-30 minutes. This will infuse the beef with flavor and help tenderize it.
- Blanch the Broccoli: While the beef is marinating, bring a pot of water to a boil. Add the broccoli florets and blanch them for about 2-3 minutes until they’re bright green and slightly tender. Immediately transfer the broccoli to an ice bath to stop the cooking process. Drain and set aside.
- Cook the Beef: Heat the vegetable oil in a large skillet over medium-high heat. Add the marinated beef to the skillet in a single layer, cooking for about 3-4 minutes or until browned. Avoid overcrowding the pan; you may need to do this in batches.
- Make the Sauce: In a small bowl, mix the cornstarch with ½ cup of water until smooth. Once the beef is cooked, return all the beef to the skillet and add the blanched broccoli. Pour the cornstarch mixture into the skillet, stirring well to coat the beef and broccoli with the sauce. Cook for an additional 2-3 minutes until the sauce thickens.
- Garnish and Serve: Once the sauce has thickened and everything is well combined, remove the skillet from heat. Garnish with sesame seeds and chopped green onions before serving. Enjoy your Korean Beef and Broccoli over steamed rice or quinoa for a complete meal.
Extra Tips
When preparing Korean Beef and Broccoli, consider using a meat tenderizer or marinating the beef overnight for an even more tender texture. Additionally, feel free to customize the dish by adding other vegetables such as bell peppers or snap peas for added color and nutrition.
If you prefer a spicier kick, a dash of red pepper flakes or a drizzle of sriracha can enhance the flavor profile beautifully. Enjoy your cooking experience!
Spicy Chicken Noodle Soup (Dak Kalguksu)
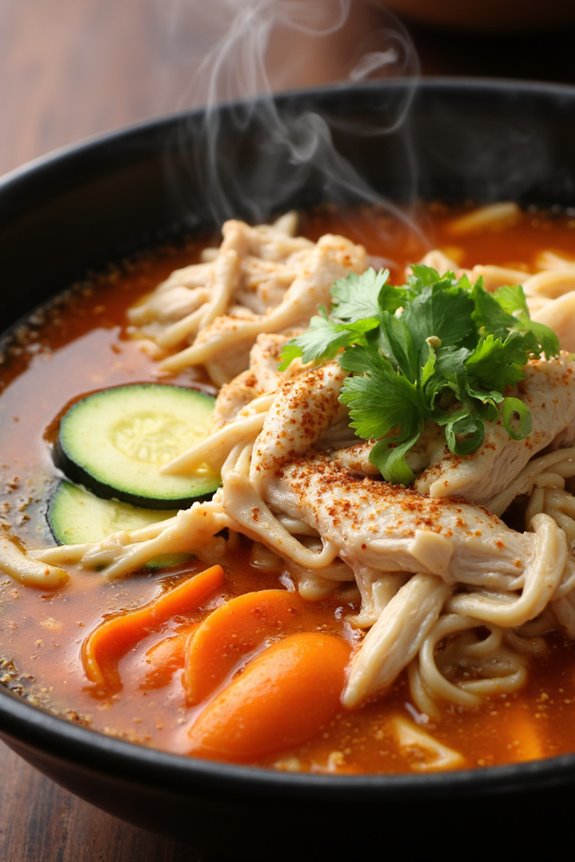
Dak Kalguksu is a comforting and hearty Korean dish that brings together tender chicken, chewy handmade noodles, and a spicy, flavorful broth. This dish is perfect for those chilly evenings when you’re craving something warm and satisfying. The combination of spices and fresh ingredients not only makes it delicious but also packs in a healthy dose of protein, making it an excellent option for a nourishing meal.
To make Dak Kalguksu, you’ll first prepare the chicken and broth, allowing the flavors to meld beautifully. The handmade noodles add a delightful texture and authenticity to this dish. Once everything is cooked, you can garnish your soup with fresh herbs and enjoy a bowl of this delectable Korean comfort food.
Ingredients (Serves 4-6):
- 1 whole chicken (about 3-4 pounds), cut into pieces
- 8 cups water
- 2 tablespoons sesame oil
- 1 medium onion, sliced
- 4 cloves garlic, minced
- 1-inch piece ginger, sliced
- 2 medium carrots, julienned
- 1 medium zucchini, julienned
- 2-3 green onions, chopped
- 2 tablespoons gochugaru (Korean red pepper flakes)
- 2 tablespoons soy sauce
- 1 tablespoon salt (adjust to taste)
- 1 tablespoon black pepper
- 4 servings of kalguksu noodles (or any thick wheat noodles)
- Fresh cilantro or parsley for garnish
Cooking Instructions:
- Prepare the Chicken and Broth: In a large pot, add the chicken pieces and cover with 8 cups of water. Bring to a boil over medium-high heat. Once boiling, reduce the heat to low, skim off any foam that rises to the surface, and let it simmer for about 30 minutes. This will create a rich chicken broth.
- Add Aromatics: After simmering the chicken, add sesame oil, sliced onion, minced garlic, and ginger to the pot. Continue to simmer for another 15 minutes until the chicken is fully cooked and tender. You can check the doneness by verifying the internal temperature reaches 165°F (75°C).
- Incorporate Vegetables and Spice: Once the chicken is cooked, remove it from the pot and set it aside to cool slightly. In the same broth, add the julienned carrots, zucchini, gochugaru, soy sauce, salt, and black pepper. Stir well and let the vegetables cook for 10 minutes until tender.
- Make the Noodles: While the vegetables are cooking, prepare the kalguksu noodles according to the package instructions. Drain and set aside.
- Shred the Chicken: While the vegetables are cooking, shred the cooled chicken into bite-sized pieces, discarding the skin and bones. Return the shredded chicken to the pot and stir to combine.
- Combine and Serve: Once everything is well combined, add the cooked noodles to the pot and stir gently to confirm they’re coated in the broth. Let the soup simmer for an additional 5 minutes to heat everything through.
- Garnish and Enjoy: Ladle the soup into bowls and garnish with chopped green onions and fresh cilantro or parsley. Serve hot and enjoy your homemade Dak Kalguksu!
Extra Tips:
For a richer flavor, consider adding a splash of fish sauce or a tablespoon of miso paste to the broth. You can also adjust the level of spiciness by varying the amount of gochugaru you use. If you’re short on time, store-bought noodles can be used, but nothing beats the texture of fresh kalguksu noodles.
Finally, feel free to include other vegetables like mushrooms or spinach for additional nutrition and flavor!
Shrimp and Vegetable Pancakes (Haemul Pajeon)

Shrimp and Vegetable Pancakes, known as Haemul Pajeon in Korean, are a delicious and savory treat that combines the freshness of seafood with the crunch of vegetables, all encased in a crispy pancake. This dish isn’t only high in protein due to the shrimp but also offers a delightful mix of textures and flavors that make it a favorite among many.
Often enjoyed as an appetizer or snack, Haemul Pajeon can also be served with dipping sauces, making it perfect for gatherings or a cozy meal at home.
The beauty of Haemul Pajeon lies in its versatility. You can customize the vegetables used, depending on what you have on hand or your personal preferences. Common additions include scallions, zucchini, and bell peppers, which not only add color but also enhance the pancake’s nutritional value.
Whether you’re a fan of seafood or just looking to add more protein to your diet, these pancakes are sure to impress.
Ingredients (serving size: 4-6 people):
- 1 cup all-purpose flour
- 1 cup water
- 1 large egg
- 1/2 teaspoon salt
- 1/4 teaspoon black pepper
- 1 cup cooked shrimp, peeled and deveined
- 1 cup green onions, chopped
- 1/2 cup zucchini, julienned
- 1/2 cup bell pepper, thinly sliced
- 1/4 cup carrots, julienned
- Vegetable oil for frying
- Soy sauce (for dipping, optional)
Cooking Instructions:
- Prepare the Batter: In a large mixing bowl, combine the all-purpose flour, water, egg, salt, and black pepper. Whisk the ingredients together until you achieve a smooth batter without lumps. This batter will serve as the base for your pancake, providing a light and crispy texture.
- Add the Fillings: Stir in the cooked shrimp, green onions, zucchini, bell pepper, and carrots into the batter. Mix gently until all the ingredients are evenly coated with the batter. The shrimp and vegetables will add flavor and nutrition, making the pancakes hearty and satisfying.
- Heat the Pan: In a large non-stick skillet, heat about 2 tablespoons of vegetable oil over medium heat. Confirm the oil is hot enough by sprinkling a drop of batter into the pan—if it sizzles, the oil is ready for frying.
- Cook the Pancakes: Pour half of the batter mixture into the hot skillet, spreading it evenly to form a large pancake. Cook for about 4-5 minutes or until the bottom is golden brown. Use a spatula to check the underside periodically.
- Flip the Pancake: Once the bottom is golden, carefully flip the pancake using the spatula. Add a little more oil to the pan if necessary, and cook the other side for an additional 4-5 minutes until it’s also golden brown and cooked through.
- Repeat Cooking: Remove the pancake from the skillet and place it on a paper towel to absorb excess oil. Repeat the process with the remaining batter, adding more oil to the skillet as needed for each pancake.
- Serve: Cut the pancakes into wedges and serve them warm with soy sauce for dipping. These pancakes are best enjoyed fresh, but they can also be reheated in a skillet if needed.
Extra Tips: For an extra crunch, consider adding a tablespoon of cornstarch to the batter. This will enhance the crispiness of the pancakes, making every bite even more enjoyable.
Additionally, feel free to experiment with different vegetables or proteins such as squid or scallops, allowing you to create your perfect version of Haemul Pajeon. Enjoy your cooking experience and the delicious results!
Korean Quinoa Bibimbap
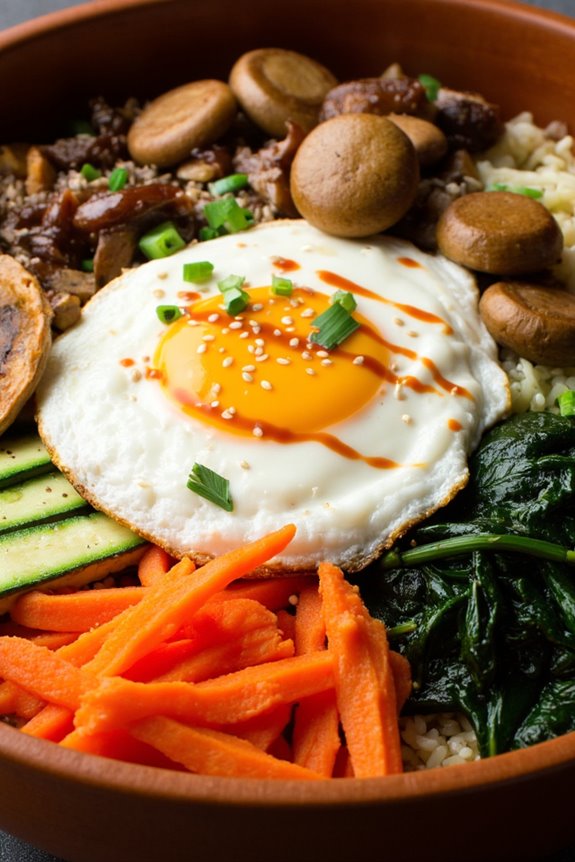
Korean Quinoa Bibimbap is a nutritious and colorful dish that has gained popularity for its health benefits and flavor. This delightful bowl combines seasoned vegetables, protein, and quinoa, a superfood packed with essential amino acids, making it an excellent option for those looking to boost their protein intake.
Traditionally served with a fried egg on top and a spicy gochujang sauce, this modern twist on bibimbap isn’t only satisfying but also a feast for the eyes. This recipe is perfect for meal prep or a family dinner, and it offers a great way to incorporate a variety of vegetables into one meal.
Each ingredient in this bibimbap contributes to a balanced and wholesome dish that’s both filling and delicious. Whether you’re a fan of Korean cuisine or trying it for the first time, Korean Quinoa Bibimbap is an easy and gratifying choice that everyone will love.
Ingredients (Serves 4-6):
- 1 cup quinoa
- 2 cups water or vegetable broth
- 1 cup carrots, julienned
- 1 cup zucchini, julienned
- 1 cup spinach, chopped
- 1 cup shiitake mushrooms, sliced
- 4 large eggs (optional for topping)
- 2 tablespoons sesame oil
- 2 tablespoons soy sauce
- 1 tablespoon gochujang (Korean chili paste)
- 1 tablespoon rice vinegar
- 1 tablespoon sesame seeds
- Salt and pepper to taste
- Green onions, chopped (for garnish)
Cooking Instructions:
1. Cook the Quinoa: Rinse 1 cup of quinoa under cold water to remove any bitterness. In a medium saucepan, combine the rinsed quinoa and 2 cups of water or vegetable broth. Bring to a boil, then reduce the heat to low, cover, and let it simmer for about 15 minutes or until the quinoa is fluffy and all the liquid is absorbed.
Remove from heat and let it sit covered for an additional 5 minutes before fluffing with a fork.
2. Sauté the Vegetables: In a large skillet, heat 1 tablespoon of sesame oil over medium heat. Add the julienned carrots and zucchini, sautéing for about 3-4 minutes until tender. Remove them from the skillet and set aside.
In the same skillet, add another tablespoon of sesame oil, then add the chopped spinach and sliced shiitake mushrooms. Sauté for about 3-5 minutes until the mushrooms are cooked and the spinach is wilted. Season the vegetables with salt and pepper to taste.
3. Prepare the Gochujang Sauce: In a small bowl, mix together the gochujang, soy sauce, rice vinegar, and a splash of water to create a sauce. Adjust the spiciness to your preference by adding more gochujang if desired.
4. Fry the Eggs: In the same skillet, you can Fry the Eggs if you’re adding them to your bibimbap. Heat a little oil over medium heat and crack the eggs into the skillet. Cook until the whites are set, and the yolks are still runny (or to your desired doneness).
5. Assemble the Bibimbap: In each serving bowl, place a scoop of cooked quinoa as the base. Arrange the sautéed vegetables on top of the quinoa in sections for a beautiful presentation. Place a fried egg on top of the vegetables. Drizzle with the gochujang sauce and sprinkle with sesame seeds and chopped green onions.
Extra Tips:
When making Korean Quinoa Bibimbap, feel free to customize the vegetables based on your preferences or what you have on hand. Common additions include bean sprouts, bell peppers, and radishes.
For a vegan version, simply omit the fried egg or substitute it with tofu. Additionally, if you prefer a milder flavor, reduce the amount of gochujang in the sauce or use a mild chili paste instead. Enjoy your healthy, protein-packed meal!