

Exploring vegan Japanese cuisine has become such a rewarding journey. Each recipe is like a little masterpiece, from the cozy miso broth in a ramen bowl to the beautiful vegetable sushi rolls. These plant-forward meals are both nourishing and inspiring. If you’re eager to find out how to create delightful vegan versions of traditional dishes, you’re in the right place. Keep reading to uncover these culinary gems.
Vegan Ramen With Miso Broth
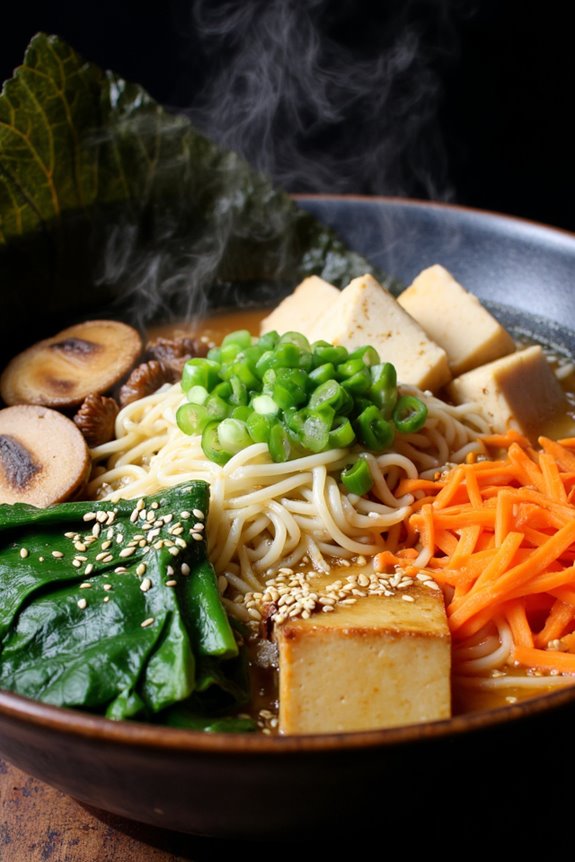
Vegan ramen with miso broth is a comforting and hearty dish that brings the flavors of Japan into your kitchen without the use of animal products. This delicious plant-based ramen features a rich and savory miso broth, perfectly cooked noodles, and a variety of fresh vegetables and toppings that add both texture and nutritional value.
With its umami flavor profile, this dish will satisfy your cravings for a warm bowl of ramen while keeping it completely vegan.
This recipe isn’t only easy to make but also versatile, allowing you to customize the toppings to suit your preferences. Whether you choose to add tofu, mushrooms, or a medley of your favorite vegetables, each bowl can be a unique culinary experience.
Prepare to indulge in a bowl of steaming vegan ramen that brings a taste of Japan straight to your table.
Ingredients (Serves 4-6)
- 4 cups vegetable broth
- 1/4 cup white miso paste
- 3 tablespoons soy sauce
- 2 teaspoons sesame oil
- 2 teaspoons grated ginger
- 2 cloves garlic, minced
- 8 ounces ramen noodles (or any vegan noodles)
- 1 cup shiitake mushrooms, sliced
- 1 cup bok choy, chopped
- 1 cup shredded carrots
- 1 cup bean sprouts
- 1 block firm tofu, cubed
- 2 green onions, chopped
- Sesame seeds for garnish
- Seaweed sheets (nori) for garnish (optional)
Cooking Instructions
1. Prepare the Miso Broth: In a large pot, combine the vegetable broth, white miso paste, soy sauce, sesame oil, grated ginger, and minced garlic. Whisk together over medium heat until the miso paste is fully dissolved and the broth is heated through.
Allow the broth to simmer gently for about 10 minutes to let the flavors meld together.
2. Cook the Ramen Noodles: While the broth is simmering, bring a separate pot of water to a boil. Add the ramen noodles and cook according to package instructions until al dente.
Drain and rinse the noodles under cold water to stop the cooking process, then set aside.
3. Sauté the Vegetables: In a large skillet or wok, heat a splash of sesame oil over medium heat. Add the sliced shiitake mushrooms and sauté for about 4-5 minutes until they begin to soften.
Next, add the chopped bok choy and shredded carrots, continuing to sauté until the bok choy is wilted and the carrots are tender, about 3-4 minutes.
4. Cook the Tofu: In the same skillet, push the vegetables to the side and add the cubed tofu. Cook until the tofu is golden brown on all sides, which should take about 5-7 minutes.
Stir everything together to combine.
5. Assemble the Ramen Bowls: Divide the cooked ramen noodles among serving bowls. Pour the miso broth over the noodles, then top each bowl with the sautéed vegetable and tofu mixture.
Add a handful of bean sprouts to each bowl for freshness.
6. Garnish and Serve: Finish each bowl with a sprinkle of chopped green onions and sesame seeds. If desired, add strips of seaweed (nori) for an extra layer of flavor.
Serve hot and enjoy your delicious vegan ramen!
Extra Tips
When making vegan ramen, feel free to get creative with your choice of vegetables and toppings. This dish is incredibly flexible, so you can easily swap out ingredients based on what you have on hand or what’s in season.
For added flavor, consider marinating the tofu beforehand or adding a splash of chili oil for some heat. Always taste your broth and adjust the seasonings to suit your palate, as the balance of miso and soy sauce can vary based on personal preference.
Enjoy experimenting to create your perfect bowl of vegan ramen!
Shoyu Tofu Stir-Fry
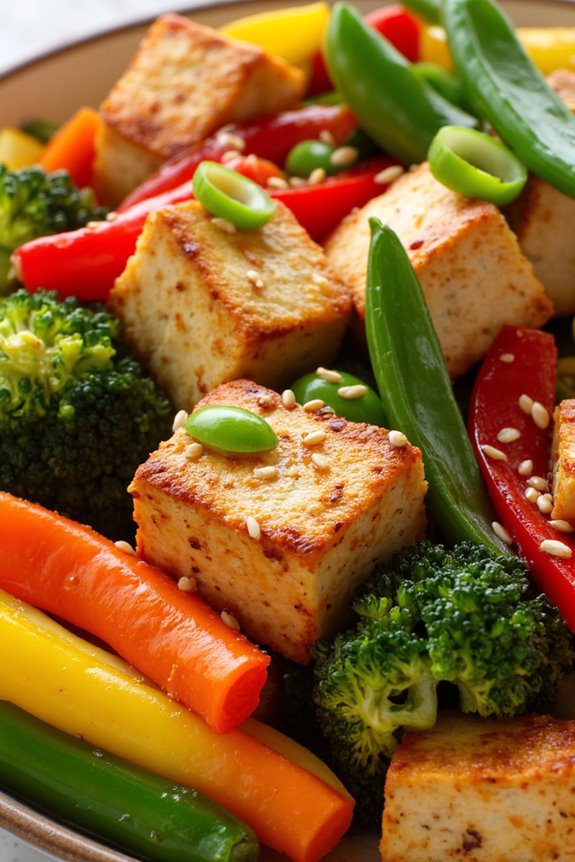
Shoyu Tofu Stir-Fry is a delightful and vibrant dish that showcases the versatility of tofu while celebrating the rich flavors of Japanese cuisine. This recipe emphasizes the umami taste found in shoyu (soy sauce) and pairs it perfectly with fresh vegetables, making it an ideal meal for both vegans and those looking to incorporate more plant-based dishes into their diet. The combination of sautéed tofu, colorful vegetables, and a savory sauce creates a dish that isn’t only visually appealing but also satisfying and nutritious.
Making Shoyu Tofu Stir-Fry is a straightforward process that allows you to customize the ingredients based on your preferences or what you have on hand. This dish can be served over rice or noodles, making it a versatile option for lunch or dinner. Whether you’re an experienced cook or a beginner, this recipe will guide you through each step to achieve a delicious and well-balanced meal.
Ingredients (Serves 4-6)
- 1 block (14 oz) firm tofu, drained and pressed
- 2 tablespoons vegetable oil
- 1 bell pepper, sliced (any color)
- 1 medium carrot, julienned
- 1 cup broccoli florets
- 1 cup snap peas, trimmed
- 3 green onions, sliced
- 3 cloves garlic, minced
- 1 tablespoon ginger, minced
- 1/4 cup shoyu (soy sauce)
- 2 tablespoons mirin (sweet rice wine)
- 1 tablespoon sesame oil
- Sesame seeds for garnish (optional)
Cooking Instructions
- Prepare the Tofu: Begin by draining the tofu and pressing it to remove excess moisture. This can be done by wrapping the tofu block in a clean kitchen towel and placing a heavy object on top for about 15-20 minutes. Once pressed, cut the tofu into bite-sized cubes.
- Cook the Tofu: In a large skillet or wok, heat 2 tablespoons of vegetable oil over medium-high heat. Once the oil is hot, add the cubed tofu. Cook for about 5-7 minutes, turning occasionally, until the tofu is golden brown and crispy on all sides. Remove the tofu from the pan and set it aside.
- Sauté the Vegetables: In the same skillet, add the sliced bell pepper, julienned carrot, broccoli florets, and snap peas. Sauté the vegetables for about 4-5 minutes until they’re tender but still crisp. Add the minced garlic and ginger, stirring for an additional minute until fragrant.
- Combine Tofu and Sauce: Return the cooked tofu to the skillet with the vegetables. In a small bowl, mix together the shoyu, mirin, and sesame oil. Pour this sauce over the tofu and vegetables, stirring well to coat everything evenly. Cook for another 2-3 minutes, allowing the sauce to heat through and slightly thicken.
- Finish and Serve: Remove the stir-fry from heat and sprinkle with sliced green onions and sesame seeds, if desired. Serve the Shoyu Tofu Stir-Fry over steamed rice or noodles for a complete meal.
Extra Tips
When making Shoyu Tofu Stir-Fry, feel free to experiment with your choice of vegetables based on what’s in season or what you enjoy most. For added texture and flavor, consider including mushrooms, zucchini, or baby corn.
Additionally, if you prefer a spicier kick, you can add a dash of chili flakes or a splash of sriracha to the sauce. This dish isn’t only quick to prepare but also makes for excellent leftovers, making it a perfect option for meal prepping!
Vegetable Sushi Rolls
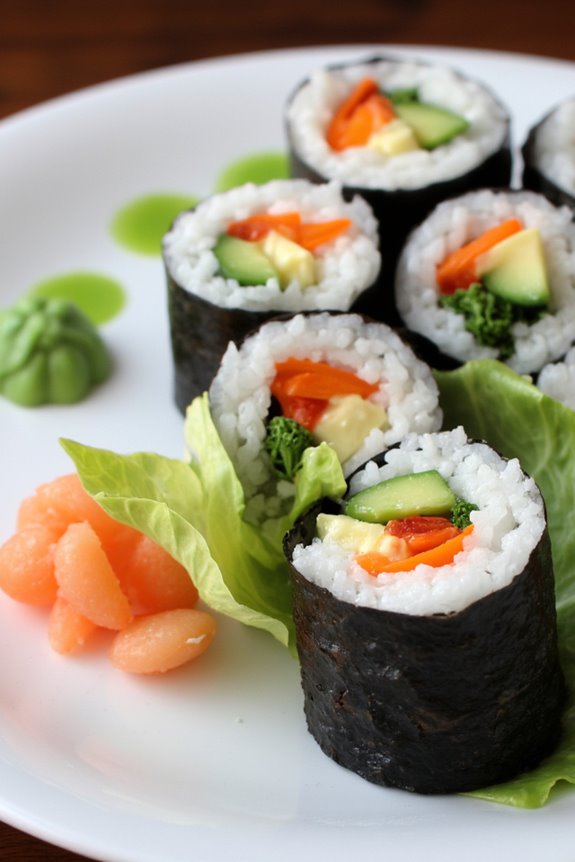
Vegetable sushi rolls, or “kappa maki,” are a delightful and healthy option for anyone looking to enjoy traditional Japanese cuisine in a plant-based form. These colorful rolls are packed with fresh vegetables and wrapped in seasoned rice and nori (seaweed), making them a fun and nutritious meal or snack.
They’re perfect for sushi beginners and can be personalized to suit your taste preferences by varying the vegetables or adding your favorite sauces.
Making vegetable sushi rolls at home is a simple and rewarding process. With a little practice, you’ll be able to roll them up like a pro, impressing your friends and family with your culinary skills. This recipe serves 4-6 people, making it ideal for a gathering or a cozy night in. You can also get creative with your fillings, so feel free to experiment with other vegetables or even include some avocado for an extra creamy texture.
Ingredients:
- 2 cups sushi rice
- 2 1/2 cups water
- 1/4 cup rice vinegar
- 2 tablespoons sugar
- 1 teaspoon salt
- 4 sheets nori (seaweed)
- 1 cucumber, julienned
- 1 carrot, julienned
- 1 bell pepper (red, yellow, or green), julienned
- 1 avocado, sliced
- Soy sauce, for serving
- Pickled ginger, for serving
- Wasabi, for serving (optional)
Cooking Instructions:
- Prepare the Sushi Rice: Rinse the sushi rice under cold water until the water runs clear to remove excess starch. This will help achieve a better texture. Combine the rinsed rice and water in a rice cooker or a pot. If using a pot, bring to a boil, then reduce heat to low, cover, and cook for about 20 minutes until the water is absorbed. Let it rest for 10 minutes off the heat.
- Season the Rice: While the rice is resting, mix the rice vinegar, sugar, and salt in a small bowl until dissolved. Once the rice has rested, transfer it to a large bowl and gently fold in the vinegar mixture using a spatula or wooden spoon. Be careful not to mash the rice; you want to keep it fluffy. Allow the rice to cool to room temperature.
- Prepare the Vegetables: While the rice cools, wash and cut the vegetables. Julienne the cucumber and carrot into thin sticks, and slice the bell pepper and avocado. Set aside.
- Assemble the Sushi Rolls: Place a bamboo sushi mat on a clean surface and lay a sheet of nori on top, shiny side down. With wet hands (to prevent sticking), grab a handful of sushi rice and spread it evenly over the nori, leaving about an inch of space at the top edge. Press the rice down gently to make sure it sticks.
- Add the Fillings: Arrange a line of your chosen vegetables (cucumber, carrot, bell pepper, and avocado) horizontally across the center of the rice-covered nori.
- Roll the Sushi: Starting from the edge closest to you, lift the bamboo mat and begin to roll the sushi tightly away from you, tucking the filling in as you go. Continue rolling until you reach the bare edge of the nori. Use a little water to seal the edge of the nori.
- Slice the Rolls: Using a sharp knife, slice the rolled sushi into 6-8 pieces. Wipe the knife with a wet cloth between cuts to make sure clean slices.
- Serve and Enjoy: Arrange the sushi rolls on a platter and serve with soy sauce, pickled ginger, and wasabi on the side.
Extra Tips: When making vegetable sushi rolls, freshness is key. Always use the freshest vegetables you can find for the best flavor and texture.
Additionally, practice makes perfect when it comes to rolling sushi. Don’t be discouraged if your first few attempts aren’t perfect; with a little time, you’ll find the right technique for rolling tightly and evenly.
Finally, consider adding a touch of sesame seeds or sprinkles of furikake (Japanese seasoning) on the rice before you roll for an extra layer of flavor. Enjoy your sushi-making adventure!
Japanese Potato Salad
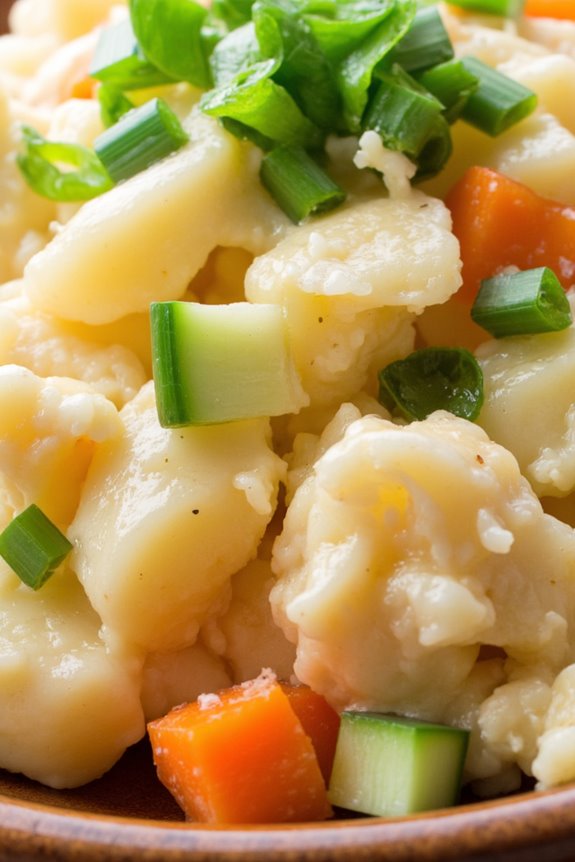
Japanese Potato Salad is a delightful twist on the classic Western potato salad, characterized by its creamy texture and unique flavors. This vegan version retains the essence of traditional Japanese cuisine by incorporating ingredients like Japanese mayonnaise and rice vinegar, while ensuring it’s plant-based. The dish isn’t only satisfying but also visually appealing, making it a perfect side dish for various meals or a light lunch.
This comforting salad is a favorite in many Japanese households and is often enjoyed during picnics or as a part of a bento box. With its combination of creamy potatoes, crisp vegetables, and a tangy dressing, Vegan Japanese Potato Salad brings a taste of Japan to your dining table. It’s simple to make and can be customized with your choice of vegetables, making it both versatile and delicious.
Ingredients (Serves 4-6)
- 4 medium-sized potatoes
- 1 medium carrot, peeled and diced
- 1/2 cucumber, thinly sliced
- 1/4 cup green onions, finely chopped
- 1/2 cup vegan mayonnaise
- 2 tablespoons rice vinegar
- 1 tablespoon soy sauce
- Salt and pepper, to taste
Cooking Instructions
- Prepare the Potatoes: Begin by peeling the potatoes and cutting them into quarters. Place them in a large pot and cover with cold water. Add a pinch of salt to the water. Bring the pot to a boil and let the potatoes cook for about 15-20 minutes, or until they’re tender and easily pierced with a fork.
- Cook the Carrots: While the potatoes are boiling, bring another small pot of water to a boil. Add the diced carrots and blanch for about 3-5 minutes until they’re slightly tender but still crisp. Drain and set aside to cool.
- Prepare the Vegetables: Slice the cucumber thinly and chop the green onions. You can also soak the cucumber slices in a little salt for about 10 minutes to draw out excess moisture, then rinse and pat dry.
- Mash the Potatoes: Once the potatoes are cooked, drain them and let them cool slightly. In a large mixing bowl, mash the potatoes with a potato masher or fork, leaving some chunks for texture.
- Make the Dressing: In a separate bowl, combine the vegan mayonnaise, rice vinegar, soy sauce, salt, and pepper. Mix well to create a smooth dressing.
- Combine Everything: Add the blanched carrots, cucumber, and green onions to the mashed potatoes. Pour the dressing over the mixture and gently fold everything together until well combined. Be careful not to over-mix, as you want some potato chunks to remain intact.
- Chill and Serve: Transfer the potato salad to a serving bowl and refrigerate for at least 30 minutes to let the flavors meld together. Serve chilled or at room temperature, garnished with additional green onions if desired.
Extra Tips
For a bit of extra flavor, consider adding a teaspoon of Dijon mustard to the dressing for a subtle kick. You can also mix in other vegetables such as bell peppers or corn for added color and sweetness.
If you prefer a creamier texture, you can increase the amount of vegan mayonnaise. This salad can be made a day ahead of time, making it a great option for meal prep or gatherings. Enjoy your Vegan Japanese Potato Salad as a rejuvenating side dish or a light main course!
Zucchini Noodle Yaki Soba
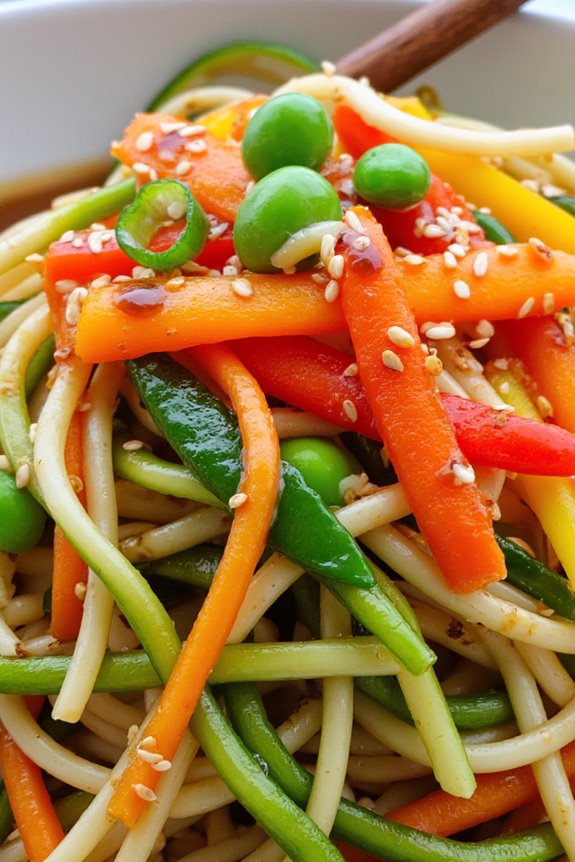
Zucchini Noodle Yaki Soba is a vibrant and healthy twist on the traditional Japanese stir-fried noodle dish. This vegan version replaces wheat noodles with spiralized zucchini, making it a lighter option that’s still full of vibrant flavors and satisfying textures.
With the right combination of fresh vegetables and savory sauces, this dish isn’t only delicious but also packed with nutrients. Perfect for a quick weeknight dinner or meal prep, it’s sure to impress both vegans and non-vegans alike!
This recipe is designed to serve 4-6 people, making it an excellent choice for family gatherings or sharing with friends. The use of fresh ingredients and a dash of creativity will elevate your cooking experience, allowing you to enjoy a delightful and healthy meal that feels indulgent without the added calories.
Let’s explore the ingredients and cooking instructions to bring this dish to life!
Ingredients
- 4 medium zucchinis, spiralized
- 2 cups of shredded carrots
- 1 bell pepper, thinly sliced
- 1 cup of snap peas, trimmed
- 1 cup of bean sprouts
- 1 small onion, thinly sliced
- 3 cloves of garlic, minced
- 1 tablespoon of fresh ginger, grated
- 3 tablespoons of soy sauce (or tamari for gluten-free)
- 2 tablespoons of sesame oil
- 1 tablespoon of rice vinegar
- 1 tablespoon of maple syrup
- 1 tablespoon of cornstarch mixed with 2 tablespoons of water (for thickening)
- 2 tablespoons of sesame seeds (for garnish)
- 3 green onions, sliced (for garnish)
Cooking Instructions
- Prepare the Zucchini Noodles: Start by spiralizing the zucchinis using a spiralizer or a julienne peeler. Once spiralized, set them aside in a colander to drain any excess moisture while you prepare the other ingredients. This will help prevent the dish from becoming too watery.
- Sauté the Vegetables: In a large skillet or wok, heat the sesame oil over medium-high heat. Once hot, add the sliced onion, garlic, and ginger. Sauté for about 2-3 minutes until the onion becomes translucent and fragrant.
- Add Carrots and Bell Peppers: Toss in the shredded carrots and sliced bell pepper. Stir-fry the mixture for another 3-4 minutes until the vegetables are just tender yet still crisp.
- Incorporate Snap Peas and Bean Sprouts: Add the snap peas and bean sprouts to the skillet, continuing to stir-fry for an additional 2 minutes. These vegetables will add crunch and freshness to the dish.
- Mix the Sauce: In a small bowl, whisk together the soy sauce, rice vinegar, and maple syrup. Pour this sauce over the sautéed vegetables and stir to evenly coat them.
- Combine with Zucchini Noodles: Finally, add the spiralized zucchini noodles to the skillet. Toss everything together for about 3-5 minutes until the noodles are heated through and slightly softened. If the mixture appears too dry, add a splash of water or additional soy sauce.
- Thicken the Sauce: As a final step, stir in the cornstarch mixture. This will help thicken the sauce slightly, giving it a glossy finish. Cook for another minute, stirring constantly until the sauce has thickened.
- Serve and Garnish: Remove the skillet from heat. Serve the Zucchini Noodle Yaki Soba warm, garnished with sesame seeds and sliced green onions for a pop of color and added flavor.
Extra Tips
When making Zucchini Noodle Yaki Soba, feel free to customize the vegetables based on your preferences or what you have on hand. Broccoli, mushrooms, and bok choy are excellent additions.
To add more protein, consider incorporating tofu or tempeh, marinated and pan-fried before adding them to the stir-fry. Always remember to adjust the seasoning to taste and enjoy this dish fresh, as zucchini noodles can become mushy if left to sit too long.
Happy cooking!
Edamame and Avocado Salad
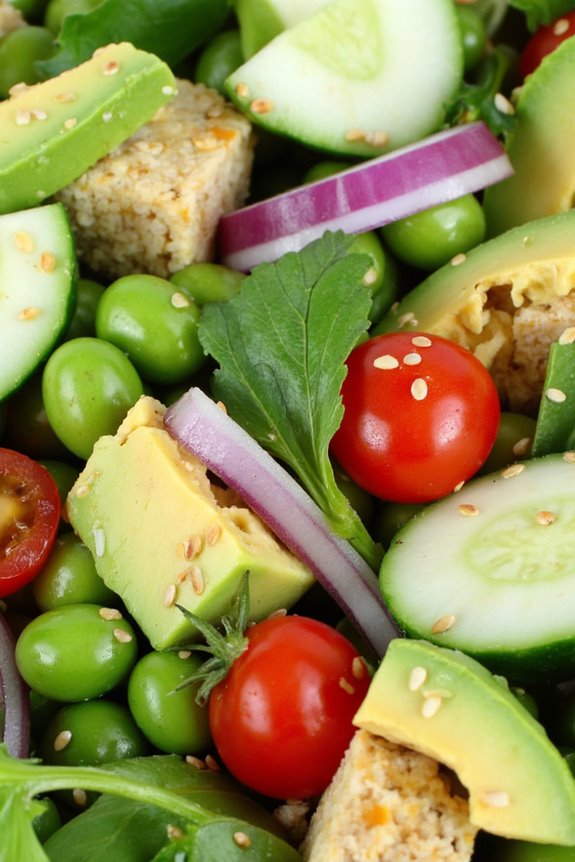
Edamame and Avocado Salad is a revitalizing and nutritious dish that brings together the vibrant flavors of Japanese cuisine with the wholesome goodness of plant-based ingredients. This salad combines tender edamame, creamy avocado, and crisp vegetables, all dressed in a light sesame-soy vinaigrette. It’s perfect as a side dish or a light meal on its own, making it a versatile addition to any plant-based menu.
The combination of protein-rich edamame and heart-healthy avocado provides a satisfying texture and flavor profile that’s both filling and revitalizing. This salad isn’t only visually appealing with its bright colors but also packed with nutrients, making it an ideal choice for health-conscious eaters.
Whether you’re hosting a dinner party or simply looking to enjoy a healthy lunch, this Edamame and Avocado Salad is sure to impress.
Ingredients (Serves 4-6)
- 2 cups shelled edamame (fresh or frozen)
- 2 ripe avocados, diced
- 1 cup cherry tomatoes, halved
- 1 cucumber, diced
- ¼ cup red onion, finely chopped
- ¼ cup fresh cilantro, chopped
- 3 tablespoons soy sauce (or tamari for gluten-free)
- 2 tablespoons sesame oil
- 1 tablespoon rice vinegar
- 1 tablespoon lime juice
- 1 teaspoon maple syrup (optional)
- Sesame seeds for garnish
- Salt and pepper to taste
Cooking Instructions
- Prepare the Edamame: If using frozen edamame, cook it according to the package instructions until tender, usually about 5 minutes in boiling water. Drain and rinse under cold water to stop the cooking process. If using fresh edamame, boil in salted water for about 3-5 minutes until tender. Set aside to cool.
- Chop the Vegetables: While the edamame is cooling, prepare the vegetables. Dice the avocados and cucumber, and halve the cherry tomatoes. Finely chop the red onion and cilantro. Place all the chopped vegetables into a large mixing bowl.
- Make the Dressing: In a small bowl, whisk together the soy sauce, sesame oil, rice vinegar, lime juice, and maple syrup (if using). This will create a balanced dressing that enhances the flavors of the salad.
- Combine Ingredients: Once the edamame has cooled, add it to the bowl with the vegetables. Pour the dressing over the salad and gently toss everything together until well combined. Be careful not to mash the avocado.
- Season and Serve: Taste the salad and season with salt and pepper as needed. Transfer the salad to a serving dish and sprinkle sesame seeds on top for garnish. Serve immediately, or chill in the refrigerator for about 15 minutes to allow the flavors to meld.
Extra Tips
When preparing the Edamame and Avocado Salad, choose ripe avocados for the best creaminess and flavor. If you’re making this salad ahead of time, consider adding the avocado just before serving to prevent browning.
You can also customize this salad by adding other ingredients such as bell peppers, carrots, or even cooked quinoa for extra texture and nutrition. Enjoy this dish as a nourishing side or a fulfilling main course!
Tofu Katsu With Tonkatsu Sauce
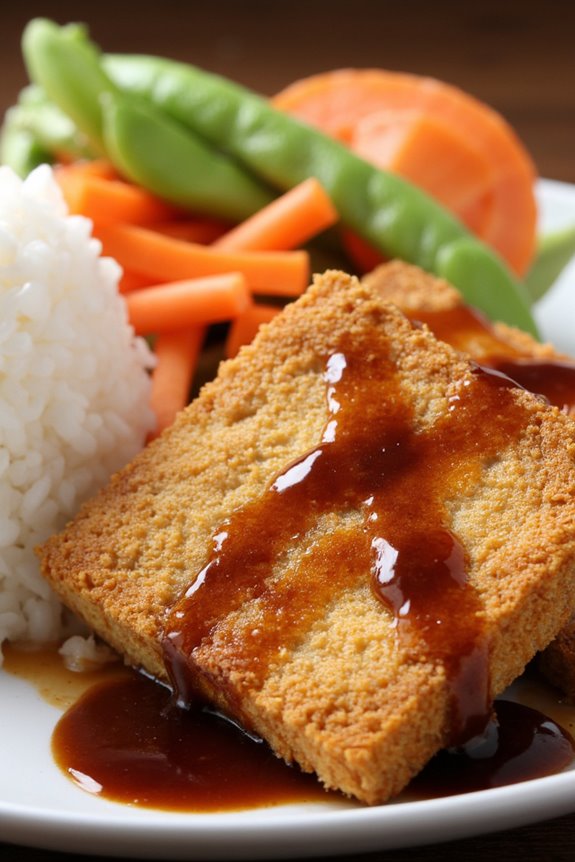
Tofu Katsu is a delightful vegan twist on the classic Japanese dish, Katsu, which typically features breaded and fried meat. In this recipe, firm tofu is marinated, breaded, and fried to golden perfection, creating a rich and savory experience that’s both satisfying and wholesome. The accompanying Tonkatsu sauce, a sweet and tangy condiment, elevates the dish, making it perfect for serving with rice or as part of a rice bowl.
This dish isn’t only easy to prepare but also packed with flavor and nutrition. It makes an excellent meal for family dinners or gatherings, providing a delicious plant-based option that everyone can enjoy. Whether you’re a seasoned vegan or just looking to incorporate more plant-based meals into your diet, Tofu Katsu with Tonkatsu Sauce is sure to impress.
Ingredients (Serves 4-6):
- 1 block (14 oz) firm tofu
- 1 cup panko breadcrumbs
- 1/2 cup all-purpose flour
- 1/2 cup unsweetened plant milk (such as almond or soy)
- 2 tablespoons soy sauce
- 1 tablespoon cornstarch
- 1 teaspoon garlic powder
- 1 teaspoon onion powder
- Salt and pepper, to taste
- Vegetable oil, for frying
- 1/2 cup Tonkatsu sauce (store-bought or homemade)
Cooking Instructions:
- Prepare the Tofu: Drain the tofu and press it to remove excess moisture. You can do this by wrapping the tofu in a clean kitchen towel and placing a heavy object on top for about 15-20 minutes. Once pressed, slice the tofu into 1/2-inch thick cutlets.
- Marinate the Tofu: In a shallow dish, mix the plant milk and soy sauce together. Add the tofu cutlets and let them marinate for at least 15 minutes, allowing the tofu to absorb the flavors.
- Set Up Breading Station: In one bowl, place the all-purpose flour. In a second bowl, combine the panko breadcrumbs with garlic powder, onion powder, salt, and pepper. In a third bowl, mix the cornstarch with a little water to create a slurry.
- Bread the Tofu: Remove each tofu cutlet from the marinade, allowing excess liquid to drip off. First, coat the cutlet in flour, shaking off any excess. Next, dip it into the cornstarch slurry, ensuring it’s evenly coated. Finally, press the cutlet into the panko breadcrumbs, making sure to cover both sides thoroughly.
- Fry the Tofu: Heat about 1/2 inch of vegetable oil in a large skillet over medium-high heat. Once the oil is hot, carefully add the breaded tofu cutlets to the skillet. Fry for approximately 3-4 minutes on each side, or until golden brown and crispy. Remove the cutlets from the skillet and place them on a paper towel-lined plate to drain any excess oil.
- Serve with Tonkatsu Sauce: Slice the fried tofu katsu into strips and serve hot with a drizzle of Tonkatsu sauce over the top. Pair with steamed rice and your choice of vegetables for a complete meal.
Extra Tips:
For an even more flavorful Tofu Katsu, consider adding spices to your panko breadcrumbs or marinating the tofu in additional seasonings such as ginger or sesame oil.
If you prefer a gluten-free option, you can substitute the all-purpose flour with a gluten-free flour blend and use gluten-free panko breadcrumbs.
Additionally, for a healthier alternative, you can bake the breaded tofu instead of frying it—simply spray with a little oil and bake in a preheated oven at 400°F (200°C) for about 20-25 minutes, flipping halfway through.
Enjoy your delicious vegan meal!
Vegan Okonomiyaki
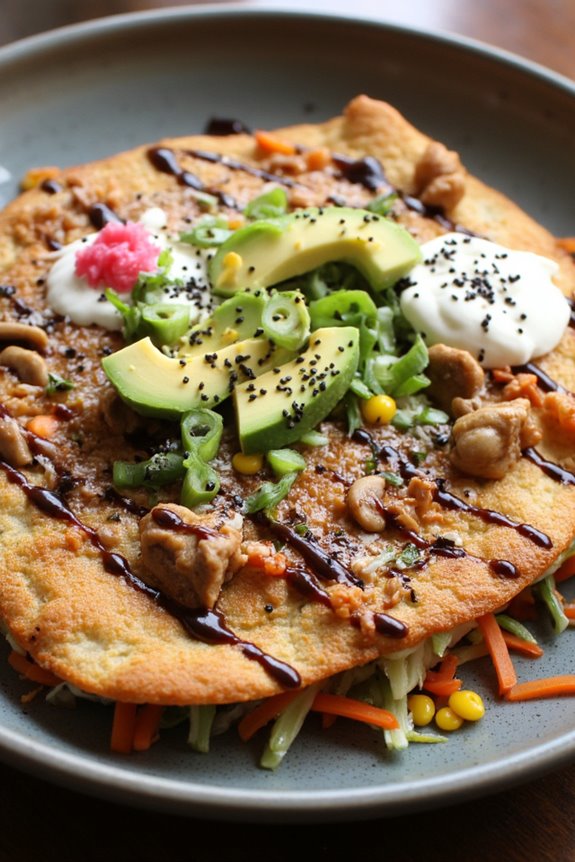
Vegan Okonomiyaki is a delightful Japanese savory pancake that isn’t only filling but also customizable to your taste. Traditionally made with eggs and seafood, this vegan version substitutes those ingredients with plant-based alternatives, allowing everyone to enjoy this classic dish without compromising on flavor.
The base is made from a simple batter of flour and water, mixed with shredded cabbage and a variety of vegetables, making it a nutritious and hearty meal. Topped with vegan mayo and a drizzle of okonomiyaki sauce, it’s a treat that will surely impress friends and family.
Preparing Vegan Okonomiyaki is straightforward and fun. The beauty of this dish lies in its versatility; you can add your favorite vegetables, mushrooms, or even tofu to enhance the texture and flavor. This recipe serves 4-6 people, making it perfect for a family dinner or a casual gathering with friends. Gather your ingredients and get ready to flip some delicious pancakes!
Ingredients
- 1 cup all-purpose flour
- 1 cup water
- 2 cups shredded cabbage
- 1/2 cup grated carrots
- 1/2 cup sliced green onions
- 1/2 cup diced mushrooms (shiitake or button)
- 1/4 cup corn (fresh or frozen)
- 1 tablespoon soy sauce
- 1 teaspoon vegetable oil (for frying)
- Vegan mayo (for topping)
- Okonomiyaki sauce (store-bought or homemade)
- Optional toppings: sliced avocado, sesame seeds, pickled ginger
Cooking Instructions
- Prepare the Batter: In a large mixing bowl, combine the all-purpose flour and water. Whisk until you have a smooth batter. The consistency should be similar to pancake batter—thick but pourable. Let it rest for about 10 minutes to allow the flour to hydrate.
- Add Vegetables: After the batter has rested, fold in the shredded cabbage, grated carrots, sliced green onions, diced mushrooms, and corn. Make certain all the vegetables are evenly coated with the batter. This mixture should be thick and chunky, which will give the okonomiyaki its texture.
- Heat the Pan: Heat a non-stick skillet or griddle over medium heat. Add a teaspoon of vegetable oil and spread it evenly across the surface. You want the pan to be hot enough that a drop of water sizzles when added.
- Cook the Pancakes: Pour a generous amount of the vegetable mixture onto the hot skillet (about 1/4 cup per pancake) and flatten it slightly with a spatula to form a round shape. Cook for about 4-5 minutes, or until the bottom is golden brown.
- Flip and Cook the Other Side: Carefully flip the pancake using a spatula. You can use two spatulas if needed to help support it. Cook for an additional 4-5 minutes on the other side until it’s also golden brown and cooked through.
- Serve: Once cooked, remove the pancake from the skillet and place it on a serving plate. Drizzle with vegan mayo and okonomiyaki sauce to taste. Add optional toppings like sliced avocado, sesame seeds, or pickled ginger for an extra flavor boost.
Extra Tips
To enhance the flavor of your Vegan Okonomiyaki, consider adding nutritional yeast to the batter for a cheesy taste or incorporating chopped nori (seaweed) for an umami kick.
If you prefer a bit of heat, sprinkle some chili flakes into the batter or top with sriracha. Remember, the key to a great okonomiyaki is to not overcrowd the pan; cook in batches if necessary for that perfect golden crust. Enjoy your cooking adventure!
Miso Glazed Eggplant
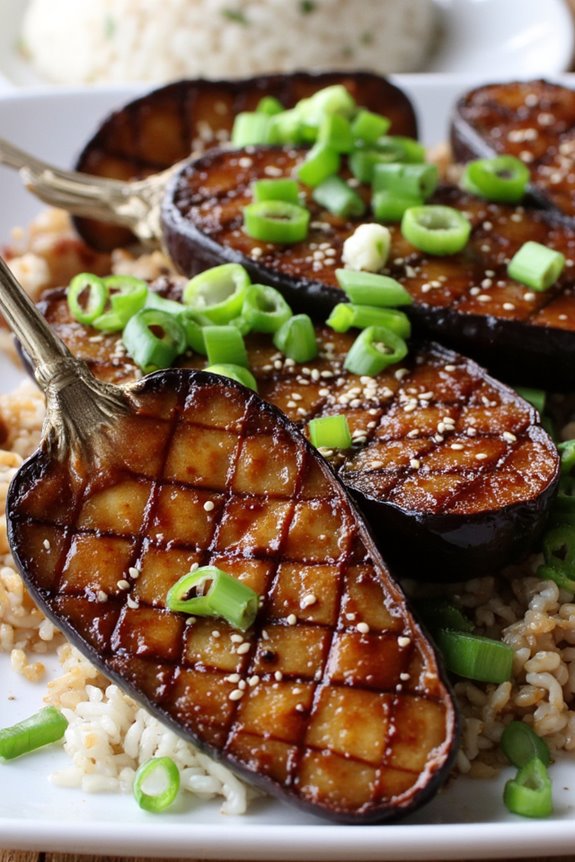
Miso Glazed Eggplant is a delightful dish that perfectly showcases the umami-rich flavors of Japanese cuisine while adhering to a vegan lifestyle. The combination of sweet and savory miso paste with the tender, caramelized eggplant creates a harmonious balance that’s both satisfying and addictive. This dish isn’t only visually appealing, with its vibrant colors, but it’s also simple to prepare, making it an excellent choice for both weeknight dinners and entertaining guests.
Eggplant, also known as aubergine, absorbs flavors beautifully, making it an ideal candidate for a miso glaze. In this recipe, the eggplant is sliced, brushed with a miso mixture, and then roasted until golden brown and tender. Served alongside rice or as part of a larger Japanese-inspired meal, Miso Glazed Eggplant is sure to impress your family and friends with its delightful taste and presentation.
Ingredients (Serves 4-6)
- 2 large eggplants
- 1/4 cup white miso paste
- 2 tablespoons maple syrup
- 2 tablespoons rice vinegar
- 1 tablespoon soy sauce (or tamari for gluten-free)
- 1 tablespoon sesame oil
- 1 teaspoon grated fresh ginger
- 1 teaspoon minced garlic
- 1 tablespoon sesame seeds (for garnish)
- 2 green onions, sliced (for garnish)
Cooking Instructions
- Prepare the Eggplants: Preheat your oven to 400°F (200°C). While the oven is heating, wash and dry the eggplants. Cut them in half lengthwise, and then score the flesh in a diamond pattern without cutting through the skin. This scoring allows the glaze to penetrate the eggplant better and helps it cook evenly.
- Make the Miso Glaze: In a medium bowl, combine the white miso paste, maple syrup, rice vinegar, soy sauce, sesame oil, grated ginger, and minced garlic. Mix well until the ingredients form a smooth, thick glaze. Taste and adjust the sweetness or saltiness if desired.
- Glaze the Eggplants: Place the eggplant halves on a baking sheet, skin side down. Using a brush or spoon, generously spread the miso glaze over the cut side of each eggplant half, ensuring that the glaze fills the scored areas for maximum flavor.
- Roast the Eggplants: Place the baking sheet in the preheated oven and roast the eggplants for 25-30 minutes, or until they’re tender and the glaze is bubbly and caramelized. You can check for doneness by inserting a fork into the flesh; it should be soft and creamy.
- Serve and Garnish: Once the eggplants are done, remove them from the oven and let them cool slightly. Transfer the glazed eggplants to a serving platter and sprinkle with sesame seeds and sliced green onions for garnish. Serve warm with steamed rice or as part of a larger meal.
Extra Tips
For the best flavor, let the miso glaze sit for a few minutes before applying it to the eggplant, allowing the flavors to meld together. Additionally, you can experiment with different types of miso paste, such as red or yellow miso, to achieve a variation in taste.
If you prefer a little extra texture, consider topping the eggplant with crushed nuts or toasted panko breadcrumbs before roasting. Enjoy your culinary adventure with this delightful vegan Japanese dish!
Chilled Soba Noodles With Sesame Dressing
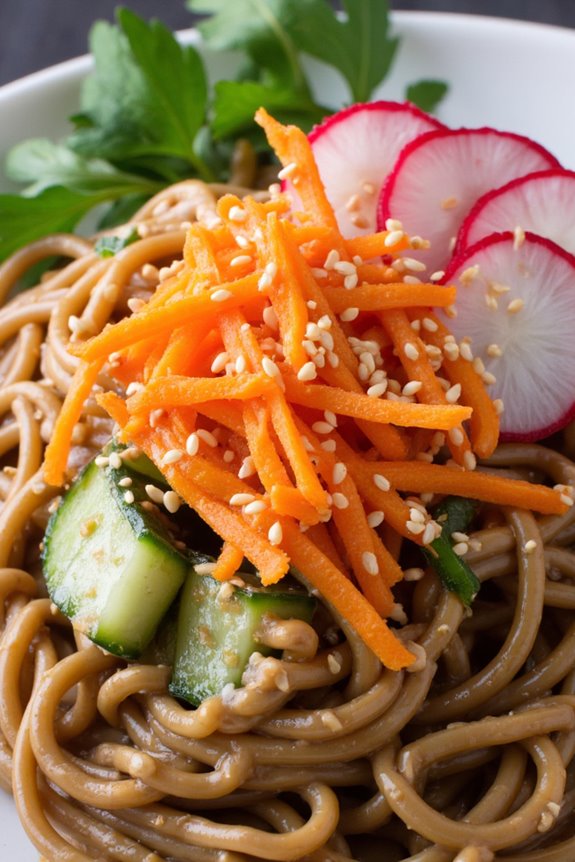
Chilled Soba Noodles with Sesame Dressing is a revitalizing and nutritious dish that perfectly embodies the essence of Japanese cuisine. Soba noodles, made from buckwheat flour, are naturally gluten-free and provide a nutty flavor and chewy texture. This dish is particularly popular during the warmer months, as it’s served cold and offers a delightful contrast to hot summer days.
The sesame dressing adds a rich, umami flavor that complements the noodles beautifully, making it a satisfying meal that can be enjoyed on its own or paired with a variety of fresh vegetables.
This recipe isn’t only easy to prepare, but it’s also versatile. You can customize the toppings and vegetables according to your preferences or what you have on hand. The dish can be served as a light lunch, a side dish, or even as part of a larger Japanese-inspired meal. With its vibrant colors and delicious flavors, Chilled Soba Noodles with Sesame Dressing is sure to please vegans and non-vegans alike.
Ingredients (Serves 4-6):
- 12 oz soba noodles
- 1/4 cup tahini
- 3 tablespoons soy sauce (or tamari for gluten-free)
- 2 tablespoons rice vinegar
- 2 tablespoons maple syrup
- 1 tablespoon sesame oil
- 1 tablespoon grated ginger
- 2 cloves garlic, minced
- 1/4 cup water (more if needed)
- 1/4 cup toasted sesame seeds
- 4 green onions, sliced
- 1 cup cucumber, julienned
- 1 cup carrots, julienned
- 1 cup radishes, thinly sliced
- Fresh cilantro or parsley for garnish (optional)
Cooking Instructions:
1. Cook the Soba Noodles: In a large pot, bring water to a rolling boil. Add the soba noodles and cook according to the package instructions (usually about 4-6 minutes). Stir occasionally to prevent sticking.
Once cooked, drain the noodles in a colander and rinse under cold water until completely cooled. This stops the cooking process and helps remove excess starch.
2. Prepare the Sesame Dressing: In a medium bowl, whisk together the tahini, soy sauce, rice vinegar, maple syrup, sesame oil, grated ginger, minced garlic, and water. Mix until smooth and creamy.
If the dressing is too thick, you can add a bit more water, one tablespoon at a time, until you reach your desired consistency.
3. Combine Noodles and Dressing: In a large mixing bowl, place the cooled soba noodles. Pour the sesame dressing over the noodles and gently toss to combine, ensuring all the noodles are evenly coated.
4. Add Toppings: Once the noodles are well-dressed, add the sliced green onions, julienned cucumber, carrots, and radishes. Toss everything together gently to mix the vegetables with the noodles.
5. Serve and Garnish: Transfer the chilled soba noodles to serving plates or a large serving bowl. Sprinkle toasted sesame seeds on top and garnish with fresh cilantro or parsley if desired.
Optionally, serve with extra soy sauce on the side for dipping.
Extra Tips:
To enhance the flavor of your Chilled Soba Noodles with Sesame Dressing, consider adding a splash of lime juice or a sprinkle of chili flakes for a zesty kick.
Additionally, feel free to experiment with other vegetables like bell peppers or edamame for added color and texture. For a more substantial meal, you can also incorporate some grilled or sautéed tofu.
Remember to taste and adjust the seasoning of the dressing according to your preference before serving!
Matcha Coconut Chia Pudding
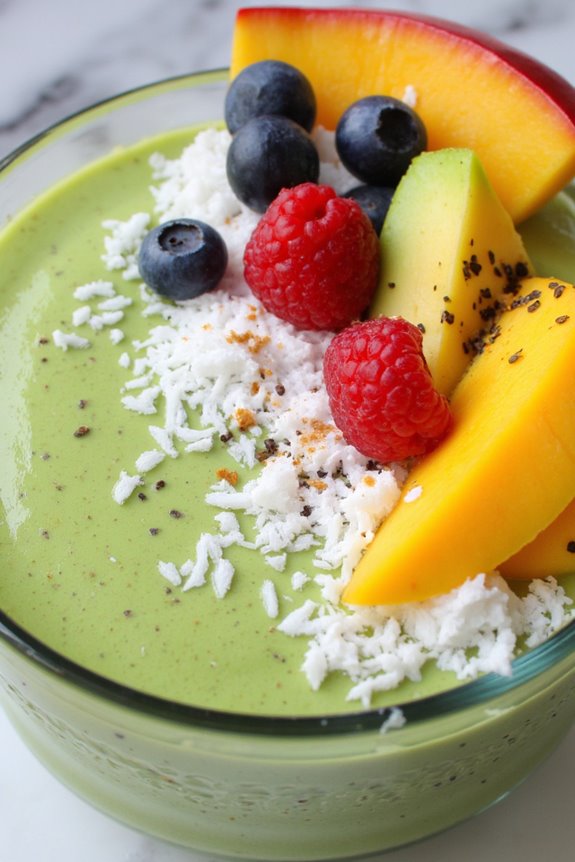
Matcha Coconut Chia Pudding is a delightful and nutritious vegan dessert that combines the rich flavors of matcha green tea with the creamy texture of coconut milk. This dish isn’t only visually appealing with its vibrant green hue, but it also packs a punch regarding health benefits.
Chia seeds are a fantastic source of omega-3 fatty acids, fiber, and protein, making this pudding a perfect snack or breakfast option that will keep you full and satisfied.
Preparing Matcha Coconut Chia Pudding is simple and requires minimal time and effort. With just a few ingredients, you can whip up this healthy treat that’s great for any occasion. The combination of matcha and coconut creates a deliciously smooth and creamy texture that will have everyone coming back for seconds.
Serve it in individual cups or bowls for a beautiful presentation at your next gathering!
Ingredients (Serves 4-6)
- 1 cup coconut milk (canned or carton)
- 1/4 cup chia seeds
- 2 tablespoons maple syrup (or agave syrup)
- 1 tablespoon matcha green tea powder
- 1 teaspoon vanilla extract
- Pinch of salt
- Fresh fruits (like mango, berries, or banana) for topping (optional)
- Shredded coconut for garnish (optional)
Instructions
- Combine the Base Ingredients: In a mixing bowl, whisk together the coconut milk, maple syrup, matcha powder, vanilla extract, and a pinch of salt. Make certain the matcha is thoroughly dissolved and there are no clumps. This mixture will be the base of your chia pudding.
- Add Chia Seeds: Once the base is well combined, add the chia seeds to the mixture. Stir well to guarantee that the chia seeds are evenly distributed throughout the liquid. This step is essential as it prevents the chia seeds from clumping together.
- Let It Sit: Cover the bowl with plastic wrap or transfer the mixture to an airtight container. Place it in the refrigerator for at least 4 hours, or preferably overnight. During this time, the chia seeds will absorb the liquid and expand, creating a thick and pudding-like consistency.
- Stir and Serve: After the pudding has set, give it a good stir to break up any clumps that may have formed. Spoon the pudding into individual serving cups or bowls. Top with fresh fruits and shredded coconut if desired, for added flavor and texture.
- Chill Before Serving: For an extra invigorating treat, place the servings back into the refrigerator for about 30 minutes before serving. This will enhance the flavors and make the pudding even more enjoyable.
Extra Tips
When making Matcha Coconut Chia Pudding, it’s important to choose high-quality matcha powder for the best flavor and health benefits.
If you prefer a sweeter pudding, feel free to adjust the amount of maple syrup to your taste. Additionally, experiments with different toppings can elevate your dish; consider adding nuts, granola, or a drizzle of nut butter for added crunch and flavor.
Finally, always verify the chia seeds are well mixed to avoid clumping, and remember that the pudding will thicken further as it sits. Enjoy this easy and healthy dessert!
Japanese Curry With Root Vegetables
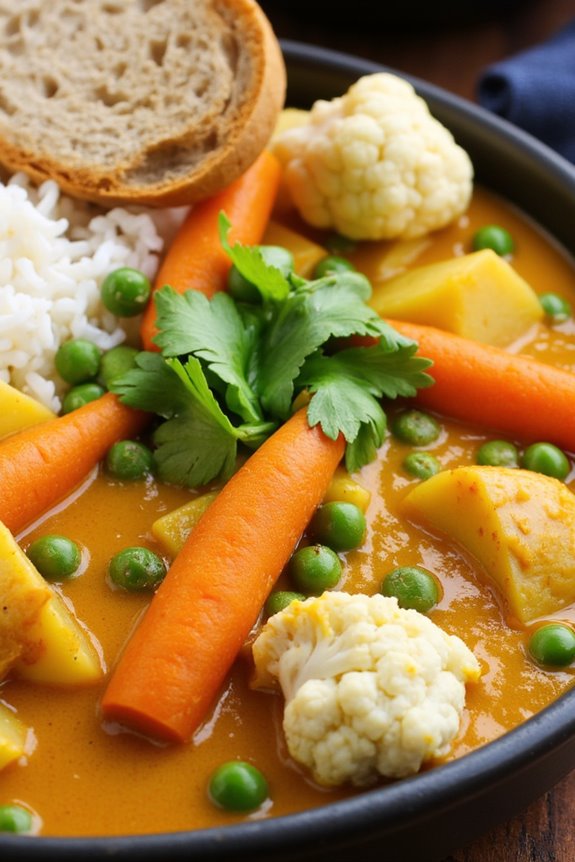
Japanese curry is a comforting, hearty dish that has become a beloved staple in many households. Known for its rich, sweet, and mildly spicy flavor, this vegan version incorporates a medley of root vegetables, making it not only nutritious but also satisfying.
With its deep umami taste coming from the curry roux and the natural sweetness from the vegetables, this dish is perfect for a cozy dinner, especially during the colder months.
This recipe for Vegan Japanese Curry With Root Vegetables serves 4-6 people and is simple to prepare. It combines carrots, potatoes, and other root vegetables simmered in a fragrant curry sauce, delivering a delightful experience for your taste buds.
Serve it over fluffy rice or with crusty bread to soak up the delicious sauce.
Ingredients
- 2 tablespoons vegetable oil
- 1 large onion, diced
- 2 cloves garlic, minced
- 1 tablespoon ginger, grated
- 2 medium carrots, sliced
- 2 medium potatoes, diced
- 1 medium sweet potato, diced
- 1 cup cauliflower florets
- 1 cup green peas (fresh or frozen)
- 4 cups vegetable broth
- 3 tablespoons curry powder
- 2 tablespoons soy sauce or tamari
- 1 tablespoon miso paste (optional)
- Salt and pepper to taste
- Cooked rice or bread for serving
- Fresh cilantro or green onions for garnish (optional)
Cooking Instructions
- Prepare the vegetables: Begin by washing, peeling, and chopping all of your root vegetables into bite-sized pieces. This guarantees they cook evenly and allows for a pleasant texture in the final dish.
- Sauté the aromatics: In a large pot, heat the vegetable oil over medium heat. Add the diced onion and sauté for about 5 minutes, or until translucent. Add the minced garlic and grated ginger, cooking for an additional minute until fragrant.
- Cook the root vegetables: Toss in the sliced carrots, diced potatoes, sweet potato, and cauliflower florets. Stir well to combine them with the sautéed onion, garlic, and ginger. Cook for about 5-7 minutes, allowing the vegetables to begin softening and absorb the flavors.
- Add the broth and seasonings: Pour in the vegetable broth, and stir in the curry powder, soy sauce, and miso paste (if using). Bring the mixture to a gentle boil, then reduce the heat to low. Simmer uncovered for about 20-25 minutes, or until the vegetables are tender.
- Finish with green peas: In the last 5 minutes of cooking, add the green peas. Stir to combine and allow them to heat through. Taste the curry and adjust the seasoning with salt and pepper as needed.
- Serve: Ladle the curry into bowls over a serving of cooked rice or alongside crusty bread. Garnish with fresh cilantro or sliced green onions for an added burst of flavor.
Extra Tips
To enhance the flavor of your Vegan Japanese Curry With Root Vegetables, consider making your own curry roux by combining flour, curry powder, and a little vegetable oil in a pan, then cooking until fragrant.
This can deepen the flavor profile of your dish. Additionally, feel free to mix and match your choice of vegetables based on what you have on hand; other great additions include bell peppers, zucchini, or even mushrooms.
For a bit of heat, add some chili flakes or a chopped chili pepper during the sautéing step. Enjoy your delicious, vegan curry!
Vegan Dango With Sweet Soy Sauce
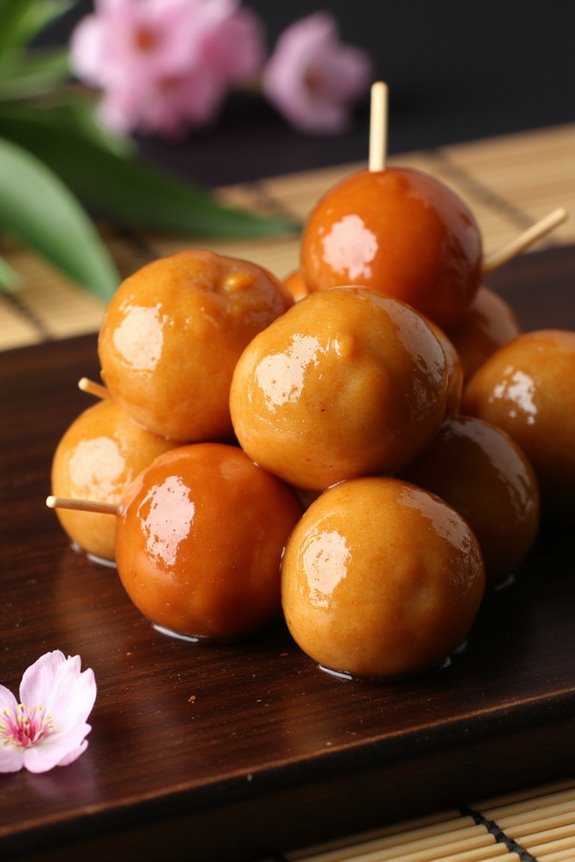
Dango is a traditional Japanese dumpling made from rice flour, and it’s often enjoyed during festivals or as a sweet treat. This vegan version of dango isn’t only delicious but also easy to make at home. The chewy texture of the dango pairs perfectly with the rich and sweet soy sauce glaze, creating a delightful contrast that will transport your taste buds straight to Japan.
Making vegan dango involves just a few simple ingredients, and the process is straightforward. Whether you’re planning a special occasion or just want to enjoy a unique dessert, this recipe will guide you through creating perfect dango balls that are both satisfying and completely plant-based.
Ingredients (Serves 4-6):
- 1 cup of sweet rice flour (mochi flour)
- 1/4 cup of water (adjust as needed)
- 1/4 cup of sugar (can use coconut sugar for a healthier option)
- 1/4 cup of soy sauce
- 1/4 cup of maple syrup or agave syrup
- A pinch of salt
- Optional: Food coloring (for decorative dango)
Cooking Instructions:
- Prepare the Dango Dough: In a mixing bowl, combine the sweet rice flour and a pinch of salt. Gradually add water while stirring until the mixture forms a smooth and pliable dough. If desired, divide the dough into portions and add food coloring to create colorful dango.
- Shape the Dango: Take small portions of the dough and roll them into balls about 1-inch in diameter. Make sure they’re evenly sized for uniform cooking. You can make them plain or mix different colors together for a festive look.
- Boil the Dango: Bring a pot of water to a boil. Carefully drop the dango balls into the boiling water. Cook them for about 3-5 minutes or until they float to the surface, indicating they’re cooked through. Once they float, let them cook for another minute before removing them with a slotted spoon.
- Prepare the Sweet Soy Sauce Glaze: In a separate saucepan, combine the soy sauce, maple syrup (or agave syrup), and sugar. Heat over low-medium heat, stirring constantly until the sugar is dissolved and the sauce is slightly thickened. This should take about 3-5 minutes.
- Glaze the Dango: Once the dango are cooked, transfer them to a serving plate. Drizzle the sweet soy sauce glaze generously over the dango balls. You can also skewer the dango onto bamboo sticks for easier serving and a traditional presentation.
- Serve and Enjoy: Allow the dango to sit for a few minutes to absorb some of the glaze. Serve warm or at room temperature, and enjoy your delicious vegan dango with sweet soy sauce!
Extra Tips:
When making dango, verify the consistency of the dough is just right—too dry, and they won’t hold together; too wet, and they’ll be difficult to shape. If you find the dough isn’t forming well, gradually add a little more water until it reaches the desired texture.
Additionally, feel free to experiment with different toppings or fillings, such as sweet red bean paste or matcha powder, for added flavor and variety.
Fruit Sushi With Coconut Sticky Rice
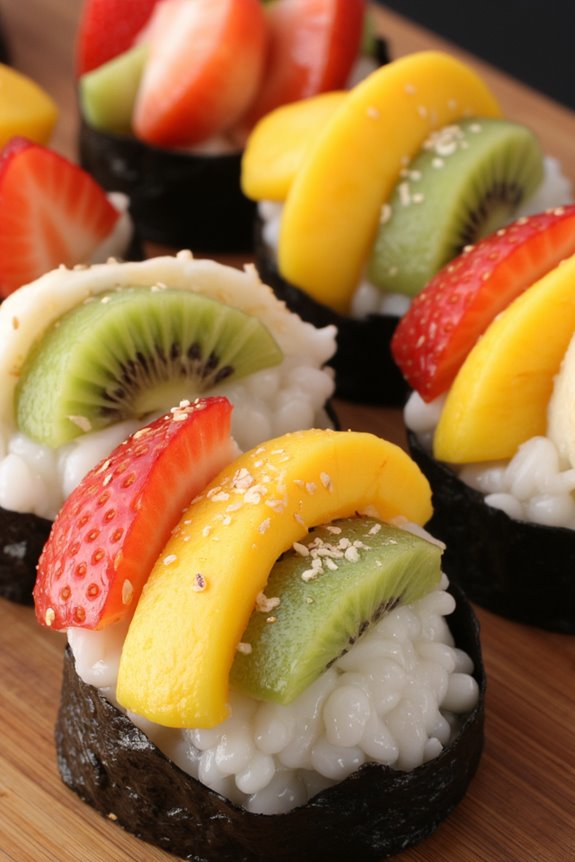
Fruit sushi with coconut sticky rice is a delightful twist on the traditional sushi experience, perfect for those who prefer a sweet and fruity treat. This dish combines the creaminess of coconut sticky rice with a variety of fresh fruits, making it not only visually appealing but also a rejuvenating dessert or snack. The vibrant colors and flavors of the fruits, paired with the subtle sweetness of the coconut rice, create a harmonious balance that will tantalize your taste buds.
Making fruit sushi is an excellent way to introduce kids and adults alike to sushi-making without the use of fish or other animal products. You can get creative with the fruit selections to suit your preferences, using seasonal fruits to add a personal touch. Whether it’s a summer gathering or a fun family activity, fruit sushi with coconut sticky rice is sure to impress and satisfy.
Ingredients (Serves 4-6)
- 1 cup sushi rice
- 1 cup coconut milk
- 2 tablespoons sugar
- 1/2 teaspoon salt
- 1/2 teaspoon vanilla extract
- 1 mango, peeled and sliced
- 1 kiwi, peeled and sliced
- 1 banana, sliced
- 1 cup strawberries, hulled and sliced
- 4 sheets of nori (seaweed)
- Toasted sesame seeds or shredded coconut for garnish (optional)
Cooking Instructions
- Rinse the Sushi Rice: Begin by rinsing the sushi rice under cold water until the water runs clear. This helps to remove excess starch and prevents the rice from becoming too sticky. Drain the rice well.
- Cook the Rice: In a medium saucepan, combine the rinsed rice with 1 cup of water. Bring to a boil over medium heat. Once boiling, reduce the heat to low, cover the pot, and simmer for about 15 minutes, or until the rice is tender and all the water is absorbed. Remove from heat and let it sit, covered, for 10 minutes.
- Prepare Coconut Mixture: In a separate small saucepan, combine the coconut milk, sugar, salt, and vanilla extract. Heat over low heat until the sugar dissolves, but don’t bring it to a boil. Once dissolved, remove from heat and let it cool slightly.
- Combine Rice and Coconut Mixture: After the rice has rested, transfer it to a large bowl. Pour the coconut mixture over the rice and gently fold it in using a spatula. Be careful not to mash the rice; you want to keep the grains intact. Allow the rice to cool to room temperature.
- Assemble the Sushi: Lay a sheet of nori on a bamboo sushi mat (or a clean surface). With wet hands, spread an even layer of coconut sticky rice over the nori, leaving a small border at the top. Arrange your choice of sliced fruits in a line across the center of the rice.
- Roll the Sushi: Starting from the bottom, carefully roll the sushi away from you while applying gentle pressure to form a tight roll. Use the bamboo mat to help shape it. Once rolled, use a sharp knife to slice the sushi into bite-sized pieces.
- Garnish and Serve: Place the sliced fruit sushi on a serving platter. If desired, sprinkle with toasted sesame seeds or shredded coconut for added texture and flavor. Serve immediately and enjoy!
Extra Tips
When preparing fruit sushi with coconut sticky rice, feel free to experiment with different fruits based on what’s in season or your personal favorites. Fruits like blueberries, peaches, or even pomegranate seeds can add unique flavors and colors to the dish.
Additionally, consider serving the fruit sushi with a side of vegan chocolate sauce or a drizzle of agave syrup for an extra touch of sweetness. If you want to make the rice ahead of time, store it in an airtight container in the refrigerator for up to a day, but be sure to bring it back to room temperature before assembling your sushi.