

Exploring the vibrant world of Filipino vegetarian cuisine is like uncovering a treasure trove of color and flavor. Every dish, from the hearty Pinakbet to the creamy Laing, brings something unique to the table. These recipes are all about celebrating fresh, local ingredients that make Filipino cooking special. Ready to embark on this flavorful journey with me? Let’s get started on creating these mouthwatering plates that promise to delight your senses.
Pinakbet: A Hearty Vegetable Medley
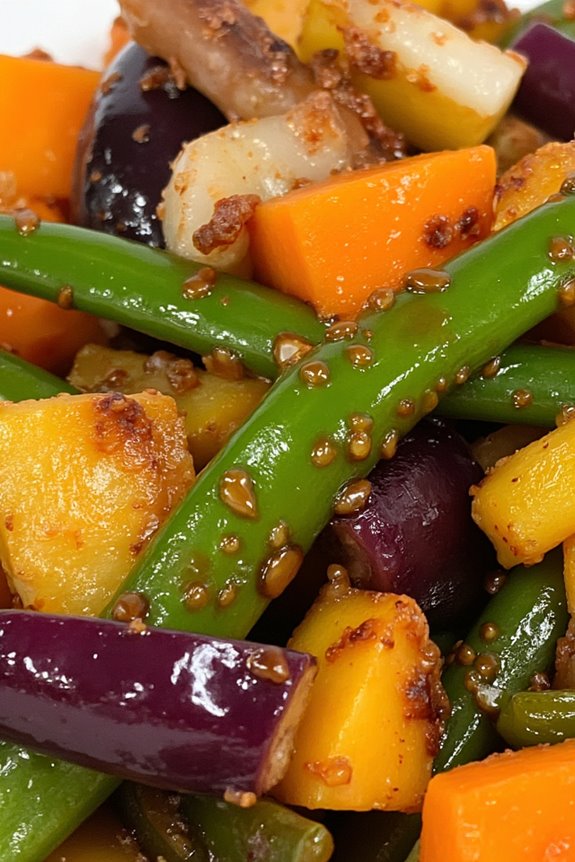
Pinakbet is a traditional Filipino dish that encapsulates the essence of home-cooked comfort food, particularly in the northern regions of the Philippines. This hearty vegetable medley is bursting with flavors, showcasing a variety of fresh vegetables that are often grown in local gardens.
Commonly enjoyed with rice, Pinakbet is both nutritious and satisfying, making it a popular choice for vegetarians and meat-eaters alike. The dish is beautifully seasoned with shrimp paste, which adds a unique umami flavor, while the combination of vegetables provides a colorful and appetizing presentation.
Typically, Pinakbet includes a mix of regional vegetables that may vary by season and availability. Common ingredients include bitter melon, eggplant, and squash, all of which contribute to the dish’s rich texture and flavor.
The beauty of Pinakbet lies in its versatility; you can adjust the ingredients based on your preferences or what you have on hand. This recipe serves 4-6 people, making it perfect for family gatherings or a cozy dinner at home.
Ingredients
- 1 medium-sized bitter melon, sliced
- 1 medium-sized eggplant, sliced into rounds
- 1 cup of diced squash (kalabasa)
- 1 cup of string beans (sitaw), cut into 2-inch pieces
- 1 medium onion, chopped
- 2 tomatoes, chopped
- 2 cloves of garlic, minced
- 1/2 cup of shrimp paste (bagoong)
- 1-2 cups of water
- 2 tablespoons of cooking oil
- Salt and pepper to taste
Cooking Instructions
- Prepare the vegetables: Start by washing and slicing all your vegetables. This includes cutting the bitter melon, eggplant, and squash into appropriate sizes. Make sure to remove the seeds from the bitter melon before slicing it. Having all your ingredients prepped will make the cooking process smoother.
- Sauté aromatics: In a large pan or wok, heat the cooking oil over medium heat. Add the minced garlic and chopped onions, sautéing until they become fragrant and the onions are translucent. This step is important as it forms the flavor base for your Pinakbet.
- Add tomatoes: Once the onions are cooked, add the chopped tomatoes to the pan. Cook for about 2-3 minutes until the tomatoes soften and release their juices. This will add a nice, tangy flavor to your dish.
- Incorporate the shrimp paste: Stir in the shrimp paste and let it cook for an additional 1-2 minutes. This step is vital as it allows the shrimp paste to meld with the aromatics, enhancing the overall flavor profile of the dish.
- Add the vegetables: Begin layering in the vegetables, starting with the diced squash, followed by the string beans, eggplant, and finally the bitter melon. Stir gently to combine everything without breaking the vegetables.
- Add water and simmer: Pour in 1-2 cups of water, just enough to cover the vegetables. Bring the mixture to a gentle simmer. Cover the pan and let it cook for about 15-20 minutes, or until the vegetables are tender but not mushy. Stir occasionally to guarantee even cooking.
- Season and serve: Once the vegetables are cooked to your liking, taste and adjust the seasoning with salt and pepper as needed. Serve hot with steamed rice, and enjoy the delightful medley of flavors that Pinakbet has to offer.
Extra Tips
When cooking Pinakbet, remember that the key to achieving the best flavor is to use fresh, high-quality vegetables.
If you’re looking to add a different twist, consider incorporating other vegetables like radishes or okra, which can enhance the dish’s texture and taste. Additionally, adjusting the amount of shrimp paste can cater to your taste preferences—less for a milder flavor or more for a stronger umami punch. Enjoy experimenting with this versatile dish!
Laing: Creamy Taro Leaves in Coconut Milk
Laing is a traditional Filipino dish that showcases the rich flavors of taro leaves cooked in creamy coconut milk, often enhanced with spices and other ingredients. This dish, originating from the Bicol region of the Philippines, is celebrated for its unique blend of flavors and textures.
The taro leaves absorb the creamy coconut milk, resulting in a comforting and hearty dish that can be enjoyed on its own or paired with rice. Laing not only represents the vibrancy of Filipino cuisine but also provides a delicious vegetarian option for those looking to explore plant-based meals.
The preparation of Laing is simple yet rewarding, allowing the natural flavors of the ingredients to shine. The key to a successful Laing lies in the quality of the coconut milk and the careful handling of the taro leaves, making sure they’re properly cooked without bitterness.
This dish can be a delightful centerpiece for any meal, and with its creamy texture and aromatic spices, it’s sure to impress family and friends alike.
Ingredients (Serves 4-6)
- 2 cups fresh taro leaves, cleaned and chopped
- 1 can (13.5 oz) coconut milk
- 1 medium onion, finely chopped
- 4 cloves garlic, minced
- 2-3 green chili peppers, sliced (adjust to taste)
- 1 tablespoon ginger, minced
- 2 tablespoons shrimp paste (optional, or use a vegetarian substitute)
- 1 tablespoon vegetable oil
- Salt and pepper to taste
- Water as needed
Cooking Instructions
- Prepare the Taro Leaves: Start by washing the taro leaves thoroughly under running water. Remove any tough stems and chop the leaves into smaller pieces. This will help them cook evenly and absorb the flavors of the coconut milk.
- Sauté Aromatics: In a large pot, heat the vegetable oil over medium heat. Add the chopped onion and sauté until it becomes translucent. Then, add the minced garlic and ginger, cooking for another minute until fragrant. This step builds a flavorful base for the dish.
- Add the Coconut Milk: Pour in the coconut milk, stirring well to combine with the sautéed aromatics. Bring the mixture to a gentle simmer. If you prefer a thinner consistency, you can add a little water at this stage.
- Incorporate the Taro Leaves: Once the coconut milk is simmering, add the chopped taro leaves to the pot. Stir gently to make certain the leaves are well-coated in the coconut milk. If using shrimp paste, add it at this point and mix thoroughly.
- Season and Simmer: Add the sliced green chili peppers, salt, and pepper to taste. Allow the mixture to simmer on low heat for about 15-20 minutes, stirring occasionally. This will make sure the taro leaves are tender and infused with the coconut flavor.
- Adjust Consistency and Serve: After simmering, check the consistency of the Laing. If it’s too thick, you can add a splash more of coconut milk or water. Once satisfied, remove from heat and serve hot with steamed rice.
Extra Tips
When cooking Laing, it’s important to use fresh taro leaves for the best flavor and texture. If fresh leaves are unavailable, you can use dried taro leaves, but make sure to soak them in water to rehydrate before cooking.
Adjust the level of spiciness by controlling the number of chili peppers you add, as this dish can be made mild or spicy to suit your preference. Finally, remember to taste and adjust the seasoning throughout the cooking process to achieve a balanced and flavorful dish. Enjoy your Laing!
Tortang Talong: Grilled Eggplant Omelette

Tortang Talong, or grilled eggplant omelette, is a beloved Filipino dish that showcases the versatility of eggplants. This simple yet flavorful recipe transforms the humble eggplant into a satisfying meal that can be enjoyed at any time of the day.
Traditionally served with rice and vinegar on the side, this dish isn’t only vegetarian but also packed with nutrients, making it a perfect choice for those seeking a healthy option.
Grilling the eggplants gives them a smoky flavor that perfectly complements the eggs. The key to achieving the ideal texture is to guarantee the eggplants are properly cooked before combining them with the egg mixture. This recipe is easy to follow and will surely impress family and friends with its delightful taste and vibrant presentation.
Ingredients (Serves 4-6):
- 4 medium-sized eggplants
- 4 large eggs
- 1 medium onion, finely chopped
- 2 cloves garlic, minced
- 1 medium tomato, diced
- 2 tablespoons cooking oil
- Salt and pepper to taste
- Optional: chopped green onions or cilantro for garnish
Cooking Instructions:
1. Prepare the Eggplants: Begin by washing the eggplants thoroughly. Using a fork, prick the eggplants a few times to prevent them from bursting while grilling. Place them directly on an open flame or on a grill pan and cook until the skin is charred and the flesh is soft, about 10-15 minutes. Turn them occasionally to guarantee even cooking.
2. Peel the Eggplants: Once the eggplants are grilled, remove them from the heat and let them cool slightly. When they’re cool enough to handle, peel off the charred skin and set the eggplant aside. You can either leave them whole or mash them lightly with a fork, depending on your preference.
3. Saute the Aromatics: In a skillet, heat 2 tablespoons of cooking oil over medium heat. Add the chopped onions and minced garlic, and sauté for about 2-3 minutes until they become translucent and fragrant.
Then, add the diced tomatoes and cook for another 2-3 minutes until they soften.
4. Combine Ingredients: In a mixing bowl, crack the eggs and whisk them together. Stir in the grilled eggplant (mashed or whole), sautéed onions, garlic, and tomatoes. Season the mixture with salt and pepper to taste. Mix well until all the ingredients are evenly incorporated.
5. Cook the Omelette: Pour the egg and eggplant mixture back into the skillet over medium heat. Cook for about 5-7 minutes, or until the bottom is set and golden brown. Carefully flip the omelette using a large plate to cook the other side for an additional 5 minutes, or until fully cooked through and golden.
6. Serve: Once cooked, transfer the Tortang Talong to a serving platter. Optionally, garnish with chopped green onions or cilantro. Serve hot with steamed rice and vinegar on the side for dipping.
Extra Tips:
To enhance the flavor of your Tortang Talong, consider adding other vegetables such as bell peppers or spinach to the egg mixture.
If you prefer a creamier texture, you can mix in a splash of milk or cream with the eggs. Always guarantee that the eggplants are grilled until tender; this not only improves the flavor but also ensures that they blend well with the eggs.
Enjoy experimenting with different herbs and spices to personalize your omelette!
Ginataang Sitaw: Long Beans in Coconut Sauce

Ginataang Sitaw is a delightful Filipino dish that showcases the unique flavors of long green beans, also known as sitaw, cooked in a rich and creamy coconut sauce. This vegetarian recipe not only highlights the natural sweetness of the beans but also infuses them with aromatic spices and a hint of heat, making it a perfect accompaniment to rice or a standalone meal.
The use of coconut milk not only adds a luscious texture but also a tropical flair that’s quintessential in Filipino cuisine. This dish is simple yet satisfying, making it an ideal choice for family gatherings or everyday meals. It’s a great way to incorporate more vegetables into your diet while enjoying the traditional flavors of the Philippines.
With its colorful presentation and enticing aroma, Ginataang Sitaw is sure to impress both vegetarians and non-vegetarians alike.
Ingredients (Serves 4-6)
- 1 pound long green beans (sitaw), cut into 2-inch pieces
- 1 can (13.5 oz) coconut milk
- 1 medium onion, chopped
- 2 cloves garlic, minced
- 1-2 tablespoons ginger, minced
- 1-2 green chilies (siling pangsigang), slit lengthwise (optional)
- 2 tablespoons vegetable oil
- 2 tablespoons fish sauce (or soy sauce for a vegan option)
- Salt and pepper to taste
Cooking Instructions
- Prepare the Ingredients: Start by washing the long beans thoroughly and cutting them into 2-inch pieces. Chop the onion and mince the garlic and ginger. If using, slit the green chilies lengthwise to release their flavor. Having all your ingredients prepped will make the cooking process smoother.
- Sauté the Aromatics: In a large skillet or pot, heat the vegetable oil over medium heat. Add the chopped onion and sauté until translucent, about 2-3 minutes. Next, add the minced garlic and ginger, stirring continuously for another minute until fragrant. This step builds the foundational flavors of the dish.
- Cook the Long Beans: Add the cut long beans to the skillet and sauté for about 5 minutes, stirring occasionally. You want the beans to be tender-crisp, allowing them to retain their vibrant color and nutritional value.
- Add Coconut Milk and Seasoning: Pour in the coconut milk and stir well to combine. Add the fish sauce (or soy sauce for a vegan option) and the green chilies, if using. Bring the mixture to a gentle simmer.
- Simmer the Dish: Allow the Ginataang Sitaw to simmer for about 10-15 minutes, stirring occasionally. This will help the beans absorb the flavors of the coconut milk while thickening the sauce slightly. Taste and adjust seasoning with salt and pepper as desired.
- Serve: Once the beans are cooked through and the sauce has thickened, remove from heat. Serve the Ginataang Sitaw hot over steamed rice, allowing the creamy coconut sauce to enhance each bite.
Extra Tips
For a richer flavor, you can add a dash of turmeric or a sprinkle of red pepper flakes for some heat. If you prefer a thicker sauce, let the dish simmer a bit longer.
Additionally, feel free to incorporate other vegetables like eggplant or bell peppers into the mix for added color and nutrition. Always taste as you go to guarantee the flavors are well-balanced to your liking!
Adobong Kangkong: Sautéed Water Spinach
Adobong Kangkong is a delightful vegetarian dish that brings together the rich flavors of Filipino cuisine with the freshness of water spinach, also known as kangkong. This popular dish showcases the versatility of kangkong, which absorbs the savory notes of soy sauce and vinegar, creating a harmonious blend of flavors that’s both satisfying and nutritious.
Perfect as a side or a main dish, Adobong Kangkong isn’t only easy to prepare but also showcases the beauty of simple ingredients coming together to create something truly special.
In this recipe, we’ll highlight the straightforward steps to prepare Adobong Kangkong while ensuring that you capture the essence of Filipino cooking. The combination of garlic, soy sauce, and vinegar creates a tangy yet savory sauce that perfectly coats the vibrant greens.
This dish is an excellent way to incorporate more vegetables into your diet, and it pairs wonderfully with steamed rice, making it a complete meal.
Ingredients (Serves 4-6)
- 1 pound water spinach (kangkong), cleaned and trimmed
- 3 tablespoons vegetable oil
- 4 cloves garlic, minced
- ½ cup soy sauce
- ¼ cup vinegar (preferably cane vinegar)
- 1 teaspoon black pepper
- 1 teaspoon sugar (optional)
- Salt, to taste
- 1 small onion, sliced (optional)
Cooking Instructions
- Prepare the Water Spinach: Start by thoroughly washing the water spinach under running water. Trim the ends of the stems and remove any yellow or wilted leaves. Set aside to drain.
- Sauté the Aromatics: In a large pan or wok, heat the vegetable oil over medium heat. Add the minced garlic and sauté until fragrant, about 1-2 minutes. If using onions, add them at this stage and cook until they become translucent.
- Add the Sauce Ingredients: Pour in the soy sauce and vinegar, stirring well to combine. Allow the mixture to simmer for a minute to meld the flavors. If you prefer a hint of sweetness, add the sugar at this point and stir until dissolved.
- Cook the Kangkong: Add the cleaned water spinach to the pan. Toss the leaves in the sauce, ensuring they’re evenly coated. Cover the pan and let it cook for about 3-5 minutes, or until the leaves are wilted and tender.
- Season and Serve: Once the kangkong is cooked, taste and adjust the seasoning with salt and black pepper as needed. Remove from heat and transfer to a serving dish. Serve hot alongside steamed rice.
Extra Tips
For added depth of flavor, consider incorporating a few slices of chili peppers for a bit of heat, or add some crispy fried tofu for a protein boost.
Adobong Kangkong is best enjoyed fresh, but if you have leftovers, they can be stored in the refrigerator for a day or two. Reheat gently to avoid overcooking the water spinach.
This dish isn’t only delicious but also versatile; feel free to experiment with different vegetables or protein sources to make it your own!
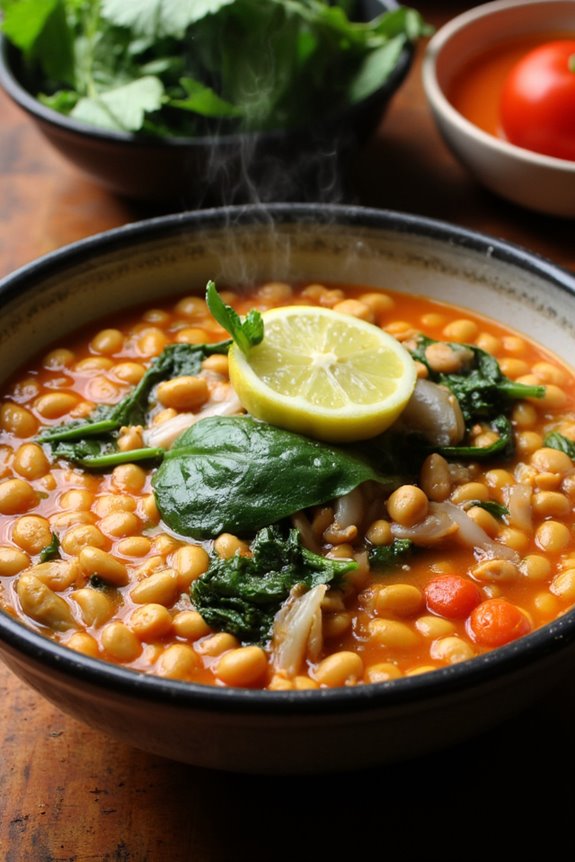
Sinigang Na Miso: Miso Soup With Vegetables

Sinigang Na Miso is a delightful and comforting Filipino dish that brings together the rich umami flavor of miso with a medley of fresh vegetables. This traditional sour soup isn’t only nourishing but also offers a burst of flavors, making it a popular choice among vegetarians and health enthusiasts alike.
The combination of miso paste and tamarind creates a unique tanginess that perfectly complements the crisp textures of the vegetables. It’s a dish that warms the soul and is perfect for family gatherings or a cozy dinner at home.
To make Sinigang Na Miso, you’ll need a variety of fresh produce and miso paste, which serves as the base for the soup. This vegetarian version incorporates seasonal vegetables such as radish, eggplant, and leafy greens, which add color and nutritional value to the dish.
Whether you’re a seasoned cook or a beginner in the kitchen, this recipe is straightforward and can be adjusted to your taste preferences. Serve it hot over steamed rice for a complete meal that everyone will enjoy.
Ingredients (Serves 4-6):
- 8 cups water
- 1 cup miso paste (white or yellow)
- 1 medium onion, quartered
- 2 medium tomatoes, quartered
- 1 radish (labanos), sliced
- 1 medium eggplant, sliced
- 1 cup green beans, trimmed
- 1 cup bok choy or other leafy greens
- 2-3 green chili peppers (optional, for spice)
- 1 tablespoon soy sauce (optional)
- Salt and pepper to taste
- Fresh cilantro or green onions for garnish
Cooking Instructions:
- Prepare the Broth: In a large pot, bring 8 cups of water to a boil. Once boiling, add the quartered onion and tomatoes. Boil for about 5-7 minutes until the tomatoes start to soften, releasing their juices, which enhances the flavor of the broth.
- Add Miso Paste: Lower the heat to a simmer. In a separate bowl, mix the miso paste with a ladleful of the hot broth until it becomes a smooth mixture. This helps prevent clumps in the soup. Gradually stir this mixture back into the pot, ensuring it’s well combined.
- Incorporate Vegetables: Add the sliced radish and eggplant to the pot and let them cook for about 5 minutes. These vegetables will absorb the flavors of the broth while contributing their own textures.
- Add Green Beans and Greens: Next, add the green beans and bok choy (or your choice of leafy greens) to the pot. Continue to simmer for another 5-7 minutes until all the vegetables are tender but not mushy.
- Season the Soup: Taste the soup and adjust the seasoning with salt, pepper, and soy sauce if desired. If you enjoy a bit of heat, you can also add the whole green chili peppers at this stage.
- Serve: Once the vegetables are cooked to your liking, remove the pot from heat. Ladle the soup into bowls, garnishing with fresh cilantro or green onions. Serve hot with steamed rice on the side.
Extra Tips:
For an added depth of flavor, consider incorporating other vegetables like mushrooms or zucchini. You can also adjust the sourness by using more or less miso paste or by adding a splash of tamarind juice.
Additionally, allowing the soup to simmer longer will help blend the flavors more deeply, so don’t hesitate to customize the cooking time based on your preferences. Enjoy your nourishing bowl of Sinigang Na Miso!
Ensaladang Mangga: Green Mango Salad
Ensaladang Mangga, or Green Mango Salad, is a revitalizing and tangy dish that showcases the vibrant flavors of the Philippines. This salad is typically made with unripe green mangoes, which provide a crisp texture and a delightful tartness that contrasts beautifully with the other ingredients.
It’s often served as a side dish or a palate cleanser, making it a perfect accompaniment to grilled meats or as a light meal on its own.
In addition to green mangoes, this salad typically includes tomatoes, onions, and sometimes even shrimp or salted eggs for added flavor. However, in this vegetarian version, we’ll focus on the fresh and simple ingredients that highlight the bright taste of the mango.
Tossed in a light dressing, Ensaladang Mangga isn’t only easy to prepare but also a nutritious option packed with vitamins and minerals.
Ingredients (Serves 4-6)
- 2 medium green mangoes, peeled and julienned
- 2 medium tomatoes, diced
- 1 small red onion, thinly sliced
- 1 tablespoon fish sauce (or soy sauce for a vegetarian option)
- 1 tablespoon lime juice
- Salt and pepper to taste
- 1/4 cup chopped fresh cilantro (optional)
- 1/4 cup diced cucumber (optional)
Cooking Instructions
1. Prepare the Ingredients: Begin by washing and peeling the green mangoes. Using a sharp knife, julienne the mangoes into thin strips for a more attractive presentation.
Next, wash the tomatoes and dice them into small pieces. Finally, peel and thinly slice the red onion.
2. Combine the Vegetables: In a large mixing bowl, combine the julienned green mangoes, diced tomatoes, and sliced red onion. If you choose to add cucumber and cilantro for extra flavor and texture, include them at this stage.
3. Make the Dressing: In a small bowl, mix together the fish sauce (or soy sauce) and lime juice. This dressing will enhance the flavors of the salad, so whisk until well combined.
If desired, you can adjust the dressing by adding more lime juice for extra tanginess or a pinch of sugar if you prefer a sweeter flavor.
4. Dress the Salad: Pour the dressing over the salad mixture. Gently toss all the ingredients together, ensuring that the dressing evenly coats the mangoes, tomatoes, and onions.
Be careful not to mash the mangoes; you want to keep them intact for the best texture.
5. Season and Serve: Taste the salad and add salt and pepper as needed. Once seasoned, let the salad sit for about 10 minutes to allow the flavors to meld.
Serve chilled or at room temperature as a delicious accompaniment to your meal.
Extra Tips
For a more vibrant flavor, consider adding a pinch of chili flakes or a finely chopped chili pepper to the dressing for a bit of heat.
Additionally, if you’re preparing the salad in advance, it’s best to wait until just before serving to add the dressing to maintain the crispness of the mango and other vegetables.
This salad is best enjoyed fresh but can be kept in the refrigerator for up to a day.
Kare-Kare: Peanut Stew With Vegetables

Kare-Kare is a beloved Filipino dish known for its rich and creamy peanut sauce, traditionally made with oxtail or tripe. However, this vegetarian version brings the same bold flavors and comforting essence to the table using a variety of vegetables, making it a perfect choice for those seeking a meatless meal. The dish is usually served with bagoong (fermented shrimp paste) on the side, but you can also opt for a vegetarian alternative or skip it altogether for a fully plant-based experience.
Making Kare-Kare is a labor of love, but the delicious outcome is worth the effort. The key to a successful Kare-Kare lies in the quality of the peanut butter and the combination of vegetables you choose. This recipe incorporates hearty vegetables like eggplant, banana hearts, and green beans, all simmered to perfection in a savory peanut sauce. It’s a wonderful dish that embodies the heart of Filipino cooking while being accessible to vegetarians and vegans alike.
Ingredients (Serves 4-6):
- 1 cup peanut butter (creamy or chunky)
- 4 cups vegetable broth
- 2 tablespoons vegetable oil
- 1 medium onion, chopped
- 4 cloves garlic, minced
- 1 large eggplant, sliced into rounds
- 1 cup banana hearts (puso ng saging), sliced
- 1 cup green beans, trimmed
- 1 cup bok choy or pechay, chopped
- 1 tablespoon rice flour (or cornstarch) mixed with 2 tablespoons water (for thickening)
- Salt and pepper, to taste
- Optional: 1 tablespoon soy sauce (for added flavor)
Cooking Instructions:
- Prepare the Vegetables: Begin by washing and slicing all the vegetables you’ll be using. Make sure the eggplant is cut into rounds, the banana hearts are sliced, and the green beans are trimmed. Set aside so that they’re ready for cooking.
- Sauté Aromatics: In a large pot, heat the vegetable oil over medium heat. Once hot, add the chopped onion and sauté for about 3-4 minutes until they become translucent. Next, add the minced garlic and continue to cook for another minute until fragrant.
- Combine Peanut Butter and Broth: Lower the heat and stir in the peanut butter, mixing well with the sautéed onions and garlic. Gradually pour in the vegetable broth, stirring constantly to avoid lumps. Bring the mixture to a gentle simmer.
- Add the Vegetables: Once the sauce is simmering, add the sliced eggplant and banana hearts to the pot. Cook for about 10 minutes, allowing the vegetables to soften. After this, add the green beans and bok choy, and cook for an additional 5-7 minutes until all the vegetables are tender.
- Thicken the Sauce: To achieve a thicker consistency, mix the rice flour (or cornstarch) with water to create a slurry. Slowly pour this mixture into the pot while continuously stirring. Allow the sauce to simmer for a few more minutes until it thickens to your desired consistency.
- Season to Taste: Finally, taste the Kare-Kare and season with salt and pepper. If you want to enhance the flavor further, you can add soy sauce. Give it a good stir and remove from heat.
- Serve: Ladle the Kare-Kare into serving bowls and enjoy it hot. It’s traditionally served with steamed rice and a side of bagoong or a vegetarian alternative.
Extra Tips:
To elevate your Kare-Kare experience, try using homemade peanut butter for a fresher taste, or mix in some crushed peanuts for added texture.
If you want to experiment with different vegetables, feel free to include other favorites like squash or carrots.
Don’t hesitate to adjust the thickness of the sauce based on your preference—just remember that the longer you simmer, the thicker it will become. Enjoy your cooking adventure!
Bicol Express: Spicy Coconut Eggplant Dish

Bicol Express is a beloved dish from the Bicol region of the Philippines, known for its rich and creamy coconut flavor combined with a spicy kick. While traditionally made with pork, this vegetarian version substitutes eggplant for a deliciously satisfying meal that captures the essence of the original recipe.
The combination of coconut milk, chili peppers, and the earthy flavor of eggplant creates a comforting dish that pairs beautifully with steamed rice. This recipe is perfect for those looking to enjoy the bold flavors of Filipino cuisine without meat.
It’s easy to prepare and showcases the vibrant colors and tastes of the ingredients. Whether you’re serving it for a family dinner or a special occasion, Bicol Express is sure to impress your guests and satisfy your taste buds.
Ingredients (Serves 4-6)
- 3 medium-sized eggplants, cut into bite-sized pieces
- 1 can (400 ml) coconut milk
- 3 tablespoons vegetable oil
- 1 medium onion, chopped
- 4 cloves garlic, minced
- 2-3 long green chili peppers, sliced (adjust to taste)
- 2-3 red chili peppers, sliced (adjust to taste)
- 1 tablespoon shrimp paste (or a vegetarian alternative)
- 1 tablespoon soy sauce
- Salt and pepper to taste
- Fresh basil leaves for garnish (optional)
Cooking Instructions
1. Prepare the Eggplant: Start by washing the eggplants thoroughly. Cut them into bite-sized pieces to guarantee they cook evenly. You can choose to soak them in salted water for about 10 minutes to reduce any bitterness, then drain and set aside.
2. Sauté Aromatics: In a large skillet or saucepan, heat the vegetable oil over medium heat. Add the chopped onions and sauté until they become translucent, about 3-4 minutes.
Then, add the minced garlic and continue to sauté for another 1-2 minutes until fragrant.
3. Add the Eggplant: Once the onions and garlic are ready, add the eggplant pieces to the pan. Stir well to coat them with the oil and allow them to cook for about 5-7 minutes. The eggplants should start to soften but not completely break down.
4. Incorporate Coconut Milk: Pour the coconut milk into the skillet with the sautéed eggplants. Stir to combine, assuring the eggplants are submerged in the creamy mixture.
Reduce the heat to low and let it simmer for about 10-15 minutes, stirring occasionally. The coconut milk will thicken and coat the eggplants beautifully.
5. Add Spices and Seasonings****: After the coconut milk has thickened, add the shrimp paste (or vegetarian alternative), soy sauce, and the sliced chili peppers.
Mix well and let it simmer for an additional 5 minutes. Taste and adjust seasoning with salt and pepper as needed.
6. Serve and Garnish: Once everything is well combined and the eggplants are tender, remove from heat. Serve hot over steamed rice and garnish with fresh basil leaves if desired.
Extra Tips
For an extra layer of flavor, consider adding chopped bell peppers or tomatoes to the sautéed aromatics.
You can also adjust the heat level by using more or fewer chili peppers based on your preference. If you want a thicker sauce, let the dish simmer uncovered for a bit longer.
This dish is best enjoyed fresh but can also be stored in the refrigerator for up to three days. Reheat gently before serving to maintain its creamy texture.
Lumpiang Sariwa: Fresh Spring Rolls
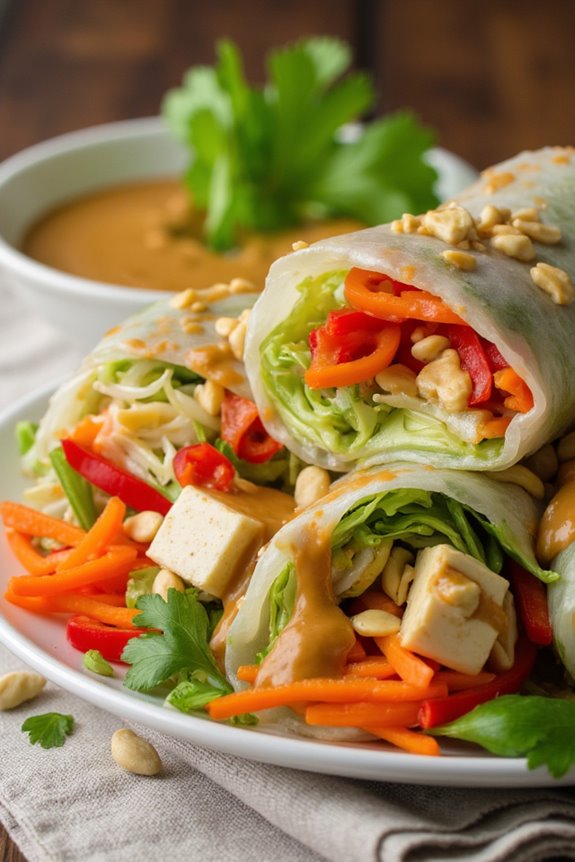
Lumpiang Sariwa, or fresh spring rolls, is a delightful and healthy dish from the Philippines that celebrates the vibrant flavors of fresh vegetables. This vegetarian dish is wrapped in a soft crepe-like wrapper and served with a savory garlic-peanut sauce. Not only is it delicious, but it also offers a colorful presentation that makes it perfect for gatherings or a light meal.
The use of fresh ingredients allows you to customize the filling according to your preference, making it a versatile recipe for everyone to enjoy. The beauty of Lumpiang Sariwa lies in its simplicity and the ability to use seasonal vegetables. This dish isn’t only a feast for the eyes but also a nutritious option packed with vitamins and minerals.
The combination of flavors and textures—from the crispiness of the vegetables to the smoothness of the sauce—creates a delightful culinary experience. Let’s plunge into the recipe and learn how to make this Filipino favorite that will surely impress your family and friends.
Ingredients (Serves 4-6)
- 10-12 pieces of fresh lumpia wrappers
- 2 cups of shredded cabbage
- 1 cup of grated carrots
- 1 cup of sliced bell peppers (red and green)
- 1 cup of cooked green beans, cut into 1-inch pieces
- 1 cup of jicama (singkamas), julienned
- 1/2 cup of chopped green onions
- 1/2 cup of fresh cilantro, chopped
- 1 cup of cooked tofu, diced (optional)
- 2 tablespoons of vegetable oil (for sautéing)
For the Sauce:
- 1/2 cup of peanut butter
- 1/4 cup of soy sauce
- 1/4 cup of water
- 2 tablespoons of minced garlic
- 2 tablespoons of sugar
- 1 tablespoon of vinegar
- 1 tablespoon of sesame oil
- Chopped peanuts (for garnish)
Cooking Instructions
- Prepare the Vegetables: In a large mixing bowl, combine the shredded cabbage, grated carrots, sliced bell peppers, cooked green beans, jicama, chopped green onions, and cilantro. If you’re using tofu, add that as well. Mix all the ingredients well to guarantee an even distribution of flavors.
- Sauté the Mixture: Heat vegetable oil in a large pan over medium heat. Add the vegetable mixture and sauté for about 5-7 minutes, or until the vegetables are slightly tender yet still crisp. This step helps to enhance the flavors of the vegetables.
- Make the Sauce: In a separate bowl, whisk together the peanut butter, soy sauce, water, minced garlic, sugar, vinegar, and sesame oil until smooth. Adjust the consistency by adding more water if desired. Taste and adjust seasoning as needed.
- Assemble the Lumpiang Sariwa: Lay a lumpia wrapper on a flat surface. Place a generous amount of the sautéed vegetable mixture at the bottom third of the wrapper. Fold the sides over the filling and roll it up tightly, starting from the bottom and tucking in the filling as you go. Repeat this process for the remaining wrappers and filling.
- Serve: Arrange the fresh spring rolls on a serving platter. Drizzle the peanut sauce generously over the rolls or serve it on the side as a dipping sauce. Garnish with chopped peanuts for an extra crunch.
Extra Tips
To enhance the flavor of your Lumpiang Sariwa, consider adding a sprinkle of lime juice or a hint of chili for a spicy kick. You can also experiment with different vegetables, such as bean sprouts or radish, based on what you have on hand.
If you prefer a gluten-free option, check for gluten-free soy sauce and wrappers. Enjoy this invigorating dish with friends and family, and don’t hesitate to get creative with your fillings!
Pansit Bihon: Stir-Fried Rice Noodles With Vegetables
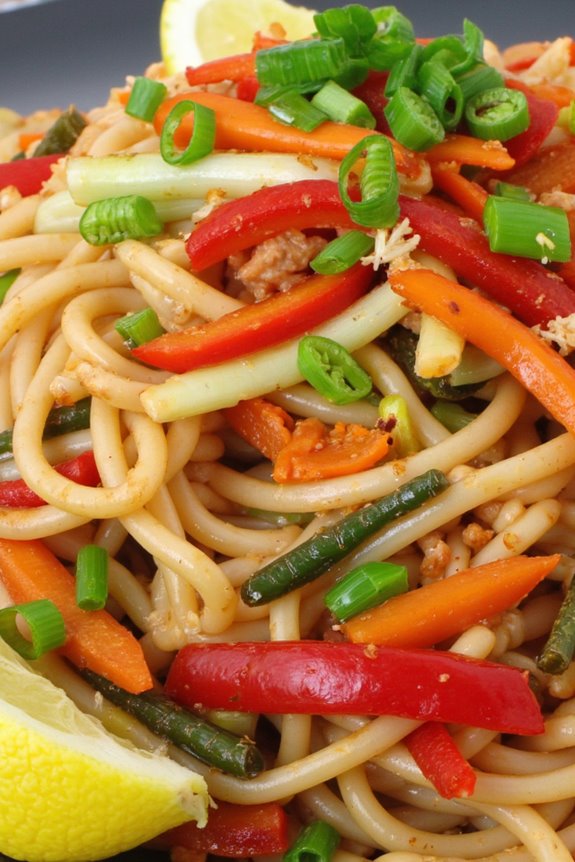
Pansit Bihon is a beloved Filipino dish that features delicate rice noodles stir-fried with a colorful array of vegetables and sometimes added proteins. However, in this vegetarian version, we focus solely on the vibrant vegetables and aromatic seasonings that make this dish a delightful meal on its own.
It’s a staple at Filipino gatherings, symbolizing long life and good fortune, making it a perfect dish for celebrations or an everyday meal. This dish isn’t only flavorful but also quick to prepare, making it an ideal choice for busy weeknights or when you’re looking to impress guests with a taste of Filipino cuisine.
The combination of crispy vegetables with the soft rice noodles creates a satisfying texture, and the soy sauce adds a savory depth that ties all the flavors together beautifully.
Ingredients (Serves 4-6)
- 8 oz bihon rice noodles
- 2 tablespoons vegetable oil
- 1 medium onion, thinly sliced
- 3 cloves garlic, minced
- 1 medium carrot, julienned
- 1 cup cabbage, shredded
- 1 red bell pepper, thinly sliced
- 1 green bell pepper, thinly sliced
- 1 cup snow peas, trimmed
- 3 tablespoons soy sauce
- 2 tablespoons oyster sauce (or mushroom sauce for a vegan option)
- Salt and pepper to taste
- 3 green onions, chopped (for garnish)
- Lemon or calamansi wedges (for serving)
Cooking Instructions
- Soak the Noodles: Begin by placing the bihon rice noodles in a large bowl and soaking them in warm water for about 20-30 minutes, or until they’re soft. This step is essential as it softens the noodles, allowing them to absorb flavor during cooking.
- Prepare the Vegetables: While the noodles soak, wash and prepare all your vegetables. Julienne the carrots, shred the cabbage, and slice the bell peppers. Having everything prepped in advance will make the cooking process smoother and quicker.
- Heat the Oil: In a large skillet or wok, heat the vegetable oil over medium heat. Once the oil is hot, add the sliced onions and sauté for 2-3 minutes until they become translucent and fragrant.
- Add Garlic: Stir in the minced garlic and continue to sauté for another minute, being careful not to let the garlic burn, as it will impart a bitter flavor to the dish.
- Incorporate Vegetables: Add the julienned carrots, bell peppers, and snow peas to the skillet. Cook for about 3-4 minutes, stirring frequently, until the vegetables are tender yet still crisp.
- Add the Noodles: Drain the soaked bihon noodles and add them to the skillet with the vegetables. Use tongs or chopsticks to gently toss the noodles with the vegetables, making sure they’re evenly mixed.
- Season the Dish: Pour the soy sauce and oyster (or mushroom) sauce over the noodles. Toss everything together to combine, making sure the noodles are well coated. Cook for an additional 2-3 minutes, allowing the noodles to absorb the flavors.
- Finish Up: Taste and adjust seasoning with salt and pepper as needed. Once everything is heated through and well mixed, remove the skillet from heat.
- Serve: Transfer the Pansit Bihon to a serving platter and garnish with chopped green onions. Serve with lemon or calamansi wedges on the side for an extra burst of flavor.
Extra Tips
When making Pansit Bihon, feel free to customize the vegetables based on what you have available or your personal preferences. Common additions include mushrooms, green beans, or broccoli.
Also, if you want to enhance the flavor, consider adding a splash of sesame oil or a sprinkle of crushed red pepper for some heat. To keep the noodles from sticking together, make sure you toss them frequently during cooking and serve immediately after preparation. Enjoy your delicious vegetarian Pansit Bihon!
Ginisang Munggo: Mung Bean Stew
Ginisang Munggo is a beloved Filipino dish that showcases the humble mung bean in a hearty and nutritious stew. Often enjoyed as a comforting meal, this dish isn’t only rich in flavor but also packed with protein, making it a perfect choice for vegetarians and those looking to incorporate more plant-based meals into their diet.
Typically served with rice, Ginisang Munggo is versatile and can be customized with various vegetables, making it a staple in many Filipino households.
This mung bean stew is relatively simple to prepare, requiring only a few ingredients that are easily accessible. The key to a delicious Ginisang Munggo lies in the sautéing of aromatics like garlic, onions, and tomatoes, which create a flavorful base for the stew.
Once the mung beans are cooked to perfection, this dish can be enjoyed on its own or paired with rice for a satisfying meal.
Ingredients (Serves 4-6)
- 1 cup mung beans
- 4 cups water
- 2 tablespoons vegetable oil
- 4 cloves garlic, minced
- 1 medium onion, chopped
- 2 medium tomatoes, diced
- 1-2 cups spinach or bitter melon leaves (optional)
- 1 tablespoon fish sauce (optional)
- Salt and pepper to taste
- Lemon or calamansi (for serving, optional)
Cooking Instructions
- Rinse and Soak the Mung Beans: Start by rinsing the mung beans under cold running water to remove any dirt or impurities. Soaking the beans for about an hour can help to soften them and reduce cooking time, although this step is optional.
- Boil the Mung Beans: In a medium pot, combine the rinsed mung beans and 4 cups of water. Bring the mixture to a boil over medium-high heat. Once boiling, reduce the heat and let it simmer for about 30-40 minutes or until the mung beans are soft and tender. Stir occasionally and add more water if necessary to prevent the beans from drying out.
- Sauté the Aromatics: While the mung beans are cooking, heat the vegetable oil in a large skillet over medium heat. Add the minced garlic and sauté until fragrant, about 1 minute. Then add the chopped onion and continue to sauté until the onion becomes translucent, approximately 3-4 minutes. Finally, add the diced tomatoes and cook until they soften and release their juices, about 5 minutes.
- Combine Mung Beans and Aromatics: Once the mung beans are cooked, carefully transfer them into the skillet with the sautéed aromatics. Stir well to combine, and if the mixture looks too thick, you can add a little more water to reach your desired consistency.
- Add Greens and Seasoning: If using spinach or bitter melon leaves, add them to the skillet and cook for an additional 2-3 minutes until the greens are wilted. Season the stew with fish sauce (if using), salt, and pepper to taste. Mix everything thoroughly and let it simmer for another 5 minutes.
- Serve: Remove the skillet from the heat and transfer the Ginisang Munggo to a serving bowl. Serve hot with steamed rice and a squeeze of lemon or calamansi on top for added brightness.
Extra Tips
When cooking Ginisang Munggo, feel free to experiment with additional vegetables such as carrots, eggplants, or bell peppers to enhance the dish’s flavor and nutritional value.
If you prefer a creamier texture, you can mash some of the cooked mung beans with a fork or potato masher before serving. Additionally, adjusting the seasoning to your taste is essential, so don’t hesitate to add more salt, pepper, or fish sauce as needed.
Enjoy this wholesome dish with your family and friends!
Halo-Halo: Colorful Shaved Ice Dessert

Halo-Halo is a delightful and colorful dessert that’s a staple in Filipino cuisine, especially during the sweltering summer months. With a medley of sweetened fruits, jellies, and beans, all layered beneath a mountain of finely shaved ice, this dessert offers a rejuvenating respite from the heat. The name “halo-halo” translates to “mix-mix,” which perfectly describes the way you prepare and enjoy this vibrant treat. Each spoonful is a mix of flavors and textures, making it a fun and satisfying dessert that’s sure to please anyone.
The beauty of halo-halo lies in its versatility; you can customize it to your liking with various ingredients that suit your taste. Typically, it includes ingredients like sweetened jackfruit, purple yam, and coconut, all topped with creamy leche flan and a scoop of ice cream. The vibrant colors of each ingredient not only make halo-halo visually appealing but also create a symphony of flavors that dance on your palate. This recipe will guide you through making a traditional halo-halo that serves 4-6 people, perfect for sharing with family and friends.
Ingredients (Serves 4-6):
- 2 cups finely shaved ice
- 1 cup sweetened kidney beans (canned or cooked)
- 1 cup sweetened jackfruit, sliced
- 1 cup sweetened banana (saba), sliced
- 1 cup sweetened purple yam (ube) puree
- 1 cup macapuno (sweetened coconut strips)
- 1 cup jellies (agar-agar or any colorful gelatin)
- 1 cup leche flan, cut into small pieces
- 4-6 scoops of vanilla or ube ice cream
- Evaporated milk, for drizzling
- Sugar, to taste (optional)
Cooking Instructions:
- Prepare the Ingredients: Before assembling your halo-halo, make certain all ingredients are prepared and ready to go. If using fresh fruits, peel and slice them as needed. If you’re using canned ingredients, drain the syrup and set them aside. This step guarantees a smooth assembly process.
- Layer the Base: In a large serving bowl or individual cups, start by adding a layer of sweetened kidney beans at the bottom. This will serve as the first layer of flavor and texture. Follow with a layer of sweetened jackfruit, sweetened banana, and sweetened purple yam. The order can vary based on your preference, but layering helps in creating a beautiful presentation.
- Add the Jellies and Macapuno: Next, add your jellies and macapuno on top of the fruit layers. These ingredients provide a fun chewy texture that contrasts with the creaminess of the ice cream and the softness of the fruits.
- Shave the Ice: Using a shaved ice machine or a blender, finely shave ice until you have about 2 cups. Pack the shaved ice on top of your layered ingredients, creating a mound.
- Add the Toppings: On top of the shaved ice, place the small pieces of leche flan and finish with a generous scoop of ice cream. The ice cream adds a creamy richness that perfectly complements the other ingredients.
- Drizzle with Evaporated Milk: Finally, drizzle evaporated milk over the top of the halo-halo. This adds a creamy element that enhances the overall flavor. You can also sprinkle sugar if you prefer a sweeter dessert.
- Mix and Enjoy: Serve your halo-halo immediately with a spoon. Encourage your guests to mix all the layers together before enjoying to experience the full range of flavors and textures.
Extra Tips:
When making halo-halo, feel free to get creative with the ingredients. You can add other elements like sweetened fruits (mango, strawberries), different types of jellies, or even a sprinkle of toasted rice flakes for added crunch.