

Japanese cuisine has always been my go-to for quick and satisfying meals. Whether you’re in the mood for a savory teriyaki chicken bowl or the simplicity of onigiri, these recipes are perfect for when time is short. You can enjoy crispy ebi tempura or a rich salmon teriyaki without spending hours in the kitchen. Ready to give your meals a delicious twist? Let’s explore these ten easy Japanese recipes together.
Teriyaki Chicken Bowl
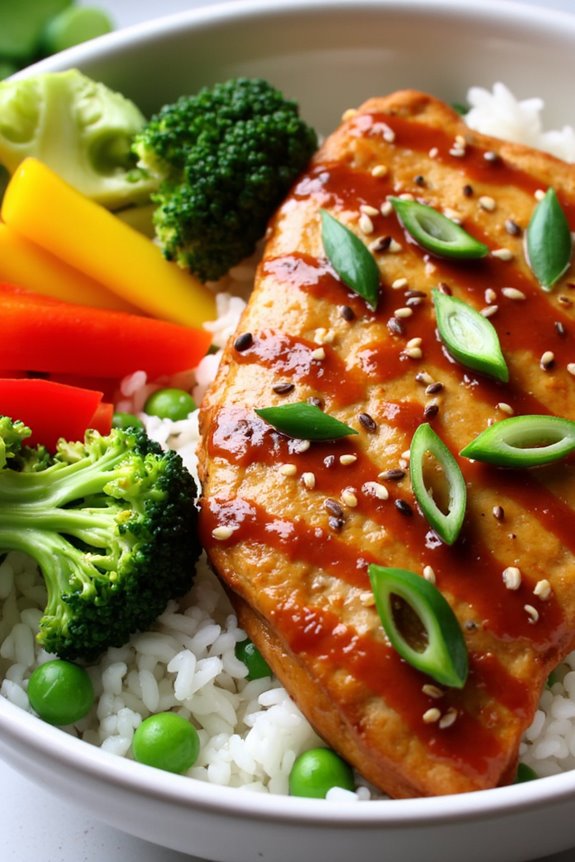
The Teriyaki Chicken Bowl is a delicious and satisfying dish that blends succulent chicken with a savory-sweet teriyaki sauce, served over a bed of fluffy rice and accompanied by fresh vegetables. This dish is a staple in Japanese cuisine, loved for its simplicity and bold flavors. Perfect for a family dinner or a meal prep option, the Teriyaki Chicken Bowl is sure to please both adults and kids alike.
Cooking this dish at home is easier than you might think. With just a few key ingredients and simple steps, you can create a flavorful meal that rivals your favorite Japanese restaurant. This recipe serves 4-6 people, making it ideal for gatherings or meal prep for the week ahead. Let’s get started on making this delightful Teriyaki Chicken Bowl!
Ingredients:
- 1.5 lbs boneless, skinless chicken thighs
- 1 cup teriyaki sauce
- 2 tablespoons vegetable oil
- 4 cups cooked jasmine rice
- 2 cups mixed vegetables (such as broccoli, bell peppers, and snap peas)
- 2 green onions, sliced
- Sesame seeds for garnish (optional)
Cooking Instructions:
- Marinate the Chicken: Begin by placing the chicken thighs in a bowl or a resealable plastic bag. Pour the teriyaki sauce over the chicken, ensuring that each piece is well-coated. Seal the bag or cover the bowl and let the chicken marinate in the refrigerator for at least 30 minutes, or up to overnight for maximum flavor.
- Cook the Rice: While the chicken is marinating, cook the jasmine rice according to package instructions. Typically, this involves rinsing the rice, boiling it with water, and then simmering until tender. Once cooked, fluff the rice with a fork and set it aside.
- Sauté the Vegetables: In a large skillet or wok, heat the vegetable oil over medium-high heat. Add the mixed vegetables and stir-fry for about 5-7 minutes until they’re tender-crisp. Remove the vegetables from the pan and set them aside.
- Cook the Chicken: In the same skillet, add the marinated chicken thighs (reserve the marinade for later). Cook the chicken for about 6-8 minutes on each side, or until the internal temperature reaches 165°F and the chicken is golden brown. Once cooked, remove the chicken from the skillet and let it rest for a few minutes before slicing it into bite-sized pieces.
- Add the Sauce: Pour the reserved teriyaki marinade into the skillet and bring it to a simmer. Allow it to cook for 2-3 minutes until it thickens slightly. Then, return the sliced chicken to the skillet and toss to coat it in the sauce.
- Assemble the Bowls: To serve, divide the cooked rice among bowls. Top each bowl with the teriyaki chicken and sautéed vegetables. Garnish with sliced green onions and a sprinkle of sesame seeds if desired.
Extra Tips:
For a variation on this dish, feel free to add other proteins like tofu or shrimp, or mix in different vegetables based on your preferences.
Additionally, if you want a bit of heat, consider adding a dash of sriracha to the teriyaki sauce. Leftover chicken can be stored in the refrigerator for up to three days, making it perfect for quick lunches throughout the week.
Enjoy your homemade Teriyaki Chicken Bowl!
Quick Miso Soup
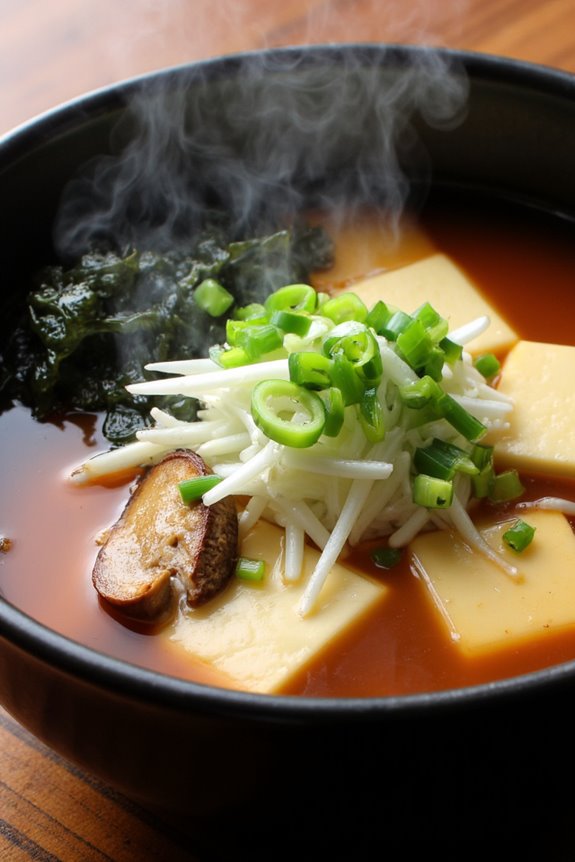
Miso soup is a beloved Japanese dish known for its comforting flavors and quick preparation. This traditional soup isn’t only nutritious but also versatile, as you can customize it with various ingredients according to your preference.
Quick Miso Soup can be made in under 20 minutes, making it an ideal choice for a light meal or a warming side dish alongside rice and other Japanese fare. The main ingredient, miso paste, is rich in probiotics and adds depth of flavor, while the inclusion of tofu and seaweed contributes to both taste and texture.
This recipe serves 4-6 people, making it perfect for a family dinner or a gathering with friends. With simple ingredients and straightforward steps, anyone can whip up this delightful soup. Whether you’re a seasoned cook or a beginner in the kitchen, this Quick Miso Soup recipe will surely impress and satisfy your taste buds.
Ingredients:
- 4 cups of water
- 1/4 cup of miso paste (white or red)
- 1 cup of firm tofu, cubed
- 1 cup of dried seaweed (wakame)
- 2 green onions, sliced
- 1 cup of mushrooms, sliced (shiitake or button)
- Optional: 1 cup of vegetables (like spinach or bok choy)
Cooking Instructions:
- Prepare the Seaweed: Start by soaking the dried wakame seaweed in a bowl of warm water for about 5 minutes. This will rehydrate the seaweed, making it soft and ready to add to the soup. Once rehydrated, drain and set aside.
- Boil the Water: In a medium-sized pot, bring 4 cups of water to a gentle boil over medium heat. This will serve as the base for your miso soup. Confirm the water is boiling before proceeding to the next step.
- Add the Tofu and Mushrooms: Carefully add the cubed tofu and sliced mushrooms to the boiling water. Allow them to simmer for about 5 minutes. This step infuses the water with flavors from the mushrooms and warms up the tofu.
- Dissolve the Miso Paste: In a separate small bowl, take a ladleful of the hot broth from the pot and mix in the miso paste until it’s completely dissolved. This prevents clumping when you add it to the soup.
- Combine All Ingredients: Lower the heat to a gentle simmer and slowly stir the dissolved miso paste back into the pot. Be careful not to boil the soup after adding the miso, as high heat can destroy its beneficial properties.
- Add the Seaweed and Green Onions: Finally, stir in the rehydrated wakame and sliced green onions. Let the soup simmer for another minute to heat through before removing it from the heat.
- Serve: Ladle the soup into bowls and serve immediately, enjoying the warmth and flavors of this delicious Quick Miso Soup.
Extra Tips:
When cooking Quick Miso Soup, remember that the type of miso paste you use can greatly affect the flavor. White miso is milder and sweeter, while red miso has a stronger taste. Feel free to experiment with different types to find your perfect balance.
Additionally, you can enhance the nutrition by adding other vegetables like carrots or zucchini, or even a splash of soy sauce for extra umami. Make sure to serve the soup fresh, as it’s best enjoyed right after it’s made.
Japanese Fried Rice

Japanese Fried Rice, known as “Chahan,” is a versatile and delicious dish that embodies the essence of comfort food in Japan. This dish is typically prepared with leftover rice, making it a perfect way to utilize any leftover ingredients you may have in your fridge.
The beauty of Chahan lies in its adaptability; you can mix and match your favorite vegetables and proteins to create a unique flavor profile that suits your taste. The key to a great Japanese Fried Rice is to use cold, day-old rice, as it helps to prevent the dish from becoming mushy.
The rice is stir-fried with a medley of ingredients, including vegetables, protein, and soy sauce, resulting in a savory and satisfying meal. Serve it alongside a bowl of miso soup or with pickles for an authentic Japanese experience.
Ingredients (Serving Size: 4-6 people)
- 4 cups cooked and cooled rice (preferably day-old)
- 2 tablespoons vegetable oil
- 1 medium onion, finely chopped
- 2 cloves garlic, minced
- 1 cup mixed vegetables (carrots, peas, corn)
- 2 eggs, beaten
- 3 tablespoons soy sauce
- 2 green onions, chopped
- Salt and pepper to taste
- Optional: cooked chicken, shrimp, or tofu (about 1 cup)
Cooking Instructions
- Prepare the Ingredients: Start by gathering all your ingredients and chopping the vegetables, including the onion, garlic, and green onions. If you’re using any protein like chicken, shrimp, or tofu, make sure it’s cooked and cut into small pieces.
- Heat the Oil: In a large skillet or wok, heat 2 tablespoons of vegetable oil over medium-high heat. Make sure the oil is hot before adding the ingredients, as this will help to achieve a nice stir-fry.
- Sauté the Aromatics: Add the finely chopped onion to the skillet and sauté for about 2-3 minutes until it becomes translucent. Then, add the minced garlic and stir for another 30 seconds until fragrant, being careful not to burn it.
- Add the Mixed Vegetables: Toss in the mixed vegetables and stir-fry for about 3-4 minutes until they’re tender. If you’re adding any pre-cooked protein, this is the time to include it in the pan.
- Incorporate the Eggs: Push the vegetable mixture to one side of the skillet. Pour in the beaten eggs on the other side and scramble them until fully cooked. Once done, mix the eggs into the vegetable mixture.
- Add the Rice: Add the cooked and cooled rice to the skillet. Use a spatula to break up any clumps and combine the rice with the vegetable and egg mixture. Stir-fry everything together for about 3-4 minutes until heated through.
- Season the Rice: Pour in the soy sauce while continuously stirring to evenly coat all the ingredients. Season with salt and pepper to taste, adjusting according to your preference.
- Finish with Green Onions: Finally, add the chopped green onions and give the fried rice one last stir. Cook for an additional minute and then remove the skillet from the heat.
Extra Tips
For the best flavor, consider using a combination of soy sauce and a splash of sesame oil to elevate the dish. You can also experiment with different vegetables like bell peppers, mushrooms, or broccoli, depending on what you have on hand.
If you want an extra kick, a dash of chili oil or a sprinkle of furikake (a Japanese seasoning) can add depth to your fried rice. Remember, the key to perfect fried rice is high heat and constant stirring to prevent sticking and guarantee even cooking!
Yakisoba Noodles
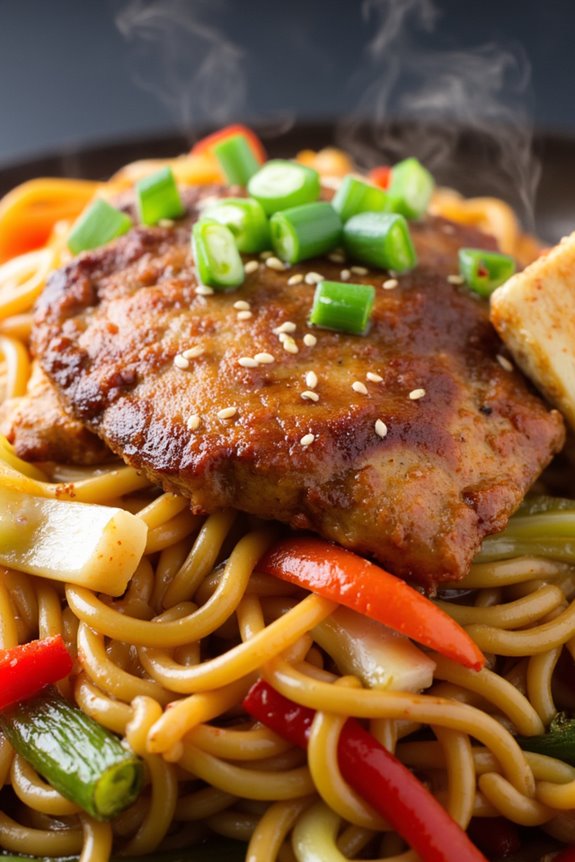
Yakisoba, a popular Japanese stir-fried noodle dish, is a delicious way to enjoy a variety of flavors and textures in one meal. The name “yakisoba” translates to “fried buckwheat”, although the noodles are actually made from wheat. Traditionally, this dish is served with a savory sauce, colorful vegetables, and your choice of protein, making it a versatile option for any occasion. It’s perfect for using up leftovers and is often enjoyed at festivals or as a quick weeknight dinner.
The beauty of yakisoba lies in its adaptability; you can customize it based on your preferences or dietary needs. Whether you prefer chicken, pork, beef, or a vegetarian option, each variation brings its own unique taste. With its balance of flavors and satisfying textures, yakisoba is sure to become a favorite in your household.
Ingredients (Serves 4-6):
- 12 oz. yakisoba noodles (or fresh ramen noodles)
- 2 tablespoons vegetable oil
- 1 medium onion, sliced
- 1 bell pepper, sliced
- 2 cups cabbage, chopped
- 2 carrots, julienned
- 2 green onions, chopped
- 1 cup protein of your choice (chicken, pork, beef, or tofu)
- 4 tablespoons yakisoba sauce (or a mix of soy sauce, Worcestershire sauce, and ketchup)
- Salt and pepper to taste
- Optional: sesame seeds for garnish
Cooking Instructions:
- Prepare the Noodles: If using dried yakisoba noodles, cook them according to the package instructions until tender, usually 3-4 minutes. Drain and rinse with cold water to stop the cooking process. If you have fresh noodles, you can skip this step as they’ll cook quickly in the stir-fry.
- Heat the Pan: In a large skillet or wok, heat the vegetable oil over medium-high heat. Make sure the oil is hot enough to sizzle when you add the ingredients. This helps in achieving a nice stir-fry texture.
- Sauté the Aromatics and Protein: Add the sliced onion and protein of your choice to the pan. Stir-fry for about 3-4 minutes, or until the protein is cooked through and the onion is translucent. This step builds the foundational flavors of the dish.
- Add the Vegetables: Next, add the bell pepper, cabbage, and carrots. Continue to stir-fry for another 3-5 minutes, until the vegetables are tender yet still crisp. This adds a nice crunch and vibrant color to your yakisoba.
- Incorporate the Noodles: Add the prepared yakisoba noodles to the pan along with the yakisoba sauce. Toss everything together using tongs or a spatula, ensuring that the sauce evenly coats all the ingredients. Cook for an additional 2-3 minutes until everything is heated through.
- Season and Garnish: Taste the stir-fry and season with salt and pepper if needed. Finally, sprinkle the chopped green onions and sesame seeds over the top before serving. This adds a fresh flavor and appealing visual finish to your dish.
Extra Tips: For the best results, make sure all your ingredients are prepped and ready to go before you begin cooking, as stir-frying is a quick process. You can also experiment with different vegetables such as broccoli or snap peas, and adjust the sauce to suit your taste preferences. Leftover yakisoba can be stored in the refrigerator and reheated, but it’s best enjoyed fresh for maximum flavor and texture.
Onigiri (Rice Balls)
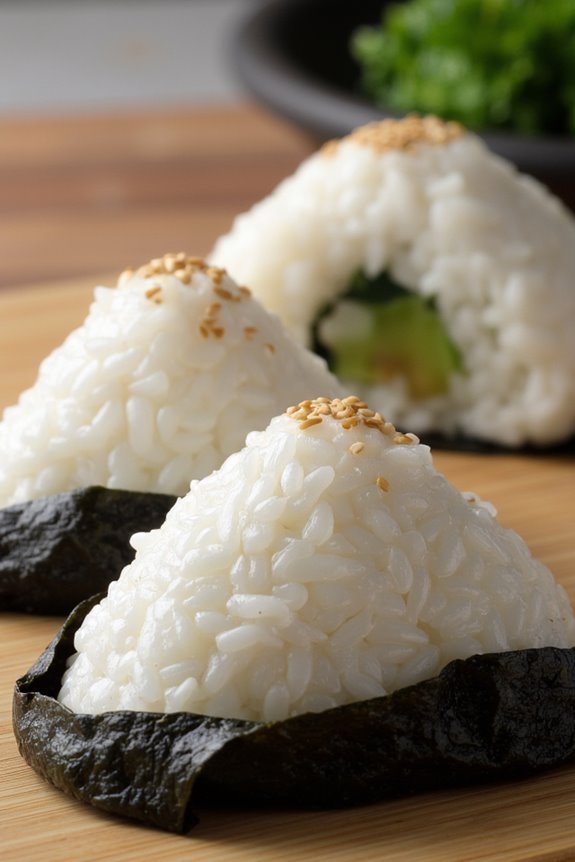
Onigiri, also known as rice balls, is a popular Japanese dish that’s both simple to make and incredibly versatile. Typically made with white rice and shaped into triangles or balls, onigiri can be filled or topped with various ingredients like pickled plums, salted salmon, or even seaweed. This dish is great for packed lunches, snacks, or light meals, making it a staple in Japanese cuisine.
With its delightful texture and ability to be customized with different flavors, onigiri is perfect for both beginners and experienced cooks alike.
To make onigiri, you’ll need to start with freshly cooked rice, preferably short-grain Japanese rice, as it has the right amount of stickiness needed to hold the shape. The rice is seasoned with salt, and once cooled slightly, it’s ready to be shaped into either traditional triangular forms or more casual round shapes. This dish not only satisfies the palate but also offers a fun way to engage with Japanese culinary traditions.
Ingredients (serving size: 4-6 people)
- 2 cups short-grain Japanese rice
- 2 1/2 cups water
- 1 teaspoon salt
- 1 tablespoon rice vinegar (optional)
- 1 tablespoon sugar (optional)
- Fillings of your choice (e.g., pickled plum, grilled salmon, tuna mayo)
- Nori (seaweed) sheets, cut into strips (optional)
- Sesame seeds (optional)
Cooking Instructions
1. Rinse the Rice: Begin by placing the short-grain rice in a large bowl. Rinse the Rice under cold water, gently swirling it around with your hand. Drain the water and repeat the rinsing process 3-4 times until the water runs mostly clear. This step is essential as it removes excess starch, which helps achieve the perfect texture.
2. Cook the Rice: In a rice cooker or a pot, add the rinsed rice and 2 1/2 cups of water. If using a rice cooker, simply turn it on and let it cook until the rice is done. If using a pot, bring the water to a boil, then reduce the heat to low, cover, and simmer for about 15-20 minutes, or until the water has been absorbed.
Once cooked, let the rice sit for an additional 10 minutes, covered, to steam.
3. Season the Rice: In a small bowl, mix together the salt, rice vinegar, and sugar (if using). Once the rice has cooled slightly, transfer it to a large bowl and gently fold in the seasoning mixture, being careful not to mash the rice. This adds flavor and enhances the overall taste of your onigiri.
4. Shape the Onigiri: Wet your hands with water to prevent sticking, then take a portion of the seasoned rice (about a handful) and flatten it slightly in your palm. Place your chosen filling in the center and mold the rice around it, pressing gently to form a triangle or ball shape.
Be sure to pack it firmly enough that it holds together but not so tightly that it becomes dense.
5. Wrap with Nori: If desired, cut strips of nori and wrap them around the base of each onigiri. This adds flavor and makes the rice balls easier to handle. Optionally, you can also sprinkle sesame seeds on top for added texture and flavor.
6. Serve: Your onigiri is ready to be enjoyed! They can be served immediately or stored in a container for later consumption. If storing, keep them wrapped in plastic wrap to maintain freshness.
Extra Tips
When making onigiri, it’s important to use freshly cooked rice as it has the right texture to shape properly. If you’re planning to include fillings, make sure they aren’t too wet, as this can cause the rice to fall apart.
Additionally, you can customize your onigiri by experimenting with different fillings and shapes. If you’re in a hurry, prepared onigiri can also be found in many Japanese grocery stores or convenience stores. Enjoy your homemade onigiri as a delightful snack or meal!
Gyudon (Beef Bowl)
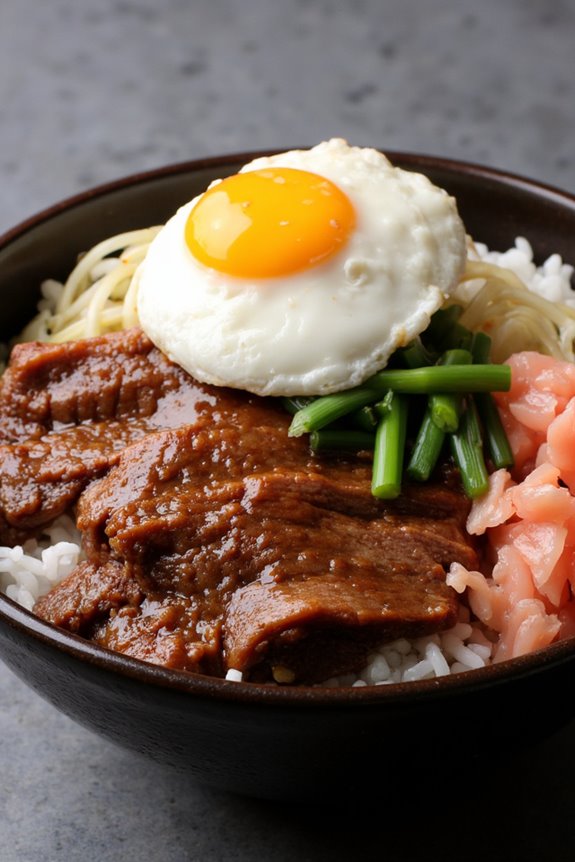
Gyudon, or beef bowl, is a beloved Japanese comfort food that features tender, thinly sliced beef simmered in a sweet and savory sauce, served over a bed of fluffy rice. This dish isn’t only quick to prepare but also incredibly satisfying, making it perfect for a weeknight meal or a casual gathering with friends and family.
The balance of flavors from the soy sauce, mirin, and sugar creates a delicious glaze that coats the beef beautifully, bringing out its natural umami while the onions add sweetness and depth.
In addition to its wonderful taste, gyudon can be easily customized with various toppings, such as a raw or poached egg, sliced green onions, or pickled ginger, making it a versatile option for any palate. Traditionally, gyudon is enjoyed with a side of miso soup and pickles, rounding out the meal and offering a delightful combination of textures and flavors.
With just a few simple ingredients and steps, you can recreate this iconic dish in your own kitchen.
Ingredients (Serves 4-6)
- 1 lb (450g) thinly sliced beef (such as sirloin or ribeye)
- 2 medium onions, thinly sliced
- 4 cups cooked Japanese short-grain rice
- 1/2 cup soy sauce
- 1/2 cup mirin
- 2 tablespoons sugar
- 1 tablespoon sake (optional)
- 4-6 eggs (optional, for topping)
- Sliced green onions (for garnish)
- Pickled ginger (for serving, optional)
Cooking Instructions
- Prepare the Rice: Begin by cooking the Japanese short-grain rice according to package instructions. This typically involves rinsing the rice until the water runs clear, soaking it for about 30 minutes, then cooking it in a rice cooker or on the stovetop until tender. Once cooked, fluff the rice and set it aside, keeping it warm.
- Sauté the Onions: In a large skillet or frying pan, heat a small amount of oil over medium heat. Add the thinly sliced onions and sauté them until they become translucent and slightly caramelized, about 5-7 minutes. This step enhances the sweetness of the onions, which will complement the beef nicely.
- Cook the Beef: Add the thinly sliced beef to the pan with the onions, cooking until the meat is browned but not fully cooked through, which should take around 3-4 minutes. Stir constantly to make certain the beef cooks evenly and absorbs the flavors from the onions.
- Create the Sauce: In a bowl, mix together the soy sauce, mirin, sugar, and sake (if using). Pour this mixture over the beef and onions in the pan. Stir to combine everything, and allow it to simmer for about 5 minutes. This will allow the sauce to thicken slightly while the beef finishes cooking, resulting in a flavorful glaze.
- Prepare Optional Eggs: If you’re adding eggs as a topping, bring a small pot of water to a gentle simmer. Carefully crack the eggs into the water and poach them for about 3-4 minutes, or until the whites are set but the yolks remain runny. Remove the eggs with a slotted spoon and set aside.
- Serve the Gyudon: To serve, place a generous scoop of the cooked rice in bowls, then top with the beef and onion mixture, ensuring to drizzle some of the sauce over the top. If using, place a poached egg on top of each bowl. Garnish with sliced green onions and serve with pickled ginger on the side.
Extra Tips
For the best results, use high-quality beef and slice it as thinly as possible to guarantee tenderness. If you can’t find mirin, you can substitute it with a mixture of rice vinegar and sugar, although the flavor will differ slightly.
Additionally, don’t hesitate to experiment with different toppings, such as grated daikon radish or sesame seeds, to add your own personal touch to this traditional dish. Enjoy your homemade gyudon with a side of miso soup for a complete meal!
Ebi Tempura
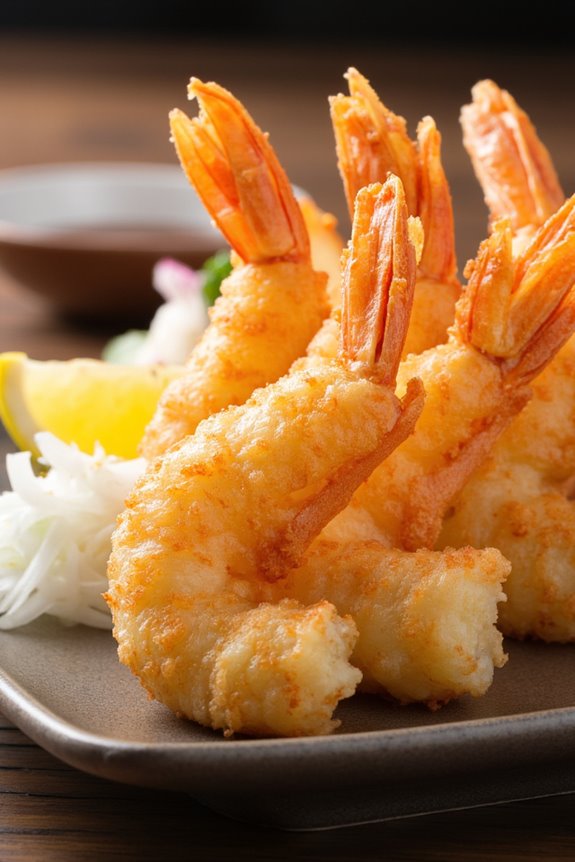
Ebi Tempura is a classic Japanese dish that features succulent shrimp, lightly battered and deep-fried to crispy perfection. This dish is known for its airy texture and delightful crunch, making it a favorite among seafood lovers. Often served with a dipping sauce, Ebi Tempura can be enjoyed as an appetizer or as part of a larger meal, paired with rice and vegetables.
The key to achieving the perfect tempura lies in the batter, which should be cold and mixed lightly to avoid gluten formation, resulting in that signature light and crispy coating.
Preparing Ebi Tempura at home is easier than you might think! With just a few simple ingredients and some straightforward techniques, you can whip up this delicious treat in no time. Whether you’re looking to impress guests at a dinner party or simply indulge in a comforting meal, this dish will surely satisfy.
Let’s plunge into the ingredients and cooking instructions for this delightful recipe that serves 4-6 people.
Ingredients:
- 12 large shrimp, peeled and deveined
- 1 cup all-purpose flour
- 1/2 cup cornstarch
- 1 egg, lightly beaten
- 1 cup cold water
- 1 teaspoon baking powder
- Salt, to taste
- Vegetable oil, for frying
- Tempura dipping sauce (store-bought or homemade)
Cooking Instructions:
- Prepare the Shrimp: Start by peeling and deveining the shrimp if not already done. Make a few shallow cuts along the length of each shrimp to prevent them from curling during frying. Pat them dry with paper towels to remove excess moisture.
- Make the Tempura Batter: In a mixing bowl, combine the all-purpose flour, cornstarch, baking powder, and a pinch of salt. In a separate bowl, mix the cold water with the beaten egg. Then, pour the egg mixture into the dry ingredients and stir gently with chopsticks or a fork. The batter should be a bit lumpy; don’t overmix, as this will lead to a tougher texture.
- Heat the Oil: In a deep pot or fryer, heat vegetable oil over medium-high heat until it reaches around 350°F (175°C). You can test the oil by dropping a small amount of batter into it; if it sizzles and rises to the surface, it’s ready for frying.
- Fry the Shrimp: Dip each shrimp into the batter, allowing the excess to drip off, and carefully place them into the hot oil. Fry in batches, being careful not to overcrowd the pot. Cook the shrimp for about 2-3 minutes or until they turn golden brown. Use a slotted spoon to remove them and place them on a paper towel-lined plate to absorb excess oil.
- Serve: Once all the shrimp are cooked, serve them hot with a side of tempura dipping sauce. Garnish with lemon wedges or shredded daikon radish if desired.
Extra Tips:
For the best results, keep your batter cold by using ice-cold water and working quickly during preparation. This helps achieve that light, crispy texture.
Additionally, consider adding vegetables such as sweet potato, zucchini, or bell peppers to your tempura for a colorful and varied dish.
Finally, verify the oil is at the right temperature to avoid greasy tempura; adjust the heat as necessary during frying. Enjoy your homemade Ebi Tempura!
Salmon Teriyaki
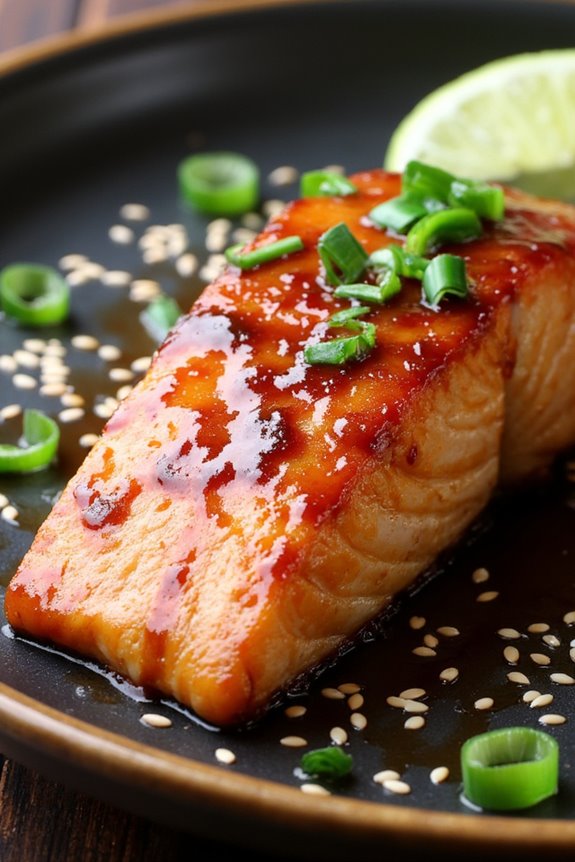
Salmon Teriyaki is a popular Japanese dish that features succulent salmon fillets glazed in a savory-sweet teriyaki sauce. The dish isn’t only delicious but also incredibly simple to prepare, making it a great option for weeknight dinners or special occasions.
With its rich flavors and beautiful presentation, Salmon Teriyaki is sure to impress your family and friends while introducing them to the delightful world of Japanese cuisine.
This recipe highlights the key elements of teriyaki cooking, which involves marinating the salmon in a mixture of soy sauce, mirin, and sugar before cooking. The result is a perfect balance of sweetness and umami that complements the natural flavors of the salmon. Serve it over steamed rice and alongside sautéed vegetables for a complete and satisfying meal.
Ingredients (Serves 4-6):
- 4-6 salmon fillets (about 6 ounces each)
- 1/2 cup soy sauce
- 1/4 cup mirin (sweet rice wine)
- 1/4 cup brown sugar
- 2 tablespoons sake (optional)
- 1 tablespoon sesame oil
- 2 cloves garlic, minced
- 1 teaspoon fresh ginger, grated
- 2 green onions, chopped (for garnish)
- Sesame seeds (for garnish)
Cooking Instructions:
- Prepare the Marinade: In a small saucepan, combine the soy sauce, mirin, brown sugar, sake (if using), sesame oil, minced garlic, and grated ginger. Heat the mixture over medium heat, stirring occasionally until the sugar dissolves. Remove from heat and allow it to cool slightly.
- Marinate the Salmon: Place the salmon fillets in a shallow dish or a resealable plastic bag. Pour the cooled marinade over the salmon, ensuring each fillet is well coated. Cover the dish with plastic wrap or seal the bag, and refrigerate for at least 30 minutes, or up to 2 hours for more flavor.
- Preheat the Grill or Pan: If you’re grilling, preheat the grill to medium-high heat. If you’re using a frying pan, heat a non-stick skillet over medium heat. Lightly oil the grill or pan to prevent sticking.
- Cook the Salmon: Remove the salmon from the marinade, letting any excess drip off. Place the salmon fillets skin-side down on the hot grill or in the skillet. Cook for about 4-5 minutes, then carefully flip the fillets and cook for an additional 4-5 minutes, or until the salmon is cooked through and flakes easily with a fork.
- Glaze with Marinade: While the salmon is cooking, you can brush some of the reserved marinade (that hasn’t touched raw fish) over the fillets for added flavor. Cook for another minute to allow the glaze to caramelize slightly.
- Serve: Once cooked, transfer the salmon to a serving platter. Garnish with chopped green onions and sesame seeds. Serve the Salmon Teriyaki with steamed rice and sautéed vegetables for a complete meal.
Extra Tips: When cooking Salmon Teriyaki, it’s essential not to overcook the salmon, as it can become dry. Aim for an internal temperature of about 145°F for perfectly tender salmon.
Additionally, if you prefer a thicker glaze, you can simmer the leftover marinade in a saucepan until it reduces to your desired consistency before drizzling it over the salmon. Enjoy your cooking adventure!
Chahan (Fried Rice)
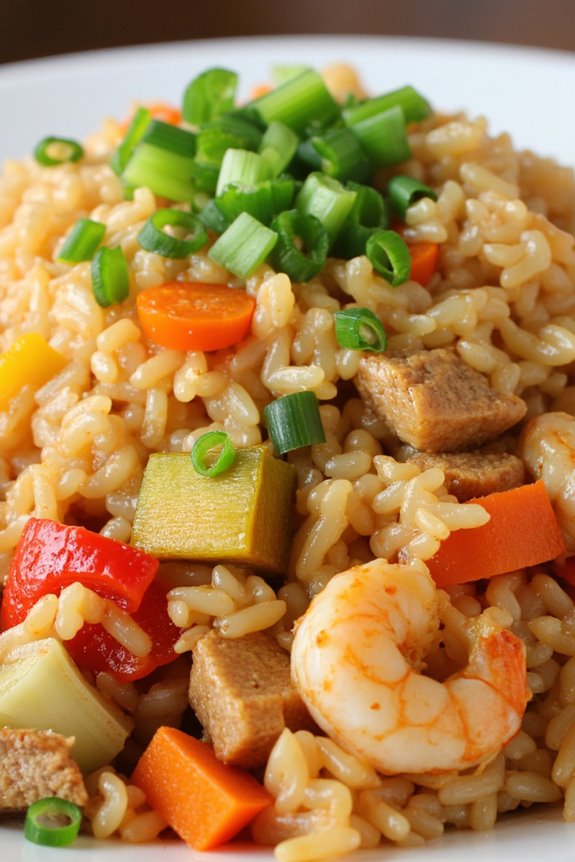
Chahan, also known as Japanese fried rice, is a beloved dish that embodies the essence of home-cooked comfort food. This recipe showcases how you can transform simple ingredients into a flavorful and satisfying meal that can be enjoyed any time of the day. Often made with leftover rice, Chahan is both practical and delicious, allowing for various ingredient adaptations based on what you have available in your kitchen. The combination of vegetables, protein, and seasoning creates a delightful harmony of flavors and textures.
Preparing Chahan is an excellent opportunity to release your creativity in the kitchen. Whether you prefer it with chicken, shrimp, or just vegetables, this dish is versatile and can easily cater to different dietary preferences. The key to achieving the perfect fried rice is to use cold, day-old rice, as it helps prevent the rice from becoming mushy during cooking. So, gather your ingredients, and let’s get started on making this easy and delicious Japanese fried rice!
Ingredients (Serves 4-6):
- 4 cups cooked and cooled rice (preferably day-old)
- 2 tablespoons vegetable oil
- 2 large eggs, beaten
- 1 cup diced vegetables (carrots, peas, bell peppers, etc.)
- 1 cup cooked protein (chicken, shrimp, or tofu)
- 3 green onions, chopped
- 3 tablespoons soy sauce
- 1 tablespoon sesame oil
- Salt and pepper to taste
Cooking Instructions:
- Prep the Ingredients: Before you start cooking, confirm all your ingredients are prepped and ready to go. Dice the vegetables, chop the green onions, and have your cooked protein on hand. Using day-old rice is crucial as it will make the frying process easier and yield the best texture.
- Heat the Pan: In a large skillet or wok, heat the vegetable oil over medium-high heat. Make sure the oil is hot enough before adding anything to confirm a good stir-fry. You can test this by adding a small piece of vegetable; it should sizzle immediately.
- Cook the Eggs: Pour the beaten eggs into the hot skillet and scramble them until fully cooked. This should only take a minute or two. Once done, push the scrambled eggs to one side of the pan.
- Stir-Fry the Vegetables: In the same pan, add your diced vegetables to the other side. Stir-fry them for about 2-3 minutes until they’re tender but still crisp.
- Add the Protein: Incorporate your cooked protein into the pan with the vegetables. Stir everything together and cook for an additional 2 minutes to heat through.
- Combine with Rice: Add the cold, cooked rice to the pan. Use a spatula to break up any clumps of rice while mixing it with the other ingredients. Stir-fry everything together for about 3-4 minutes, confirming that the rice is heated through and well combined.
- Season the Chahan: Drizzle the soy sauce and sesame oil over the rice mixture. Season with salt and pepper to taste. Continue to stir-fry for another minute to evenly distribute the flavors.
- Finish with Green Onions: Finally, add the chopped green onions and give everything one last stir. Remove the pan from heat and serve hot.
Extra Tips:
When making Chahan, feel free to customize the recipe based on your preferences and what you have on hand. You can include other vegetables like corn or mushrooms, or even add spices like garlic or ginger for extra flavor.
Always use cold rice for the best texture, and if you don’t have any day-old rice, spread freshly cooked rice on a baking sheet to cool it quickly. Enjoy your delicious Chahan with a side of pickled vegetables or miso soup for a complete meal!
Instant Ramen With a Twist
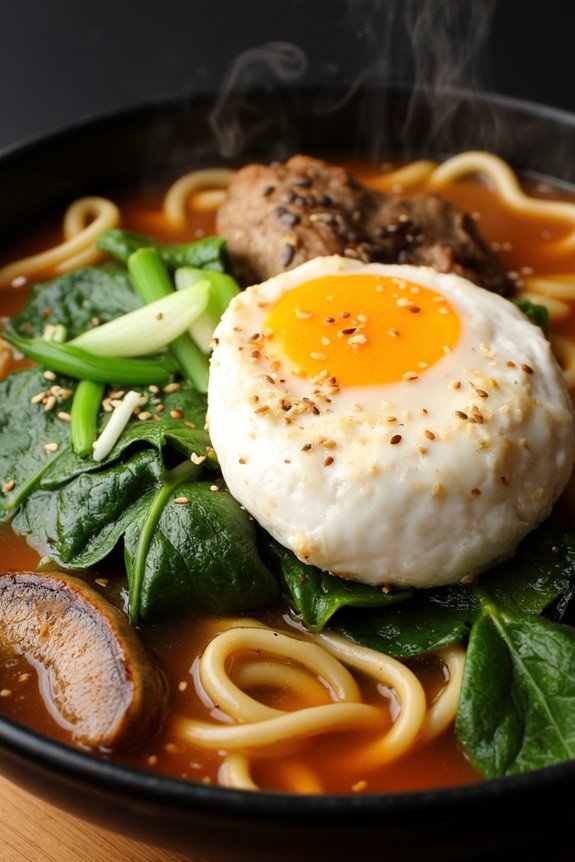
Instant ramen is a beloved staple for many, known for its quick preparation and satisfying flavors. However, it can be transformed into a gourmet meal with just a few simple additions. This recipe for “Instant Ramen With a Twist” takes the classic noodle dish and elevates it with fresh ingredients, proteins, and seasonings that will make your taste buds dance. Perfect for a quick weeknight dinner or a cozy lunch, this dish can easily serve 4-6 people, making it a great option for family meals or gatherings with friends.
The beauty of this recipe lies not only in its simplicity but also in its versatility. You can customize it according to your preferences by adding veggies or proteins of your choice. The combination of the rich broth, tender noodles, and vibrant toppings creates a satisfying dish that’s both comforting and exciting. So, get ready to take your instant ramen experience to a whole new level!
Ingredients
- 4 packets of instant ramen noodles (any flavor)
- 4 cups of water
- 2 cups of fresh spinach
- 1 cup of sliced mushrooms (shiitake or button)
- 2 large eggs
- 1 cup of cooked chicken or tofu (cubed)
- 2 green onions (sliced)
- 1 tablespoon of soy sauce
- 1 teaspoon of sesame oil
- 1 teaspoon of chili paste (optional)
- Salt and pepper to taste
- Sesame seeds (for garnish)
Cooking Instructions
- Boil the Water: In a large pot, bring 4 cups of water to a boil over high heat. This will serve as the base for your ramen broth. Once boiling, reduce the heat to medium-high.
- Cook the Noodles: Add the instant ramen noodles to the boiling water. Let them cook for about 3-4 minutes, or until they’re tender but still slightly firm. Stir occasionally to prevent sticking.
- Add the Vegetables: Once the noodles are cooked, add the sliced mushrooms and fresh spinach to the pot. Stir them in and let them cook for an additional 2 minutes until the spinach wilts and the mushrooms become tender.
- Incorporate the Protein: Next, add the cooked chicken or tofu to the pot. This step not only enhances the flavor but also adds protein to the dish. Stir well to combine all the ingredients.
- Season the Broth: Pour in the soy sauce and sesame oil, and stir to evenly distribute the flavors. Taste the broth and add salt, pepper, and chili paste if desired for an extra kick.
- Poach the Eggs: In a separate small pot, bring water to a gentle simmer. Crack the eggs into the simmering water and poach them for about 3-4 minutes until the whites are set, and the yolks are still runny.
- Serve the Ramen: Once everything is well combined and heated through, ladle the ramen into bowls. Top each bowl with a poached egg, sliced green onions, and a sprinkle of sesame seeds for garnish.
Extra Tips
For a heartier meal, feel free to add more vegetables like bok choy, carrots, or bell peppers. If you want to make it vegetarian, simply substitute the chicken with tofu and use vegetable broth instead of water.
To enhance the flavor further, consider using homemade broth or adding a splash of miso paste for an umami boost. Enjoy your delicious and comforting Instant Ramen With a Twist!