

When it comes to Japanese desserts, red bean treats hold a special place in my heart. The gentle sweetness of creations like daifuku and dorayaki is truly captivating. These desserts not only highlight the rich flavor of anko but also offer a delightful variety of textures and shapes. Each recipe has its own unique charm, making them perfect for any occasion. Let’s explore 12 lovely red bean creations that might just inspire your next sweet craving.
Anko (Sweet Red Bean Paste)
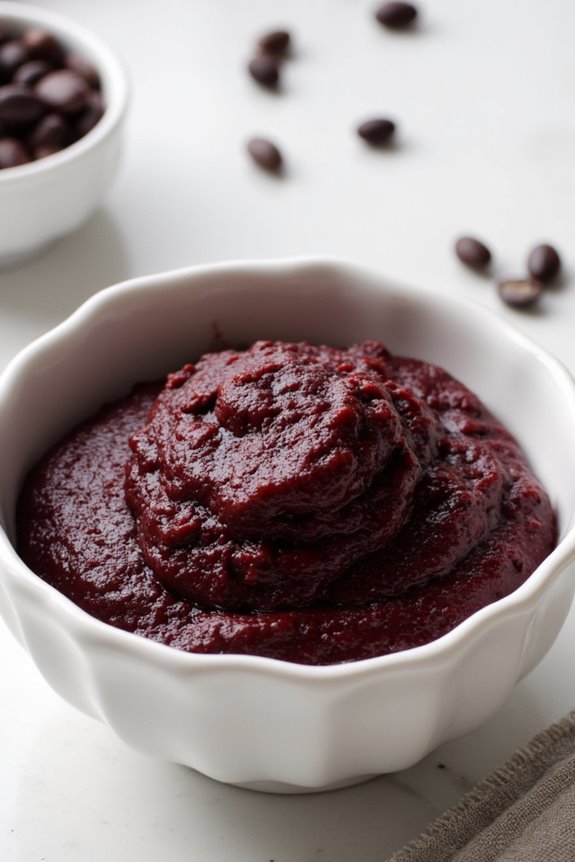
Anko, a traditional Japanese sweet red bean paste, is a versatile ingredient that can elevate various desserts. This delicacy is primarily made from adzuki beans and sugar, creating a sweet and creamy texture that complements a wide range of dishes, from mochi to dorayaki.
The process of making Anko is relatively simple, but it requires patience as the beans must be cooked to the perfect consistency. This delightful paste can be made in two different styles: ‘koshian’, a smooth version, and ‘tsubu-an’, which includes whole beans for a chunkier texture.
Not only is Anko delicious, but it also carries cultural significance in Japanese cuisine, often enjoyed during festive occasions and celebrations. Making your own Anko at home allows you to customize the sweetness and texture to suit your preferences. This recipe yields a generous amount suitable for 4-6 people, perfect for sharing or for use in multiple desserts.
Ingredients
- 1 cup adzuki beans
- 3 cups water (for soaking and boiling)
- 1 cup granulated sugar
- A pinch of salt
Cooking Instructions
1. Soak the Beans: Begin by rinsing the adzuki beans under cold water to remove any impurities. Place the beans in a bowl and cover them with water. Let them soak for at least 4 hours or overnight. This step helps to soften the beans and reduces cooking time.
2. Boil the Beans: After soaking, drain and rinse the beans again. In a pot, add the beans and 3 cups of fresh water. Bring the water to a boil over medium heat. Once boiling, reduce the heat to low and let it simmer for about 30-45 minutes, or until the beans are tender.
It’s important to check occasionally and add more water if necessary to keep the beans covered.
3. Mash and Sweeten: Once the beans are tender, drain any excess water. Return the beans to the pot and add the granulated sugar and a pinch of salt. Cook over low heat, stirring constantly until the sugar dissolves and the mixture thickens, about 10-15 minutes.
If you prefer a smooth texture (koshian), you can use a potato masher or food processor to blend the beans until smooth.
4. Cool and Store: Once you achieve your desired consistency, remove the pot from heat and let the Anko cool completely. You can store it in an airtight container in the refrigerator for up to a week or freeze it for longer storage.
Extra Tips
When making Anko, you can adjust the sweetness to your liking by adding more or less sugar. For a richer flavor, consider using brown sugar instead of granulated sugar.
If you want to experiment, try infusing the beans with flavors like vanilla or matcha during the cooking process. Always remember that Anko thickens as it cools, so aim for a slightly runny consistency when hot to achieve the perfect texture once cooled.
Enjoy your homemade Anko in various desserts or simply spread it on toast for a delightful treat!
Daifuku (Mochi With Red Bean Filling)
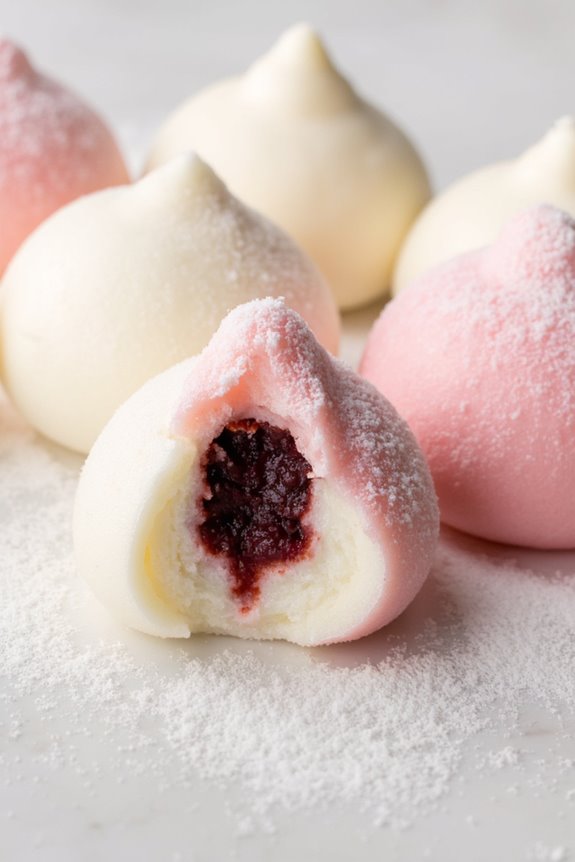
Daifuku is a traditional Japanese dessert that combines the chewy texture of mochi with the sweet and earthy flavor of red bean paste. This delightful treat is enjoyed by many, both as a snack and a dessert.
Daifuku can be found in various flavors and fillings, but the classic version, filled with anko (sweet red bean paste), is a favorite among many. The process of making Daifuku is a wonderful way to explore the art of Japanese sweets, allowing you to experience the joy of crafting these delightful morsels from scratch.
The key to a successful Daifuku lies in the quality of the mochi and the red bean paste. The mochi should be soft and pliable, while the filling should be sweet but not overpowering. This recipe will guide you through the steps to create Daifuku that’s sure to impress your family and friends with its unique texture and flavor.
Let’s get started on this delicious journey into Japanese desserts!
Ingredients (Serves 4-6)
- 1 cup glutinous rice flour (also known as mochiko)
- 1/4 cup sugar
- 1/2 cup water
- Cornstarch (for dusting)
- 1 cup sweet red bean paste (anko)
- Optional: food coloring (for coloring the mochi)
Cooking Instructions
- Prepare the Red Bean Paste: If you’re using store-bought sweet red bean paste, you can skip this step. If making from scratch, soak azuki beans overnight, then boil in water until soft. Drain and mash the beans, adding sugar to taste. Allow it to cool and shape into small balls (about 1 inch in diameter) and set aside.
- Mix Mochi Ingredients: In a microwave-safe bowl, combine the glutinous rice flour and sugar. Gradually add water to the mixture, stirring until smooth. If you want colored mochi, add a few drops of food coloring at this stage.
- Cook the Mochi: Cover the bowl with plastic wrap, leaving a small vent for steam to escape. Microwave on high for about 1 minute, remove and stir. Return to the microwave for another minute, then stir again. Cook for an additional 30 seconds until the mochi is thick and sticky.
- Dust the Surface: Sprinkle a generous amount of cornstarch on a clean surface to prevent sticking. Carefully transfer the cooked mochi onto the cornstarch-dusted surface.
- Shape the Mochi: Once the mochi is cool enough to handle, coat your hands with cornstarch and divide the mochi into equal pieces (about 8-10). Flatten each piece into a disc shape.
- Fill the Mochi: Take a piece of flattened mochi and place a ball of red bean paste in the center. Carefully fold the edges of the mochi over the filling, pinching to seal it and form a ball. Repeat for all pieces.
- Dust and Serve: Once all Daifuku are shaped, roll them in cornstarch to prevent them from sticking together. Serve immediately or store in an airtight container for later enjoyment.
Extra Tips
When making Daifuku, it’s important to work quickly as the mochi can become sticky and harder to handle as it cools.
Be generous with the cornstarch to prevent sticking, and consider using a bamboo steamer if you prefer steaming the mochi instead of microwaving it. Experiment with different fillings such as ice cream or fruit for a modern twist on this classic dessert. Enjoy your homemade Daifuku!
Dorayaki (Red Bean Pancakes)

Dorayaki is a beloved Japanese dessert that consists of two fluffy pancakes filled with sweet red bean paste, known as “anko.” This delightful treat isn’t only popular among children but also cherished by adults for its soft texture and delightful sweetness.
Traditionally, dorayaki is enjoyed as a snack or dessert and can be found in many Japanese confectionery shops. Making dorayaki at home is an incredibly rewarding experience, allowing you to customize the sweetness level of the filling and serve it fresh.
To create the perfect dorayaki, you’ll need to prepare both the pancake batter and the sweet red bean filling. While the pancakes are light and airy, the red bean paste adds a rich, earthy flavor that perfectly complements the sweetness of the cake. With just a few ingredients and some simple techniques, you can whip up a batch of these delicious red bean pancakes that will impress your family and friends.
Ingredients (Serves 4-6 people):
- 1 cup all-purpose flour
- 2/3 cup granulated sugar
- 1 teaspoon baking powder
- 2 large eggs
- 1/2 cup milk
- 1 tablespoon honey
- 1 cup sweet red bean paste (anko)
- Cooking oil (for frying)
Cooking Instructions:
- Prepare the pancake batter: In a mixing bowl, sift together the all-purpose flour and baking powder. In a separate bowl, whisk together the eggs, granulated sugar, milk, and honey until well combined. Gradually add the dry mixture to the wet mixture, stirring gently until just combined. Be careful not to overmix; the batter should be slightly lumpy.
- Rest the batter: Allow the batter to rest for about 10-15 minutes. This resting period helps to create a softer pancake texture by letting the gluten relax.
- Cook the pancakes: Heat a non-stick skillet or griddle over medium heat and lightly grease it with a small amount of cooking oil. Pour about 1/4 cup of the batter onto the skillet for each pancake. Cook until bubbles form on the surface and the edges appear set, about 2-3 minutes. Flip the pancakes and cook for an additional 1-2 minutes until golden brown. Repeat with the remaining batter, adjusting the heat as necessary to prevent burning.
- Assemble the dorayaki: Take one pancake and spread a generous tablespoon of sweet red bean paste onto the center. Place another pancake on top to create a sandwich. Press gently to verify the filling is enclosed. Repeat this process with the remaining pancakes and red bean paste.
- Serve and enjoy: Dorayaki can be served warm or at room temperature. They can be enjoyed immediately or stored in an airtight container for a couple of days. If desired, you can also dust them with powdered sugar for an extra touch.
Extra Tips: When preparing the sweet red bean paste, you can adjust the sweetness according to your personal taste by adding more or less sugar. If you want a smoother texture, you can blend the red bean paste until it reaches your desired consistency.
Additionally, feel free to experiment with fillings, such as whipped cream, fruit, or chocolate, to create your own unique version of dorayaki!
Taiyaki (Fish-Shaped Red Bean Cakes)

Taiyaki is a delightful Japanese street food treat that captures the essence of traditional Japanese desserts. Shaped like a fish, these golden-brown cakes are filled with sweet red bean paste, known as “anko.” This delicious filling is made from azuki beans and offers a unique flavor experience that perfectly complements the light and fluffy cake exterior.
Taiyaki can be enjoyed warm or at room temperature, making it a versatile dessert option for any occasion. Making Taiyaki at home is easier than it may seem, and with the right tools and ingredients, you can replicate this beloved Japanese treat. The key to an authentic Taiyaki is achieving the perfect batter consistency and guaranteeing that the filling is generously added.
This recipe serves 4-6 people, so get ready to impress your family and friends with your culinary skills!
Ingredients
- 1 cup all-purpose flour
- 1 cup water
- 1/4 cup sugar
- 1 tsp baking powder
- 1/2 tsp vanilla extract
- 2 large eggs
- 1 cup sweet red bean paste (anko)
- 1 tbsp vegetable oil (for greasing the pan)
Cooking Instructions
1. Prepare the Batter: In a large mixing bowl, combine the all-purpose flour, sugar, and baking powder. In a separate bowl, whisk together the water, eggs, and vanilla extract until well blended.
Gradually pour the wet ingredients into the dry ingredients, stirring gently until just combined. Avoid overmixing to keep the batter light and fluffy.
2. Preheat the Taiyaki Pan: Heat a Taiyaki pan over medium heat. Once it’s hot, lightly brush the cavities of the pan with vegetable oil to prevent sticking.
Guarantee the oil is evenly distributed for a perfect golden crust.
3. Fill the Pan: Pour a small amount of batter into one side of the Taiyaki pan, enough to cover the base. Using a spoon, add a generous dollop of sweet red bean paste on top of the batter, being careful not to overfill.
Then, pour more batter over the filling to cover it completely.
4. Cook the Taiyaki: Close the Taiyaki pan and cook for about 3-4 minutes on one side. After this time, carefully flip the pan over to cook the other side for an additional 3-4 minutes, or until the Taiyaki are golden brown and cooked through.
5. Remove and Serve: Once cooked, carefully remove the Taiyaki from the pan using a spatula. Place them on a serving plate and allow them to cool slightly before serving.
Enjoy them warm or at room temperature!
Extra Tips
To elevate your Taiyaki experience, consider experimenting with different fillings, such as custard, chocolate, or even matcha.
Additionally, make sure not to overfill the cakes, as this could lead to spilling during cooking. Keep the heat at medium to prevent burning and guarantee an evenly cooked texture.
If you want to add a crispy texture, you can sprinkle a little sugar on the batter before cooking. Enjoy your homemade Taiyaki!
Kuzumochi (Sweet Potato and Red Bean Dessert)
Kuzumochi, a delightful Japanese dessert, combines the subtle sweetness of sweet potatoes with the earthy flavor of red beans, creating a unique and satisfying treat. This dessert is often enjoyed during special occasions or festivals, and it’s particularly cherished for its chewy texture and vibrant colors. The soft, glutinous nature of kuzumochi makes it a favorite among those who appreciate traditional Japanese sweets, or wagashi.
In this recipe, we’ll explore how to create Kuzumochi using simple ingredients that are readily available. The combination of sweet potatoes and adzuki beans creates a harmonious balance of flavors, while the addition of a sweet syrup enhances the overall experience. Perfect for sharing, this dessert serves 4-6 people and is sure to impress family and friends alike.
Ingredients (Serves 4-6)
- 2 medium sweet potatoes
- 1 cup adzuki beans
- 1 cup sugar (divided)
- 1/4 teaspoon salt
- 1/2 cup water (for cooking beans)
- 1 tablespoon cornstarch
- 1/2 cup water (for kuzumochi mixture)
- Cornstarch (for dusting)
Cooking Instructions
- Prepare the Adzuki Beans: Rinse the adzuki beans under cold water. In a pot, combine the rinsed beans with 1/2 cup of water and bring to a boil. Once boiling, reduce the heat to low, cover, and let it simmer for about 30-40 minutes until the beans are tender. Drain any excess water.
- Sweeten the Beans: In a separate bowl, mash the cooked adzuki beans lightly with a fork. Add 1/2 cup of sugar and a pinch of salt to the beans. Mix well and set aside to cool. This will create a sweet red bean paste.
- Cook the Sweet Potatoes: While the beans are cooling, peel and chop the sweet potatoes into chunks. Boil them in water until they’re tender, which should take about 15-20 minutes. Drain and mash the sweet potatoes in a bowl until smooth.
- Make the Kuzumochi Mixture: In a saucepan, combine the mashed sweet potatoes with 1/2 cup of water and 1/2 cup of sugar. Stir in the cornstarch to create a smooth mixture. Cook over low heat, stirring continuously until the mixture thickens and becomes glossy, about 5-7 minutes.
- Assemble the Dessert: Lightly dust a flat surface with cornstarch. Once the kuzumochi mixture is ready, pour it onto the dusted surface. Allow it to cool slightly, then spread the sweet red bean paste evenly over the top. Roll the mixture tightly into a log shape, using the cornstarch to prevent sticking.
- Slice and Serve: Once the log has cooled, slice it into bite-sized pieces. Dust the pieces with cornstarch to prevent them from sticking together. Serve the kuzumochi on a plate and enjoy!
Extra Tips
When making Kuzumochi, verify that the sweet potatoes are fully cooked for the best texture. If you prefer a smoother red bean paste, you can blend the cooked beans in a food processor instead of mashing them.
Additionally, feel free to adjust the sweetness to your liking by varying the amount of sugar used in both the red bean paste and the kuzumochi mixture. Enjoy your homemade kuzumochi as a delightful dessert or snack!
Red Bean Soup (Zenzai)
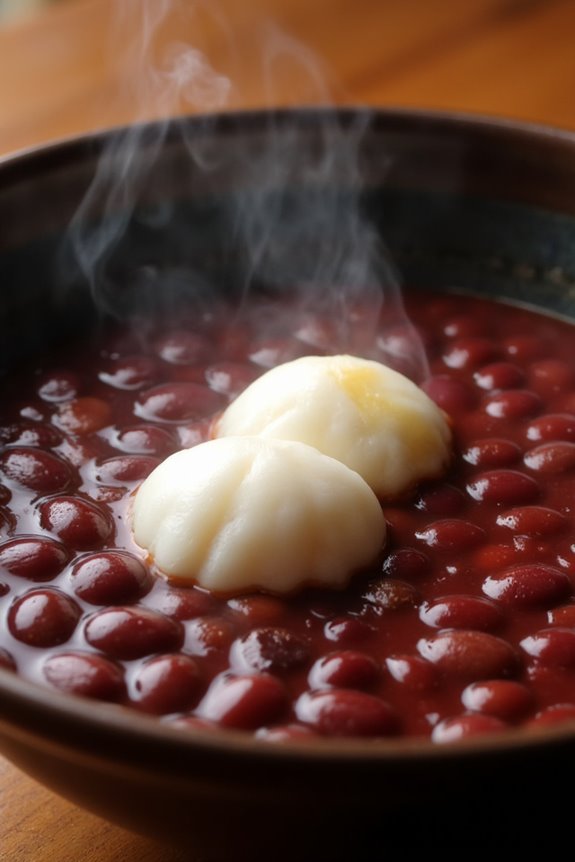
Red Bean Soup, or Zenzai, is a traditional Japanese dessert that’s both comforting and delicious. Made from adzuki beans, this sweet soup is often enjoyed warm and can be served with mochi or over rice. The rich, earthy flavors of the adzuki beans combined with the sweetness of sugar create a delightful balance that’s sure to please anyone with a sweet tooth.
This dish is particularly popular during the winter months, but it can be enjoyed year-round as a delightful treat.
Preparing Red Bean Soup may seem intimidating, but it’s quite simple and rewarding. The adzuki beans require soaking and slow cooking, allowing their natural sweetness to develop. You can adjust the sweetness to your liking, and feel free to experiment with toppings such as shiratama (rice dumplings) or fresh fruits.
Serve it in small bowls for a delightful dessert or a comforting snack.
Ingredients (Serves 4-6)
- 1 cup adzuki beans
- 4 cups water (for cooking beans)
- 1/2 cup sugar (adjust to taste)
- 1/4 teaspoon salt
- 1-2 cups water (for adjusting consistency)
- Mochi or shiratama (optional, for serving)
Cooking Instructions
- Soak the Beans: Rinse the adzuki beans under cold water to remove any impurities. Place the beans in a bowl and cover them with water. Let them soak for at least 4 hours or overnight. This step helps to soften the beans and reduces cooking time.
- Cook the Beans: After soaking, drain the beans and transfer them to a pot. Add 4 cups of fresh water and bring to a boil over medium heat. Once boiling, reduce the heat to low and let the beans simmer for about 1 hour, or until they’re tender. You may need to add more water during cooking to keep the beans submerged.
- Sweeten the Soup: Once the beans are tender, add the sugar and salt to the pot. Stir well to combine and let the mixture simmer for another 10-15 minutes. Taste the soup and adjust the sweetness according to your preference.
- Adjust Consistency: If you prefer a thinner soup, gradually add 1-2 cups of water while stirring until you reach your desired consistency. Continue simmering for a few more minutes to integrate the flavors.
- Serve: Ladle the hot Red Bean Soup into bowls. If desired, add pieces of mochi or shiratama on top for added texture and flavor. Enjoy warm.
Extra Tips
When cooking Red Bean Soup, be mindful of the soaking time for the adzuki beans, as this greatly affects the cooking process. If you’re short on time, you can skip soaking, but be prepared for a longer cooking time.
Additionally, feel free to experiment with different sweeteners such as honey or maple syrup to put your own twist on the traditional recipe. For a more authentic experience, serve the soup with freshly made mochi, which adds a delightful chewiness that complements the smoothness of the red bean soup.
Matcha Red Bean Parfait
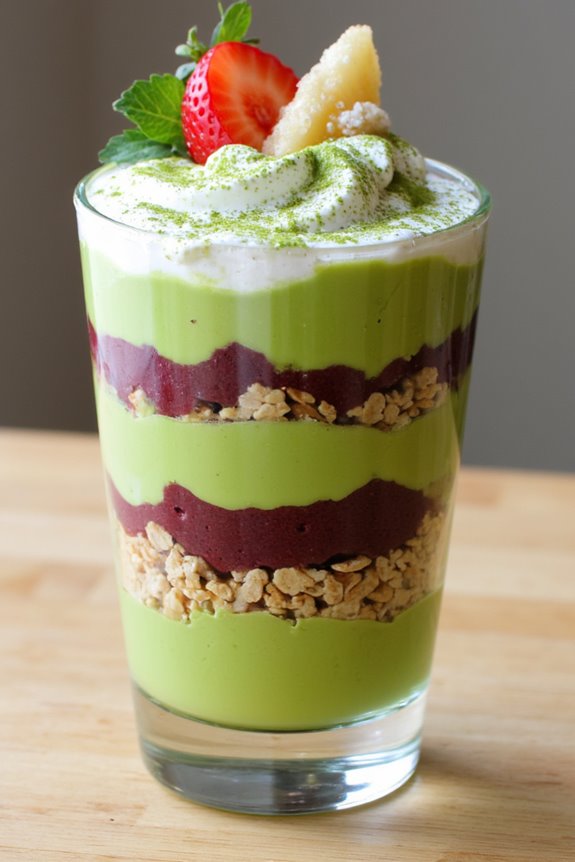
The Matcha Red Bean Parfait is a delightful Japanese dessert that combines the earthy flavor of matcha green tea with the sweet, creamy texture of red bean paste. This layered dessert isn’t only visually appealing but also offers a harmonious blend of flavors and textures.
The combination of fluffy whipped cream, velvety red bean paste, and crunchy toppings creates a satisfying experience for the palate. Perfect for any occasion, this parfait can be enjoyed as a sweet treat after a meal or as a revitalizing snack on a warm day.
Creating a Matcha Red Bean Parfait at home is easier than it might seem. With just a few ingredients and some simple steps, you can impress your friends and family with this beautiful and delicious dessert. The recipe serves 4-6 people, making it a great option for sharing, whether at a dinner party or a family gathering.
Let’s explore the ingredients and the steps to make this delightful dessert.
Ingredients:
- 2 cups heavy cream
- 3 tablespoons sugar
- 1 teaspoon vanilla extract
- 1/2 cup matcha powder (plus extra for garnish)
- 1 cup sweetened red bean paste (anko)
- 1 cup granola or crushed biscuits (for layering)
- Fresh fruit or mochi (optional, for garnish)
Cooking Instructions:
1. Prepare the Whipped Cream: In a large mixing bowl, pour in 2 cups of heavy cream. Add 3 tablespoons of sugar and 1 teaspoon of vanilla extract. Using a hand mixer or a whisk, whip the cream until soft peaks form. Be careful not to overwhip it, as you want a light and fluffy texture for the parfait.
2. Make the Matcha Cream: In a separate bowl, take about 1 cup of the prepared whipped cream and gently fold in 1/2 cup of matcha powder. Use a spatula to combine the two, ensuring that the matcha is fully integrated without deflating the whipped cream. This mixture will serve as the matcha layer in your parfait.
3. Assemble the Parfait: Take your serving glasses or bowls and start layering the ingredients. Begin with a layer of the matcha cream mixture at the bottom. Follow this with a layer of sweetened red bean paste, spreading it evenly. Then, add a layer of granola or crushed biscuits for a nice crunch.
Repeat these layers until the glasses are filled, finishing with a layer of whipped cream on top.
4. Garnish and Chill: Once all layers are assembled, dust the top layer with a little extra matcha powder for garnish. If desired, you can also add fresh fruit or pieces of mochi as a decorative touch. Place the parfaits in the refrigerator for at least 30 minutes to chill and allow the flavors to meld together.
5. Serve: After chilling, carefully remove the parfaits from the refrigerator and serve them chilled. Enjoy the delightful combination of the creamy matcha and sweet red bean flavors with every spoonful.
Extra Tips: When preparing the Matcha Red Bean Parfait, be sure to use high-quality matcha for the best flavor and color. If you prefer a less sweet dessert, you can adjust the sugar in the whipped cream or use unsweetened red bean paste.
Additionally, feel free to customize your parfait with different toppings like seasonal fruits or nuts for added texture and flavor. Enjoy experimenting with different layers and presentations!
Red Bean Ice Cream

Red Bean Ice Cream, or “Azuki Ice Cream,” is a delightful dessert that marries the creamy texture of ice cream with the subtle sweetness of red beans. This traditional Japanese treat isn’t only delicious but also offers a unique twist on the classic ice cream flavors we’re used to.
The red beans, often used in various Asian desserts, provide a perfect balance of flavors and textures, making this dessert an exciting option for those looking to try something new.
Making Red Bean Ice Cream at home is simpler than you might think. With just a few ingredients and some patience, you can whip up this delightful dessert that will impress your family and friends.
Whether served as a revitalizing finish to a meal or enjoyed on its own, this ice cream is a perfect way to indulge your sweet tooth while exploring the flavors of Japanese cuisine.
Ingredients (Serves 4-6)
- 1 cup adzuki beans (red beans)
- 1 cup sugar
- 1/2 teaspoon salt
- 2 cups heavy cream
- 1 cup whole milk
- 1 teaspoon vanilla extract
- 1/2 cup sweetened condensed milk
Cooking Instructions
1. Prepare the Adzuki Beans: Rinse the adzuki beans thoroughly under cold water. In a medium saucepan, combine the beans with enough water to cover them by about an inch. Bring the water to a boil, then reduce the heat and let it simmer for about 30 minutes, or until the beans are tender.
Drain the beans and set aside.
2. Sweeten the Beans: In the same saucepan, return the drained beans and add 1 cup of sugar, 1/2 teaspoon of salt, and enough water to cover the beans again. Cook over medium heat, stirring occasionally, until the sugar dissolves and the mixture thickens slightly, about 10-15 minutes.
Remove from heat and allow to cool.
3. Make the Ice Cream Base****: In a large mixing bowl, whisk together the heavy cream, whole milk, vanilla extract, and sweetened condensed milk until well combined. This creamy mixture will serve as the base for your ice cream.
4. Combine Beans and Cream Mixture: Once the adzuki beans have cooled, gently fold them into the cream mixture. Make sure that the beans are evenly distributed throughout the mixture for a delightful surprise in every bite.
5. Chill the Mixture: Cover the bowl with plastic wrap and place it in the refrigerator for at least 2 hours or until it’s thoroughly chilled. This step is essential as it helps the flavors develop and guarantees a smoother texture when churning.
6. Churn the Ice Cream: Pour the chilled mixture into an ice cream maker and churn according to the manufacturer’s instructions. This usually takes about 20-30 minutes until the mixture reaches a soft-serve consistency.
7. Freeze the Ice Cream: Transfer the churned ice cream into an airtight container and spread it evenly. Cover the container with a lid or plastic wrap and freeze for at least 4 hours or until the ice cream is firm.
8. Serve and Enjoy: Once the ice cream is set, scoop it into bowls or cones and enjoy your homemade Red Bean Ice Cream!
Extra Tips
When preparing Red Bean Ice Cream, feel free to adjust the sweetness of the red beans to your taste. If you prefer a less sweet flavor, you can reduce the sugar slightly.
Additionally, if you don’t have an ice cream maker, you can still make this dessert by pouring the mixture into a shallow dish and freezing it. Stir vigorously every 30 minutes for the first few hours to break up the ice crystals, guaranteeing a creamier texture.
Enjoy your culinary adventure into Japanese desserts!
Sekihan (Red Bean Rice)
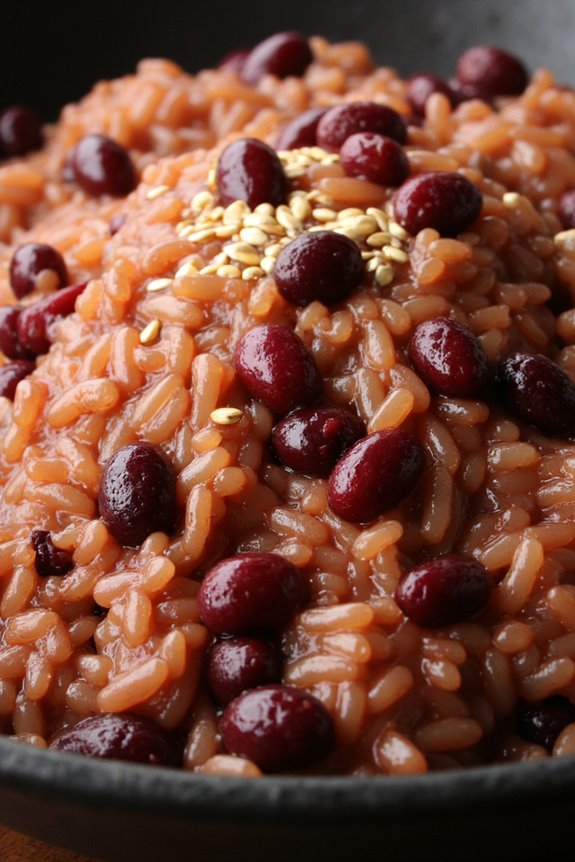
Sekihan, or red bean rice, is a traditional Japanese dish often served during celebrations and special occasions. The name “Sekihan” translates to “red rice,” referring to the beautiful color imparted by adzuki beans. This dish isn’t only visually stunning but also offers a unique flavor profile, combining the nuttiness of the rice with the sweetness of the red beans.
It’s typically enjoyed during significant events like birthdays, weddings, and festivals, symbolizing happiness and good fortune.
Making Sekihan involves soaking the adzuki beans and cooking them with glutinous rice, creating a sticky and flavorful combination. The beans are boiled until tender and then mixed with the rice, resulting in a dish that’s both satisfying and culturally meaningful. Enjoy this delightful dish as part of a larger Japanese meal or as a comforting side on its own.
Ingredients (Serves 4-6):
- 2 cups glutinous rice (mochi rice)
- 1/2 cup adzuki beans
- 2 1/2 cups water (for cooking the rice)
- 1/2 teaspoon salt
- A few drops of soy sauce (optional, for flavor)
- Sesame seeds (optional, for garnish)
Cooking Instructions:
- Soak the Adzuki Beans: Begin by rinsing the adzuki beans under cold water. Soak them in a bowl of water for at least 4 hours, or preferably overnight. This softens the beans and reduces cooking time.
- Cook the Adzuki Beans: After soaking, drain the beans and transfer them to a pot. Add enough fresh water to cover the beans by about an inch. Bring the water to a boil, then reduce the heat and let it simmer for about 30 minutes or until the beans are tender but not mushy. Drain the beans and set aside.
- Prepare the Rice: Rinse the glutinous rice under cold water until the water runs clear. This removes excess starch and helps achieve the desired sticky texture. Soak the rice in water for about 30 minutes, then drain.
- Combine Beans and Rice: In a rice cooker or pot, combine the rinsed glutinous rice, cooked adzuki beans, salt, and water. If desired, add a few drops of soy sauce for extra flavor. Stir gently to mix the ingredients without breaking the beans.
- Cook the Sekihan: If using a rice cooker, simply select the “white rice” setting and start the cooking process. If using a pot, bring the mixture to a boil over medium heat, then cover and reduce the heat to low. Cook for about 20 minutes, or until the rice has absorbed all the water.
- Fluff and Serve: Once the rice is cooked, turn off the heat and let it sit covered for an additional 10 minutes. After resting, fluff the rice gently with a fork. Serve warm, garnished with sesame seeds if desired.
Extra Tips:
To enhance the flavor and presentation of your Sekihan, consider adding a few drops of soy sauce or a sprinkle of salt during the cooking process.
For a more festive touch, you can also garnish the dish with toasted sesame seeds or even a few slices of pickled vegetables.
If you have leftovers, Sekihan can be stored in an airtight container in the refrigerator for a couple of days and reheated gently before serving. Enjoy this traditional dish with a side of pickled vegetables or a light soup for a complete meal!
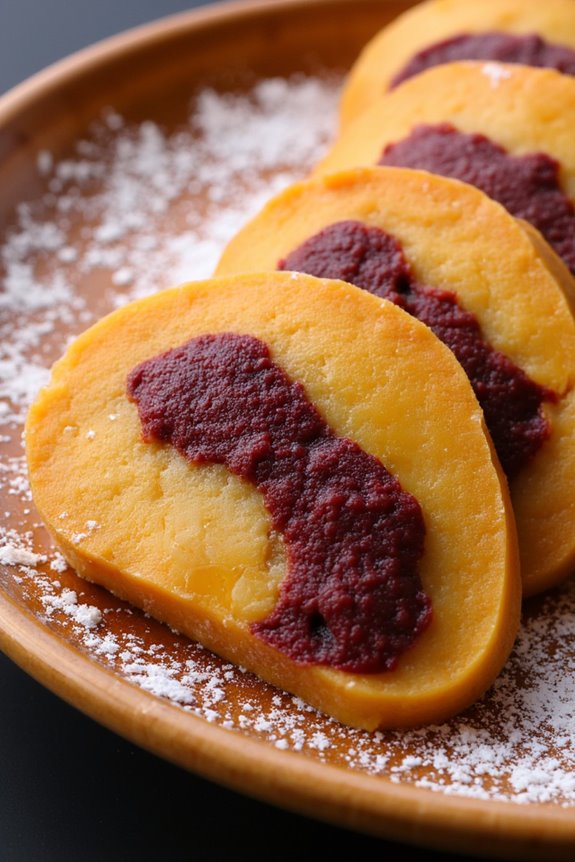
Yaki Imo With Red Bean

Yaki Imo, or Japanese roasted sweet potatoes, is a beloved snack that captures the essence of comfort food in Japan. When paired with sweet red bean paste, it transforms into a delightful dessert that isn’t only delicious but also visually appealing.
The natural sweetness of the sweet potatoes complements the rich, earthy flavor of the red bean paste, making it a perfect treat for any occasion, whether as an afternoon snack or a dessert after dinner.
This recipe for Yaki Imo with Red Bean is straightforward and allows you to enjoy these traditional flavors right in your own kitchen. With a few simple ingredients, you can create a dish that showcases the beauty of Japanese culinary traditions.
The sweet potatoes can be roasted to perfection, allowing their natural sugars to caramelize, while the red bean paste adds a creamy texture that ties the dish together. Gather your ingredients, and let’s get started on this delicious dessert!
Ingredients (serving size: 4-6 people)
- 4 medium Japanese sweet potatoes (Satsuma-imo)
- 1 cup sweet red bean paste (anko)
- 1 tablespoon sesame seeds (optional, for garnish)
- 1 tablespoon honey or maple syrup (optional, for drizzling)
Cooking Instructions
1. Prepare the Sweet Potatoes: Start by washing the Japanese sweet potatoes thoroughly to remove any dirt. You can leave the skin on as it adds texture and flavor. Preheat your oven to 400°F (200°C) while you prepare the potatoes.
2. Roast the Sweet Potatoes: Place the washed sweet potatoes directly on the oven rack or on a baking sheet lined with parchment paper. Roast them for about 45-60 minutes, or until they’re tender and the skin is slightly caramelized.
The cooking time may vary depending on the size of the potatoes, so check them by inserting a fork or knife to verify they’re soft throughout.
3. Prepare the Red Bean Paste: While the sweet potatoes are roasting, if you’re using store-bought sweet red bean paste (anko), you can skip this step. However, if you have dried red beans, soak them overnight and then boil until tender.
Mash the cooked beans and sweeten them with sugar to taste, or leave them as is for a more natural flavor.
4. Assemble the Dish: Once the sweet potatoes are roasted, remove them from the oven and let them cool slightly. Cut each sweet potato lengthwise to create a pocket, and gently mash the flesh slightly with a fork to create a space for the red bean paste.
5. Serve: Spoon a generous amount of sweet red bean paste into the pocket of each sweet potato. If desired, drizzle a bit of honey or maple syrup on top and sprinkle with sesame seeds for added flavor and presentation. Serve warm and enjoy!
Extra Tips
For an added depth of flavor, consider incorporating a hint of salt to the sweet red bean paste to balance the sweetness.
Additionally, if you’re feeling adventurous, try experimenting with different toppings, such as whipped cream or a scoop of vanilla ice cream alongside the Yaki Imo with Red Bean. This dessert is perfect for any season, but it shines particularly in the fall when sweet potatoes are at their peak.
Red Bean Mochi Cake
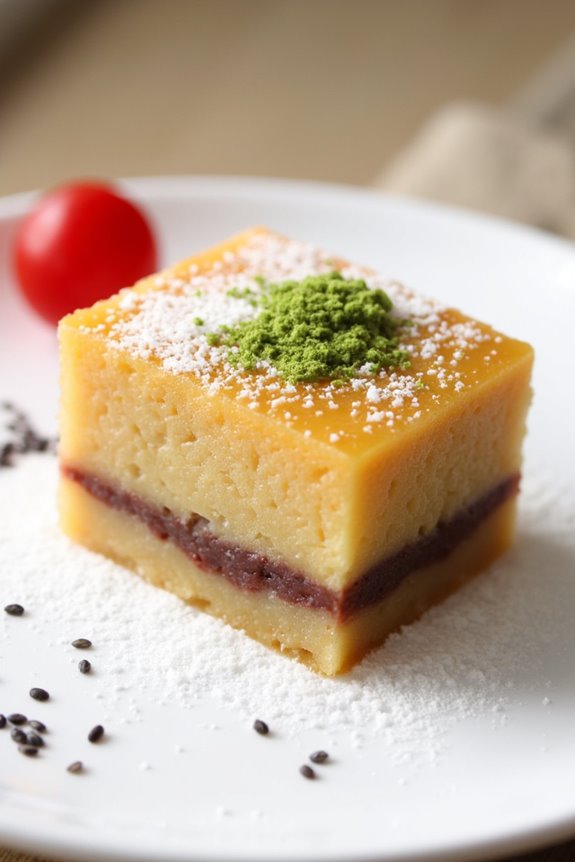
Red Bean Mochi Cake is a delightful fusion dessert that combines the chewy texture of mochi with the sweet and earthy flavor of red beans. This cake isn’t only visually appealing, but it also offers a unique taste experience that’s beloved in Japanese cuisine.
The combination of glutinous rice flour and red bean paste creates a moist, tender cake that’s perfect for any occasion, whether it’s a family gathering or a special celebration.
Making Red Bean Mochi Cake is straightforward and rewarding. The chewy texture of the mochi pairs beautifully with the sweetened red bean filling, making it a perfect dessert for those who enjoy traditional Japanese sweets.
With just a few simple ingredients and steps, you can create this delicious treat that will impress your friends and family. Let’s get started!
Ingredients (Serves 4-6)
- 1 cup glutinous rice flour (mochi flour)
- 1 cup water
- 1/2 cup sugar
- 1/2 teaspoon baking powder
- 1 cup sweetened red bean paste (anko)
- Cornstarch (for dusting)
- Optional: Matcha powder or sesame seeds for garnish
Cooking Instructions
- Prepare the Baking Dish: Preheat your oven to 350°F (175°C). Grease an 8-inch square baking dish with cooking spray or a light layer of oil. This will prevent the mochi cake from sticking to the pan.
- Mix Dry Ingredients: In a large mixing bowl, combine the glutinous rice flour, sugar, and baking powder. Stir until well blended, ensuring there are no lumps.
- Add Wet Ingredients: Gradually add the water to the dry ingredients while stirring continuously. Mix until you achieve a smooth batter. The batter should be slightly thick but pourable.
- Layer the Red Bean Paste: Pour half of the mochi batter into the prepared baking dish, spreading it evenly. Then, spoon the sweetened red bean paste over the batter, spreading it gently to cover the entire surface. Pour the remaining mochi batter on top, ensuring the red bean paste is completely covered.
- Bake: Place the baking dish in the preheated oven and bake for 30-35 minutes, or until the top is slightly golden and a toothpick inserted in the center comes out clean. Keep an eye on it to avoid over-baking.
- Cool and Slice: Once baked, remove the dish from the oven and let it cool in the pan for about 10 minutes. Dust a clean surface with cornstarch and carefully transfer the cake onto it. Allow it to cool completely before slicing into squares.
- Serve: Dust the tops of the mochi cake with additional cornstarch to prevent stickiness. You can also sprinkle matcha powder or sesame seeds on top for added flavor and presentation. Serve at room temperature or slightly chilled.
Extra Tips
When preparing Red Bean Mochi Cake, be mindful of the texture of the mochi. The key to achieving the perfect chewiness is ensuring you don’t overbake the cake; it should still be soft and moist in the center.
If you can, use high-quality sweetened red bean paste for the best flavor. Additionally, you can customize the cake by incorporating different flavors or toppings, such as a layer of coconut cream or fresh fruits, to create your own version.
Enjoy your delicious homemade Red Bean Mochi Cake!
Red Bean Jelly (Agar-Agar)
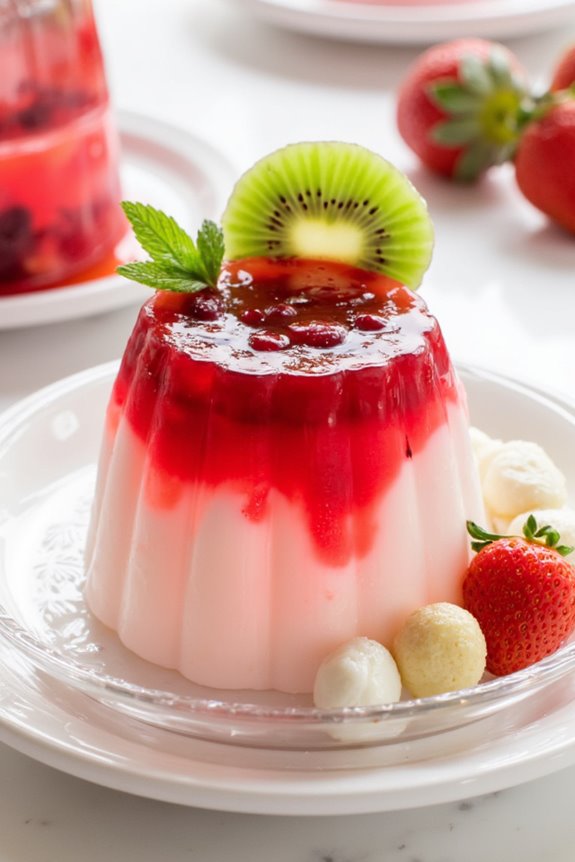
Red Bean Jelly, known as “Zenzai” in Japan, is a delightful dessert that combines the natural sweetness of red beans with the invigorating texture of agar-agar. This dish is often enjoyed chilled, making it a perfect treat for warm weather or as a light, sweet finish to any meal.
The combination of creamy red bean paste and the jellied texture creates a unique dessert experience that’s both satisfying and invigorating. Agar-agar, a vegetarian gelatin alternative derived from seaweed, is the key ingredient that gives this jelly its delightful consistency.
The sweetness of the red beans is beautifully complemented by the subtle flavors of coconut milk or fresh fruit, making it versatile and appealing to a wide range of palates. Whether served in individual cups or as a larger mold, this Japanese dessert is sure to impress family and friends.
Ingredients (Serves 4-6):
- 1 cup adzuki beans
- 4 cups water (for boiling beans)
- 1/2 cup granulated sugar
- 2 cups water (for agar-agar)
- 1 tablespoon agar-agar powder
- 1 cup coconut milk
- A pinch of salt
- Optional: fresh fruits or mochi for serving
Cooking Instructions:
1. Prepare the Adzuki Beans: Rinse the adzuki beans under cold water to remove any dirt or impurities. In a pot, combine the beans with 4 cups of water and bring them to a boil over medium heat.
Once boiling, reduce the heat to low and let the beans simmer for about 45-60 minutes or until they’re soft. Make sure to check occasionally and add more water if needed to prevent the beans from drying out.
2. Sweeten the Beans: Once the beans are soft, drain any excess water and return them to the pot. Add the granulated sugar and a pinch of salt. Stir the mixture over low heat for about 5-10 minutes until the sugar dissolves and the beans are well-coated.
Remove from heat and let the mixture cool slightly.
3. Prepare the Agar-Agar Mixture: In a separate saucepan, combine 2 cups of water with the agar-agar powder. Bring this mixture to a boil while stirring continuously.
Once it reaches a boil, reduce the heat and simmer for about 5 minutes until the agar-agar is completely dissolved.
4. Combine and Set****: In a mixing bowl, combine the sweetened adzuki beans with the agar-agar mixture. Pour in the coconut milk and stir well until everything is evenly mixed.
Pour this mixture into serving cups or a mold. Allow it to cool at room temperature for about 30 minutes before transferring it to the refrigerator. Let the jelly set for at least 2-3 hours until firm.
5. Serve: Once the jelly is set, carefully remove it from the molds or cups. You can Serve it as is or topped with fresh fruits or small pieces of mochi for added texture and flavor.
Extra Tips:
When making Red Bean Jelly, it’s important to verify that the agar-agar is fully dissolved in water to achieve the right texture.
If using a mold, lightly greasing the mold with a bit of oil can help with easy removal of the jelly once set. Additionally, you can experiment with flavors by adding a splash of vanilla or almond extract to the coconut milk for a unique twist.
Enjoy your Red Bean Jelly chilled, and don’t hesitate to get creative with toppings to enhance the presentation and flavor!