

Noche Buena holds a special place in my heart, filled with memories of laughter and love. The aroma of lechon and bibingka always brings me back to those joyful family gatherings. This collection of recipes is more than just delicious dishes; it’s a tribute to our rich Filipino heritage. Each one is a piece of the tradition that connects us all. Let’s explore these cherished favorites together and celebrate the magic they bring to our tables.
Lechon: The Star of the Feast
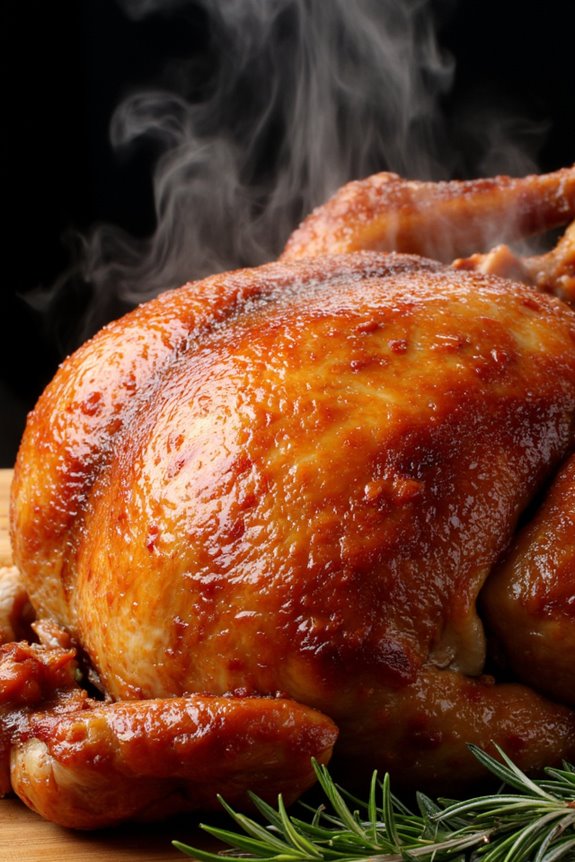
Lechon, a whole roasted pig, is the centerpiece of every Filipino Noche Buena celebration, symbolizing abundance and festivity. Its golden-brown, crispy skin paired with tender, flavorful meat makes it a dish that’s both a visual delight and a culinary masterpiece. Traditionally, the pig is marinated with a blend of spices, stuffed with herbs, and roasted over an open flame or in a traditional oven, which imbues the meat with rich flavors and a smoky aroma that tantalizes the senses.
Cooking lechon is definitely a labor of love, often requiring hours of preparation and cooking. However, the end result is always worth the effort, as the succulent meat and crunchy skin leave a lasting impression on family and friends alike. While the traditional method of roasting a whole pig might be challenging for some, this recipe provides a simplified version that can be achieved using a smaller cut of pork, ensuring that everyone can enjoy this iconic dish during their Christmas feast.
Ingredients (Serves 4-6)
- 1 kg pork belly (with skin)
- 4 cloves garlic, minced
- 2 tablespoons soy sauce
- 1 tablespoon rock salt
- 1 tablespoon black pepper
- 1 tablespoon paprika
- 1 tablespoon olive oil
- 1 tablespoon vinegar
- 2-3 bay leaves
- 1 tablespoon lemongrass, minced (optional)
- 2 cups water
Cooking Instructions
- Prepare the Marinade: In a bowl, combine minced garlic, soy sauce, rock salt, black pepper, paprika, olive oil, vinegar, and minced lemongrass (if using). Mix well to create a marinade. This blend of ingredients won’t only flavor the pork but also help tenderize the meat.
- Marinate the Pork: Rub the marinade all over the pork belly, ensuring the mixture penetrates the meat and is generously applied to the skin. Place the pork in a sealed container or wrap it tightly in plastic. Let it marinate in the refrigerator for at least 4 hours, preferably overnight. This step is essential for maximizing flavor.
- Preheat Oven: Preheat your oven to 250°C (482°F). A hot oven is key to achieving that crispy skin that lechon is famous for.
- Prepare for Roasting: Place the marinated pork belly on a roasting rack in a baking tray. Pour water into the tray, making sure it doesn’t touch the pork skin. The water will create steam during roasting, helping to keep the meat juicy.
- Roast the Pork: Roast the pork in the preheated oven for about 1.5 to 2 hours. Halfway through, increase the oven temperature to 300°C (572°F) for about 20 minutes to help crisp up the skin. Keep an eye on it to prevent burning.
- Final Crisping: For an even crispier skin, you can switch to the broiler setting for the last 10 minutes of cooking. This will give the skin a perfect golden brown color and extra crunch.
- Rest and Serve: Once cooked, remove the lechon from the oven and let it rest for about 15 minutes before slicing. This resting period allows the juices to redistribute throughout the meat, ensuring every slice is succulent.
Extra Tips
To enhance the flavor of your lechon, consider adding herbs such as rosemary or thyme to the marinade for an aromatic twist. Additionally, if you’re aiming for that extra crispy skin, make sure to pat the skin dry before applying the marinade, as moisture can prevent it from becoming crispy.
Finally, serving your lechon with a side of liver sauce or vinegar dip can elevate the dish even further, creating a delightful balance of flavors. Enjoy your festive feast!
Pancit Canton: Stir-Fried Noodles for Good Fortune
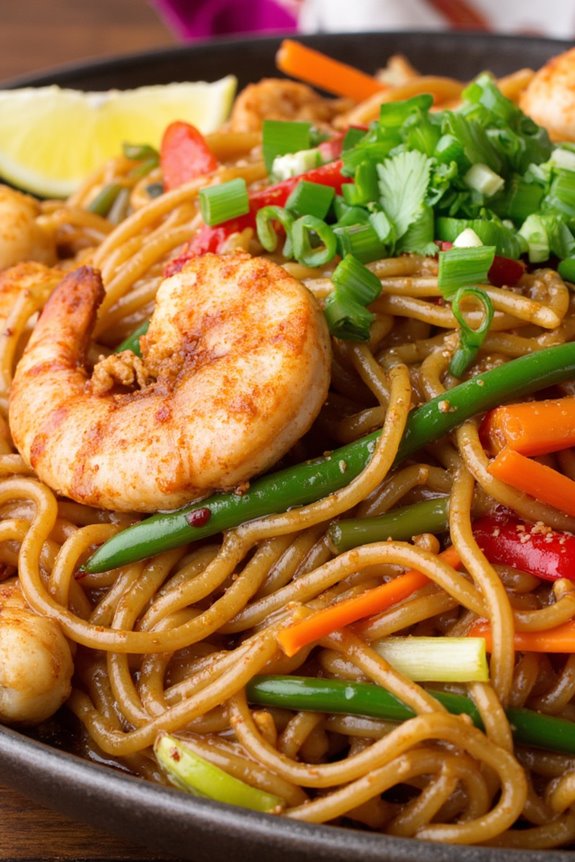
Pancit Canton is a traditional Filipino dish often served during special occasions, particularly during Noche Buena, to symbolize long life and good fortune. This delightful stir-fried noodle dish is packed with fresh vegetables, a variety of proteins, and seasoned with soy sauce and other flavorful ingredients. Its vibrant colors and rich flavors not only make it a festive centerpiece but also a comforting meal that brings families together.
Cooking Pancit Canton is a straightforward process that allows for customization based on your preference for protein and vegetables. The key is to have all your ingredients prepped and ready to go before you start cooking, as the dish comes together quickly in a hot wok or skillet. Whether you use chicken, shrimp, or a mix of both, the result will always be a delicious and satisfying dish that embodies the spirit of Filipino celebrations.
Ingredients (Serves 4-6)
- 500g Pancit Canton noodles
- 2 tablespoons vegetable oil
- 1 onion, sliced
- 4 cloves garlic, minced
- 1 cup carrots, julienned
- 1 cup cabbage, shredded
- 1/2 cup bell peppers, sliced
- 1 cup green beans, trimmed and cut into 1-inch pieces
- 200g chicken breast, sliced thinly
- 200g shrimp, peeled and deveined
- 3 tablespoons soy sauce
- 2 tablespoons oyster sauce
- 1 teaspoon sesame oil
- Salt and pepper, to taste
- 2 green onions, chopped (for garnish)
- Lemon or calamansi wedges (for serving)
Cooking Instructions
- Prepare the Noodles: Begin by cooking the Pancit Canton noodles according to the package instructions. Usually, this involves boiling them briefly until just tender. Once cooked, drain and set aside, making sure to toss them lightly with a bit of oil to prevent sticking.
- Sauté Aromatics: In a large wok or skillet, heat the vegetable oil over medium-high heat. Add the sliced onion and minced garlic, and sauté for about 2 minutes until the onion becomes translucent and the garlic is fragrant.
- Cook the Proteins: Add the sliced chicken breast to the pan. Stir-fry for about 3-4 minutes until the chicken is cooked through. Then, add the shrimp and continue to cook for another 2-3 minutes until they turn pink and opaque.
- Add Vegetables: Once the proteins are cooked, add the carrots, cabbage, bell peppers, and green beans to the wok. Stir-fry the mix for about 4-5 minutes until the vegetables are tender yet still crisp.
- Combine Noodles: Add the cooked Pancit Canton noodles to the wok. Pour in the soy sauce, oyster sauce, and sesame oil. Gently toss everything together, making sure the noodles are well coated with the sauces and combined with the vegetables and proteins.
- Season and Garnish: Taste the dish and season with salt and pepper as needed. Once everything is heated through, remove from heat. Transfer to a serving platter and garnish with chopped green onions. Serve with lemon or calamansi wedges on the side.
Extra Tips
For an added depth of flavor, consider marinating the chicken in soy sauce and a dash of sesame oil for about 30 minutes before cooking. Additionally, feel free to customize the vegetables based on what’s in season or what you have on hand; snow peas, broccoli, or even mushrooms can be great additions.
Finally, make sure your wok or skillet is hot enough before adding ingredients, as this will help achieve that signature stir-fried taste!
Bibingka: Traditional Rice Cake Delight

Bibingka is a beloved traditional Filipino rice cake that holds a special place in the hearts of many, particularly during the Christmas season. This delightful treat is often enjoyed warm and is characterized by its soft and fluffy texture, with a hint of coconut flavor.
Traditionally cooked in clay pots lined with banana leaves, bibingka is topped with salted egg and grated coconut, giving it a unique blend of sweet and savory flavors. The aroma of bibingka baking in the oven is sure to evoke nostalgia and warmth, making it a perfect addition to your Noche Buena spread.
Making bibingka is a delightful experience that allows you to connect with Filipino culinary traditions. With simple ingredients and a few steps, you can recreate this festive delicacy in the comfort of your home.
Whether you’re sharing it with family or serving it to guests, bibingka is sure to impress and bring joy to your holiday celebrations.
Ingredients (Serves 4-6)
- 2 cups rice flour
- 1 cup coconut milk
- 1 cup water
- 1 cup sugar
- 2 teaspoons baking powder
- 1/4 teaspoon salt
- 2 large eggs
- 1/2 cup grated coconut (fresh or desiccated)
- 2 pieces salted eggs, sliced
- Banana leaves (for lining the baking pan)
Cooking Instructions
- Prepare the Baking Pan: Preheat your oven to 375°F (190°C). Line a round baking pan (about 9 inches in diameter) with banana leaves, allowing the leaves to hang over the sides. This will add flavor and prevent sticking.
- Mix Dry Ingredients: In a large mixing bowl, combine the rice flour, sugar, baking powder, and salt. Whisk these dry ingredients together until they’re well blended. This guarantees that the leavening agent is evenly distributed in the batter.
- Combine Wet Ingredients: In another bowl, whisk together the eggs, coconut milk, and water. Make sure the mixture is smooth and free of lumps. This will create a rich and moist batter for the bibingka.
- Combine Mixtures: Gradually pour the wet mixture into the dry ingredients while stirring continuously. This will help to avoid any lumps in the batter. Mix until just combined; don’t overmix.
- Add Grated Coconut: Gently fold in the grated coconut to the batter. This will add a delicious texture and a hint of coconut flavor to your bibingka.
- Pour and Bake: Pour the batter into the prepared baking pan, smoothing the top with a spatula. Place the sliced salted eggs on top of the batter, evenly distributing them. Bake in the preheated oven for about 25-30 minutes, or until the top is golden brown and a toothpick inserted in the center comes out clean.
- Cool and Serve: Once done, remove the bibingka from the oven and let it cool for a few minutes. Carefully lift the bibingka out of the pan using the banana leaves and slice it into wedges. Serve warm, optionally garnished with additional grated coconut.
Extra Tips
When making bibingka, be sure to use fresh coconut milk for the best flavor and richness. If you can’t find banana leaves, parchment paper can be a suitable substitute, but it won’t impart the same aroma.
For an extra touch, you can brush the top of the bibingka with melted butter before serving for added flavor. Enjoy your bibingka with a steaming cup of hot chocolate or coffee for a truly festive experience!
Puto Bumbong: Purple Rice Cake With a Twist
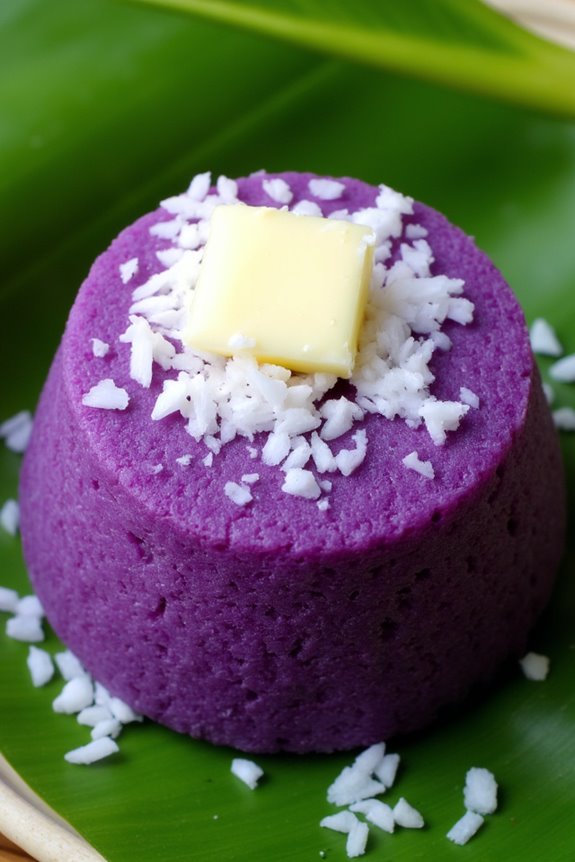
Puto Bumbong is a beloved Filipino delicacy traditionally served during the Christmas season, particularly during the Noche Buena. This delightful purple rice cake is made from glutinous rice flour, colored with the vibrant hue of ube (purple yam), and is often steamed in bamboo tubes, giving it a unique shape and texture.
The dish is typically served with a sprinkle of grated coconut and a drizzle of butter, making it a sweet and savory treat that captures the essence of Filipino festivities.
This recipe takes the classic Puto Bumbong and adds a twist by incorporating a few modern ingredients while still preserving the traditional flavors. Whether you’re preparing for a family gathering or simply craving a nostalgic taste of home, this dish is sure to evoke memories and bring joy to those who indulge in it.
Let’s plunge into making this delightful treat that can serve 4-6 people.
Ingredients:
- 2 cups glutinous rice flour
- 1 cup ube (purple yam) puree
- 1 cup coconut milk
- 1 cup water
- 1/2 cup sugar
- 1/4 teaspoon salt
- 1 cup grated fresh coconut (for topping)
- 1/4 cup butter (for drizzling)
- Banana leaves (for lining)
- Optional: sugar for sprinkling
Instructions:
- Prepare the Steamer: Begin by filling a steamer pot with water and bringing it to a boil. If you don’t have a bamboo steamer, a regular steamer will work just fine. Make sure to line the steamer basket with banana leaves to prevent the rice mixture from sticking and to add a subtle flavor.
- Mix the Ingredients: In a large bowl, combine the glutinous rice flour, ube puree, coconut milk, water, sugar, and salt. Mix well until the batter is smooth and free of lumps. The texture should be slightly thick but pourable, similar to pancake batter.
- Pour into the Steamer: Once the mixture is well combined, pour it into the prepared steamer, filling each bamboo tube or small molds about three-quarters full to allow for expansion during steaming.
- Steam the Puto Bumbong: Cover the steamer with a lid and steam for approximately 20-25 minutes or until a toothpick inserted in the center comes out clean. Keep an eye on the water level in the steamer and add more if necessary to prevent it from drying out.
- Serve: Once cooked, remove the Puto Bumbong from the steamer and let it cool slightly. Carefully remove them from the bamboo tubes or molds and place them on a serving plate. Top with grated coconut and drizzle with melted butter. If desired, sprinkle with extra sugar for sweetness.
Extra Tips:
For an authentic experience, try using freshly grated coconut, as it adds a rich flavor and texture to the dish.
If you want to experiment with flavors, you can incorporate a bit of pandan essence or even mix in some other flavored purees along with the ube.
Finally, serve Puto Bumbong warm for the best taste, and don’t hesitate to pair it with other traditional Noche Buena dishes for a festive feast!
Hamon: Sweet and Savory Holiday Ham
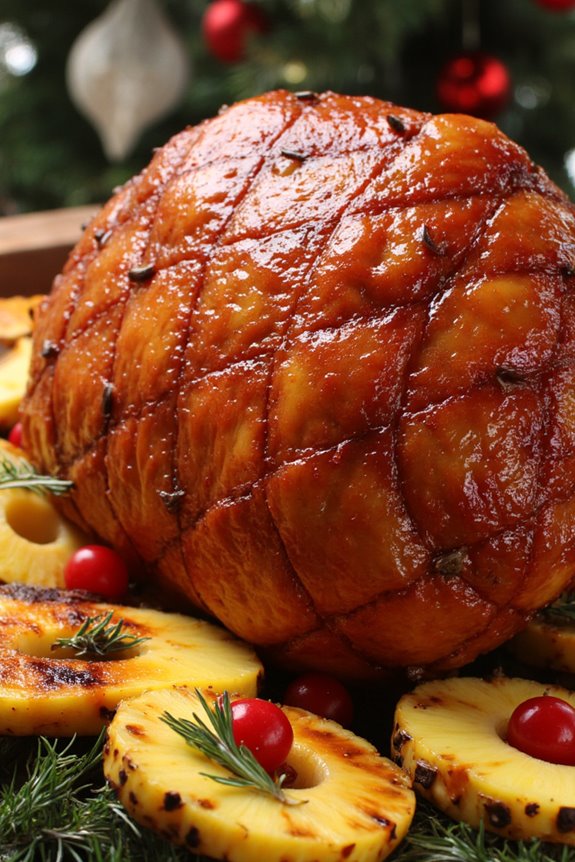
Hamon, or holiday ham, is a quintessential centerpiece in Filipino Noche Buena celebrations. This sweet and savory dish not only adds flavor to the feast but also embodies the warmth and joy of family gatherings during the Christmas season. Traditionally, the ham is glazed with a mixture of sugar, pineapple juice, and spices, creating a deliciously sticky coating that caramelizes beautifully when baked. The aroma of the ham wafting through the house is a nostalgic reminder of the holidays and brings everyone together around the dinner table.
Preparing hamon can be a simple yet rewarding experience, especially if you choose a high-quality cured ham. Whether you opt for a store-bought ham or prepare one from scratch, the key lies in the glaze that elevates this dish to holiday heights. Serve it alongside traditional Filipino sides, like puto or ensaymada, and watch as your loved ones gather to enjoy this festive delicacy.
Ingredients (Serves 4-6):
- 1 whole fully cooked ham (about 4-5 pounds)
- 1 cup brown sugar
- 1 cup pineapple juice
- 1/2 cup honey
- 1/4 cup Dijon mustard
- 1 teaspoon ground cloves
- 1 teaspoon ground cinnamon
- Whole cloves (for studding the ham)
- Pineapple slices (for garnish, optional)
- Maraschino cherries (for garnish, optional)
Cooking Instructions:
- Preheat the Oven: Begin by preheating your oven to 325°F (160°C). This will guarantee that the ham cooks evenly and properly caramelizes during baking.
- Prepare the Ham: If your ham has a thick layer of fat, use a sharp knife to score the surface in a diamond pattern. This helps the glaze penetrate and flavor the meat. Stud the intersections of the diamonds with whole cloves for added flavor and decoration.
- Make the Glaze: In a medium saucepan, combine brown sugar, pineapple juice, honey, Dijon mustard, ground cloves, and ground cinnamon. Heat over medium heat, stirring until the sugar has dissolved and the mixture is well combined. Allow it to simmer for a few minutes until slightly thickened.
- Glaze the Ham: Place the ham in a roasting pan, cut side down. Brush half of the glaze generously over the ham, making sure it seeps into the scored cuts. Reserve the remaining glaze for later.
- Bake the Ham: Cover the ham loosely with aluminum foil and place it in the preheated oven. Bake for about 1.5 to 2 hours, basting every 30 minutes with the reserved glaze. The ham is done when it reaches an internal temperature of 140°F (60°C).
- Caramelize the Ham: For the last 15-20 minutes of baking, remove the foil to allow the glaze to caramelize and turn golden brown. Keep an eye on it to prevent burning.
- Garnish and Serve: Once the ham is beautifully caramelized, remove it from the oven and let it rest for about 10-15 minutes. Garnish with pineapple slices and maraschino cherries if desired, then slice and serve warm.
Extra Tips:
For an extra layer of flavor, consider adding a splash of ginger ale or orange juice to the glaze. This will introduce a revitalizing citrus note that complements the sweetness of the ham.
Additionally, if you’re using a bone-in ham, the bone will contribute to the richness of the dish, so don’t discard it; it can serve as a base for a delicious soup later on. Enjoy the process and savor the time spent with family while preparing this festive treat!
Lumpiang Shanghai: Crispy Spring Rolls

Lumpiang Shanghai is a beloved Filipino dish that often graces the dining tables during Noche Buena, the festive Christmas Eve feast. These crispy spring rolls are filled with a savory mixture of ground pork, vegetables, and seasonings, then fried to golden perfection.
They aren’t only a favorite among family and friends but also a perfect finger food for gatherings, making them a must-have during the holiday season.
Making Lumpiang Shanghai can be an engaging activity for the whole family, as everyone can pitch in to help roll the spring rolls. The process may seem a bit time-consuming at first, but the deliciously crispy outcome is worth every minute spent in the kitchen.
Serve them with a sweet and sour dipping sauce or a soy-vinegar dip for an added burst of flavor that complements the rolls beautifully.
Ingredients (Serves 4-6)
- 1 pound ground pork
- 1 cup grated carrots
- 1 cup finely chopped green beans
- 1/2 cup minced onions
- 3 cloves garlic, minced
- 1/4 cup soy sauce
- 1 egg, beaten
- 1 teaspoon salt
- 1/2 teaspoon pepper
- 1 package spring roll wrappers
- Oil for frying
Cooking Instructions
1. Prepare the Filling: In a large mixing bowl, combine the ground pork, grated carrots, finely chopped green beans, minced onions, garlic, soy sauce, beaten egg, salt, and pepper. Use your hands or a spatula to thoroughly mix the ingredients until well combined.
This mixture will be the flavorful filling for your Lumpiang Shanghai.
2. Assemble the Spring Rolls: Take a spring roll wrapper and lay it flat on a clean surface with one corner pointing towards you. Place about 2 tablespoons of the filling near the corner. Fold the corner over the filling, then fold in the sides tightly.
Roll the wrapper away from you, making sure to keep it tight. Seal the edge with a dab of water to secure the roll. Repeat this process until all the filling is used.
3. Heat the Oil: In a deep frying pan or wok, heat about 2 inches of oil over medium heat. To check if the oil is hot enough, drop a small piece of the spring roll wrapper into the oil; if it sizzles immediately, the oil is ready for frying.
4. Fry the Spring Rolls: Carefully place a few rolled spring rolls into the hot oil, making sure not to overcrowd the pan. Fry for about 4-5 minutes on each side or until they turn golden brown and crispy.
Use a slotted spoon to remove the spring rolls from the oil and drain them on paper towels to remove excess oil.
5. Serve and Enjoy: Once all the spring rolls are fried, arrange them on a serving platter. They can be served hot or at room temperature alongside your favorite dipping sauces.
Enjoy the delightful crunch and savory flavor of your homemade Lumpiang Shanghai!
Extra Tips
For an extra twist, consider adding finely chopped shrimp or chicken to the filling for more flavor.
Always verify that the oil is hot enough before frying to achieve the perfect crispiness; if the oil is too cool, the spring rolls can become greasy.
Finally, you can prepare the filling a day ahead and keep it refrigerated, making the assembly process quicker and easier on the day of your gathering!
Kare-Kare: Oxtail Stew With Peanut Sauce
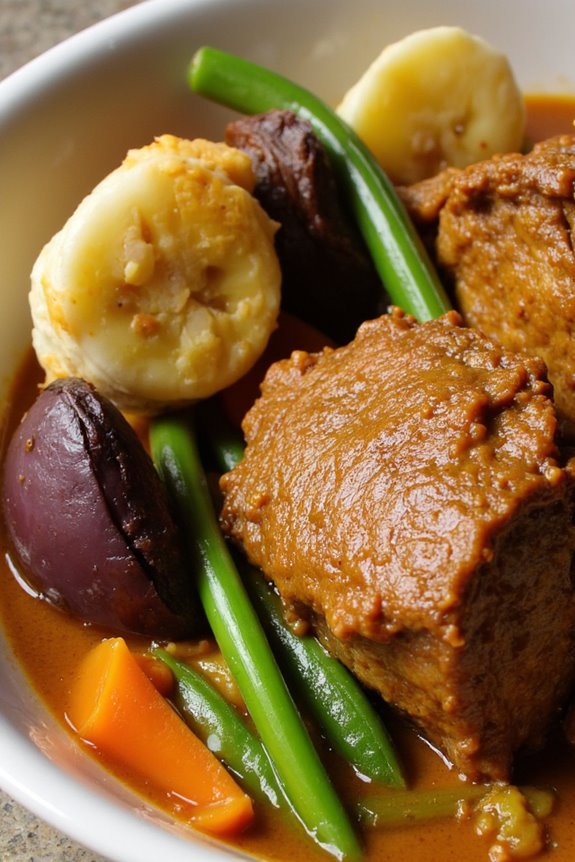
Kare-Kare is a traditional Filipino dish that showcases the rich culinary heritage of the Philippines, often served during special occasions like Noche Buena. This savory oxtail stew is renowned for its thick and creamy peanut sauce, complemented by an array of vegetables and sometimes, tripe or other meats.
The dish’s unique flavor profile is achieved through a blend of roasted peanuts, ground rice, and a variety of spices, all simmered to perfection to create a comforting meal that brings families together.
While the preparation of Kare-Kare may seem intimidating, it’s a rewarding process that fills your home with delicious aromas. The key to a great Kare-Kare lies in the quality of the ingredients and the balance of flavors. Traditionally served with bagoong (fermented shrimp paste) on the side, this dish is sure to impress your family and friends at any festive gathering.
Ingredients (Serves 4-6)
- 2 lbs oxtail, cut into pieces
- 1/2 cup peanut butter
- 1/4 cup ground rice (or toasted rice flour)
- 1 onion, chopped
- 4 cloves garlic, minced
- 1/2 teaspoon annatto powder (or achuete powder)
- 6 cups water (for boiling)
- 2 cups eggplant, sliced
- 1 cup long green beans (sitaw), cut into 2-inch pieces
- 1 cup banana heart (puso ng saging), sliced (optional)
- Salt and pepper, to taste
- Bagoong (fermented shrimp paste), for serving
Cooking Instructions
- Prepare the Oxtail: Begin by rinsing the oxtail pieces under cold water to remove any impurities. In a large pot, add the oxtail and cover it with 6 cups of water. Bring it to a boil and let it simmer for about 1.5 to 2 hours, or until the meat is tender and the broth is flavorful. Skim off any foam that rises to the surface.
- Sauté Aromatics: In a separate pan, heat a tablespoon of oil over medium heat. Add the chopped onion and minced garlic, sautéing until they become fragrant and translucent. This step builds the flavor base for your Kare-Kare.
- Incorporate Peanut Butter: Once the onions and garlic are cooked, stir in the peanut butter and annatto powder. Mix thoroughly until the peanut butter is well incorporated with the aromatics, which will help create a rich and creamy sauce.
- Combine with Broth: After the oxtail is tender, remove it from the pot and set it aside. Strain the broth to remove any solids, then gradually add the strained broth to the sautéed mixture, stirring continuously to prevent lumps. Bring the mixture to a gentle simmer.
- Thicken the Sauce: Add the ground rice to the peanut sauce and continue to simmer for about 10 minutes, stirring constantly until the sauce thickens to your desired consistency. If the sauce becomes too thick, you can add more broth or water to adjust.
- Add Vegetables and Oxtail: Once the sauce has thickened, return the oxtail to the pot along with the sliced eggplant, long green beans, and banana heart (if using). Let everything simmer together for another 5-10 minutes until the vegetables are tender and the flavors meld beautifully.
- Season and Serve: Taste the Kare-Kare and adjust the seasoning with salt and pepper as needed. Serve hot with a side of bagoong, allowing everyone to add it to their liking.
Extra Tips
For an even richer flavor, consider using roasted peanuts instead of peanut butter, which you can grind yourself for a more authentic taste.
Additionally, if you’re short on time, you can use a pressure cooker to reduce the cooking time for the oxtail. Just remember to adjust your liquid levels accordingly.
Finally, don’t hesitate to experiment with different vegetables like bok choy or sitaw to customize your Kare-Kare to your preference!
Morcon: Beef Roll Stuffed With Flavor
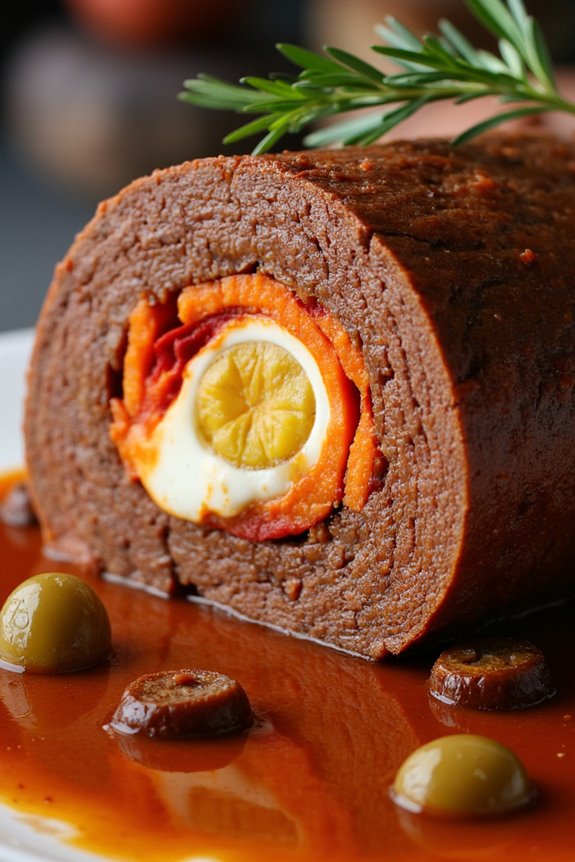
Morcon is a beloved Filipino dish that’s often served during festive occasions like Noche Buena. This savory beef roll isn’t only a feast for the palate but also a feast for the eyes with its beautiful presentation. Traditionally, morcon is made with beef flank or round slices that are rolled and filled with an array of delectable ingredients such as chorizo, carrots, and hard-boiled eggs. This dish encapsulates the spirit of Filipino gatherings, where sharing delicious meals is an integral part of the celebration.
Preparing morcon might seem intimidating at first, but with a little patience and love, you can create a spectacular dish that will impress your family and friends. The process involves marinating the beef to infuse it with flavor, stuffing it with a delightful mixture, and then braising it in a rich sauce. As the beef cooks, it becomes tender and succulent, making every bite a rewarding experience.
Let’s jump into the recipe for Morcon that serves 4-6 people.
Ingredients:
- 1 kg beef flank or round, sliced thinly
- 1/2 cup soy sauce
- 3 cloves garlic, minced
- 1/2 teaspoon ground black pepper
- 1 tablespoon olive oil
- 1 medium carrot, cut into strips
- 1/2 cup chorizo, sliced
- 3 hard-boiled eggs, quartered
- 1/4 cup green olives, sliced
- 1/4 cup raisins
- 1 cup beef broth
- 1 tablespoon tomato paste
- 1 bay leaf
- Salt to taste
- Toothpicks or kitchen twine for tying
Cooking Instructions:
- Marinate the Beef: In a bowl, combine the soy sauce, minced garlic, and pepper. Add the beef slices and make sure they’re well-coated. Cover and let it marinate in the refrigerator for at least 2 hours, preferably overnight, to enhance the flavor.
- Prepare the Filling: While the beef is marinating, prepare the filling ingredients. Cut the carrot into thin strips, slice the chorizo, and quarter the hard-boiled eggs. Set aside all the filling ingredients in a bowl.
- Assemble the Morcon: Lay a slice of marinated beef on a clean surface. Place a few strips of carrot, a slice of chorizo, a couple of quarters of hard-boiled egg, a few slices of green olives, and a sprinkle of raisins onto the beef. Roll the beef tightly from one end to the other and secure it with toothpicks or kitchen twine. Repeat this process for all beef slices.
- Brown the Rolls: In a large skillet, heat the olive oil over medium heat. Add the beef rolls, browning them on all sides. This step adds flavor and creates a nice crust.
- Simmer in Sauce: Once browned, remove the beef rolls and set them aside. In the same skillet, add the beef broth, tomato paste, and bay leaf. Stir to combine and then return the beef rolls to the skillet. Bring the mixture to a simmer, cover, and let it cook for about 1 to 1.5 hours, or until the beef is tender, turning the rolls occasionally.
- Serve: Once the morcon is cooked, remove it from the heat and let it rest for a few minutes. Remove the toothpicks or twine, slice into rounds, and serve with the sauce drizzled on top.
Extra Tips:
To elevate the flavor of your morcon, consider adding a splash of lemon or calamansi juice to the marinade for a hint of acidity. You can also experiment with different fillings such as bell peppers or even mushrooms for a unique twist.
Finally, make sure that you allow the morcon to rest before slicing, as this helps retain the juices and makes for a more flavorful dish. Enjoy your cooking adventure!
Menudo: Hearty Pork and Liver Stew
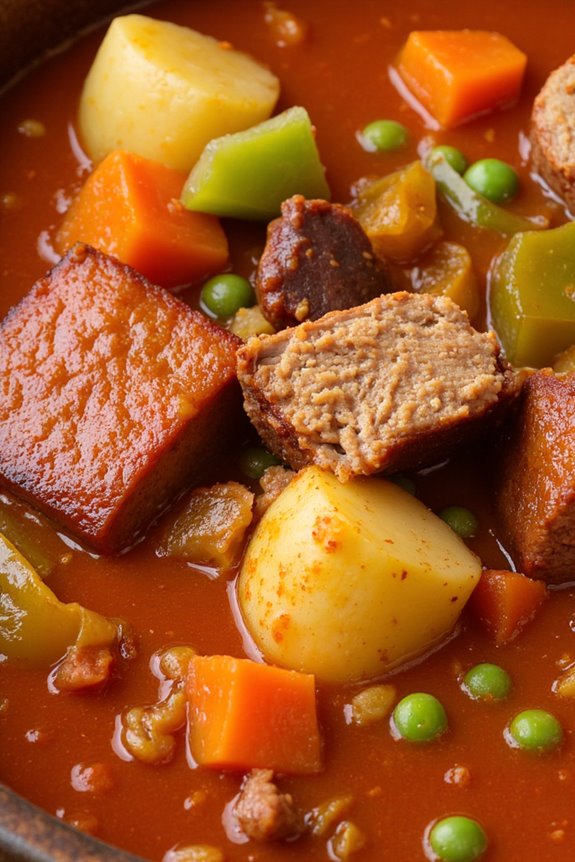
Menudo is a beloved Filipino dish often served during special occasions like Noche Buena, bringing warmth and comfort to family gatherings. This hearty stew combines tender pork, flavorful liver, and a medley of vegetables, creating a delicious and satisfying meal. The dish isn’t only rich in taste but also visually appealing with its vibrant colors, making it a feast for the eyes as well.
Traditionally, Menudo is slow-cooked to allow the flavors to meld beautifully, resulting in a savory sauce that pairs perfectly with rice. The combination of spices, tomato sauce, and the distinct flavor of liver elevates this dish, making it a staple in Filipino households. Whether you’re preparing for a festive celebration or simply craving a comforting meal, Menudo is bound to please everyone at the table.
Ingredients (Serves 4-6)
- 1 lb pork belly, cut into bite-sized cubes
- 1/2 lb pork liver, cut into small pieces
- 1 medium onion, chopped
- 4 cloves garlic, minced
- 2 medium tomatoes, chopped
- 1 medium carrot, diced
- 1 medium potato, diced
- 1/2 cup green peas
- 1/4 cup raisins
- 1/4 cup soy sauce
- 2 cups water
- 1 tsp salt
- 1/2 tsp black pepper
- 2 tbsp cooking oil
- 2 bay leaves
Cooking Instructions
- Prepare the Ingredients: Start by washing and cutting all the ingredients as mentioned. This includes chopping the onions, garlic, and tomatoes, as well as dicing the carrots and potatoes. Having everything ready will make the cooking process smoother.
- Sauté the Aromatics: In a large pot, heat the cooking oil over medium heat. Add the chopped onions and minced garlic, sautéing until the onions are translucent and the garlic is fragrant. This step builds the foundation of flavor for the stew.
- Brown the Pork: Add the cubed pork belly to the pot and cook until the meat is browned on all sides. This should take about 5-7 minutes. Browning the meat enhances its flavor and adds depth to the stew.
- Incorporate the Tomatoes: Mix in the chopped tomatoes and continue to cook until they’re soft and have released their juices. This step will help create a rich base for the sauce.
- Add the Seasonings: Pour in the soy sauce, and add salt, black pepper, and bay leaves. Stir to combine, allowing the pork to absorb the flavors. This is essential for building the savory profile of the dish.
- Simmer with Water: Add 2 cups of water to the pot and bring the mixture to a boil. Once boiling, reduce the heat to low, cover, and let it simmer for about 30 minutes. This slow cooking allows the flavors to meld together and the pork to become tender.
- Add the Liver and Vegetables: After 30 minutes, add the pork liver, diced carrots, diced potatoes, green peas, and raisins to the pot. Stir gently and let it cook for another 15-20 minutes, or until the vegetables are tender. The liver will enrich the stew with its unique flavor.
- Adjust the Seasoning: Taste the stew and adjust the seasoning if necessary. You can add more salt or pepper according to your preference. This final touch guarantees the dish is seasoned to your liking.
- Serve: Once everything is cooked and well-combined, remove the bay leaves and serve the Menudo hot with steamed rice. The comforting aroma and hearty texture are sure to evoke nostalgia and delight your family and friends.
Extra Tips
When cooking Menudo, feel free to customize the vegetables to your liking; bell peppers and celery can also be great additions. If you prefer a thicker sauce, you can let the stew simmer uncovered for a few minutes to reduce the liquid.
Additionally, allowing the dish to rest for a few hours or overnight in the refrigerator can enhance the flavors even more, making it taste better the next day. Enjoy your Menudo with a side of warm rice and a sprinkle of fresh parsley for added color!
Dinuguan: Savory Pork Blood Stew
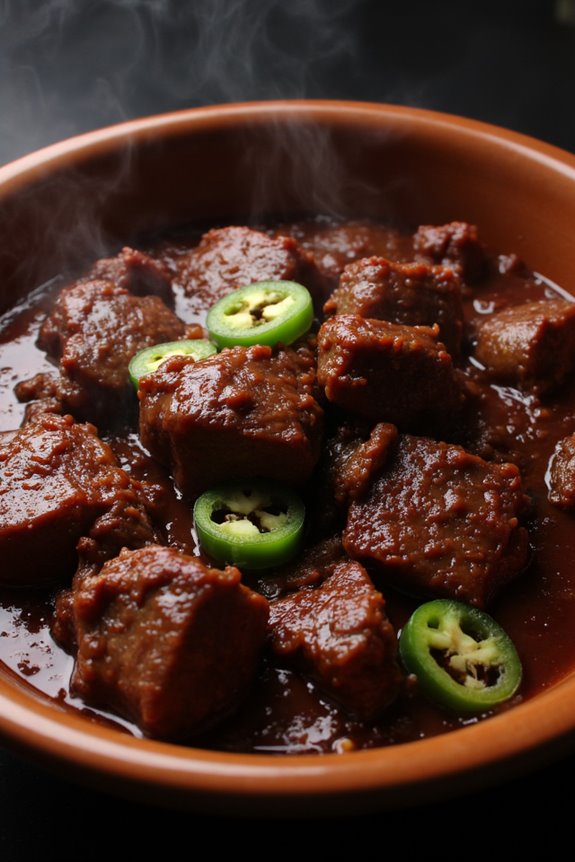
Dinuguan is a beloved Filipino dish that brings warmth and comfort to any Noche Buena gathering. This savory pork blood stew is characterized by its rich, deep flavor derived from pork, vinegar, and the signature ingredient: pig’s blood. Often served with steamed rice or puto (rice cakes), Dinuguan is a dish that evokes fond memories of family gatherings and festive celebrations. Its unique taste and texture make it a standout dish during the holiday season, as it embodies the essence of Filipino culinary traditions.
This dish may seem challenging at first, but with the right ingredients and techniques, anyone can create an authentic Dinuguan that captures the heart of Filipino cuisine. The combination of spices, herbs, and the tanginess of vinegar creates a harmonious blend that complements the richness of the pork.
Whether you’re a seasoned cook or a newcomer to Filipino cooking, this recipe will guide you through the steps to serve a delightful and satisfying Dinuguan that your family and friends will love.
Ingredients (Serves 4-6):
- 1 pound pork belly, cut into bite-sized pieces
- 1 cup pig’s blood
- 1 medium onion, chopped
- 4 cloves garlic, minced
- 2-3 green chili peppers (siling mahaba), sliced
- 1 cup vinegar (preferably cane vinegar)
- 2 cups water
- 2 tablespoons fish sauce (patis)
- 2 tablespoons cooking oil
- 1 teaspoon salt
- 1 teaspoon pepper
- Optional: 1 tablespoon sugar (to balance acidity)
Cooking Instructions:
1. Prepare the Pork: In a large pot, heat the cooking oil over medium heat. Add the chopped onion and minced garlic, sautéing until fragrant and the onions are translucent.
Then, add the pork belly pieces and cook until they’re browned on all sides. This step helps to render some fat from the pork, enriching the stew’s flavor.
2. Add Vinegar and Seasonings: Pour in the vinegar and allow it to boil without stirring for about 3-5 minutes. This process guarantees that the vinegar’s strong flavor mellows out.
Afterward, add the fish sauce, salt, and pepper. Stir to combine the seasonings evenly.
3. Incorporate Water and Simmer****: Pour in the water and bring the mixture to a boil. Once boiling, lower the heat to a simmer.
Cover the pot and let it cook for about 30-40 minutes, or until the pork is tender. This slow cooking process allows the flavors to meld together beautifully.
4. Add Pig’s Blood: After the pork is tender, slowly add the pig’s blood to the pot while stirring continuously to prevent it from clumping.
This step is essential for achieving the stew’s signature texture. Allow the Dinuguan to simmer for an additional 10-15 minutes. If desired, add sugar to balance the acidity.
5. Finish with Chili Peppers: Finally, stir in the sliced green chili peppers and let the dish simmer for another 5 minutes.
The chili peppers will infuse a mild heat into the stew, enhancing the overall flavor.
6. Serve: Once done, taste and adjust seasoning if necessary. Serve hot with steamed rice or puto, and enjoy the rich and savory flavors of your homemade Dinuguan.
Extra Tips:
When preparing Dinuguan, confirm that the pig’s blood is fresh for the best flavor and texture. If you’re unsure about using pig’s blood, some markets offer pre-packaged blood that’s safe for cooking.
Additionally, feel free to experiment with the level of heat by adjusting the amount of chili peppers to suit your taste. For a thicker stew, let it simmer longer to reduce the liquid.
Dinuguan can also be made ahead of time, as it tastes even better the next day when the flavors have had more time to develop. Enjoy your cooking!
Sinigang: Tangy Pork Soup for Warmth
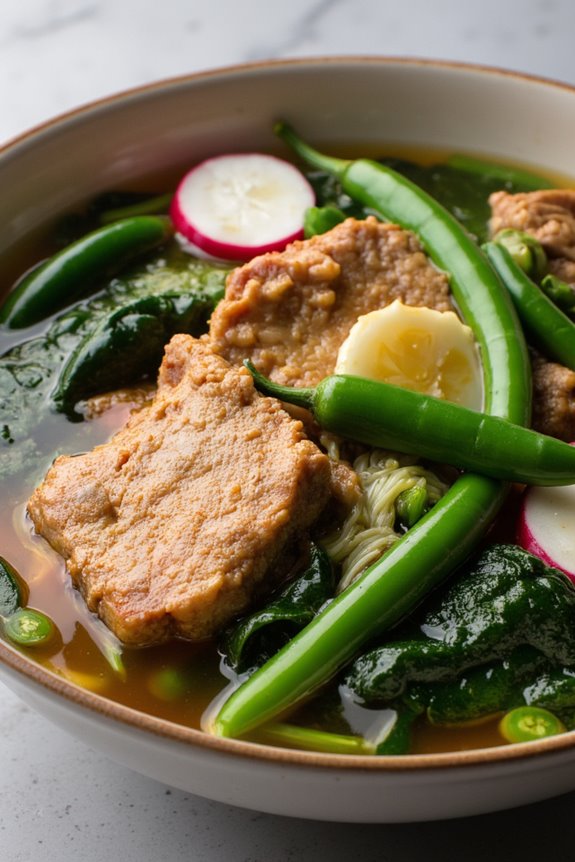
Sinigang is a beloved Filipino sour soup that evokes warmth and comfort, particularly during the festive season of Noche Buena. This dish is traditionally made with pork, but it can also feature beef, shrimp, or fish, depending on personal preference.
The tanginess of sinigang comes from tamarind, along with various vegetables, creating a delightful contrast to the richness of the meat. It’s not just a meal; it’s a culinary experience that brings families together, often served with steamed rice and enjoyed in the cozy ambiance of shared stories and laughter.
This dish is perfect for the holidays, offering a unique flavor profile that warms the heart and soul. As you prepare sinigang, you’ll find that the combination of savory, sour, and umami flavors creates a symphony of taste that’s both invigorating and hearty.
Whether you’re cooking for a large gathering or enjoying a quiet family dinner, sinigang is sure to be a hit on your Noche Buena table.
Ingredients (Serves 4-6):
- 2 lbs pork belly or ribs, cut into chunks
- 8 cups water
- 1 medium onion, quartered
- 2 medium tomatoes, quartered
- 1 radish (labanos), sliced
- 2 cups water spinach (kangkong) or other leafy greens
- 1 cup long green beans (sitaw), cut into 2-inch pieces
- 2-3 green chili peppers (siling pangsigang)
- 1 cup tamarind paste or 1 cup fresh tamarind pods (if using fresh, you’ll need to soak and mash them)
- Fish sauce (patis), to taste
- Salt and pepper, to taste
Cooking Instructions:
- Prepare the Broth: In a large pot, combine the pork and water. Bring it to a boil over high heat, then reduce the heat to medium. Skim off any scum that rises to the surface for a clearer broth.
- Add Aromatics: Once the broth is boiling and the scum has been removed, add the quartered onion and tomatoes. Let it simmer for about 30 minutes, allowing the flavors to meld and the pork to become tender.
- Incorporate the Tamarind: If you’re using fresh tamarind, prepare it by boiling the pods in water for about 10 minutes until soft, then mash and strain the liquid to extract the sour flavor. If using tamarind paste, simply add it to the pot. Stir well to distribute the sourness evenly throughout the broth.
- Add Vegetables: Once the pork is tender, add the sliced radish, long green beans, and green chili peppers. Let it simmer for another 5-7 minutes until the vegetables are cooked but still crisp.
- Finish with Greens: Finally, add the water spinach or any other leafy greens you prefer. Cook for an additional 2-3 minutes until the greens are wilted. Season with fish sauce, salt, and pepper to taste.
- Serve: Ladle the hot sinigang into bowls and serve with steamed rice on the side. Enjoy the comforting flavors of this nostalgic dish!
Extra Tips:
For a deeper flavor, consider marinating the pork in fish sauce and garlic for an hour before cooking. This enhances the umami notes in your sinigang.
Additionally, if you prefer a spicier kick, you can add more green chili peppers or even a dash of chili flakes. Remember, sinigang is all about personal taste, so feel free to adjust the sourness and seasoning to suit your preference. Enjoy the process of making this dish as much as the joy it brings to your table!
Biko: Sweet Sticky Rice Dessert
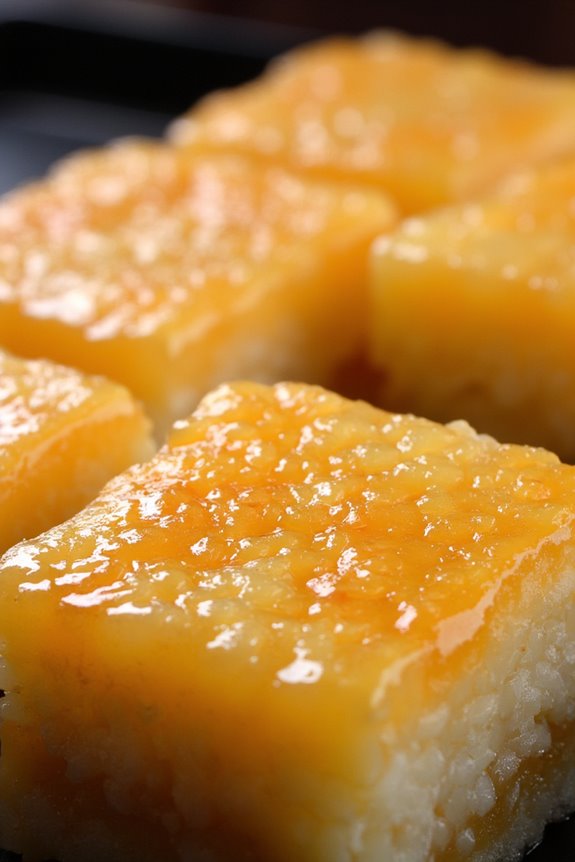
Biko is a beloved Filipino dessert that perfectly embodies the spirit of Noche Buena, the traditional Christmas Eve feast celebrated by families across the Philippines. This sweet sticky rice dish is made with glutinous rice, coconut milk, and brown sugar, creating a rich and indulgent treat that’s often served on special occasions.
The dish is typically topped with a layer of caramelized coconut cream, called latik, which adds a delightful crunch and depth of flavor, making it a favorite among children and adults alike.
Preparing Biko is a labor of love, but the end result is a dessert that will transport you back to cherished memories of holiday gatherings. The beautiful combination of textures and flavors makes Biko not just a dessert but also a centerpiece that invites sharing and celebration.
Whether you’re making it for a family gathering or simply to satisfy your sweet tooth, Biko is certain to bring joy to any table.
Ingredients (serving size: 4-6 people):
- 2 cups glutinous rice (also known as sweet rice)
- 1 can (400 ml) coconut milk
- 1 cup brown sugar
- 1/2 teaspoon salt
- 1/4 cup water
- 1/2 cup latik (coconut cream) for topping (optional)
Cooking Instructions:
- Rinse the Rice: Begin by rinsing the glutinous rice under cold water in a fine mesh strainer until the water runs clear. This helps to remove excess starch and guarantees that the rice cooks evenly and achieves the desired sticky texture.
- Cook the Rice: In a pot, combine the rinsed glutinous rice with 2 cups of water. Bring to a boil over medium heat, then reduce the heat to low, cover, and simmer for about 15-20 minutes or until the rice is fully cooked and has absorbed most of the water. Once cooked, set it aside.
- Prepare the Coconut Mixture: In a separate saucepan, combine the coconut milk, brown sugar, and salt. Stir over medium heat until the sugar dissolves completely. Bring the mixture to a gentle simmer, stirring occasionally to prevent it from scorching. Let it cook for about 5-7 minutes until it thickens slightly.
- Combine Rice and Coconut Mixture: Add the cooked glutinous rice to the coconut mixture in the saucepan. Stir well until the rice is completely coated and the mixture is well combined. Cook for an additional 5 minutes over low heat, stirring frequently until the rice absorbs some of the coconut mixture and thickens further.
- Transfer to a Dish: Grease a square or rectangular baking dish with a little oil or cooking spray. Pour the Biko mixture into the dish and spread it evenly using a spatula. Press it down gently to create a compact layer.
- Prepare Latik (Optional): In a small saucepan, pour the remaining coconut cream and heat it over low heat. Stir continuously until the cream thickens and turns golden brown, forming small curds. This is your latik, which can be drizzled on top of the Biko before serving.
- Cool and Serve: Allow the Biko to cool at room temperature for about 30 minutes before slicing it into squares or rectangles. If desired, top with latik before serving.
Extra Tips: When making Biko, feel free to adjust the sweetness by adding more or less brown sugar according to your preference. For a richer flavor, you can also use pandan leaves while cooking the coconut milk.
Additionally, serving Biko with a side of fresh mangoes or a scoop of ice cream can elevate the dessert experience. Enjoy this nostalgic dish with your loved ones and relish the sweet taste of tradition!
Leche Flan: Creamy Caramel Custard

Leche Flan, also known as caramel custard, is a classic Filipino dessert that has become a staple in every Noche Buena feast. This silky smooth and rich custard, topped with a luscious layer of caramel, brings a sense of nostalgia and comfort to the holiday table. Traditionally made with eggs and condensed milk, Leche Flan is a reflection of the Filipino penchant for delightful desserts that are both simple and indulgent.
Making Leche Flan is a labor of love, but the end result is well worth the effort. The combination of sweet, creamy custard with the bittersweet caramel creates a heavenly dessert that will have your family and friends asking for seconds. Whether served chilled or at room temperature, this delightful treat is sure to evoke fond memories of festive celebrations and family gatherings.
Ingredients (Serves 4-6):
- 6 large eggs
- 1 can (14 oz) sweetened condensed milk
- 1 can (12 oz) evaporated milk
- 1 cup granulated sugar
- 1/4 cup water
- 1 teaspoon vanilla extract
- Pinch of salt
Cooking Instructions:
- Prepare the Caramel: In a saucepan over medium heat, combine the granulated sugar and water. Stir gently until the sugar has completely dissolved. Stop stirring and allow the mixture to boil until it turns a deep amber color, about 8-10 minutes. Be careful not to burn the caramel. Once ready, quickly pour the caramel into a round flan mold or individual ramekins, tilting to coat the bottom evenly. Set aside to cool and harden.
- Make the Custard Mixture: In a large mixing bowl, whisk together the eggs, sweetened condensed milk, evaporated milk, vanilla extract, and a pinch of salt. Whisk until everything is well combined and smooth. Avoid creating too many bubbles, as they can affect the texture of the flan.
- Strain the Mixture: To guarantee an ultra-smooth texture, strain the custard mixture through a fine-mesh sieve into another bowl. This will remove any chalazae or bits of cooked egg that may have formed during whisking.
- Pour into the Mold: Carefully pour the strained custard mixture over the hardened caramel in your mold or ramekins. Fill them up to about three-quarters full, leaving some space for the flan to expand.
- Steam the Flan: Prepare a steamer or a large pot with a steaming rack. Fill the pot with water, making sure the water level is below the mold. Bring the water to a simmer over medium heat. Place the flan mold in the steamer or on the rack, cover with a lid, and steam for about 30-40 minutes, or until the flan is set and a toothpick inserted in the center comes out clean.
- Cool and Refrigerate: Once cooked, carefully remove the flan from the steamer and let it cool at room temperature for about 15 minutes. Then, refrigerate for at least 4 hours or overnight to allow it to chill and firm up.
- Serve: To serve, run a knife around the edge of the flan to loosen it from the mold. Invert the flan onto a serving plate, allowing the caramel to drizzle over the top. Slice and enjoy!
Extra Tips: When making Leche Flan, it’s important to avoid overcooking the caramel, as it can quickly burn and become bitter. If you’re unsure about your steaming setup, you can also bake the flan in a water bath in the oven at 350°F (175°C) for about 50-60 minutes. Always let it chill thoroughly before serving for the best texture, and feel free to experiment by adding flavors like citrus zest or coconut for a unique twist!
Tsokolate: Thick Filipino Hot Chocolate

Tsokolate, a beloved Filipino drink, is a sumptuous treat that evokes the warmth of family gatherings during the festive season. Made from rich cacao and often enjoyed during Noche Buena, this thick hot chocolate is a delightful way to indulge your taste buds. The traditional preparation involves using tablea, which are discs of pure cacao, allowing you to experience the deep, rich flavor that only authentic Filipino chocolate can offer.
Whether served alone or paired with freshly baked pan de sal, Tsokolate is a comforting beverage that brings nostalgia to many.
To prepare Tsokolate, you’ll need to gather a few simple ingredients that are commonly found in Filipino households. The process is straightforward, but the secret lies in the way the drink is stirred and blended, creating a smooth and velvety texture that’s truly irresistible. This recipe serves 4-6 people, making it perfect for sharing with friends and family during the holidays.
Ingredients:
- 200g tablea (Filipino cacao discs)
- 4 cups water
- 1 cup milk (whole or evaporated for added creaminess)
- 1/4 cup sugar (adjust to taste)
- A pinch of salt
- Optional: cinnamon stick or vanilla extract for added flavor
Instructions:
- Prepare the Cacao: Start by breaking the tablea into smaller pieces. This will help them melt more easily when combined with water. If you prefer a smoother drink, you can also grind the tablea into a fine powder using a mortar and pestle or a food processor.
- Boil the Water: In a medium saucepan, bring 4 cups of water to a boil over medium heat. This will serve as the base for your hot chocolate and will dissolve the cacao.
- Add the Cacao: Once the water is boiling, add the broken pieces of tablea to the pot. Stir continuously until the cacao has completely melted and is fully incorporated into the water. This should take about 5-7 minutes. The mixture should begin to thicken slightly.
- Incorporate Milk and Sugar: Lower the heat and gradually pour in the milk, stirring well to combine. Add the sugar and a pinch of salt to enhance the flavor of the chocolate. Stir until the sugar is dissolved, and let the mixture simmer for another 5 minutes, allowing the flavors to meld together.
- Add Optional Flavorings: If you wish to elevate the flavor of your Tsokolate, add a cinnamon stick or a splash of vanilla extract. Allow it to simmer for an additional 2-3 minutes, then remove from heat.
- Serve: Carefully pour the Tsokolate into mugs, ensuring each serving has a creamy texture. If you used a cinnamon stick, remove it before serving. Enjoy your thick Filipino hot chocolate warm, ideally with some pan de sal or other festive treats.
Extra Tips: For an even richer flavor, consider using a combination of milk and coconut milk. This will add a unique twist and an extra layer of creaminess to your Tsokolate.
Additionally, if you like your hot chocolate sweeter, feel free to adjust the amount of sugar to suit your personal taste. Remember that the key to a great Tsokolate lies in the stirring; whisk it vigorously to achieve that perfect frothy consistency!
Pan De Sal: Soft Filipino Bread Rolls
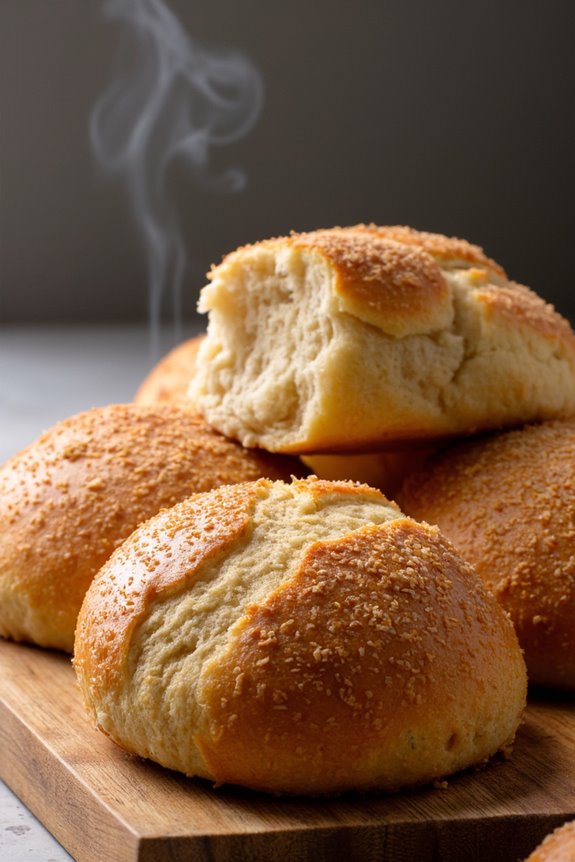
Pan de Sal, which translates to “bread of salt,” is a staple in many Filipino households, especially during the festive season. These soft, slightly sweet rolls are often enjoyed at breakfast or as a snack, paired with butter, cheese, or even jam.
The dough is enriched with eggs and milk, resulting in a delightful texture that’s crispy on the outside and soft on the inside. Baking these rolls won’t only fill your home with the comforting aroma of freshly baked bread but will also evoke fond memories of family gatherings and celebrations.
The process of making Pan de Sal is relatively simple, yet it requires some patience as the dough needs to rise properly for the best results. Kneading the dough well is vital for achieving that soft, fluffy texture that makes Pan de Sal so beloved.
Whether you’re preparing for a Noche Buena feast or simply craving a taste of home, this recipe will guide you in creating the perfect batch of Pan de Sal that your family will surely enjoy.
Ingredients (Serves 4-6)
- 4 cups all-purpose flour
- 1 cup warm milk (about 110°F or 43°C)
- 1/2 cup granulated sugar
- 1/4 cup unsalted butter, softened
- 2 large eggs
- 2 teaspoons active dry yeast
- 1 teaspoon salt
- 1/2 cup breadcrumbs (for rolling)
Cooking Instructions
- Activate the Yeast: In a small bowl, combine the warm milk and active dry yeast. Allow the mixture to sit for about 5-10 minutes or until it becomes frothy. This indicates that the yeast is active and ready to help the dough rise.
- Mix the Dry Ingredients: In a large mixing bowl, combine the flour, sugar, and salt. Stir well to confirm that the ingredients are evenly distributed. This step is essential as it helps to incorporate the flavors throughout the dough.
- Combine Wet Ingredients: In another bowl, whisk together the eggs and softened butter until well blended. Once the yeast mixture is ready, add it to the egg and butter mixture and mix thoroughly.
- Form the Dough: Gradually pour the wet ingredients into the bowl of dry ingredients. Mix using a wooden spoon or your hands until a shaggy dough forms. At this stage, the dough may be slightly sticky.
- Knead the Dough: Transfer the dough onto a lightly floured surface and knead it for about 10 minutes, until it becomes smooth and elastic. If the dough is too sticky, you can sprinkle a little more flour as needed. This step develops the gluten in the flour, which gives the bread its structure.
- First Rise: Place the kneaded dough in a greased bowl, cover it with a clean kitchen towel or plastic wrap, and let it rise in a warm place for about 1-2 hours or until it has doubled in size.
- Shape the Rolls: Once the dough has risen, punch it down to release the air. Divide the dough into equal portions (about 12-15 pieces) and shape each portion into a ball. Roll each ball in breadcrumbs for a crispy exterior.
- Second Rise: Arrange the shaped rolls on a greased baking tray, leaving some space between each roll. Cover them again and let them rise for another 30-45 minutes, or until they puff up.
- Preheat the Oven: While the rolls are rising, preheat your oven to 375°F (190°C). This guarantees that the rolls will bake evenly and develop a beautiful golden color.
- Bake the Rolls: Once the rolls have risen, place the baking tray in the preheated oven and bake for about 15-20 minutes, or until they’re golden brown on top.
- Cool and Serve: Remove the rolls from the oven and allow them to cool slightly on a wire rack before serving. Enjoy them warm with butter or your favorite spreads!
Extra Tips
For the best results, make sure your ingredients are at room temperature before starting, especially the butter and eggs.
If you want to add a twist to your Pan de Sal, consider incorporating cheese or a hint of vanilla extract into the dough for added flavor.
Finally, to guarantee a soft texture, avoid over-baking the rolls; they should be golden brown and still have a slightly soft feel when you touch them.
Enjoy your freshly baked Pan de Sal with family and friends, and create lasting memories around the dining table!