

As someone who cherishes the comforting embrace of Filipino cuisine, I’ve discovered that lighter versions of our beloved dishes can be equally satisfying. From a savory Sinigang Na Baboy Sa Miso to a refreshing Pinoy Salad with Mango and Prawns, there’s an exciting array to explore. These recipes honor tradition while embracing a healthier lifestyle. Let’s uncover how these nourishing dishes can bring warmth and flavor to your table. Keeping things light has never been so delicious.
Sinigang Na Baboy Sa Miso (Pork Sinigang With Miso)
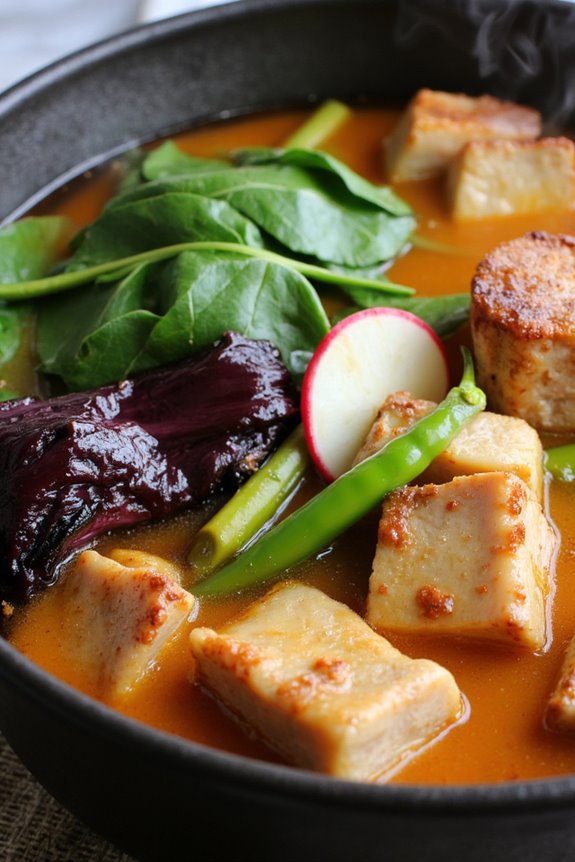
Sinigang Na Baboy Sa Miso is a traditional Filipino dish that offers a delightful balance of sourness and umami. The sour broth, typically made with tamarind, is enhanced by the savory notes of miso paste, creating a rich and flavorful soup that warms the heart and satisfies the palate.
This dish isn’t only comforting but also packed with nutrients, making it a healthy choice for family meals. The combination of tender pork, fresh vegetables, and the unique flavor of miso makes this sinigang variant a must-try.
Often enjoyed with steamed rice, this dish is perfect for rainy days or when you’re craving something hearty and wholesome. Let’s immerse ourselves in the recipe that serves 4-6 people.
Ingredients:
- 1 kg pork belly, cut into cubes
- 1 cup miso paste (white or yellow)
- 8 cups water
- 2 medium tomatoes, quartered
- 1 medium onion, quartered
- 2-3 green chili peppers (siling pangsigang)
- 1 cup radish (labanos), sliced
- 1 cup eggplant, sliced
- 1 cup water spinach (kangkong) or other leafy greens
- 2 tablespoons fish sauce (patis)
- Salt and pepper to taste
- Optional: 1-2 tablespoons of tamarind paste (if additional sourness is desired)
Cooking Instructions:
- Prepare the Pork: In a large pot, combine the pork belly and water. Bring to a boil over medium-high heat. Allow it to simmer for about 5-10 minutes, skimming off any scum that rises to the surface to maintain a clear broth.
- Add Aromatics: Once the scum is removed, add the quartered tomatoes and onions to the pot. These ingredients will enhance the flavor of the broth. Let it simmer for another 15-20 minutes until the pork is tender.
- Incorporate Miso: In a separate bowl, mix the miso paste with a ladle of the hot broth until smooth. This step helps dissolve the miso more evenly when added to the pot. After mixing, pour the miso mixture back into the pot and stir well.
- Season the Broth: Add the fish sauce and taste the broth. Adjust the seasoning with salt and pepper as needed. If you prefer a more pronounced sour flavor, incorporate tamarind paste at this stage.
- Add Vegetables: Begin adding the sliced radish, eggplant, and green chili peppers. These vegetables add texture and flavor to the dish. Let the mixture simmer for another 5-7 minutes until the vegetables are cooked but still crisp.
- Finish with Leafy Greens: Finally, add the water spinach (or other leafy greens) to the pot and cook for an additional 1-2 minutes until wilted. This adds a fresh element to the sinigang.
- Serve: Once everything is cooked, remove the pot from the heat. Ladle the sinigang into bowls and serve hot with steamed rice on the side.
Extra Tips:
For a deeper flavor, consider marinating the pork in the fish sauce and miso for about 30 minutes before cooking.
Additionally, feel free to customize the vegetables based on seasonal availability or personal preference. Other common additions include long green beans or taro root.
Always taste the broth before serving to confirm the balance of flavors is to your liking, and remember that the soup becomes thicker as it cools down, so serve it hot!
Adobo Sa Gata (Adobo in Coconut Milk)
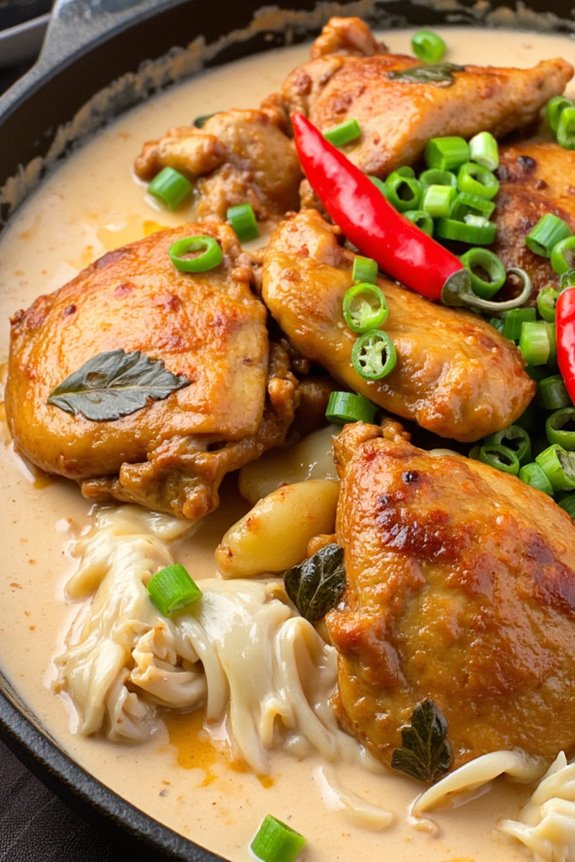
Adobo Sa Gata is a delicious and rich Filipino dish that brings together the classic flavors of the traditional adobo with the creamy, luscious texture of coconut milk. This variation offers a unique twist to the well-loved adobo, making it a perfect choice for family gatherings or a comforting weeknight meal.
The combination of soy sauce, vinegar, garlic, and spices simmered with coconut milk creates a savory and slightly sweet dish that’s sure to please everyone’s palate.
Cooking Adobo Sa Gata isn’t only easy, but it also allows you to enjoy the health benefits of coconut milk, which is rich in healthy fats and can enhance the dish’s flavor profile. Served over a bed of warm rice, this dish becomes a fulfilling meal that showcases the vibrant culinary culture of the Philippines.
Whether you’re a long-time fan of Filipino cuisine or trying it for the first time, Adobo Sa Gata will surely leave a lasting impression.
Ingredients (Serves 4-6):
- 2 lbs chicken thighs, bone-in and skin-on
- 1 cup coconut milk
- 1/2 cup soy sauce
- 1/2 cup vinegar (cane vinegar recommended)
- 1 medium onion, sliced
- 5 cloves garlic, minced
- 2-3 bay leaves
- 1 teaspoon black peppercorns
- 1 tablespoon cooking oil
- Salt to taste
- 1-2 red chili peppers (optional for heat)
- Chopped green onions for garnish (optional)
Cooking Instructions:
- Marinate the Chicken: In a bowl, combine the chicken thighs with soy sauce, vinegar, minced garlic, and black peppercorns. Let it marinate for at least 30 minutes to allow the flavors to penetrate the meat. This step is vital as it infuses the chicken with the essential adobo flavors.
- Sauté the Aromatics: In a large skillet or pot, heat the cooking oil over medium heat. Add the sliced onions and sauté until they become translucent, about 3-4 minutes. The onions add sweetness and depth to the dish.
- Brown the Chicken: Remove the chicken from the marinade (reserve the marinade) and place it in the skillet. Brown the chicken on all sides for about 5-7 minutes. This step enhances the flavor and texture of the chicken.
- Add Marinade and Simmer: Pour the reserved marinade into the skillet along with the bay leaves and bring to a boil. Once boiling, reduce the heat to low and let it simmer for about 20 minutes. This allows the chicken to absorb the tangy flavors of the marinade.
- Incorporate Coconut Milk: After the chicken has simmered, slowly add the coconut milk to the pot. Stir well to combine and let it simmer for an additional 10-15 minutes, until the sauce thickens slightly. The coconut milk adds creaminess and richness to the dish.
- Adjust Seasoning: Taste the sauce and adjust the seasoning with salt as needed. If you prefer a spicier dish, add the red chili peppers at this stage. Simmer for a few more minutes to let the flavors meld.
- Serve: Once done, remove from heat and let it rest for a couple of minutes. Serve hot over steamed rice and garnish with chopped green onions if desired.
Extra Tips:
For an added layer of flavor, consider using fresh coconut milk instead of canned, as it can enhance the dish’s authenticity.
Additionally, you can experiment with different proteins such as pork or tofu for a vegetarian version. Always taste the sauce before serving and adjust the seasoning based on your preference.
Allowing the adobo to rest for a bit before serving can also deepen the flavors even further. Enjoy your delicious Adobo Sa Gata!
Grilled Chicken Inasal

Grilled Chicken Inasal is a beloved Filipino dish that hails from the vibrant region of Bacolod. Known for its unique flavor profile and aromatic marinade, this dish showcases the best of Filipino culinary traditions. It isn’t just a meal but a festive experience that brings family and friends together.
The marinade, made with a blend of vinegar, calamansi juice, and spices, infuses the chicken with a zesty tang that’s perfectly complemented by the smoky char from the grill. Whether enjoyed at a backyard barbecue or a family gathering, Chicken Inasal is sure to delight everyone at the table.
To achieve the authentic taste of Chicken Inasal, it’s vital to let the chicken marinate for several hours, allowing the flavors to deeply penetrate the meat. The grilling technique is also key, as it brings out the juiciness of the chicken while creating a beautifully caramelized exterior. Serve this dish with garlic rice and a side of pickled vegetables for a complete Filipino feast that will have everyone asking for seconds.
Ingredients (Serves 4-6):
- 2 lbs bone-in chicken thighs and drumsticks
- 1/2 cup soy sauce
- 1/2 cup cane vinegar or white vinegar
- 1/4 cup calamansi juice (or lemon juice)
- 1 tablespoon minced garlic
- 1 tablespoon minced ginger
- 1 tablespoon brown sugar
- 1 teaspoon ground black pepper
- 1 teaspoon paprika
- 1 teaspoon salt
- 1/4 cup vegetable oil (for basting)
- 2-3 stalks of green onions (for garnish)
Cooking Instructions:
- Prepare the Marinade: In a large bowl, combine the soy sauce, vinegar, calamansi juice, minced garlic, minced ginger, brown sugar, ground black pepper, paprika, and salt. Whisk together until the sugar is dissolved and all ingredients are well mixed.
- Marinate the Chicken: Add the chicken pieces to the marinade, ensuring they’re well coated. Cover the bowl with plastic wrap and refrigerate for at least 2 hours, preferably overnight for maximum flavor.
- Preheat the Grill: About 30 minutes before you’re ready to cook, preheat your grill to medium-high heat. If using charcoal, ensure the coals are glowing and have a thin layer of ash.
- Prepare for Grilling: Remove the chicken from the marinade and allow any excess marinade to drip off. Discard the remaining marinade. Brush the chicken lightly with vegetable oil to prevent sticking.
- Grill the Chicken: Place the chicken pieces skin-side down on the grill. Cook for about 5-7 minutes or until the skin is nicely charred. Flip the chicken and baste with oil. Continue grilling for another 10-15 minutes, turning occasionally, until the internal temperature reaches 165°F (75°C) and the juices run clear.
- Rest and Serve: Once cooked, remove the chicken from the grill and let it rest for about 5 minutes. This helps to lock in the juices. Arrange the chicken on a serving platter, garnish with chopped green onions, and serve with garlic rice and pickled vegetables.
Extra Tips:
For an even more authentic flavor, consider using lemongrass and bay leaves in your marinade. Additionally, if you have access to a charcoal grill, it can enhance the smoky flavor of the chicken.
Remember to keep an eye on the chicken as it grills to prevent flare-ups, and feel free to adjust the marinade’s acidity by adding more vinegar or calamansi juice to suit your taste preferences. Enjoy your Grilled Chicken Inasal with a side of spicy vinegar for an extra kick!
Vegetable Laing (Taro Leaves in Coconut Milk)
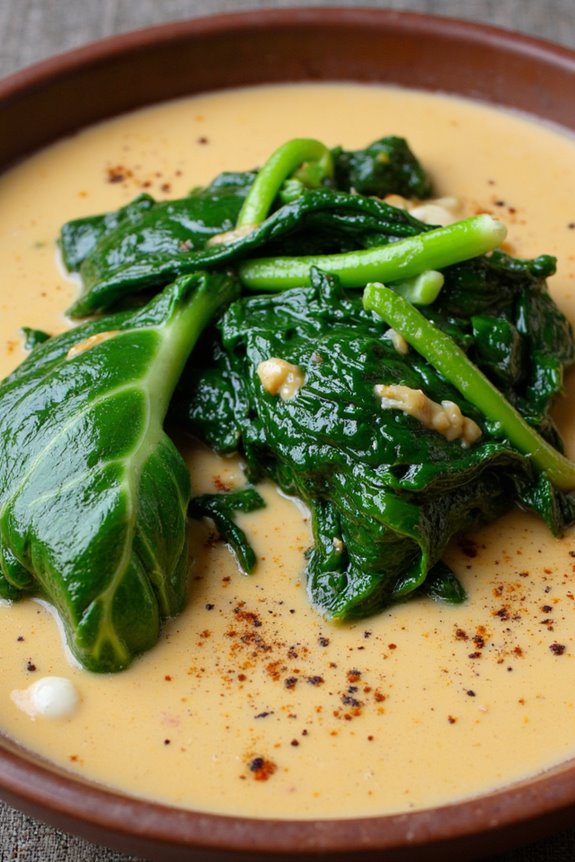
Vegetable Laing is a traditional Filipino dish that showcases the unique flavors of taro leaves cooked in creamy coconut milk. This dish isn’t only rich in flavor but also packed with nutrients, making it a healthy choice for anyone looking to enjoy a wholesome meal.
The combination of taro leaves, coconut milk, and spices creates a comforting dish that’s perfect for sharing with family and friends. Whether enjoyed as a main dish or a side, Laing is a great way to appreciate the natural sweetness of taro leaves while indulging in the richness of Filipino cuisine.
Making Vegetable Laing is a relatively simple process, requiring minimal ingredients but delivering maximum flavor. The key to a great Laing lies in properly preparing the taro leaves and balancing the spices, allowing the coconut milk to enhance the natural taste of the greens.
This dish is typically served with steamed rice, making it a satisfying meal that everyone will enjoy.
Ingredients (Serves 4-6):
- 1 lb taro leaves (fresh or dried)
- 1 can (400 ml) coconut milk
- 1 medium onion, chopped
- 4 cloves garlic, minced
- 2-3 Thai chili peppers, chopped (adjust to taste)
- 2 tablespoons shrimp paste (bagoong) or a vegetarian alternative
- 2 tablespoons cooking oil
- 1 teaspoon ground black pepper
- Salt to taste
- 1 cup water (if using dried taro leaves)
Cooking Instructions:
- Prepare the Taro Leaves: If using fresh taro leaves, rinse them well under running water and remove the tough stems. Tear the leaves into smaller pieces. If using dried taro leaves, soak them in water for about 30 minutes to soften, then drain.
- Sauté the Aromatics: In a large pan, heat the cooking oil over medium heat. Add the chopped onion and sauté until translucent. Then, add the minced garlic and chopped Thai chili peppers. Continue to sauté for about 2-3 minutes until fragrant.
- Incorporate the Shrimp Paste: Stir in the shrimp paste (or vegetarian alternative) and cook for another 2 minutes, allowing the flavors to meld together. This adds a savory umami flavor to the dish.
- Add Coconut Milk and Taro Leaves: Pour in the coconut milk and stir well. If you used dried taro leaves, add 1 cup of water to the mixture. Bring it to a gentle simmer. Then, add the prepared taro leaves, ensuring they’re well immersed in the coconut milk.
- Season and Cook: Season with ground black pepper and salt to taste. Allow the mixture to cook on low heat for about 20-30 minutes, stirring occasionally until the taro leaves are tender and the coconut milk has thickened. Adjust seasoning if needed.
- Serve: Once cooked, remove from heat and let it cool slightly. Serve the Vegetable Laing hot over steamed rice, and enjoy the rich flavors and textures of this delightful dish.
Extra Tips: When cooking Vegetable Laing, be cautious not to overcook the taro leaves as they can become mushy. If you prefer a spicier kick, feel free to add more chili peppers or even a splash of chili oil before serving.
You can also enhance the flavor by adding some chopped vegetables like eggplant or green beans to the mix. Enjoy this dish with a side of grilled or fried fish for a complete meal!
Quinoa Pinakbet
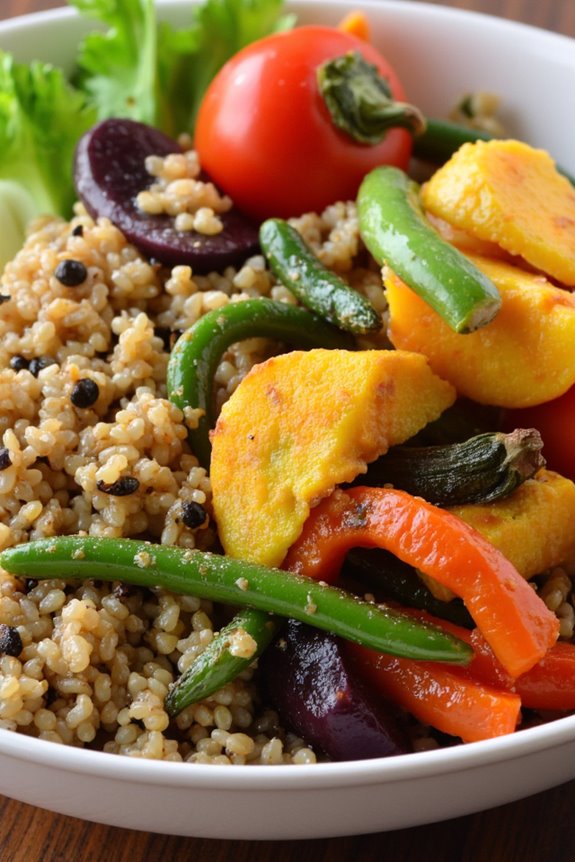
Quinoa Pinakbet is a delightful twist on the traditional Filipino vegetable dish known as Pinakbet, which is typically made with a variety of vegetables and flavored with shrimp paste. This healthy version replaces rice with quinoa, giving it a protein-packed boost while maintaining the essence of the original recipe. Quinoa isn’t only nutritious but also adds a unique texture, allowing it to absorb the flavors of the vegetables and the savory sauce. This dish is ideal for those looking for a wholesome meal that’s both filling and satisfying.
The beauty of Quinoa Pinakbet lies in its vibrant medley of vegetables, including eggplant, bitter melon, and squash, providing a colorful and nutritious plate. This dish is perfect for family gatherings, as it serves 4 to 6 people, making it a great option for sharing. With just the right balance of flavors and a hint of umami from the shrimp paste (or a vegetarian alternative), Quinoa Pinakbet is sure to be a hit at your next meal.
Ingredients (Serves 4-6):
- 1 cup quinoa
- 2 cups water
- 1 tablespoon olive oil
- 1 onion, chopped
- 3 cloves garlic, minced
- 1 medium tomato, diced
- 1 medium eggplant, sliced
- 1 small bitter melon, sliced
- 1 cup squash, cubed
- 1 cup okra, trimmed
- 1 cup green beans, cut into 2-inch pieces
- 2 tablespoons shrimp paste (or miso paste for a vegetarian option)
- 1 tablespoon fish sauce (optional)
- Salt and pepper to taste
- 1/4 cup water (as needed)
Cooking Instructions:
- Rinse the Quinoa: Begin by rinsing the quinoa under cold running water using a fine mesh strainer. This helps to remove the natural coating called saponin that can give quinoa a bitter taste.
- Cook the Quinoa: In a medium saucepan, combine the rinsed quinoa and 2 cups of water. Bring it to a boil over medium-high heat. Once boiling, reduce the heat to low, cover the pot, and let it simmer for about 15 minutes, or until the quinoa is fluffy and the water has been absorbed. Remove from heat and set aside.
- Sauté Vegetables: In a large skillet or wok, heat the olive oil over medium heat. Add the chopped onion and minced garlic, sautéing until the onions are translucent and fragrant, about 3-4 minutes.
- Add Tomatoes and Vegetables: Stir in the diced tomato, cooking for an additional 2 minutes. Then, add the sliced eggplant, bitter melon, squash, okra, and green beans. Stir-fry the vegetables for about 5-7 minutes until they begin to soften.
- Incorporate Flavorings: Add the shrimp paste (or miso paste) and fish sauce (if using) to the skillet. Stir well to coat the vegetables with the flavors. If the mixture looks too dry, add a little water (about 1/4 cup) to help steam the vegetables.
- Combine with Quinoa: Once the vegetables are tender, gently fold in the cooked quinoa. Stir until everything is well combined and heated through. Season with salt and pepper to taste.
- Serve: Transfer the Quinoa Pinakbet to a serving dish and enjoy it warm. This dish can be served on its own or with grilled meats for a more filling meal.
Extra Tips:
For an added layer of flavor, consider incorporating a splash of coconut milk or a squeeze of lime juice just before serving. This can enhance the dish’s richness and add a revitalizing twist.
Additionally, feel free to customize the vegetables based on what you have on hand or what’s in season. Broccoli, carrots, or even spinach can be great additions.
Finally, if you prefer a spicier kick, adding sliced chili peppers during the sautéing step can elevate the dish’s flavor profile.
Baked Labanos (Radish) With Garlic

Baked Labanos, or Baked Radish with Garlic, is a delightful and healthy dish that showcases the unique flavor of radishes, a staple in Filipino cuisine. This dish isn’t only nutritious but also incredibly easy to prepare, making it a perfect side dish for any meal.
The process of baking the labanos allows the radishes to develop a tender texture while enhancing their natural sweetness, all while being infused with the aromatic essence of garlic. This dish pairs beautifully with grilled meats or can be enjoyed as a standalone vegetarian option.
In addition to being delicious, Baked Labanos is a great way to incorporate more vegetables into your diet. Radishes are low in calories and high in fiber, vitamins, and minerals, making them a healthy choice for any meal.
The addition of garlic not only elevates the flavor profile of the dish but also brings its own health benefits, such as boosting the immune system and improving heart health. With just a few simple ingredients and straightforward steps, you can create a delightful dish that’s sure to impress your family and friends.
Ingredients (Serves 4-6):
- 1 pound labanos (radish), sliced into thin rounds
- 4 tablespoons olive oil
- 6 cloves garlic, minced
- 1 teaspoon salt
- 1/2 teaspoon black pepper
- 1 teaspoon paprika (optional)
- Fresh parsley or green onions for garnish (optional)
Cooking Instructions:
- Preheat the Oven: Begin by preheating your oven to 400°F (200°C). This guarantees that the labanos will bake evenly and achieve a nice golden color.
- Prepare the Radishes: Rinse the labanos thoroughly under cold water to remove any dirt. Once clean, slice them into thin rounds (about 1/4 inch thick). This will help them cook evenly and become tender in the oven.
- Mix Ingredients: In a large mixing bowl, combine the sliced labanos with olive oil, minced garlic, salt, black pepper, and paprika (if using). Toss everything together until the radish slices are evenly coated with the oil and seasonings.
- Arrange on Baking Sheet: Line a baking sheet with parchment paper for easy cleanup. Spread the seasoned labanos in a single layer on the baking sheet, ensuring they aren’t overcrowded. This allows for better roasting.
- Bake: Place the baking sheet in the preheated oven and bake for 25-30 minutes, or until the radishes are tender and slightly caramelized. Stir halfway through to guarantee even cooking.
- Garnish and Serve: Once the labanos are done baking, remove them from the oven and let them cool slightly. Transfer to a serving platter and garnish with fresh parsley or chopped green onions, if desired. Serve warm.
Extra Tips:
For an added depth of flavor, consider marinating the sliced labanos in the olive oil and garlic mixture for about 30 minutes before baking.
You can also experiment with different herbs and spices to customize the dish to your taste. If you prefer a little heat, adding a pinch of red pepper flakes can give the dish a delightful kick. Enjoy your Baked Labanos as a healthy side dish or as a unique addition to your next gathering!
Lighter Pancit Canton
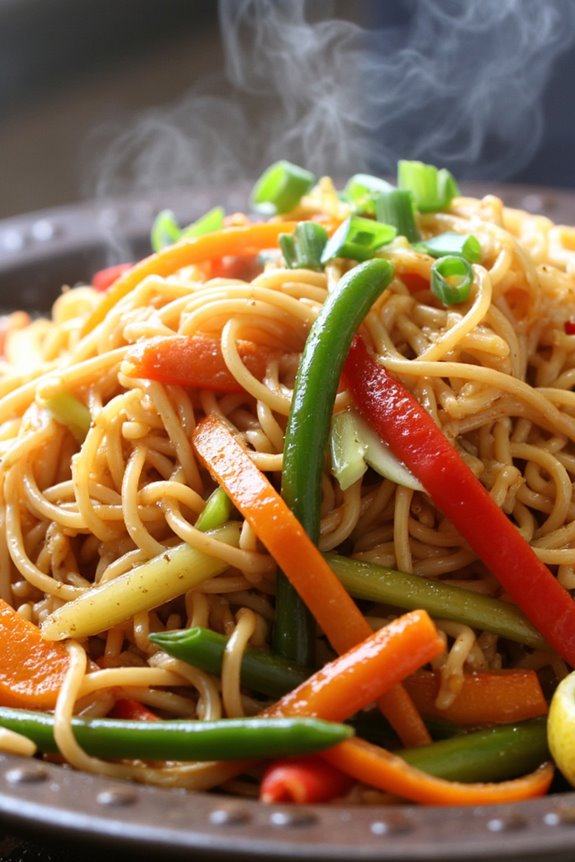
Pancit Canton is a beloved Filipino noodle dish that’s often served during celebrations and gatherings, symbolizing long life and good fortune. Traditionally made with wheat noodles and a variety of meats and vegetables, this lighter version offers a healthier twist while maintaining the dish’s essential flavors and textures. By incorporating more vegetables and reducing the amount of oil and meat, this dish becomes a nutritious option for those who want to enjoy the classic taste without the heaviness.
This Lighter Pancit Canton recipe is perfect for a family dinner or a casual get-together with friends. The vibrant colors of the vegetables not only make the dish visually appealing but also pack it with nutrients. With a hearty mix of carrots, bell peppers, and cabbage, this dish is sure to please both the palate and the eye. Plus, it’s quick and easy to prepare, making it ideal for busy weeknights.
Ingredients (Serves 4-6):
- 8 ounces Pancit Canton noodles
- 1 tablespoon vegetable oil
- 2 cloves garlic, minced
- 1 small onion, sliced
- 1 medium carrot, julienned
- 1 small bell pepper, sliced (any color)
- 1 cup green beans, trimmed and cut into 1-inch pieces
- 1 cup cabbage, shredded
- 2 cups vegetable or chicken broth
- 2 tablespoons soy sauce
- 1 teaspoon oyster sauce (optional)
- Salt and pepper to taste
- Green onions, chopped for garnish
- Lemon or calamansi wedges for serving
Cooking Instructions:
- Prepare the Noodles: Begin by soaking the Pancit Canton noodles in warm water for about 10 minutes or until they’re soft but not fully cooked. Drain and set aside. This will help the noodles absorb the flavors during cooking.
- Sauté Aromatics: In a large skillet or wok, heat the vegetable oil over medium heat. Add the minced garlic and sliced onion, sautéing until fragrant and the onion becomes translucent, about 2-3 minutes.
- Add Vegetables: Incorporate the julienned carrots, sliced bell pepper, and green beans into the skillet. Stir-fry the vegetables for about 5 minutes until they begin to soften but still retain some crunch.
- Combine Noodles and Broth: Add the soaked Pancit Canton noodles to the vegetable mixture. Pour in the vegetable or chicken broth, soy sauce, and oyster sauce (if using). Toss everything together gently to combine, making sure the noodles are evenly coated with the sauce.
- Cook until Done: Cover the skillet and let it simmer for about 5-7 minutes, stirring occasionally, until the noodles are fully cooked and have absorbed most of the liquid. Add the shredded cabbage in the last couple of minutes of cooking, allowing it to wilt.
- Season and Serve: Taste the dish and adjust the seasoning with salt and pepper as needed. Once everything is well combined and heated through, remove from heat. Serve hot, garnished with chopped green onions and lemon or calamansi wedges on the side for a zesty finish.
Extra Tips:
When preparing Lighter Pancit Canton, feel free to customize the vegetables based on what you have available or prefer. Other great additions can include snap peas, broccoli, or mushrooms.
Additionally, for a protein boost, you can include shredded chicken or tofu. Just make sure to adjust the cooking time to make certain that any added ingredients are cooked through.
Finally, this dish can be made ahead of time and reheated, making it a convenient option for meal prep!
Tortang Talong (Eggplant Omelette)

Tortang Talong, or Eggplant Omelette, is a beloved Filipino dish that showcases the versatility of eggplant. This simple yet flavorful recipe transforms grilled or roasted eggplant into a satisfying meal, often enjoyed for breakfast or as a side dish. The smoky flavor from the eggplant pairs beautifully with the fluffy eggs, creating a delightful combination that’s both nutritious and delicious.
This dish isn’t only easy to prepare but also offers a great way to incorporate vegetables into your diet.
To make Tortang Talong, you’ll need to start by roasting the eggplants until they’re tender and the skins are charred. This step is essential as it enhances the flavor and texture of the eggplant. Once the eggplants are prepared, they’re mashed and combined with beaten eggs, then cooked to golden perfection in a hot pan. Serve it with rice and a side of dipping sauce for a complete meal that satisfies the palate and nourishes the body.
Ingredients (Serves 4-6):
- 4 medium-sized eggplants
- 4 large eggs
- 1/2 cup of onion, finely chopped
- 2 cloves of garlic, minced
- 1/2 teaspoon of salt
- 1/4 teaspoon of black pepper
- 2 tablespoons of cooking oil (for frying)
- Optional: sliced tomatoes for garnish
Cooking Instructions:
1. Prepare the Eggplants: Start by roasting the eggplants over an open flame or in a preheated oven until the skin is charred and blistered. This should take about 10-15 minutes. Turn the eggplants occasionally to guarantee even cooking.
Once done, allow them to cool slightly before peeling off the charred skin.
2. Mash the Eggplants: Once the eggplants are cool enough to handle, gently mash the flesh with a fork, keeping some texture. Set aside in a bowl.
3. Prepare the Egg Mixture: In a separate bowl, beat the eggs and then add the finely chopped onion, minced garlic, salt, and black pepper. Mix well to combine all the ingredients.
4. Combine Eggplant and Egg Mixture: Add the mashed eggplant to the egg mixture and stir until everything is well incorporated. This will create a thick batter-like consistency.
5. Heat the Oil: In a large skillet or frying pan, heat the cooking oil over medium heat. Make sure the oil is hot before adding the eggplant mixture to achieve a crispy edge.
6. Cook the Tortang Talong: Pour the eggplant and egg mixture into the hot oil, spreading it evenly in the pan. Cook for about 5-7 minutes or until the bottom is golden brown.
Carefully flip the omelette using a large spatula and cook the other side for an additional 5-7 minutes until it’s fully set and golden.
7. Serve: Once cooked, transfer the Tortang Talong to a serving plate. It can be garnished with sliced tomatoes if desired. Serve hot with rice and your favorite dipping sauce.
Extra Tips:
For an added twist, consider incorporating ground meat or other vegetables like bell peppers into the egg mixture for a heartier version of Tortang Talong.
Also, when flipping the omelette, use a large spatula to make it easier and prevent it from breaking. If you prefer a softer texture, you can skip the flipping step and simply cover the pan to cook the top side gently.
Enjoy your cooking!
Healthy Lumpiang Sariwa (Fresh Spring Rolls)
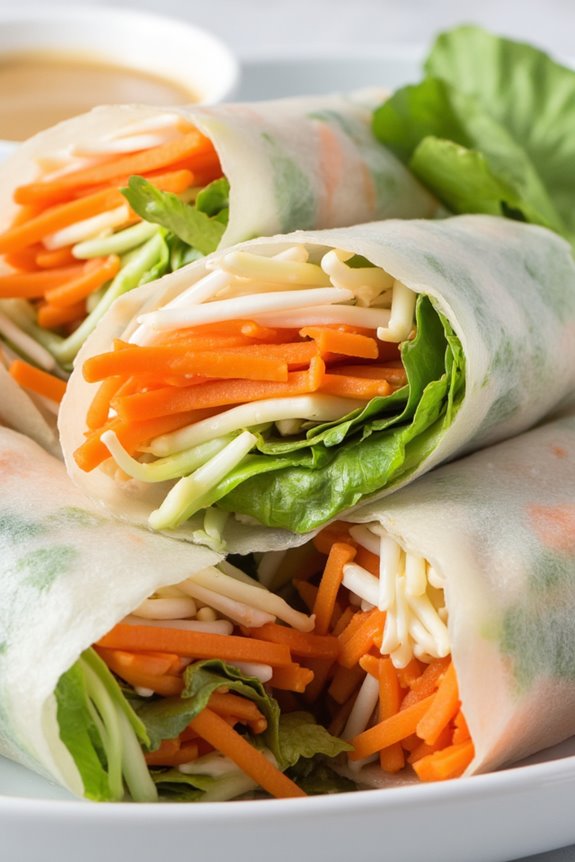
Lumpiang Sariwa, also known as fresh spring rolls, is a popular Filipino dish that offers a revitalizing burst of flavor while being nutritious. This delightful dish features a medley of fresh vegetables, protein, and sometimes even fruits, all wrapped in a soft and pliable rice paper or fresh lumpia wrapper.
Served with a savory garlic-peanut sauce, Lumpiang Sariwa makes for a perfect appetizer or a light meal, allowing you to enjoy a variety of textures and tastes in every bite.
Making Healthy Lumpiang Sariwa isn’t only straightforward, but it also allows for customization based on your dietary preferences. You can easily incorporate different vegetables, proteins, and even adjust the sauce to suit your taste.
This dish is a fantastic way to incorporate more vegetables into your diet while providing a delicious and satisfying experience for your family and friends.
Ingredients (serving size: 4-6 people):
- 1 cup of shredded carrots
- 1 cup of finely chopped cabbage
- 1 cup of bean sprouts
- ½ cup of chopped green beans
- ½ cup of diced tofu or cooked shrimp (optional)
- 4-6 fresh lumpia wrappers (or rice paper)
- ¼ cup of chopped green onions
- 1 tablespoon of minced garlic
- 1 tablespoon of soy sauce
- ½ teaspoon of ground black pepper
- 1 tablespoon of vegetable oil (for sautéing)
Cooking Instructions:
1. Prepare the Filling: In a large skillet, heat the vegetable oil over medium heat. Add the minced garlic and sauté for about 30 seconds until fragrant.
Then add the shredded carrots, chopped cabbage, green beans, and bean sprouts. Stir-fry the vegetables for about 3-5 minutes until they’re tender yet crisp. If using tofu or shrimp, add them to the skillet and cook for an additional 2-3 minutes.
Season the mixture with soy sauce and black pepper, then remove from heat and let it cool slightly.
2. Soften the Wrappers: If you’re using rice paper, fill a shallow dish with warm water. Dip each rice paper into the water for about 10-15 seconds, or until it becomes soft and pliable.
If using fresh lumpia wrappers, you can skip this step as they’re usually soft and ready to use.
3. Assemble the Rolls: Lay the softened wrapper flat on a clean surface. Place a generous spoonful of the vegetable filling near the edge of the wrapper closest to you.
Sprinkle some chopped green onions on top of the filling. Fold the sides of the wrapper over the filling, then carefully roll it away from you to form a tight roll.
Repeat this process until all the filling is used.
4. Prepare the Sauce (Optional): In a small bowl, you can mix together peanut butter, a splash of soy sauce, and a little water to create a creamy dipping sauce.
Adjust the consistency by adding more water as needed.
5. Serve: Arrange the finished Lumpiang Sariwa on a serving platter. Serve alongside the garlic-peanut sauce for dipping.
Enjoy your healthy fresh spring rolls as a delicious appetizer or light meal!
Extra Tips: When preparing Lumpiang Sariwa, feel free to get creative with your fillings! You can add ingredients like bell peppers, avocados, or even fruits such as mango for a sweet twist.
Confirm that all vegetables are chopped finely to make rolling easier and to provide an even distribution of flavor. If you prefer a crunchier texture, consider briefly sautéing the vegetables so they retain some bite.
Finally, serve the rolls immediately after making them to preserve their freshness, but they can be stored in the refrigerator for a few hours if necessary.
Pinoy Salad With Mango and Prawns

The Pinoy Salad With Mango and Prawns is a delightful and invigorating dish that beautifully combines the sweetness of ripe mangoes with the savory taste of prawns. This salad isn’t only vibrant in color but also rich in flavors, making it a perfect appetizer or side dish for any meal.
The use of fresh ingredients and the simplicity of preparation highlight the essence of Filipino cuisine, celebrating the bounty of tropical produce. This salad is ideal for gatherings, potlucks, or even just a light meal at home. Its zesty dressing complements the ingredients perfectly, enhancing the overall taste without overpowering the natural flavors.
Whether you’re a fan of seafood or simply looking to try something new, this Pinoy Salad With Mango and Prawns will surely satisfy your cravings and impress your guests.
Ingredients (serving size: 4-6 people)
- 1 pound prawns, peeled and deveined
- 2 ripe mangoes, diced
- 1 cup cherry tomatoes, halved
- 1 cucumber, diced
- 1 red onion, finely chopped
- 1/4 cup fresh cilantro, chopped
- 1/4 cup lime juice
- 2 tablespoons fish sauce
- 1 tablespoon sugar
- Salt and pepper, to taste
- 4 cups mixed salad greens (lettuce, arugula, or spinach)
Cooking Instructions
1. Prepare the Prawns: In a pot of boiling salted water, add the prawns and cook for about 3-4 minutes or until they turn pink and opaque. Be careful not to overcook them.
Once cooked, drain and immediately transfer them to an ice bath to stop the cooking process. After a few minutes, drain again and set aside.
2. Chop the Vegetables and Mangoes: While the prawns are cooling, prepare the salad ingredients. Dice the mangoes, halve the cherry tomatoes, and chop the cucumber and red onion.
Confirm all vegetables are cut into bite-sized pieces for easy mixing and eating.
3. Make the Dressing: In a small bowl, whisk together the lime juice, fish sauce, and sugar until the sugar is dissolved.
Taste the dressing and adjust with salt and pepper according to your preference. This dressing will add a tangy and slightly sweet flavor to the salad.
4. Combine Ingredients: In a large mixing bowl, combine the cooked prawns, diced mangoes, cherry tomatoes, cucumber, red onion, and chopped cilantro.
Pour the dressing over the mixture and gently toss until everything is well coated, taking care not to break the delicate mangoes.
5. Serve on Greens: Arrange the mixed salad greens on a serving platter or individual plates. Spoon the prawn and mango mixture over the greens, allowing the vibrant colors to shine.
Garnish with additional cilantro, if desired.
Extra Tips
For an added crunch, consider incorporating some toasted nuts or seeds, such as peanuts or sesame seeds, into the salad.
You can also experiment with different types of seafood, such as crab or scallops, for a unique twist. If you’re planning to serve this salad later, keep the dressing separate until just before serving to maintain the freshness of the greens.
Enjoy this dish chilled, as it enhances the flavors and provides an invigorating experience on a warm day!
Baked Bangus (Milkfish) With Tomatoes

Baked Bangus, or Milkfish, is a beloved dish in Filipino cuisine that showcases the delicate flavors of this popular fish. Known for its tender flesh and mild taste, Bangus is often enjoyed in various preparations, but baking it with tomatoes elevates its natural flavors while making it a healthy and nutritious option.
This dish isn’t only easy to prepare but also a great way to incorporate omega-3 fatty acids and essential nutrients into your diet, making it an excellent choice for families looking to enjoy a wholesome meal.
In this recipe, we combine the richness of Bangus with the acidity and sweetness of ripe tomatoes, resulting in a dish that’s both light and satisfying. Perfect for lunch or dinner, Baked Bangus with Tomatoes is sure to impress your family and friends. Serve it with steamed rice and a side of vegetables for a complete Filipino dining experience!
Ingredients (Serves 4-6)
- 1 whole Bangus (milkfish), cleaned and scaled
- 2 medium ripe tomatoes, sliced
- 1 medium onion, sliced
- 3 cloves garlic, minced
- 2 tablespoons soy sauce
- 1 tablespoon olive oil
- 1 teaspoon ground black pepper
- 1 teaspoon salt
- 2 tablespoons fresh parsley or cilantro, chopped (for garnish)
- Lemon wedges (for serving)
Cooking Instructions
- Preheat the Oven: Begin by preheating your oven to 375°F (190°C). This guarantees that your fish will cook evenly and thoroughly once placed inside.
- Prepare the Bangus: Rinse the Bangus under cold running water and pat it dry with paper towels. Make three diagonal slashes on each side of the fish to help it cook evenly and absorb the flavors of the ingredients.
- Season the Fish: In a small bowl, mix the soy sauce, minced garlic, ground black pepper, and salt. Rub this mixture generously inside the cavity of the fish and over its surface, making sure that the seasoning penetrates the meat.
- Layer the Vegetables: On a baking dish, arrange the sliced tomatoes and onions in an even layer. Place the Bangus on top of the vegetables. This not only adds flavor but also helps keep the fish moist during baking.
- Drizzle with Olive Oil: Drizzle the olive oil over the fish and vegetables. This will enhance the flavors and provide a nice sheen to the dish as it bakes.
- Bake the Bangus: Cover the baking dish with aluminum foil and place it in the preheated oven. Bake for about 25-30 minutes, then remove the foil and bake for an additional 10-15 minutes until the fish is cooked through and the flesh flakes easily with a fork.
- Garnish and Serve: Once cooked, remove the Bangus from the oven and let it rest for a few minutes. Garnish with chopped parsley or cilantro, and serve with lemon wedges on the side for an added zest.
Extra Tips
To enhance the flavor of your Baked Bangus, consider marinating the fish for about 30 minutes in the soy sauce mixture before cooking.
You can also experiment with adding other vegetables such as bell peppers or eggplants to the baking dish for additional texture and nutrition. For a spicier kick, try adding sliced chili peppers on top of the fish before baking.
Enjoy your healthy Filipino meal!
Turmeric Garlic Rice

Turmeric Garlic Rice is a vibrant and flavorful dish that perfectly complements any Filipino meal. This rice recipe isn’t only visually appealing with its sunny yellow hue from turmeric but also packed with health benefits. Turmeric is known for its anti-inflammatory properties, while garlic adds a delightful aroma and taste to the dish. Together, they create a simple yet delicious side that elevates your dining experience.
Cooking Turmeric Garlic Rice is straightforward and can be done in under 30 minutes, making it an ideal choice for busy weeknights or a special family gathering. This dish pairs wonderfully with grilled meats, stews, or vegetable dishes, bringing a wholesome touch to your table. With its beautiful color and comforting flavor, this rice will surely become a staple in your kitchen.
Ingredients (Serves 4-6):
- 2 cups jasmine rice
- 4 cups water or chicken broth
- 1 tablespoon olive oil or butter
- 4 cloves garlic, minced
- 1 teaspoon ground turmeric
- 1 teaspoon salt (adjust to taste)
- Freshly cracked black pepper (to taste)
- Chopped fresh parsley or cilantro for garnish (optional)
Cooking Instructions:
- Rinse the Rice: Start by rinsing the jasmine rice under cold water until the water runs clear. This step removes excess starch, preventing the rice from becoming gummy. Drain well and set aside.
- Sauté the Garlic: In a medium-sized pot, heat the olive oil or butter over medium heat. Once hot, add the minced garlic and sauté for about 1-2 minutes, until it becomes fragrant and golden. Be careful not to burn the garlic, as it can turn bitter.
- Add Turmeric and Rice: Stir in the ground turmeric and salt, mixing well to coat the garlic. Then, add the rinsed rice to the pot, stirring to combine. This step helps toast the rice slightly, enhancing the overall flavor.
- Pour in Water/Broth: Carefully add the water or chicken broth to the rice mixture. Bring it to a gentle boil, then reduce the heat to low. Cover the pot with a tight-fitting lid and let the rice simmer for about 15-20 minutes, or until the liquid is absorbed and the rice is tender.
- Fluff and Season: Once the rice is cooked, remove the pot from heat and let it sit covered for an additional 5 minutes. Afterward, use a fork to fluff the rice gently. Taste and adjust the seasoning with salt and freshly cracked black pepper as desired.
- Garnish and Serve: Transfer the turmeric garlic rice to a serving dish and garnish with chopped fresh parsley or cilantro if using. Serve warm as a delightful side dish to your favorite Filipino entrees.
Extra Tips: To enhance the flavor of your Turmeric Garlic Rice, consider adding a splash of lemon or lime juice just before serving. This acidity can brighten up the dish and add an extra layer of flavor. Additionally, feel free to customize the recipe by mixing in some sautéed vegetables or adding cooked proteins like shrimp or chicken for a more substantial meal. Enjoy your cooking!