

When lunchtime rolls around and you’re juggling a busy schedule, Japanese cuisine can be a lifesaver. With each dish, from onigiri to yakisoba, you’re treated to a burst of flavor without the fuss. These meals are perfect for meal prepping or a quick fix when you’re short on time. If you’re on the hunt for meals that are effortless yet delicious, this list might just have your next favorite. Let’s explore these recipes that can make your midday break feel a little more special!
Onigiri (Rice Balls)
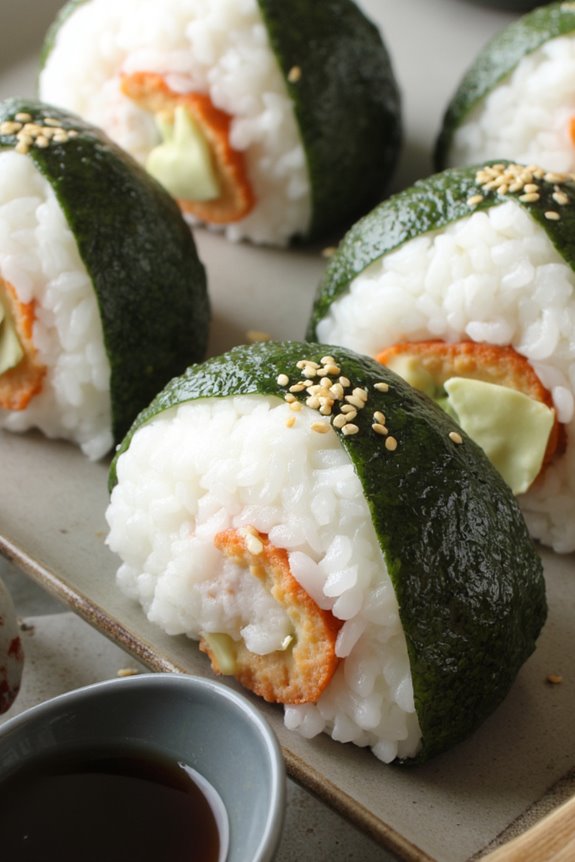
Onigiri, also known as rice balls, is a traditional Japanese dish that has been adored for centuries. These delightful morsels are made from steamed rice and shaped into triangles or balls, often with a savory filling and wrapped in nori (seaweed). Onigiri isn’t only a popular item in bento boxes, but it also serves as a portable snack perfect for picnics or lunch on the go.
The beauty of onigiri lies in its versatility; you can customize the fillings and flavors to suit your taste, making it an ideal dish for anyone who enjoys experimenting in the kitchen.
Making onigiri is relatively simple, requiring just a few key ingredients and some basic techniques. The most important factor is the rice; it must be short-grain Japanese rice to achieve the right sticky texture that holds the shape of the rice balls. Fillings can range from pickled plum (umeboshi) to grilled salmon or seasoned vegetables.
With a little practice, you’ll be able to create these beautiful and tasty rice balls that aren’t only delicious but also visually appealing.
Ingredients (Serves 4-6 people):
- 2 cups short-grain Japanese rice
- 2 1/2 cups water
- 1/4 teaspoon salt
- 1 tablespoon rice vinegar (optional)
- 1/4 cup filling of your choice (e.g., grilled salmon, pickled plum, tuna with mayonnaise)
- 4-6 sheets of nori (seaweed), cut into strips
- Sesame seeds (optional, for garnish)
Cooking Instructions:
- Rinse the Rice: Start by rinsing the short-grain rice under cold water until the water runs clear. This step removes excess starch and prevents the rice from becoming gummy. Use a fine-mesh strainer or bowl to do this, gently swirling the rice with your hand.
- Cook the Rice: In a rice cooker or a pot, combine the rinsed rice and water. If using a rice cooker, follow the manufacturer’s instructions for cooking rice. If using a pot, bring the mixture to a boil over medium heat, then reduce the heat to low, cover, and simmer for about 18-20 minutes until the water is absorbed.
- Season the Rice: Once the rice is cooked, remove it from heat and let it sit covered for about 10 minutes. If you’d like to add a slight tang, mix in the rice vinegar and salt while the rice is still warm. This will enhance the flavor of the rice.
- Prepare the Fillings: While the rice is cooling, prepare your desired fillings. If you’re using grilled salmon, make certain it’s flaked; for pickled plum, remove the pit and chop it finely. Keep your fillings ready to use once the rice is cool enough to handle.
- Shape the Onigiri: Wet your hands with water to prevent the rice from sticking. Take a handful of rice (about 1/4 cup) and flatten it into your palm. Place a small amount of your chosen filling in the center, then mold the rice around the filling to encase it completely. Form the rice into a triangle or ball shape by pressing gently but firmly.
- Wrap with Nori: Once shaped, take a strip of nori and wrap it around the base of the onigiri or place it on the side. This adds flavor and makes the rice balls easier to hold.
- Serve: Arrange the onigiri on a plate and sprinkle with sesame seeds if desired. You can serve them immediately or refrigerate them for later. If storing, wrap each onigiri in plastic wrap to keep them fresh.
Extra Tips:
When making onigiri, make certain your hands are always slightly wet to help shape the rice without it sticking. You can also experiment with different fillings based on your preferences, such as marinated vegetables, or even cheese for a fusion twist.
Make sure to consume the onigiri within a day or two, as they’re best enjoyed fresh. If you prepare them in advance, consider leaving the nori off until you’re ready to eat, as this will prevent it from becoming soggy. Enjoy your homemade onigiri!
Yakisoba (Fried Noodles)
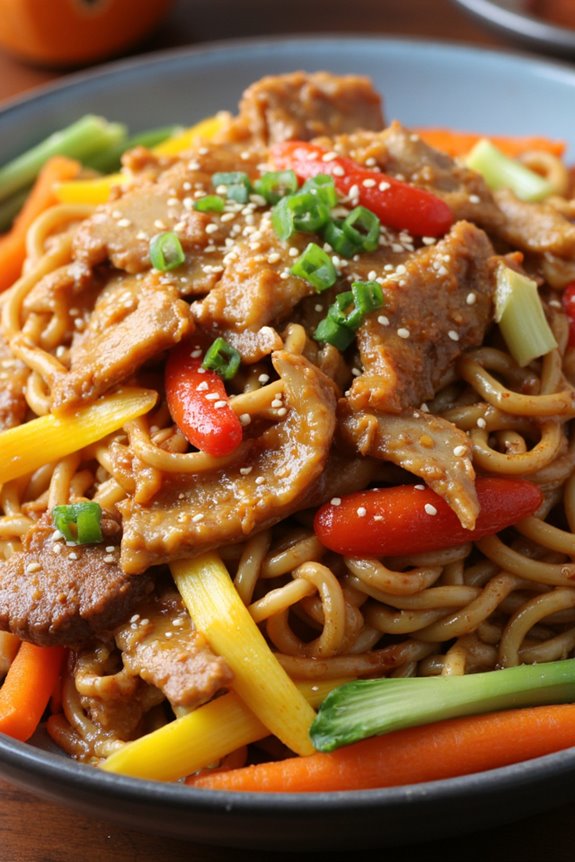
Yakisoba, a popular Japanese stir-fried noodle dish, is a delightful combination of savory flavors and colorful vegetables. Traditionally made with wheat noodles, it’s commonly served in street food stalls across Japan, showcasing a balance of textures and tastes. The dish is versatile, allowing for various types of proteins and vegetables, making it an excellent choice for a quick lunch or dinner.
With its rich sauce and fresh ingredients, yakisoba is an easy yet satisfying meal that everyone will love.
Preparing yakisoba at home isn’t only simple but also a fun culinary experience. The key to achieving the perfect stir-fry lies in the timing and heat management. By keeping the ingredients moving in a hot pan, you guarantee that everything cooks evenly while maintaining a delightful crunch.
The combination of savory sauce, tender noodles, and crisp vegetables creates a comforting dish that can be customized to suit your taste preferences.
Ingredients (Serves 4-6):
- 12 oz yakisoba noodles (fresh or dried)
- 1 cup sliced cabbage
- 1 cup sliced carrots
- 1 cup sliced bell peppers (any color)
- 1 small onion, thinly sliced
- 1 cup bean sprouts
- 1 cup cooked protein (chicken, pork, beef, or tofu)
- 3 tablespoons yakisoba sauce
- 2 tablespoons vegetable oil
- 1 tablespoon soy sauce
- 1 teaspoon sesame oil
- Salt and pepper to taste
- Optional toppings: pickled ginger, green onions, sesame seeds
Cooking Instructions:
1. Prepare the Noodles: If using dried yakisoba noodles, cook them according to the package instructions until they’re tender. Drain and set aside. If using fresh noodles, simply separate them and set aside.
2. Heat the Oil: In a large skillet or wok, heat the vegetable oil over medium-high heat. Confirm the oil is hot enough before adding the vegetables; this will help them cook quickly and maintain their crunch.
3. Sauté the Vegetables: Add the sliced onions, carrots, and bell peppers to the skillet. Stir-fry them for about 3-4 minutes until they start to soften but still retain some crunch.
Then, add the cabbage and bean sprouts, and continue to stir-fry for another 2-3 minutes.
4. Add the Protein: Once the vegetables are cooked to your liking, add the cooked protein of your choice (chicken, pork, beef, or tofu). Stir everything together to combine the flavors.
5. Incorporate the Noodles: Add the cooked yakisoba noodles to the skillet. Gently toss everything together, ensuring the noodles are well mixed with the vegetables and protein.
6. Season the Dish: Pour the yakisoba sauce, soy sauce, and sesame oil over the noodle mixture. Toss everything together until the noodles are evenly coated with the sauce. Taste and season with salt and pepper as needed.
7. Serve: Remove the skillet from heat and transfer the yakisoba to serving plates. Garnish with optional toppings such as pickled ginger, chopped green onions, and sesame seeds.
Extra Tips:
For an authentic taste, make sure to use yakisoba sauce, which can be found at Asian grocery stores or online. If you want to add more flavor, consider sprinkling some chili flakes for a bit of heat.
Additionally, feel free to include other vegetables like mushrooms or zucchini based on your preference. Yakisoba is best enjoyed fresh, but leftovers can be stored in the refrigerator for a day or two; just reheat them in a skillet with a touch of oil to restore some of the original texture.
Tamagoyaki (Japanese Omelette)

Tamagoyaki, a delightful Japanese omelette, is a staple in Japanese cuisine that’s often served in bento boxes or as part of a traditional breakfast. This sweet and savory dish is characterized by its layered texture, achieved by cooking the eggs in a rectangular pan and rolling them up. The process may seem intimidating at first, but with practice, you’ll master the art of making this delicious omelette that isn’t only visually appealing but also incredibly tasty.
To prepare Tamagoyaki, you’ll need a few basic ingredients and a special rectangular pan called a tamagoyaki pan or makiyakinabe. The key to a successful Tamagoyaki lies in the technique of cooking and folding the eggs, allowing for a fluffy and tender texture. Whether you’re serving it at a family meal or impressing guests at a gathering, Tamagoyaki is sure to be a hit.
Ingredients (Serves 4-6):
- 6 large eggs
- 2 tablespoons soy sauce
- 1 tablespoon mirin (sweet rice wine)
- 1 tablespoon sugar
- 1 teaspoon dashi stock (optional)
- Cooking oil (for frying)
Cooking Instructions:
- Prepare the Egg Mixture: In a large bowl, crack the eggs and whisk them together until well combined. Add the soy sauce, mirin, sugar, and dashi stock (if using) to the eggs. Mix until the ingredients are fully incorporated, guaranteeing the sugar is dissolved.
- Heat the Pan: Place your tamagoyaki pan over medium heat and lightly oil the surface using a paper towel or a brush. It’s crucial to confirm the pan is evenly coated to prevent the eggs from sticking.
- Cook the First Layer: Pour a small amount of the egg mixture (about a quarter of it) into the pan, tilting the pan to spread the mixture evenly. Allow it to cook until the edges begin to set but the top is still slightly runny.
- Roll the Omelette: Using chopsticks or a spatula, carefully lift one edge of the cooked egg and roll it towards the opposite edge of the pan. Once rolled, push the rolled omelette to one side of the pan.
- Add More Egg Mixture: Oil the pan again if necessary, then pour in another quarter of the egg mixture. Lift the rolled omelette slightly to allow the new mixture to flow underneath. Once the edges begin to set, repeat the rolling process.
- Continue Layering: Repeat the process of pouring, cooking, and rolling the egg mixture until all of it’s used up. The omelette should be thick and well-layered by the end.
- Final Cooking: Once all layers are rolled, gently press the omelette down in the pan for a few seconds to confirm it holds its shape. Remove it from the pan and let it cool slightly.
- Slice and Serve: Using a sharp knife, slice the Tamagoyaki into bite-sized pieces and serve it warm or at room temperature.
Extra Tips:
When making Tamagoyaki, patience is key. Take your time with each layer, and don’t rush the cooking process to guarantee the eggs cook evenly.
If you don’t have a tamagoyaki pan, a regular non-stick skillet can work, but the shape may differ. Experiment with different fillings like chopped vegetables or crab for added flavor.
Finally, practice makes perfect, so don’t be discouraged if your first attempt isn’t flawless!
Miso Soup
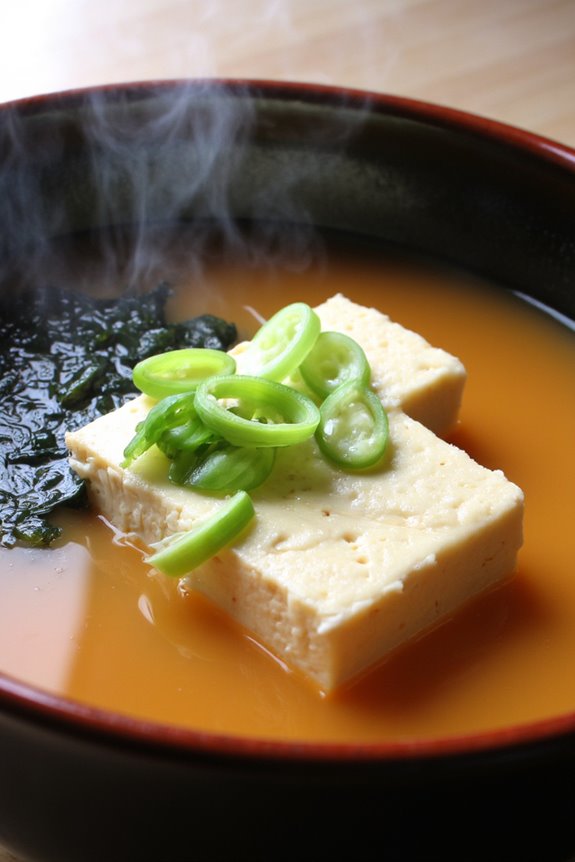
Miso soup is a traditional Japanese soup that embodies the essence of umami, making it a staple in Japanese cuisine. This comforting dish is typically made with a dashi broth and miso paste, which is fermented soybean paste that adds depth and flavor.
Miso soup isn’t only delicious but also versatile, allowing for various ingredients such as tofu, seaweed, and green onions to be added, making it a wholesome choice for lunch or dinner.
The beauty of miso soup lies in its simplicity and the ease of preparation. With just a few ingredients and steps, you can create a nourishing bowl of soup that warms both the body and soul. Perfect for a light meal or as an appetizer, miso soup is enjoyed by many and can easily be customized to suit your taste preferences.
Ingredients (for 4-6 servings):
- 4 cups dashi broth (made from kombu and bonito flakes or instant dashi powder)
- 1 cup miso paste (white or red, based on preference)
- 1 cup cubed soft or silken tofu
- 1 cup sliced green onions (scallions)
- 1 cup wakame seaweed (rehydrated)
- Optional: additional ingredients like mushrooms, daikon radish, or spinach
Cooking Instructions:
- Prepare the Dashi Broth: If you’re using kombu and bonito flakes, soak a piece of kombu in 4 cups of cold water for about 30 minutes. After soaking, bring it to a simmer over low heat. Once it starts to simmer, remove the kombu and add a handful of bonito flakes. Allow it to cook for about 5 minutes, then strain the broth through a fine sieve. If using instant dashi powder, simply dissolve it in hot water according to package instructions.
- Rehydrate Wakame Seaweed: If using dried wakame, soak it in warm water for about 10-15 minutes until it expands, then drain and chop it into bite-sized pieces. This step is essential to ascertain the seaweed is tender and ready to be added to the soup.
- Combine Miso Paste and Broth: In a separate bowl, take a ladleful of the hot dashi broth and mix it with the miso paste until smooth. This helps to dissolve the miso evenly without clumps. Once dissolved, add it back into the pot with the remaining dashi broth.
- Add Tofu and Seaweed: Gently add the cubed tofu and rehydrated wakame to the pot. Allow the soup to heat through on low heat for about 5 minutes. Avoid boiling the soup vigorously, as high heat can affect the flavor and texture of the miso.
- Finish with Green Onions: Just before serving, add the sliced green onions to the pot. Stir gently to combine and let the soup heat for another minute. This step enhances the freshness and aroma of the soup.
- Serve: Ladle the miso soup into bowls and serve hot. You can garnish with extra green onions or a sprinkle of sesame seeds if desired.
Extra Tips: When preparing miso soup, avoid boiling the soup after adding miso, as this can alter its flavor and nutritional benefits. Additionally, feel free to customize the soup with your favorite vegetables or proteins, but always add delicate ingredients like green onions at the end to preserve their freshness.
Keep in mind that miso paste can vary in saltiness; adjust the amount according to your taste preference. Enjoy your homemade miso soup as part of a delicious Japanese lunch!
Soba Noodle Salad
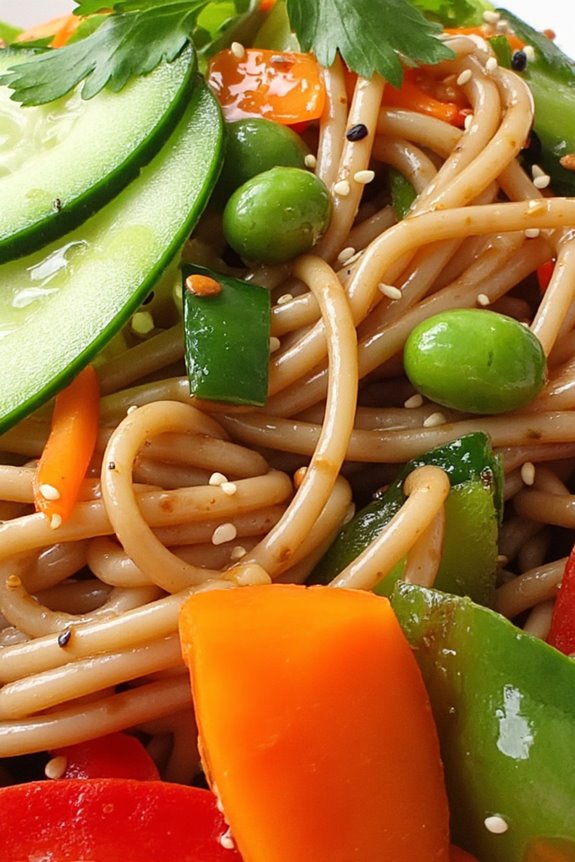
Soba Noodle Salad is a revitalizing and nutritious dish that embodies the essence of Japanese cuisine. Made with buckwheat noodles, this salad isn’t only gluten-free but also rich in protein and fiber, making it a perfect choice for a light lunch or a side dish. The combination of fresh vegetables and a tangy dressing elevates the flavors, creating a delightful meal that can be enjoyed year-round.
Whether you’re hosting a lunch gathering or simply looking for a quick and healthy meal, this soba noodle salad is sure to impress.
The beauty of Soba Noodle Salad lies in its versatility. You can customize the ingredients based on what you have on hand or your personal preferences. Add more vegetables, include proteins like tofu or chicken, or adjust the dressing to suit your taste.
This dish can be served cold or at room temperature, making it an excellent option for meal prep or picnics. Let’s explore the ingredients and cooking instructions to create this delicious salad for 4-6 people.
Ingredients
- 12 ounces soba noodles
- 1 cup shredded carrots
- 1 cup cucumber, thinly sliced
- 1 bell pepper, thinly sliced (any color)
- 1 cup edamame, shelled and cooked
- 1/4 cup green onions, chopped
- 1/4 cup fresh cilantro, chopped
- 1/4 cup sesame seeds (optional)
Dressing:
- 1/4 cup soy sauce
- 2 tablespoons rice vinegar
- 1 tablespoon sesame oil
- 1 tablespoon honey or maple syrup
- 1 teaspoon ginger, grated
- 1 clove garlic, minced
- Salt and pepper to taste
Cooking Instructions
1. Cook the Soba Noodles: Begin by bringing a large pot of water to a boil. Once boiling, add the soba noodles and cook according to the package instructions, typically around 4-6 minutes. Stir occasionally to prevent sticking.
Once cooked, drain the noodles and rinse them under cold water to stop the cooking process and cool them down.
2. Prepare the Vegetables: While the noodles are cooking, prepare your vegetables. Shred the carrots, slice the cucumber and bell pepper, and chop the green onions and cilantro. Place all the prepared vegetables into a large mixing bowl.
3. Make the Dressing: In a small bowl, whisk together the soy sauce, rice vinegar, sesame oil, honey (or maple syrup), grated ginger, minced garlic, and a pinch of salt and pepper.
Taste the dressing and adjust the seasoning as needed, adding more sweetness or acidity based on your preference.
4. Combine Ingredients: Once the soba noodles have cooled, add them to the bowl with the vegetables. Pour the dressing over the noodle and vegetable mixture. Toss everything together gently to guarantee the noodles and veggies are well-coated in the dressing.
5. Add Edamame and Garnish: Fold in the cooked edamame and garnish the salad with chopped green onions, cilantro, and sesame seeds if using. Toss lightly to combine.
6. Serve: The Soba Noodle Salad can be served immediately or chilled in the refrigerator for about 30 minutes to allow the flavors to meld. Serve in individual bowls or on a large platter.
Extra Tips
When preparing Soba Noodle Salad, feel free to experiment with different vegetables based on the season or your taste preferences.
You can also add proteins such as grilled chicken, shrimp, or tofu for a more filling dish. If you like a bit of spice, consider adding a dash of chili oil or red pepper flakes to your dressing.
For a unique twist, try incorporating toasted nuts or seeds for added crunch and flavor. Enjoy your Soba Noodle Salad as a versatile dish that can be easily adapted to suit any occasion!
Bento Box With Grilled Chicken
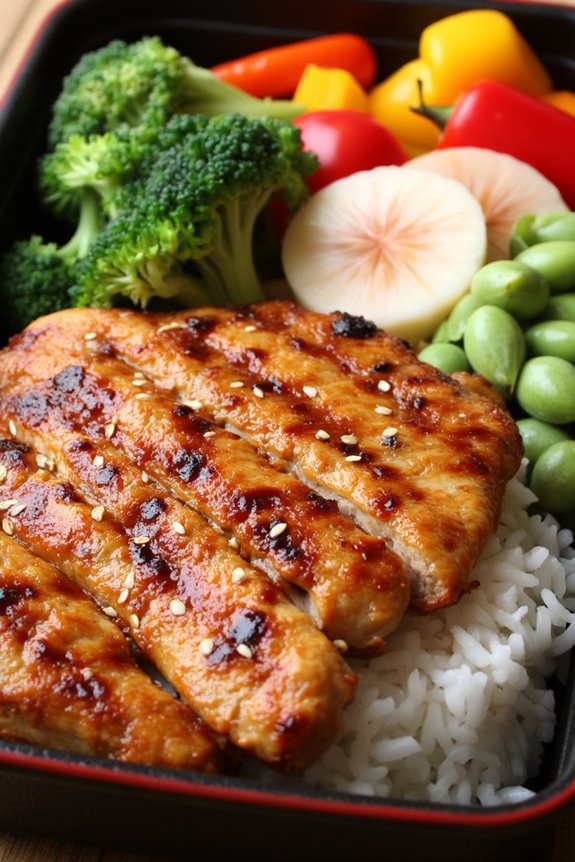
Bento boxes are a wonderful way to enjoy a variety of flavors and textures in a single meal, and this Bento Box with Grilled Chicken brings the essence of Japanese cuisine to your lunch table. Featuring marinated grilled chicken, colorful vegetables, and delicious rice, this dish isn’t only visually appealing but also packed with nutrients. It can be easily customized to fit your preferences, making it a perfect choice for both kids and adults alike.
To create a bento box that’s both delicious and aesthetically pleasing, you can include side dishes such as pickled vegetables, edamame, or fruit. The grilled chicken is marinated in a savory sauce that adds a depth of flavor, while the accompanying rice can be seasoned with sesame seeds or nori for added taste. This recipe serves 4-6 people, making it an excellent option for family meals, picnics, or meal prep for the week.
Ingredients (Serves 4-6):
- 4 boneless, skinless chicken breasts
- 1/4 cup soy sauce
- 2 tablespoons mirin (sweet rice wine)
- 1 tablespoon sesame oil
- 2 cloves garlic, minced
- 1 teaspoon grated ginger
- 2 cups cooked rice (white or brown)
- 1 cup steamed broccoli florets
- 1 cup sliced bell peppers (assorted colors)
- 1 cup edamame (shelled)
- 1 tablespoon sesame seeds (for garnish)
- 1/4 cup pickled ginger (optional)
- Fresh fruit slices (such as oranges or strawberries, for garnish)
Cooking Instructions:
- Marinate the Chicken: In a bowl, combine the soy sauce, mirin, sesame oil, minced garlic, and grated ginger. Add the chicken breasts to the bowl, ensuring they’re well coated in the marinade. Cover and refrigerate for at least 30 minutes, or up to 2 hours for more flavor.
- Grill the Chicken: Preheat your grill or grill pan over medium-high heat. Remove the chicken from the marinade and discard the leftover marinade. Place the chicken on the grill and cook for about 6-7 minutes on each side, or until the internal temperature reaches 165°F (75°C) and the chicken is cooked through. Once done, remove from the grill and let it rest for a few minutes before slicing.
- Prepare the Rice: While the chicken is grilling, cook the rice according to package instructions if not already prepared. Once cooked, fluff the rice with a fork and set aside.
- Steam the Vegetables: In a separate pot, bring water to a boil and place the broccoli florets and edamame in a steamer basket over the boiling water. Cover and steam for about 5-7 minutes, or until the vegetables are tender yet still vibrant in color. Remove from heat and set aside.
- Assemble the Bento Box: In each bento box or compartment, start by placing a generous scoop of rice. Next, add sliced grilled chicken on top of the rice. Arrange the steamed broccoli, sliced bell peppers, and edamame in separate sections of the box. Optionally, add some pickled ginger and fresh fruit slices for a touch of sweetness. Sprinkle sesame seeds over the chicken for garnish.
- Serve and Enjoy: Close the bento box or serve it immediately while everything is still warm. Enjoy your delightful Bento Box with Grilled Chicken for lunch or dinner!
Extra Tips:
When preparing your bento box, consider using seasonal vegetables for freshness and variety. You can also experiment with different marinades for the chicken, such as teriyaki or miso, to change up the flavor profile.
If you’re short on time, using pre-cooked chicken or rotisserie chicken can be a great shortcut. Finally, packing your bento box with an ice pack can help keep your meal fresh and cool until you’re ready to enjoy it!
Chirashi Sushi (Scattered Sushi)
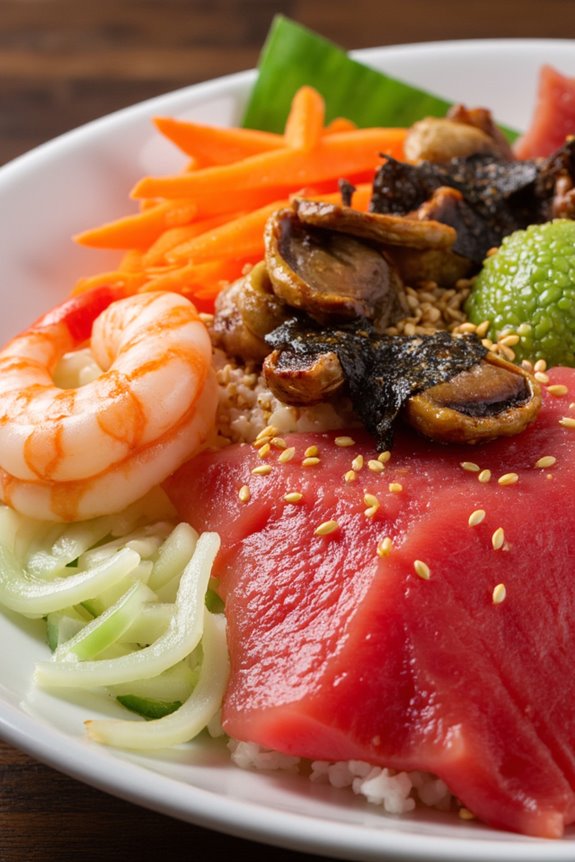
Chirashi Sushi, or scattered sushi, is a vibrant and colorful Japanese dish that beautifully showcases a variety of fresh ingredients atop a bed of seasoned sushi rice. Unlike traditional sushi, which is often rolled or shaped into bite-sized pieces, Chirashi allows for a more casual and creative presentation, making it perfect for festive occasions or everyday lunches.
This dish provides a delightful combination of flavors and textures, combining the sweetness of seasonal vegetables, the richness of seafood, and the tanginess of sushi rice, all in one bowl.
The beauty of Chirashi Sushi lies in its versatility. You can customize the toppings according to your preferences, using whatever fresh ingredients you have on hand or that are in season. Common toppings include sashimi-grade fish, pickled vegetables, and vibrant garnishes like nori and sesame seeds.
This makes Chirashi not just a meal but a celebration of colors and flavors that can be adapted to suit any palate.
Ingredients (Serves 4-6):
- 2 cups sushi rice
- 2 1/2 cups water
- 1/4 cup rice vinegar
- 2 tablespoons sugar
- 1 teaspoon salt
- 1/2 pound sashimi-grade salmon, sliced
- 1/2 pound sashimi-grade tuna, sliced
- 1/2 pound cooked shrimp
- 1 small cucumber, julienned
- 1 small carrot, julienned
- 4-5 shiitake mushrooms, sliced and sautéed
- 2 sheets nori, cut into thin strips
- 2 tablespoons sesame seeds
- Pickled ginger, for serving
- Wasabi, for serving
- Soy sauce, for serving
Cooking Instructions:
1. Prepare the Sushi Rice: Rinse the sushi rice under cold water until the water runs clear. This removes excess starch. Place the rinsed rice and 2 1/2 cups of water in a rice cooker or pot and cook according to the rice cooker instructions or bring to a boil, then reduce to low heat, cover, and simmer for about 18 minutes.
Remove from heat and let it sit for 10 minutes, covered.
2. Season the Rice: While the rice is resting, prepare the sushi vinegar. In a small saucepan over low heat, combine the rice vinegar, sugar, and salt. Stir until the sugar and salt dissolve. Once the rice has rested, transfer it to a large bowl and gently fold in the vinegar mixture using a wooden spatula.
Be careful not to smash the rice grains. Allow the rice to cool to room temperature.
3. Prepare the Toppings: While the sushi rice cools, prepare your toppings. Slice the sashimi-grade salmon and tuna into thin pieces. Julienne the cucumber and carrot. Sauté the shiitake mushrooms until tender. If using cooked shrimp, peel and devein them if necessary.
4. Assemble the Chirashi Sushi: In individual bowls or a large serving platter, create a bed of the seasoned sushi rice. Artistically arrange the salmon, tuna, shrimp, cucumber, carrot, and sautéed mushrooms on top of the rice.
Sprinkle with nori strips and sesame seeds for added flavor and crunch.
5. Serve: Serve the Chirashi Sushi immediately, accompanied by pickled ginger, wasabi, and soy sauce on the side. This allows each person to customize their flavors as desired.
Extra Tips:
When preparing Chirashi Sushi, freshness is key, especially for the seafood. Always opt for high-quality, sashimi-grade fish from a reputable source.
Feel free to get creative with the toppings; you can add other ingredients like avocado, daikon radish, or even seasonal vegetables to enhance the dish. For a more colorful presentation, consider using a variety of fish and vegetables.
Japanese Curry Rice

Japanese Curry Rice, known as “Kare Raisu,” is a beloved comfort food that combines sweet and savory flavors with a rich, hearty sauce. This dish is typically served over steamed rice and can be customized with various ingredients, including meat and vegetables. The Japanese curry roux, which is a key element of this dish, is uniquely flavored with spices like turmeric, cumin, and coriander, giving it a distinctive taste compared to other types of curry.
The beauty of Japanese Curry Rice lies in its versatility; you can easily adjust the ingredients based on what you have on hand. Whether you choose to use chicken, beef, or tofu for a vegetarian option, and a mix of seasonal vegetables, this dish is sure to warm your heart and fill your stomach. It’s perfect for family dinners or meal prep, as it keeps well and tastes even better the next day.
Ingredients (Serves 4-6 people):
- 1 lb (450g) chicken thighs, diced (or beef, pork, or tofu)
- 2 medium onions, sliced
- 2 medium carrots, diced
- 2 medium potatoes, diced
- 4 cups water or chicken broth
- 1 package (about 7 oz) Japanese curry roux (any brand)
- 2 tablespoons vegetable oil
- Salt and pepper to taste
- Cooked Japanese short-grain rice (for serving)
- Optional: green peas or other vegetables for variation
Cooking Instructions:
- Prepare the Ingredients: Start by washing, peeling, and cutting your vegetables. Dice the onions, carrots, and potatoes into bite-sized pieces. If using chicken, beef, or tofu, cut them into similar-sized pieces for even cooking. This preparation step helps in cooking everything uniformly.
- Sauté the Aromatics: In a large pot or Dutch oven, heat the vegetable oil over medium heat. Add the sliced onions and sauté them until they become translucent and fragrant, about 5-7 minutes. This step builds a flavor base for the curry.
- Brown the Meat: Add the diced chicken (or your choice of meat/tofu) to the pot and season with salt and pepper. Cook until the meat is browned on all sides, which usually takes about 5-10 minutes. Browning the meat adds depth to the flavor of the dish.
- Add the Vegetables: Once the meat is browned, add the diced carrots and potatoes to the pot. Stir everything together for a couple of minutes to combine the flavors before adding the liquid.
- Simmer with Liquid: Pour in the water or chicken broth, making sure to scrape up any browned bits from the bottom of the pot. Bring the mixture to a boil, then reduce the heat to low, cover, and let it simmer for about 15-20 minutes, or until the vegetables are tender.
- Incorporate the Curry Roux: Break the curry roux into pieces and add it to the pot. Stir until the roux is fully dissolved. Allow the curry to simmer uncovered for an additional 10 minutes, stirring occasionally. This gives the curry its thick, rich consistency and enhances the flavors.
- Final Adjustments: Taste the curry and adjust the seasoning with more salt and pepper if needed. If you prefer a thicker curry, you can simmer it for a few more minutes.
- Serve: Serve the Japanese curry over a bed of fluffy cooked rice. You can garnish with green peas or other vegetables if desired.
Extra Tips: To make your Japanese Curry Rice even more special, consider adding a splash of soy sauce or a sprinkle of garam masala for additional flavor. For those who enjoy a little heat, adding some chili flakes or paste can spice things up. Leftovers can be stored in the fridge for up to three days and can also be frozen for later use. Reheating the curry may enhance the flavors, making it taste even better the next day!
Edamame and Sea Salt

Edamame and sea salt is a simple yet delightful Japanese dish that highlights the natural flavor of young soybeans. Often enjoyed as a snack or appetizer, this dish isn’t only nutritious but also incredibly easy to prepare. The combination of fresh edamame pods sprinkled with sea salt creates a perfect balance of taste, making it a favorite among both adults and children alike.
To prepare edamame and sea salt, you’ll need fresh or frozen edamame pods, which are packed with protein and fiber. This dish is typically enjoyed warm, making it an ideal addition to any Japanese-inspired lunch. The preparation involves boiling the edamame until tender and then seasoning them with a sprinkle of sea salt. This straightforward recipe is perfect for serving 4-6 people, making it a great choice for gatherings or as a side dish to complement your main courses.
Ingredients (Serves 4-6):
- 1 pound fresh or frozen edamame pods in their shells
- 2 teaspoons sea salt
- Water (for boiling)
Cooking Instructions:
- Boil Water: In a large pot, fill it with enough water to fully submerge the edamame pods. Bring the water to a rolling boil over high heat.
- Add Edamame: Once the water is boiling, carefully add the edamame pods to the pot. If using frozen edamame, there’s no need to thaw them beforehand.
- Cook the Edamame: Allow the edamame to cook for about 5-7 minutes, or until they’re tender but still firm. You can taste a bean to check for doneness. Avoid overcooking as they can become mushy.
- Drain and Rinse: After cooking, carefully drain the edamame in a colander. Rinse them briefly under cold running water to stop the cooking process and cool them down slightly.
- Season with Sea Salt: Transfer the warm edamame to a serving bowl. Sprinkle the sea salt evenly over the pods, tossing gently to coat.
- Serve: Serve the edamame warm as a snack or appetizer. Guests can pop the beans out of the pods with their teeth, discarding the shells.
Extra Tips:
For an extra layer of flavor, consider adding a squeeze of fresh lemon juice or a dash of soy sauce before serving. You can also experiment with different types of salts, such as garlic salt or chili salt, for a unique twist on this classic dish.
Remember to adjust the amount of salt according to your taste preference, as you can always add more, but it’s hard to remove excess once added. Enjoy your delicious and healthy edamame and sea salt!
Gyoza (Japanese Dumplings)
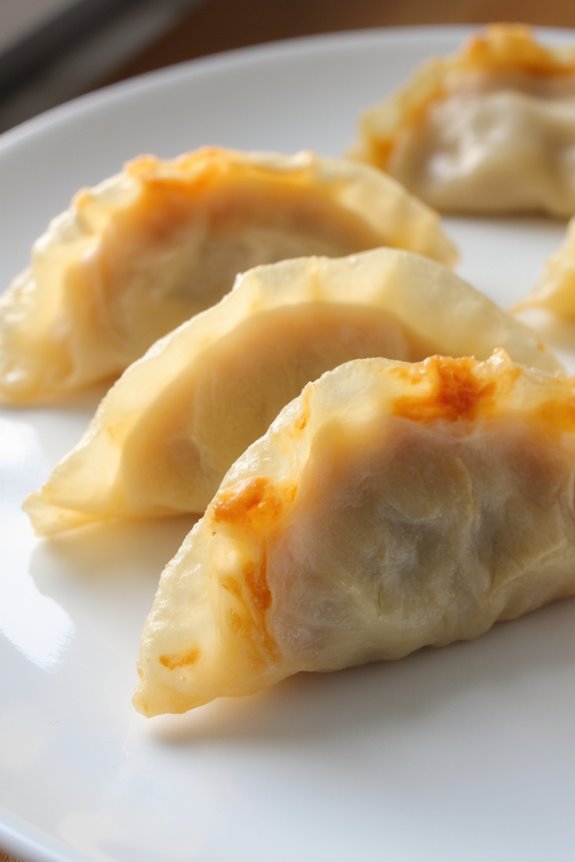
Gyoza, also known as Japanese dumplings, are a beloved dish that can be found in many households and restaurants across Japan. These delectable dumplings are typically filled with a mixture of ground meat and vegetables, and they can be either steamed, boiled, or pan-fried. The perfect gyoza has a crispy bottom while the tops remain tender, making them a delightful treat for any occasion.
Whether you’re enjoying them as an appetizer, main dish, or a snack, gyoza are sure to impress with their delicious flavors and satisfying textures.
Making gyoza at home can be a fun activity, and it’s a great way to experiment with different fillings. While the traditional filling often includes ground pork, you can easily customize the recipe by incorporating your favorite ingredients, such as chicken, shrimp, or vegetables.
Once you master the art of folding and cooking these dumplings, you can enjoy the satisfying process of creating a dish that isn’t only tasty but also visually appealing. Gather your ingredients and let’s plunge into this delicious recipe for gyoza!
Ingredients (Serves 4-6 people)
- 1 pound ground pork (or chicken/shrimp)
- 1 cup napa cabbage, finely chopped
- 2 green onions, finely chopped
- 2 cloves garlic, minced
- 1 tablespoon ginger, grated
- 2 tablespoons soy sauce
- 1 tablespoon sesame oil
- 1 tablespoon rice vinegar
- 1/2 teaspoon salt
- 1/4 teaspoon black pepper
- 30 gyoza wrappers
- Oil for frying
- Water for steaming
Cooking Instructions
1. Prepare the Filling: In a large mixing bowl, combine the ground pork (or your choice of protein) with the finely chopped napa cabbage, green onions, minced garlic, grated ginger, soy sauce, sesame oil, rice vinegar, salt, and black pepper.
Mix thoroughly until all ingredients are well incorporated. This mixture will be the flavorful filling for your gyoza.
2. Assemble the Gyoza: Take a gyoza wrapper and place about 1 tablespoon of the filling in the center. Moisten the edges of the wrapper with a little water using your finger.
Fold the wrapper in half to create a half-moon shape, then pinch the edges to seal it tightly. You can also create pleats along the edge for a traditional look. Repeat this step with the remaining wrappers and filling.
3. Cook the Gyoza: Heat a large skillet over medium-high heat and add a tablespoon of oil. Once the oil is hot, place the gyoza in the skillet, flat-side down, making sure not to overcrowd them.
Cook for about 2-3 minutes, or until the bottoms are golden brown.
4. Steam the Gyoza: After the bottoms are browned, carefully add about 1/4 cup of water to the skillet and immediately cover it with a lid. This will create steam that cooks the tops of the gyoza.
Let them steam for about 5-7 minutes or until the water has evaporated.
5. Serve: Once the gyoza are cooked, remove the lid and allow them to crisp up for another minute. Transfer the gyoza to a serving plate and serve them hot with a dipping sauce made from soy sauce, rice vinegar, and a splash of chili oil if desired.
Extra Tips
When making gyoza, feel free to experiment with the filling ingredients based on your preferences or what you have on hand. For a vegetarian option, substitute meat with a mix of mushrooms, tofu, and additional vegetables.
Additionally, make sure to seal the gyoza tightly to prevent any filling from leaking out during cooking. You can also freeze uncooked gyoza for later use; just make sure they aren’t touching each other before freezing. Enjoy your homemade gyoza!
Teriyaki Salmon Bowl

The Teriyaki Salmon Bowl is a vibrant and delicious dish that marries the rich flavors of succulent salmon with a sweet and savory teriyaki sauce. This Japanese-inspired meal isn’t only quick to prepare but also incredibly satisfying, making it a perfect option for lunch or dinner.
Served over a bed of fluffy rice and accompanied by fresh vegetables, the Teriyaki Salmon Bowl is a well-balanced meal that delights the senses and nourishes the body.
Creating this dish at home allows you to customize the ingredients to your liking, whether you prefer brown rice, quinoa, or an assortment of seasonal vegetables. The sweet and sticky teriyaki sauce can be made from scratch or purchased pre-made from the store, saving you time while still delivering exceptional flavor.
With its vibrant colors and delicious taste, the Teriyaki Salmon Bowl is sure to become a favorite in your household.
Ingredients (Serves 4-6)
- 4 salmon fillets (about 6 oz each)
- 1 cup soy sauce
- 1/2 cup mirin (sweet rice wine)
- 1/2 cup brown sugar
- 2 tablespoons grated ginger
- 2 tablespoons minced garlic
- 4 cups cooked rice (white or brown)
- 2 cups mixed vegetables (such as broccoli, bell peppers, and carrots)
- 2 tablespoons sesame oil
- 1 tablespoon sesame seeds (for garnish)
- 2 green onions, sliced (for garnish)
Cooking Instructions
1. Prepare the Teriyaki Sauce: In a medium saucepan, combine the soy sauce, mirin, brown sugar, grated ginger, and minced garlic. Heat over medium heat, stirring occasionally, until the sugar has dissolved and the sauce begins to simmer.
Allow it to simmer for about 5 minutes to thicken slightly, then remove from heat and set aside.
2. Marinate the Salmon: Place the salmon fillets in a shallow dish and pour half of the prepared teriyaki sauce over them. Allow the salmon to marinate for at least 15-30 minutes. This will help to infuse the fish with flavor.
3. Cook the Salmon: In a large skillet, heat the sesame oil over medium-high heat. Remove the salmon from the marinade (discard the marinade) and place the fillets skin-side down in the skillet.
Cook for about 4-5 minutes on each side, or until the salmon is cooked through and flakes easily with a fork. During the final minute of cooking, brush the remaining teriyaki sauce over the salmon for added flavor.
4. Prepare the Vegetables: While the salmon is cooking, in another pan, add a splash of sesame oil and sauté the mixed vegetables over medium heat for about 5-7 minutes until they’re tender but still crisp.
5. Assemble the Bowls: To serve, place a portion of cooked rice in each bowl, top with a salmon fillet, and arrange the sautéed vegetables alongside.
Drizzle any leftover teriyaki sauce over the top and garnish with sesame seeds and sliced green onions.
Extra Tips
For added depth of flavor, consider grilling the salmon instead of pan-searing it, as this will give it a smoky taste that complements the teriyaki sauce beautifully.
If you’re short on time, feel free to use pre-cooked rice or frozen mixed vegetables for a quicker prep. Finally, don’t hesitate to experiment with different vegetables or even add toppings such as avocado or pickled ginger for a unique twist on your Teriyaki Salmon Bowl.
Cold Tofu With Soy Sauce

Cold Tofu with Soy Sauce is a delightful Japanese dish that embodies simplicity and fresh flavors. This dish showcases the delicate texture of silken tofu, served chilled and complemented by a rich soy sauce dressing. It’s perfect for a light lunch or as an appetizer in a more elaborate meal. The beauty of this dish lies in its minimalistic approach, allowing the natural flavors of the tofu to shine through while being enhanced by the savory soy sauce.
This recipe is incredibly easy to prepare and requires no cooking, making it an ideal choice for hot summer days or when you’re short on time. With just a few ingredients, you can create a invigorating dish that isn’t only delicious but also nutritious. Whether you’re a fan of Japanese cuisine or simply looking to try something new, Cold Tofu with Soy Sauce is a must-try!
Ingredients (Serving Size: 4-6 People)
- 1 block (14 oz) silken tofu
- 3 tablespoons soy sauce
- 1 tablespoon sesame oil
- 2 green onions, finely chopped
- 1 tablespoon bonito flakes (optional)
- 1 teaspoon grated ginger (optional)
- 1 teaspoon sesame seeds (optional)
Cooking Instructions
- Prepare the Tofu: Begin by carefully removing the silken tofu from its packaging. Gently drain any excess water to prevent the dish from becoming watery. Place the tofu on a cutting board and slice it into cubes or rectangles, depending on your preference for serving size.
- Create the Dressing: In a small bowl, combine the soy sauce and sesame oil. If you’re using optional ingredients such as grated ginger or bonito flakes, add them to the mixture as well. Stir gently until all the components are well blended.
- Plate the Tofu: Arrange the tofu pieces on a serving platter or individual plates. Confirm that the pieces are evenly spaced for presentation.
- Add the Dressing: Drizzle the soy sauce dressing over the arranged tofu. Be generous, as the dressing is what elevates the dish.
- Garnish: Sprinkle the finely chopped green onions over the tofu and dressing. If using, add sesame seeds for extra crunch and texture.
- Serve: Chill the dish in the refrigerator for about 10-15 minutes before serving for a invigorating experience. Enjoy this cold dish as an appetizer or alongside rice and other side dishes.
Extra Tips
When preparing Cold Tofu with Soy Sauce, it’s important to choose high-quality silken tofu, as its texture greatly impacts the overall experience of the dish.
For a variation, consider adding additional toppings such as sliced radishes or a dash of chili oil for a bit of heat. This dish can also be served alongside steamed rice or other Japanese side dishes, making it a versatile addition to any meal.
Enjoy experimenting with different garnishes and flavors to make this dish your own!
Veggie Sushi Rolls

Veggie sushi rolls, also known as maki sushi, are a delightful and healthy option for a Japanese lunch. These rolls are packed with fresh vegetables and wrapped in sushi rice and seaweed, making them not only nutritious but also visually appealing.
Whether you’re a sushi enthusiast or a novice in the kitchen, making veggie sushi rolls at home is a fun and rewarding experience. By using a variety of colorful vegetables and your favorite sushi rice, you can customize these rolls to suit your taste.
To get started, it’s important to gather all your ingredients and tools. A bamboo sushi mat is a must-have for rolling the sushi, but if you don’t have one, you can use a clean kitchen towel. The key to perfect veggie sushi rolls is to guarantee that your rice is seasoned properly and that you cut your vegetables into thin, uniform strips for easy rolling.
With a little practice, you’ll be rolling like a pro in no time!
Ingredients (Serves 4-6 people):
- 2 cups sushi rice
- 2 1/2 cups water
- 1/4 cup rice vinegar
- 2 tablespoons sugar
- 1 teaspoon salt
- 4 sheets nori (seaweed)
- 1 cucumber, julienned
- 1 carrot, julienned
- 1 bell pepper (any color), julienned
- 1 avocado, sliced
- Soy sauce (for serving)
- Wasabi (optional)
- Pickled ginger (optional)
Cooking Instructions:
1. Prepare the Sushi Rice: Rinse the sushi rice under cold water until the water runs clear. This removes excess starch. Combine the rinsed rice and water in a rice cooker or pot and cook according to the manufacturer’s instructions. If using a pot, bring to a boil, then cover and reduce to a simmer for 20 minutes.
Once cooked, let it sit for 10 minutes, covered.
2. Season the Rice: In a small bowl, combine rice vinegar, sugar, and salt. Microwave for 30 seconds to dissolve the sugar and salt. Once the rice has cooled slightly, transfer it to a large bowl and gently fold in the vinegar mixture. Be careful not to mash the rice; you want it to remain fluffy.
3. Prepare the Vegetables: While the rice is cooking, wash and cut the cucumber, carrot, bell pepper, and avocado into thin strips. Keep the vegetables organized for easy access when rolling.
4. Assemble the Sushi Rolls: Place a sheet of nori on your bamboo mat, shiny side down. Wet your hands to prevent sticking and take a handful of sushi rice (about 3/4 cup) and spread it evenly over the nori, leaving about 1 inch at the top edge. Press the rice down gently to guarantee it sticks.
5. Add the Fillings: In the center of the rice-covered nori, lay down a few pieces of each vegetable, arranging them neatly in a line.
6. Roll the Sushi: Starting from the edge closest to you, lift the bamboo mat and begin to Roll the Sushi away from you, pressing gently but firmly. Roll until you reach the uncovered edge of the nori. Moisten the edge with a little water to seal the roll.
7. Cut the Rolls: Use a sharp knife to slice the roll into 6-8 pieces. Wipe the knife with a damp cloth between cuts to keep the slices clean.
8. Serve: Arrange the sushi rolls on a platter and Serve with soy sauce, wasabi, and pickled ginger on the side.
Extra Tips:
When making veggie sushi rolls, feel free to get creative with your fillings! You can add other vegetables like radishes, zucchini, or even cooked ingredients like tempura or tofu for additional protein.
Always guarantee your ingredients are fresh, and don’t hesitate to experiment with different flavor combinations. For an extra touch, sprinkle sesame seeds on the rice before rolling, and enjoy your homemade veggie sushi rolls with friends and family!