

Japanese chicken dishes have a special place in my heart with their vibrant flavors and heartwarming stories. Whether it’s the sweet glaze of teriyaki or the smoky essence of yakitori, each recipe brings a unique twist to chicken. These dishes not only highlight tender chicken but also pair perfectly with fresh vegetables and aromatic herbs. If you’re curious about crafting these juicy bites, let’s explore some satisfying options that will elevate your culinary repertoire. Get ready to embrace these delightful flavors in your kitchen.
Teriyaki Chicken

Teriyaki Chicken is a popular Japanese dish known for its delightful balance of sweet and savory flavors. It typically features succulent pieces of chicken marinated in a rich teriyaki sauce made from soy sauce, mirin, and sugar. This dish isn’t only delicious but also easy to prepare, making it a favorite among home cooks and families.
When served with steamed rice and vegetables, Teriyaki Chicken becomes a wholesome meal that’s certain to please everyone at the table.
In this recipe, you’ll learn how to create the perfect Teriyaki Chicken that boasts a glossy, sticky sauce that clings to the chicken beautifully. The process involves marinating the chicken to infuse it with flavor, followed by cooking it to achieve that irresistible caramelized finish.
Whether you’re hosting a dinner party or simply cooking for your family, this dish is bound to impress.
Ingredients (Serves 4-6)
- 1.5 lbs boneless, skinless chicken thighs or breasts
- 1/2 cup soy sauce
- 1/4 cup mirin
- 1/4 cup brown sugar
- 2 tablespoons rice vinegar
- 1 tablespoon sesame oil
- 2 cloves garlic, minced
- 1 teaspoon fresh ginger, grated
- 1 tablespoon cornstarch (optional, for thickening)
- 2 tablespoons water (optional, for thickening)
- Sesame seeds (for garnish)
- Green onions, sliced (for garnish)
Cooking Instructions
1. Prepare the Marinade**: In a medium bowl, combine the soy sauce, mirin, brown sugar, rice vinegar, sesame oil, minced garlic, and grated ginger. Whisk the ingredients together until the sugar is dissolved and the mixture is well combined. This marinade will infuse the chicken with flavor and help create that signature teriyaki glaze**.
2. Marinate the Chicken: Place the chicken thighs or breasts in a large resealable plastic bag or a shallow dish. Pour the marinade over the chicken, making sure it’s fully coated. Seal the bag or cover the dish, and refrigerate for at least 30 minutes, or up to 2 hours for a deeper flavor.
This step is essential for maximizing the taste of the chicken.
3. Cook the Chicken: Heat a large skillet or grill pan over medium-high heat. Remove the chicken from the marinade, allowing the excess to drip off. Add the chicken to the hot skillet. Cook for about 5-7 minutes on each side, or until the chicken is cooked through and has a nice golden-brown color.
Use a meat thermometer to confirm the internal temperature reaches 165°F (75°C).
4. Make the Teriyaki Sauce: While the chicken is cooking, pour the leftover marinade into a small saucepan. Bring it to a simmer over medium heat. If you prefer a thicker sauce, mix the cornstarch with water in a separate bowl and add it to the simmering sauce, stirring continuously until it thickens.
This will give your teriyaki sauce that desired glossy texture.
5. Glaze the Chicken: Once the chicken is cooked, drizzle the thickened teriyaki sauce over the chicken in the skillet, allowing it to caramelize slightly for an additional 1-2 minutes. This step enhances the flavor and creates a beautiful glaze.
6. Serve: Remove the chicken from the heat and slice it into bite-sized pieces. Serve the Teriyaki Chicken over steamed rice and drizzle with any remaining sauce. Garnish with sesame seeds and sliced green onions for an added touch of flavor and presentation.
Extra Tips
For the best results, marinate the chicken for a longer period if possible, as this allows the flavors to penetrate deeper.
You can also substitute chicken thighs for chicken breasts if you prefer a juicier cut. If you’re looking to add a little variety, consider incorporating vegetables like bell peppers, broccoli, or snap peas into the dish.
These can be sautéed in the same skillet for a colorful and nutritious addition to your Teriyaki Chicken meal. Enjoy your cooking!
Chicken Katsu
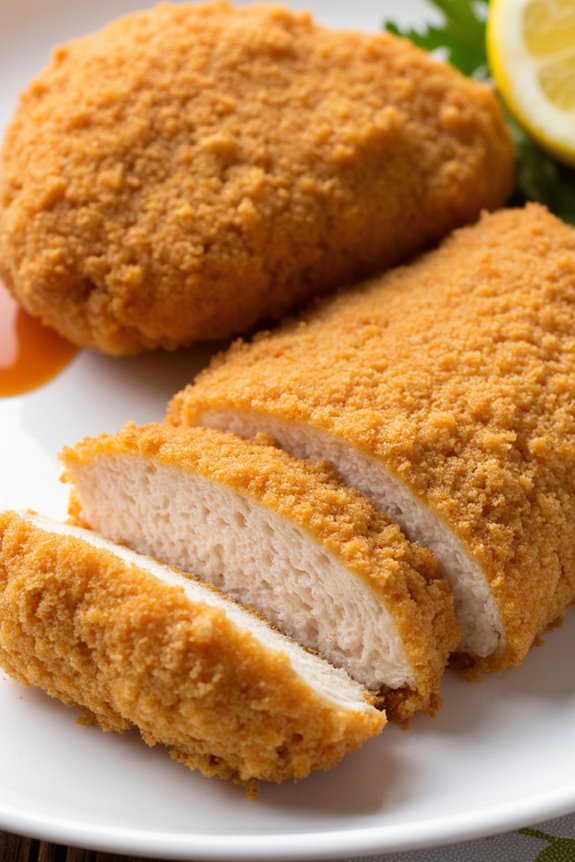
Chicken Katsu is a popular Japanese dish that features breaded and deep-fried chicken cutlets, known for their crispy exterior and juicy interior. This dish isn’t only loved for its delightful crunch, but also for its versatility, as it can be served with a variety of sides, such as rice, salad, or even in a sandwich.
Typically accompanied by a tangy katsu sauce, Chicken Katsu makes for a satisfying meal that can be enjoyed by the whole family.
The preparation of Chicken Katsu is relatively straightforward, making it an excellent choice for both novice cooks and seasoned chefs alike. With just a few key ingredients and simple techniques, anyone can whip up this delicious dish in no time.
Whether you’re looking to impress guests or simply enjoy a comforting homemade meal, Chicken Katsu is bound to become a favorite in your kitchen.
Ingredients (Serves 4-6)
- 4 boneless, skinless chicken breasts
- Salt and pepper, to taste
- 1 cup all-purpose flour
- 2 large eggs
- 2 cups panko breadcrumbs
- Vegetable oil, for frying
- Katsu sauce, for serving
- Lemon wedges, for garnish (optional)
Cooking Instructions
1. Prepare the Chicken: Start by placing the chicken breasts between two sheets of plastic wrap or parchment paper. Using a meat mallet or rolling pin, gently pound the chicken to an even thickness of about 1/2 inch. This guarantees even cooking and tenderness.
Season both sides with salt and pepper to enhance the flavor.
2. Set Up the Breading Station: In three shallow dishes, set up your breading station. In the first dish, add the flour. In the second dish, whisk the eggs until well combined.
In the third dish, place the panko breadcrumbs. This assembly line will make the breading process easier and more efficient.
3. Bread the Chicken: Take one chicken breast and dredge it in the flour, making sure to coat both sides evenly. Shake off any excess flour.
Next, dip the floured chicken into the beaten eggs, allowing any excess to drip off. Finally, coat the chicken with panko breadcrumbs, pressing gently to adhere the crumbs to the chicken.
Repeat this process for all the chicken breasts.
4. Heat the Oil: In a large skillet or frying pan, pour enough vegetable oil to cover the bottom of the pan by about 1/4 inch. Heat the oil over medium-high heat until it reaches approximately 350°F (175°C).
You can test the oil by dropping in a few breadcrumbs; they should sizzle and turn golden brown when the oil is hot enough.
5. Fry the Chicken: Carefully place the breaded chicken cutlets into the hot oil, making sure not to overcrowd the pan. Fry the chicken for about 3-4 minutes on each side or until golden brown and cooked through.
The internal temperature should reach 165°F (75°C). Once cooked, transfer the chicken to a paper towel-lined plate to drain excess oil.
6. Serve: Slice the Chicken Katsu into strips and serve immediately with katsu sauce drizzled on top or on the side for dipping. Garnish with lemon wedges if desired.
Extra Tips
To achieve an even crispier texture, consider double-breading the chicken by dipping it in the egg and panko twice.
Additionally, you can customize the flavor of your katsu sauce by adding a splash of soy sauce or a hint of garlic. For a healthier option, try baking the breaded chicken in a preheated oven at 400°F (200°C) for about 20-25 minutes, flipping halfway through, until golden and cooked through.
Yakitori
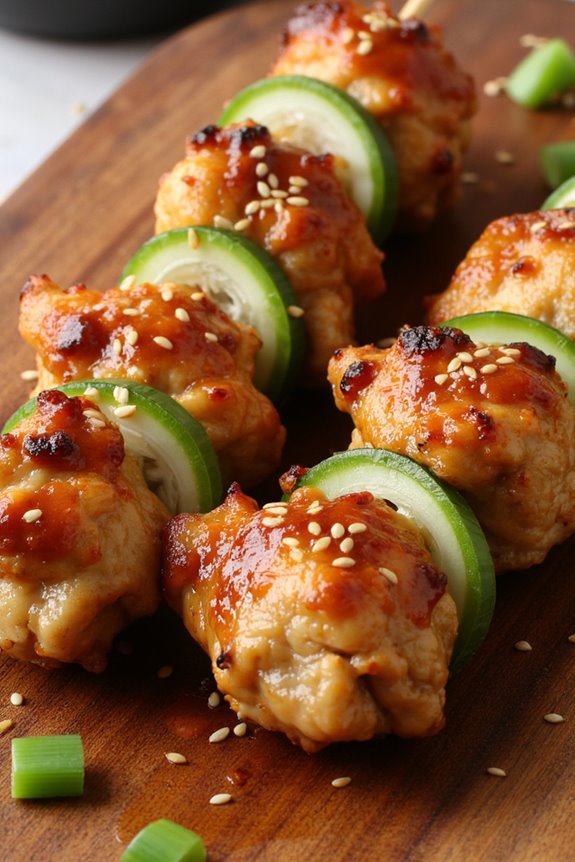
Yakitori is a traditional Japanese dish that consists of skewered and grilled chicken, often seasoned simply with salt or coated in a savory-sweet sauce known as tare. This dish isn’t only popular in izakayas (Japanese pubs) but also a favorite for outdoor barbecues and family gatherings.
Yakitori celebrates the natural flavors of chicken, and its simplicity allows for a variety of adaptations, including different cuts of chicken and various vegetables. The beauty of yakitori lies in its versatility. You can use different parts of the chicken, such as thighs, breasts, wings, and even offals like liver and heart, to create a diverse platter.
The skewers are usually grilled over charcoal, imparting a smoky flavor that enhances the overall taste. Serve yakitori with a side of rice and a revitalizing salad for a complete meal that will surely impress your family and friends.
Ingredients (serves 4-6 people):
- 2 lbs chicken thighs, boneless and skinless
- 1 lb green onions, cut into 2-inch pieces
- Salt, to taste
- 1 cup soy sauce
- 1/2 cup mirin (sweet rice wine)
- 1/2 cup sake (Japanese rice wine)
- 1/4 cup sugar
- Bamboo skewers (soaked in water for 30 minutes)
Cooking Instructions:
- Prepare the chicken: Start by cutting the chicken thighs into bite-sized pieces, about 1-2 inches each. This size is ideal for skewering and guarantees even cooking. Place the chicken in a bowl and set aside while you prepare the marinade.
- Make the tare sauce: In a saucepan, combine the soy sauce, mirin, sake, and sugar. Heat over medium heat until it begins to simmer. Stir occasionally until the sugar fully dissolves. Allow the mixture to simmer for about 10-15 minutes until it thickens slightly. Remove from heat and let it cool. Reserve half of the tare for serving.
- Skewer the chicken and green onions: Take the soaked bamboo skewers and thread the chicken pieces onto them, alternating with pieces of green onion. Aim for about 4-5 pieces of chicken and 2-3 pieces of green onion per skewer. Leave some space at the ends of the skewers for easy handling.
- Season the skewers: Lightly sprinkle the assembled skewers with salt. This will enhance the natural flavors of the chicken and balance the sweetness of the tare sauce.
- Grill the yakitori: Preheat your grill or grill pan over medium-high heat. Once hot, place the skewers on the grill. Cook for about 3-4 minutes on one side until browned, then flip and brush with the tare sauce. Continue grilling for another 3-4 minutes while basting with the sauce, until the chicken is fully cooked and has a nice glaze.
- Serve: Once cooked, remove the skewers from the grill and place them on a serving platter. Drizzle with the reserved tare sauce for extra flavor. Optionally, garnish with sesame seeds or chopped green onions for a finishing touch.
Extra Tips:
When preparing yakitori, feel free to experiment with different vegetables such as bell peppers, mushrooms, or zucchini alongside the chicken.
Also, confirm that your skewers are soaked well to prevent burning on the grill. For an authentic experience, consider using binchotan (Japanese charcoal) for grilling, as it offers a unique flavor that enhances the dish.
Finally, don’t shy away from trying different marinades or spices to personalize your yakitori to suit your taste!
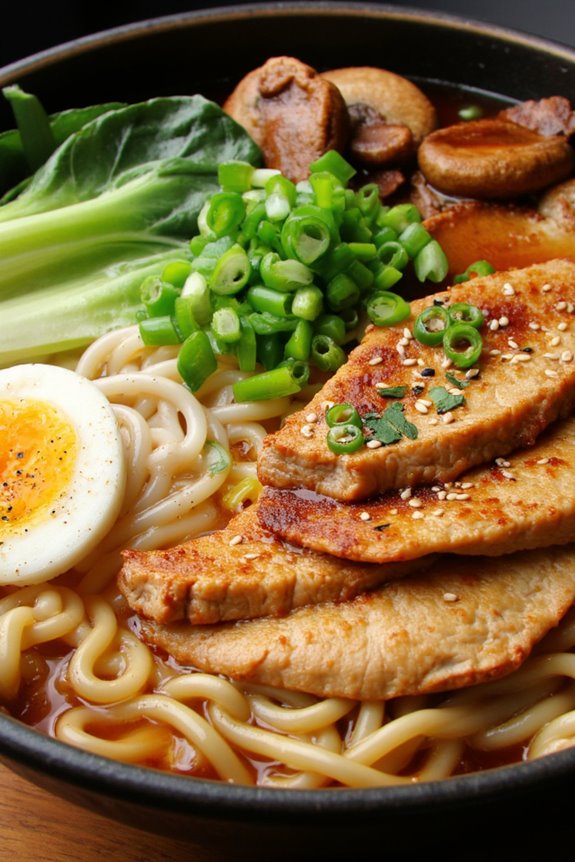
Chicken Ramen
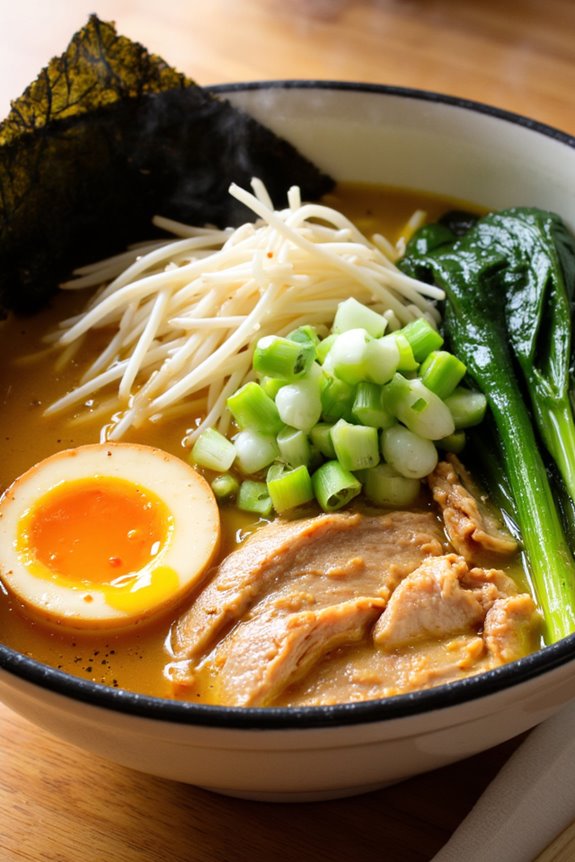
Chicken Ramen is a beloved Japanese dish that combines tender chicken, rich broth, and chewy noodles into a comforting meal perfect for any day of the week. This dish not only warms the soul but also provides a delightful mix of flavors and textures with every slurp of noodle and sip of broth.
With its savory depth and aromatic garnishes, Chicken Ramen is a fantastic way to showcase the simplicity and elegance of Japanese cuisine. Creating your own Chicken Ramen at home allows you to experiment with different ingredients and customize the flavors to your liking. You can use store-bought ramen noodles or make your own for an authentic touch.
The key to a great ramen lies in the broth, which is often simmered for hours to extract the deepest flavors from the chicken and aromatics. Whether you’re cooking for a cozy dinner or entertaining friends, this Chicken Ramen recipe will surely impress.
Ingredients (Serves 4-6)
- 1 whole chicken (about 3-4 pounds), cut into pieces
- 8 cups of water
- 2 tablespoons soy sauce
- 1 tablespoon miso paste (white or red)
- 2 teaspoons sesame oil
- 1 onion, sliced
- 4 cloves garlic, minced
- 1-inch piece of ginger, sliced
- 4 green onions, chopped (plus extra for garnish)
- 2 cups bok choy or spinach
- 4-6 servings of ramen noodles
- Soft-boiled eggs (optional, for garnish)
- Nori seaweed sheets (optional, for garnish)
- Bean sprouts (optional, for garnish)
Cooking Instructions
- Prepare the Broth: In a large pot, combine the chicken pieces, water, soy sauce, miso paste, sesame oil, sliced onion, minced garlic, and sliced ginger. Bring the mixture to a boil over high heat, then reduce to a simmer. Let it simmer for about 45 minutes to 1 hour, skimming off any foam that may rise to the surface. This step is essential for a clear and flavorful broth.
- Cook the Chicken: After simmering, remove the chicken pieces from the pot and set them aside to cool slightly. Once cool enough to handle, shred the meat from the bones and discard the bones and skin. Return the shredded chicken to the pot with the broth to absorb more flavor.
- Prepare the Noodles: In a separate pot, cook the ramen noodles according to the package instructions. Make sure not to overcook them, as they’ll continue to soften when added to the broth. Drain and rinse the noodles under cold water to stop the cooking process and set aside.
- Add Vegetables: In the same pot with the broth, add the bok choy or spinach and chopped green onions. Let them cook for about 3-5 minutes until they’re just wilted. This step adds both nutrients and color to your ramen.
- Assemble the Ramen Bowls: To serve, divide the cooked ramen noodles into serving bowls. Ladle the hot broth with chicken and vegetables over the noodles. If desired, top each bowl with a soft-boiled egg, a few sheets of nori, and bean sprouts for added texture and flavor.
- Garnish and Serve: Finish off with additional chopped green onions and serve immediately while hot. Enjoy your homemade Chicken Ramen!
Extra Tips
When preparing Chicken Ramen, feel free to customize the toppings based on your preferences. You can add corn, mushrooms, or even chili oil for a bit of heat.
For a richer broth, consider simmering the chicken bones longer or incorporating some chicken stock. If you’re short on time, you can use rotisserie chicken to save on cooking time while still achieving a flavorful dish. Don’t forget to experiment with different types of noodles to find your favorite!
Oyako Donburi

Oyako Donburi, a traditional Japanese comfort food, brings together the harmonious flavors of chicken, eggs, and onions over a bed of fluffy rice. The name “Oyako” translates to “parent and child,” referring to the chicken and eggs used in this delightful dish.
It’s a staple in many Japanese households, known for its simplicity and heartwarming taste. The dish isn’t only easy to prepare, but it also showcases the umami-rich flavors characteristic of Japanese cuisine, making it an instant favorite for family dinners.
This one-pot meal is perfect for busy weeknights or when you’re craving something warm and satisfying. The combination of tender chicken simmered in a savory dashi broth, alongside silky scrambled eggs, creates a texture and taste that’s truly comforting.
Served over steaming rice, Oyako Donburi is a delicious way to bring the flavors of Japan to your kitchen.
Ingredients (serving size: 4-6 people)
- 1 lb (450 g) boneless, skinless chicken thighs, cut into bite-sized pieces
- 1 medium onion, thinly sliced
- 4 large eggs
- 2 cups cooked Japanese short-grain rice
- 1 cup dashi broth (or substitute with chicken stock)
- 3 tablespoons soy sauce
- 2 tablespoons mirin
- 1 tablespoon sugar
- 2 green onions, sliced (for garnish)
- Nori seaweed strips (optional, for garnish)
Cooking Instructions
- Prepare the Dashi Broth: If you’re making dashi from scratch, combine 1 cup of water with a piece of kombu (dried kelp) and bring it to a simmer. Remove the kombu, add bonito flakes, and let it steep for a few minutes. Strain the liquid to get a clear broth. Alternatively, use store-bought dashi or chicken stock.
- Cook the Chicken and Onions: In a large skillet or pan, heat the dashi broth over medium heat. Add the sliced onions and cook until they start to soften, about 3-5 minutes. Then, add the chicken pieces to the pan and cook for another 5-7 minutes, or until the chicken is cooked through.
- Season the Mixture: Once the chicken is cooked, stir in the soy sauce, mirin, and sugar. Let it simmer for an additional 3-4 minutes to allow the flavors to meld together.
- Add the Eggs: In a bowl, beat the eggs lightly. Pour the beaten eggs over the chicken and onion mixture in the skillet. Cover the pan with a lid and let it cook for about 2-3 minutes, or until the eggs are just set but still slightly runny.
- Serve Over Rice: Prepare bowls of warm cooked rice. Gently spoon the chicken and egg mixture over the rice. Make sure to include the flavorful broth. Garnish with sliced green onions and nori strips if desired.
Extra Tips
When making Oyako Donburi, the key is to guarantee that the eggs aren’t overcooked; they should remain soft and creamy for the best texture.
You can also customize the dish by adding vegetables like shiitake mushrooms or spinach for added nutrition. If you’re unsure about the seasoning, taste the broth before adding the eggs and adjust the soy sauce or mirin to your preference.
Enjoy your homemade Oyako Donburi!
Miso Glazed Chicken
Miso Glazed Chicken is a delightful dish that showcases the umami-rich flavors of miso paste combined with tender chicken, creating a savory and slightly sweet glaze. This recipe is inspired by traditional Japanese cooking, where miso is often used to enhance the taste of various meats and vegetables. The marinade not only infuses the chicken with rich flavor but also helps to keep it moist and juicy during the cooking process.
This dish is perfect for a family dinner or a gathering with friends, as it can be served alongside steamed rice and a vibrant vegetable stir-fry. The combination of flavors makes Miso Glazed Chicken a crowd-pleaser that’s both satisfying and easy to prepare. With just a few simple ingredients, you can create a meal that transports your taste buds to Japan.
Ingredients (serves 4-6):
- 4-6 boneless, skinless chicken thighs or breasts
- 1/4 cup white miso paste
- 2 tablespoons soy sauce
- 2 tablespoons mirin (Japanese sweet rice wine)
- 2 tablespoons sake (Japanese rice wine)
- 2 tablespoons honey or brown sugar
- 1 tablespoon sesame oil
- 2 cloves garlic, minced
- 1 teaspoon grated fresh ginger
- 1 tablespoon chopped green onions (for garnish)
- Sesame seeds (for garnish)
Cooking Instructions:
- Prepare the Marinade: In a mixing bowl, combine the white miso paste, soy sauce, mirin, sake, honey (or brown sugar), sesame oil, minced garlic, and grated ginger. Whisk the ingredients together until smooth. This marinade is vital as it will provide the rich flavor that characterizes the dish.
- Marinate the Chicken: Place the chicken thighs or breasts in a large resealable plastic bag or a shallow dish. Pour the miso marinade over the chicken, ensuring that all pieces are well coated. Seal the bag or cover the dish and refrigerate for at least 30 minutes, or preferably for a few hours or overnight. The longer the chicken marinates, the more flavor it will absorb.
- Preheat the Oven: When you’re ready to cook, preheat your oven to 400°F (200°C). This temperature will help achieve a nice caramelization on the chicken while keeping it juicy inside.
- Bake the Chicken: Remove the chicken from the marinade and place it on a baking sheet lined with parchment paper or in a baking dish. Reserve the marinade for basting later. Bake the chicken in the preheated oven for about 25-30 minutes or until the internal temperature reaches 165°F (74°C), basting with the reserved marinade halfway through cooking.
- Broil for Extra Glaze: For an extra caramelized glaze, switch the oven to broil for the last 3-5 minutes of cooking. Keep a close eye on the chicken to prevent burning. This step will enhance the flavor and give the chicken a beautiful golden color.
- Serve and Garnish: Once the chicken is cooked through, remove it from the oven and let it rest for a few minutes. Slice the chicken if desired and serve it warm, garnished with chopped green onions and sesame seeds.
Extra Tips:
When preparing Miso Glazed Chicken, it’s important to choose a high-quality miso paste for the best flavor. White miso is milder and sweeter compared to red miso, making it perfect for this dish.
Additionally, you can experiment with different cuts of chicken, such as drumsticks or wings, to create a unique dining experience. If you’re short on time, marinating for even 15 minutes can still yield a flavorful result.
Pair the chicken with steamed jasmine rice and sautéed vegetables for a complete and satisfying meal. Enjoy your culinary journey with this delicious Japanese dish!
Karaage (Japanese Fried Chicken)
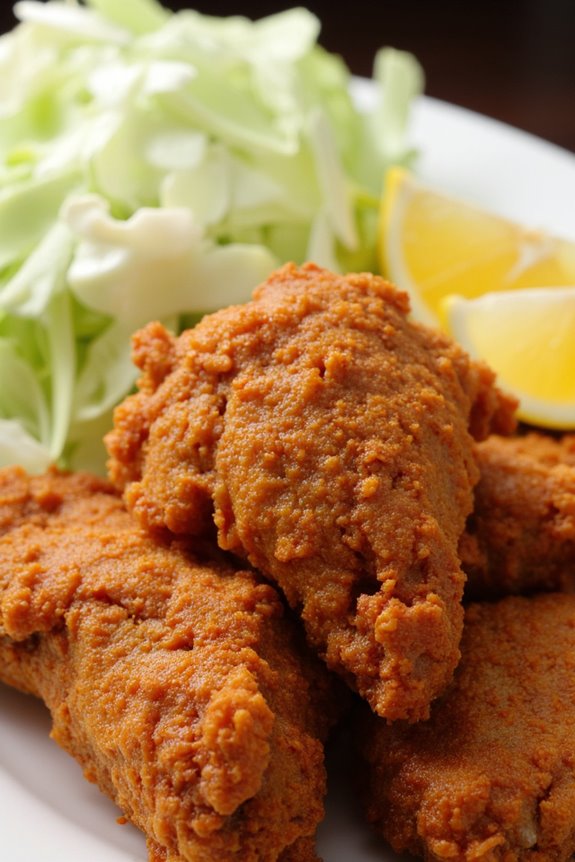
Karaage is a beloved Japanese dish that consists of marinated chicken, which is then coated in a light flour mixture and deep-fried to golden perfection. The result is juicy, tender chicken with a satisfying crunch on the outside, making it a favorite for family meals and gatherings. Although it’s often enjoyed as a main dish, it can also be served as a side or appetizer, typically accompanied by a wedge of lemon for an added zesty flavor.
The key to authentic Karaage lies in the marination process and the choice of chicken. It’s best to use chicken thighs for this dish due to their rich flavor and moisture retention during cooking. Marinating the chicken not only enhances its taste but also tenderizes the meat, resulting in a delightful texture. With simple ingredients and straightforward steps, you can bring the taste of Japan to your kitchen with this delicious recipe.
Ingredients (Serves 4-6)
- 1 lb (450g) chicken thighs, boneless and skinless
- 4 tablespoons soy sauce
- 2 tablespoons sake (Japanese rice wine)
- 2 tablespoons mirin (sweet rice wine)
- 2 cloves garlic, minced
- 1-inch piece of ginger, grated
- 1 cup potato starch or cornstarch (for coating)
- Oil for frying
- Lemon wedges (for serving)
- Shredded cabbage (optional, for serving)
Cooking Instructions
- Prepare the Chicken: Start by cutting the chicken thighs into bite-sized pieces, approximately 1-2 inches. This will guarantee even cooking and allow the marinade to penetrate the meat more effectively.
- Marinate the Chicken: In a mixing bowl, combine soy sauce, sake, mirin, minced garlic, and grated ginger. Add the chicken pieces to the marinade, making sure they’re fully coated. Cover the bowl with plastic wrap and refrigerate for at least 30 minutes, or up to 2 hours for more flavor.
- Coat the Chicken: After marination, remove the chicken from the refrigerator. In a separate bowl, add the potato starch (or cornstarch). Take each piece of marinated chicken and coat it evenly with the starch, shaking off any excess. This coating will give the chicken its signature crispy texture when fried.
- Heat the Oil: In a deep skillet or frying pan, pour enough oil (about 2-3 inches deep) to fry the chicken. Heat the oil over medium-high heat until it reaches 340°F (170°C). You can test the oil by dropping a small piece of the coated chicken in; it should sizzle immediately.
- Fry the Chicken: Carefully add the coated chicken pieces to the hot oil in batches, ensuring not to overcrowd the pan. Fry for about 4-5 minutes, turning occasionally until the chicken is golden brown and cooked through. Use a slotted spoon to remove the chicken and place it on a plate lined with paper towels to absorb excess oil.
- Serve: Once all the chicken is fried, serve it hot with lemon wedges on the side and optionally, a bed of shredded cabbage. Enjoy your Karaage with rice or as a standalone dish!
Extra Tips
For the best results, make sure to maintain a consistent oil temperature while frying. If the oil is too hot, the coating may burn before the chicken is cooked through, while oil that isn’t hot enough can lead to greasy chicken.
You can also experiment with adding a pinch of cayenne pepper or other spices to the coating for an extra kick of flavor. Finally, serve Karaage immediately after frying for ideal crispness, as it tends to lose its crunch if left to sit for too long. Enjoy your homemade Japanese fried chicken!
Chicken Udon
Chicken Udon is a comforting and hearty Japanese noodle dish that showcases thick, chewy udon noodles paired with tender chicken and a savory broth. This dish isn’t only flavorful but also versatile, as it can be adapted with various vegetables and seasonings to suit your taste.
In Japan, udon is enjoyed in many forms, from hot soups to cold salads, but this chicken version warms the soul and is perfect for family dinners or gatherings.
Making Chicken Udon at home is easier than you might think. With just a few key ingredients and simple steps, you can create a delicious meal that’s certain to impress. The combination of succulent chicken, fresh vegetables, and umami-rich broth creates a wonderful balance of flavors.
Whether you’re familiar with Japanese cuisine or trying it for the first time, this Chicken Udon recipe will undoubtedly become a favorite.
Ingredients (Serving Size: 4-6 people)
- 400g udon noodles
- 300g boneless, skinless chicken thighs, sliced
- 1 tablespoon vegetable oil
- 4 cups chicken broth
- 2 tablespoons soy sauce
- 1 tablespoon mirin
- 1 tablespoon sesame oil
- 2 cloves garlic, minced
- 1-inch piece of ginger, grated
- 1 cup shiitake mushrooms, sliced
- 1 cup bok choy, chopped
- 2 green onions, sliced (for garnish)
- Optional: sesame seeds for garnish
Cooking Instructions
- Cook the Udon Noodles: Begin by boiling a large pot of water. Once the water is at a rolling boil, add the udon noodles and cook according to the package instructions, usually about 8-10 minutes. Once cooked, drain the noodles and rinse them under cold water to stop the cooking process. Set aside.
- Sauté the Chicken: In a large pot or deep skillet, heat the vegetable oil over medium heat. Add the sliced chicken thighs and cook until they’re golden brown and cooked through, about 5-7 minutes. Confirm the chicken is no longer pink in the center, then remove it from the pot and set aside.
- Prepare the Broth: In the same pot, add the minced garlic and grated ginger. Sauté for about 1 minute until fragrant. Next, pour in the chicken broth, soy sauce, mirin, and sesame oil. Stir well and bring the mixture to a simmer.
- Add Vegetables and Chicken: Once the broth is simmering, add the sliced shiitake mushrooms and chopped bok choy. Return the cooked chicken to the pot and let everything simmer together for about 5 minutes, allowing the flavors to meld and the vegetables to soften.
- Combine with Udon: Finally, add the cooked udon noodles to the broth and gently stir to combine. Allow the noodles to warm through for about 2-3 minutes. Taste and adjust seasoning if necessary.
- Serve: Ladle the Chicken Udon into bowls and garnish with sliced green onions and sesame seeds if desired. Serve hot and enjoy!
Extra Tips
When cooking Chicken Udon, feel free to customize the dish with your favorite vegetables such as carrots, spinach, or bell peppers. You can also adjust the level of seasoning to your preference, adding more soy sauce for saltiness or mirin for sweetness.
If you have leftovers, store the broth separately from the noodles to prevent them from becoming mushy when reheating. Enjoy your delicious homemade Chicken Udon!
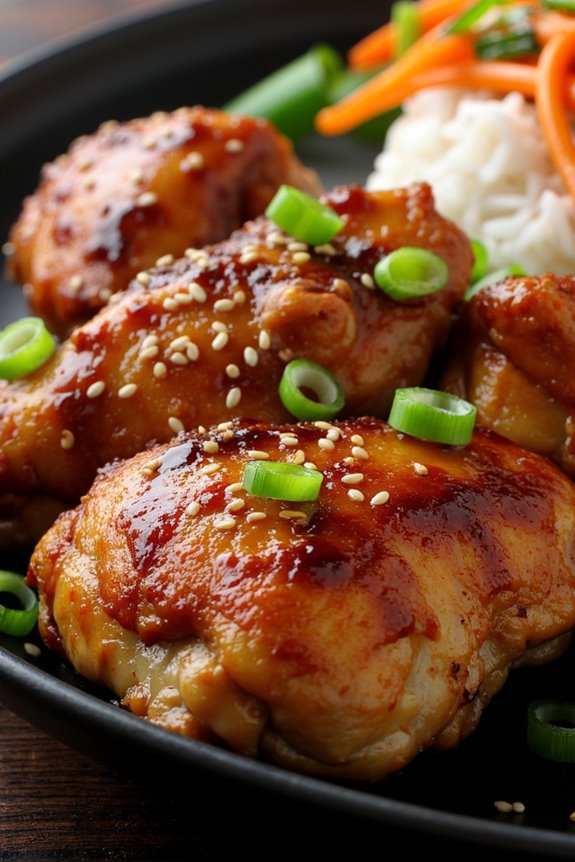
Shoyu Chicken
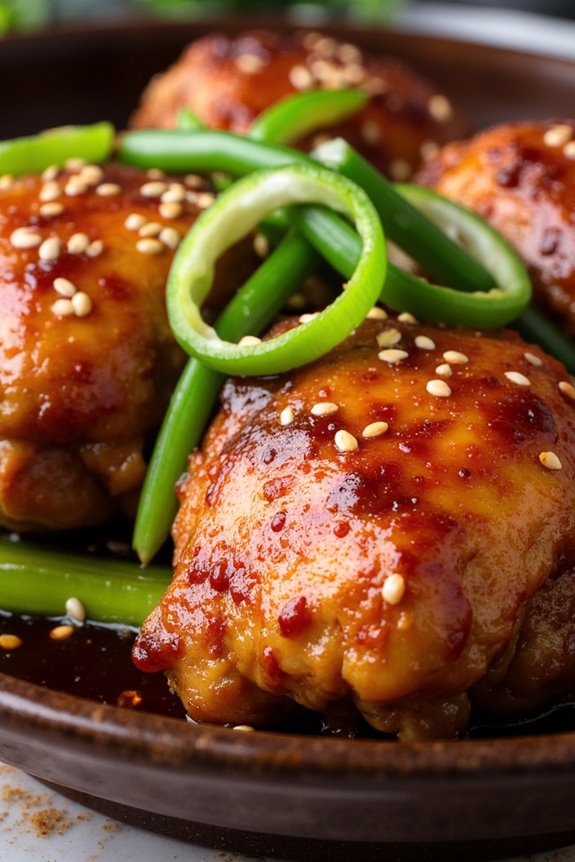
Shoyu Chicken is a delightful dish that brings together the savory flavors of soy sauce with tender, juicy chicken. This Japanese-inspired recipe isn’t only easy to prepare but also features a rich glaze that perfectly complements the meat. Originating from a blend of traditional Japanese cooking and Hawaiian influences, Shoyu Chicken has become a beloved meal in many households.
The combination of sweet and salty flavors, along with the aromatic garlic and ginger, creates a dish that’s satisfying and full of umami. This recipe is perfect for family dinners or gatherings, and it can be served with steamed rice and a side of vegetables for a complete meal. The chicken can be marinated ahead of time for even more flavor, making it a great choice for meal prep or entertaining.
With just a few simple ingredients, you can create a delectable dish that showcases the best of Japanese cuisine.
Ingredients (Serves 4-6):
- 4-6 chicken thighs (bone-in, skin-on for best flavor)
- ½ cup soy sauce (shoyu)
- ¼ cup mirin (sweet rice wine)
- ¼ cup sake (Japanese rice wine)
- 2 tablespoons brown sugar
- 2 cloves garlic, minced
- 1 tablespoon fresh ginger, grated
- 1 teaspoon sesame oil
- 2 green onions, sliced (for garnish)
- Sesame seeds (for garnish)
Cooking Instructions:
- Prepare the Marinade: In a mixing bowl, combine the soy sauce, mirin, sake, brown sugar, minced garlic, grated ginger, and sesame oil. Whisk the ingredients together until the sugar is fully dissolved and the mixture is well combined. This marinade will infuse the chicken with rich flavors.
- Marinate the Chicken: Place the chicken thighs in a large resealable plastic bag or a shallow dish. Pour the marinade over the chicken, ensuring that each piece is well coated. Seal the bag or cover the dish and refrigerate for at least 1 hour, or preferably overnight for deeper flavor.
- Cook the Chicken: Preheat your oven to 375°F (190°C). Remove the chicken from the marinade and place it in a baking dish. Reserve the marinade for later. Bake the chicken in the preheated oven for about 30-40 minutes, or until the chicken reaches an internal temperature of 165°F (74°C) and the skin is crispy.
- Reduce the Marinade: While the chicken is baking, pour the reserved marinade into a saucepan and bring it to a boil over medium heat. Reduce the heat and let it simmer for about 10-15 minutes, or until it thickens slightly. This will create a flavorful glaze to drizzle over the finished chicken.
- Glaze the Chicken: Once the chicken is cooked, remove it from the oven and brush the thickened marinade over the chicken thighs. Return the dish to the oven for an additional 5-10 minutes to allow the glaze to caramelize slightly.
- Serve and Garnish: Remove the chicken from the oven and let it rest for a few minutes. Slice the chicken, if desired, and serve it on a platter. Drizzle any remaining glaze over the top and garnish with sliced green onions and sesame seeds for a beautiful finish.
Extra Tips:
For an even more authentic flavor, try using dark soy sauce in addition to regular soy sauce for a richer color and depth. You can also substitute chicken breasts if you prefer a leaner cut, but be sure to adjust the cooking time as they may cook faster.
Serve the Shoyu Chicken with a side of steamed bok choy or a fresh salad to balance out the savory flavors. Enjoy your delicious homemade Shoyu Chicken!
Chicken Sukiyaki
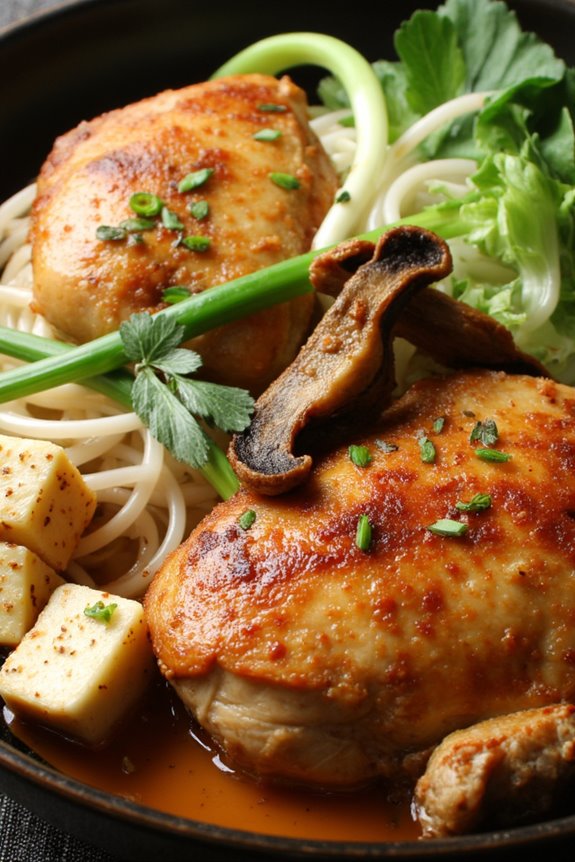
Chicken Sukiyaki is a beloved Japanese dish that beautifully combines tender chicken with a variety of vegetables, noodles, and a sweet-savory broth. Traditionally cooked in a shallow iron skillet, this one-pot meal isn’t only flavorful but also a fantastic way to gather friends and family around the table for a communal dining experience. The dish is often enjoyed with a side of rice or can be served with dipping sauces for added depth of flavor.
Making Chicken Sukiyaki at home is simple and rewarding, allowing you to customize the ingredients based on your preferences. The key to a great Sukiyaki is the balance between the sweet and savory elements, typically achieved through a mixture of soy sauce, sugar, and mirin. As the ingredients cook together, they absorb the flavors, creating a rich and satisfying dish that warms the soul.
Ingredients (Serves 4-6)
- 1 lb (450g) boneless, skinless chicken thighs, sliced
- 1 medium onion, thinly sliced
- 1 cup shiitake mushrooms, sliced
- 1 cup napa cabbage, chopped
- 1 cup green onions, cut into 2-inch pieces
- 1 cup tofu, cubed
- 2 cups shirataki noodles or udon noodles
- 1/4 cup soy sauce
- 1/4 cup mirin
- 2 tablespoons sugar
- 1 tablespoon sake (optional)
- 2 tablespoons vegetable oil
- Fresh parsley or shiso leaves for garnish (optional)
Cooking Instructions
- Prepare the Ingredients: Begin by slicing the chicken, onions, and mushrooms, and chopping the napa cabbage and green onions. If using shirataki noodles, rinse them under cold water and drain well. If using udon noodles, cook them according to package instructions and drain.
- Make the Sukiyaki Sauce: In a small bowl, whisk together the soy sauce, mirin, sugar, and sake (if using). This mixture is the backbone of the flavor for your Sukiyaki.
- Heat the Skillet: In a large skillet or a Sukiyaki pot, heat the vegetable oil over medium-high heat. Once hot, add the sliced chicken and sauté until it starts to brown. This should take about 3-5 minutes.
- Add the Vegetables: Once the chicken is browned, add the sliced onions and shiitake mushrooms to the skillet. Stir-fry for an additional 2-3 minutes until the onions are translucent.
- Combine with the Sauce: Pour the prepared sukiyaki sauce over the chicken and vegetables. Stir to guarantee everything is evenly coated and let it simmer for about 5 minutes.
- Add Remaining Ingredients: Gently add the napa cabbage, green onions, tofu, and noodles to the skillet. Pour in a little water if necessary to help cook the vegetables and noodles through. Allow everything to simmer together for another 5-10 minutes until the vegetables are tender and the flavors meld together.
- Serve and Enjoy: Once cooked, remove the skillet from heat. Serve the Chicken Sukiyaki hot, garnished with fresh parsley or shiso leaves if desired. Enjoy it straight from the skillet with rice or as a communal dish where everyone can serve themselves.
Extra Tips
For the best flavor, don’t be afraid to adjust the sweetness or saltiness of the broth according to your taste preferences. Additionally, feel free to experiment with seasonal vegetables you have on hand, such as carrots or spinach.
Sukiyaki is highly versatile, and each ingredient adds its unique flavor to the dish. Finally, serving raw egg yolk on the side for dipping can enhance the experience, as many people enjoy the creamy texture it adds when mixed into the hot dish.
Ginger Chicken

Ginger Chicken is a delightful Japanese dish that combines the warmth and spice of fresh ginger with tender chicken, creating a dish that’s both aromatic and flavorful. This recipe is perfect for family dinners or gatherings, as it serves 4-6 people, guaranteeing that there’s enough to go around.
The marinade, which includes soy sauce, sake, and honey, infuses the chicken with a rich umami flavor, while the ginger adds a zesty kick that balances the sweetness. This dish not only highlights the beautiful fusion of flavors typical in Japanese cuisine but is also simple to prepare.
With just a few ingredients and straightforward instructions, you can create a meal that will impress your family and friends. Pair it with steamed rice and a side of vegetables for a complete, satisfying meal.
Ingredients:
- 1 ½ pounds boneless, skinless chicken thighs
- 3 tablespoons fresh ginger, finely grated
- 4 cloves garlic, minced
- ¼ cup soy sauce
- 2 tablespoons sake (or dry white wine)
- 2 tablespoons honey
- 2 tablespoons vegetable oil
- 1 tablespoon sesame oil
- 2 green onions, chopped (for garnish)
- Cooked rice (for serving)
Cooking Instructions:
- Prepare the Marinade: In a large bowl, combine the grated ginger, minced garlic, soy sauce, sake, and honey. Whisk the ingredients together until well mixed. This marinade won’t only flavor the chicken but also tenderize it, making every bite juicy and delicious.
- Marinate the Chicken: Cut the chicken thighs into bite-sized pieces and add them to the marinade. Confirm that the chicken is well-coated. Cover the bowl with plastic wrap or transfer everything into a resealable plastic bag. Let the chicken marinate in the refrigerator for at least 30 minutes, or up to 2 hours for deeper flavor.
- Heat the Oils: In a large skillet or wok, heat the vegetable oil and sesame oil over medium-high heat. The combination of oils will help achieve a high cooking temperature and add a rich flavor to the dish.
- Cook the Chicken: Once the oils are hot, add the marinated chicken to the skillet. Cook the chicken for about 8-10 minutes, stirring frequently, until it’s browned and cooked through. Confirm that the chicken reaches an internal temperature of at least 165°F to verify it’s safe to eat.
- Serve the Dish: Once cooked, remove the skillet from heat. Transfer the ginger chicken to a serving platter and garnish with chopped green onions. Serve it hot alongside steamed rice for a complete meal.
Extra Tips:
For an added depth of flavor, consider adding a splash of rice vinegar or a pinch of red pepper flakes to the marinade for a hint of tang and spice.
Additionally, you can enhance the dish by including vegetables such as bell peppers or snap peas during the cooking process, allowing them to stir-fry with the chicken. This not only adds color but also makes the dish more nutritious. Enjoy your Ginger Chicken with a side of pickled vegetables for a traditional touch!
Szechuan Chicken
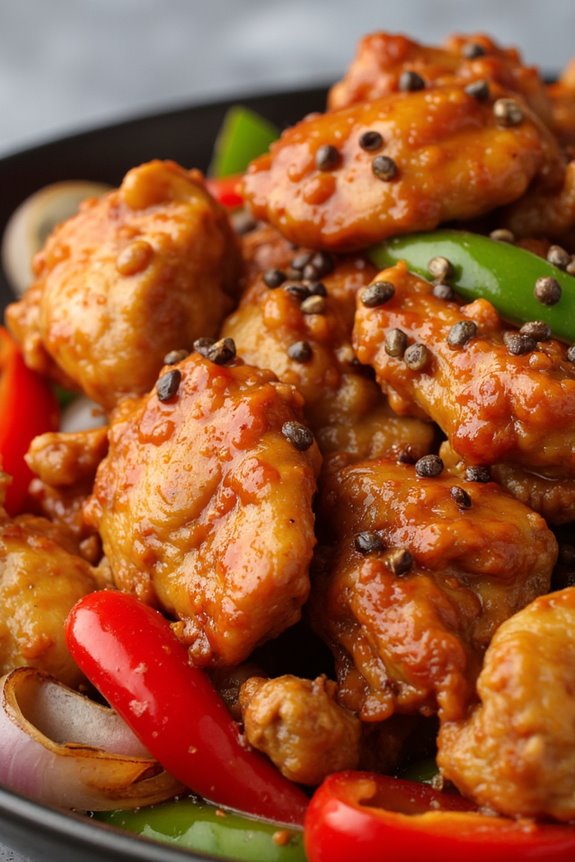
Szechuan Chicken is a flavorful and spicy dish that hails from the Szechuan province of China. Known for its bold flavors and numbing heat, this dish combines tender chicken pieces with Szechuan peppercorns, garlic, and a mix of vibrant vegetables. The result is a mouthwatering experience that captures the essence of Szechuan cuisine. This dish is perfect for those who enjoy a kick of spice and want to bring a taste of China to their dining table.
Cooking Szechuan Chicken at home is both rewarding and straightforward. With the right balance of spices and ingredients, you can create a dish that rivals your favorite takeout. This recipe serves 4-6 people, making it ideal for family dinners or gatherings with friends. Prepare to impress your guests with this delightful dish that bursts with flavor and showcases your culinary skills.
Ingredients:
- 1.5 lbs boneless, skinless chicken thighs, cut into bite-sized pieces
- 2 tablespoons vegetable oil
- 1 red bell pepper, sliced
- 1 green bell pepper, sliced
- 1 onion, sliced
- 3 cloves garlic, minced
- 1 tablespoon fresh ginger, minced
- 2 tablespoons Szechuan peppercorns
- 2-3 tablespoons chili paste (adjust based on spice preference)
- 3 tablespoons soy sauce
- 2 tablespoons rice vinegar
- 1 tablespoon sugar
- 1 tablespoon cornstarch
- Salt and pepper, to taste
- 1 green onion, chopped (for garnish)
Cooking Instructions:
- Marinate the Chicken: In a bowl, combine the chicken pieces with soy sauce, rice vinegar, sugar, and cornstarch. Mix well to guarantee all the chicken is coated. Let it marinate for at least 30 minutes to absorb the flavors. This process tenderizes the chicken and enhances its flavor.
- Prepare the Vegetables: While the chicken is marinating, slice the bell peppers and onion. Mince the garlic and ginger to have everything ready for quick cooking. Having your ingredients prepped will make the cooking process smoother and more efficient.
- Heat the Oil: In a large skillet or wok, heat the vegetable oil over medium-high heat. Once hot, add the Szechuan peppercorns. Stir them for about 30 seconds until they become fragrant. This step releases the aromatic oils from the peppercorns, which is essential for the authentic Szechuan flavor.
- Cook the Chicken: Add the marinated chicken to the skillet and stir-fry for about 5-7 minutes until the chicken is cooked through and slightly browned. Be sure to stir continuously to prevent burning and to cook the chicken evenly.
- Add the Aromatics: Incorporate the minced garlic and ginger into the skillet. Stir-fry for an additional 1-2 minutes until they’re fragrant but not burnt. This will enhance the overall flavor of the dish.
- Add the Vegetables: Toss in the sliced bell peppers and onion. Stir-fry everything together for another 3-4 minutes until the vegetables are tender yet still crisp. This adds color and texture to the dish.
- Season and Serve: Finally, mix in the chili paste, adjusting the amount based on your heat preference. Season with salt and pepper as needed. Cook for another minute to combine all the flavors. Remove from heat and garnish with chopped green onions before serving.
Extra Tips:
When preparing Szechuan Chicken, feel free to customize the vegetables according to your preference; broccoli, snap peas, or carrots can be great additions.
For an extra punch of flavor, consider adding a splash of sesame oil just before serving. If you want to mellow the heat, serve the dish alongside steamed rice or noodles, which will balance the spice nicely. Enjoy your culinary adventure!
Chicken Yaki Onigiri
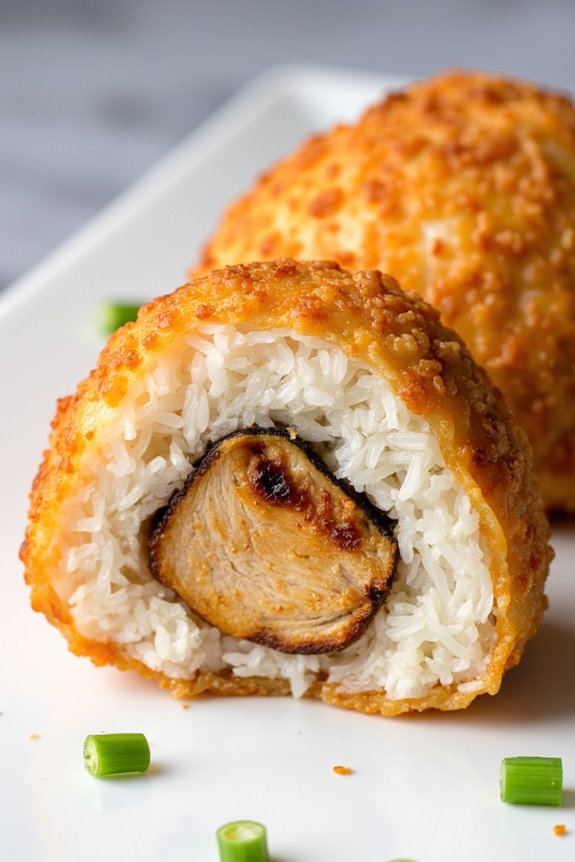
Chicken Yaki Onigiri is a delightful Japanese dish that features grilled rice balls filled with tender chicken and often enhanced with savory seasonings. This dish is perfect for a picnic, a light lunch, or as a side to complement your favorite Japanese main course. The crispy exterior combined with the soft and flavorful interior makes it an irresistible treat that everyone will enjoy.
The beauty of Chicken Yaki Onigiri lies in its versatility; you can customize the fillings and seasonings to suit your tastes. Traditionally, Yaki Onigiri is made with plain rice, but adding chicken creates a heartier option that’s satisfying and delicious. The grilling process gives the onigiri a lovely char, enhancing the flavors and making it a standout dish at any meal.
Ingredients for Chicken Yaki Onigiri (Serves 4-6):
- 2 cups Japanese short-grain rice
- 2 1/2 cups water
- 1/2 pound boneless, skinless chicken thighs, chopped
- 2 tablespoons soy sauce
- 1 tablespoon mirin
- 1 tablespoon sesame oil
- 1 teaspoon grated ginger
- 1/4 teaspoon salt
- 1/4 teaspoon black pepper
- 1 tablespoon chopped green onions (optional)
- Cooking oil for grilling
Cooking Instructions:
- Prepare the Rice: Rinse the Japanese short-grain rice under cold water until the water runs clear. This removes excess starch and helps achieve the perfect texture. Drain the rice and transfer it to a rice cooker or a pot. Add 2 1/2 cups of water and let it soak for 30 minutes. Then, cook the rice according to the rice cooker’s instructions or bring to a boil, cover, and simmer for about 18-20 minutes until the water is absorbed.
- Cook the Chicken: While the rice is cooking, heat sesame oil in a skillet over medium heat. Add the chopped chicken thighs and season with soy sauce, mirin, grated ginger, salt, and black pepper. Cook the chicken for about 7-10 minutes, stirring occasionally until fully cooked and browned. If you like, add chopped green onions for added flavor. Remove from heat and let it cool slightly.
- Form the Onigiri: Once the rice is cooked, transfer it to a large bowl and let it cool slightly until it’s manageable. With wet hands (to prevent sticking), take a handful of rice and flatten it in your palm. Place a spoonful of the cooked chicken mixture in the center and mold the rice around it to form a triangle or oval shape. Make sure the filling is well encased by the rice. Repeat this process until all rice and chicken are used.
- Grill the Onigiri: Preheat a grill or a non-stick skillet over medium heat and lightly coat it with cooking oil. Place the formed onigiri on the grill and cook for about 2-3 minutes on each side, or until golden brown and crispy. You can brush the onigiri with a little soy sauce while grilling for extra flavor.
- Serve: Once the onigiri are nicely grilled, remove them from the heat and let them cool slightly before serving. They can be enjoyed warm or at room temperature.
Extra Tips: When making Chicken Yaki Onigiri, feel free to experiment with different fillings such as cooked vegetables, other proteins, or even pickled ingredients. Additionally, using day-old rice can help achieve a better texture since it tends to hold its shape better. If you find your rice is too sticky, you can lightly wet your hands while shaping the onigiri to make it easier to work with. Enjoy your homemade Japanese Chicken Yaki Onigiri with a side of soy sauce or your favorite dipping sauce!
Chicken Curry

Japanese Chicken Curry is a beloved comfort food that brings a taste of Japan straight to your kitchen. This dish combines tender chicken pieces with a rich and flavorful curry sauce, resulting in a hearty meal that pairs perfectly with steamed rice.
Unlike traditional Indian curries, Japanese curry is characterized by its mild sweetness and thick consistency, making it an ideal dish for families and those who prefer a less spicy option. The use of vegetables such as carrots and potatoes adds nutritional value and texture, creating a well-rounded meal that everyone will enjoy.
One of the best things about Japanese Chicken Curry is its versatility; you can easily customize it by adding your favorite vegetables or adjusting the level of seasoning to suit your taste. The base of the curry is typically made from store-bought curry roux, which comes in various flavors and spice levels, making preparation quick and convenient.
Whether you’re looking for a comforting weeknight dinner or a dish to impress guests, Japanese Chicken Curry is sure to be a hit!
Ingredients (Serves 4-6):
- 500g chicken thighs, boneless and skinless, cut into bite-sized pieces
- 2 medium onions, thinly sliced
- 2 medium carrots, peeled and sliced
- 2 medium potatoes, peeled and cubed
- 3 cups water
- 1 tablespoon vegetable oil
- 1 package (100g) Japanese curry roux (mild, medium, or hot)
- 1 tablespoon soy sauce
- Salt and pepper to taste
- Cooked rice, for serving
- Chopped green onions or parsley, for garnish (optional)
Cooking Instructions:
- Prepare the Ingredients: Begin by cutting the chicken thighs into bite-sized pieces. Slice the onions, peel and slice the carrots, and peel and cube the potatoes. Having all ingredients prepped in advance will streamline the cooking process.
- Sauté the Chicken: In a large pot or Dutch oven, heat the vegetable oil over medium heat. Add the chicken pieces to the pot and season with salt and pepper. Sauté the chicken for about 5-7 minutes until it’s browned on all sides. This step adds depth of flavor to the curry.
- Add the Onions and Vegetables: Once the chicken is browned, add the sliced onions to the pot and cook for an additional 3-4 minutes until they’re translucent. Then, add the sliced carrots and cubed potatoes, stirring to combine all the ingredients.
- Add Water and Simmer: Pour in the 3 cups of water and bring the mixture to a boil. Once boiling, reduce the heat to low and cover the pot. Let it simmer for about 15 minutes, or until the vegetables are tender.
- Add the Curry Roux: After the vegetables are cooked, break the curry roux into pieces and add it to the pot. Stir well until the roux is completely dissolved. The sauce will begin to thicken as it cooks.
- Season and Finish: Add the soy sauce for extra flavor and stir to combine. Let the curry simmer for an additional 5-10 minutes, stirring occasionally. Taste and adjust seasoning with salt and pepper as needed.
- Serve: Once the curry has reached your desired thickness and flavor, remove it from heat. Serve the chicken curry over cooked rice and garnish with chopped green onions or parsley if desired.
Extra Tips:
For an extra depth of flavor, consider adding a teaspoon of grated ginger or minced garlic when sautéing the onions. You can also experiment with different vegetables such as bell peppers or peas for added nutrition.
If you prefer a thicker curry, allow it to simmer uncovered for a few extra minutes. Leftovers can be refrigerated and taste even better the next day, as the flavors continue to meld. Enjoy your delicious homemade Japanese Chicken Curry!
Spicy Chicken Soba
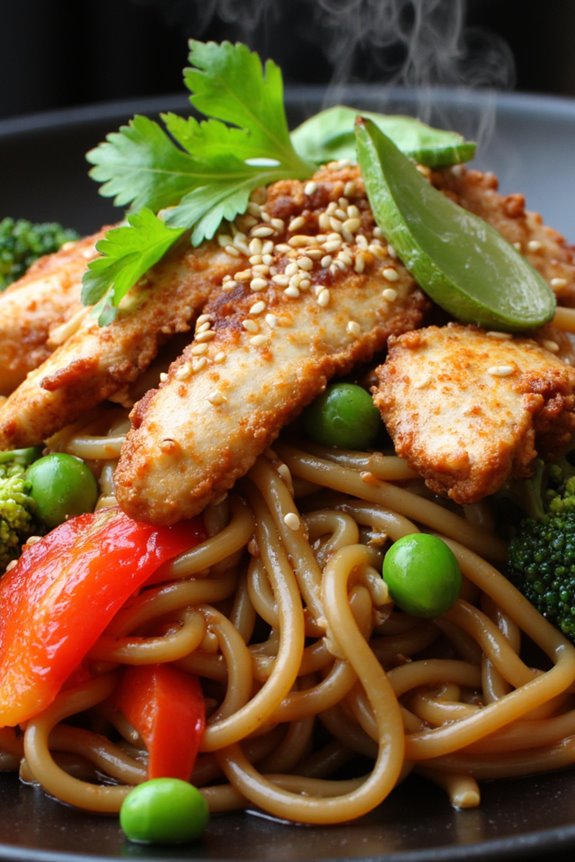
Spicy Chicken Soba is a vibrant and flavorful dish that combines tender chicken with hearty buckwheat noodles and an array of fresh vegetables. This dish isn’t only quick to prepare but also packed with nutrients, making it an excellent choice for a weeknight dinner or a weekend gathering.
The spice level can be adjusted according to your taste, allowing for a customizable culinary experience that can cater to both spice lovers and those who prefer a milder flavor.
The key to a successful Spicy Chicken Soba is in the marinade and the stir-frying technique. A simple marinade made from soy sauce, sesame oil, and chili paste infuses the chicken with rich flavors, while quick-cooking soba noodles soak up the delicious sauce, creating a dish that’s both comforting and satisfying.
The addition of fresh vegetables adds texture and color, making this dish not only delicious but visually appealing as well.
Ingredients (Serves 4-6):
- 1 pound chicken breast, thinly sliced
- 8 ounces soba noodles
- 2 tablespoons soy sauce
- 1 tablespoon sesame oil
- 2 tablespoons chili paste (adjust to taste)
- 1 red bell pepper, sliced
- 1 cup broccoli florets
- 1 cup snap peas
- 3 green onions, chopped
- 2 cloves garlic, minced
- 1 tablespoon ginger, minced
- 2 tablespoons vegetable oil
- Sesame seeds for garnish
- Fresh cilantro for garnish (optional)
Cooking Instructions:
- Marinate the Chicken: In a bowl, combine the sliced chicken with soy sauce, sesame oil, and chili paste. Mix well to guarantee the chicken is evenly coated. Let it marinate for at least 15-30 minutes, allowing the flavors to penetrate the meat.
- Cook Soba Noodles: In a large pot, bring water to a boil. Add the soba noodles and cook according to the package instructions, typically around 4-6 minutes. Once cooked, drain and rinse under cold water to stop the cooking process. Set aside.
- Prepare the Vegetables: While the noodles are cooking, wash and slice the bell pepper, cut the broccoli into florets, and trim the snap peas. Set the vegetables aside for later use.
- Stir-Fry the Chicken: In a large skillet or wok, heat vegetable oil over medium-high heat. Add the marinated chicken and stir-fry for about 5-7 minutes or until the chicken is cooked through and no longer pink. Remove the chicken from the skillet and set aside.
- Cook the Vegetables: In the same skillet, add minced garlic and ginger, sautéing for about 30 seconds until fragrant. Add the bell pepper, broccoli, and snap peas, and stir-fry for an additional 3-4 minutes, or until the vegetables are tender but still crisp.
- Combine Everything: Return the cooked chicken to the skillet along with the soba noodles. Toss everything together, guaranteeing the noodles and chicken are well combined with the vegetables. Adjust seasoning if necessary, adding more soy sauce or chili paste for extra flavor.
- Serve: Plate the Spicy Chicken Soba and garnish with chopped green onions, sesame seeds, and fresh cilantro if desired. Serve hot and enjoy!
Extra Tips:
To enhance the flavor of your Spicy Chicken Soba, consider adding a splash of rice vinegar or lime juice before serving for a tangy kick.
You can also experiment with other vegetables such as carrots or bok choy, depending on what you have available. For a vegetarian version, replace the chicken with tofu and guarantee the chili paste is suitable for your dietary preferences.
Finally, don’t hesitate to adjust the spice level to suit your palate; a little extra chili can go a long way in elevating the dish!