

There’s something truly special about ending a meal with sweet Chinese desserts. Each one brings its own delightful flavors and textures to the table, making them a perfect treat. From the creamy mango pudding to the chewy sesame balls, these recipes offer a taste for everyone. If you’re excited to try making these lovely desserts at home, I’ve gathered 13 recipes that will surely impress. Get ready to satisfy your sweet cravings with these delightful treats.
Mango Pudding
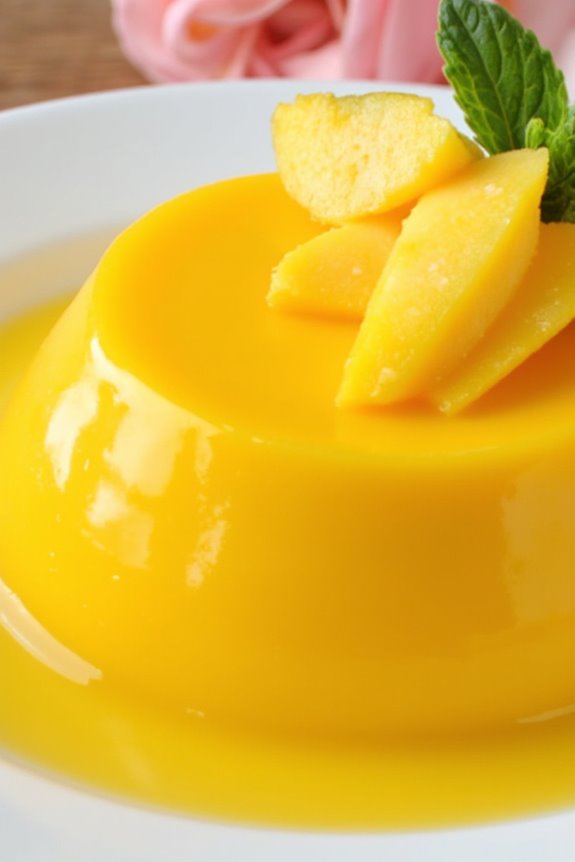
Mango Pudding is a beloved Chinese dessert that combines the tropical sweetness of ripe mangoes with a smooth, creamy texture. This delightful treat is often served chilled, making it a perfect choice for warm days or as a revitalizing end to a meal.
The pudding isn’t only simple to make but also showcases the vibrant flavor of mangoes, making it a favorite among both children and adults alike. Making Mango Pudding at home allows you to adjust the sweetness and texture to your liking, guaranteeing that every bite is just as you enjoy it.
With just a few ingredients, you can create a luscious dessert that will impress your guests and bring a taste of Asia to your dining table. Whether you serve it in individual cups or as a larger dish, this pudding is sure to be a hit.
Ingredients (Serves 4-6)
- 2 ripe mangoes, peeled and diced
- 1 cup coconut milk
- 1/2 cup milk
- 1/4 cup sugar (adjust to taste)
- 2 tablespoons gelatin powder
- 1/4 cup cold water
- 1 teaspoon vanilla extract (optional)
- Fresh mango slices and mint leaves for garnish (optional)
Cooking Instructions
- Prepare the Gelatin: In a small bowl, sprinkle the gelatin powder over the cold water and let it sit for about 5 minutes, allowing it to bloom. This step is essential as it helps the gelatin dissolve properly when heated.
- Blend the Mangoes: In a blender, combine the diced mangoes, coconut milk, milk, and sugar. Blend until smooth and creamy. Taste the mixture and adjust the sweetness if necessary. If you prefer a smoother pudding, you can strain the mixture through a fine mesh sieve to remove any fibrous bits.
- Dissolve the Gelatin: Once the gelatin has bloomed, gently heat it in a small saucepan over low heat until it completely dissolves. Don’t let it boil. Once dissolved, remove it from the heat and let it cool slightly.
- Combine Mixtures: Slowly pour the dissolved gelatin into the mango mixture while blending on low speed to guarantee it incorporates evenly. If using, add the vanilla extract at this stage and blend until everything is well combined.
- Chill the Pudding: Pour the mango pudding mixture into serving cups or a large dish. Cover with plastic wrap and refrigerate for at least 4 hours, or until fully set. The pudding should be firm to the touch but still creamy.
- Serve: Once set, remove the pudding from the fridge. If desired, garnish with fresh mango slices and mint leaves for an extra touch of invigorating flavor. Serve chilled and enjoy!
Extra Tips
For the best flavor, use ripe mangoes that are sweet and fragrant. If fresh mangoes aren’t available, you can substitute with canned mango puree, but be sure to adjust the sugar accordingly, as canned varieties can be sweeter.
To enhance the creaminess of the pudding, consider adding a bit of heavy cream or using full-fat coconut milk. You can also experiment with different toppings, such as shredded coconut or a drizzle of condensed milk, to add a unique twist to your Mango Pudding.
Sesame Balls
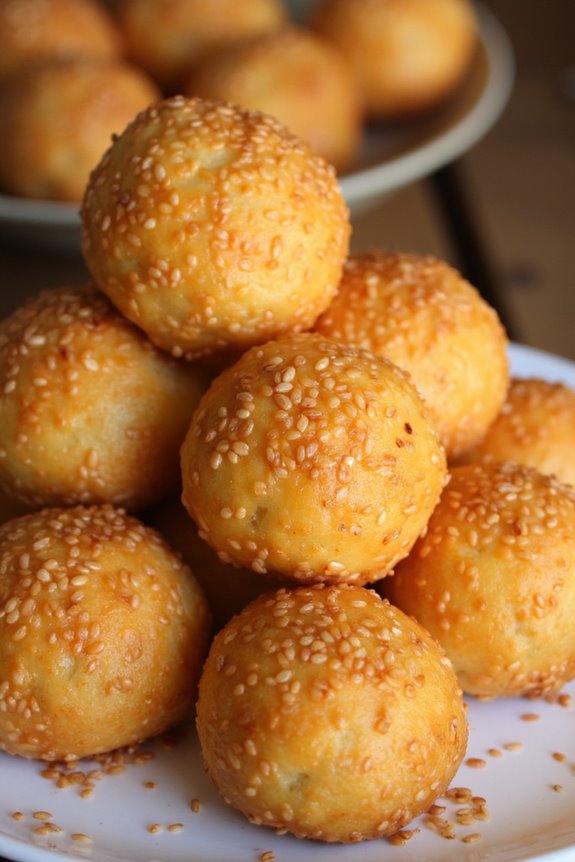
Sesame Balls, also known as “Jian Dui,” are a delightful Chinese dessert that features a chewy glutinous rice dough filled with sweet red bean paste or lotus seed paste, coated in sesame seeds, and deep-fried to golden perfection.
These treats aren’t only popular during festivals and celebrations but also beloved as a street food snack across China. The combination of crispy exterior and chewy interior makes them a unique dessert that will satisfy anyone’s sweet tooth.
Making Sesame Balls may seem intimidating, but with the right ingredients and step-by-step instructions, you can create these delicious morsels at home. This recipe yields about 4-6 servings, making it perfect for sharing with family and friends. Let’s jump into the ingredients and the process of crafting these sweet delights!
Ingredients:
- 1 cup glutinous rice flour
- 1/2 cup water
- 1/4 cup sugar
- 1/2 cup sweet red bean paste or lotus seed paste
- 1/2 cup sesame seeds
- Oil for deep frying
Cooking Instructions:
- Prepare the Dough: In a mixing bowl, combine the glutinous rice flour and sugar. Gradually add water while stirring until a dough forms. Knead the dough for about 5 minutes until it becomes smooth and pliable. If the dough is too sticky, add a little more flour.
- Portion the Dough: Divide the dough into equal pieces, approximately the size of a golf ball. You should have around 8 to 10 pieces. This will allow you to create the balls that will enclose the filling.
- Fill the Dough: Take one piece of dough and flatten it in the palm of your hand to form a small disc. Place about a teaspoon of sweet red bean paste or lotus seed paste in the center. Carefully fold the edges of the dough over the filling and pinch to seal it completely, forming a smooth ball. Repeat this process for all pieces of dough.
- Coat with Sesame Seeds: Once all the balls are formed, roll each ball in a plate of sesame seeds, making sure they’re evenly coated. This adds flavor and a nice crunchy texture to the outer layer.
- Heat the Oil: In a deep frying pan or wok, heat enough oil over medium heat for deep frying (about 2-3 inches deep). To check if the oil is ready, drop a small piece of dough into the oil; if it sizzles and rises to the surface, the oil is ready for frying.
- Fry the Sesame Balls: Carefully add the sesame balls to the hot oil in batches, making sure not to overcrowd the pan. Fry them for about 4-5 minutes, turning occasionally, until they’re golden brown and puffed up. Remove them from the oil using a slotted spoon and transfer them to a plate lined with paper towels to drain excess oil.
- Serve: Allow the sesame balls to cool slightly before serving. They can be enjoyed warm or at room temperature.
Extra Tips: To guarantee your sesame balls have a perfectly chewy texture, make sure to use glutinous rice flour, as regular rice flour won’t yield the same results.
You can also experiment with different fillings such as chocolate or coconut for a unique twist. If you want to make them healthier, consider baking them instead of frying, though the texture will differ. Enjoy your homemade Sesame Balls with tea or coffee for a delightful treat!
Red Bean Soup
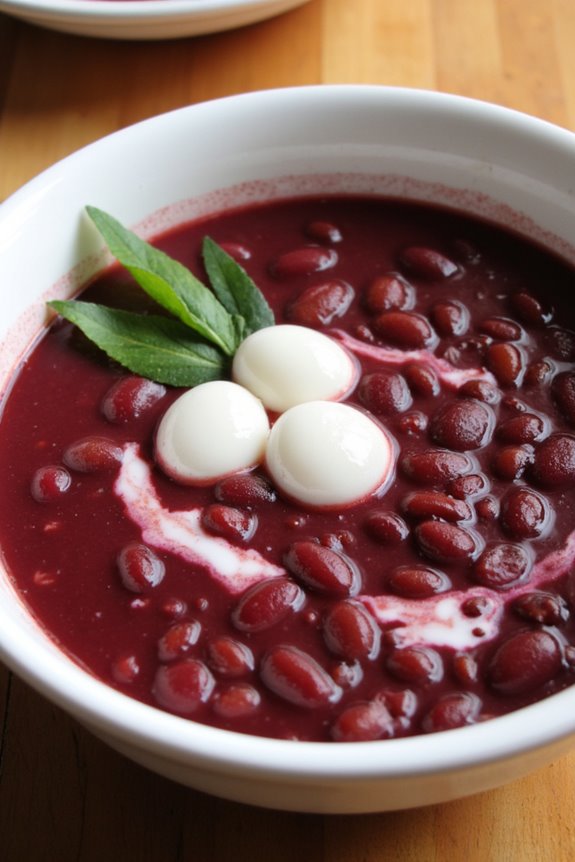
Red Bean Soup, also known as “Hong Dou Tang,” is a popular Chinese dessert that’s both comforting and nourishing. Made primarily from adzuki beans, this sweet soup is often enjoyed warm or chilled and is especially popular during festivals or as a revitalizing treat on a hot day. Its subtle sweetness, combined with the creamy texture of the cooked beans, creates a delightful balance that appeals to many dessert lovers.
The beauty of Red Bean Soup lies in its simplicity and versatility. You can customize it by adding ingredients such as coconut milk, rice balls, or even sago for added texture. This dessert isn’t only delicious but also packed with nutrients, making it a wholesome choice for satisfying your sweet tooth.
Now, let’s explore the recipe for this delightful dessert that serves 4-6 people.
Ingredients
- 1 cup adzuki beans
- 4 cups water (for boiling)
- 1/2 cup sugar (adjust to taste)
- 1/4 teaspoon salt
- 1/4 cup coconut milk (optional)
- 1/4 cup tapioca pearls (optional)
- 2-3 pandan leaves (optional, for added fragrance)
Cooking Instructions
- Soak the Beans: Begin by rinsing the adzuki beans thoroughly under cold water. Then, soak the beans in water for at least 4 hours or overnight. Soaking helps to soften the beans and reduces cooking time.
- Cook the Beans: After soaking, drain the beans and place them in a pot. Add 4 cups of fresh water and bring to a boil over medium heat. Once boiling, reduce the heat to low and let the beans simmer for about 30-40 minutes, or until they’re tender. You can check their doneness by pressing a bean between your fingers; it should easily mash.
- Sweeten the Soup: Once the beans are tender, add sugar and salt to the pot. Stir well until the sugar dissolves completely. If you prefer a sweeter soup, feel free to adjust the sugar to your liking.
- Optional Additions: If you want to add coconut milk for creaminess, pour it in at this stage and stir to combine. For a fun texture, you can also cook tapioca pearls separately and add them to the soup before serving.
- Simmer and Serve: Allow the soup to simmer for an additional 5-10 minutes to let the flavors meld. If you’re using pandan leaves for flavor, you can add them during this step, then remove them before serving. Serve the Red Bean Soup warm or chilled, garnished with a drizzle of coconut milk if desired.
Extra Tips
When preparing Red Bean Soup, it’s important to keep an eye on the texture of the beans. If you prefer a smoother consistency, you can blend the soup after cooking to achieve a creamy texture.
Additionally, feel free to experiment with different types of sweeteners, such as honey or rock sugar, for a unique flavor profile. This dessert can also be stored in the refrigerator for a few days, making it a great make-ahead option for gatherings.
Enjoy your homemade Red Bean Soup!
Egg Tarts
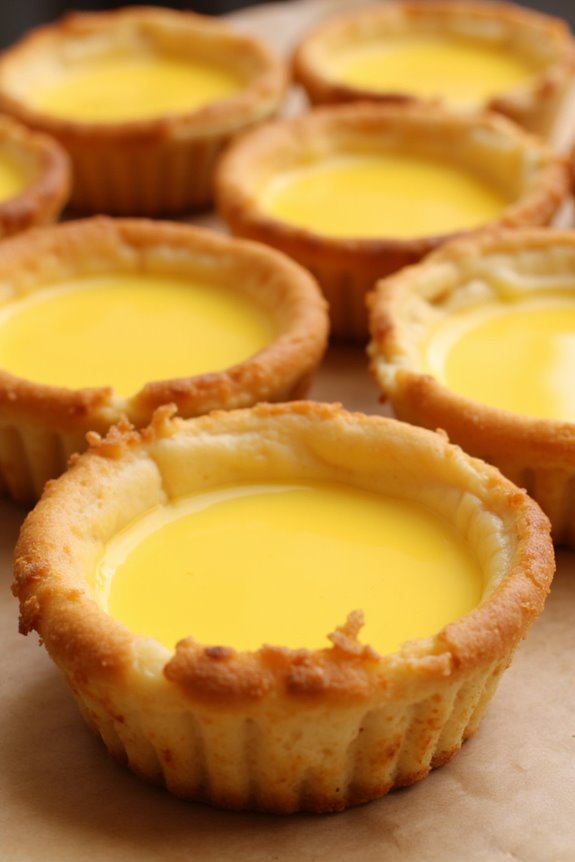
Egg tarts, or “Dan Tat,” are a beloved Chinese dessert that hails from both Cantonese and Macanese cuisine. These creamy, custard-filled pastries are encased in a flaky crust, making them a delightful treat for any occasion.
Originating in the early 20th century, egg tarts have become a staple in dim sum restaurants and bakeries across the globe. The balance of sweet and creamy custard with a buttery crust is simply irresistible, making them a must-try for dessert lovers.
Making egg tarts at home is easier than you might think! With a few simple ingredients and some careful preparation, you can whip up a batch of these delicious treats to impress your family and friends.
The key to perfect egg tarts lies in the quality of the custard filling and achieving the right texture in the crust. Follow this recipe to create your own egg tarts and enjoy a taste of Chinese pastry perfection.
Ingredients (Serves 4-6)
- 1 sheet of puff pastry (store-bought or homemade)
- 3 large eggs
- 1/2 cup granulated sugar
- 1 cup whole milk
- 1/4 cup heavy cream
- 1 teaspoon vanilla extract
- A pinch of salt
- Optional: a few drops of yellow food coloring (for color)
Cooking Instructions
- Prepare the Crust: Preheat your oven to 400°F (200°C). Roll out the puff pastry on a lightly floured surface until it’s about 1/8 inch thick. Use a round cutter to cut out circles that are slightly larger than your tart molds. Place the pastry circles into the molds, pressing gently to fit. Trim any excess pastry hanging over the edges.
- Chill the Crust: Place the pastry-lined molds in the refrigerator for about 15 minutes to firm up the crust. This helps to prevent shrinking during baking.
- Make the Custard Filling: In a mixing bowl, whisk together the eggs and granulated sugar until well combined. Add the whole milk, heavy cream, vanilla extract, and a pinch of salt. If desired, add a few drops of yellow food coloring for a richer custard color. Mix until the ingredients are fully incorporated, but avoid over-mixing to prevent bubbles.
- Strain the Filling: To achieve a silky smooth texture, strain the custard mixture through a fine mesh sieve into another bowl. This step removes any lumps and guarantees a creamy filling.
- Fill the Tart Shells: Carefully pour the custard filling into each pastry shell, filling them about 3/4 full to allow for expansion during baking.
- Bake the Tarts: Place the filled tart molds onto a baking sheet and bake in the preheated oven for 20-25 minutes, or until the custard is set and the tops are lightly browned. Keep an eye on them to avoid over-baking.
- Cool and Serve: Once baked, remove the egg tarts from the oven and allow them to cool in the molds for about 10 minutes. Carefully remove them from the molds and transfer to a wire rack to cool completely. Serve warm or at room temperature.
Extra Tips
To guarantee the perfect egg tart, it’s important to monitor the baking time closely, as ovens can vary in temperature.
If you prefer a slightly caramelized top, you can briefly broil the egg tarts for a minute or two after baking. Additionally, using high-quality ingredients, especially fresh eggs and dairy, will elevate the flavor of your custard.
Don’t be afraid to experiment with the sweetness level by adjusting the sugar according to your taste. Enjoy your homemade egg tarts!
Sweet Rice Cake
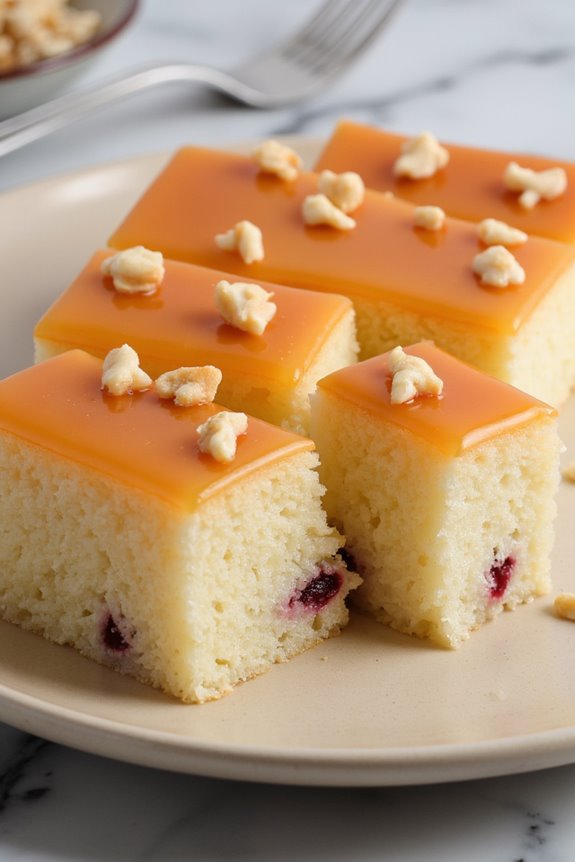
Sweet Rice Cake, also known as “Nian Gao,” is a beloved Chinese dessert often enjoyed during celebrations, particularly the Lunar New Year. This traditional delicacy is made from glutinous rice flour and is known for its chewy texture and subtly sweet flavor. It can be served plain or with various fillings, and it’s often steamed to perfection, making it a delightful treat for family and friends.
The preparation of Sweet Rice Cake is relatively simple, but it requires some patience and precision to achieve the ideal texture. This dessert can be enjoyed warm or at room temperature and is versatile enough to be adapted with different flavors and fillings, making it a favorite for both young and old.
Let’s explore making this delicious dessert that’s sure to impress your guests!
Ingredients (Serves 4-6):
- 2 cups glutinous rice flour
- 1 cup water
- 1 cup sugar
- 1/2 cup coconut milk (optional)
- 1/2 teaspoon vanilla extract (optional)
- 1/4 cup chopped red bean paste (optional filling)
- 1/4 cup chopped nuts (optional topping)
Cooking Instructions:
- Prepare the Baking Dish: Grease a round or square baking dish with a little oil to prevent the cake from sticking. Make sure to cover the entire base and sides evenly.
- Mix the Dry Ingredients: In a large mixing bowl, combine the glutinous rice flour and sugar. Stir well to make certain that the sugar is evenly distributed throughout the flour.
- Add Liquid Ingredients: Gradually add the water and coconut milk (if using) to the dry mixture. Stir continuously until you achieve a smooth batter, making sure there are no lumps. You can add vanilla extract at this stage for extra flavor.
- Incorporate Fillings: If you’re using red bean paste or any other filling, gently fold it into the batter. Make sure it’s evenly distributed to guarantee a delightful surprise in every bite.
- Pour into Baking Dish: Carefully pour the batter into the prepared baking dish. Use a spatula to smooth the top, ensuring an even surface.
- Steam the Cake: Fill a steamer pot with water and bring it to a boil. Place the baking dish into the steamer, making sure that the water doesn’t touch the batter. Cover with a lid and steam for about 45-60 minutes, or until the cake is firm and cooked through. You can test doneness by inserting a toothpick into the center; it should come out clean.
- Cool and Serve: Once cooked, remove the baking dish from the steamer and let it cool for a few minutes. Once cool enough to handle, cut the Sweet Rice Cake into squares or slices. Serve warm or at room temperature, optionally topped with chopped nuts.
Extra Tips:
When making Sweet Rice Cake, make sure that you measure your ingredients accurately for the best results.
Steaming time may vary depending on the thickness of the cake, so keep an eye on it to avoid overcooking. If you want to add more flavor, consider incorporating different fillings like sweetened shredded coconut or fruit purees.
Leftovers can be stored in an airtight container in the refrigerator and can be reheated by steaming or microwaving before serving. Enjoy this delightful dessert and share it with your loved ones!
Almond Jelly
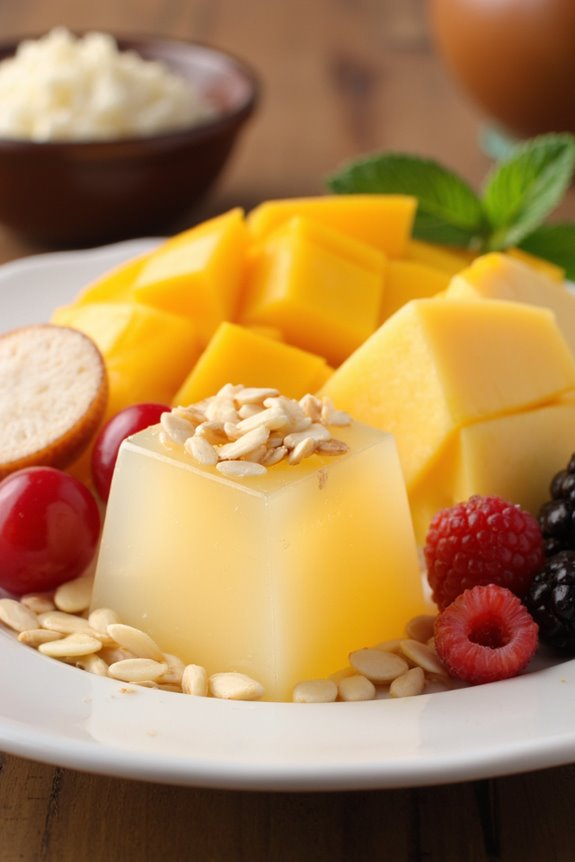
Almond Jelly, or “Almond Tofu,” is a popular Chinese dessert that’s light, invigorating, and perfect for any occasion. Often served chilled, it has a subtle almond flavor that’s both soothing and delightful. This dessert is made using almond extract and gelatin, creating a delicate, wobbly texture that’s visually appealing and a treat for the taste buds.
Traditionally, it’s paired with a fruit cocktail or served with sweet syrup, making it a versatile dessert that can adapt to various preferences. This dessert isn’t only easy to prepare but also requires minimal ingredients, making it accessible for home cooks of all skill levels.
Whether you’re looking to impress guests at a dinner party or simply want to enjoy a sweet treat after a meal, Almond Jelly is an excellent choice. With its creamy consistency and mild flavor, it serves as a perfect palate cleanser or a light ending to a hearty meal.
Ingredients (Serves 4-6):
- 1 cup almond milk
- 1 cup water
- 1/4 cup granulated sugar
- 2 teaspoons agar-agar powder or gelatin
- 1 teaspoon almond extract
- 1/4 cup chopped almonds (optional)
- Fresh fruit for serving (such as lychee, mango, or berries)
Cooking Instructions:
- Prepare the Gelatin/Agar-Agar: In a small bowl, combine the agar-agar powder (or gelatin) with 1/2 cup of water. Allow it to sit for 5-10 minutes to bloom. This activates the gelling agent, guaranteeing it sets properly later.
- Heat the Mixture: In a saucepan, combine the almond milk, remaining 1/2 cup of water, and granulated sugar. Heat the mixture over medium heat, stirring occasionally until the sugar is fully dissolved. Don’t let it boil.
- Incorporate the Gelatin/Agar-Agar: Once the almond milk mixture is warm and the sugar is dissolved, add the bloomed agar-agar (or gelatin) to the saucepan. Stir continuously until the agar-agar is fully dissolved. If using agar-agar, bring the mixture to a gentle boil for about 2-3 minutes, then remove it from heat. If using gelatin, just verify it’s dissolved without boiling.
- Add Flavoring: Remove the saucepan from the heat and stir in the almond extract. This will infuse the jelly with that signature almond flavor, enhancing the overall taste of the dessert.
- Set the Mixture: Pour the mixture into a mold or individual serving cups. If desired, sprinkle chopped almonds on top for added texture. Allow the jelly to cool at room temperature for about 30 minutes, then refrigerate for at least 2-3 hours or until fully set.
- Serve: Once the jelly has set, gently unmold it if using a larger mold, or simply serve it in cups. Top with fresh fruit or syrup, if desired, and enjoy!
Extra Tips:
When making Almond Jelly, verify all your ingredients are at room temperature for better blending. You can adjust the sweetness by adding more or less sugar depending on your taste preference.
If you’re looking for a more intense almond flavor, consider using almond syrup instead of sugar. Additionally, feel free to experiment with different fruits and toppings to personalize the dish to your liking!
Tangyuan (Glutinous Rice Balls)
Tangyuan, also known as glutinous rice balls, is a traditional Chinese dessert that’s particularly popular during the Lantern Festival and other festive occasions. These delightful little spheres are made from glutinous rice flour and can be filled with a variety of sweet fillings such as black sesame, red bean paste, or peanut butter. The chewy texture of the rice balls, combined with a sweet syrup or broth, makes them a comforting and enjoyable treat for both children and adults.
Making Tangyuan at home can be a fun and rewarding experience. The process of shaping the dough into balls can be a great activity to do with family or friends, and it allows for creativity in choosing fillings. The end result isn’t only delicious but also visually appealing, as they can be served in a clear sweet soup, showcasing their vibrant colors.
Now, let’s explore the recipe and create these delightful glutinous rice balls together!
Ingredients (serves 4-6 people):
- 2 cups glutinous rice flour
- 3/4 cup water (adjust as needed)
- 1/2 cup sweetened red bean paste (or filling of choice)
- 1/4 cup sugar
- 4 cups water (for boiling)
- 1 tablespoon sesame oil (optional for flavor)
- 1-2 cups sweet ginger syrup or the syrup of your choice (for serving)
Cooking Instructions:
- Prepare the Dough: In a mixing bowl, combine the glutinous rice flour and water. Mix until a smooth dough forms. If the dough is too dry, gradually add more water until it reaches a pliable consistency that can be shaped easily. The dough should be soft but not sticky.
- Divide the Dough: Once the dough is ready, divide it into equal portions (about 20-24 pieces). This will make it easier to fill and shape each tangyuan. Keep the pieces covered with a damp cloth to prevent them from drying out as you work.
- Prepare the Filling: Take a small amount of the filling of your choice (like sweetened red bean paste) and roll it into a small ball, about the size of a marble. Make sure the filling isn’t too wet, as this will make it difficult to seal the tangyuan.
- Shape the Tangyuan: Take one piece of dough, flatten it in your palm, and place the filling ball in the center. Carefully fold the edges of the dough over the filling, pinching to seal completely and rolling it gently between your palms to form a smooth ball. Repeat this process until all the dough and filling are used.
- Boil the Tangyuan: In a large pot, bring 4 cups of water to a boil. Gently drop the shaped tangyuan into the boiling water. Be careful not to overcrowd the pot. Once they float to the surface, let them cook for an additional 2-3 minutes to verify they’re fully cooked through.
- Prepare the Serving Sauce: While the tangyuan are boiling, you can prepare a sweet ginger syrup or use any other syrup of your choice. To make a simple ginger syrup, combine water and sugar in a pot, add sliced ginger, and simmer until the sugar dissolves and the syrup is fragrant.
- Serve: Once the tangyuan are cooked, use a slotted spoon to remove them from the pot and transfer them to bowls. Pour the warm sweet syrup over the tangyuan and serve immediately, optionally drizzling with sesame oil for added flavor.
Extra Tips:
When making Tangyuan, feel free to experiment with different fillings to suit your taste preferences. If you want to add a colorful twist, you can incorporate natural food coloring into the dough before shaping.
Additionally, verify that your water is boiling before adding the tangyuan; this helps them maintain their shape and texture. If you prefer a chewier texture, you can replace a portion of glutinous rice flour with regular rice flour.
Enjoy your homemade Tangyuan with family and friends, and don’t forget to share your delicious creations!
Coconut Sticky Rice
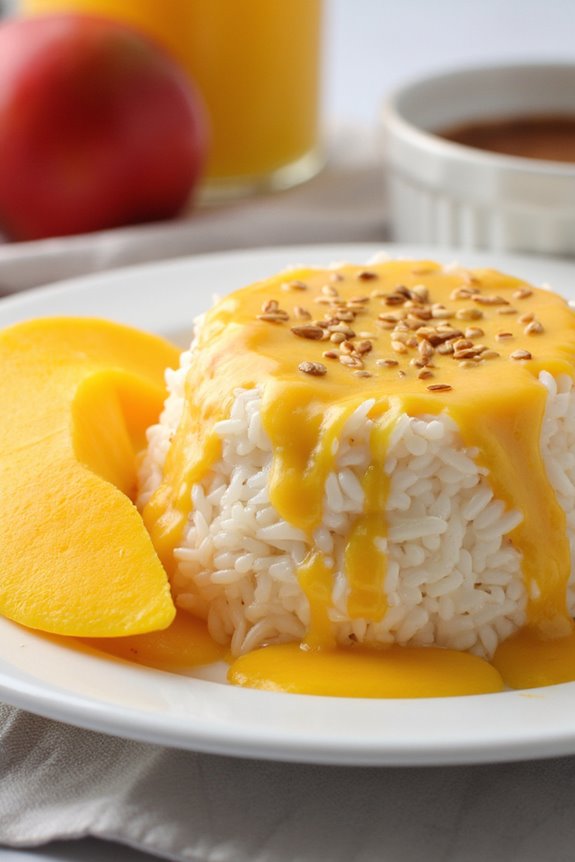
Coconut Sticky Rice, also known as “Khao Niew Mamuang” in Thai cuisine, is a delightful dessert that combines the rich creaminess of coconut milk with the chewy texture of glutinous rice. This dish is often served with ripe mangoes, making it a perfect treat for warm weather or a sweet ending to any meal.
The combination of flavors and textures creates a truly indulgent experience that’s beloved in many Asian cultures.
Cooking Coconut Sticky Rice is a straightforward process, but it requires a bit of patience and attention to detail. The key to achieving the perfect sticky rice lies in soaking the rice beforehand and cooking it until it reaches the right consistency.
Once you master this simple yet rewarding recipe, you can impress your family and friends with your culinary skills and transport them to the streets of Southeast Asia with every bite.
Ingredients (Serves 4-6)
- 2 cups glutinous rice (sticky rice)
- 1 cup coconut milk
- 1/2 cup granulated sugar
- 1/4 teaspoon salt
- 2 ripe mangoes, peeled and sliced
- Sesame seeds or mung beans for garnish (optional)
Cooking Instructions
1. Soak the Rice: Begin by rinsing the glutinous rice under cold water until the water runs clear. This removes excess starch and helps achieve the perfect texture.
Once rinsed, soak the rice in enough water to cover it for at least 4 hours or overnight. This soaking process is essential for softening the rice and ensuring it cooks evenly.
2. Prepare the Coconut Sauce: In a small saucepan, combine the coconut milk, granulated sugar, and salt. Heat the mixture over low heat, stirring continuously until the sugar is completely dissolved.
Don’t bring it to a boil, as this can alter the texture of the coconut milk. Set aside about 1/4 cup of this mixture for drizzling over the sticky rice later.
3. Steam the Rice: After the rice has soaked and expanded, drain it and place it in a steamer lined with cheesecloth or a clean kitchen towel to prevent it from falling through the holes.
Steam the rice over boiling water for about 20-30 minutes, or until it becomes translucent and chewy. Make sure to cover the steamer with a lid to trap the steam.
4. Combine the Rice and Coconut Sauce: Once the rice is cooked, transfer it to a large mixing bowl and pour the remaining coconut sauce over it.
Gently mix the rice and sauce together using a spatula or wooden spoon, ensuring that the rice is evenly coated. Let it sit for about 10-15 minutes to absorb the flavors.
5. Serve the Dish: To serve, scoop a generous portion of the coconut sticky rice onto a plate or bowl.
Arrange the sliced mangoes beside or on top of the rice. Drizzle the reserved coconut sauce over the top and sprinkle with sesame seeds or mung beans for added texture and visual appeal.
Extra Tips
When preparing Coconut Sticky Rice, it’s important to use glutinous rice, as regular rice won’t yield the same sticky texture.
If you can’t find glutinous rice, look for sushi rice as a substitute, but remember that the flavor and texture may differ slightly. Additionally, to enhance the dish, consider adding a pinch of pandan extract or leaves while cooking the rice for a fragrant aroma.
Finally, serve this dessert warm or at room temperature, as the flavors are best enjoyed fresh!
Pineapple Buns
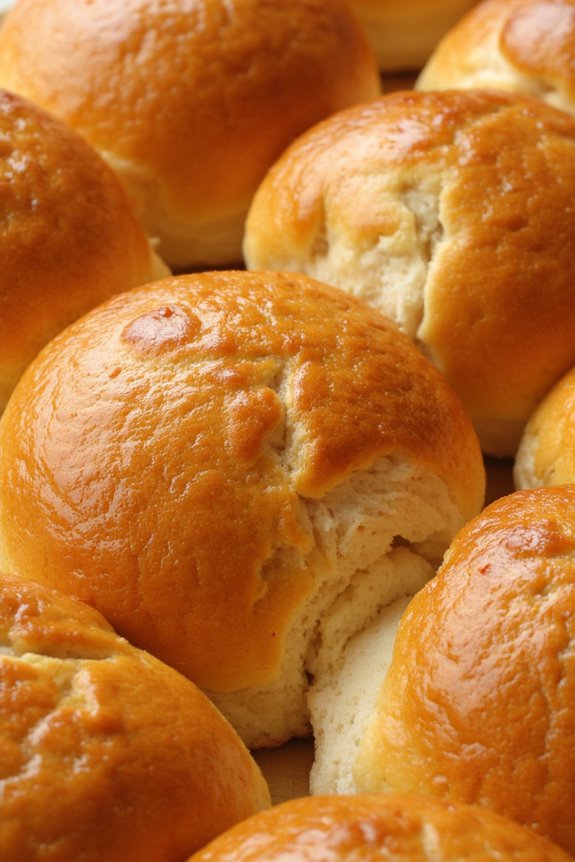
Pineapple buns, known as “Bolo Bao” in Cantonese, are a beloved staple in Chinese bakeries. Despite their name, these delicious treats don’t contain pineapple; instead, the name refers to the sweet, crusty topping that resembles the texture and appearance of a pineapple.
These soft, fluffy buns are typically enjoyed warm and are perfect for breakfast, snacks, or dessert. Baking them at home can fill your kitchen with an irresistible aroma and provide a delightful treat for family and friends.
The preparation of pineapple buns involves a two-part process: making the dough and preparing the sweet topping. The dough is soft and slightly sweet, while the topping adds a crunchy sweetness that contrasts perfectly with the bun’s fluffiness.
Once you master this recipe, you’ll find that these delightful buns can be enjoyed on their own or stuffed with various fillings like custard or BBQ pork. Gather your ingredients and get ready to bake a batch of these iconic Chinese buns!
Ingredients (Serves 4-6):
- 3 cups all-purpose flour
- 1/4 cup sugar
- 1/2 teaspoon salt
- 1 tablespoon instant yeast
- 1/4 cup warm milk
- 1/2 cup water
- 1/4 cup unsalted butter, softened
- 1 large egg
- 1/2 teaspoon vanilla extract
- 1/2 cup cake flour (for topping)
- 1/4 cup powdered sugar (for topping)
- 1/4 teaspoon baking powder (for topping)
- 1/4 cup unsalted butter, softened (for topping)
- 1 large egg yolk (for topping)
- 1 tablespoon milk (for topping)
Cooking Instructions:
- Prepare the Dough: In a large mixing bowl, combine the all-purpose flour, sugar, salt, and instant yeast. Mix well. In a separate bowl, whisk together the warm milk, water, softened butter, egg, and vanilla extract. Gradually pour the liquid mixture into the dry ingredients and mix until a dough forms.
- Knead the Dough: Transfer the dough onto a floured surface and knead for about 10 minutes until it becomes smooth and elastic. If the dough is too sticky, sprinkle a little more flour as needed. Kneading is vital for developing gluten, which gives the buns their structure.
- First Rise: Place the kneaded dough in a lightly greased bowl and cover it with a damp cloth. Let it rise in a warm place for about 1 to 1.5 hours, or until it has doubled in size. This step allows the yeast to ferment, causing the dough to rise and develop flavor.
- Make the Topping: In a separate bowl, combine the cake flour, powdered sugar, baking powder, and softened butter. Mix until crumbly. Add the egg yolk and milk, and stir until it forms a smooth paste. This topping gives the buns their distinctive crunchy texture.
- Shape the Buns: Once the dough has risen, punch it down to release the air. Divide the dough into 8 equal portions and shape each into a ball. Place the balls on a baking sheet lined with parchment paper, spaced apart to allow for rising.
- Apply the Topping: Divide the topping into 8 equal portions and flatten each portion into a disc. Place the disc on top of each bun and press gently to adhere. This will create the signature crust on top of the buns.
- Second Rise: Cover the buns with a cloth and let them rise for another 30 minutes. This second rise helps achieve a light and fluffy texture.
- Preheat the Oven: While the buns are rising, preheat your oven to 375°F (190°C). This guarantees that the buns will bake evenly and develop a beautiful golden color.
- Bake the Buns: Once the buns have risen, place them in the preheated oven and bake for 15-20 minutes, or until the tops are golden brown. Keep an eye on them to avoid over-baking.
- Cool and Serve: Remove the buns from the oven and let them cool slightly on a wire rack. Enjoy them warm, either plain or with your favorite filling!
Extra Tips:
When making pineapple buns, it’s important to allow adequate time for both rises; this is significant for achieving the desired texture. If you’re short on time, you can speed up the first rise by placing the dough in a slightly warm oven.
Additionally, for a richer flavor in the topping, consider adding a hint of coconut or almond extract. These buns are best enjoyed fresh, but they can be stored in an airtight container for a couple of days or frozen for later use. Enjoy your homemade pineapple buns!
Mooncakes
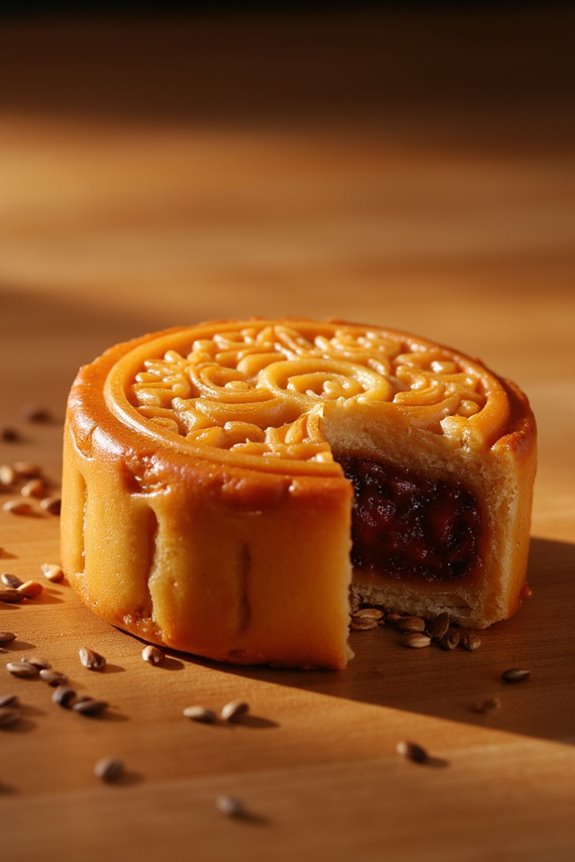
Mooncakes are a traditional Chinese pastry that holds great significance during the Mid-Autumn Festival, celebrated by families and friends as a time of reunion and gratitude. These beautifully crafted round pastries symbolize completeness and unity. The outer layer is typically made from a soft, chewy dough, while the filling can vary widely, featuring flavors such as lotus seed paste, red bean paste, or even salted egg yolk. The intricate designs etched on the surface not only enhance their aesthetic appeal but also reflect the artistry and cultural heritage of Chinese cuisine.
Making mooncakes is a rewarding endeavor that can be enjoyed by both novice and experienced bakers. While the process may seem intimidating at first, the end result is a delightful treat that can be shared with loved ones. In this recipe, we’ll guide you through the steps required to create your own mooncakes, ensuring that you have a delicious centerpiece for your Mid-Autumn Festival celebrations. With a serving size of 4-6 people, these mooncakes are perfect for sharing and enjoying alongside tea.
Ingredients:
- 250g all-purpose flour
- 150g golden syrup
- 50g lard or vegetable oil
- 1/2 tsp alkaline water
- 200g lotus seed paste or red bean paste
- 4 salted egg yolks (optional)
- 1 egg (for egg wash)
- 1 tbsp sesame seeds (optional, for decoration)
Cooking Instructions:
- Prepare the Dough: In a large mixing bowl, combine the all-purpose flour, golden syrup, lard (or vegetable oil), and alkaline water. Mix until a dough forms. Knead the dough gently for about 5 minutes until it becomes smooth and elastic. Cover the dough with a damp cloth and let it rest for at least 30 minutes. This resting period allows the gluten to relax, making it easier to shape the mooncakes later.
- Prepare the Filling: If using salted egg yolks, steam them for about 10 minutes until cooked, then let them cool. In a separate bowl, divide the lotus seed paste (or red bean paste) into equal portions, approximately 40g each, and if you’re using salted egg yolks, place one yolk in the center of each portion of paste. Shape the paste around the yolk, forming a smooth ball.
- Shape the Mooncakes: After the dough has rested, divide it into equal portions (approximately 25g each). Flatten each piece of dough into a small disc, then place a ball of filling in the center. Carefully wrap the dough around the filling and pinch it closed, ensuring no filling is exposed. Roll the filled dough into a smooth ball.
- Mold the Mooncakes: Lightly flour a mooncake mold and place the filled ball inside. Press down firmly to shape the mooncake and release it from the mold. Repeat this process until all the dough and filling is used.
- Preheat the Oven: Preheat your oven to 180°C (350°F). While the oven is heating, prepare the egg wash by beating the egg in a small bowl.
- Bake the Mooncakes: Place the molded mooncakes on a parchment-lined baking sheet. Brush the tops gently with the egg wash and sprinkle sesame seeds if desired. Bake in the preheated oven for about 15-20 minutes or until they’re golden brown. Remove them from the oven and let them cool on a wire rack.
- Rest Before Serving: Once cooled, allow the mooncakes to rest for at least 1-2 days before serving. This resting period helps to enhance the flavor and texture of the mooncakes, making them more enjoyable.
Extra Tips: When making mooncakes, feel free to experiment with different fillings, such as mixed nuts or fruit pastes, to suit your taste. Additionally, consider adjusting the sweetness of the filling to your preference. If you find that your dough is too dry, adding a little water can help achieve the perfect consistency. Ultimately, be sure to store the mooncakes in an airtight container to keep them fresh for days after baking. Enjoy your homemade mooncakes with family and friends during the Mid-Autumn Festival!
Chinese Fruit Salad
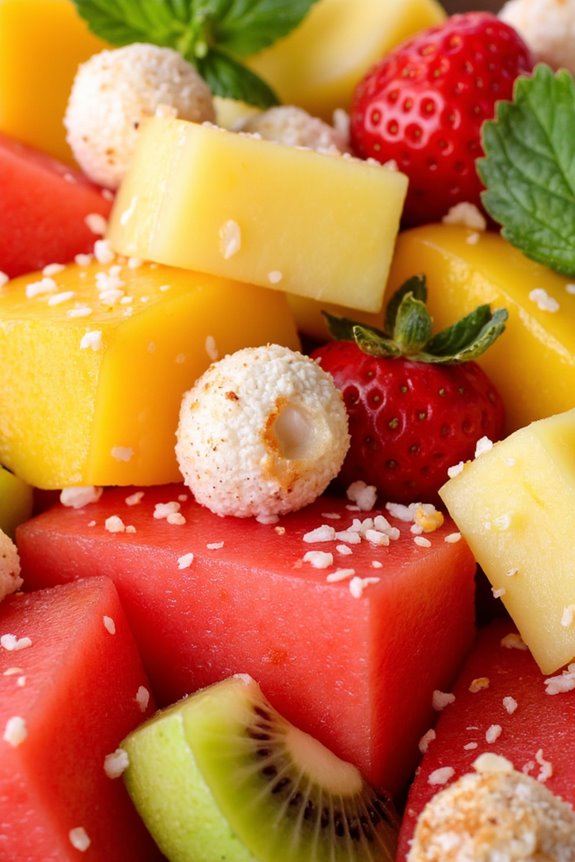
Chinese Fruit Salad is a revitalizing and vibrant dish that combines the natural sweetness of tropical fruits with a hint of Chinese culinary flair. This delightful salad isn’t only a perfect way to cool down in hot weather, but it also offers a beautiful presentation for any occasion, from family gatherings to festive celebrations.
The combination of fresh fruits and a light dressing makes it a healthy choice that’s both delicious and visually appealing. Traditionally, Chinese fruit salad often incorporates a variety of seasonal fruits such as lychee, mango, and kiwi, along with a sweet and tangy dressing that enhances the natural flavors.
The salad can be easily customized based on your preferences and the fruits available in your region. It’s a versatile dish that can be served as a side, dessert, or even a light snack. With its colorful appearance and revitalizing taste, Chinese Fruit Salad is guaranteed to impress your guests.
Ingredients (Serves 4-6):
- 1 cup diced watermelon
- 1 cup diced pineapple
- 1 cup diced mango
- 1 cup diced kiwi
- 1 cup halved strawberries
- 1/2 cup canned lychee, drained
- 1/4 cup honey
- 2 tablespoons fresh lime juice
- 1 tablespoon fresh mint leaves, chopped
- Optional: 1/4 cup shredded coconut for garnish
Cooking Instructions:
- Prepare the Fruits: Start by washing all the fresh fruits thoroughly. Peel and dice the watermelon, pineapple, mango, and kiwi into bite-sized pieces. Hull the strawberries and cut them in half. If using fresh lychee, peel and pit them before adding to the salad. Verify all fruits are cut uniformly for an appealing presentation.
- Combine the Fruits: In a large mixing bowl, combine the diced watermelon, pineapple, mango, kiwi, halved strawberries, and lychee. Gently toss the fruits together to mix them evenly without mashing them.
- Make the Dressing: In a separate small bowl, whisk together the honey and fresh lime juice until well combined. This dressing will enhance the flavors of the fruits and add a revitalizing tang.
- Dress the Salad: Pour the honey-lime dressing over the mixed fruits in the large bowl. Using a spatula or wooden spoon, gently fold the dressing into the fruit mixture, ensuring that all pieces are coated without damaging them.
- Chill and Serve: Allow the salad to chill in the refrigerator for about 30 minutes before serving. This will help the flavors meld together and enhance the revitalizing taste. When ready to serve, sprinkle the chopped mint leaves over the salad and garnish with shredded coconut if desired.
Extra Tips:
When preparing Chinese Fruit Salad, feel free to experiment with different fruits based on seasonal availability or personal preference. Other great additions could include pomegranate seeds, orange segments, or even a sprinkle of sesame seeds for added texture.
Additionally, for a more exotic flavor, consider adding a splash of coconut milk or a sprinkle of five-spice powder to the dressing. Always serve the salad chilled for the best flavor and revitalizing experience!
Steamed Custard Buns
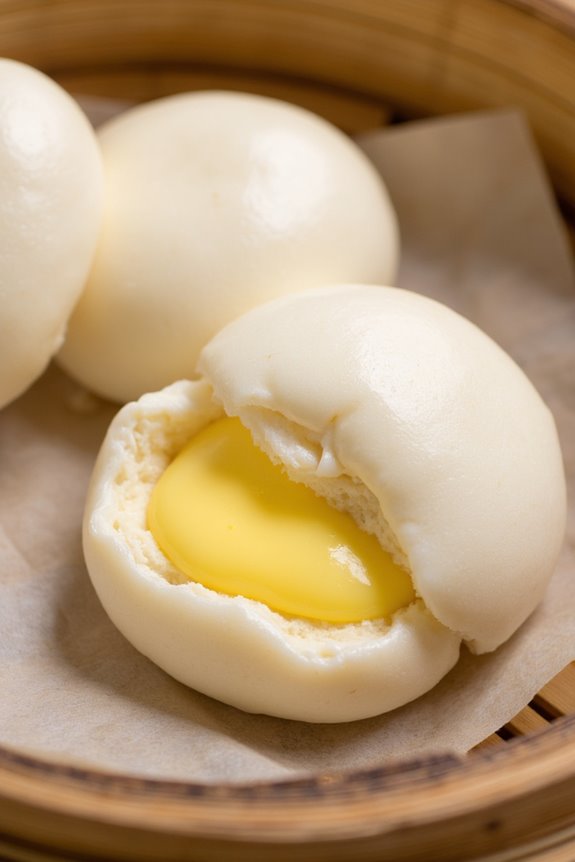
Steamed Custard Buns, also known as “Nai Wong Bao,” are a beloved Chinese dessert that combines a soft, fluffy bun with a rich, creamy custard filling. These delightful treats are often enjoyed as a dim sum delicacy and are perfect for special occasions or simply as a sweet indulgence.
The buns are steamed to perfection, resulting in a tender texture that complements the luscious custard inside, making them a favorite among both children and adults.
Making Steamed Custard Buns can seem intimidating at first, but with the right ingredients and a little patience, you can create these delightful desserts at home. The key to achieving the perfect bun lies in the dough’s consistency and the steaming process, which guarantees that the buns remain moist and fluffy.
Your family and friends will be impressed when you serve these delightful treats, and they’ll surely ask for the recipe!
Ingredients (serving size: 4-6 people)
- 2 cups all-purpose flour
- 1 teaspoon instant yeast
- ½ cup warm water
- 2 tablespoons sugar
- 1 tablespoon vegetable oil
- ½ teaspoon salt
- 1 cup milk powder
- ½ cup sugar (for custard filling)
- 2 large egg yolks
- 1 tablespoon cornstarch
- 1 teaspoon vanilla extract
- 1 cup water (for steaming)
Cooking Instructions
- Prepare the Dough: In a large mixing bowl, combine the all-purpose flour, instant yeast, sugar, and salt. Mix the dry ingredients well. In a separate bowl, mix warm water and vegetable oil. Gradually add the wet ingredients to the dry ingredients, stirring until a dough forms. Knead the dough on a floured surface for about 5-7 minutes until it becomes smooth and elastic.
- Let the Dough Rise: Place the kneaded dough into a lightly greased bowl, cover it with a damp cloth or plastic wrap, and let it rise in a warm place for about 1 hour or until it has doubled in size. This step is essential for achieving the soft texture of the buns.
- Make the Custard Filling: In a medium saucepan, combine the milk powder, sugar, egg yolks, cornstarch, and vanilla extract. Gradually add water while stirring to prevent lumps. Cook the mixture over low heat, stirring constantly until it thickens and becomes a smooth custard. Remove from heat and let it cool slightly.
- Shape the Buns: Once the dough has risen, punch it down to release the air. Divide the dough into 10-12 equal pieces. Roll each piece into a small circle about 3-4 inches in diameter. Place a spoonful of the cooled custard filling in the center of each circle. Gather the edges of the dough and pinch them together to seal the filling inside, forming a bun shape.
- Steam the Buns: Line a steamer basket with parchment paper to prevent sticking. Place the shaped buns in the steamer, leaving space between each bun for expansion. Fill the steamer with water and bring it to a boil over high heat. Once boiling, reduce to medium heat and steam the buns for about 15-20 minutes or until they’re fluffy and cooked through.
- Serve: Carefully remove the buns from the steamer and let them cool for a few minutes. Serve warm and enjoy the soft texture and sweet custard filling.
Extra Tips
When making Steamed Custard Buns, it’s important to guarantee that your dough is kneaded well to develop gluten, which provides structure.
For the custard filling, you can adjust the sweetness to your preference by varying the amount of sugar. Additionally, ensure that the water in the steamer is boiling before placing the buns inside, as this will help them rise properly.
If you’re making these buns ahead of time, you can freeze the uncooked buns and steam them directly from the freezer, adding a few extra minutes to the steaming time.
Enjoy your homemade Steamed Custard Buns!
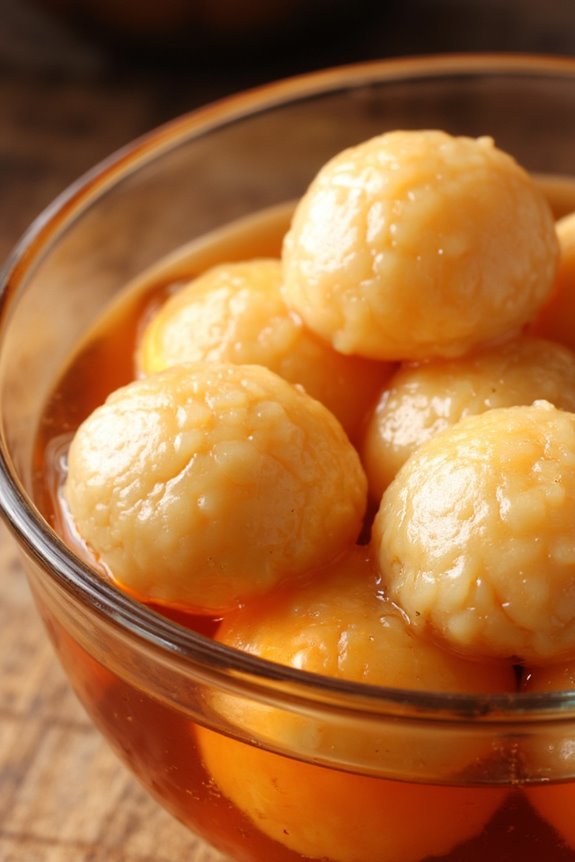
Taro Balls
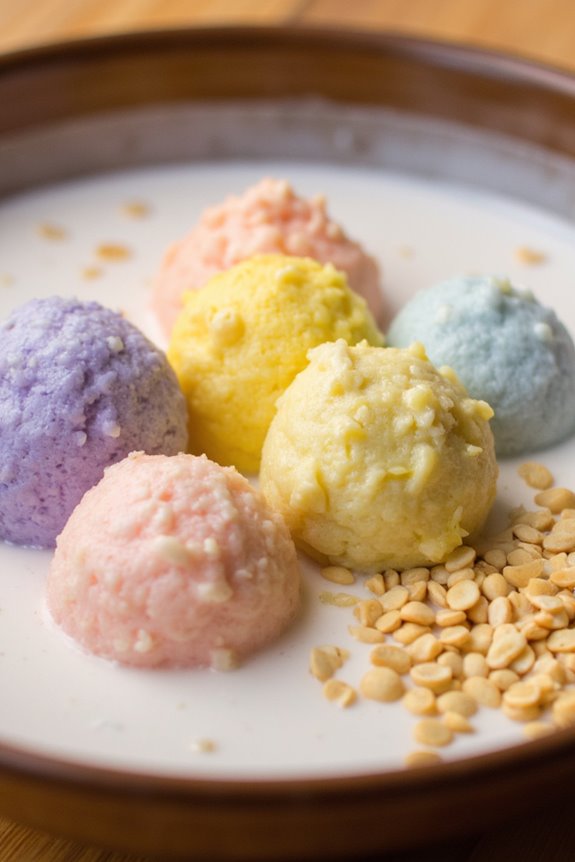
Taro balls, also known as “taro boba,” are a delightful Taiwanese dessert made from the starchy root vegetable taro. These chewy, colorful balls are often used in various sweet dishes, including desserts and bubble tea. The combination of the subtle sweetness of taro and the chewy texture makes them a popular choice for dessert lovers.
When prepared correctly, they offer a unique flavor and texture that’s both satisfying and enjoyable. Making taro balls at home can be a fun and rewarding experience. Not only do you get to enjoy the delicious end product, but you can also customize the flavors and colors of the balls. This recipe will guide you through the steps of creating these delightful treats, guaranteeing you impress your family and friends with your culinary skills.
Ingredients (Serves 4-6)
- 400g taro, peeled and diced
- 150g tapioca starch
- 50g sugar
- A pinch of salt
- 2 tablespoons of coconut milk (optional, for flavor)
- Food coloring (optional, for color)
Cooking Instructions
- Prepare the Taro: Start by peeling and dicing the taro into small cubes. This will help it cook evenly and allow for easier mashing later on. Place the diced taro into a steamer basket and steam for about 20-25 minutes or until the taro is fork-tender.
- Mash the Taro: Once the taro is cooked, remove it from the steamer and allow it to cool slightly. Using a fork or potato masher, mash the taro until it forms a smooth paste. If desired, you can mix in the coconut milk at this stage for added flavor.
- Mix the Dough: In a large mixing bowl, combine the mashed taro with sugar, a pinch of salt, and tapioca starch. Stir well until all the ingredients are fully incorporated. The mixture should be slightly sticky but manageable. If it’s too dry, add a little more coconut milk or water.
- Form the Balls: Take small portions of the taro dough and roll them into small balls, about the size of a marble. If you want to add color, you can divide the dough and knead in a few drops of food coloring before rolling.
- Boil the Taro Balls: Bring a pot of water to a boil. Carefully drop the taro balls into the boiling water in batches. Once they float to the surface, let them cook for an additional 2-3 minutes. This indicates they’re cooked through.
- Cool and Serve: Using a slotted spoon, remove the taro balls from the water and place them in a bowl of cold water to stop the cooking process. After a few minutes, drain the water and serve the taro balls warm with your choice of syrup, coconut milk, or in a dessert soup.
Extra Tips
When preparing taro balls, it’s essential to guarantee that the taro is cooked thoroughly for the best flavor and texture.
Experiment with different flavors by adding other ingredients such as matcha powder or sweet potato for a colorful twist. Additionally, you can serve the taro balls with a variety of toppings, like crushed peanuts, sesame seeds, or even fresh fruits, to enhance the dessert experience further. Enjoy your culinary adventure with taro balls!