

If you’re anything like me, you can’t resist the rich and creamy essence of coconut that brings a taste of the tropics right to your kitchen. Filipino desserts are a treasure trove of sweet delights, each showcasing coconut in unique ways. From the soft texture of bibingka to the indulgent layers of sapin-sapin, there’s so much to explore. Let’s uncover these delicious recipes that will surely impress your guests and satisfy your sweet cravings.
Bibingka: Traditional Coconut Rice Cake
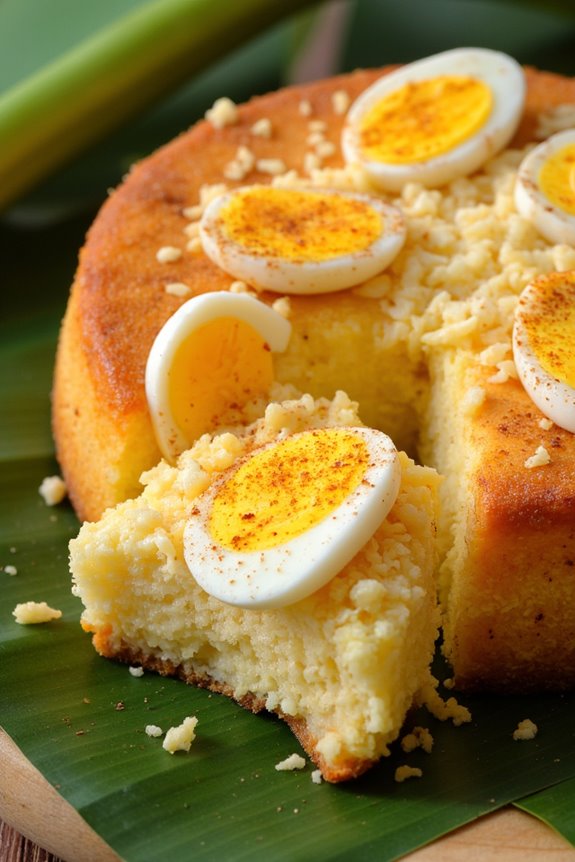
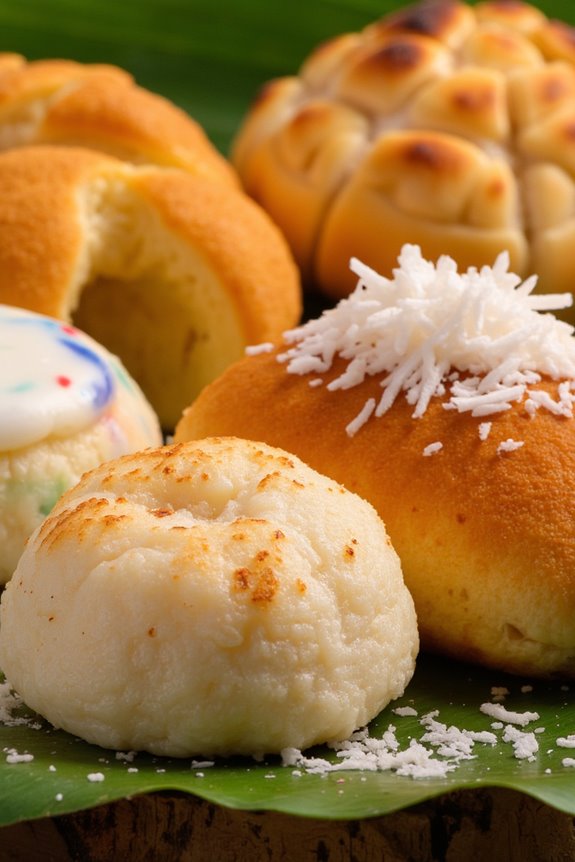
Bibingka is a beloved traditional Filipino dessert that’s often enjoyed during the Christmas season, particularly during the Simbang Gabi (night mass) celebrations. This delightful coconut rice cake is made from a mixture of rice flour and coconut milk, giving it a unique texture and flavor that’s both slightly sweet and rich.
With a soft, moist interior and a slightly crisp top, bibingka is typically baked in a banana leaf-lined mold, which imparts a subtle aroma and flavor to the cake. Topped with salted eggs and cheese, this dessert isn’t only a treat for the taste buds but also a feast for the eyes.
The preparation of bibingka is relatively simple, making it a perfect recipe for both novice and experienced bakers. As it bakes, the sweet aroma fills your kitchen and creates a warm ambiance, reminiscent of Filipino holiday gatherings.
Whether enjoyed warm or at room temperature, bibingka is best served with a sprinkle of grated coconut or a drizzle of butter. This recipe serves 4-6 people, making it ideal for sharing with family and friends during festive occasions or simply as a delightful afternoon snack.
Ingredients (serves 4-6):
- 1 cup rice flour
- 1 cup coconut milk
- 1/2 cup sugar
- 1/2 teaspoon baking powder
- 1/4 teaspoon salt
- 2 large eggs
- 1/2 cup grated coconut (fresh or desiccated)
- 2 salted eggs, sliced
- 1/2 cup grated cheese (e.g., Edam or Cheddar)
- Banana leaves (for lining the mold)
Cooking Instructions:
- Prepare the Banana Leaves: If using fresh banana leaves, pass them over an open flame or dip them in hot water for a few seconds to make them pliable. Cut the leaves into squares that can line your baking dish or molds. Grease the molds lightly with oil to prevent sticking.
- Mix Dry Ingredients: In a mixing bowl, combine the rice flour, sugar, baking powder, and salt. Stir well to ascertain that all the dry ingredients are evenly mixed.
- Combine Wet Ingredients: In another bowl, whisk together the coconut milk and eggs until well combined. Make sure the eggs are fully incorporated into the mixture.
- Combine Wet and Dry Mixtures: Gradually pour the wet mixture into the dry ingredients, stirring gently to avoid lumps. Add the grated coconut and mix until you achieve a smooth batter.
- Preheat the Oven: While preparing the batter, preheat your oven to 375°F (190°C) to guarantee it’s ready for baking.
- Pour the Batter into Molds: Fill the lined molds or baking dish with the batter, leaving some space at the top for the cake to rise as it bakes.
- Add Toppings: Gently press the sliced salted eggs and grated cheese on top of the batter. These toppings will create a savory contrast to the sweetness of the cake.
- Bake the Bibingka: Place the molds in the preheated oven and bake for approximately 25-30 minutes, or until the top is golden brown and a toothpick inserted into the center comes out clean.
- Cool and Serve: Once baked, remove the bibingka from the oven and let it cool for a few minutes. Carefully remove it from the molds and serve warm, optionally topping with additional grated coconut or a pat of butter.
Extra Tips:
To enhance the flavor of your bibingka, consider adding a splash of vanilla extract or a pinch of grated nutmeg to the batter. If you prefer a more pronounced coconut flavor, use coconut cream instead of coconut milk.
Additionally, for a traditional touch, you may place the molds on top of hot coals while baking or use a clay pot for that authentic bibingka experience. Enjoy your bibingka fresh out of the oven for the best taste!
Leche Flan: Creamy Caramel Custard
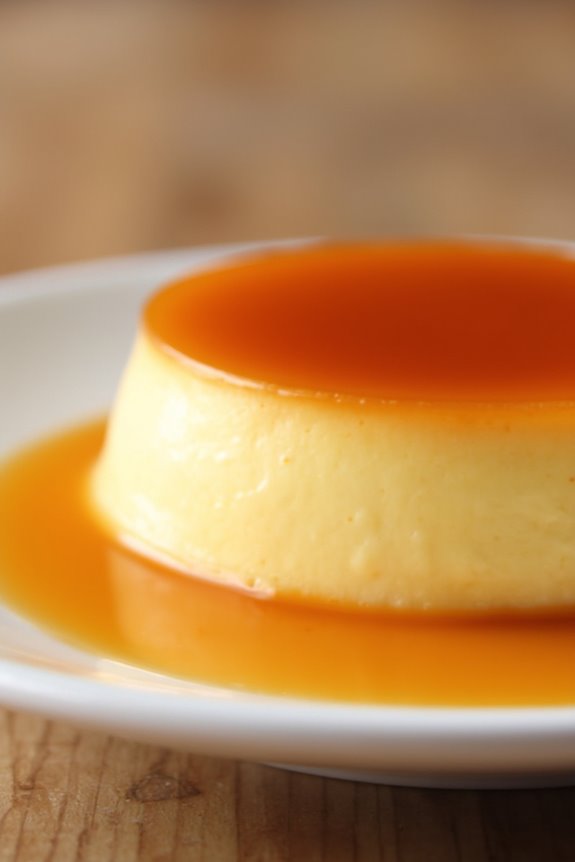
Leche Flan is a traditional Filipino dessert that has gained immense popularity for its rich, creamy texture and delightful sweetness. This delectable caramel custard is often served during special occasions such as birthdays, holidays, and family gatherings. Made with just a few simple ingredients, it’s a dish that showcases the beauty of Filipino culinary traditions. The silky-smooth custard pairs beautifully with a luscious caramel topping, creating a dessert that isn’t only visually appealing but also a treat for the taste buds.
The preparation of Leche Flan requires a bit of patience, but the end result is well worth the effort. The combination of egg yolks, condensed milk, and evaporated milk creates a custard that melts in your mouth, while the homemade caramel adds a sweet, slightly bitter contrast. Whether you’re a seasoned cook or a beginner, this recipe will guide you through the steps needed to create this classic Filipino dessert that’s bound to impress your family and friends.
Ingredients (Serves 4-6):
- 1 cup granulated sugar
- 1/4 cup water
- 6 large egg yolks
- 1 can (14 oz) sweetened condensed milk
- 1 can (12 oz) evaporated milk
- 1 tablespoon vanilla extract
- A pinch of salt
Cooking Instructions:
- Prepare the Caramel: In a saucepan, combine the granulated sugar and water over medium heat. Stir gently until the sugar dissolves, then stop stirring and allow it to boil. Watch closely as the mixture turns golden brown. Once it reaches a deep amber color, quickly remove it from heat and carefully pour it into a round llanera (flan mold) or any heatproof dish. Swirl the mold to coat the bottom evenly with the caramel, then set aside to cool and harden.
- Mix the Custard Ingredients: In a large mixing bowl, whisk together the egg yolks, sweetened condensed milk, evaporated milk, vanilla extract, and a pinch of salt until smooth and well combined. Be careful not to overmix, as you want to avoid incorporating too much air into the mixture.
- Strain the Mixture: To guarantee a silky-smooth custard, strain the mixture through a fine-mesh sieve into the prepared llanera. This step will remove any lumps and create a more refined texture.
- Steam the Flan: Prepare a steamer or place a rack in a large pot with water. Bring the water to a gentle simmer. Place the llanera with the custard mixture into the steamer or pot. Cover with a lid and steam for about 30-40 minutes or until the custard is set but still slightly jiggly in the center. You can check for doneness by inserting a toothpick; it should come out clean.
- Cool and Chill: Once cooked, remove the llanera from the steamer and allow it to cool at room temperature. After cooling, cover it with plastic wrap and refrigerate for at least 4 hours or overnight to set completely.
- Serve the Leche Flan: To serve, run a knife around the edges of the flan to loosen it. Invert the mold onto a serving plate, allowing the caramel to drizzle over the flan. Slice into pieces and enjoy!
Extra Tips: To make the best Leche Flan, it’s important to use fresh eggs and high-quality milk for a richer flavor. If you prefer a more intense caramel taste, you can add a splash of lemon juice to the sugar while cooking the caramel to balance the sweetness. Additionally, verify that the steaming process is gentle; too much heat can cause the flan to develop bubbles or cracks. Enjoy this delightful dessert chilled for the best taste and texture!
Buko Pandan: Refreshing Coconut and Pandan Salad
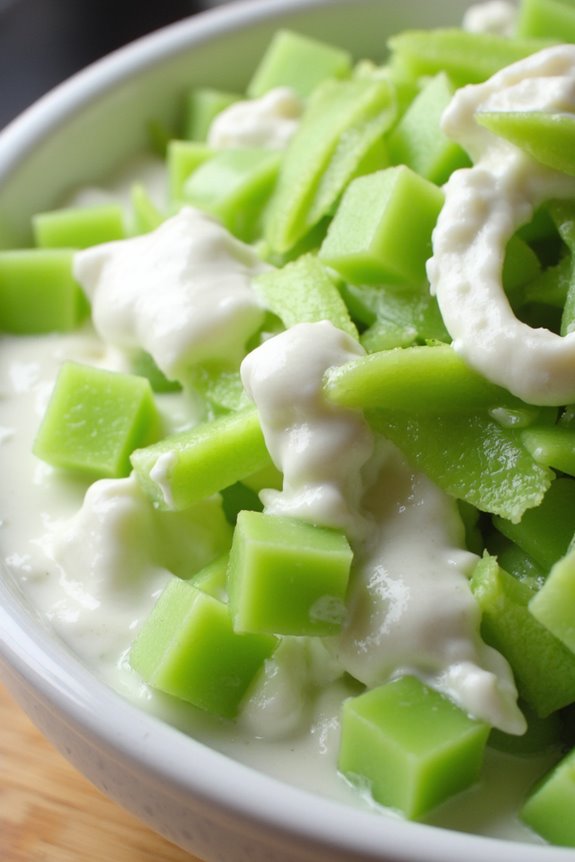
Buko Pandan is a beloved Filipino dessert that perfectly encapsulates the tropical flavors of the Philippines. This delightful salad features strips of young coconut (buko) combined with the fragrant essence of pandan leaves, creating a revitalizing treat that can be enjoyed on a hot day or as a unique addition to any gathering.
Traditionally served chilled, Buko Pandan is often enhanced with a creamy dressing, sweetened with condensed milk and coconut cream, making every bite a luscious experience. The vibrant green color of the pandan leaves not only adds visual appeal but also provides a subtle, sweet aroma that complements the nuttiness of the coconut.
This dessert is versatile enough to be customized with a variety of ingredients, such as fruit cocktail or sago pearls. Whether served at birthday parties, family gatherings, or simply as a midday snack, Buko Pandan is sure to impress with its delightful combination of textures and tastes.
Ingredients (Serves 4-6)
- 2 cups young coconut meat, shredded
- 1 cup pandan-infused gelatin, cut into small cubes
- 1 cup sweetened condensed milk
- 1 cup coconut cream
- 1 teaspoon pandan extract
- 1/2 cup crushed ice (optional)
- 1/2 cup sugar (adjust to taste)
- A pinch of salt
- Optional: 1/2 cup fruit cocktail or sago pearls
Cooking Instructions
- Prepare the Pandan Gelatin: Start by boiling 2 cups of water and adding the pandan leaves to steep for about 10 minutes. Strain the liquid to remove the leaves. In a separate bowl, dissolve 1 tablespoon of gelatin powder in 1/4 cup of cold water. Once dissolved, mix it with the warm pandan extract along with 1/2 cup of sugar. Pour the mixture into a mold and refrigerate until set, which usually takes about 1-2 hours.
- Shred the Young Coconut: While the gelatin is setting, carefully open a fresh coconut. Use a coconut scraper or a sharp knife to shred the young coconut meat into fine strips. Set aside in a large mixing bowl.
- Prepare the Cream Mixture: In a separate bowl, combine the sweetened condensed milk, coconut cream, pandan extract, and a pinch of salt. Mix well until smooth and creamy. Taste the mixture and adjust the sweetness by adding more sugar if desired.
- Combine Ingredients: Once the gelatin has set, cut it into small cubes. Add the gelatin cubes and shredded coconut to the bowl with the cream mixture. If you’re using fruit cocktail or sago pearls, fold them in gently to combine.
- Chill and Serve: Add crushed ice if desired to the mixture for an extra invigorating touch. Transfer the Buko Pandan salad into a serving dish or individual cups. Refrigerate for at least 30 minutes before serving to allow the flavors to meld together.
Extra Tips
For an authentic touch, opt for fresh young coconuts rather than canned options, as they offer a superior texture and flavor. Additionally, feel free to experiment with the ingredients; adding fruits like mango or jackfruit can elevate the dish further.
If you’re looking for a more vibrant green color, consider using food coloring in moderation for presentation but remember that the natural color of the pandan is lovely on its own. Serve chilled for the best experience and enjoy this invigorating treat with family and friends!
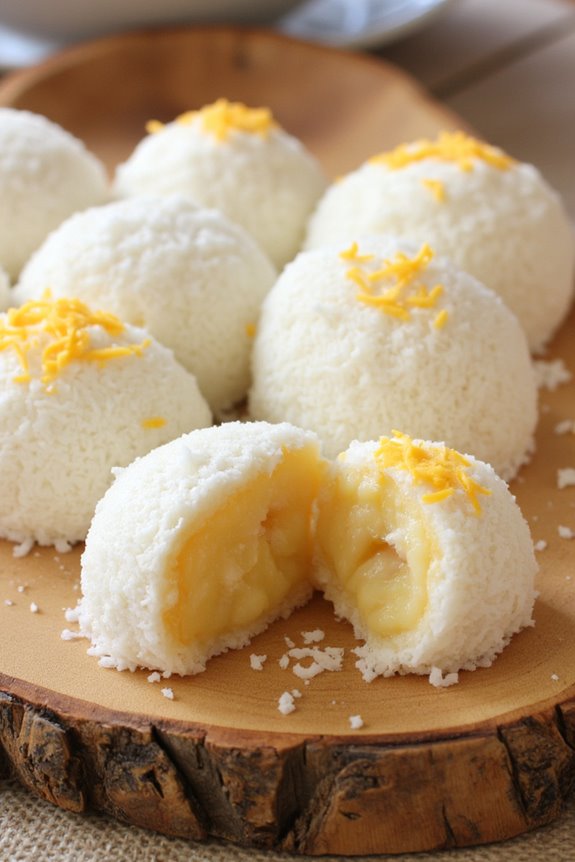
Puto: Steamed Coconut Rice Cakes
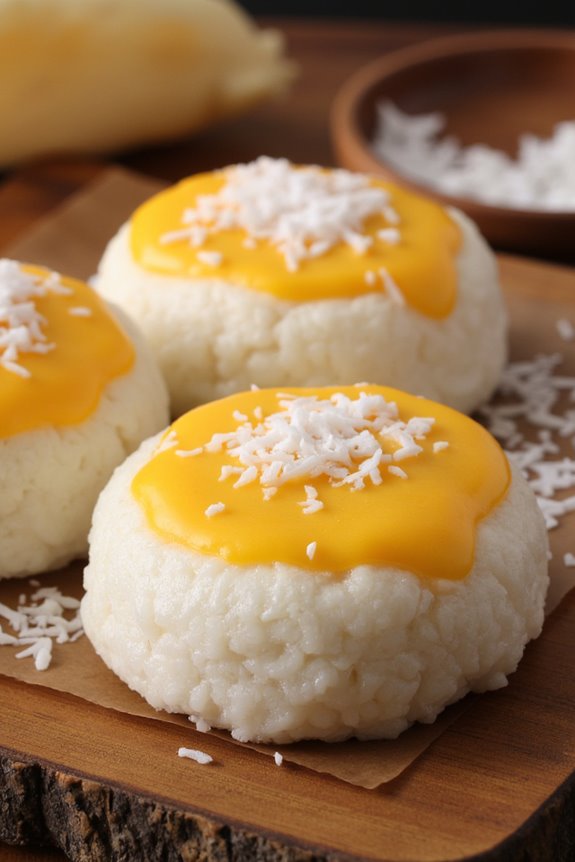
Puto is a delightful Filipino delicacy that showcases the unique flavors of coconut and rice. These steamed rice cakes are soft, fluffy, and slightly sweet, making them a popular choice for breakfast or as a snack. Traditionally, they’re enjoyed with savory dishes like dinuguan (pork blood stew) or simply topped with cheese and served with a hot cup of coffee or tea.
The versatility of puto allows it to be flavored with various ingredients, but the classic version remains a favorite among many. Preparing puto is relatively simple and requires only a few key ingredients. The cooking method involves steaming, which gives these rice cakes their unique texture.
Whether you’re a seasoned cook or trying your hand at Filipino desserts for the first time, this recipe for puto will surely impress your family and friends. Gather your ingredients, and let’s get started on making these delicious coconut rice cakes!
Ingredients (Serves 4-6):
- 2 cups rice flour
- 1 cup coconut milk
- 1 cup water
- 3/4 cup sugar
- 1 tablespoon baking powder
- 1/2 teaspoon salt
- 1/4 cup grated coconut (optional, for topping)
- Cheese slices (optional, for topping)
Cooking Instructions:
- Prepare the Steamer: Fill a steamer pot with water and bring it to a boil. Make sure to have enough water to last through the steaming process. If you don’t have a steamer, you can use a large pot with a lid and place a heat-proof plate or a rack inside to hold the molds above the water.
- Mix Dry Ingredients: In a large mixing bowl, combine the rice flour, sugar, baking powder, and salt. Whisk the dry ingredients together until they’re evenly mixed. This step guarantees that the leavening agent (baking powder) is evenly distributed throughout the flour.
- Add Wet Ingredients: Pour in the coconut milk and water into the bowl of dry ingredients. Stir the mixture using a whisk or spatula until it forms a smooth batter. Make sure there are no lumps, as a smooth batter results in a better texture for the puto.
- Prepare the Molds: Lightly grease small puto molds or muffin cups with oil or cooking spray to prevent sticking. You can also line them with banana leaves for added flavor. If you’re using cheese as a topping, place small pieces at the bottom of each mold before adding the batter.
- Fill the Molds: Pour the batter into the prepared molds, filling them about 3/4 full to allow space for the puto to rise as they steam. If desired, sprinkle some grated coconut on top of each filled mold for extra texture and flavor.
- Steam the Puto: Carefully place the molds into the preheated steamer. Cover the steamer with a lid and steam the puto for about 20-25 minutes, or until a toothpick inserted into the center comes out clean. Be sure to monitor the water level in the steamer and refill as necessary to prevent it from drying out.
- Cool and Serve: Once cooked, carefully remove the molds from the steamer and let them cool for a few minutes. Gently remove the puto from the molds and serve warm. Enjoy them plain, or top with additional cheese or grated coconut if desired.
Extra Tips:
When making puto, you can experiment with different flavors by adding ingredients like pandan extract or ube (purple yam) for color and taste.
It’s also essential to ascertain that the steaming process is consistent; avoid opening the lid frequently, as this can cause the temperature to drop and affect the cooking time. If you find that your puto is too dense, try adding a bit more liquid to the batter or ascertain that your baking powder is fresh for ideal rise.
Enjoy your homemade puto!
Sapin-Sapin: Layered Coconut Rice Dessert
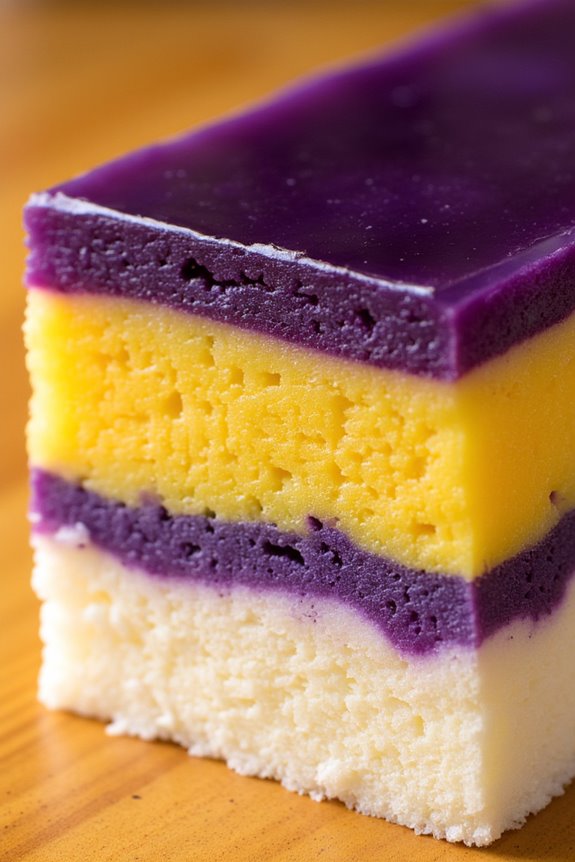
Sapin-Sapin is a delightful Filipino dessert known for its vibrant layers and rich flavors of coconut and rice. This colorful treat is made by combining glutinous rice flour with coconut milk, sugar, and other flavorings to create a multi-layered dish that isn’t only visually stunning but also deliciously satisfying.
Traditionally, Sapin-Sapin is served during special occasions and festive gatherings, making it a favorite among many Filipino families. Each layer often features different flavors, such as ube (purple yam), jackfruit, or plain coconut, giving it a variety of tastes and textures.
Preparing Sapin-Sapin is a straightforward process, but the layering requires some patience and attention. Once you have all the ingredients ready, you’ll be able to create a beautiful dessert that can impress your guests. The layers are cooked separately and then stacked together to form the final dish. The result is a sweet, chewy, and creamy dessert that’s perfect for any celebration or as a special treat for yourself.
Ingredients (Serves 4-6):
- 2 cups glutinous rice flour
- 1 cup coconut milk
- 1 cup water
- 1 cup sugar
- 1 teaspoon vanilla extract
- 1/2 cup ube halaya (purple yam jam)
- 1/2 cup ripe jackfruit, chopped (optional)
- A pinch of salt
- Food coloring (optional, for vibrant layers)
Cooking Instructions:
1. Prepare the Base Mixture****: In a large mixing bowl, combine the glutinous rice flour, sugar, coconut milk, water, and a pinch of salt. Mix well until you achieve a smooth batter. This mixture will serve as the foundation of your Sapin-Sapin.
2. Divide the Mixture: Once the base mixture is ready, divide it into three equal portions. This will allow you to create three distinct layers.
3. Flavor the Layers:
- For the first layer (plain), keep one portion as is.
- For the second layer, mix in the ube halaya until well incorporated. This will give it a beautiful purple color and flavor.
- For the third layer, mix in chopped ripe jackfruit or food coloring if you want a different color for visual appeal.
4. Prepare the Steamer: Fill a steamer pot with water and bring it to a boil. Line a 9-inch round cake pan or a rectangular dish with banana leaves or parchment paper to prevent sticking.
5. Steam the First Layer: Pour the plain layer mixture into the prepared pan and steam for about 20-25 minutes or until set. You can check by inserting a toothpick; it should come out clean.
6. Add the Ube Layer: Once the first layer is set, carefully pour the ube layer mixture over it. Steam again for another 20-25 minutes until firm.
7. Finish with the Jackfruit Layer: After the ube layer is set, pour the jackfruit layer on top and steam for an additional 20-25 minutes until fully cooked.
8. Cool and Serve: Once all layers are cooked, remove the pan from the steamer and let it cool. Once cooled, carefully invert the Sapin-Sapin onto a serving plate. Slice into pieces and enjoy!
Extra Tips:
When making Sapin-Sapin, make sure that each layer is fully cooked before adding the next one to prevent them from mixing. You can experiment with different flavors and colors to make your dessert unique.
Also, if you want a creamier texture, consider using fresh coconut milk instead of canned. Finally, serving it chilled can enhance the flavor and make it even more enjoyable!
Kutsinta: Brown Steamed Rice Cake
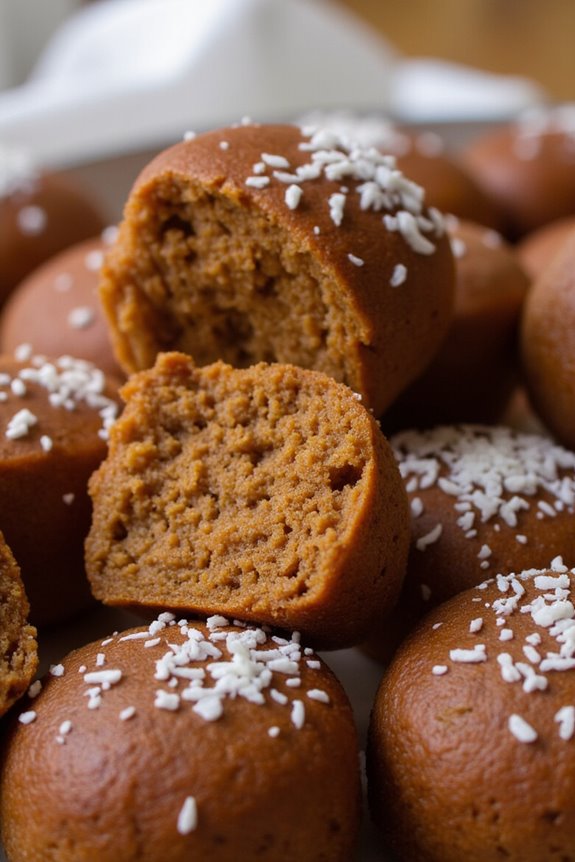
Kutsinta is a beloved Filipino delicacy that showcases the rich flavors and textures of Filipino cuisine. This brown steamed rice cake is known for its chewy and slightly sticky consistency, making it a delightful treat for any occasion. Often enjoyed as a snack or dessert, kutsinta is typically served with a sprinkle of grated coconut on top, adding a hint of creaminess that complements the sweet and earthy flavors of the cake.
Making kutsinta at home is a rewarding experience, and it brings a taste of the Philippines right to your kitchen. To achieve the perfect kutsinta, you’ll need to gather some essential ingredients that are commonly found in Filipino cooking. The preparation is relatively simple, and with a few key steps, you can create this delicious treat that will impress family and friends.
Whether served at a fiesta or enjoyed during a casual afternoon snack, kutsinta is sure to be a hit!
Ingredients (Serves 4-6):
- 1 cup rice flour
- 1/2 cup brown sugar
- 1 cup water
- 1/2 teaspoon lye water (kaustic soda)
- 1 tablespoon grated coconut (optional, for topping)
- Banana leaves or silicone molds (for steaming)
Cooking Instructions:
- Prepare the Molds: If using banana leaves, cut them into squares measuring about 4 inches each. Slightly soften the leaves by passing them over an open flame for a few seconds or dipping them in hot water. This makes them pliable and easy to work with. If using silicone molds, verify they’re clean and set aside.
- Mix the Ingredients: In a mixing bowl, combine the rice flour and brown sugar. Gradually add the water while stirring continuously to prevent lumps from forming. Once the mixture is smooth, add the lye water and mix well. The lye water is what gives kutsinta its distinct texture and color.
- Fill the Molds: Pour the batter into the prepared banana leaves or silicone molds, filling them about three-quarters full to allow for expansion while steaming. If using banana leaves, fold the edges to form a cup shape. Make sure to leave a little space at the top for the cakes to rise.
- Steam the Kutsinta: Place the filled molds in a steamer over boiling water. Cover the steamer with a lid and steam for about 30-40 minutes or until a toothpick inserted in the center comes out clean. Check occasionally to verify there’s enough water in the steamer to prevent it from drying out.
- Cool and Serve: Once cooked, remove the molds from the steamer and let them cool for a few minutes. Gently remove the kutsinta from the molds or banana leaves. If desired, top each piece with grated coconut before serving. Enjoy your kutsinta warm or at room temperature!
Extra Tips:
For an added twist, you can infuse your kutsinta with flavors such as pandan or ube by incorporating pandan extract or ube powder into the batter. Adjust the sweetness to your preference by varying the amount of brown sugar used.
Additionally, if you want a smoother texture, you can blend the rice flour with the water before mixing in the other ingredients. Remember to keep an eye on the steaming process to prevent overcooking, which can make the kutsinta rubbery. Enjoy experimenting and making this delightful Filipino dessert!
Buko Pie: Coconut Custard Pie
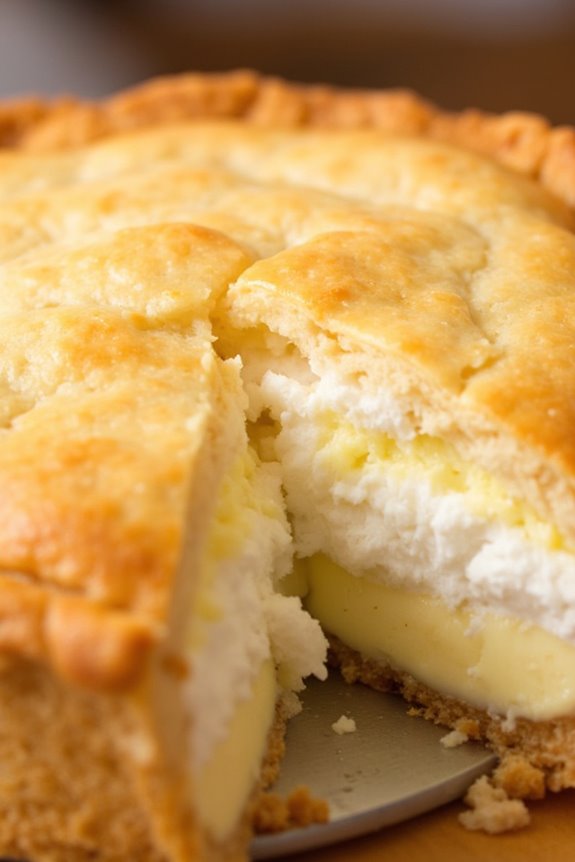
Buko Pie is a beloved Filipino dessert that showcases the rich and creamy flavor of young coconut (buko) combined with a luscious custard filling, all encased in a flaky pie crust. This delightful treat is perfect for special occasions or simply as a sweet indulgence after a meal. The combination of fresh coconut meat and the smooth custard creates a harmonious blend of textures and flavors that’s certain to please any palate.
Making Buko Pie may seem intimidating, but with the right ingredients and a little patience, you can create this delicious dessert in your own kitchen. The key to a perfect Buko Pie lies in using fresh young coconut for the best flavor and texture. Once baked, the pie becomes a showstopper, with its golden crust inviting everyone to take a bite. Prepare to impress your family and friends with this delightful Filipino dessert!
Ingredients (Serves 4-6 People):
- 1 ½ cups all-purpose flour
- ½ cup unsalted butter, chilled and cubed
- 1/4 cup granulated sugar
- 1/4 teaspoon salt
- 4-6 tablespoons cold water
- 2 cups young coconut meat, shredded
- 1 cup coconut milk
- 1/2 cup evaporated milk
- 3/4 cup sugar
- 2 large eggs
- 1 teaspoon vanilla extract
- 1/4 cup cornstarch
- 1/4 teaspoon salt
- 1 tablespoon butter, for greasing
Cooking Instructions:
- Prepare the Pie Crust: In a mixing bowl, combine the flour, sugar, and salt. Add the chilled, cubed butter and mix with a pastry cutter or your fingers until the mixture resembles coarse crumbs. Gradually add cold water, one tablespoon at a time, mixing until the dough comes together. Form the dough into a ball, flatten it into a disk, wrap it in plastic wrap, and refrigerate for at least 30 minutes.
- Roll Out the Dough: Once chilled, remove the dough from the refrigerator. On a lightly floured surface, roll out the dough into a circle about 1/8 inch thick. Carefully transfer it to a greased pie dish, pressing it into the bottom and up the sides. Trim any excess dough hanging over the edges and prick the bottom with a fork to prevent bubbling. Preheat the oven to 350°F (175°C).
- Make the Custard Filling: In a large bowl, whisk together the eggs and sugar until well combined. Add the coconut milk, evaporated milk, and vanilla extract, mixing until smooth. In a separate bowl, combine the cornstarch and salt, then gradually add this mixture to the custard, whisking until there are no lumps. Finally, fold in the shredded young coconut.
- Assemble the Pie: Pour the coconut custard filling into the prepared pie crust. Spread it evenly and gently shake the pie dish to make sure the filling settles.
- Bake the Pie: Place the pie in the preheated oven and bake for about 45-50 minutes, or until the custard is set and the top is lightly golden. You can check for doneness by gently shaking the pie; the filling shouldn’t jiggle excessively.
- Cool and Serve: Once baked, remove the pie from the oven and allow it to cool at room temperature for about 30 minutes. Refrigerate for at least 2 hours before serving to let the filling firm up. Slice and enjoy!
Extra Tips:
For the best flavor, use fresh young coconut meat instead of canned or dried coconut. If you can’t find young coconut, you can substitute with canned coconut meat, but make sure it’s well-drained.
Additionally, you may sprinkle some grated cheese on top before baking for a unique twist that adds a savory element to the sweet filling. Always let the pie cool completely to make certain clean slices when serving. Enjoy your homemade Buko Pie with friends and family!
Maja Blanca: Coconut Pudding
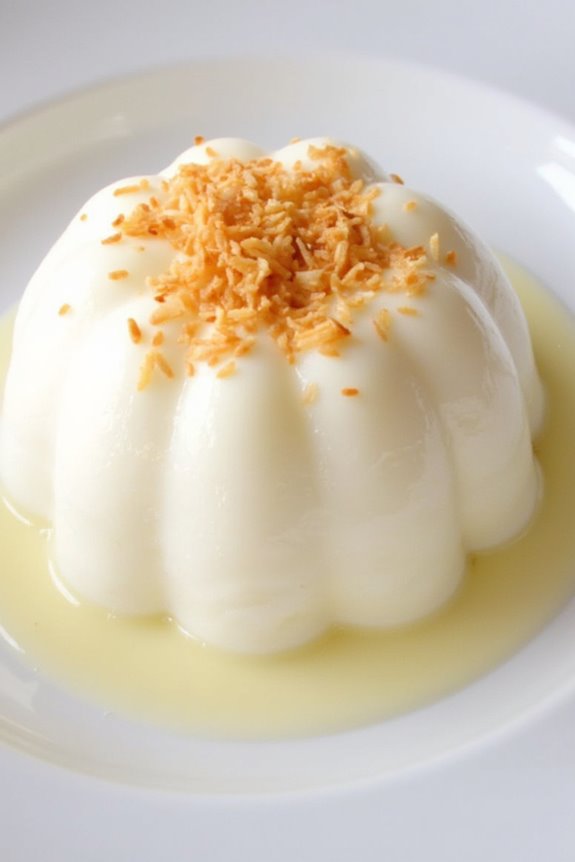
Maja Blanca is a traditional Filipino dessert that embodies the delightful flavors of coconut milk and corn, all while presenting a creamy and smooth texture that’s loved by many. This delectable coconut pudding is often enjoyed during special occasions and family gatherings, as it brings a sense of nostalgia and comfort to those who indulge in it.
The combination of coconut milk and sweet corn creates a rich and flavorful experience, making Maja Blanca a true crowd-pleaser.
Preparing Maja Blanca isn’t only simple but also quite rewarding. As the pudding sets, it transforms into a beautifully smooth dessert that can be easily sliced into squares or served in individual cups. Topped with toasted coconut or a sprinkle of cheese, this dish is sure to impress and satisfy the sweet cravings of everyone at the table.
Now, let’s explore the ingredients and instructions to create this delightful coconut pudding for a serving size of 4-6 people.
Ingredients:
- 1 cup coconut milk
- 1 cup evaporated milk
- 1 cup sweet corn kernels (fresh or canned)
- 1/2 cup sugar
- 1/2 cup cornstarch
- 1/4 teaspoon salt
- 1 teaspoon vanilla extract (optional)
- 1/4 cup toasted grated coconut (for garnish)
Cooking Instructions:
- Prepare the Base Mixture: In a medium-sized mixing bowl, combine the cornstarch, sugar, and salt. Gradually add the coconut milk and evaporated milk to the dry ingredients while whisking continuously to avoid lumps. Confirm that the mixture is smooth and well-combined.
- Add Sweet Corn: Once the mixture is smooth, fold in the sweet corn kernels. If using canned corn, make sure to drain it well. This addition will provide a delightful texture and flavor to the pudding.
- Cook the Mixture: Transfer the mixture into a saucepan and set it over medium heat. Stir the mixture continuously to prevent it from sticking to the bottom of the pan. Continue cooking until the mixture thickens and starts to pull away from the sides of the pan, which usually takes about 10-15 minutes.
- Pour into Molds: Once thickened, remove the saucepan from the heat and pour the mixture into a greased mold or a rectangular dish. Use a spatula to smooth out the top, ensuring an even surface. Allow it to cool at room temperature for about 30 minutes before refrigerating.
- Chill the Pudding: Place the mold in the refrigerator and chill for at least 2 hours, or until the pudding is completely set. This allows the flavors to meld together and the texture to firm up.
- Serve and Garnish: Once set, carefully unmold the Maja Blanca onto a serving platter. Cut it into squares or scoop it into individual cups. Garnish with toasted grated coconut on top for an added crunch and flavor.
Extra Tips:
When preparing Maja Blanca, it’s crucial to stir continuously while cooking to achieve a smooth and creamy texture. If you prefer a more pronounced coconut flavor, consider using fresh coconut milk or adding a bit of coconut extract.
Additionally, feel free to experiment with toppings such as grated cheese or diced fruits to personalize your dessert. Enjoy your Maja Blanca chilled for the best experience!
Ube Halaya: Purple Yam and Coconut Dessert
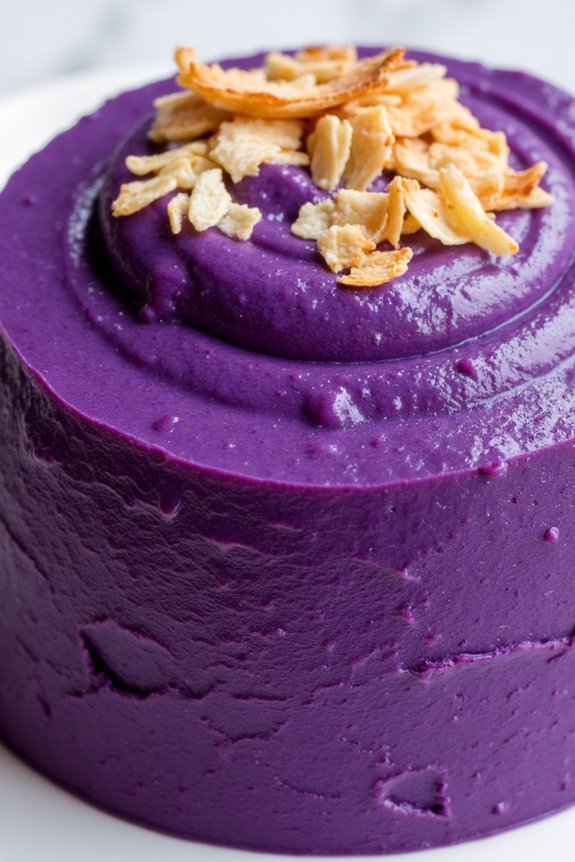
Ube Halaya is a beloved Filipino dessert that showcases the vibrant purple yam, known as ube. This delightful treat isn’t only visually stunning but also rich in flavor and texture. The combination of creamy coconut milk and sweetened purple yam creates a smooth and luscious dessert that melts in your mouth.
Traditionally served during special occasions and celebrations, Ube Halaya has gained popularity worldwide for its unique taste and beautiful color. Preparing Ube Halaya at home is a wonderful way to experience Filipino culture and indulge in a delicious dessert that can be enjoyed by all.
The recipe is relatively simple, requiring just a few key ingredients and some patience. Once you master this dish, you’ll be able to impress family and friends with your culinary skills and introduce them to the wonders of Filipino cuisine.
Ingredients (Serves 4-6 people)
- 2 cups ube (purple yam), boiled and mashed
- 1 cup coconut milk
- 1 cup condensed milk
- 1/2 cup evaporated milk
- 1/2 cup sugar (adjust based on sweetness preference)
- 1/4 cup unsalted butter
- 1 teaspoon vanilla extract (optional)
- Grated coconut or toasted coconut flakes for garnish (optional)
Cooking Instructions
1. Prepare the Ube: Start by boiling the ube until it’s tender, which usually takes about 30-40 minutes. Once cooked, allow it to cool slightly, then peel off the skin and mash it using a fork or potato masher until it’s smooth. Make certain there are no lumps for a creamy texture.
2. Combine Ingredients: In a large saucepan, combine the mashed ube with coconut milk, condensed milk, evaporated milk, and sugar. Stir well to guarantee that all ingredients are evenly mixed. The mixture should have a beautiful purple hue at this point.
3. Cook the Mixture: Place the saucepan over medium heat and add the unsalted butter. Continuously stir the mixture to prevent it from sticking to the bottom of the pan. Cook for about 20-30 minutes, or until the mixture thickens and pulls away from the sides of the pan.
Be patient, as this step is vital for achieving the right consistency.
4. Add Flavoring: Once the mixture has thickened, you can add the vanilla extract if desired. Stir well to incorporate the flavor. Continue cooking for another 5 minutes while stirring constantly.
5. Transfer to a Mold: Remove the saucepan from heat and pour the ube mixture into a greased mold or a shallow dish. Use a spatula to spread it evenly and smoothen the top. Let it cool to room temperature, then refrigerate for at least 2 hours to set.
6. Serve: Once the Ube Halaya has set, you can slice it into squares or scoop it out with a spoon. Optionally, top with grated coconut or toasted coconut flakes for added texture and flavor.
Extra Tips
When preparing Ube Halaya, selecting the right type of ube is essential for achieving the best flavor and color. If fresh ube is unavailable, you can use frozen or powdered ube, but be sure to adjust the liquid ingredients accordingly.
Additionally, for a more decadent version, consider adding a layer of coconut cream on top before serving or mixing in some grated cheese for a sweet and salty contrast. Enjoy your homemade Ube Halaya!
Pichi-Pichi: Chewy Cassava Balls With Coconut
Pichi-Pichi is a delightful Filipino dessert made primarily from cassava, a starchy tuber that provides a unique chewy texture to this treat. This dessert is often served during celebrations and special occasions, making it a beloved favorite among many Filipinos. The addition of coconut enhances the flavor, resulting in a sweet and satisfying treat that pairs beautifully with a sprinkle of grated cheese on top, offering a delightful contrast to the sweetness of the cassava.
Making Pichi-Pichi requires a few simple ingredients and a bit of patience, but the end result is well worth the effort. The chewy consistency and subtle sweetness make it a perfect dessert to share with family and friends. Whether you’re looking to impress guests at a gathering or simply satisfy your sweet tooth, Pichi-Pichi is a fantastic choice that showcases the rich culinary traditions of the Philippines.
Ingredients (serving size: 4-6 people)
- 2 cups grated cassava (fresh or frozen)
- 1 cup sugar
- 1 cup coconut milk
- 1 teaspoon vanilla extract
- ½ teaspoon baking powder
- ½ cup grated coconut (for rolling)
- ½ cup cheese (grated, optional for topping)
- Banana leaves or silicone molds (for steaming)
Cooking Instructions
- Prepare the Ingredients: If using fresh cassava, peel and grate it finely. If using frozen cassava, verify it’s thawed and drained of excess water. Measure out the sugar, coconut milk, vanilla extract, and baking powder. This preparation will make the mixing process smoother.
- Mix the Batter: In a large mixing bowl, combine the grated cassava, sugar, coconut milk, vanilla extract, and baking powder. Stir the mixture until all ingredients are well blended and the batter is smooth. Make sure there are no lumps, as this will affect the texture of the finished product.
- Prepare the Steaming Setup: If using banana leaves, cut them into squares and line your steaming trays or molds. If using silicone molds, you can skip this step. This preparation prevents the Pichi-Pichi from sticking and makes for easy removal after cooking.
- Fill the Molds: Pour the batter into the prepared molds or trays, filling them about ¾ full to allow for expansion during steaming. Verify that the batter is evenly distributed to allow for uniform cooking.
- Steam the Pichi-Pichi: Fill a steamer with water and bring it to a boil. Once boiling, place the filled molds or trays inside the steamer, cover with a lid, and steam for about 30-40 minutes or until a toothpick inserted into the center comes out clean. Keep an eye on the water level in the steamer and replenish as necessary to prevent it from drying out.
- Cool and Roll in Coconut: Once cooked, carefully remove the molds from the steamer and allow them to cool for a few minutes. Once they’re cool enough to handle, gently remove the Pichi-Pichi from the molds and roll each piece in grated coconut to coat. This adds flavor and a lovely texture to the dessert.
- Serve and Enjoy: Arrange the Pichi-Pichi on a serving platter. If desired, sprinkle grated cheese on top for an extra layer of flavor. Serve immediately or store in an airtight container for later enjoyment.
Extra Tips
For the best results, use fresh cassava if possible, as it offers superior texture and flavor compared to frozen. If you’re looking for a twist, consider adding a bit of pandan extract for a unique aroma and taste.
Additionally, you can experiment with different toppings such as grated cheese or even a drizzle of coconut cream for extra richness. Always verify that your steamer has enough water throughout the cooking process to maintain a consistent steaming environment for perfectly chewy Pichi-Pichi.
Buko Salad: Sweet Coconut Fruit Salad
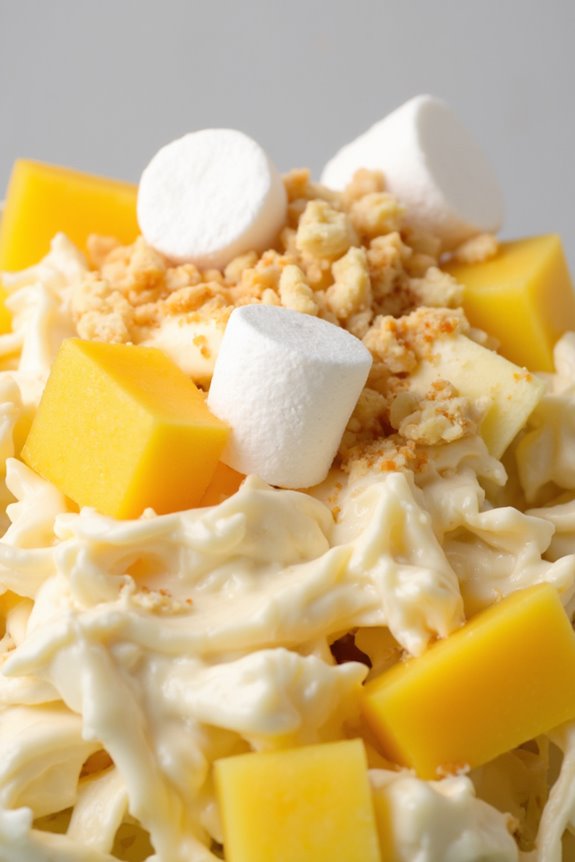
Buko Salad is a delightful Filipino dessert that showcases the fresh and creamy flavors of young coconut (buko) combined with a medley of colorful fruits. This sweet coconut fruit salad is a popular treat during festive occasions and family gatherings, offering both a rejuvenating taste and a beautiful presentation.
The combination of young coconut meat, fruits, and a creamy dressing creates a deliciously indulgent dessert that’s sure to please everyone.
In this recipe, we’ll be preparing Buko Salad for 4-6 people, making it perfect for sharing. The salad isn’t only visually appealing but also packed with nutrients from the fresh fruits. Whether you’re celebrating a special occasion or simply want to enjoy a sweet treat, Buko Salad is a fantastic choice that embodies the essence of Filipino dessert culture.
Ingredients:
- 2 cups young coconut meat, shredded (about 2 buko)
- 1 cup ripe mango, diced
- 1 cup pineapple, diced
- 1 cup sweetened jackfruit, sliced (optional)
- 1 cup mini marshmallows
- 1 cup all-purpose cream
- ½ cup condensed milk
- 1 teaspoon vanilla extract
- ¼ cup grated cheese (optional, for garnish)
- ¼ cup chopped nuts (optional, for garnish)
Cooking Instructions:
- Prepare the Young Coconut: Start by cracking open the young coconuts. Carefully scoop out the coconut meat using a spoon and shred it into small pieces. Set aside the shredded coconut meat in a large mixing bowl.
- Chop the Fruits: Dice the ripe mango and pineapple into bite-sized pieces. If using sweetened jackfruit, slice it into thin strips. Add all the chopped fruits to the mixing bowl with the shredded coconut.
- Mix the Dressing: In a separate bowl, combine the all-purpose cream, condensed milk, and vanilla extract. Stir well until the mixture is smooth and fully combined. This creamy dressing will enhance the flavors of the fruits.
- Combine Ingredients: Pour the creamy dressing over the fruit and coconut mixture in the large bowl. Gently fold everything together using a spatula until all the ingredients are evenly coated with the dressing. Be careful not to mash the fruits.
- Add Marshmallows: Incorporate the mini marshmallows into the mixture for an added touch of sweetness and texture. Gently mix them in until they’re evenly distributed.
- Chill and Serve: Cover the bowl with plastic wrap and refrigerate the Buko Salad for at least 1 hour to allow the flavors to meld together. When ready to serve, transfer the salad to a serving dish and garnish with grated cheese and chopped nuts, if desired.
Extra Tips:
For an extra burst of flavor, consider adding a splash of fresh calamansi juice to the dressing. This will enhance the overall taste and add a hint of tanginess to the salad.
Additionally, feel free to customize the fruit mix according to your preferences or seasonal availability. Other fruits like bananas, grapes, or even berries can be great additions. Enjoy your Buko Salad chilled for the best experience!
Turon: Banana and Coconut Spring Rolls
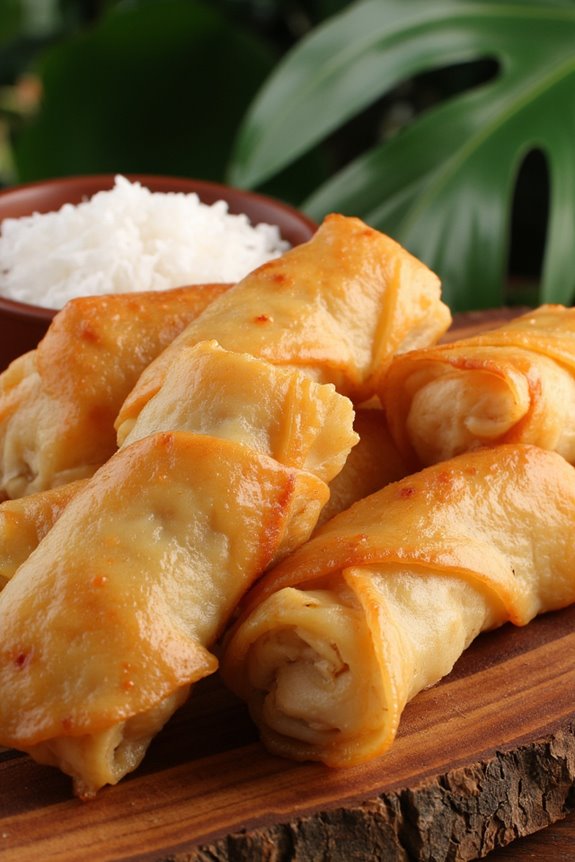
Turon, a popular Filipino snack, is a delightful treat made by wrapping ripe bananas and a sprinkle of shredded coconut in spring roll wrappers, then frying them until golden and crispy. These sweet rolls encapsulate the essence of the tropics, with the natural sweetness of bananas and the rich flavor of coconut coming together in a perfect harmony.
Turon is often enjoyed as a street food delicacy, making it a favorite among both locals and tourists alike. Making Turon isn’t only simple but also a fun activity for families and friends to enjoy together. The ingredients are easily accessible, and the cooking process is quick, allowing you to savor this delectable dessert in no time.
Whether you’re having a gathering, looking for a sweet snack, or simply craving something tropical, Turon will definitely satisfy your taste buds.
Ingredients (Serves 4-6)
- 6 ripe saba bananas (or any firm, sweet bananas)
- 1 cup shredded coconut (fresh or desiccated)
- 6-8 spring roll wrappers
- 1 cup brown sugar
- 1 cup water
- Cooking oil (for frying)
- Optional: 1 teaspoon cinnamon (for extra flavor)
Cooking Instructions
- Prepare the Bananas: Start by peeling the ripe saba bananas and cutting them in half lengthwise. If the bananas are large, you may want to quarter them to make them easier to wrap. This guarantees that they fit nicely inside the spring roll wrappers.
- Make the Sugar Coating: In a small saucepan, combine the brown sugar and water, and heat over medium heat. Stir until the sugar dissolves completely, creating a syrup. You can add cinnamon at this stage if you like a hint of spice. Remove from heat and let it cool slightly.
- Assemble the Rolls: Lay a spring roll wrapper on a clean surface, with one corner pointing towards you. Place a piece of banana in the center of the wrapper, then sprinkle a generous amount of shredded coconut over the banana. Fold the bottom corner of the wrapper over the banana, then fold in the sides, and roll it tightly towards the top corner. Seal the edge with a bit of water to hold it together. Repeat for the remaining wrappers and filling.
- Heat the Oil: In a deep frying pan or a pot, heat about 1-2 inches of cooking oil over medium heat. To check if the oil is hot enough, drop a small piece of wrapper into the oil; if it sizzles, it’s ready for frying.
- Fry the Turon: Carefully place the rolled Turon into the hot oil, ensuring not to overcrowd the pan. Fry until golden brown and crispy, about 3-4 minutes on each side. Use a slotted spoon to flip them as necessary.
- Coat with Sugar: Once fried, remove the Turon from the oil and drain on paper towels. While still hot, dip each piece into the prepared sugar syrup, coating them evenly. Allow any excess syrup to drip off before serving.
- Serve: Arrange the Turon on a plate and let them cool slightly before serving. Enjoy them warm for the best experience!
Extra Tips
When preparing Turon, make sure to use ripe but firm bananas, as overly soft bananas may break during wrapping. If you’d like to add extra flavor, consider incorporating a sprinkle of cinnamon or even a dash of vanilla extract into the brown sugar syrup.
For a healthier twist, you can try baking the Turon instead of frying them; just brush them lightly with oil and bake at 375°F (190°C) for about 15-20 minutes, flipping halfway through. Enjoy your tropical treat!
Coconut Macaroons: Chewy Coconut Cookies

Coconut macaroons are a delightful treat that perfectly encapsulate the flavors and textures of the tropics. These chewy coconut cookies aren’t only easy to make but also incredibly satisfying with their sweet, toasty coconut flavor. Originating from various cultures, including Filipino cuisine, these macaroons are a popular dessert choice for gatherings, special occasions, or simply as a sweet snack to enjoy with your favorite beverage.
The beauty of coconut macaroons lies in their simplicity, requiring just a few key ingredients. The combination of shredded coconut, sweetened condensed milk, and egg whites creates a chewy texture that’s hard to resist. Once baked, they develop a lovely golden exterior while remaining soft and moist on the inside. This recipe serves 4-6 people, making it perfect for sharing or enjoying throughout the week.
Ingredients:
- 3 cups shredded sweetened coconut
- 1 cup sweetened condensed milk
- 2 large egg whites
- 1 teaspoon vanilla extract
- 1/4 teaspoon salt
- Optional: 1/2 cup chocolate chips for dipping
Cooking Instructions:
- Preheat the Oven: Start by preheating your oven to 325°F (160°C). This guarantees that your macaroons will bake evenly and develop a nice golden color.
- Prepare the Baking Sheet: Line a baking sheet with parchment paper or a silicone baking mat. This prevents the macaroons from sticking and makes for easy cleanup.
- Mix the Ingredients: In a large mixing bowl, combine the shredded coconut, sweetened condensed milk, egg whites, vanilla extract, and salt. Stir well until all ingredients are thoroughly mixed and the coconut is evenly coated with the wet mixture.
- Form the Macaroons: Using a tablespoon or a small ice cream scoop, scoop out portions of the mixture and shape them into small mounds on the prepared baking sheet. Make sure to space them about 1 inch apart, as they’ll expand slightly while baking.
- Bake the Macaroons: Place the baking sheet in the preheated oven and bake for about 25-30 minutes, or until the tops are golden brown. Keep an eye on them to prevent over-baking.
- Cool and Serve: Once baked, remove the macaroons from the oven and let them cool on the baking sheet for about 10 minutes. Then transfer them to a wire rack to cool completely. If desired, you can dip the cooled macaroons in melted chocolate for an extra indulgent treat.
Extra Tips:
For an added depth of flavor, consider toasting the shredded coconut in a dry skillet over medium heat before mixing it with the other ingredients. This brings out a richer coconut flavor and enhances the overall taste of your macaroons.
Additionally, you can experiment by adding a pinch of cinnamon or almond extract for a different twist. Store the macaroons in an airtight container at room temperature for up to a week to maintain their chewy texture. Enjoy your delicious coconut macaroons!
Kakanin: Assorted Filipino Rice Cakes
Kakanin, or Filipino rice cakes, are delightful treats made from glutinous rice and coconut milk, often enjoyed during festivals, family gatherings, or as a snack. These rice cakes come in various forms and flavors, each with its unique texture and taste. The use of coconut milk not only adds richness but also enhances the overall flavor profile, making them a beloved staple in Filipino cuisine.
In this recipe, we’ll explore how to make an assortment of kakanin, including *puto* (steamed rice cakes), *bibingka* (rice cake baked with banana leaves), and *kutsinta* (steamed brown rice cake). Each variety brings something special to the table, and together they create a colorful and mouthwatering spread that’s certain to impress family and friends.
Ingredients (Serves 4-6 people)
- 2 cups glutinous rice flour
- 1 cup coconut milk
- 1 cup water
- 1 cup sugar
- 1 teaspoon baking powder
- ½ teaspoon salt
- 2 tablespoons grated coconut (for topping)
- Banana leaves (for bibingka)
- Food coloring (optional, for added variety)
Cooking Instructions
- Prepare the Steamer: Start by filling a steamer pot with water and bringing it to a boil. If using banana leaves for bibingka, cut them into circles to line the steamer or the baking dish and set aside.
- Mix the Batter for Puto: In a mixing bowl, combine the glutinous rice flour, sugar, baking powder, and salt. Gradually add the coconut milk and water, whisking until you achieve a smooth batter. If you’d like to add food coloring, divide the batter into portions and mix in the desired colors.
- Prepare the Puto Molds: Lightly grease the puto molds or small cups. Pour the batter into the molds, filling them about ¾ full to allow space for the cakes to rise during steaming.
- Steam the Puto: Place the molds in the steamer and cover with a lid. Steam for about 15-20 minutes, or until a toothpick inserted into the center comes out clean. Once done, carefully remove the molds from the steamer and set aside.
- Prepare the Kutsinta: In a separate bowl, mix the glutinous rice flour, sugar, and water until smooth. Add a little brown food coloring for a richer color. Pour this batter into greased molds or small cups.
- Steam the Kutsinta: Place the kutsinta molds in the steamer and steam for about 30-35 minutes. Once cooked, let them cool slightly before unmolding.
- Prepare the Bibingka: If you’re making bibingka, pour some batter into the lined baking dish. Add a layer of grated coconut on top. Bake in a preheated oven at 350°F (175°C) for about 25-30 minutes, or until set and lightly browned on the top.
- Serve and Enjoy: Once all the kakanin varieties are ready, arrange them on a serving platter. Serve warm or at room temperature, and enjoy the delicious assortment of Filipino rice cakes!
Extra Tips
When making kakanin, be mindful of the steaming process to guarantee even cooking. You can also experiment with flavors by adding ingredients like cheese, ube (purple yam), or pandan essence to the batter.
For added authenticity, serve the rice cakes with a drizzle of sweet coconut sauce or a sprinkle of grated coconut on top. Remember to keep the steamer covered during cooking to maintain the steam, which is essential for achieving the perfect texture.
Ginataang Bilo-Bilo: Coconut Soup With Rice Balls and Fruits
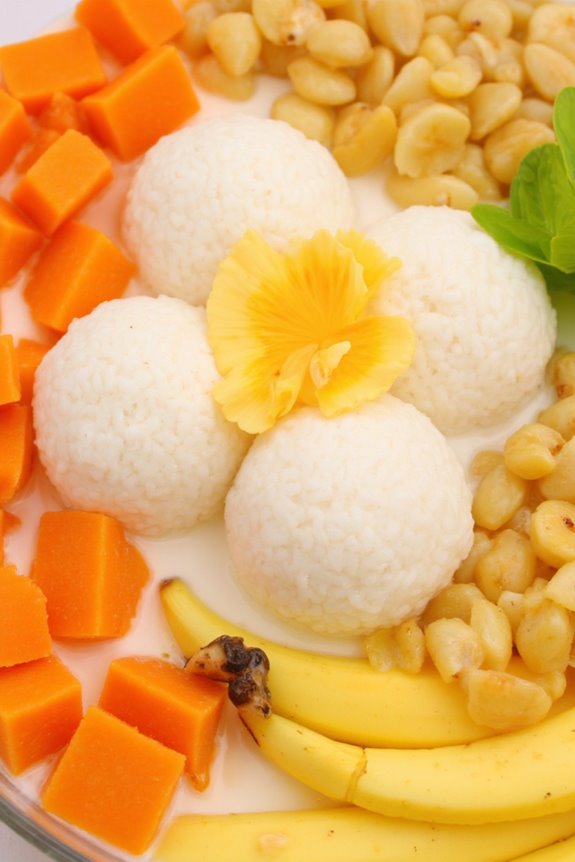
Ginataang Bilo-Bilo is a delightful Filipino dessert that combines the rich flavors of coconut milk with the chewy texture of rice balls and a medley of fruits. This comforting dish is often served warm, making it perfect for any occasion, whether it’s a festive gathering or a simple family meal. The combination of sweetened coconut milk, glutinous rice balls, and fruits creates a harmonious blend of flavors that’s both satisfying and invigorating.
The name “Bilo-Bilo” refers specifically to the small, round rice balls made from glutinous rice flour, which are the star of this dessert. When cooked in coconut milk, these little delights take on a soft and chewy texture that pairs beautifully with the creamy soup. Adding fruits like sweet potatoes, bananas, and jackfruit not only enhances the flavor but also adds a vibrant color to the dish, making it visually appealing.
Ingredients (Serves 4-6)
- 1 cup glutinous rice flour
- 1/4 cup water (for making rice balls)
- 1 cup sweet potato, peeled and diced
- 1 cup ripe jackfruit, sliced
- 1 cup ripe banana, sliced
- 2 cups coconut milk
- 1/2 cup sugar (adjust to taste)
- 1/4 teaspoon salt
- 2 cups water (for boiling)
Cooking Instructions
- Prepare the Rice Balls: In a mixing bowl, combine the glutinous rice flour and 1/4 cup of water. Mix until you form a smooth and pliable dough. Divide the dough into small pieces and roll them into balls about the size of a marble. Set them aside.
- Boil the Sweet Potatoes: In a pot, bring 2 cups of water to a boil. Add the diced sweet potatoes and cook until they’re tender, which should take about 10-15 minutes. Once cooked, drain the water and set the sweet potatoes aside.
- Combine Coconut Milk and Ingredients: In the same pot, pour in 2 cups of coconut milk and add the cooked sweet potatoes. Stir in the sugar and salt, and bring the mixture to a gentle simmer over medium heat.
- Add the Rice Balls: Carefully drop the prepared rice balls into the simmering coconut milk mixture. Allow them to cook for about 10 minutes, or until they float to the surface, indicating they’re done.
- Incorporate the Fruits: Once the rice balls are cooked, add the sliced bananas and jackfruit to the pot. Let everything simmer together for an additional 5 minutes, allowing the flavors to meld.
- Serve Warm: After simmering, remove the pot from heat. Ladle the Ginataang Bilo-Bilo into serving bowls and enjoy warm.
Extra Tips
When preparing Ginataang Bilo-Bilo, feel free to customize the fruit ingredients based on your preferences or what’s in season. You can also adjust the sweetness to your liking by adding more or less sugar.
If you want a thicker soup, let the coconut milk simmer a bit longer until it reduces to your desired consistency. Remember to keep an eye on the rice balls as they cook to avoid overcooking them. Enjoy your cooking adventure!