

Mochi holds a special charm with its chewy texture and variety of flavors. I’m thrilled to share 11 delightful recipes that highlight this cherished Japanese dessert. From the earthy taste of matcha to the decadent surprise of chocolate lava, each treat offers a fresh take on tradition. Trust me, these creations are worth exploring and might just become your new favorites. Let’s get started on this sweet journey!
Classic Matcha Mochi
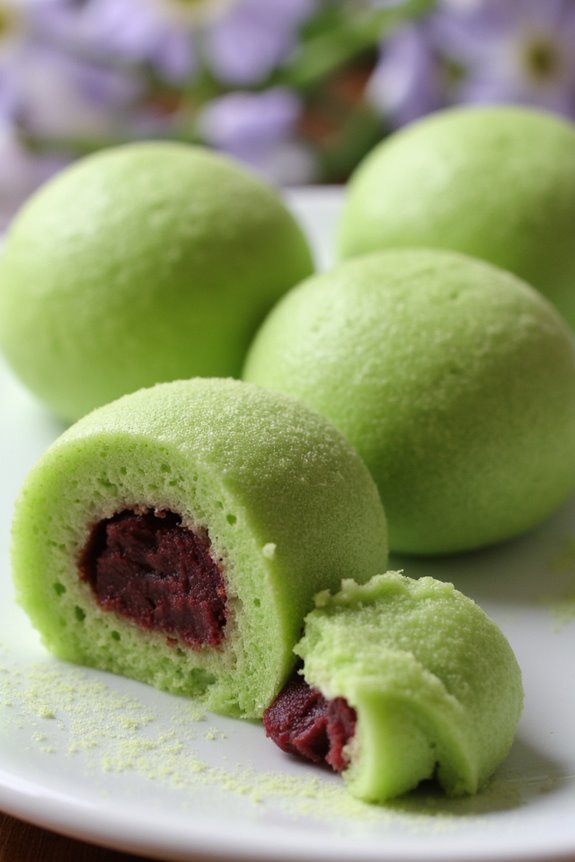
Classic Matcha Mochi is a delightful Japanese dessert that combines the chewy texture of glutinous rice with the earthy flavor of matcha green tea. This sweet treat isn’t only visually appealing with its vibrant green color but also offers a unique taste experience that’s both satisfying and comforting.
Perfect for any occasion, whether it’s a casual gathering or a special celebration, Classic Matcha Mochi is certain to impress your family and friends.
Making this mochi is a fun project that can bring a little bit of Japan to your kitchen. The process involves creating a sweetened matcha dough, filling it with a sweet red bean paste, and then shaping it into bite-sized pieces. While it may take a little practice to get the texture just right, the end result is well worth the effort.
Enjoy it as a snack or dessert, and let the rich flavors transport you to a serene tea house.
Ingredients (Serves 4-6):
- 1 cup glutinous rice flour (mochi flour)
- 1 cup water
- 2 tablespoons granulated sugar
- 1 tablespoon matcha powder
- 1/4 cup sweet red bean paste (anko)
- Cornstarch or potato starch (for dusting)
Cooking Instructions:
- Prepare the Matcha Mixture: In a mixing bowl, combine the glutinous rice flour, granulated sugar, and matcha powder. Mix well to guarantee that the matcha is evenly distributed throughout the flour.
- Add Water: Gradually add the water to the dry ingredients while stirring continuously. Mix until you achieve a smooth batter with no lumps. The consistency should be similar to pancake batter.
- Steam the Mixture: Pour the matcha batter into a heatproof dish or a steamer basket lined with parchment paper. Steam the mixture over medium heat for about 20-25 minutes, or until it becomes translucent and slightly sticky. Make sure to cover the dish with a lid to retain steam during cooking.
- Cool the Mochi: Once cooked, carefully remove the dish from the steamer and allow the mochi to cool for about 10-15 minutes until it’s safe to handle. Be cautious as it will be hot.
- Dust with Cornstarch: Sprinkle a clean surface with cornstarch or potato starch to prevent sticking. Transfer the cooled mochi onto the dusted surface.
- Shape the Mochi: Divide the mochi into equal portions, about 1-1.5 inches in size. Flatten each piece slightly and place about a teaspoon of sweet red bean paste in the center. Carefully fold the edges over the filling and pinch to seal, forming a ball.
- Final Dusting: Once shaped, roll each piece in more cornstarch to prevent sticking. Place them on a plate and allow them to rest for a few minutes before serving.
Extra Tips:
When making Classic Matcha Mochi, be sure to use quality matcha powder for the best flavor. If you’re new to working with mochi, keep a bowl of cornstarch nearby to dust your hands and work surface to prevent sticking.
Feel free to experiment with different fillings, such as fruit or chocolate, to add your own twist to this classic dessert. Store any leftover mochi in an airtight container at room temperature for up to two days, or refrigerate for longer freshness, but note that they may harden slightly.
Enjoy the chewy goodness of your homemade matcha mochi!
Red Bean Paste Mochi
Red Bean Paste Mochi is a delightful Japanese dessert that combines the chewy texture of mochi with the sweet, rich flavor of red bean paste. This traditional treat isn’t only delicious but also easy to make at home. The soft, glutinous rice dough wraps around the smooth and sweet red bean filling, creating a perfect harmony of flavors and textures.
It’s a popular choice during festivals and celebrations, yet it’s simple enough to enjoy any day of the week.
To make Red Bean Paste Mochi, you’ll need a few basic ingredients such as glutinous rice flour, water, sugar, and sweet red bean paste. The process is straightforward but requires some attention to detail to achieve the right consistency for the mochi. Once you master this recipe, you can customize it with various fillings or flavors, making it a versatile addition to your dessert repertoire.
Ingredients (Serves 4-6)
- 1 cup glutinous rice flour
- 1/4 cup sugar
- 3/4 cup water
- 1/2 cup sweet red bean paste (anko)
- Cornstarch (for dusting)
- Optional: food coloring or matcha powder (for flavoring)
Cooking Instructions
- Prepare the Red Bean Paste: If using store-bought sweet red bean paste, verify it’s at room temperature. If making it from scratch, cook azuki beans until soft, mash them, and mix with sugar until desired sweetness is reached. Allow it to cool.
- Mix the Mochi Dough: In a microwave-safe bowl, combine the glutinous rice flour and sugar. Gradually add water while stirring until the mixture is smooth and free of lumps. If desired, you can add a few drops of food coloring or a teaspoon of matcha powder for flavor.
- Cook the Mochi Dough: Cover the bowl with plastic wrap or a microwave-safe lid, leaving a small vent for steam to escape. Microwave on high for 1 minute, then stir the mixture. Microwave for an additional 1-2 minutes until the dough becomes sticky and translucent. Be cautious as it will be hot.
- Shape the Mochi: Dust a clean surface with cornstarch to prevent sticking. Once the mochi dough is cool enough to handle, transfer it to the cornstarch-dusted surface. Flatten the dough slightly with your hands, then divide it into equal portions (around 8-10 pieces).
- Fill the Mochi: Take one portion of the mochi dough and flatten it into a circle. Place about 1 tablespoon of red bean paste in the center. Carefully fold the edges of the dough over the filling and pinch to seal, forming a ball. Repeat with the remaining dough and filling.
- Dust and Serve: Once all the mochi balls are formed, dust them lightly with cornstarch to prevent sticking. Serve immediately or store them in an airtight container at room temperature for up to a day.
Extra Tips
When making Red Bean Paste Mochi, it’s important to keep the dough moist but not overly sticky. If the dough is too wet, add a small amount of glutinous rice flour until the desired consistency is attained.
Additionally, verify your working surface is adequately dusted with cornstarch to make shaping the mochi easier. You can also experiment with different fillings such as matcha paste or fruit preserves for a unique twist on this classic dessert.
Strawberry Shortcake Mochi
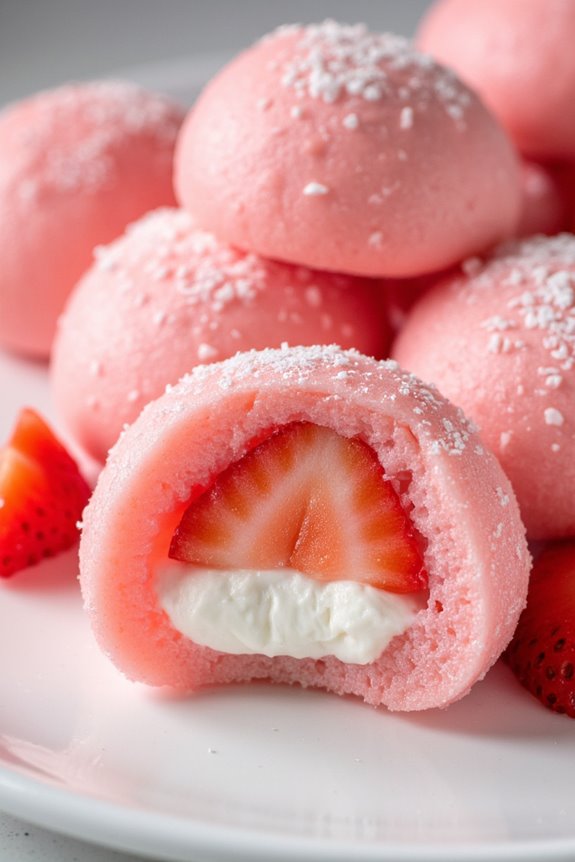
Strawberry Shortcake Mochi is a delightful fusion dessert that combines the chewy texture of mochi with the classic flavors of strawberry shortcake. This dessert features a soft, sweet rice cake filled with fresh strawberries and whipped cream, making it a perfect treat for any occasion. The preparation may seem a bit intricate, but the result is a unique and flavorful dessert that’s sure to impress your family and friends.
Making Strawberry Shortcake Mochi is a fun and rewarding experience. Whether you’re hosting a party or simply treating yourself, this recipe will bring a delightful twist to the traditional strawberry shortcake. The mochi dough is made from sweet rice flour and is filled with fresh strawberries and whipped cream, creating a delightful combination of flavors and textures. Let’s explore the ingredients and instructions to bring this delightful dessert to life!
Ingredients (serving size: 4-6 people)
- 1 cup sweet rice flour (mochi flour)
- 1/4 cup sugar
- 3/4 cup water
- 1/2 teaspoon vanilla extract
- Cornstarch (for dusting)
- 1 cup fresh strawberries, hulled and sliced
- 1 cup heavy whipping cream
- 2 tablespoons powdered sugar
- 1 teaspoon vanilla extract
Cooking Instructions
- Prepare the Strawberries: Start by washing and hulling the strawberries. Slice them into thin pieces and set them aside. You can sprinkle a little sugar on the strawberries to enhance their sweetness if desired.
- Make the Whipped Cream: In a mixing bowl, combine the heavy whipping cream, powdered sugar, and vanilla extract. Using a hand mixer or stand mixer, whip the cream until it forms soft peaks. Be careful not to overwhip the cream, as it can turn grainy. Once done, set the whipped cream aside in the refrigerator to keep it cool.
- Prepare the Mochi Dough: In a microwave-safe bowl, mix the sweet rice flour and sugar together. Gradually add the water and vanilla extract, stirring until there are no lumps. Cover the bowl with plastic wrap and microwave the mixture for 1 minute. Stir the mixture, then cover it again and microwave for another minute. Repeat this process one more time, microwaving for a total of 3 minutes. The dough should be sticky and slightly translucent.
- Dust the Work Surface: On a clean surface, sprinkle a generous amount of cornstarch to prevent the mochi from sticking. Carefully transfer the hot mochi dough onto the cornstarch-covered surface. Be cautious, as the dough will be hot.
- Shape the Mochi: Using cornstarch-dusted hands, divide the mochi dough into small portions, about the size of a golf ball. Flatten each piece into a disc shape, making sure the edges are thinner than the center.
- Fill the Mochi: Place a spoonful of sliced strawberries and a dollop of whipped cream in the center of each mochi disc. Gently fold the edges over the filling, pinching them closed to form a ball. Make sure there are no gaps where the filling can escape.
- Chill and Serve: Once all the mochi balls are filled, place them in the refrigerator for about 30 minutes to firm up. Serve the Strawberry Shortcake Mochi cold, dusted with extra cornstarch if desired.
Extra Tips
When making Strawberry Shortcake Mochi, it’s essential to work quickly with the mochi dough while it’s still warm, as it becomes more challenging to shape when it cools down. If you find the dough too sticky, keep your hands and the work surface dusted with cornstarch throughout the process.
Additionally, feel free to customize the filling with other fruits or flavored whipped creams according to your preference for a unique twist on this classic dessert!
Mango Coconut Mochi
Mango Coconut Mochi is a delightful fusion dessert that combines the chewy texture of traditional mochi with the tropical flavors of mango and coconut. This treat is perfect for those who enjoy a sweet, soft, and slightly sticky snack that melts in your mouth. The vibrant yellow of ripe mango paired with the creamy coconut gives this dessert a revitalizing taste that’s ideal for warm weather or as a unique addition to any dessert table.
Making Mango Coconut Mochi can be a fun activity, especially when preparing it with family or friends. The process involves making a sweet rice flour dough, filling it with a luscious mango coconut mixture, and then shaping it into bite-sized pieces. This recipe isn’t only easy to follow but also allows you to customize the filling according to your preferences. Get ready to impress your guests with this exotic yet approachable dessert!
Ingredients (Serves 4-6):
- 1 cup glutinous rice flour
- 1/4 cup sugar
- 1/2 cup coconut milk
- 1/4 cup water
- 1 ripe mango, peeled and diced
- 1/4 cup sweetened shredded coconut
- Cornstarch (for dusting)
- A pinch of salt
Cooking Instructions:
- Prepare the Mochi Dough: In a microwave-safe bowl, combine the glutinous rice flour, sugar, coconut milk, water, and a pinch of salt. Stir until the mixture is smooth and well combined.
- Cook the Dough: Cover the bowl with plastic wrap, leaving a small opening for steam to escape. Microwave the mixture on high for about 2 minutes. Stir the dough, cover it again, and microwave for an additional 1-2 minutes until it becomes thick and slightly translucent.
- Cool the Dough: Carefully remove the bowl from the microwave, as it will be hot. Allow the mochi dough to cool slightly until it’s manageable but still warm. Dust your work surface with cornstarch to prevent sticking.
- Shape the Mochi: Once the dough has cooled enough to handle, divide it into small portions (about 1.5 inches in diameter). Flatten each piece in your hand to create a small disc.
- Prepare the Filling: In a separate bowl, mix the diced mango with the shredded coconut. Place a small spoonful of the mango coconut mixture in the center of each mochi disc.
- Seal the Mochi: Gently fold the edges of the mochi disc over the filling to create a ball. Pinch the edges to seal it tightly and guarantee the filling is enclosed.
- Dust and Serve: Roll each filled mochi in cornstarch to prevent them from sticking together. Place them on a serving plate and let them cool completely before serving.
Extra Tips:
When preparing Mango Coconut Mochi, be sure to use ripe mango for the best flavor and sweetness. If you want to enhance the coconut flavor further, consider adding a splash of coconut extract to the dough mixture.
Also, keep in mind that mochi can be a bit sticky, so dust your hands and the work surface generously with cornstarch to make the shaping process easier. Enjoy your homemade treat fresh, but if you have leftovers, store them in an airtight container at room temperature for up to two days.
Chocolate Lava Mochi
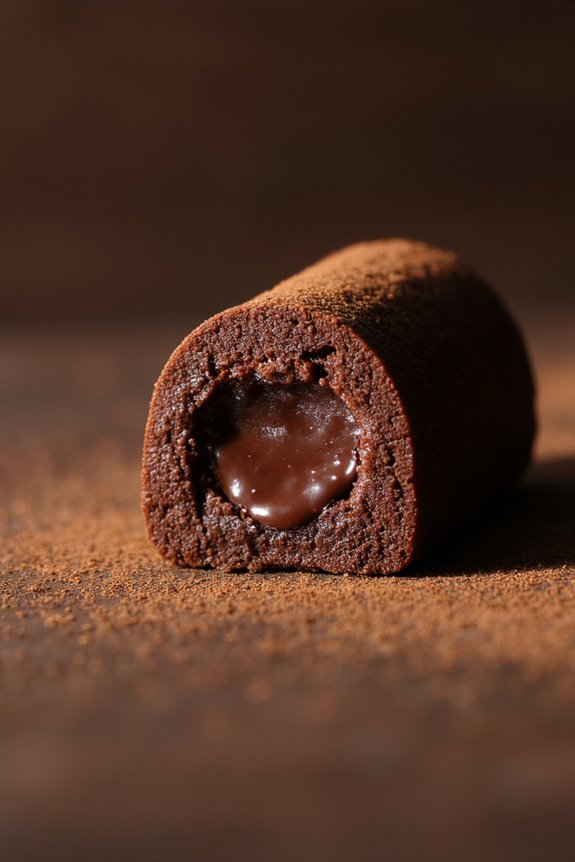
Chocolate Lava Mochi is a delightful fusion dessert that brings together the chewy texture of mochi with a rich, molten chocolate center. Originating from the traditional Japanese rice cake, this innovative recipe takes the classic concept to new heights by incorporating a gooey chocolate filling that oozes out when you take a bite.
Perfect for special occasions or simply as a decadent treat, this dessert is sure to impress friends and family alike.
Making Chocolate Lava Mochi isn’t only a fun cooking adventure but also a rewarding one. The combination of glutinous rice flour, sugar, and cocoa powder creates a soft and chewy exterior, while the chocolate filling offers a luscious surprise.
With a few simple ingredients and straightforward steps, you can create a batch of these indulgent mochi that will satisfy any sweet tooth.
Ingredients (Servings: 4-6)
- 1 cup glutinous rice flour
- 1/4 cup cocoa powder
- 1/2 cup sugar
- 1 cup water
- 1/4 teaspoon salt
- 1/2 teaspoon baking powder
- 1/2 cup dark chocolate chips
- 2 tablespoons unsalted butter
- Cornstarch (for dusting)
Instructions
- Prepare the Chocolate Filling: In a microwave-safe bowl, combine the dark chocolate chips and unsalted butter. Heat in the microwave in 30-second intervals, stirring in between, until the mixture is smooth and fully melted. Once melted, set it aside to cool slightly.
- Mix the Mochi Dough: In a large mixing bowl, combine the glutinous rice flour, cocoa powder, sugar, salt, and baking powder. Gradually add water while whisking until you achieve a smooth batter without any lumps.
- Steam the Mochi: Prepare a steamer or a large pot with a steaming rack. Pour the mochi batter into a heatproof dish lined with parchment paper. Steam the batter over boiling water for about 20-25 minutes, or until the mochi is firm and slightly translucent. Allow it to cool for a few minutes after steaming.
- Portion the Mochi: Dust your work surface with cornstarch to prevent sticking. Once the mochi has cooled enough to handle, transfer it onto the cornstarch-dusted surface. Divide the mochi into equal pieces (about 10-12) using a knife or a bench scraper.
- Fill the Mochi: Flatten each piece of mochi into a small disc. Place about 1 teaspoon of the chocolate filling in the center of each disc. Carefully fold the edges of the mochi over the filling, pinching to seal it securely, and roll it gently into a ball shape. Make sure there are no gaps for the filling to escape.
- Chill and Serve: Place the filled mochi balls on a plate dusted with cornstarch to prevent them from sticking. Refrigerate for at least 30 minutes to help firm up the chocolate filling before serving. Enjoy your delicious Chocolate Lava Mochi!
Extra Tips
To enhance the flavor of your Chocolate Lava Mochi, consider adding a hint of vanilla extract to the mochi dough for added depth.
Additionally, be careful not to overfill the mochi with chocolate, as it may overflow during cooking. If you’re looking for a creative twist, try substituting the dark chocolate with flavored chocolates like raspberry or mint for a unique taste experience.
Remember to dust your hands and the mochi well with cornstarch to prevent sticking while shaping. Enjoy your sweet creation!
Peanut Butter Mochi Bites
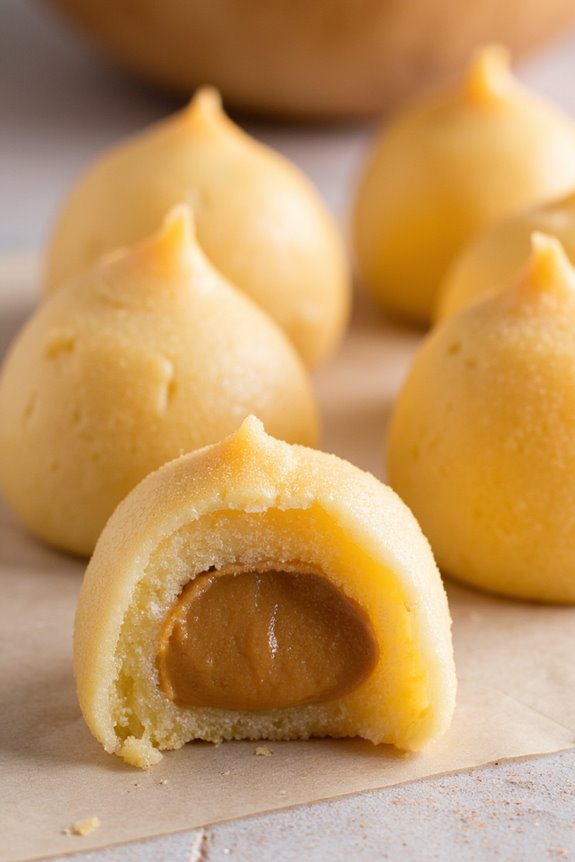
If you’re seeking a unique and delightful dessert that combines the chewy texture of mochi with the rich, creamy flavor of peanut butter, search no more than Peanut Butter Mochi Bites. This simple yet delicious treat is perfect for sharing with family and friends or as a sweet snack to enjoy on your own. The combination of glutinous rice flour and peanut butter creates a wonderful contrast that’s both satisfying and indulgent.
Making these mochi bites isn’t only easy but also allows for customization. You can adjust the sweetness and even add toppings such as crushed nuts or chocolate drizzle. Whether you’re a mochi enthusiast or have never tried it before, this recipe is sure to impress. Let’s get started on creating these delightful Peanut Butter Mochi Bites!
Ingredients (Serves 4-6):
- 1 cup glutinous rice flour
- 1/4 cup sugar
- 1/2 cup water
- 1/2 cup creamy peanut butter
- 1/2 cup cornstarch (for dusting)
- A pinch of salt
Cooking Instructions:
- Prepare the Mochi Dough: In a microwave-safe bowl, combine the glutinous rice flour, sugar, and a pinch of salt. Gradually add the water while stirring to form a smooth batter. Ascertain there are no lumps, as this will affect the texture of the mochi.
- Cook the Dough: Cover the bowl with a microwave-safe lid or plate. Microwave the mixture on high for about 1-2 minutes, then remove and stir. Return to the microwave and cook for another 1-2 minutes until the dough is sticky and slightly translucent.
- Shape the Mochi: Dust a clean surface with cornstarch to prevent sticking. Transfer the hot mochi dough onto the surface and let it cool for a minute. Once cool enough to handle, dust your hands with cornstarch and divide the dough into small equal portions (about the size of a tablespoon).
- Fill with Peanut Butter: Flatten each portion of mochi dough in your hand and place a small teaspoon of peanut butter in the center. Carefully fold the edges over the peanut butter to enclose it completely, forming a ball. Repeat this process for all dough portions.
- Coat and Serve: Once all the mochi bites are formed, roll them in cornstarch to prevent them from sticking together. Place the finished mochi bites on a serving plate and let them sit for 10-15 minutes to firm up slightly before serving.
Extra Tips:
When making Peanut Butter Mochi Bites, it’s important to work quickly with the hot dough, as it becomes more difficult to handle as it cools. If you find the dough too sticky, don’t hesitate to add a little extra cornstarch while shaping.
Additionally, feel free to experiment with different fillings, such as chocolate, fruit preserves, or even a mix of nut butters for variety. Enjoy your mochi bites fresh, but they can also be stored in an airtight container in the fridge for a couple of days.
Sweet Potato Mochi
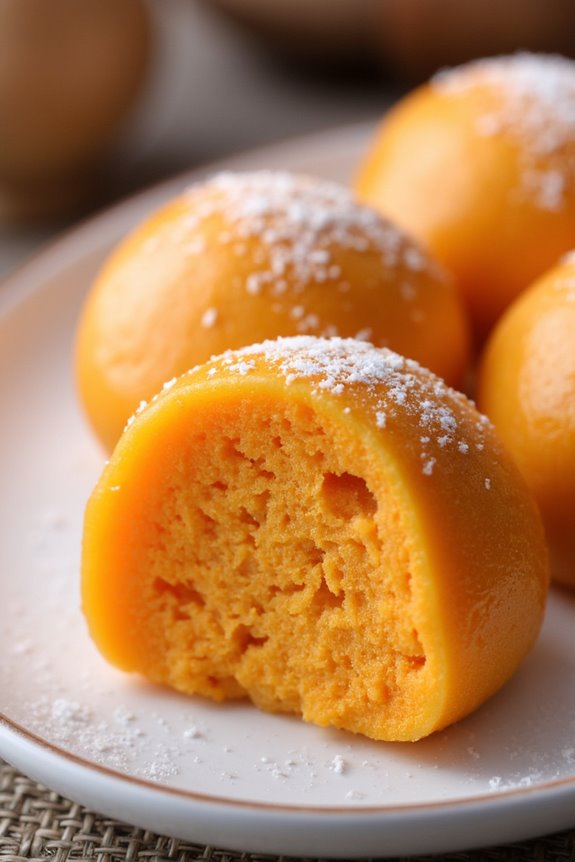
Sweet Potato Mochi, a delightful variation of the traditional Japanese rice cake, is a unique dessert that combines the earthy sweetness of sweet potatoes with the chewy texture of mochi. This dish isn’t only visually appealing but also incredibly satisfying to eat. With its vibrant color and delectable taste, Sweet Potato Mochi is perfect for special occasions or as a fun treat to share with family and friends.
Making Sweet Potato Mochi is a straightforward process that involves steaming sweet potatoes, mixing them with glutinous rice flour, and shaping them into bite-sized pieces. The result is a beautifully chewy dessert that can be enjoyed on its own or filled with sweet red bean paste or other fillings of your choice. This recipe serves 4-6 people and is sure to impress anyone who tries it.
Ingredients:
- 2 medium-sized sweet potatoes (about 1 lb)
- 1 cup glutinous rice flour (mochi flour)
- ½ cup granulated sugar
- ½ cup water
- Cornstarch or potato starch (for dusting)
- Optional: Sweet red bean paste or other fillings
Cooking Instructions:
- Prepare the Sweet Potatoes: Begin by peeling the sweet potatoes and cutting them into chunks. Place them in a steamer basket and steam for about 20-25 minutes or until they’re tender when pierced with a fork. This step is essential as it guarantees the sweet potatoes are soft enough to mash and incorporate into the mochi.
- Mash the Sweet Potatoes: Once the sweet potatoes are cooked, remove them from the steamer and let them cool slightly. Then, using a fork or potato masher, mash the sweet potatoes until smooth. You can leave some small chunks for texture if desired. This creamy mixture will provide the flavor base for your mochi.
- Combine Ingredients: In a mixing bowl, combine the mashed sweet potatoes, glutinous rice flour, and granulated sugar. Gradually add the water, mixing until a dough forms. You want the mixture to be pliable but not too sticky. If it’s too dry, add a little more water; if it’s too wet, add a bit more rice flour.
- Knead the Dough: Transfer the dough to a clean, floured surface. Knead it gently for a few minutes until it becomes smooth and elastic. This step helps develop the chewy texture characteristic of mochi. Be careful not to over-knead, as it can make the dough tough.
- Shape the Mochi: Divide the dough into small pieces (about the size of a golf ball). If you’re using a filling, flatten each piece in your palm, place about a teaspoon of sweet red bean paste in the center, and carefully fold the dough over to seal it. Roll it gently into a ball. For unfilled mochi, simply roll the pieces into balls.
- Dust and Serve: Once shaped, dust the mochi with cornstarch or potato starch to prevent them from sticking together. Arrange them on a serving plate and enjoy them fresh. You can also refrigerate them for a few hours for a firmer texture, but they’re best enjoyed the same day.
Extra Tips:
When making Sweet Potato Mochi, it’s important to choose sweet potatoes that are sweet and starchy for the best flavor and texture. If you want to experiment, consider adding flavors such as matcha or cocoa powder to the dough or trying different fillings like fruit preserves or chocolate.
Also, keep in mind that mochi can be quite sticky, so always keep your work surface and hands dusted with starch to make handling easier. Enjoy your sweet potato mochi as a delightful treat for any occasion!
Green Tea Mochi Ice Cream

Green tea mochi ice cream is a delightful fusion of traditional Japanese mochi and creamy ice cream, perfect for those who appreciate the unique taste of matcha. This dessert combines the chewy texture of mochi with the rich, earthy flavor of green tea, creating a treat that’s both invigorating and satisfying. Ideal for warm weather or any occasion that calls for a sweet ending, this recipe is sure to impress your family and friends.
Making green tea mochi ice cream is an enjoyable experience that allows you to customize the sweetness and creaminess to your liking. The mochi dough is made from glutinous rice flour, which gives it its signature chewy texture, while the green tea ice cream provides a creamy, rich contrast.
Once you master the art of making mochi, you can experiment with different fillings and flavors to suit your taste, making it a versatile dessert choice.
Ingredients (Serves 4-6)
- 1 cup glutinous rice flour (mochi flour)
- 1 tablespoon matcha green tea powder
- 1/4 cup granulated sugar
- 1 cup water
- Cornstarch (for dusting)
- 2 cups green tea ice cream
Instructions
- Prepare the Mochi Dough: In a mixing bowl, combine the glutinous rice flour, matcha green tea powder, and granulated sugar. Gradually add the water while stirring to form a smooth batter. Make sure there are no lumps, as a smooth mixture is essential for a good texture.
- Steam the Dough: Pour the batter into a heatproof dish (such as a glass or metal dish) that fits into your steamer. Place the dish in the steamer, cover, and steam over medium heat for about 20 minutes. The dough should become somewhat translucent and sticky when fully cooked.
- Cool the Dough: Once steamed, carefully remove the dish from the steamer and let the mochi dough cool for about 10-15 minutes. It should be warm but manageable to touch.
- Dust and Shape the Mochi: On a clean surface dusted with cornstarch, turn out the warm mochi dough. Dust your hands with cornstarch and divide the dough into equal portions (about 8-12 pieces). Flatten each piece into a circle that’s about 3 inches in diameter.
- Fill with Ice Cream: Take a small scoop of green tea ice cream and place it in the center of each mochi circle. Gently lift the edges of the mochi to wrap around the ice cream, pinching to seal. Make sure the ice cream is well-covered by the mochi to avoid any leakage.
- Freeze the Mochi Ice Cream: Place the filled mochi on a tray lined with parchment paper, and return them to the freezer for at least 2 hours. This will allow the ice cream to firm up and the mochi to set properly.
- Serve: Once the mochi ice cream is ready, remove it from the freezer and let it sit for a few minutes before serving. Dust with additional cornstarch if necessary, and enjoy this delicious treat.
Extra Tips
When making green tea mochi ice cream, it’s important to work quickly when handling the dough, as it can become sticky if left out for too long.
If you’re new to making mochi, don’t hesitate to experiment with different flavors of ice cream or even add fillings like red bean paste or fresh fruit for variety.
Keep in mind that the quality of your matcha will greatly affect the flavor, so opt for high-quality matcha powder for the best results. Enjoy your homemade dessert!
Black Sesame Mochi

Black Sesame Mochi is a delightful and chewy Japanese dessert that combines the nutty flavor of black sesame paste with the soft, glutinous texture of mochi. This sweet treat isn’t only delicious but also visually appealing, making it a perfect addition to any dessert table.
Traditionally enjoyed during special occasions, this mochi can be served as a snack or a dessert, and it showcases the unique flavors of Asian cuisine.
Making Black Sesame Mochi involves a few key ingredients, but the process is quite simple once you get the hang of it. The combination of glutinous rice flour and black sesame creates a beautifully soft and slightly sticky texture that’s hard to resist.
With the right techniques, you can create perfect little bites of this delightful dessert that will impress your family and friends.
Ingredients (Serves 4-6):
- 1 cup glutinous rice flour
- 1/4 cup sugar
- 1/2 cup water
- 1/4 cup black sesame paste
- Cornstarch (for dusting)
- Optional: black sesame seeds for garnish
Cooking Instructions:
- Prepare the Steamer: Fill a pot with water and bring it to a boil. Place a steaming basket or a heatproof dish lined with parchment paper inside the pot, making certain that the water doesn’t touch the bottom of the dish. Cover and keep it simmering while you prepare the mochi dough.
- Mix the Dough: In a mixing bowl, combine the glutinous rice flour and sugar. Gradually add water while stirring continuously until you achieve a smooth batter. The mixture should be thick but pourable.
- Steam the Dough: Pour the batter into the steaming basket or dish, spreading it evenly. Cover the pot with a lid and steam for about 20 minutes until the mochi is cooked through and becomes slightly translucent. You can check for doneness by inserting a toothpick; it should come out clean.
- Add the Black Sesame Paste: Once the mochi is cooked, remove it from the steamer and let it cool slightly. While it’s still warm, use a spatula to fold in the black sesame paste until fully incorporated. Be careful, as the mochi will be hot!
- Shape the Mochi: Dust a clean surface with cornstarch to prevent sticking. Transfer the mochi mixture onto the cornstarch-dusted surface. Use your hands to flatten and shape the mochi into small, bite-sized pieces. Dust your hands with cornstarch as needed to prevent sticking.
- Garnish and Serve: Optionally, sprinkle black sesame seeds on top of the mochi pieces for added flavor and decoration. Serve the Black Sesame Mochi at room temperature and enjoy your delicious creation!
Extra Tips:
To achieve the perfect texture for your Black Sesame Mochi, make certain that the dough is steamed adequately; undercooking can lead to a gummy texture.
Additionally, you can experiment with the sweetness by adjusting the sugar to suit your taste. If you prefer a smoother texture, you can blend the black sesame paste with a little water before incorporating it into the mochi.
Don’t forget to dust with cornstarch generously to prevent sticking during the shaping process!
Yuzu Citrus Mochi
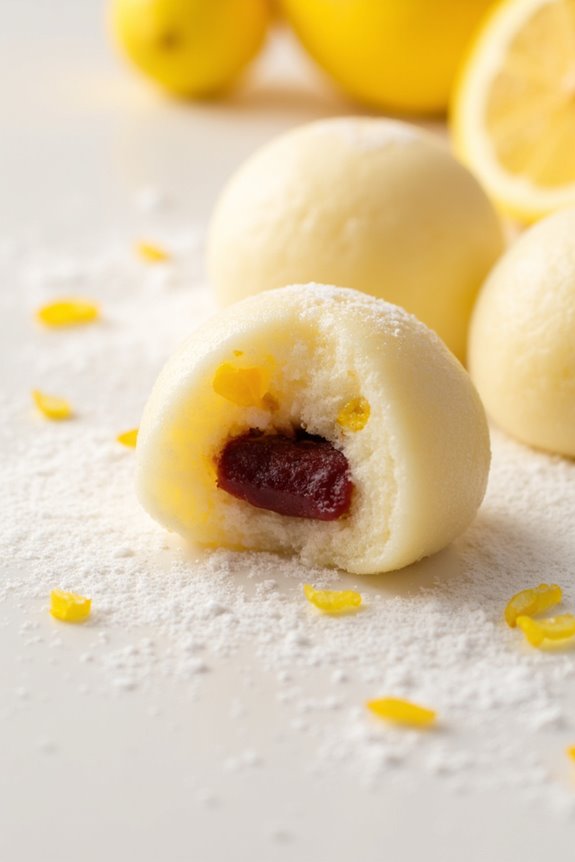
Yuzu Citrus Mochi is a delightful Japanese dessert that combines the unique flavor of yuzu, a citrus fruit known for its fragrant aroma and tartness, with the chewy texture of mochi. This sweet treat not only provides a burst of invigorating flavor but also offers an interesting twist to traditional mochi recipes.
Perfect for serving at gatherings or enjoying as a personal indulgence, Yuzu Citrus Mochi is a wonderful way to experience the essence of Japanese cuisine.
Making Yuzu Citrus Mochi is a straightforward process that involves preparing the mochi dough and filling it with a sweet yuzu-infused filling. The combination of glutinous rice flour and yuzu juice creates a delicate, chewy dessert that melts in your mouth.
Once you master this recipe, you’ll be able to impress your friends and family with your culinary skills and introduce them to the vibrant flavors of yuzu.
Ingredients (serves 4-6):
- 1 cup glutinous rice flour (mochi flour)
- 1/4 cup granulated sugar
- 1/2 teaspoon salt
- 3/4 cup water
- 2 tablespoons yuzu juice
- 1 tablespoon yuzu zest
- 1/2 cup cornstarch (for dusting)
- 1/2 cup sweetened red bean paste (or any desired filling)
Cooking Instructions:
- Prepare the Mochi Dough: In a microwave-safe bowl, combine the glutinous rice flour, granulated sugar, and salt. Mix them thoroughly. Gradually add the water, yuzu juice, and yuzu zest to the dry ingredients, stirring until you achieve a smooth batter without lumps.
- Cook the Dough: Cover the bowl with plastic wrap, leaving a small vent for steam to escape. Microwave the mixture on high for 1 minute, then stir the dough. Repeat this process two more times (total of 3 minutes), ensuring that you stir after each minute until the dough becomes thick and sticky.
- Dust the Surface: Once the mochi dough is cooked, sprinkle a clean surface with cornstarch to prevent sticking. Carefully transfer the hot mochi dough onto the cornstarch-dusted surface using a spatula or greased hands. Be cautious, as it will be hot.
- Shape the Mochi: Dust your hands with cornstarch and divide the mochi dough into equal portions (about 12 pieces). Flatten each piece into a disc shape. Place a small amount of sweetened red bean paste in the center of each disc, then fold the edges over to seal the filling inside, gently shaping it into a ball.
- Coat and Serve: Once all the mochi balls are formed, roll each one in cornstarch to prevent sticking. Allow them to cool completely before serving. Enjoy your Yuzu Citrus Mochi at room temperature or chilled.
Extra Tips: When preparing Yuzu Citrus Mochi, feel free to experiment with different fillings like fruit preserves or chocolate for a unique twist.
Make sure to keep your hands and surfaces well-dusted with cornstarch to avoid a sticky mess. If you can’t find yuzu juice, you can substitute it with a mix of lemon and lime juice for a similar citrus flavor.
Enjoy your mochi fresh, as they’re best consumed within a couple of days.
Nutella-Stuffed Mochi

Mochi is a delightful Japanese rice cake that has gained popularity around the world for its chewy texture and versatility. Combining traditional mochi with the rich, creamy flavor of Nutella creates an irresistible dessert that’s perfect for any occasion.
Whether you’re hosting a party or simply satisfying your sweet tooth, these Nutella-stuffed mochi bites will surely impress your friends and family.
Making Nutella-stuffed mochi is a fun and rewarding process. The dough is made from glutinous rice flour, which gives it that signature chewiness. Once you’ve prepared the mochi and filled it with Nutella, the result is a delectable treat that bursts with flavor.
With only a few key ingredients, you can whip up this delightful dessert in no time!
Ingredients (Serves 4-6 people):
- 1 cup glutinous rice flour (mochi flour)
- 1/4 cup granulated sugar
- 1 cup water
- Cornstarch (for dusting)
- 1/2 cup Nutella
- Optional: Cocoa powder or powdered sugar for dusting
Cooking Instructions:
- Prepare the Mochi Dough: In a microwave-safe bowl, combine the glutinous rice flour and granulated sugar. Gradually add the water while stirring to guarantee there are no lumps. This mixture should be smooth and well-combined.
- Cook the Dough: Cover the bowl with plastic wrap, leaving a small vent for steam to escape. Microwave the bowl on high for about 2 minutes. After 2 minutes, stir the mixture, cover it again, and microwave for an additional 1-2 minutes until the dough becomes sticky and slightly translucent.
- Cool the Dough: Carefully remove the bowl from the microwave (it will be hot!) and let it cool for a few minutes until it’s safe to handle. Dust your work surface generously with cornstarch to prevent sticking.
- Shape the Mochi: Once cool enough to handle, transfer the mochi dough onto the dusted surface. Using your hands or a rolling pin, flatten the dough to about 1/4 inch thickness. Cut out small circles (about 3 inches in diameter) using a round cutter or a glass.
- Fill with Nutella: Place about 1 teaspoon of Nutella in the center of each mochi circle. Carefully fold the edges of the dough over the Nutella to enclose it completely, pinching the edges to seal the filling inside.
- Dust and Serve: After shaping all the mochi, dust each piece lightly with cornstarch or cocoa powder to prevent sticking. Place mochi on a serving plate and enjoy fresh!
Extra Tips:
When making Nutella-stuffed mochi, confirm that you dust your hands and workspace with cornstarch to prevent the sticky dough from clinging.
If you find the dough too sticky to work with, you can slightly wet your hands or dust with a bit more cornstarch. Additionally, feel free to experiment with different fillings such as fruit preserves or other types of chocolate to personalize your mochi.
Enjoy these delightful treats fresh, as they’re best when served immediately after preparation!