

I’ve stumbled upon some amazing high protein Japanese recipes that are perfect for transforming mealtime into something special. From grilled salmon with teriyaki sauce to comforting miso soup with tofu and seaweed, each dish is both delicious and nourishing. Picture enjoying crispy chicken katsu or flavorful shrimp tempura. These meals are crafted to fill you up and keep your energy levels high all day. Let’s explore these mouthwatering options together.
Grilled Salmon With Teriyaki Sauce
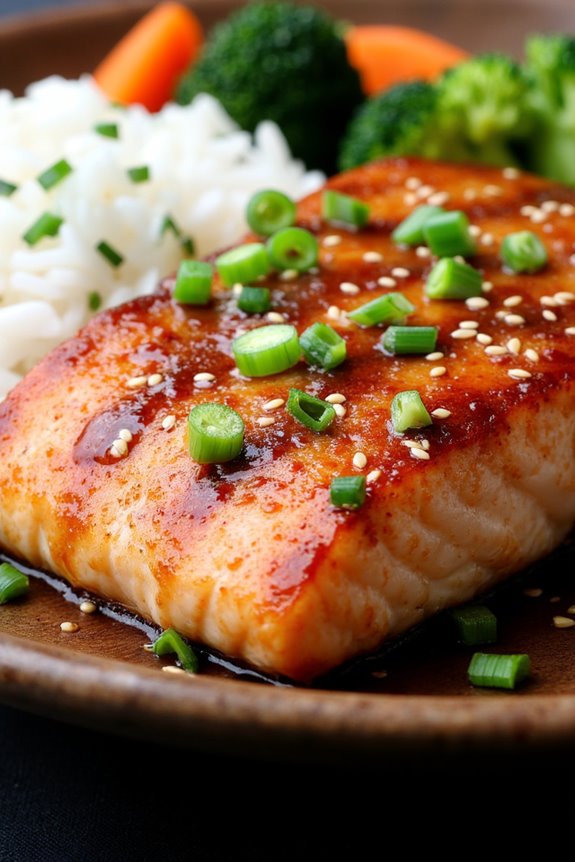
Grilled Salmon with Teriyaki Sauce is a delectable Japanese dish that perfectly marries the rich flavors of succulent salmon with the sweet, savory notes of traditional teriyaki sauce. This dish not only highlights the natural taste of the fish but also provides a healthy dose of protein, making it an excellent choice for anyone seeking a nutritious meal.
The glossy teriyaki glaze enhances the salmon’s flavor, creating a delightful combination that’s sure to please the palate. This recipe is straightforward, making it accessible for both novice and experienced cooks.
Whether you’re preparing a family dinner or hosting a gathering, Grilled Salmon with Teriyaki Sauce is guaranteed to impress your guests. Pair it with steamed rice and sautéed vegetables for a complete meal that showcases the best of Japanese cuisine.
Ingredients (serving size: 4-6 people):
- 4-6 salmon fillets (about 6 ounces each)
- 1/2 cup soy sauce
- 1/4 cup mirin (sweet rice wine)
- 1/4 cup sake (Japanese rice wine)
- 2 tablespoons brown sugar
- 2 cloves garlic, minced
- 1 teaspoon fresh ginger, grated
- 1 tablespoon sesame oil
- 2 green onions, finely chopped (for garnish)
- Sesame seeds (for garnish)
Cooking Instructions:
1. Prepare the Teriyaki Sauce: In a medium saucepan, combine soy sauce, mirin, sake, brown sugar, minced garlic, and grated ginger. Heat over medium heat, stirring occasionally until the sugar dissolves and the mixture comes to a gentle simmer. Allow it to simmer for about 5-7 minutes until slightly thickened.
Remove from heat and stir in sesame oil. Let it cool slightly.
2. Marinate the Salmon: Place the salmon fillets in a shallow dish or a resealable plastic bag. Pour half of the teriyaki sauce over the salmon, ensuring that each fillet is well-coated. Reserve the remaining sauce for basting and serving.
Cover the dish or seal the bag, then refrigerate for at least 30 minutes to allow the flavors to meld.
3. Preheat the Grill: Preheat your grill to medium-high heat (about 400°F). If using a grill pan, heat it over medium-high heat on the stovetop.
4. Grill the Salmon: Remove the salmon from the marinade and discard the marinade. Lightly oil the grill grates to prevent sticking. Place the salmon fillets skin-side down on the grill.
Grill for about 4-5 minutes per side, basting with the reserved teriyaki sauce during the last few minutes of cooking. The salmon is done when it flakes easily with a fork and has grill marks.
5. Serve the Dish: Once cooked, carefully transfer the grilled salmon to a serving platter. Drizzle with additional teriyaki sauce and garnish with chopped green onions and sesame seeds.
Serve hot with steamed rice and your choice of vegetables.
Extra Tips: For an added depth of flavor, consider grilling the salmon with the skin on to help retain moisture during cooking. If you prefer a smokier taste, you can add wood chips to your grill.
Additionally, feel free to experiment with the marinade by incorporating other ingredients such as orange zest or chili flakes for a twist on the traditional recipe. Remember not to overcook the salmon; it should remain moist and flaky for the best texture.
Miso Soup With Tofu and Seaweed
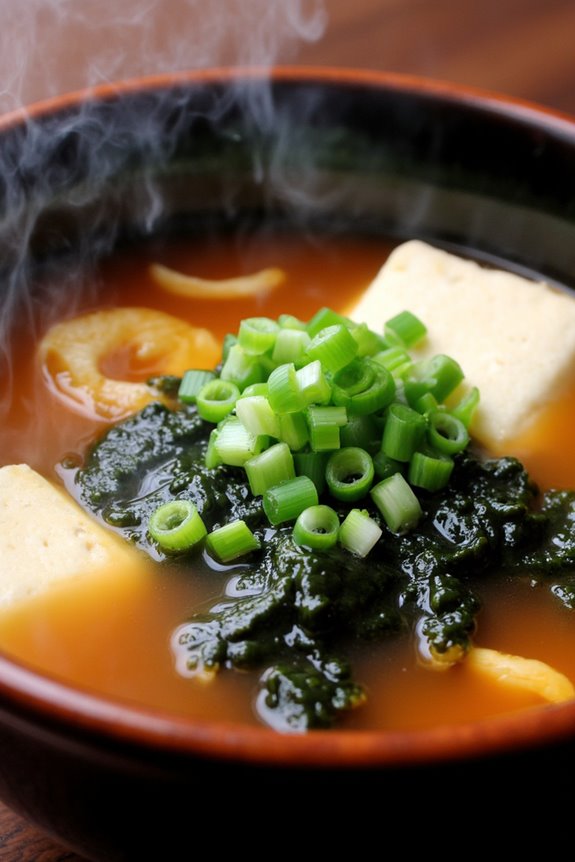
Miso Soup With Tofu and Seaweed is a traditional Japanese dish that isn’t only comforting but also packed with nutrients. This savory soup features the umami-rich flavor of miso paste, which is made from fermented soybeans, combined with soft, silken tofu, and nutrient-dense seaweed. It serves as a great starter or can be enjoyed as a light meal on its own. The inclusion of tofu contributes a high protein content, making this dish an excellent choice for those looking to increase their protein intake.
In addition to its health benefits, Miso Soup is incredibly versatile and can be tailored to personal preferences. You can add various vegetables or proteins to customize the dish further. This soup is also quick and easy to prepare, making it a perfect option for busy weeknights or a wholesome breakfast. The soothing warmth of the miso soup, combined with the texture of silky tofu and the slight chew of seaweed, creates a delightful experience for the palate.
Ingredients (Serves 4-6)
- 4 cups dashi broth (or vegetable broth)
- 3 tablespoons miso paste (white or red)
- 1 block (14 oz) firm tofu, drained and cubed
- 1 cup dried seaweed (wakame)
- 2 green onions, finely chopped
- 1 teaspoon soy sauce (optional)
- 1 tablespoon sesame oil (optional)
- 1 teaspoon grated ginger (optional)
Cooking Instructions
- Prepare the Seaweed: Start by soaking the dried wakame seaweed in warm water for about 10-15 minutes until it expands and softens. Once rehydrated, drain and chop it into bite-sized pieces if desired. This will enhance the texture of your soup and guarantee the seaweed is ready to blend well with other ingredients.
- Make the Dashi Broth: In a large pot, pour in the dashi broth (or vegetable broth) and bring it to a gentle simmer over medium heat. Dashi is the traditional Japanese soup base that complements the flavors of miso very well. If you don’t have dashi, vegetable broth works as a great alternative.
- Add Tofu: Once the broth is simmering, carefully add the cubed tofu to the pot. Allow it to simmer for about 3-5 minutes. This will warm the tofu without breaking it apart, giving a lovely texture to your soup.
- Incorporate Miso Paste: In a small bowl, take a few tablespoons of the hot broth and mix it with the miso paste to create a smooth slurry. This step helps to dissolve the miso evenly and avoids clumping. Once smooth, add this mixture back into the pot. Stir gently to combine, allowing the flavors to meld.
- Add Seaweed and Season: After stirring in the miso, add the rehydrated seaweed to the pot. You can also add soy sauce and sesame oil at this point if you desire additional flavor. Let the soup simmer for another 2-3 minutes, allowing all ingredients to warm through.
- Garnish and Serve: Finally, remove the pot from heat and ladle the soup into bowls. Garnish with finely chopped green onions and serve immediately. Enjoy your warm, nourishing bowl of Miso Soup With Tofu and Seaweed!
Extra Tips
When making Miso Soup, it’s crucial to avoid boiling the miso paste after adding it to the broth, as high heat can destroy its delicate flavors and health benefits.
Always adjust the amount of miso to your taste preference, as some may prefer a stronger flavor while others might enjoy a milder taste. Feel free to experiment with additional ingredients like mushrooms, spinach, or even a splash of rice vinegar for an extra zing. Enjoy your cooking!
Chicken Katsu With Tonkatsu Sauce
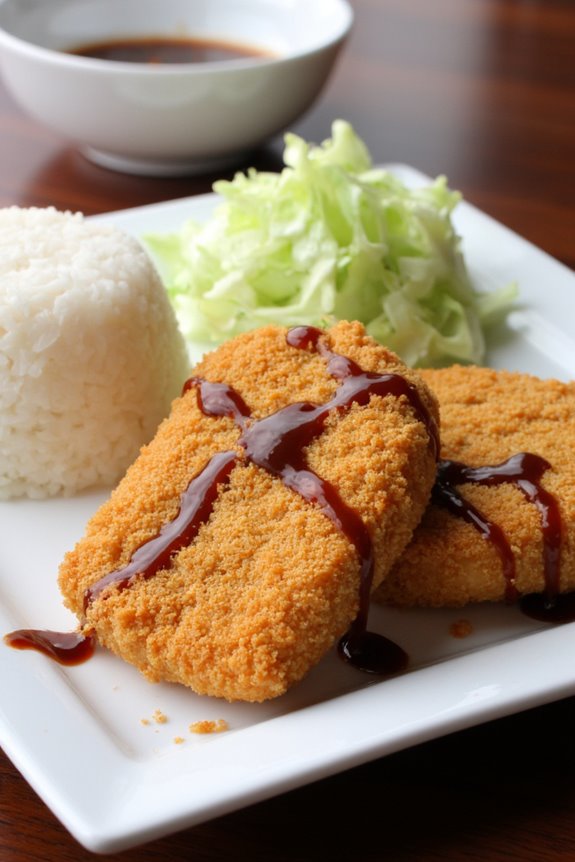
Chicken Katsu is a beloved Japanese dish that features crispy, breaded chicken cutlets served with a rich and tangy Tonkatsu sauce. This dish isn’t only delicious but also packs a punch when it comes to protein, making it a great choice for those looking to incorporate more healthy options into their diet.
The crunch of the panko breading combined with the juicy chicken creates a delightful texture that’s sure to please anyone at the dinner table. The accompanying Tonkatsu sauce adds depth and sweetness to the dish, perfectly complementing the savory flavors of the chicken.
Preparing Chicken Katsu is straightforward and can be completed in about 30 minutes, making it an excellent option for a weeknight meal or a special occasion. Served with a side of shredded cabbage or rice, Chicken Katsu is a satisfying dish that will leave you feeling full and happy.
Ingredients (Serves 4-6):
- 4 boneless, skinless chicken breasts
- Salt and pepper, to taste
- 1 cup all-purpose flour
- 2 large eggs
- 2 cups panko breadcrumbs
- Vegetable oil, for frying
- 1 cup Tonkatsu sauce (store-bought or homemade)
- Shredded cabbage, for serving (optional)
- Cooked rice, for serving (optional)
Cooking Instructions:
- Prepare the Chicken: Start by flattening the chicken breasts to guarantee they cook evenly. Place a chicken breast between two sheets of plastic wrap or parchment paper and gently pound it with a meat mallet or rolling pin until it’s about 1/2 inch thick. Repeat this process for all chicken breasts. Season both sides with salt and pepper.
- Set Up a Breading Station: Prepare three shallow bowls for the breading process. In the first bowl, place the all-purpose flour. In the second bowl, whisk together the eggs until well combined. In the third bowl, add the panko breadcrumbs. This station will allow you to coat the chicken breasts in flour, egg, and breadcrumbs in a systematic way.
- Bread the Chicken: Take one chicken breast and coat it in flour, shaking off the excess. Next, dip it in the beaten eggs, ensuring it’s fully coated. Finally, press the chicken into the panko breadcrumbs, making sure to coat it evenly and pressing gently to adhere the crumbs. Repeat this process with all chicken breasts.
- Fry the Chicken: In a large skillet, heat about 1/2 inch of vegetable oil over medium-high heat. Once the oil is hot (you can test it by dropping in a breadcrumb; it should sizzle), carefully add the breaded chicken breasts to the skillet. Cook for about 3-4 minutes on each side, or until golden brown and cooked through. You may need to do this in batches to avoid overcrowding the pan.
- Drain and Serve: Once cooked, transfer the chicken to a plate lined with paper towels to absorb any excess oil. Allow it to rest for a few minutes before slicing it into strips. Serve the Chicken Katsu with Tonkatsu sauce drizzled over the top or on the side for dipping. Pair with shredded cabbage and rice if desired.
Extra Tips: When frying the Chicken Katsu, confirm the oil temperature is just right; too hot can burn the breadcrumbs while leaving the chicken undercooked, while too cool can result in greasy chicken.
If you have leftovers, store the chicken in an airtight container in the refrigerator, but keep in mind that the breading may lose its crispiness. Reheat in an oven to regain some crunch before serving. Enjoy your homemade Chicken Katsu!
Beef Gyudon (Beef Bowl)
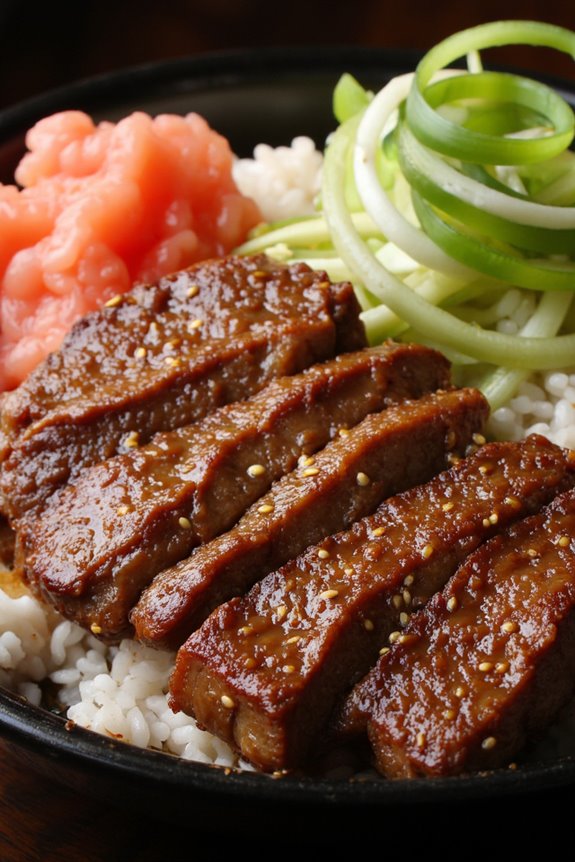
Beef Gyudon, also known as Gyudon, is a traditional Japanese dish that features thinly sliced beef simmered in a flavorful sauce made from soy sauce, mirin, and dashi. This hearty meal is typically served over a bed of steamed rice and garnished with green onions and pickled ginger, making it a popular choice for both home cooking and dining out.
With its savory and slightly sweet flavors, Gyudon isn’t only delicious but also high in protein, making it an ideal option for those looking to maintain a balanced diet.
The beauty of Beef Gyudon lies in its simplicity and the quick cooking time, making it perfect for weeknight dinners or when you’re in a hurry. The dish can be customized with various toppings like raw or soft-cooked eggs, which add richness and creaminess to the final presentation.
This recipe will guide you through creating a satisfying and nutritious Beef Gyudon that serves 4-6 people, ensuring that you and your loved ones can enjoy a taste of Japan right at home.
Ingredients (Serves 4-6)
- 1 pound (450g) thinly sliced beef (such as sirloin or ribeye)
- 2 cups cooked Japanese short-grain rice
- 1 medium onion, thinly sliced
- 1/4 cup soy sauce
- 1/4 cup mirin
- 1/4 cup dashi (or water)
- 2 tablespoons sugar
- 2 green onions, chopped (for garnish)
- Pickled ginger (for serving)
- Sesame seeds (optional, for garnish)
Cooking Instructions
- Prepare the Rice: Start by cooking the Japanese short-grain rice according to package instructions. Rinse the rice under cold water until the water runs clear, then cook it in a rice cooker or on the stove until fluffy and tender. Set aside and keep warm.
- Sauté the Onions: In a large skillet or frying pan, add a small amount of oil over medium heat. Once hot, add the sliced onions and sauté until they become translucent, about 5-7 minutes. This step enhances the flavor of the onions and provides a sweet base for the dish.
- Cook the Beef: Increase the heat to medium-high and add the thinly sliced beef to the skillet with the onions. Cook for about 2-3 minutes, stirring frequently until the beef is browned and just cooked through. Be careful not to overcook the beef, as it can become tough.
- Make the Sauce: In a bowl, combine the soy sauce, mirin, dashi (or water), and sugar. Pour this mixture over the beef and onions in the skillet. Stir well to combine and let it simmer for about 3-4 minutes, allowing the flavors to meld and the sauce to slightly thicken.
- Serve the Gyudon: To serve, spoon the cooked rice into bowls and top it generously with the beef and onion mixture, ensuring each bowl gets plenty of sauce. Garnish with chopped green onions and serve with pickled ginger on the side. Optionally, sprinkle sesame seeds for added texture and flavor.
Extra Tips
When preparing Beef Gyudon, using high-quality, thinly sliced beef is essential for achieving the best texture and flavor. If you can’t find pre-sliced beef, you can freeze a block of beef for about 30 minutes to make it easier to slice thinly.
Additionally, feel free to customize your Gyudon by adding other vegetables like mushrooms or bell peppers for extra nutrition. Remember that the balance of sweet and savory in the sauce is key, so taste and adjust the seasoning according to your preference. Enjoy your homemade Beef Gyudon!
Edamame and Quinoa Salad
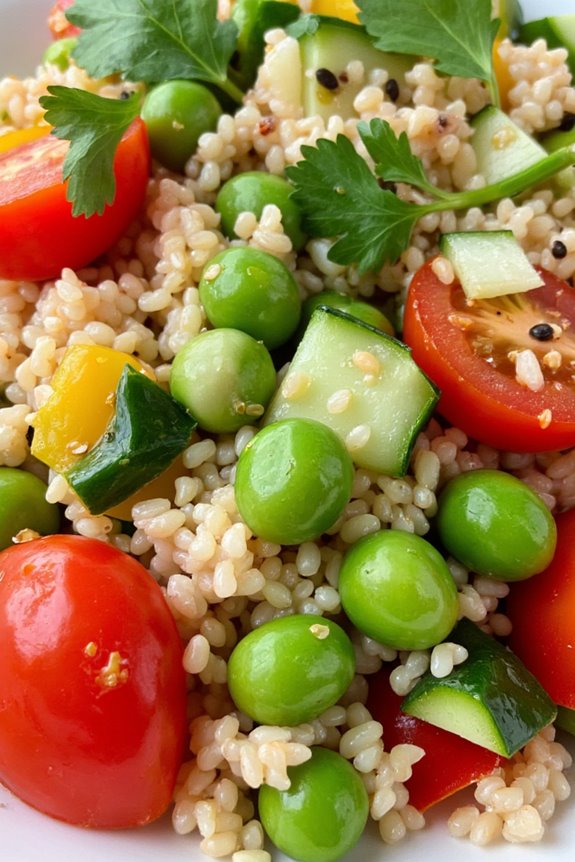
Edamame and Quinoa Salad is a vibrant and nutritious dish that beautifully marries the flavors and textures of fresh ingredients. Packed with protein, fiber, and essential nutrients, this salad offers a revitalizing twist that can serve as a delightful side or a wholesome main dish. The combination of tender edamame, fluffy quinoa, and crisp vegetables creates a colorful palette that isn’t only visually appealing but also satisfying to eat.
Its light yet filling nature makes it an excellent choice for a summer picnic or a healthy lunch option. This salad isn’t only easy to prepare but also highly versatile. You can customize it by adding your favorite vegetables or proteins, making it a great fit for various dietary preferences. The dressing, made with a simple blend of sesame oil and soy sauce, enhances the natural flavors of the ingredients while providing a rich umami taste.
Whether you’re a fan of Japanese cuisine or simply looking for a high-protein dish, Edamame and Quinoa Salad is sure to please your palate.
Ingredients (Serves 4-6):
- 1 cup quinoa, rinsed
- 2 cups water
- 1 cup shelled edamame (fresh or frozen)
- 1 cup cherry tomatoes, halved
- 1 cucumber, diced
- 1 bell pepper, diced (any color)
- 1/4 cup green onions, chopped
- 1/4 cup fresh cilantro, chopped
- 3 tablespoons sesame oil
- 2 tablespoons soy sauce
- 1 tablespoon rice vinegar
- 1 teaspoon honey or maple syrup (optional)
- Salt and pepper to taste
- Sesame seeds for garnish (optional)
Cooking Instructions:
- Cook the Quinoa: In a medium saucepan, combine the rinsed quinoa and water. Bring to a boil over medium-high heat. Once boiling, reduce the heat to low, cover, and let simmer for about 15 minutes or until all the water is absorbed. Once cooked, remove from heat and fluff the quinoa with a fork. Allow it to cool for a few minutes.
- Prepare the Edamame: If using frozen edamame, bring a small pot of water to a boil. Add the edamame and cook for 3-5 minutes until tender. Drain and rinse under cold water to stop the cooking process. If using fresh edamame, simply remove the pods and set the shelled beans aside.
- Chop the Vegetables: While the quinoa and edamame are cooling, prepare the vegetables. Dice the cucumber, bell pepper, and halve the cherry tomatoes. Chop the green onions and cilantro. Place all the chopped vegetables in a large mixing bowl.
- Combine the Ingredients: Once the quinoa and edamame have cooled, add them to the bowl with the vegetables. Gently toss everything together to combine.
- Make the Dressing: In a small bowl, whisk together the sesame oil, soy sauce, rice vinegar, and honey or maple syrup (if using). Drizzle the dressing over the salad and toss gently to ascertain all ingredients are coated evenly.
- Season and Serve: Taste the salad and season with salt and pepper as needed. If desired, sprinkle sesame seeds over the top for added flavor and presentation. Serve immediately or refrigerate for 30 minutes to allow the flavors to meld.
Extra Tips:
For added texture and flavor, consider incorporating roasted nuts or seeds, such as almonds or sunflower seeds, into your salad. You can also try adding grilled chicken or tofu for an extra protein boost.
This salad keeps well in the refrigerator for up to two days, making it a convenient option for meal prep. Just be sure to store the dressing separately if you plan to enjoy it over a few days, as it can cause the salad to become soggy.
Shrimp Tempura
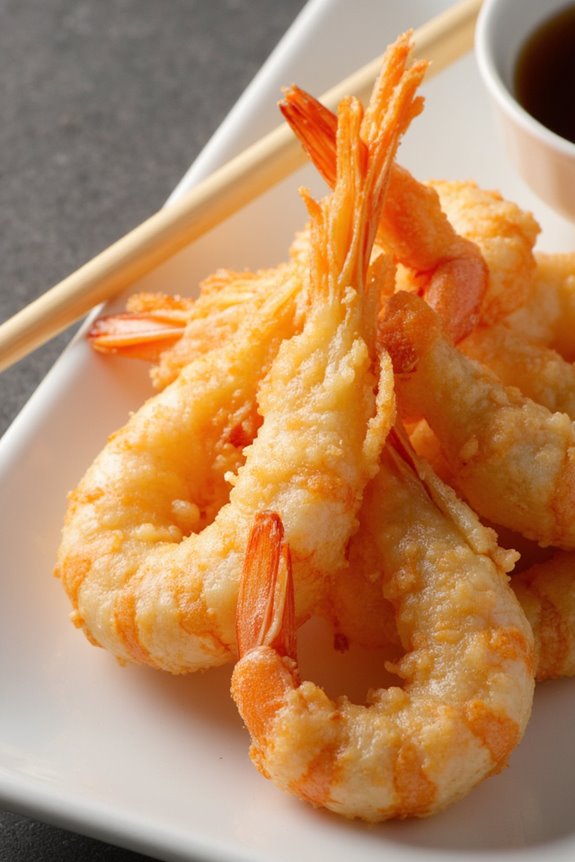
Shrimp Tempura is a classic Japanese dish that showcases the delicate texture and flavor of shrimp, enveloped in a light, crispy batter. This dish isn’t only a favorite among seafood lovers but also a fantastic high-protein option, making it an excellent addition to any meal. The key to perfecting Shrimp Tempura lies in the batter and frying technique, which creates a satisfying crunch while preserving the natural sweetness of the shrimp.
To achieve the best results, it’s important to use very cold water when preparing the batter, as this helps to prevent gluten development, ensuring the tempura remains airy and light. Pairing tempura with a dipping sauce or served over rice can transform this dish into a full meal, making it versatile for various occasions—from casual family dinners to more elegant gatherings.
Ingredients (Serves 4-6)
- 1 pound large shrimp, peeled and deveined
- 1 cup all-purpose flour
- 1/2 cup cornstarch
- 1 cup ice-cold water
- 1 large egg
- 1 teaspoon baking powder
- Salt, to taste
- Vegetable oil, for frying
- Dipping sauce (such as tentsuyu or soy sauce)
Cooking Instructions
- Prepare the Shrimp: Start by thoroughly cleaning the shrimp, removing the shells and deveining them. Pat them dry with a paper towel to remove excess moisture, which will help the batter adhere better during frying. Make a small incision along the belly of each shrimp to prevent curling while cooking.
- Make the Batter: In a large bowl, combine the all-purpose flour, cornstarch, and baking powder. In a separate bowl, whisk together the ice-cold water and the egg. Gently add the wet mixture to the dry ingredients, stirring lightly with chopsticks or a fork. Avoid overmixing; a few lumps are fine, as this will create a lighter texture.
- Heat the Oil: In a deep frying pan or pot, pour enough vegetable oil to reach a depth of about 2 inches. Heat the oil to 350°F (175°C). You can test the temperature by dropping a small amount of batter into the oil; it should sizzle and rise to the surface.
- Fry the Shrimp: Dip each shrimp into the batter, making sure it’s coated evenly. Carefully place the battered shrimp into the hot oil, a few at a time, to avoid overcrowding. Fry for about 2-3 minutes, or until the tempura is golden brown and crispy. Use a slotted spoon to remove the shrimp from the oil and place them on a plate lined with paper towels to absorb excess oil.
- Serve: Arrange the shrimp tempura on a serving platter and sprinkle with a pinch of salt. Serve with a dipping sauce on the side, and enjoy immediately while the tempura is still hot and crispy.
Extra Tips
To enhance the flavor of your Shrimp Tempura, consider adding a few slices of vegetables like sweet potatoes, zucchini, or bell peppers to the frying mix. These can be prepared in the same batter and will offer a delightful contrast in texture and taste.
Additionally, keeping the batter cold until frying is essential; you may even consider placing it over a bowl of ice to maintain the temperature. Finally, remember to serve the tempura promptly to preserve its crispness, as it tends to lose its crunchiness when left to sit.
Chashu Pork Ramen
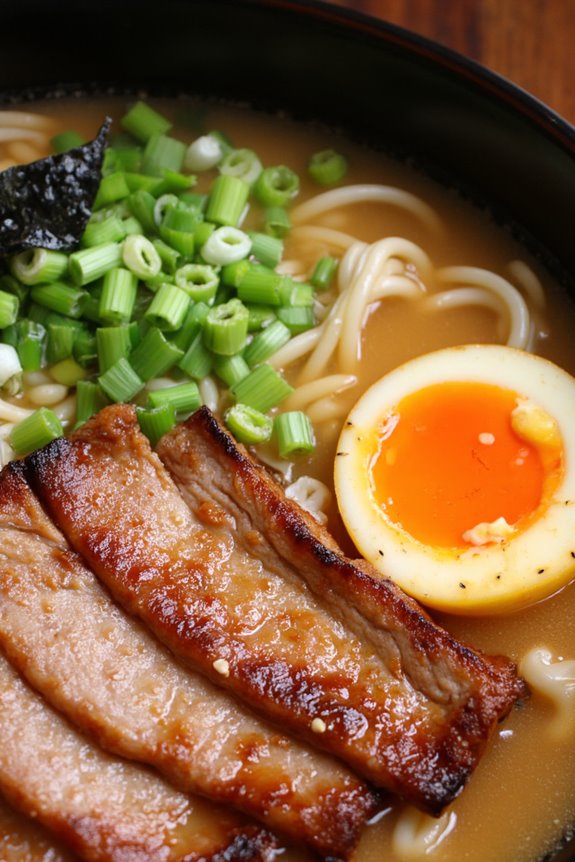
Chashu Pork Ramen is a beloved Japanese dish that combines tender braised pork belly, flavorful broth, and perfectly cooked noodles. This dish not only provides a rich and hearty meal but is also packed with protein, making it a great choice for those looking to increase their protein intake. The combination of succulent chashu, a savory broth, and fresh toppings creates a delightful and satisfying bowl of ramen that will impress family and friends alike.
Cooking Chashu Pork Ramen may seem intricate at first, but with the right approach and patience, you can create an authentic Japanese experience right in your kitchen. The key to this dish lies in the slow-cooked pork belly, which becomes melt-in-your-mouth tender and infuses the broth with deep flavor. Once you prepare the chashu, assembling the ramen is a breeze, and you can customize the toppings to your liking.
Ingredients (Serves 4-6)
- 1 lb pork belly, rolled and tied
- 1 cup soy sauce
- 1 cup mirin
- 1 cup sake
- 1/2 cup sugar
- 1-inch piece of ginger, sliced
- 4 cloves garlic, crushed
- 6 cups chicken or pork broth
- 4 servings of ramen noodles
- 4 soft-boiled eggs
- 1 cup green onions, chopped
- 1 cup nori (seaweed), cut into strips
- 1 cup bamboo shoots (menma)
- Sesame seeds for garnish
Cooking Instructions
- Prepare the Chashu Pork: In a large pot, combine the soy sauce, mirin, sake, sugar, sliced ginger, and crushed garlic. Bring the mixture to a simmer over medium heat. Once simmering, add the pork belly and make certain it’s fully submerged. Cover the pot and let it cook on low heat for about 2-3 hours, turning the pork occasionally. This slow cooking helps to infuse the flavors into the pork and makes it tender.
- Cook the Ramen Broth: While the chashu is cooking, prepare the broth. In a separate pot, bring the chicken or pork broth to a gentle boil. You can add additional seasonings if desired, such as salt or a splash of soy sauce, to enhance the flavor. Reduce the heat and let it simmer gently while the chashu finishes cooking.
- Prepare the Ramen Noodles: When the chashu is nearly done, cook the ramen noodles according to the package instructions. Usually, this involves boiling the noodles in a separate pot of water for 3-4 minutes until they’re al dente. Drain the noodles and set them aside.
- Assemble the Ramen Bowls: Once the chashu is tender, remove it from the pot and let it cool slightly before slicing it into thin pieces. To assemble, place a serving of ramen noodles in a bowl, ladle the hot broth over the noodles, and arrange the slices of chashu on top. Halve the soft-boiled eggs and place them in the bowl, along with green onions, nori strips, and bamboo shoots for garnish. Sprinkle with sesame seeds for an extra touch.
- Serve: Serve the Chashu Pork Ramen hot, allowing everyone to mix in the toppings as they like. Enjoy the rich flavors and textures of this delicious dish!
Extra Tips
When cooking Chashu Pork Ramen, it’s important to plan ahead as the chashu requires a few hours to cook properly, but it’s worth the wait. You can prepare the chashu a day in advance and store it in the refrigerator, allowing the flavors to deepen even further.
Additionally, feel free to customize your toppings based on your preferences; mushrooms, corn, or spinach can add extra nutrients and variety to the dish. Finally, be sure to taste the broth before serving, adjusting seasoning as needed to achieve your desired flavor profile.
Saba Shioyaki (Grilled Mackerel)
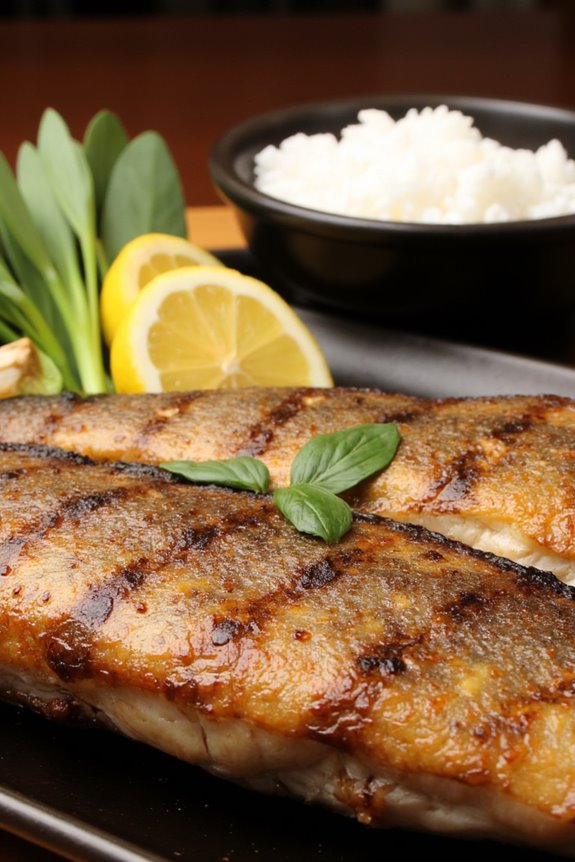
Saba Shioyaki, or grilled mackerel, is a traditional Japanese dish that highlights the rich flavor of mackerel, a fish renowned for its high omega-3 fatty acids and protein content. The dish isn’t only delicious but also simple to prepare, making it perfect for a weeknight dinner or a special occasion.
The key to a great Saba Shioyaki lies in the seasoning and grilling technique, which helps to enhance the fish’s natural flavors while maintaining its moisture and tenderness.
In this recipe, the mackerel is salted and then grilled to achieve a crispy skin and tender flesh. The simplicity of the preparation allows the fish to shine, making it a popular dish in Japanese households and restaurants alike.
Paired with steamed rice and a side of pickles or a light salad, Saba Shioyaki makes for a nutritious and satisfying meal that can serve 4 to 6 people.
Ingredients (Serves 4-6):
- 2 whole mackerel, cleaned and scaled
- 2 teaspoons sea salt
- Lemon wedges (for serving)
- Fresh shiso leaves or sliced green onions (for garnish, optional)
- Steamed rice (for serving)
Cooking Instructions:
- Prepare the Mackerel: Start by rinsing the whole mackerel under cold water to remove any residual blood or scales. Pat the fish dry with paper towels to guarantee they grill well. This step is essential for achieving a nice, crispy skin.
- Salt the Fish: Sprinkle sea salt generously over both sides of the mackerel, guaranteeing an even coating. The salt not only enhances the flavor but also helps to draw out excess moisture, which is important for grilling. Let the salted fish sit at room temperature for about 15-20 minutes to allow the salt to penetrate.
- Preheat the Grill: While the fish is resting, preheat your grill or grill pan over medium-high heat. Make sure the grill grates are clean and lightly oiled to prevent sticking. This will guarantee that the fish cooks evenly and develops a nice char.
- Grill the Mackerel: Once the grill is hot, place the mackerel skin-side down on the grill. Cook for about 4-5 minutes without moving the fish, allowing the skin to crisp up. Carefully flip the fish using a spatula or tongs, and grill for an additional 4-5 minutes on the other side until cooked through and the flesh is opaque.
- Serve: Once cooked, transfer the grilled mackerel to a serving platter. Garnish with lemon wedges and optional shiso leaves or sliced green onions for added flavor and presentation. Serve the dish alongside steamed rice for a complete meal.
Extra Tips:
When preparing Saba Shioyaki, it’s essential to use fresh mackerel for the best flavor and texture. If you can’t find whole mackerel, fillets can be used, but adjust the cooking time accordingly.
Additionally, for an extra layer of flavor, consider marinating the fish in a mixture of soy sauce and sake for about an hour before salting, but remember to reduce the salt slightly to avoid over-seasoning.
Enjoy this delightful dish with a side of pickles or a simple cucumber salad for a rejuvenating contrast!
Tofu Stir-Fry With Vegetables
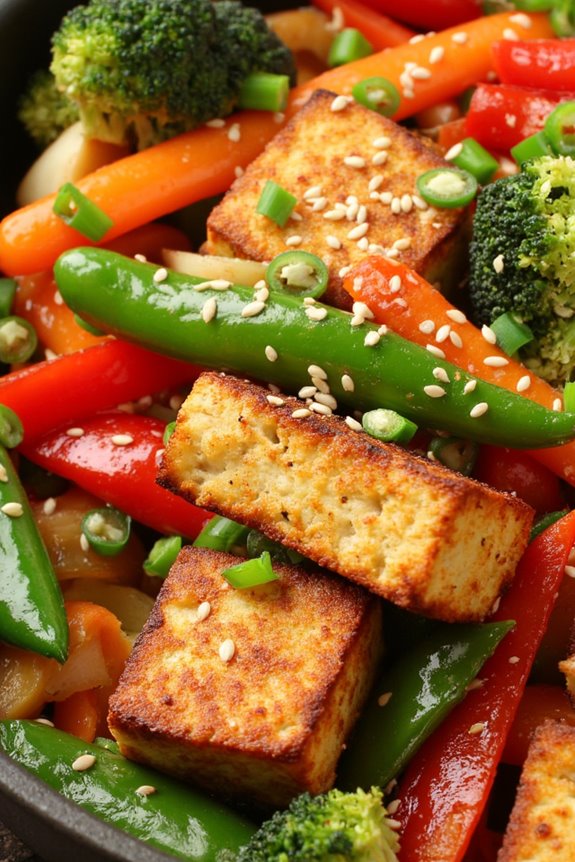
Tofu Stir-Fry With Vegetables is a delightful and nutritious dish that showcases the versatility of tofu while incorporating a vibrant array of vegetables. This dish not only boasts high protein content but also offers a colorful presentation that’s sure to please the palate. The combination of fresh vegetables and flavorful sauces makes it a perfect meal for those seeking a healthy yet satisfying option.
This stir-fry is incredibly simple to prepare, making it an ideal choice for a quick weeknight dinner or a wholesome weekend meal. With its rich textures and savory flavors, Tofu Stir-Fry With Vegetables can easily be customized to include your favorite seasonal vegetables or whatever you have on hand. Serve it over steamed rice or noodles for a complete and fulfilling meal.
Ingredients (Serves 4-6):
- 14 oz firm tofu, pressed and cubed
- 2 tablespoons soy sauce
- 2 tablespoons sesame oil
- 1 tablespoon cornstarch
- 1 red bell pepper, sliced
- 1 green bell pepper, sliced
- 1 cup broccoli florets
- 1 cup snap peas
- 2 carrots, julienned
- 3 green onions, chopped
- 2 cloves garlic, minced
- 1 teaspoon ginger, minced
- 2 tablespoons vegetable oil
- Sesame seeds for garnish (optional)
Cooking Instructions:
- Prepare the Tofu: Begin by pressing the tofu to remove excess moisture. Wrap the tofu block in a clean kitchen towel and place a heavy object on top for about 15-20 minutes. Once pressed, cut the tofu into bite-sized cubes and toss them in a bowl with soy sauce and cornstarch until evenly coated. This will help create a nice crust when cooked.
- Heat the Pan: In a large non-stick skillet or wok, heat 2 tablespoons of vegetable oil over medium-high heat. The key to a good stir-fry is to have a hot pan, which will allow the ingredients to sear quickly, locking in flavor and texture.
- Cook the Tofu: Add the tofu cubes to the hot pan in a single layer. Let them cook undisturbed for about 3-4 minutes until they’re golden brown on one side. Gently flip the tofu and cook for another 3-4 minutes until all sides are golden and crispy. Once done, remove the tofu from the pan and set aside.
- Sauté the Vegetables: In the same pan, add the sesame oil, minced garlic, and ginger. Sauté for about 30 seconds until fragrant. Then add the sliced bell peppers, broccoli, snap peas, and carrots. Stir-fry the vegetables for about 5-7 minutes until they’re tender yet still crisp.
- Combine Tofu and Vegetables: Once the vegetables are cooked, return the crispy tofu to the pan. Stir everything together and add an additional splash of soy sauce if desired. Cook for another 2 minutes to allow the flavors to meld.
- Finish and Serve: Remove the stir-fry from heat and garnish with chopped green onions and sesame seeds if using. Serve hot over steamed rice or noodles for a complete meal.
Extra Tips:
When preparing Tofu Stir-Fry With Vegetables, feel free to experiment with different vegetables based on what you enjoy or have available. Zucchini, mushrooms, and bok choy are excellent additions.
Additionally, consider marinating the tofu for a few hours in soy sauce or your favorite marinade for enhanced flavor. This dish is also extremely versatile; if you’re looking for additional protein, you can add edamame or cooked chicken. Enjoy your cooking!
Japanese Style Chicken Curry
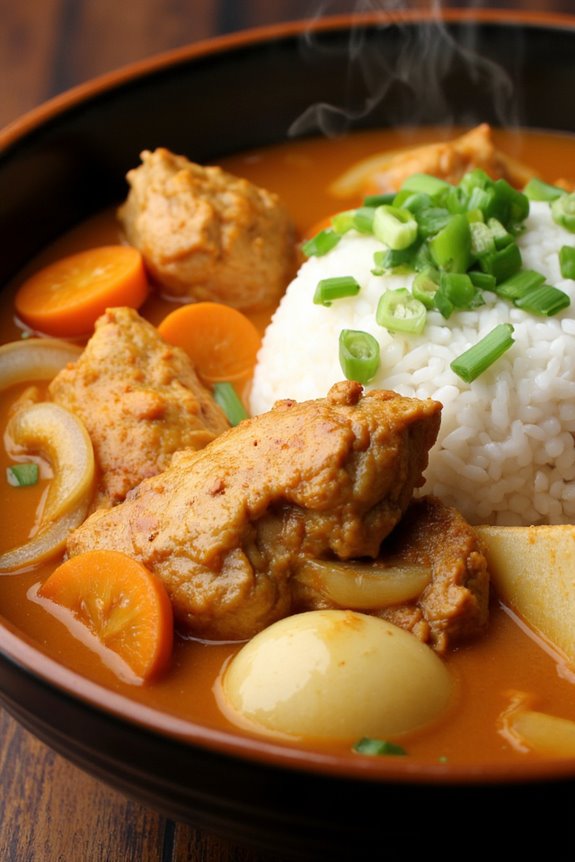
Japanese Style Chicken Curry is a comforting and hearty dish that combines tender chicken with a rich and flavorful curry sauce. This dish is a staple in many Japanese households and is loved for its unique blend of spices and the sweetness of vegetables. The curry sauce typically has a thick consistency and is served over rice, making it a satisfying meal for families and friends alike.
What sets Japanese curry apart from other curries is its milder flavor profile, which is achieved through the use of curry roux. This roux is a combination of curry powder, flour, and fat, which creates a smooth and creamy texture. The addition of vegetables like potatoes, carrots, and onions not only enhances the taste but also boosts the nutritional value of the dish.
Whether enjoyed on a chilly evening or served at a gathering, Japanese Style Chicken Curry is sure to satisfy everyone at the table.
Ingredients (serving size: 4-6 people)
- 1.5 lbs (700g) chicken thighs, boneless and skinless, cut into bite-sized pieces
- 2 medium onions, diced
- 2 medium carrots, sliced
- 2 medium potatoes, diced
- 3 cloves garlic, minced
- 1 tablespoon ginger, grated
- 4 cups chicken broth
- 1 tablespoon soy sauce
- 1 tablespoon cooking oil
- 1 package (3.5 oz) Japanese curry roux (such as Golden Curry)
- Salt and pepper to taste
- Cooked rice, for serving
- Chopped green onions (for garnish, optional)
Cooking Instructions
- Prepare the Ingredients: Start by washing and cutting all vegetables and chicken into bite-sized pieces. This will guarantee even cooking and make your prep work easier. Mince the garlic and grate the ginger, setting them aside for later use.
- Sauté the Chicken: In a large pot or Dutch oven, heat the cooking oil over medium-high heat. Add the chicken pieces and season them with salt and pepper. Cook the chicken until it’s browned on all sides, about 5-7 minutes. Browning the chicken adds depth and flavor to the final dish.
- Add Aromatics and Vegetables: Once the chicken is browned, add the diced onions, minced garlic, and grated ginger to the pot. Sauté for about 3-4 minutes, or until the onions are translucent. This step helps to release the flavors of the aromatics, creating a flavorful base for the curry.
- Incorporate Other Vegetables: Add the sliced carrots and diced potatoes to the pot, stirring to combine everything evenly. Cook for an additional 2-3 minutes, allowing the vegetables to slightly soften and absorb the flavors from the chicken and onions.
- Add Chicken Broth: Pour in the chicken broth and soy sauce, stirring to combine. Bring the mixture to a boil, then reduce the heat to low. Cover the pot and let it simmer for about 20 minutes, or until the vegetables are tender.
- Add the Curry Roux: Break the Japanese curry roux into pieces and add it to the pot. Stir well to dissolve the roux into the liquid, creating a thick and rich sauce. Continue to simmer for an additional 10 minutes, allowing the flavors to meld together.
- Serve: Taste the curry and adjust the seasoning with more salt or pepper if necessary. Serve the chicken curry over bowls of cooked rice and garnish with chopped green onions, if desired. Enjoy your delicious homemade Japanese Style Chicken Curry!
Extra Tips
For an extra layer of flavor, consider marinating the chicken in a little soy sauce and ginger before cooking. You can also customize the vegetables to your liking—adding bell peppers or peas can enhance the dish even further.
If you prefer a spicier curry, you can add some chili powder or flakes. Leftovers can be stored in the refrigerator for a couple of days and actually taste even better the next day as the flavors develop further.
Takoyaki (Octopus Balls)

Takoyaki is a popular Japanese street food that consists of savory balls filled with diced octopus, tempura scraps, pickled ginger, and green onions, all encased in a crispy batter. Originating from Osaka, this delicious treat isn’t only high in protein but also a fun dish to make at home.
With its unique flavor and delightful texture, Takoyaki is perfect for gatherings or as a tasty snack. The dish is typically served with a drizzle of takoyaki sauce and a sprinkle of bonito flakes, making it a flavorful experience for your taste buds.
Making Takoyaki might seem intimidating at first, but with the right tools and a little practice, you can master this dish in no time. A specialized Takoyaki pan is essential for creating the iconic round shape, but you can also use a muffin tin in a pinch.
Gather your ingredients, prepare your batter, and get ready to impress your family and friends with this high-protein Japanese delicacy.
Ingredients (Serves 4-6):
- 1 cup all-purpose flour
- 1 1/2 cups dashi stock (or water)
- 2 large eggs
- 1 cup cooked octopus, diced
- 1/2 cup green onions, finely chopped
- 1/4 cup pickled ginger, chopped
- 1/4 cup tempura scraps (tenkasu)
- Vegetable oil (for cooking)
- Takoyaki sauce (for serving)
- Japanese mayonnaise (for serving)
- Bonito flakes (for garnish)
- Aonori (dried seaweed flakes, for garnish)
Cooking Instructions:
- Prepare the Batter: In a large mixing bowl, combine the all-purpose flour and dashi stock until smooth. Add in the eggs and whisk until fully incorporated. The batter should be somewhat thin but still hold its shape when poured. Set aside for 10 minutes to rest.
- Heat the Takoyaki Pan: Place your Takoyaki pan over medium heat and allow it to heat up. Once hot, generously coat each of the round molds with vegetable oil, making sure they’re well-greased to prevent sticking.
- Pour the Batter: Once the pan is heated, pour the batter into each mold, filling them about 3/4 full. The batter should begin to sizzle when it hits the hot pan.
- Add Fillings: Quickly add the diced octopus, chopped green onions, pickled ginger, and tempura scraps into each mold. Use toothpicks or chopsticks to gently mix the fillings into the batter.
- Cook and Turn: Allow the Takoyaki to cook for about 2-3 minutes until the edges start to set. Use a skewer or chopsticks to carefully turn each ball over, cooking for another 2-3 minutes until they’re golden brown on all sides.
- Serve: Once cooked, remove the Takoyaki from the pan and place them on a serving plate. Drizzle with takoyaki sauce and Japanese mayonnaise, then sprinkle with bonito flakes and aonori for added flavor.
Extra Tips:
For the best results, make sure your batter is mixed just enough to eliminate lumps without over-mixing, as this can affect the texture.
If you can’t find dashi stock, you can substitute it with water, but dashi provides a more authentic flavor. Be mindful of the cooking time; overcooking can make the balls dry, while undercooking may leave them gooey inside.
Enjoy experimenting with different fillings, as Takoyaki is versatile and can include other seafood, vegetables, or even cheese!