

As a passionate foodie, I’ve always been enchanted by the comforting and bold flavors of Filipino cuisine. Lately, I’ve been on a journey to transform these classic dishes into wholesome vegan versions that celebrate their roots. From savory adobo to sweet macaroons, each recipe offers a taste of Filipino cooking without the meat. Are you excited to recreate these beloved flavors in a plant-based way? Let’s explore these delicious transformations together.
Vegan Adobo
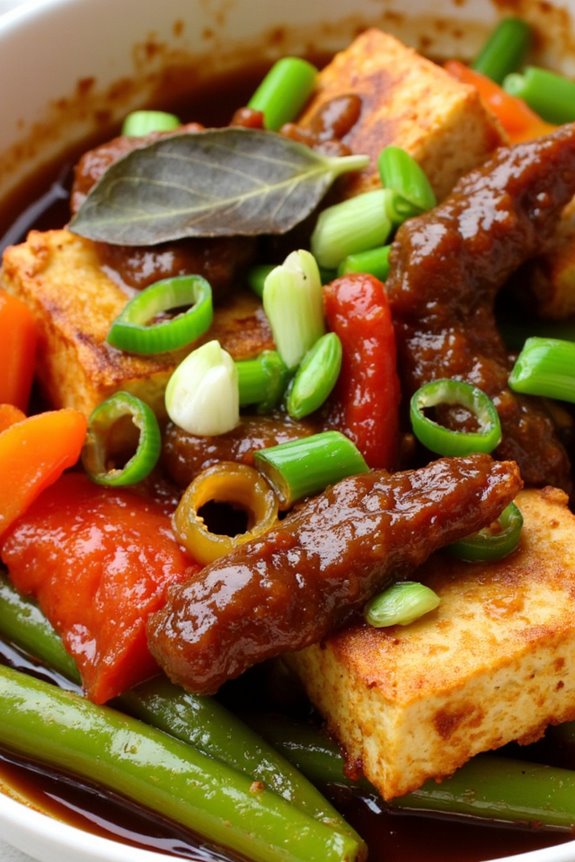
Vegan Adobo is a plant-based twist on the traditional Filipino dish known for its savory, tangy, and slightly sweet flavors. This beloved recipe typically features chicken or pork marinated and stewed in vinegar, soy sauce, garlic, and spices.
However, in this vegan version, we’ll use hearty vegetables and tofu to capture the essence of adobo while keeping it completely meat-free. The combination of soy sauce and vinegar creates a rich sauce that beautifully coats the vegetables, making this dish both satisfying and delicious.
This Vegan Adobo isn’t only simple to prepare but also allows for customization based on seasonal vegetables or personal preferences. You can serve it over steamed rice or with warm tortillas, making it a versatile meal option for family gatherings or weeknight dinners.
With this recipe, you’ll enjoy the authentic taste of Filipino cuisine while adhering to a vegan lifestyle.
Ingredients (Serves 4-6):
- 1 block (14 oz) firm tofu, pressed and cubed
- 1 cup soy sauce
- 1 cup white vinegar
- 1 medium onion, sliced
- 4 cloves garlic, minced
- 1 cup carrots, sliced
- 1 cup bell peppers, sliced (red and green)
- 1 cup green beans, trimmed
- 2 bay leaves
- 1 tablespoon black peppercorns
- 2 tablespoons vegetable oil
- Salt to taste
- 2 green onions, chopped (for garnish)
Cooking Instructions:
- Prepare the Tofu: Start by pressing the block of tofu to remove excess moisture. Wrap it in a clean kitchen towel and place a heavy object on top for about 15-20 minutes. Once pressed, cut the tofu into bite-sized cubes.
- Marinate the Tofu: In a bowl, combine the soy sauce, vinegar, minced garlic, bay leaves, and black peppercorns. Add the cubed tofu to the marinade, ensuring all pieces are well-coated. Let it marinate for at least 30 minutes to absorb the flavors.
- Sauté the Vegetables: In a large pan or skillet, heat the vegetable oil over medium heat. Add the sliced onions and sauté until they become translucent, about 3-4 minutes. Then, add the sliced carrots and bell peppers, cooking for an additional 5 minutes until they start to soften.
- Cook the Tofu: Remove the tofu from the marinade (reserve the marinade) and add it to the skillet with the sautéed vegetables. Cook for about 5-7 minutes, allowing the tofu to brown slightly on all sides.
- Add the Marinade: Pour the reserved marinade into the skillet, followed by the green beans. Stir well to combine the ingredients. Bring the mixture to a gentle simmer and let it cook for about 15-20 minutes, allowing the sauce to reduce and the flavors to meld together.
- Season and Serve: Taste the adobo and adjust the seasoning with salt if necessary. Once finished, remove from heat and garnish with chopped green onions. Serve the Vegan Adobo over steamed rice or with warm tortillas.
Extra Tips:
When making Vegan Adobo, feel free to experiment with different vegetables or plant-based proteins according to your taste. Mushrooms, eggplant, or jackfruit are great alternatives that can add texture and flavor.
Additionally, let the adobo sit for a while after cooking; the flavors will deepen and improve as it cools. If you prefer a spicier kick, consider adding sliced chili peppers to the dish during cooking. Enjoy your culinary journey through this flavorful vegan adaptation of a classic Filipino favorite!
Sinigang Na Miso With Tofu
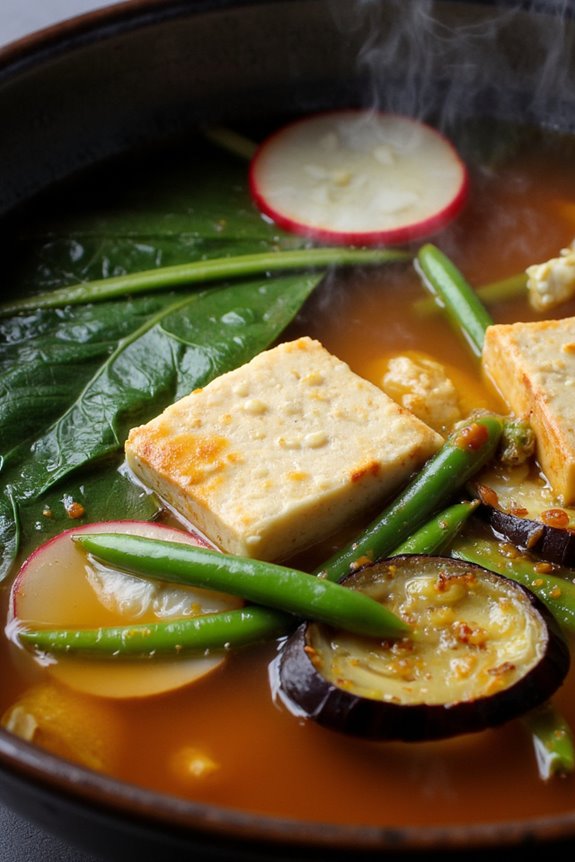
Sinigang Na Miso With Tofu is a delightful vegan twist on the traditional Filipino sour soup, perfect for those seeking a comforting and nutritious meal. This dish combines the rich umami flavors of miso with the tanginess of tamarind, creating a mouthwatering broth that complements the soft tofu and fresh vegetables. The vibrant colors and flavors of this soup make it not only a feast for the taste buds but also visually appealing.
Whether you’re serving it on a rainy day or at a family gathering, this vegan sinigang is sure to please everyone at the table.
In addition to being delicious, Sinigang Na Miso With Tofu is packed with nutrients. The tofu provides a great source of protein, while the assorted vegetables add fiber and essential vitamins. This recipe is easy to make and allows for customization based on what vegetables you have on hand.
Enjoy a bowl of this savory soup alongside steamed rice for a complete meal that will warm your heart and nourish your body.
Ingredients (Serves 4-6):
- 1 block (14 oz) firm tofu, drained and cubed
- 4 cups vegetable broth
- 1 cup water
- 1 medium onion, sliced
- 2 medium tomatoes, quartered
- 2 cups water spinach (kangkong) or any leafy greens
- 1 cup radish (labanos), sliced
- 1 cup eggplant, sliced
- 1 cup green beans, trimmed
- 3 tablespoons miso paste (white or red)
- 2 tablespoons tamarind paste or 1/2 cup fresh tamarind juice
- 2 tablespoons soy sauce
- 1 teaspoon sesame oil
- Salt and pepper, to taste
- 1-2 green chili peppers (optional), slit
Cooking Instructions:
- Prepare the Tofu: Begin by pressing the tofu to remove excess moisture. Wrap the tofu block in a clean kitchen towel and place a heavy object on top for about 15-20 minutes. Once pressed, cut the tofu into bite-sized cubes.
- Sauté the Aromatics: In a large pot, heat a tablespoon of sesame oil over medium heat. Add the sliced onion and sauté until translucent, about 3-4 minutes. Next, add the quartered tomatoes and cook until they soften, stirring occasionally.
- Add the Broth: Pour in the vegetable broth and water. Bring the mixture to a gentle boil. This forms the base of your soup, infusing flavors from the onions and tomatoes.
- Incorporate the Vegetables: Once boiling, add the sliced radish, eggplant, and green beans to the pot. Cook for about 5-7 minutes, or until the vegetables begin to soften.
- Mix in Miso and Tamarind: In a small bowl, combine the miso paste with a ladle of the hot broth until smooth. Then, stir this mixture back into the pot along with the tamarind paste or juice. This will give the soup its signature tangy flavor.
- Add the Tofu and Spinach: Gently add the cubed tofu and water spinach (or leafy greens) to the pot. Allow everything to simmer for another 3-5 minutes until the greens are wilted and the tofu is heated through.
- Season and Serve: Taste the soup and adjust the seasoning with soy sauce, salt, and pepper as desired. If you like a bit of heat, add the slit green chili peppers. Serve hot with steamed rice.
Extra Tips:
When preparing Sinigang Na Miso With Tofu, feel free to customize the vegetables based on your preference or what’s in season. You can add vegetables like bok choy, zucchini, or even mushrooms for added flavor and texture.
Also, for a richer flavor, consider using homemade vegetable broth instead of store-bought. Finally, remember to taste the broth before serving to verify the balance of sourness and saltiness is just right for your palate!
Pinakbet
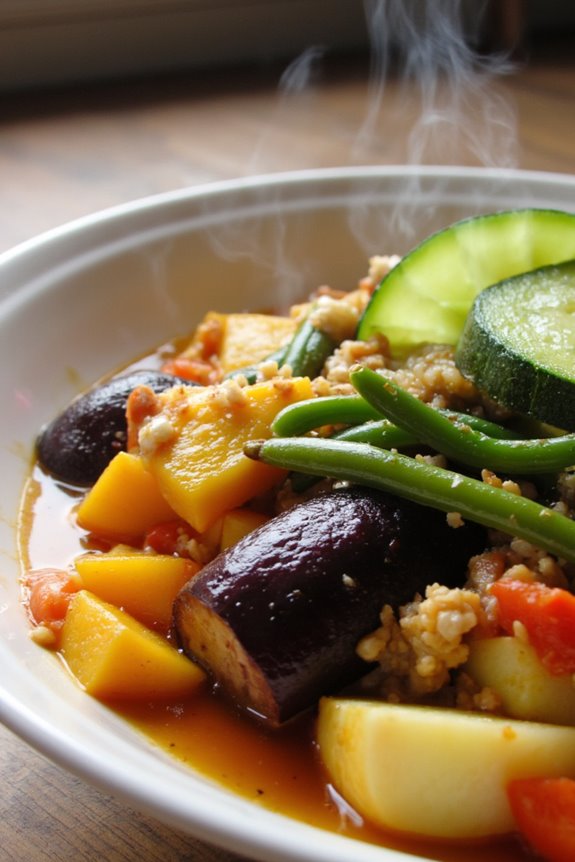
Pinakbet is a beloved Filipino dish that showcases the country’s rich agricultural heritage, traditionally made with a variety of vegetables and flavored with shrimp paste. However, this vegan version replaces the shrimp paste with a savory blend of spices to maintain the dish’s depth of flavor while guaranteeing it’s completely plant-based. This hearty vegetable stew isn’t only delicious but also packed with nutrients, making it a fantastic meal for everyone, regardless of dietary preferences.
This vibrant dish typically features a colorful array of vegetables such as eggplant, squash, and bitter melon, all simmered together to create a comforting and nutritious meal. Pinakbet is often served with rice, making it a filling option for lunch or dinner. With its balance of flavors and textures, it’s no wonder that Pinakbet is a staple in many Filipino households, and this vegan adaptation allows more people to enjoy its goodness.
Ingredients (Serves 4-6)
- 1 medium-sized eggplant, sliced
- 1 medium-sized zucchini, sliced
- 1 small bitter melon (ampalaya), sliced thinly
- 1 cup of string beans, cut into 2-inch pieces
- 1 cup of pumpkin (kalabasa), cubed
- 1 medium-sized onion, chopped
- 3 cloves of garlic, minced
- 1 tomato, chopped
- 2 cups of vegetable broth
- 2 tablespoons of soy sauce
- 1 tablespoon of miso paste
- 1 tablespoon of vegetable oil
- Salt and pepper to taste
Cooking Instructions
- Prepare the Vegetables: Start by washing and slicing all the vegetables. Ascertain that the bitter melon is sliced thinly to help reduce its bitterness. This preparation step is essential as it allows the vegetables to cook evenly and enhances the overall presentation of the dish.
- Sauté Aromatics: In a large pot, heat the vegetable oil over medium heat. Add the chopped onions and minced garlic. Sauté until the onions become translucent and fragrant. This step builds the foundational flavor of the dish, as sautéing the aromatics releases their essential oils.
- Add Tomatoes: Stir in the chopped tomatoes and cook until they soften and break down, about 3-5 minutes. This will create a natural sauce that will coat the vegetables later, adding richness to the dish.
- Incorporate the Broth and Seasonings: Pour in the vegetable broth, soy sauce, and miso paste. Stir well to combine all the ingredients and dissolve the miso paste. This mixture will infuse the vegetables with umami flavors, making the dish hearty and satisfying.
- Add the Vegetables: Gently add the prepared eggplant, zucchini, bitter melon, string beans, and pumpkin to the pot. Give everything a good stir to guarantee the vegetables are well coated with the broth mixture.
- Simmer: Cover the pot and let the mixture simmer for about 15-20 minutes on low heat until the vegetables are tender but still vibrant. Stir occasionally to prevent sticking and guarantee even cooking. This slow cooking allows the flavors to meld beautifully.
- Taste and Adjust: After the vegetables are cooked, taste the Pinakbet and adjust the seasoning with salt and pepper according to your preference. If you prefer a stronger flavor, you can also add a bit more soy sauce or miso at this stage.
- Serve: Once everything is cooked to your liking, remove the pot from heat. Serve the Pinakbet hot over steamed rice for a complete meal. Garnish with fresh herbs if desired.
Extra Tips
For an added depth of flavor, consider including additional spices like black pepper or chili flakes for a hint of heat. If you want to enhance the nutritional value, you can also add tofu or tempeh to the dish for extra protein.
Don’t be afraid to experiment with different seasonal vegetables, as Pinakbet is incredibly versatile, allowing you to use whatever is fresh and available. Enjoy your cooking!
Vegan Kare-Kare
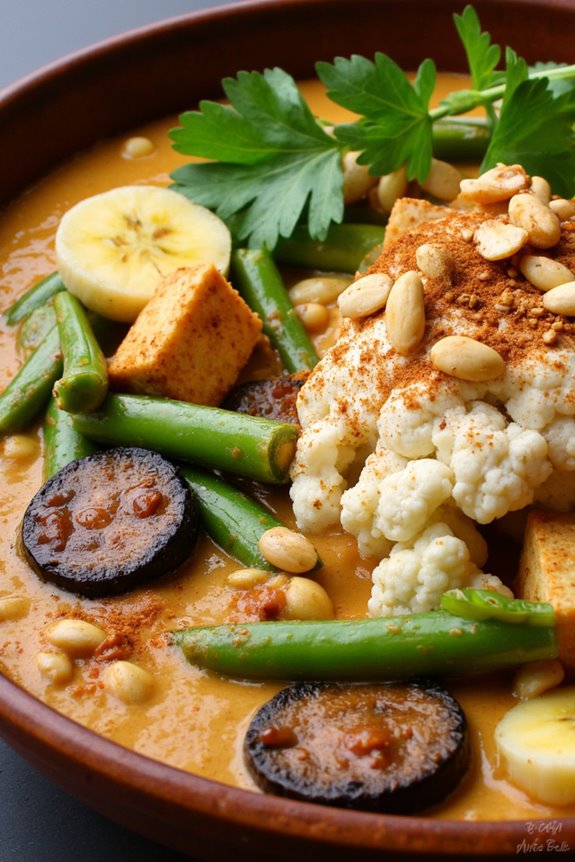
Kare-Kare is a beloved Filipino dish known for its rich and creamy peanut sauce, traditionally made with oxtail or tripe. This vegan version captures the essence of the original recipe while utilizing plant-based ingredients to create a hearty and satisfying meal. By incorporating a variety of vegetables and plant-based proteins, this Vegan Kare-Kare stays true to the flavors and textures that make the dish so special, making it a perfect option for vegans and non-vegans alike.
This recipe showcases the versatility of kare-kare with ingredients like eggplant, banana hearts, and a delicious peanut sauce made from natural ingredients. It’s often served with a side of bagoong (fermented shrimp paste), but for a vegan alternative, you can use a fermented soy alternative or simply enjoy it as is. This Vegan Kare-Kare is perfect for serving 4-6 people, making it a great dish for family gatherings or meal prep for the week ahead.
Ingredients:
- 1 large eggplant, sliced into rounds
- 1 cup banana hearts, sliced
- 1 cup green beans, trimmed
- 1 cup cauliflower florets
- 1 block (14 oz) firm tofu, cubed
- 1 cup peanut butter (natural, unsweetened)
- 2 cups vegetable broth
- 1 medium onion, chopped
- 4 cloves garlic, minced
- 1 tablespoon soy sauce
- 1 tablespoon rice vinegar
- 1 teaspoon ground turmeric
- 1 tablespoon annatto powder (optional, for color)
- Salt and pepper to taste
- 2 tablespoons vegetable oil for sautéing
- Chopped peanuts and fresh cilantro for garnish
Cooking Instructions:
- Prepare the Vegetables: Begin by washing and slicing all the vegetables. Cut the eggplant into rounds, slice the banana hearts, trim the green beans, and separate the cauliflower into florets. Set these aside.
- Cook the Tofu: In a large skillet or wok, heat the vegetable oil over medium heat. Add the cubed tofu and sauté until golden brown on all sides, about 8-10 minutes. Once cooked, remove the tofu from the skillet and set aside.
- Sauté the Aromatics: In the same skillet, add the chopped onion and minced garlic. Sauté until the onion becomes translucent and fragrant, about 3-5 minutes.
- Add the Vegetables: Add the sliced eggplant, banana hearts, green beans, and cauliflower to the skillet. Stir to combine and cook for about 5-7 minutes until the vegetables begin to soften.
- Make the Peanut Sauce: In a separate bowl, whisk together the peanut butter, vegetable broth, soy sauce, rice vinegar, ground turmeric, and annatto powder (if using). Mix until smooth and well combined.
- Combine Everything: Pour the peanut sauce over the sautéed vegetables in the skillet. Gently stir to coat the vegetables evenly in the sauce. Add the sautéed tofu back into the skillet and mix everything well. Let it simmer for an additional 10-15 minutes, allowing the flavors to meld together.
- Season and Serve: Taste the kare-kare and season with salt and pepper as needed. Once done, remove from heat and transfer to a serving dish. Garnish with chopped peanuts and fresh cilantro.
Extra Tips:
For a more authentic flavor, you can add a splash of tamarind paste for a slight tanginess that pairs well with the peanut sauce. Additionally, if you prefer a thicker sauce, you can add a bit of cornstarch mixed with water towards the end of cooking to achieve your desired consistency.
Serve your Vegan Kare-Kare with steamed rice for a complete meal!
Chao Fan (Filipino Fried Rice)
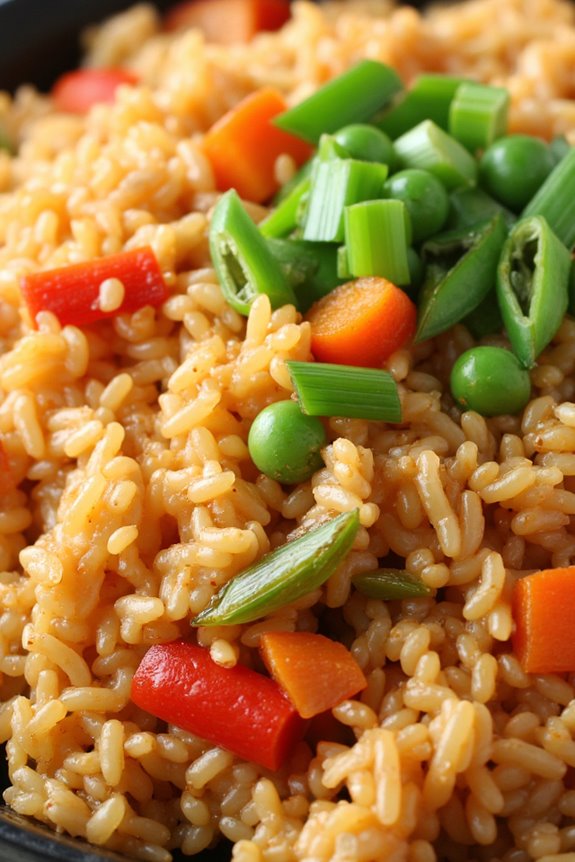
Chao Fan, a popular Filipino-style fried rice, is a delightful dish that combines leftover rice with an assortment of vegetables and seasonings. This versatile recipe is perfect for a quick meal or a side dish that packs a flavorful punch. Not only is it easy to prepare, but it’s also a great way to use up any leftover rice and vegetables you might’ve in your fridge. By making it vegan, you can enjoy all the taste without any animal products.
This dish isn’t just about filling your stomach; it’s about embracing the vibrant flavors of Filipino cuisine. The combination of soy sauce, garlic, and vegetables creates a savory base that brings the rice to life. Whether you’re serving it as a main course or as a side, Chao Fan is sure to be a hit at any table. Let’s explore this simple yet satisfying recipe that serves 4-6 people!
Ingredients:
- 4 cups cooked jasmine rice (preferably day-old)
- 2 tablespoons vegetable oil
- 4 cloves garlic, minced
- 1 small onion, chopped
- 1 cup carrots, diced
- 1 cup bell pepper, diced
- 1 cup green peas (fresh or frozen)
- 3-4 green onions, chopped
- 4 tablespoons soy sauce (adjust to taste)
- 1 tablespoon sesame oil
- Salt and pepper to taste
- Optional: chili flakes for heat
Cooking Instructions:
- Prepare the Rice: If you haven’t done so already, cook your jasmine rice a day before and refrigerate it overnight. This helps to dry out the rice, which makes it less sticky and easier to fry. If using fresh rice, let it cool completely before using.
- Heat the Oil: In a large skillet or wok, heat the vegetable oil over medium-high heat. Confirm the oil is hot enough before adding the next ingredients, as this will help to fry the rice evenly and prevent it from becoming mushy.
- Sauté Aromatics: Add the minced garlic and chopped onion to the skillet. Sauté for about 2-3 minutes or until the onion is translucent and fragrant. This step is vital for building the flavor base of the dish.
- Add Vegetables: Mix in the diced carrots and bell peppers, cooking for another 3-4 minutes until they’re slightly tender but still crisp. Stir in the green peas and cook for an additional minute. This adds color and nutrition to your fried rice.
- Incorporate the Rice: Add the cold, cooked rice to the skillet. Break apart any clumps gently with a spatula and mix everything together. Stir-fry for about 5 minutes, allowing the rice to heat through and absorb the flavors of the vegetables and aromatics.
- Season the Dish: Drizzle the soy sauce and sesame oil over the rice, mixing thoroughly to guarantee even distribution. Taste and adjust seasoning with salt, pepper, and optional chili flakes for heat, if desired. Cook for an additional 2-3 minutes.
- Finish with Green Onions: Finally, stir in the chopped green onions and cook for another minute. This adds a fresh crunch to the dish and enhances the overall flavor.
- Serve: Once everything is well combined and heated through, remove the skillet from heat. Serve your Chao Fan hot, garnished with additional green onions or chili flakes if desired.
Extra Tips:
When preparing Chao Fan, feel free to customize the vegetables based on what’s available or in season. Broccoli, mushrooms, or corn can be excellent additions.
Additionally, using day-old rice is key to achieving the perfect texture, preventing the fried rice from becoming soggy. For an extra layer of flavor, consider adding a splash of vinegar or a sprinkle of nutritional yeast to give a cheesy taste without dairy. Enjoy experimenting with your ingredients to make this dish uniquely yours!
Pancit Canton

Pancit Canton is a beloved Filipino noodle dish that celebrates the vibrant flavors and diverse textures of vegetables, making it a staple in many Filipino gatherings and celebrations. Traditionally made with egg noodles and a variety of meats and seafood, this vegan version replaces those ingredients with a colorful medley of fresh vegetables and flavorful seasonings, guaranteeing that everyone can enjoy this classic dish without sacrificing taste or authenticity.
The result is a mouthwatering stir-fry that highlights the delicious essence of Filipino cuisine while being entirely plant-based. This dish isn’t only visually appealing but also rich in nutrients, providing a fulfilling meal for family and friends. With its easy preparation and quick cooking time, Vegan Pancit Canton is perfect for weeknight dinners or special occasions.
The combination of soy sauce, garlic, and fresh vegetables creates a savory base that pairs perfectly with the chewy texture of the noodles. Whether you’re a long-time vegan or simply looking to incorporate more plant-based meals into your diet, Vegan Pancit Canton is sure to be a hit.
Ingredients (Serves 4-6):
- 8 oz. pancit canton noodles
- 2 tablespoons vegetable oil
- 4 cloves garlic, minced
- 1 small onion, sliced
- 1 carrot, julienned
- 1 bell pepper, sliced (any color)
- 1 cup green beans, trimmed and cut into 2-inch pieces
- 1 cup cabbage, shredded
- 1 teaspoon soy sauce
- 1 teaspoon oyster sauce (vegan)
- 1/2 teaspoon ground black pepper
- 2 green onions, chopped (for garnish)
- Lemon or calamansi wedges (for serving)
Cooking Instructions:
- Cook the Noodles: In a large pot of boiling water, add the pancit canton noodles and cook according to package instructions, usually around 3-5 minutes until al dente. Once cooked, drain and rinse under cold water to stop the cooking process. Set aside.
- Sauté Aromatics: In a large wok or frying pan, heat the vegetable oil over medium heat. Add the minced garlic and sliced onion, sautéing for about 2-3 minutes until fragrant and the onion becomes translucent.
- Add Vegetables: Introduce the julienned carrot, sliced bell pepper, and cut green beans to the pan. Stir-fry for about 4-5 minutes until the vegetables are slightly tender but still crisp. This step guarantees that the vegetables maintain their vibrant color and crunch.
- Incorporate Cabbage: Add the shredded cabbage to the wok and stir-fry for an additional 2-3 minutes. The cabbage will wilt down and blend beautifully with the other vegetables, adding volume and flavor to the dish.
- Combine Noodles and Sauce: Add the cooked pancit canton noodles to the vegetable mixture. Drizzle the soy sauce and vegan oyster sauce over the noodles, then sprinkle with ground black pepper. Gently toss everything together using tongs or a spatula to guarantee the noodles are evenly coated with the sauce and mixed with the vegetables.
- Final Touches: Cook for another 2-3 minutes, stirring occasionally, to allow the flavors to meld together. Taste and adjust seasoning if necessary.
- Garnish and Serve: Remove from heat and transfer the Vegan Pancit Canton to a serving platter. Garnish with chopped green onions and serve with lemon or calamansi wedges on the side for an extra zing.
Extra Tips:
For added protein, consider incorporating tofu or tempeh into the dish by pan-frying cubes of either until golden brown before adding them to the stir-fry.
Additionally, feel free to customize the vegetables based on seasonal offerings or personal preference; snow peas, mushrooms, or broccoli are excellent choices. To enhance the flavor further, you can also add a splash of sesame oil or a pinch of chili flakes for a hint of spice. Enjoy your vibrant and delicious Vegan Pancit Canton!
Vegan Laing
Vegan Laing is a delightful Filipino dish that showcases the rich flavors of taro leaves simmered in coconut milk, making it a hearty and satisfying meal. Traditionally made with meat, this vegan version replaces animal proteins with a variety of vegetables, guaranteeing that the dish remains plant-based while still being flavorful and aromatic.
The combination of spices, coconut milk, and the unique texture of the taro leaves creates a comforting dish that’s perfect for sharing with family and friends. This dish isn’t only a fantastic representation of Filipino cuisine but also a great way to enjoy the health benefits of its ingredients. Taro leaves are high in vitamins and minerals, and when paired with coconut milk, they create a creamy, rich sauce that can be served over rice or enjoyed on its own.
Whether you’re a vegan or simply looking to incorporate more plant-based meals into your diet, Vegan Laing is a must-try recipe!
Ingredients (Serves 4-6):
- 2 cups dried taro leaves (or fresh if available)
- 1 can (400 ml) coconut milk
- 1 medium onion, chopped
- 4 cloves garlic, minced
- 1-2 green chili peppers, sliced (adjust for spice preference)
- 1 tablespoon ginger, minced
- 2 cups vegetable broth
- 2 tablespoons soy sauce
- 1 tablespoon vegetable oil
- Salt and pepper to taste
Cooking Instructions:
- Prepare the Taro Leaves: If using dried taro leaves, soak them in warm water for about 30 minutes to soften. If using fresh taro leaves, wash them thoroughly and chop them into bite-sized pieces. Drain the dried leaves and set them aside.
- Sauté Aromatics: In a large pot, heat the vegetable oil over medium heat. Add the chopped onion and sauté until translucent, about 3-4 minutes. Then, add minced garlic and ginger, cooking for another 1-2 minutes until fragrant.
- Add Chili Peppers: Stir in the sliced green chili peppers and cook for an additional minute. This will infuse the oil with flavor and provide a slight heat to the dish.
- Combine Ingredients: Add the soaked or fresh taro leaves to the pot, stirring to combine with the sautéed aromatics. Pour in the vegetable broth and coconut milk, followed by the soy sauce. Mix well to guarantee all ingredients are evenly distributed.
- Simmer: Bring the mixture to a gentle boil, then reduce the heat to low. Cover the pot and let it simmer for 20-30 minutes, stirring occasionally, until the taro leaves are tender and the sauce has thickened slightly.
- Season and Serve: Taste the dish and season with salt and pepper according to your preference. Once ready, serve the Vegan Laing hot over steamed rice or enjoy it as is.
Extra Tips:
To elevate the flavors of your Vegan Laing, consider adding a squeeze of fresh lime juice just before serving for a zesty kick. Additionally, you can enhance the dish with toppings such as fried garlic, chopped scallions, or a sprinkle of toasted coconut for extra texture and flavor.
If you prefer a thicker sauce, let it simmer a bit longer until it reaches your desired consistency. Enjoy your culinary adventure with this comforting vegan dish!
Turon (Banana Lumpia)

Turon, also known as banana lumpia, is a beloved Filipino street food that showcases the delightful combination of sweet plantains and a crispy wrapper. Traditionally made with ripe bananas and often drizzled with caramelized sugar, this vegan version captures the essence of this classic treat while ensuring it remains plant-based. Perfect as a dessert or snack, turon is easy to prepare and offers a satisfying crunch with every bite.
This recipe is ideal for serving 4 to 6 people, making it a great option for gatherings or family meals. With just a few simple ingredients, you can create a deliciously sweet and crispy treat that everyone will love. Let’s explore the ingredients and cooking instructions to make this delectable vegan turon.
Ingredients:
- 4-6 ripe saba bananas (or any sweet plantains)
- 6-8 spring roll wrappers (ensure they’re vegan)
- 1 cup brown sugar (for coating)
- 1 cup cooking oil (for frying)
- Water (for sealing the wrappers)
- Optional: cinnamon or vanilla extract (for extra flavor)
Cooking Instructions:
- Prepare the Bananas: Start by peeling the ripe saba bananas. Cut each banana in half lengthwise, making sure to keep the shape intact. If you’re using larger bananas, you can slice them into quarters. This will help them fit nicely into the wrappers.
- Prepare the Wrappers: Lay out the spring roll wrappers on a clean surface with one corner facing you. If necessary, cover the wrappers with a damp cloth to prevent them from drying out while you work.
- Assemble the Turon: Place a piece of banana at the edge of the wrapper closest to you. Optionally, sprinkle a little brown sugar on top of the banana for added sweetness. Fold the bottom corner over the banana and then fold in the sides. Roll the wrapper tightly until you reach the top corner. Use a little water to seal the edge of the wrapper.
- Coat with Brown Sugar: In a shallow bowl, spread out the remaining brown sugar. Gently roll each wrapped turon in the sugar until fully coated. This step will give your turon that characteristic caramelized crust when fried.
- Fry the Turon: In a large frying pan, heat the cooking oil over medium heat. Once the oil is hot, carefully place the turon in the pan, ensuring not to overcrowd them. Fry for about 3-4 minutes on each side or until they’re golden brown and crispy.
- Drain Excess Oil: Once fried, use a slotted spoon to remove the turon from the oil and let them drain on a plate lined with paper towels. This will help absorb any excess oil.
- Serve: Allow the turon to cool slightly before serving. They’re best enjoyed warm and can be served plain or with a drizzle of coconut caramel sauce for an extra touch.
Extra Tips:
When making vegan turon, the ripeness of the bananas is essential for achieving the right sweetness and texture. Look for bananas that are just ripe, as overly ripe bananas can become too mushy during frying.
If you want to enhance the flavor, consider adding a sprinkle of cinnamon or a drop of vanilla extract to the sugar coating. Additionally, if you prefer a healthier version, you can bake the turon in the oven instead of frying, brushing them lightly with oil before baking to achieve a crispy texture. Enjoy your delicious vegan turon!
Biko (Sticky Rice Cake)

Biko is a beloved Filipino dessert that has been enjoyed for generations. Traditionally made with glutinous rice, coconut milk, and brown sugar, this sweet sticky rice cake is often served during special occasions or as a delightful snack. The rich, chewy texture combined with the creamy coconut flavor is certain to satisfy any sweet tooth.
The vegan version of Biko eliminates any animal products while maintaining the delicious essence of the traditional recipe, making it perfect for those following a plant-based diet.
Preparing Biko may require some time and patience, but the end result is worth the effort. This recipe offers a step-by-step guide to creating your own vegan Biko, allowing you to experience the flavors of the Philippines right in your kitchen.
Whether you’re sharing it with family, friends, or simply indulging yourself, this sticky rice cake is a delightful treat that will transport you to the vibrant streets of the Philippines.
Ingredients (Serves 4-6)
- 2 cups glutinous rice
- 1 ½ cups coconut milk
- 1 cup brown sugar
- ½ teaspoon salt
- 1 tablespoon coconut oil
- 1 cup grated coconut (optional, for topping)
Cooking Instructions
1. Rinse the Glutinous Rice: Begin by thoroughly rinsing the glutinous rice under cold water until the water runs clear. This step helps remove excess starch, which can make the rice overly sticky and gummy.
After rinsing, soak the rice in water for at least 4 hours or overnight to achieve the best texture when cooked.
2. Cook the Rice: Drain the soaked rice and transfer it to a pot. Add about 2 cups of water to the pot, covering the rice. Bring to a boil over medium heat, then reduce to low and cover. Cook for approximately 20-25 minutes, or until the water is absorbed and the rice is tender.
Fluff the rice with a fork and set aside.
3. Prepare the Coconut Mixture: In a separate saucepan, combine the coconut milk, brown sugar, and salt over medium heat. Stir continuously until the sugar is dissolved.
Allow the mixture to simmer gently for about 5-7 minutes, stirring frequently to prevent burning, until it thickens slightly.
4. Combine Rice and Coconut Mixture: Add the cooked glutinous rice to the coconut mixture and mix well until the rice is completely coated. Confirm that all the rice is evenly moistened by the coconut mixture.
This step is vital as it creates the rich flavor and texture of Biko.
5. Grease the Baking Dish: Preheat your oven to 350°F (175°C). Grease a square or rectangular baking dish with coconut oil to prevent sticking.
Spread the Biko mixture evenly in the greased dish, pressing it down gently to create an even layer.
6. Bake the Biko: Place the baking dish in the preheated oven and bake for 30-35 minutes, or until the top is set and slightly golden.
If desired, sprinkle grated coconut on top during the last 10 minutes of baking for added texture and flavor.
7. Cool and Serve: Once baked, remove the Biko from the oven and allow it to cool completely at room temperature.
After cooling, cut into squares or rectangles for serving. You can enjoy it warm or chilled.
Extra Tips
When making Biko, you can experiment with different toppings such as toasted sesame seeds or chopped nuts for added crunch.
Make certain to keep an eye on the baking time, as ovens may vary. If you find that the top is browning too quickly, you can cover it with aluminum foil to prevent burning.
Additionally, consider using different types of sweeteners like coconut sugar for a deeper flavor profile. Enjoy your homemade vegan Biko as a delightful addition to any gathering or as a sweet personal treat.
Ube Halaya (Purple Yam Jam)

Ube Halaya is a beloved Filipino dessert made from purple yam, known for its vibrant color and sweet, creamy texture. This delightful treat isn’t only visually stunning but also packed with flavor, making it a perfect addition to any festive occasion or just a simple indulgence at home.
Traditionally, Ube Halaya is made using fresh or frozen purple yam, coconut milk, and sweeteners, and is often enjoyed as a spread, a filling, or as a standalone dessert. The vegan version retains the same rich taste while adhering to plant-based dietary choices.
Making Ube Halaya is a straightforward process that requires a few key ingredients and some patience. The result is a luscious jam that can be enjoyed on its own or used to enhance other desserts, such as cakes, pastries, or even pancakes. This recipe is designed to serve 4-6 people, making it a great option for sharing with family and friends.
Ingredients:
- 2 cups of grated ube (purple yam), cooked and peeled
- 1 cup of coconut milk
- 1 cup of coconut cream
- 3/4 cup of sugar (adjust to taste)
- 1/2 teaspoon of vanilla extract
- A pinch of salt
- Optional: 1/4 cup of shredded coconut for garnish
Cooking Instructions:
- Prepare the Ube: If you’re using fresh ube, start by washing it thoroughly. Boil the purple yam in water for about 30-40 minutes or until it’s tender. Once cooked, peel and grate the ube. If you’re using frozen grated ube, make sure it’s thawed and ready to use.
- Combine Ingredients: In a large saucepan, combine the grated ube, coconut milk, coconut cream, sugar, vanilla extract, and a pinch of salt. The mixture should be well-blended for a smooth texture. Stir everything together until the sugar is dissolved and the ube is evenly distributed.
- Cook the Mixture: Place the saucepan over medium heat. Continuously stir the mixture to prevent it from sticking to the bottom of the pan. Cook for about 15-20 minutes, or until the mixture thickens and pulls away from the sides of the pan. The color should deepen to a vibrant purple.
- Set the Ube Halaya: Once thickened, remove the saucepan from the heat. Transfer the Ube Halaya into a greased mold or container, smoothing the top with a spatula. Allow it to cool to room temperature, then refrigerate for at least 2 hours to set properly.
- Serve and Garnish: Once chilled and set, you can slice the Ube Halaya into squares or scoop it out as desired. If you like, you can sprinkle shredded coconut on top for added texture and flavor before serving.
Extra Tips:
To enhance the flavor of your Ube Halaya, consider using high-quality coconut products, as they contribute to the creaminess and depth of the jam.
Make sure to taste the mixture while cooking; you can adjust the sweetness according to your preference. If you want a more intense ube flavor, you can also add a few drops of ube extract.
Finally, Ube Halaya can be stored in an airtight container in the refrigerator for up to a week, making it a delightful treat to have on hand.
Vegan Puto (Steamed Rice Cakes)

Vegan Puto is a delightful Filipino dessert that embodies the spirit of traditional rice cakes while being completely plant-based. These fluffy steamed rice cakes aren’t only easy to make but also versatile, allowing for various flavors and toppings.
Traditionally served during special occasions or as a snack, Vegan Puto is made with rice flour, coconut milk, and sugar, resulting in a light and airy texture that melts in your mouth. Whether you enjoy them plain or with a sprinkle of grated coconut or a slice of cheese (vegan, of course), these treats will surely satisfy your sweet tooth.
This recipe is perfect for gatherings, as it serves 4-6 people. The steaming process locks in moisture and enhances the flavors, making each bite a delightful experience. With a few simple ingredients and easy-to-follow instructions, you’ll be able to whip up a batch of Vegan Puto that your friends and family will love. Let’s get started on this delicious journey into Filipino cuisine!
Ingredients
- 2 cups rice flour
- 1 cup coconut milk
- 1 cup sugar
- 1 tablespoon baking powder
- ½ teaspoon salt
- 1 teaspoon vanilla extract
- 1 cup water (for steaming)
- Optional: Grated coconut, vegan cheese, or ube extract for flavoring
Cooking Instructions
- Prepare the Steamer: Fill a large pot with water and bring it to a boil. Place a steaming rack or a heatproof plate inside the pot, making sure it doesn’t touch the water. Cover the pot with a lid to keep the steam trapped inside.
- Mix Dry Ingredients: In a large mixing bowl, combine the rice flour, sugar, baking powder, and salt. Whisk them together until well blended. This step guarantees that the leavening agent is evenly distributed throughout the flour, helping the puto rise properly.
- Combine Wet Ingredients: In another bowl, mix together the coconut milk and vanilla extract. Stir well to combine. The coconut milk adds moisture and a rich flavor to your puto, while the vanilla enhances the overall taste.
- Combine Wet and Dry Ingredients: Gradually pour the wet mixture into the dry ingredients, stirring continuously until you achieve a smooth batter. Avoid over-mixing, as this can lead to denser rice cakes.
- Prepare the Molds: Grease your puto molds or small cups lightly with oil to prevent sticking. If you don’t have puto molds, silicone muffin cups or small ramekins will work just as well.
- Fill the Molds: Pour the batter into the prepared molds, filling them about ¾ full to allow room for rising. If you wish to add flavor, you can drop in a teaspoon of ube extract or place a small piece of vegan cheese on top of the batter.
- Steam the Puto: Carefully place the filled molds onto the steaming rack or plate in the pot. Cover the pot with the lid and steam for about 20-25 minutes or until a toothpick inserted in the center of the puto comes out clean.
- Cool and Serve: Once cooked, remove the molds from the pot and let them cool for a few minutes. Gently remove the puto from the molds and serve warm or at room temperature. You can top them with grated coconut or enjoy them plain.
Extra Tips
To guarantee your Vegan Puto turns out perfectly fluffy, avoid overmixing the batter and make sure your steaming water is at a steady boil before placing the molds inside.
If you want to experiment with flavors, consider adding pandan extract for a unique aroma or incorporating different toppings like fruits or vegan chocolate chips. Storing leftover puto is easy; simply keep them in an airtight container in the refrigerator for up to a week. Enjoy your delicious vegan treats!
Ginataang Bilo-Bilo

Ginataang Bilo-Bilo is a delightful Filipino dessert that combines the rich creaminess of coconut milk with the chewy texture of glutinous rice balls. This comforting dish is often enjoyed during special occasions and celebrations, but it’s also a perfect treat for any day. The combination of sweet and savory flavors, along with the addition of various ingredients like taro, sweet potatoes, and sago pearls, makes this dessert not just delicious but also visually appealing.
In this vegan version of Ginataang Bilo-Bilo, we keep the essence of the traditional dish while ensuring it’s plant-based. The use of coconut milk not only lends a luscious creaminess but also infuses the dish with a tropical flavor. Whether served warm or at room temperature, this sweet treat is sure to impress your family and friends with its delightful combination of textures and flavors.
Ingredients (Serves 4-6):
- 1 cup glutinous rice flour
- 1/2 cup water (adjust as needed)
- 1 cup coconut milk
- 1/2 cup sugar (or to taste)
- 1/2 teaspoon salt
- 1 cup diced sweet potatoes
- 1 cup diced taro
- 1/2 cup sago pearls (tapioca pearls)
- 2 cups water (for boiling the sago and root vegetables)
- 1-2 pandan leaves (optional, for added fragrance)
Cooking Instructions:
- Prepare the Glutinous Rice Balls: In a mixing bowl, combine the glutinous rice flour and water. Mix until a smooth dough forms, adjusting the water as necessary to achieve a pliable consistency. Take small portions of the dough and roll them into small balls, about the size of a marble. Set aside.
- Cook the Sago Pearls: In a pot, bring 2 cups of water to a boil. Add the sago pearls and cook for about 15-20 minutes, stirring occasionally to prevent sticking. Once the pearls become translucent, turn off the heat and let them sit in the water for an additional 10 minutes. Drain and rinse under cold water to remove excess starch, then set aside.
- Boil the Root Vegetables: In another pot, bring water to a boil and add the diced sweet potatoes and taro. Cook until tender, about 10-15 minutes. Once cooked, drain and set aside.
- Combine Ingredients: In a large saucepan, pour in the coconut milk and add sugar and salt. Stir well and bring to a gentle simmer over low heat. Add the cooked sweet potatoes, taro, and sago pearls to the coconut milk mixture. Stir to combine and let it simmer for about 5 minutes.
- Add the Glutinous Rice Balls: Gently drop the prepared glutinous rice balls into the simmering coconut mixture. Allow them to cook for another 5-7 minutes or until the rice balls float to the surface, indicating they’re cooked through.
- Serve: Once everything is heated through and the flavors have melded together, remove from heat. If desired, add pandan leaves for additional fragrance. Serve warm or at room temperature in dessert bowls.
Extra Tips:
When making Ginataang Bilo-Bilo, feel free to experiment with different ingredients according to your preference. You can include other fruits like ripe bananas or jackfruit for added sweetness and texture.
If you prefer a thicker coconut sauce, you can use less water or increase the amount of coconut milk. Additionally, be cautious while cooking the sago pearls; overcooking can result in a mushy texture, so keep a close eye on them.
Finally, this dish can be made ahead of time and gently reheated before serving, making it a great option for gatherings.
Vegan Halo-Halo

Halo-Halo is a classic Filipino dessert that translates to “mix-mix.” This vibrant and colorful treat is perfect for hot weather, combining a variety of ingredients that provide a delightful mix of flavors and textures. Traditionally made with shaved ice and an assortment of sweetened fruits, jellies, and beans, the vegan version stays true to its roots while ensuring that no animal products are used. This delightful concoction is topped with creamy coconut milk, making it a revitalizing and indulgent dessert that everyone can enjoy.
Creating a vegan halo-halo allows you to explore the rich culinary heritage of the Philippines while catering to plant-based diets. You can customize the ingredients based on your preference or availability, adding your favorite fruits, beans, or jellies. The beauty of halo-halo lies in its versatility, so don’t hesitate to experiment! Whether it’s a family gathering or a casual summer treat, vegan halo-halo is sure to impress and satisfy.
Ingredients (Serves 4-6):
- 1 cup sweetened red beans (or adzuki beans)
- 1 cup sweetened mung beans
- 1 cup sweetened jackfruit, sliced
- 1 cup sweetened banana (saba), sliced
- 1 cup grated young coconut (or desiccated coconut)
- 1 cup ube halaya (purple yam jam)
- 4 cups crushed ice
- 1 can (400ml) coconut milk
- 1/4 cup sugar (adjust for sweetness)
- 1 tsp vanilla extract (optional)
- 1/4 cup leche flan (vegan, if desired)
- 1/4 cup rice crispies or pinipig (optional, for crunch)
Cooking Instructions:
- Prepare the Sweetened Ingredients: If you’re starting with dried beans, soak the red and mung beans overnight and cook them until soft. For the sweetened jackfruit, banana, and coconut, you can either use store-bought versions or make your own by cooking them in water with sugar until tender and sweet.
- Make the Ube Halaya: In a saucepan, combine cooked purple yam (ube), coconut milk, and sugar. Cook over low heat, stirring constantly until it thickens (about 10-15 minutes). Remove from heat and allow it to cool.
- Assemble the Halo-Halo: In a large mixing bowl or individual serving glasses, start layering your ingredients. Begin with the sweetened red beans, followed by the sweetened mung beans, jackfruit, and banana. Add a layer of grated coconut and then a generous scoop of ube halaya.
- Add Crushed Ice: Top each serving with crushed ice, filling it to the brim. The ice should be fluffy and soft to provide the perfect texture.
- Pour the Coconut Milk: Drizzle coconut milk over the crushed ice, covering the halo-halo generously. For extra flavor, you can mix in sugar and vanilla extract into the coconut milk before pouring it.
- Finish with Toppings: Garnish your halo-halo with a slice of vegan leche flan if desired and sprinkle some rice crispies or pinipig on top for a delightful crunch.
- Serve and Enjoy: Serve immediately with a long spoon, and encourage everyone to mix their halo-halo before digging in to fully enjoy the combination of flavors.
Extra Tips:
For an even more authentic taste, try adding other traditional ingredients like sweetened purple yam, palm seeds, or even a scoop of vegan ice cream on top.
To control the sweetness, adjust the amount of sugar in the coconut milk and the sweetened ingredients according to your taste.
Remember to serve halo-halo immediately after assembly to prevent the ice from melting and diluting the flavors! Enjoy this delightful vegan treat with friends and family, and share the joy of Filipino culture through food.
Coconut Macaroons

Coconut macaroons are a delightful treat that encapsulate the essence of tropical flavors, making them a popular choice among dessert lovers. These chewy and sweet morsels aren’t only delicious but also incredibly easy to make, especially when you opt for a vegan version. By using simple plant-based ingredients, you can whip up a batch of these delightful cookies that will satisfy your sweet tooth while adhering to your dietary preferences.
Traditionally made with eggs, these vegan coconut macaroons rely on aquafaba, the liquid from canned chickpeas, to bind the ingredients together. This innovative substitute guarantees that the macaroons maintain their chewy texture while being completely free from animal products. With just a few ingredients, you can create a batch of these delectable treats that will impress everyone, whether they’re vegan or not.
Ingredients (Serves 4-6):
- 2 cups unsweetened shredded coconut
- 1/2 cup aquafaba (liquid from a can of chickpeas)
- 1/2 cup almond flour
- 1/3 cup maple syrup or agave nectar
- 1 teaspoon vanilla extract
- 1/4 teaspoon salt
- Optional: vegan dark chocolate for drizzling
Cooking Instructions:
- Preheat the Oven: Begin by preheating your oven to 350°F (175°C). This guarantees that the macaroons cook evenly and develop a lovely golden color.
- Mix Dry Ingredients: In a large mixing bowl, combine the shredded coconut, almond flour, and salt. Stir these ingredients together until they’re well mixed. This step is important because it distributes the dry ingredients evenly, which will help in creating a uniform texture in your macaroons.
- Prepare the Aquafaba: In a separate bowl, whisk the aquafaba until it becomes frothy. This usually takes about 1-2 minutes. The frothiness will help in binding the ingredients together, mimicking the function of eggs in traditional recipes.
- Combine Wet and Dry Ingredients: Pour the frothy aquafaba into the bowl with the dry ingredients. Add the maple syrup and vanilla extract. Mix everything together until all the ingredients are fully combined. The mixture should be sticky but manageable for shaping.
- Shape the Macaroons: Using your hands or a cookie scoop, form small mounds of the mixture and place them on a baking sheet lined with parchment paper. Confirm there’s enough space between each mound as they’ll expand slightly while baking.
- Bake: Place the baking sheet in the preheated oven and bake for 15-20 minutes, or until the macaroons are golden brown on the outside. Keep an eye on them as baking times can vary based on your oven.
- Cool and Drizzle (Optional): Once baked, remove the macaroons from the oven and let them cool on the baking sheet for about 10 minutes. If desired, melt some vegan dark chocolate and drizzle it over the cooled macaroons for an added touch of decadence.
Extra Tips:
For an enhanced flavor, consider adding a pinch of cinnamon or a splash of almond extract to the mixture. If you prefer a more textured macaroon, you can use sweetened shredded coconut, but keep in mind that this will increase the sweetness of the final product.
Additionally, these macaroons can be stored in an airtight container at room temperature for up to a week, making them perfect for meal prepping or treating yourself throughout the week!