

I’ve been on the hunt for scrumptious low-carb Chinese recipes that are big on flavor but light on calories. From spicy garlic shrimp stir-fry to creative cauliflower fried rice, there’s something here for everyone. These dishes are quick and easy to make and can be adjusted to match your taste. Let’s explore these zesty recipes that will shake up your dinner routine while keeping it satisfying. You won’t want to miss out on what’s next!
Spicy Garlic Shrimp Stir-Fry
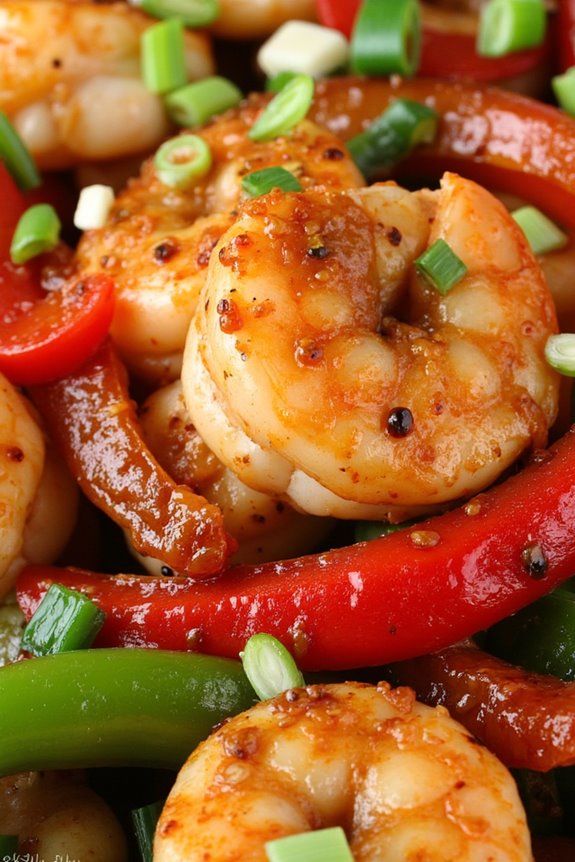
Spicy Garlic Shrimp Stir-Fry is a delightful and zesty dish that perfectly marries the flavors of succulent shrimp with a bold garlic-infused sauce. This low-carb recipe isn’t only quick to prepare but also packed with protein and vibrant vegetables, making it an ideal choice for those looking to maintain a healthy lifestyle without sacrificing taste.
The combination of fresh ingredients and spices gives this dish an enchanting aroma and a kick of heat that will surely satisfy your cravings.
In addition to being low in carbohydrates, this stir-fry is incredibly versatile. You can easily customize it by adding your favorite vegetables or adjusting the spice level to suit your palate.
Whether you serve it over a bed of cauliflower rice or enjoy it on its own, this Spicy Garlic Shrimp Stir-Fry is bound to become a family favorite that you can whip up on busy weeknights or for a special occasion.
Ingredients (serves 4-6):
- 1 pound large shrimp, peeled and deveined
- 2 tablespoons olive oil
- 4 cloves garlic, minced
- 1 tablespoon fresh ginger, minced
- 1 red bell pepper, sliced
- 1 cup snap peas, trimmed
- 1 tablespoon soy sauce (or coconut aminos for a gluten-free option)
- 1 tablespoon sriracha (adjust to taste)
- 1 teaspoon sesame oil
- 2 green onions, chopped
- Salt and pepper, to taste
- Fresh cilantro, for garnish
Cooking Instructions:
- Prepare the Shrimp: Rinse the shrimp under cold water and pat them dry with paper towels. This step is essential to guarantee a good sear when cooking and to prevent excess moisture in the stir-fry. Season with a pinch of salt and pepper to enhance the flavor.
- Heat the Oil: In a large skillet or wok, heat the olive oil over medium-high heat. Allow the oil to become hot but not smoking, as this will help achieve a nice sear on the shrimp and vegetables, enhancing their flavor and texture.
- Sauté Garlic and Ginger: Add the minced garlic and ginger to the hot oil. Sauté for about 30 seconds, stirring frequently, until fragrant. Be careful not to burn the garlic, as it can turn bitter if overcooked.
- Cook the Shrimp: Add the seasoned shrimp to the skillet in a single layer. Cook for 2-3 minutes on one side until they turn pink and opaque, then flip and cook for another 2-3 minutes on the other side. Remove the shrimp from the pan and set aside once cooked through.
- Stir-Fry the Vegetables: In the same skillet, add the sliced red bell pepper and snap peas. Stir-fry for about 3-4 minutes until the vegetables are tender-crisp. This step helps retain their vibrant color and crunch.
- Combine and Season: Return the cooked shrimp to the skillet with the vegetables. Add soy sauce, sriracha, and sesame oil, stirring everything together until well combined. Cook for an additional 1-2 minutes to allow the flavors to meld.
- Garnish and Serve: Remove the skillet from heat. Sprinkle chopped green onions and fresh cilantro over the stir-fry for added freshness and flavor. Serve hot, either on its own or over cauliflower rice if desired.
Extra Tips: To elevate the flavor of your Spicy Garlic Shrimp Stir-Fry, consider marinating the shrimp in a mixture of soy sauce, garlic, and ginger for about 15-30 minutes before cooking. This will enhance the taste and tenderness of the shrimp.
Additionally, feel free to experiment with other vegetables such as broccoli, zucchini, or mushrooms based on your preference. For a milder version, reduce the amount of sriracha or use a different sauce that fits your taste.
Cauliflower Fried Rice
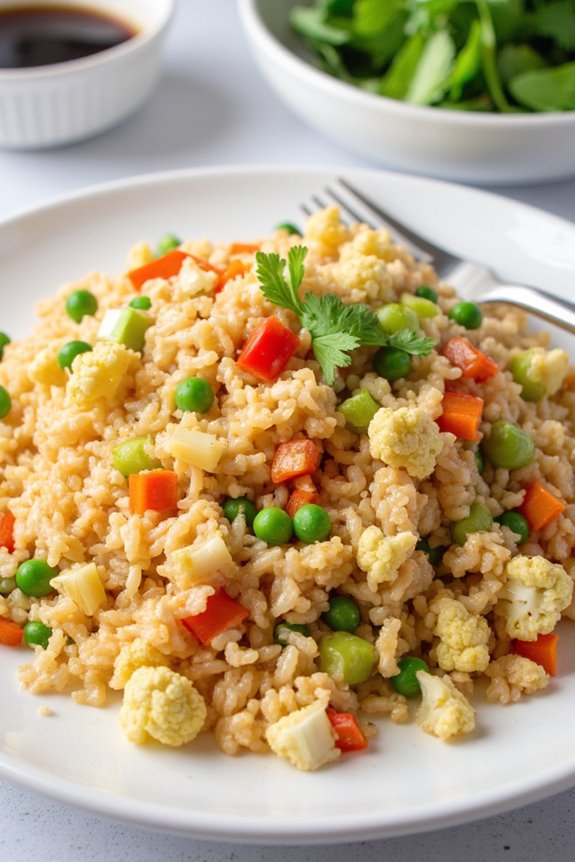
Cauliflower Fried Rice is a delicious and healthy alternative to traditional fried rice, making it an excellent choice for those following a low-carb diet. This dish utilizes grated cauliflower in place of rice, providing a similar texture while greatly reducing carbohydrates and calories. Packed with vegetables and flavor, this recipe isn’t only nutritious but also quick and easy to prepare, making it perfect for weeknight dinners or meal prep.
This versatile dish can be customized with your choice of protein, such as chicken, shrimp, or tofu, and can be enhanced with your favorite sauces and seasonings. With the right ingredients and a little creativity, Cauliflower Fried Rice can be a satisfying meal that even the pickiest eaters will enjoy. Whether served as a side or a main dish, it’s sure to become a favorite in your household.
Ingredients (Serves 4-6):
- 1 medium head of cauliflower, grated into rice-sized pieces
- 2 tablespoons sesame oil
- 1 cup mixed vegetables (peas, carrots, bell peppers)
- 3 green onions, sliced
- 2 garlic cloves, minced
- 2 large eggs, beaten
- 3 tablespoons soy sauce (or tamari for gluten-free)
- Salt and pepper to taste
- Optional: cooked chicken, shrimp, or tofu for added protein
Cooking Instructions:
- Prepare the Cauliflower: Start by removing the leaves and stem from the cauliflower. Cut it into quarters, and then use a grater or food processor to pulse the florets into rice-sized pieces. This will serve as the base of your fried rice.
- Heat the Oil: In a large skillet or wok, heat the sesame oil over medium-high heat. This oil adds a rich flavor that’s characteristic of many Asian dishes, making it an essential component for this recipe.
- Sauté the Vegetables: Once the oil is hot, add the mixed vegetables and stir-fry for about 3-4 minutes until they’re tender-crisp. Add the sliced green onions and minced garlic, cooking for an additional minute until fragrant.
- Cook the Eggs: Push the vegetable mixture to the side of the skillet and pour the beaten eggs into the cleared space. Scramble the eggs until fully cooked, then mix them with the vegetables.
- Add the Cauliflower Rice: Add the grated cauliflower to the skillet, stirring everything together. Cook for about 5-7 minutes, allowing the cauliflower to soften and absorb the flavors from the vegetables and eggs.
- Season and Serve: Drizzle the soy sauce over the cauliflower rice, and season with salt and pepper to taste. Stir well to combine, then remove from heat. If desired, add cooked chicken, shrimp, or tofu for extra protein. Serve hot as a side dish or a main dish.
Extra Tips:
To enhance the flavor of your Cauliflower Fried Rice, consider adding a splash of rice vinegar or a sprinkle of sesame seeds before serving. For added heat, incorporate some chili sauce or crushed red pepper flakes.
If you’re short on time, pre-packaged cauliflower rice can be found in most grocery stores, making this dish even quicker to prepare. Remember to adjust the cooking time slightly if using pre-packaged cauliflower rice, as it may cook faster than freshly grated cauliflower. Enjoy your healthy, low-carb meal!
Kung Pao Chicken Lettuce Wraps

Kung Pao Chicken Lettuce Wraps are a delicious, low-carb alternative to the traditional Kung Pao Chicken, allowing you to enjoy the rich flavors of this beloved dish without the added carbohydrates. The combination of tender chicken, crunchy vegetables, and the signature spicy sauce wrapped in crisp lettuce leaves makes for a satisfying meal that’s both healthy and easy to prepare.
This dish is perfect for a family dinner or as an appetizer for a gathering, and it’s sure to impress everyone with its vibrant flavors and textures.
These lettuce wraps aren’t only low in carbs, but they’re also packed with protein and healthy fats, making them a great choice for anyone following a low-carb or ketogenic diet. The use of lettuce as a wrap instead of rice or tortillas keeps the dish light and invigorating.
Plus, the ability to customize the ingredients means you can adjust the spice level and add your favorite vegetables to suit your taste.
Ingredients (Serves 4-6):
- 1 pound boneless, skinless chicken breast, diced
- 2 tablespoons soy sauce (or tamari for gluten-free)
- 1 tablespoon rice vinegar
- 1 tablespoon sesame oil
- 2 cloves garlic, minced
- 1 inch fresh ginger, minced
- 1/2 cup bell peppers, diced (red and green)
- 1/2 cup zucchini, diced
- 1/4 cup green onions, chopped
- 1/4 cup unsalted roasted peanuts, roughly chopped
- 1 tablespoon hoisin sauce
- 1 tablespoon Szechuan peppercorns (optional, for heat)
- 1 head of butter or iceberg lettuce, leaves separated
Cooking Instructions:
- Marinate the Chicken: In a medium bowl, combine the diced chicken with soy sauce, rice vinegar, and sesame oil. Mix well and let it marinate for at least 15-20 minutes to absorb the flavors. This step helps to tenderize the chicken and infuse it with a rich umami taste.
- Prepare the Sauce: In a small bowl, whisk together the hoisin sauce and a tablespoon of water until well combined. Set aside. This sauce will add a sweet and savory element to the dish.
- Cook the Chicken: Heat a large skillet or wok over medium-high heat. Add a splash of sesame oil and then add the marinated chicken. Stir-fry the chicken for about 5-7 minutes, until it’s cooked through and golden brown. Verify that the chicken is evenly cooked and remove it from the skillet and set aside.
- Sauté the Vegetables: In the same skillet, add a little more sesame oil if needed. Add the minced garlic, ginger, and Szechuan peppercorns (if using), and sauté for about 30 seconds until fragrant. Then, add the diced bell peppers and zucchini, cooking for an additional 3-4 minutes until the vegetables are tender-crisp.
- Combine Ingredients: Return the cooked chicken to the skillet with the sautéed vegetables. Pour the prepared hoisin sauce over the mixture and toss everything together to coat evenly. Cook for another 1-2 minutes to heat through and combine the flavors.
- Assemble the Wraps: To serve, take a lettuce leaf and add a generous spoonful of the Kung Pao chicken mixture. Top with chopped green onions and peanuts for extra crunch. Roll up the lettuce around the filling and enjoy!
Extra Tips:
When making Kung Pao Chicken Lettuce Wraps, feel free to customize the vegetables based on what you have on hand or your personal preference. You can also adjust the spice level by adding more or less Szechuan peppercorns or even some chili paste for an extra kick.
For an added depth of flavor, consider toasting the peanuts lightly in the skillet before adding them to the wraps. Make sure to serve these wraps immediately for the best texture and flavor, as the lettuce will wilt if left too long.
Enjoy your healthy and tasty meal!
Zucchini Noodles With Szechuan Beef
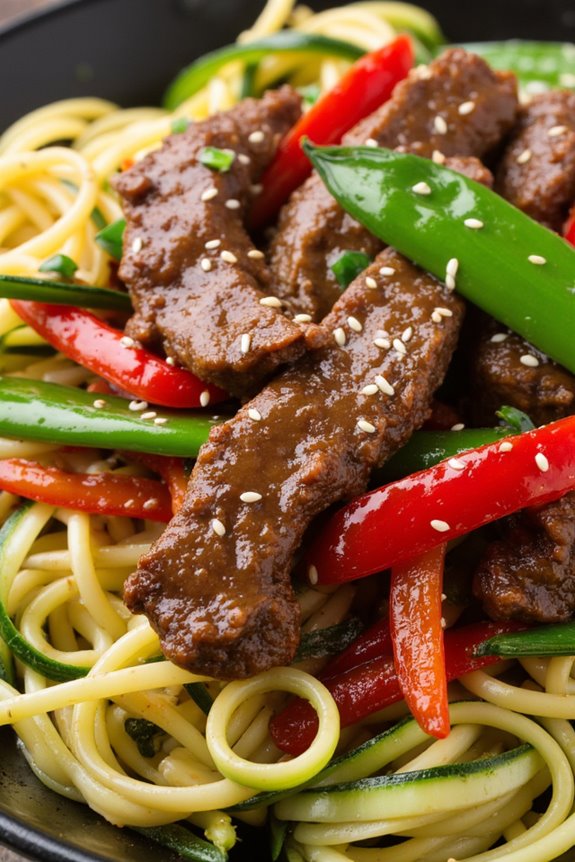
Zucchini Noodles with Szechuan Beef is a delicious and healthy twist on a classic Chinese dish that satisfies your cravings without the added carbohydrates of traditional noodles. This recipe features spiralized zucchini, which serves as a perfect low-carb alternative, while the Szechuan beef brings bold flavors and a hint of spice.
With the combination of tender beef, fresh vegetables, and aromatic Szechuan sauce, this dish is sure to become a family favorite, all while keeping your meal plan on track.
Making zucchini noodles is a simple and fun process that can be done using a spiralizer or a julienne peeler. The quick cooking method of stir-frying guarantees that the noodles retain their texture and nutrition. This dish isn’t only visually appealing but also packed with flavor.
Whether you’re looking for a healthy weeknight dinner or a meal prep option, Zucchini Noodles with Szechuan Beef is an excellent choice that will leave you feeling satisfied.
Ingredients (Serves 4-6):
- 1.5 lbs beef sirloin, thinly sliced
- 4 medium zucchinis, spiralized
- 2 tablespoons vegetable oil
- 1 red bell pepper, sliced
- 1 green bell pepper, sliced
- 1 cup snap peas
- 4 cloves garlic, minced
- 1 tablespoon ginger, minced
- 1 tablespoon Szechuan peppercorns
- 1/4 cup soy sauce (or tamari for gluten-free)
- 2 tablespoons rice vinegar
- 2 tablespoons chili paste or sauce (adjust for spice level)
- 1 tablespoon sesame oil
- Salt and pepper to taste
- Green onions, chopped (for garnish)
- Sesame seeds (for garnish)
Cooking Instructions:
- Prepare the Beef: Start by slicing the beef sirloin thinly against the grain. This will help the meat become tender during cooking. Season the slices with salt and pepper, and set aside while you prepare the other ingredients.
- Spiralize the Zucchini: Use a spiralizer or julienne peeler to turn the zucchinis into noodles. This should yield about 4-6 servings of zucchini noodles. Once done, set them aside in a bowl, and you can sprinkle a little salt on them to help draw out excess moisture if desired.
- Make the Sauce: In a small bowl, combine the soy sauce, rice vinegar, chili paste, and sesame oil. Mix well and set aside. This sauce will bring the Szechuan flavor to your dish.
- Stir-Fry the Beef: In a large skillet or wok, heat 1 tablespoon of vegetable oil over medium-high heat. Add the sliced beef in a single layer and cook for about 2-3 minutes until browned. Avoid overcrowding the pan; you may need to do this in batches. Remove the beef from the skillet and set aside.
- Cook the Vegetables: In the same skillet, add the remaining tablespoon of vegetable oil. Add the minced garlic, ginger, and Szechuan peppercorns, stirring for about 30 seconds until fragrant. Then, add the sliced bell peppers and snap peas. Stir-fry for 3-4 minutes until they’re tender-crisp.
- Combine Ingredients: Return the cooked beef to the skillet with the vegetables. Pour the prepared sauce over the mixture and stir well to combine. Allow everything to cook for another 2-3 minutes, letting the flavors meld together.
- Add the Zucchini Noodles: Gently fold in the spiralized zucchini noodles, cooking for an additional 2-3 minutes or until the noodles are just tender but not mushy. You want to maintain some crunch in the zucchini.
- Serve and Garnish: Once everything is cooked through, remove from heat. Serve the Szechuan beef over the zucchini noodles and garnish with chopped green onions and sesame seeds for added flavor and texture.
Extra Tips:
When preparing Zucchini Noodles with Szechuan Beef, it’s important to not overcook the zucchini; they should remain slightly firm to maintain their texture.
If you find that your noodles are too watery, you can briefly sauté them separately before adding them to the beef and vegetables. Additionally, feel free to adjust the spice level by altering the amount of chili paste or adding a pinch of crushed red pepper flakes.
This dish is versatile, so consider adding other vegetables like broccoli or carrots for added nutrition and color!
Egg Drop Soup With Bok Choy
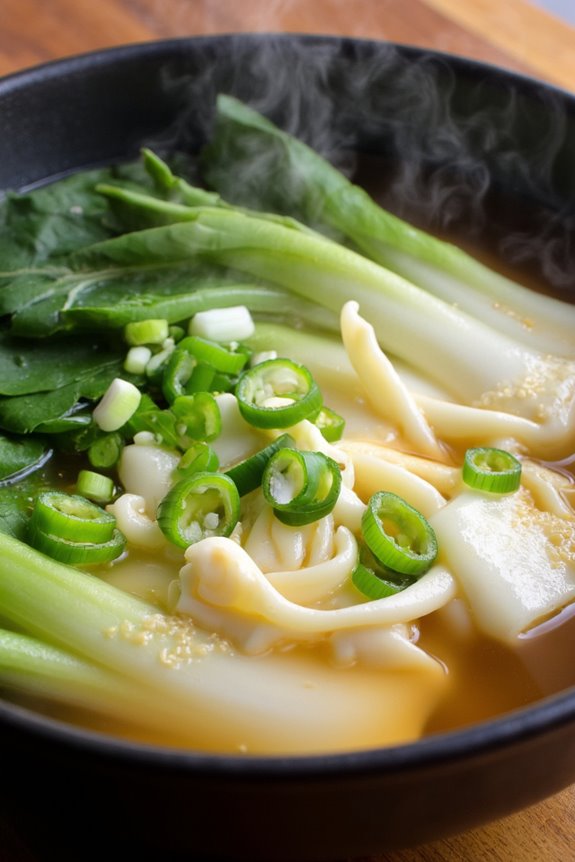
Egg Drop Soup is a classic Chinese dish that’s both simple and comforting, making it perfect for a low-carb diet. This version includes bok choy, a nutritious leafy green that adds flavor and texture to the soup. The combination of silky eggs and the delicate crunch of bok choy creates a delightful balance, making it an excellent choice for a light meal or as an appetizer.
Plus, it’s quick to prepare, ensuring that you can enjoy a delicious bowl of homemade soup in no time. In addition to being low in carbohydrates, this recipe is packed with protein from the eggs and vitamins from the bok choy. It’s a great way to incorporate more vegetables into your diet while savoring the traditional flavors of Chinese cuisine.
Whether you’re looking for a quick weeknight dinner or a soothing soup to enjoy during colder months, Egg Drop Soup with Bok Choy is sure to satisfy your cravings.
Ingredients (Serves 4-6):
- 4 cups chicken broth
- 2 large eggs
- 1 cup bok choy, chopped
- 1 tablespoon soy sauce (or tamari for gluten-free)
- 1 teaspoon sesame oil
- 2 green onions, sliced
- 1 teaspoon grated ginger (optional)
- Salt and pepper to taste
- Cornstarch slurry (1 tablespoon cornstarch mixed with 2 tablespoons water) for thickening (optional)
Cooking Instructions:
- Prepare the Broth: In a large pot, bring the chicken broth to a gentle boil over medium-high heat. This will serve as the base for your soup, providing a flavorful foundation.
- Add Bok Choy: Once the broth is boiling, add the chopped bok choy. Allow it to cook for about 2-3 minutes until it becomes tender but still vibrant in color. Bok choy not only adds nutrition but also a revitalizing crunch to the soup.
- Whisk the Eggs: In a small bowl, crack the eggs and whisk them lightly until the yolks and whites are combined. This will create the delicate egg ribbons that are characteristic of egg drop soup.
- Create the Egg Ribbons: Lower the heat to medium-low. Slowly pour the whisked eggs into the simmering broth in a thin stream while gently stirring the soup with a fork or chopstick. This will help create those beautiful, silky strands of egg as they cook instantly in the hot broth.
- Season the Soup: Stir in the soy sauce, sesame oil, and grated ginger (if using). Taste the soup and adjust the seasoning with salt and pepper as needed. The soy sauce will add depth and umami flavors to the soup.
- Thicken the Soup (Optional): If you prefer a thicker soup, stir in the cornstarch slurry while continuously stirring the soup. Allow it to simmer for another minute until the soup thickens slightly.
- Add Green Onions: Finally, stir in the sliced green onions. They’ll add a fresh flavor and a pop of color to your dish.
- Serve: Ladle the soup into bowls and enjoy hot. This soup is best served immediately for the freshest taste.
Extra Tips:
To enhance the flavor of your Egg Drop Soup with Bok Choy, consider adding additional spices such as white pepper for a subtle heat. You can also mix in other low-carb vegetables like mushrooms or spinach for variety.
If you want a richer broth, you can simmer the chicken broth with aromatics like garlic and onion before adding the bok choy. Ultimately, for a more filling meal, pair the soup with a side of grilled chicken or shrimp to boost the protein content.
Low-Carb Vegetable Dumplings

Low-Carb Vegetable Dumplings are a delightful twist on traditional dumplings, perfect for those looking to enjoy a delicious Asian-inspired dish without the extra carbs. These dumplings are made with a variety of fresh vegetables, wrapped in a low-carb dough, and can be steamed, boiled, or pan-fried for a delightful crunch. They aren’t only a great appetizer but can also serve as a light meal when paired with a dipping sauce or a side salad.
Creating these dumplings is a fun activity that can be enjoyed with family or friends. It allows for creativity in the filling, as you can mix and match various vegetables and spices based on your preferences. Whether you’re a seasoned chef or a beginner in the kitchen, these low-carb vegetable dumplings are sure to impress.
Ingredients (Serves 4-6)
- 2 cups almond flour
- 1 large egg
- 1/2 cup hot water
- 1 cup finely chopped cabbage
- 1/2 cup shredded carrots
- 1/2 cup chopped mushrooms
- 1/2 cup chopped green onions
- 1 tablespoon minced garlic
- 1 teaspoon grated ginger
- 1 tablespoon soy sauce (or coconut aminos for a soy-free option)
- Salt and pepper to taste
- Sesame oil for cooking
Cooking Instructions
- Prepare the Dough: In a mixing bowl, combine the almond flour and salt. Create a well in the middle and crack the egg into it. Gradually pour in hot water while mixing until a dough forms. Knead the dough for a few minutes until it becomes smooth. Cover it with a damp cloth and let it rest for about 30 minutes.
- Make the Filling: In a large skillet over medium heat, add a drizzle of sesame oil. Sauté the minced garlic and ginger for about 1 minute until fragrant. Add the chopped cabbage, carrots, mushrooms, and green onions. Cook for about 5-7 minutes, stirring occasionally, until the vegetables are tender. Stir in soy sauce, and season with salt and pepper. Remove from heat and let the filling cool slightly.
- Form the Dumplings: Divide the rested dough into small balls, about the size of a golf ball. On a lightly floured surface, roll each ball into a thin circle, about 3-4 inches in diameter. Place a teaspoon of the vegetable filling in the center of each circle. Fold the dough over to form a half-moon shape and pinch the edges to seal.
- Cook the Dumplings: You can choose to steam, boil, or pan-fry the dumplings. For steaming, place them in a steamer basket lined with parchment paper and steam for about 10-12 minutes. For boiling, drop them into a pot of boiling water and cook for 5-6 minutes until they float. For pan-frying, heat a tablespoon of sesame oil in a skillet over medium heat, add the dumplings, and fry until golden brown on one side, then add a splash of water and cover to steam for about 5 minutes.
- Serve: Once cooked, remove the dumplings from the heat and serve them warm with your choice of dipping sauce, such as soy sauce or a spicy chili sauce.
Extra Tips
When making Low-Carb Vegetable Dumplings, feel free to customize the filling based on seasonal vegetables or whatever you have on hand. You can also experiment with different herbs and spices for added flavor.
Verify the dumplings are sealed tightly to prevent any filling from leaking during cooking. Additionally, if you’re looking to make a larger batch, these dumplings freeze well; simply freeze them in a single layer before transferring them to a freezer bag for easy storage. Enjoy your cooking!
Sweet and Sour Pork With Bell Peppers
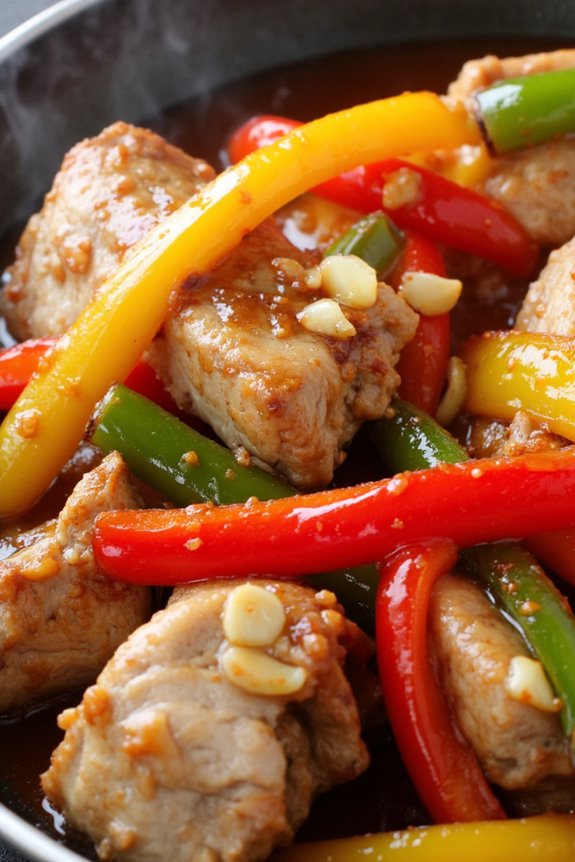
Sweet and Sour Pork With Bell Peppers is a delightful and vibrant dish that brings the flavors of Chinese cuisine right to your kitchen while keeping it low in carbohydrates. This dish features tender pieces of pork that are marinated and stir-fried to perfection, combined with colorful bell peppers and a tangy sauce that perfectly balances sweetness and acidity.
It’s a great option for anyone looking to enjoy a healthier version of this classic dish without sacrificing flavor. The combination of bell peppers not only adds a pop of color but also enhances the nutritional profile of the meal, making it a satisfying choice for both dinner parties and family meals.
Using low-carb ingredients, this recipe allows you to indulge in the rich flavors of sweet and sour pork while keeping your carbohydrate intake in check. Let’s explore this delicious recipe that serves 4-6 people!
Ingredients:
- 1 pound pork tenderloin, thinly sliced
- 2 tablespoons soy sauce
- 1 tablespoon rice vinegar
- 1 tablespoon sesame oil
- 1 tablespoon garlic, minced
- 1 tablespoon ginger, minced
- 1 cup bell peppers (red, green, yellow), sliced
- 1/2 cup onion, sliced
- 1/4 cup sugar-free ketchup
- 2 tablespoons low-sodium chicken broth
- 1 tablespoon cornstarch (optional, for thickening)
- Salt and pepper to taste
- 2 tablespoons olive oil for cooking
Cooking Instructions:
- Marinate the Pork: In a medium bowl, combine the sliced pork tenderloin with soy sauce, rice vinegar, sesame oil, minced garlic, and minced ginger. Mix well to guarantee the pork is evenly coated. Allow it to marinate for at least 30 minutes to enhance the flavors and tenderness of the meat.
- Prepare the Sauce: In a small bowl, whisk together the sugar-free ketchup, chicken broth, and cornstarch (if using). This mixture will become the sweet and sour sauce. Set it aside for later use.
- Stir-Fry the Vegetables: Heat one tablespoon of olive oil in a large skillet or wok over medium-high heat. Add the sliced bell peppers and onion, sautéing them for about 4-5 minutes until they’re slightly tender but still crisp. Remove the vegetables from the skillet and set them aside.
- Cook the Pork: In the same skillet, add the remaining tablespoon of olive oil. Once the oil is hot, add the marinated pork slices in a single layer. Cook for about 3-4 minutes until the pork is browned and cooked through, stirring occasionally to guarantee even cooking.
- Combine Everything: Add the sautéed bell peppers and onions back into the skillet with the cooked pork. Pour the prepared sauce over the meat and vegetables, stirring well to combine. Cook for an additional 2-3 minutes until the sauce thickens and everything is heated through.
- Season and Serve: Taste the dish and adjust the seasoning with salt and pepper as needed. Once everything is well combined and heated, remove it from the heat and serve immediately. Enjoy this dish on its own or with a side of cauliflower rice for a complete low-carb meal.
Extra Tips: When preparing Sweet and Sour Pork With Bell Peppers, feel free to customize the vegetables to your liking. Other options include broccoli, snap peas, or even zucchini.
If you prefer a spicier kick, consider adding sliced jalapeños or a dash of sriracha to the sauce. For a richer flavor, you can also experiment with adding a splash of pineapple juice or low-carb sweetener in place of sugar.
Make sure to keep an eye on the cooking times to prevent overcooking the pork or vegetables. Enjoy your delicious low-carb creation!
Mongolian Beef With Shirataki Noodles
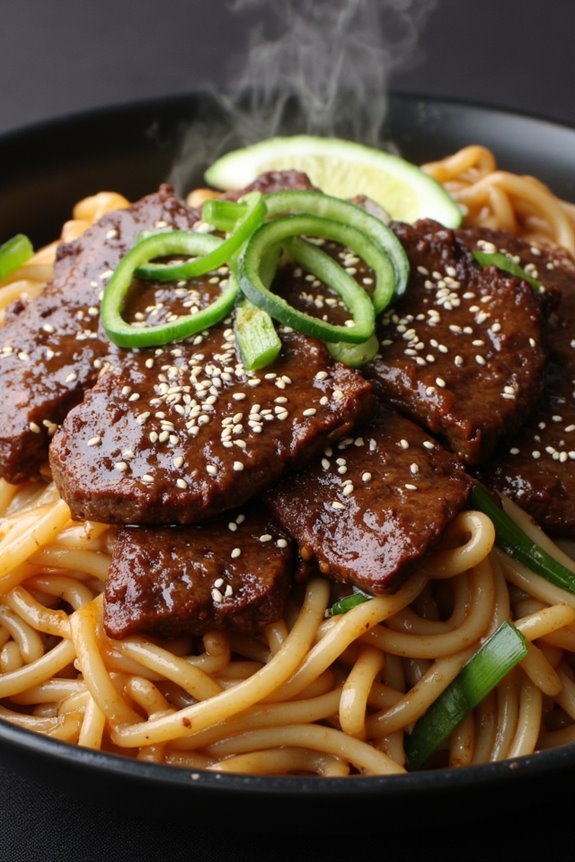
Mongolian Beef is a savory and satisfying dish that brings the flavors of Chinese cuisine right to your kitchen while keeping carbs to a minimum. This low-carb version replaces traditional noodles with Shirataki noodles, which are made from konjac yam and are extremely low in calories. The tender beef, coupled with the rich, slightly sweet sauce, creates a delightful contrast with the chewy texture of the Shirataki noodles. Perfect for a weeknight dinner, this dish is both quick to make and sure to please the whole family.
In addition to being low in carbs, this Mongolian Beef recipe is packed with flavor. The combination of soy sauce, ginger, and garlic provides a deliciously aromatic base while the green onions add a fresh crunch. The Shirataki noodles soak up the sauce beautifully, making every bite incredibly flavorful. Whether you’re following a low-carb diet or simply looking to try something new, this dish is a great option that doesn’t compromise on taste.
Ingredients (Serves 4-6):
- 1 pound flank steak, thinly sliced
- 2 tablespoons cornstarch
- 2 tablespoons vegetable oil
- 3 cloves garlic, minced
- 1 tablespoon fresh ginger, minced
- 1/2 cup soy sauce (or tamari for gluten-free)
- 1/4 cup brown sugar or sugar substitute
- 1/4 teaspoon red pepper flakes (optional)
- 1 package Shirataki noodles, rinsed and drained
- 4 green onions, sliced
- Sesame seeds for garnish (optional)
Cooking Instructions:
- Prepare the Beef: In a bowl, toss the thinly sliced flank steak with cornstarch until evenly coated. This will help to tenderize the meat and create a lovely texture when cooked.
- Heat the Oil: In a large skillet or wok, heat the vegetable oil over medium-high heat. Once hot, add the coated beef in a single layer. Allow it to sear without stirring for about 2-3 minutes until browned. Then, flip the pieces to brown the other side for another 2-3 minutes.
- Add Aromatics: Once the beef is cooked, reduce the heat to medium and add the minced garlic and ginger to the skillet. Stir-fry for about 1 minute until fragrant, being careful not to burn the garlic.
- Create the Sauce: In a small bowl, combine the soy sauce, brown sugar, and red pepper flakes (if using). Pour this mixture over the beef in the skillet. Stir well to coat the beef evenly and allow the sauce to simmer for about 2-3 minutes until it thickens slightly.
- Prepare the Shirataki Noodles: While the sauce is simmering, prepare the Shirataki noodles according to package instructions. Usually, this involves rinsing them under cold water and briefly boiling them for 2-3 minutes. Drain and add them to the skillet with the beef.
- Combine Everything: Gently toss the Shirataki noodles with the beef and sauce until well combined and heated through. Add the sliced green onions and stir to incorporate. Cook for an additional minute.
- Serve: Remove from heat and transfer the Mongolian Beef with Shirataki Noodles to a serving platter. Garnish with sesame seeds if desired and serve immediately.
Extra Tips:
When cooking Mongolian Beef with Shirataki Noodles, it’s crucial to dry the noodles thoroughly after rinsing to prevent excess water from diluting the sauce.
Feel free to adjust the sweetness of the sauce to your taste by adding more or less brown sugar or sugar substitute.
For an added crunch, consider incorporating vegetables like bell peppers or broccoli into the stir-fry.
This dish is best enjoyed fresh, but you can store leftovers in the refrigerator for up to 2 days; just reheat gently to preserve the flavors.
Hot and Sour Soup
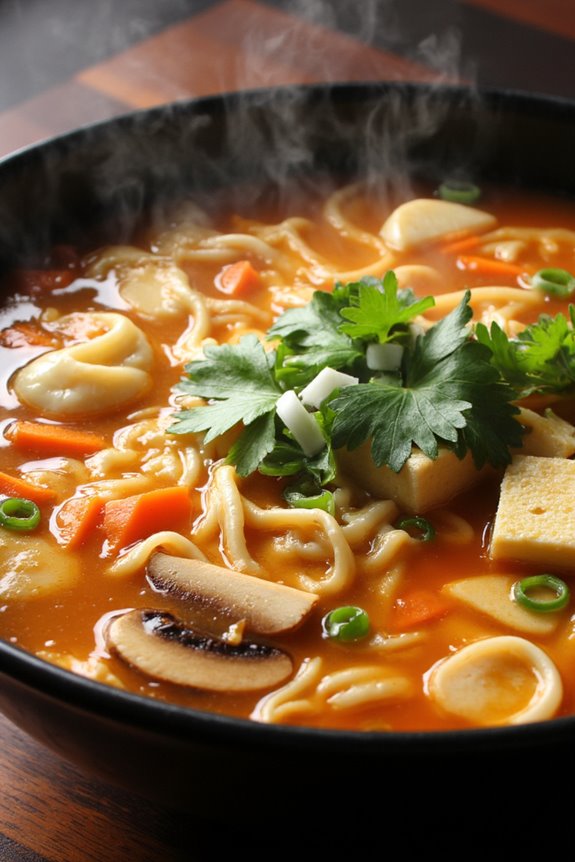
Hot and Sour Soup is a classic Chinese dish that tantalizes the taste buds with its perfect balance of spicy and tangy flavors. Traditionally made with a variety of ingredients, this low-carb version maintains the essence of the original while being mindful of your dietary choices. It’s a comforting bowl of warmth that’s perfect for any occasion, whether it’s a cozy dinner at home or an impressive appetizer for guests.
This delightful soup isn’t only low in carbohydrates but also packed with nutrients, making it a healthy option for those looking to enjoy a delicious meal without compromising on their dietary goals. The combination of mushrooms, tofu, and other fresh vegetables provides a rich texture and depth of flavor, while the blend of vinegar and white pepper gives it that signature hot and sour kick.
Ingredients (Serves 4-6)
- 4 cups chicken or vegetable broth
- 1 cup shiitake mushrooms, sliced
- 1 cup firm tofu, cubed
- 1 medium carrot, julienned
- 1 cup bamboo shoots, sliced
- 2 green onions, chopped
- 3 tablespoons soy sauce (or tamari for gluten-free)
- 2 tablespoons rice vinegar
- 1 tablespoon cornstarch (optional, for thickening)
- 1 teaspoon white pepper
- 2 eggs, beaten
- 1 tablespoon sesame oil
- Salt to taste
- Fresh cilantro for garnish (optional)
Cooking Instructions
- Prepare the Broth: In a large pot, bring 4 cups of chicken or vegetable broth to a gentle simmer over medium heat. This will serve as the base for your soup, infusing it with deep, savory flavors.
- Add Vegetables and Tofu: Once the broth is simmering, add the sliced shiitake mushrooms, cubed tofu, julienned carrot, and sliced bamboo shoots. Allow these ingredients to cook for about 5-7 minutes or until they’re tender yet still crisp. This step guarantees that each bite has a delightful crunch along with the soft tofu.
- Season the Soup: Stir in the soy sauce and rice vinegar, followed by the white pepper. Taste the soup and adjust the seasoning with salt as needed. The vinegar will give it that signature sour flavor, while the soy sauce adds a savory umami depth.
- Thicken (Optional): If you prefer a thicker soup, mix the cornstarch with a small amount of water to make a slurry and stir it into the soup. Allow it to simmer for another 2-3 minutes until it thickens to your desired consistency.
- Add the Eggs: Slowly drizzle the beaten eggs into the simmering soup while stirring gently. This will create delicate egg ribbons throughout the soup. Cook for another 1-2 minutes until the eggs are cooked through.
- Finish with Green Onions and Sesame Oil: Remove the soup from the heat and stir in the chopped green onions and sesame oil for an added layer of flavor. This step enhances the aroma and adds a nutty quality to the soup.
- Serve: Ladle the hot and sour soup into bowls and garnish with fresh cilantro if desired. Serve immediately and enjoy the warm, comforting flavors.
Extra Tips
When making Hot and Sour Soup, feel free to customize the ingredients based on your preferences or what you have on hand. You can add additional vegetables like bell peppers or spinach for extra nutrition.
Adjust the amount of white pepper and vinegar depending on how spicy and sour you like your soup. Additionally, if you’re looking for a lower sodium option, consider using low-sodium broth and tamari.
Keep the soup warm on low heat if serving to a group, but avoid boiling after adding the eggs to maintain their delicate texture.
Teriyaki Salmon With Broccoli
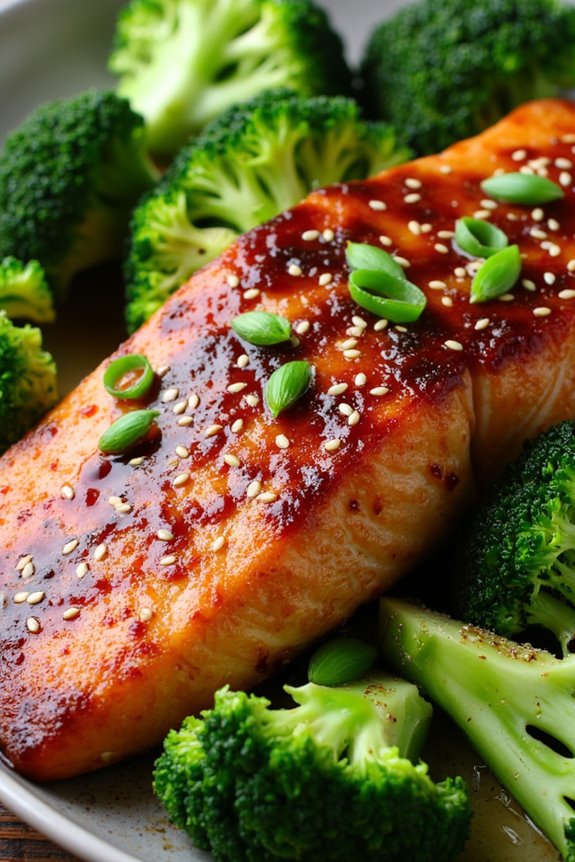
Teriyaki Salmon with Broccoli is a delightful low-carb dish that combines the rich flavors of teriyaki sauce with perfectly cooked salmon and vibrant broccoli. This recipe not only satisfies your taste buds but also offers a nutritious meal packed with healthy fats and fiber, making it an excellent choice for anyone following a low-carb diet.
The sweet and savory glaze complements the salmon beautifully, while the broccoli adds a crunchy texture and a boost of vitamins. This dish is easy to prepare and can be made in under 30 minutes, making it a perfect option for busy weeknights or a quick weekend meal.
The combination of the flaky salmon and tender broccoli, all glazed in a homemade teriyaki sauce, will leave you feeling satisfied without the carbs that typically accompany Asian cuisine. So, gather your ingredients and get ready to whip up this delicious and healthy dish.
Ingredients (Serves 4-6)
- 4-6 salmon fillets (about 6 ounces each)
- 2 cups broccoli florets
- 1/4 cup soy sauce (or tamari for gluten-free option)
- 2 tablespoons rice vinegar
- 2 tablespoons sesame oil
- 2 tablespoons erythritol or preferred low-carb sweetener
- 2 cloves garlic, minced
- 1 teaspoon ginger, grated
- 1 tablespoon cornstarch (optional, for thickening)
- 1 tablespoon water (optional, for thickening)
- Sesame seeds for garnish
- Green onions, sliced for garnish
Cooking Instructions
1. Prepare the Teriyaki Sauce: In a small saucepan, combine the soy sauce, rice vinegar, sesame oil, erythritol, minced garlic, and grated ginger. Heat over medium heat until the mixture begins to simmer.
If you prefer a thicker sauce, mix the cornstarch and water in a separate bowl to create a slurry, then add it to the sauce while stirring continuously until it thickens. Remove from heat and set aside.
2. Preheat the Oven or Grill: Preheat your oven to 400°F (200°C) or prepare your grill for medium-high heat. This is crucial for achieving a nice sear on the salmon and cooking it evenly.
3. Prepare the Salmon: Place the salmon fillets on a lined baking sheet or a grill pan. Brush the prepared teriyaki sauce generously over the top of each fillet, making sure they’re well-coated. Reserve some sauce for glazing later.
4. Cook the Broccoli: If using the oven, toss the broccoli florets in a little olive oil, salt, and pepper, and spread them out around the salmon on the baking sheet. If grilling, you can cook the broccoli in a separate grill basket or steam them.
5. Bake or Grill: Bake the salmon and broccoli in the preheated oven for about 12-15 minutes, or grill for approximately 6-8 minutes per side, depending on thickness. The salmon should be opaque and flake easily with a fork, while the broccoli should be bright green and tender.
6. Glaze and Serve: In the last few minutes of cooking, baste the salmon with more teriyaki sauce for added flavor. Once done, remove from the oven or grill, and allow the salmon to rest for a minute.
Serve the salmon and broccoli on a platter, garnished with sesame seeds and sliced green onions.
Extra Tips
For an added layer of flavor, consider marinating the salmon in the teriyaki sauce for 30 minutes to an hour before cooking. This will enhance the taste and make sure the salmon absorbs the delicious flavors.
Additionally, feel free to substitute the broccoli with other low-carb vegetables like asparagus or zucchini, allowing you to customize the dish to your preferences. Always keep an eye on the salmon as cooking times may vary depending on thickness, making certain it remains moist and tender.