

Japanese cuisine has always been a favorite of mine for its vibrant and unique flavors. However, finding lighter options that maintain those delicious tastes can sometimes be a challenge. That’s why I’ve put together a collection of 10 zesty low-carb recipes that will satisfy your cravings without overloading on carbs. Picture enjoying spiralized zucchini noodle ramen or savoring savory cauliflower sushi rolls. Ready to explore these delicious dishes?
Zucchini Noodle Ramen

Zucchini Noodle Ramen is a delightful and healthy twist on traditional ramen, perfect for those adhering to a low-carb diet. By replacing the usual wheat noodles with spiralized zucchini, this recipe not only cuts down on carbs but also adds a revitalizing crunch and a burst of color to your bowl. The rich broth combined with fresh vegetables and protein makes this dish both satisfying and nutritious, ensuring you won’t miss the traditional noodles.
This dish isn’t only quick to prepare but also allows for customization based on your preferences. Whether you prefer tofu, chicken, or shrimp as your protein, the zucchini noodles serve as the perfect base for absorbing the rich flavors of the broth. Serve this comforting bowl of Zucchini Noodle Ramen on a chilly evening or whenever you’re craving a hearty meal without the guilt.
Ingredients (Serves 4-6)
- 4 medium zucchinis, spiralized into noodles
- 6 cups chicken or vegetable broth
- 2 tablespoons soy sauce or tamari (for a gluten-free option)
- 1 tablespoon sesame oil
- 1 cup mushrooms, sliced (shiitake or button mushrooms work well)
- 1 cup baby spinach
- 1 cup shredded carrots
- 2 green onions, sliced
- 1 clove garlic, minced
- 1 teaspoon ginger, grated
- 1 cup protein of choice (tofu, chicken, or shrimp)
- Optional toppings: soft-boiled eggs, sesame seeds, seaweed, chili flakes
Cooking Instructions
- Prepare the Zucchini Noodles: Start by spiralizing the zucchinis using a spiralizer. If you don’t have one, you can use a julienne peeler to create thin noodle-like strips. Set the zucchini noodles aside in a colander to drain any excess moisture while you prepare the broth.
- Cook the Protein: In a large pot, heat the sesame oil over medium heat. If you’re using chicken or shrimp, add it to the pot and sauté until fully cooked. For tofu, cube it and sauté until golden brown. Remove the protein from the pot and set it aside for later.
- Sauté the Aromatics: In the same pot, add minced garlic and grated ginger, stirring for about 30 seconds until fragrant. This will build a flavorful base for your broth.
- Make the Broth: Pour in the chicken or vegetable broth and soy sauce into the pot. Bring the mixture to a gentle boil, then reduce the heat to simmer. Allow the broth to cook for about 10 minutes to let the flavors meld together.
- Add the Vegetables: Stir in the sliced mushrooms, shredded carrots, and baby spinach. Let the vegetables cook for an additional 5 minutes until they’re tender but still vibrant.
- Combine with Zucchini Noodles: Add the zucchini noodles into the pot and cook for another 2-3 minutes. The noodles should be tender but not mushy, resembling the texture of traditional ramen.
- Serve: To serve, ladle the soup into bowls, ensuring each bowl contains a good mix of broth, vegetables, and protein. Garnish with sliced green onions and any optional toppings you desire, such as soft-boiled eggs or sesame seeds.
Extra Tips
When cooking Zucchini Noodle Ramen, it’s essential not to overcook the zucchini noodles, as they can become mushy quickly. A quick sauté in the broth is sufficient to heat them through while maintaining their texture.
Additionally, feel free to experiment with different vegetables or add spices to customize the flavor profile to your liking. For a spicier kick, consider adding a dash of sriracha or chili oil. Enjoy this comforting bowl of ramen guilt-free!
Cauliflower Sushi Rolls

Cauliflower Sushi Rolls are a delicious and low-carb alternative to traditional sushi, making them perfect for anyone looking to reduce their carbohydrate intake without sacrificing flavor. By using cauliflower rice instead of sushi rice, you maintain the essence of sushi while keeping the dish light and healthy.
These rolls are versatile and can be filled with a variety of ingredients, allowing you to customize them according to your taste preferences. Making Cauliflower Sushi Rolls isn’t only easy but also a fun activity that the whole family can enjoy.
These sushi rolls are great as an appetizer, snack, or even a light meal. Serve them with soy sauce or a low-carb dipping sauce for an authentic sushi experience at home.
Ingredients (Serves 4-6)
- 1 medium head of cauliflower
- 1/4 cup rice vinegar
- 1 tablespoon sesame oil
- 1 teaspoon salt
- 4 sheets of nori (seaweed)
- 1 medium cucumber, julienned
- 1 medium carrot, julienned
- 1 avocado, sliced
- Optional: cooked shrimp, crab meat, or tofu for additional protein
- Soy sauce or tamari for serving
Cooking Instructions
- Prepare the Cauliflower Rice: Begin by removing the leaves and stem from the cauliflower. Cut it into florets and place them in a food processor. Pulse until the cauliflower resembles rice grains, being careful not to over-process. If you don’t have a food processor, you can grate the cauliflower using a box grater.
- Cook the Cauliflower Rice: In a large skillet, heat a bit of water over medium heat. Add the cauliflower rice and cook for about 5-7 minutes, stirring occasionally until it’s tender. Once cooked, drain any excess moisture using a fine mesh strainer or cheesecloth.
- Add Seasoning: Transfer the cooked cauliflower rice back to the skillet. Stir in the rice vinegar, sesame oil, and salt. Mix well and allow it to cool for a few minutes. This seasoned cauliflower rice will be the base for your sushi rolls.
- Assemble the Sushi Rolls: Lay a sheet of nori on a bamboo sushi mat or a clean cutting board. With wet hands, take a handful of the cauliflower rice and spread it evenly over the nori, leaving about an inch of space at the top. Layer your choice of fillings—cucumber, carrot, avocado, and any protein—across the center of the rice.
- Roll the Sushi: Starting from the bottom, carefully lift the edge of the sushi mat and roll the nori away from you, tucking the fillings in as you roll. Make sure to apply gentle pressure to keep the roll tight. Once you reach the exposed edge, wet it lightly with water to seal the roll.
- Slice and Serve: Using a sharp knife, slice the sushi roll into bite-sized pieces. Wipe the knife with a damp cloth between cuts to guarantee clean slices. Place the rolls on a serving platter and serve with soy sauce or tamari for dipping.
Extra Tips
When making Cauliflower Sushi Rolls, you can experiment with different fillings based on your preferences. Try adding thinly sliced bell peppers, radishes, or cream cheese for a variety of flavors and textures.
Additionally, to make the rolling process easier, keep a small bowl of water nearby to wet your hands and the knife. This will prevent sticking and make the assembly process smoother. Enjoy your culinary adventure while embracing this healthy twist on a classic dish!
Miso Soup With Tofu and Seaweed

Miso Soup with Tofu and Seaweed is a classic Japanese dish that isn’t only comforting but also low in carbohydrates, making it an excellent option for those looking to maintain a healthy diet. This soup is rich in umami flavors, thanks to the fermented miso paste, and provides a delightful combination of textures from the silky tofu and tender seaweed.
It’s a versatile recipe that can easily be adapted to include various ingredients, such as vegetables or proteins, but the simplicity of this version truly highlights the essence of traditional Japanese cuisine.
In addition to being delicious, Miso Soup is quick and easy to prepare, making it a perfect choice for a weeknight dinner or as a starter for a more elaborate meal. With just a few basic ingredients, you can whip up a pot of this nourishing soup in no time.
Serve it hot, and enjoy the warmth and health benefits it brings, making it an ideal dish for any season.
Ingredients (Serving Size: 4-6 people)
- 4 cups dashi broth (or vegetable broth)
- 1/4 cup white miso paste
- 1 block (14 oz) firm tofu, drained and cubed
- 1 cup wakame seaweed (dried)
- 2 green onions, thinly sliced
- 1 cup mushrooms (shiitake or enoki), sliced (optional)
- 1 tablespoon soy sauce (optional)
- 1 teaspoon sesame oil (optional)
Cooking Instructions
- Prepare the Dashi Broth: In a large pot, bring 4 cups of dashi broth to a gentle simmer over medium heat. If you don’t have dashi, vegetable broth is a great alternative that works well with the flavors of miso.
- Rehydrate the Seaweed: While the broth is heating, take the dried wakame seaweed and soak it in a bowl of warm water for about 10 minutes, or until it expands and softens. Once rehydrated, drain the seaweed and set it aside.
- Mix the Miso Paste: In a small bowl, take about a cup of hot broth from the pot and whisk in the white miso paste until it’s smooth and fully dissolved. This step guarantees that the miso is evenly distributed in the soup without clumps.
- Combine Ingredients: Once the broth is simmering, add the cubed tofu and sliced mushrooms (if using) to the pot. Allow these to gently cook for about 3-4 minutes, just until the mushrooms are tender.
- Add Miso Mixture and Seaweed: Reduce the heat to low and slowly stir in the miso mixture. Be careful not to let the soup boil after adding miso, as high heat can kill the beneficial probiotics. Then, add the rehydrated wakame seaweed to the pot.
- Garnish and Serve: Finally, sprinkle the thinly sliced green onions on top for garnish. If desired, drizzle a little soy sauce or sesame oil for extra flavor. Serve the soup hot in bowls and enjoy!
Extra Tips
When making Miso Soup, feel free to experiment with different types of miso paste; for instance, red miso will give a more robust flavor, while yellow miso is milder.
Additionally, you can customize the soup by adding other vegetables like spinach, bok choy, or carrots for extra nutrition. Always taste your soup before serving, and adjust the seasoning as needed.
Remember that the key to a good Miso Soup is to keep it simple and allow the natural flavors of the ingredients to shine through!
Grilled Salmon With Soy-Ginger Glaze

Grilled Salmon with Soy-Ginger Glaze is a delightful dish that perfectly marries the rich, buttery flavor of salmon with a savory, slightly sweet glaze. This low-carb recipe isn’t only simple to prepare but also a healthy option for those looking to maintain a balanced diet.
The combination of soy sauce, fresh ginger, and garlic creates an aromatic mixture that enhances the natural flavors of the fish, making it a favorite for both weeknight dinners and special occasions.
This dish isn’t only packed with protein but is also low in carbohydrates, making it suitable for various dietary preferences. Pair it with steamed vegetables or a fresh salad for a complete meal that’s both satisfying and nutritious.
With just a few ingredients and a quick cooking time, Grilled Salmon with Soy-Ginger Glaze is a fantastic choice for anyone looking to explore low-carb Japanese cuisine.
Ingredients (Serves 4-6):
- 4-6 salmon fillets (about 6 ounces each)
- 1/4 cup soy sauce (reduced-sodium preferred)
- 2 tablespoons honey or sugar substitute (for low-carb option)
- 2 tablespoons rice vinegar
- 1 tablespoon freshly grated ginger
- 2 cloves garlic, minced
- 1 tablespoon sesame oil
- 1 tablespoon olive oil (for grilling)
- 1 tablespoon sesame seeds (for garnish)
- Chopped green onions (for garnish)
Cooking Instructions:
- Prepare the Marinade: In a medium-sized bowl, combine soy sauce, honey (or sugar substitute), rice vinegar, grated ginger, minced garlic, and sesame oil. Whisk the mixture until the honey dissolves completely, and the ingredients are well-blended. This marinade is key to infusing the salmon with flavor.
- Marinate the Salmon: Place the salmon fillets in a shallow dish or a resealable plastic bag. Pour the marinade over the salmon, ensuring that each fillet is well-coated. Cover the dish or seal the bag and refrigerate for at least 30 minutes, allowing the flavors to penetrate the fish. For best results, marinate for up to 2 hours.
- Preheat the Grill: Preheat your grill to medium-high heat. If using a grill pan, lightly grease it with olive oil to prevent sticking. This step is important to achieve a nice sear on the salmon.
- Grill the Salmon: Remove the salmon from the marinade, allowing any excess liquid to drip off. Place the fillets skin-side down on the grill. Cook for about 5-7 minutes, depending on the thickness of the fillets. Don’t flip the salmon too soon; it should easily release from the grill when it’s ready to turn.
- Finish Cooking: After the initial grilling time, carefully flip the fillets and cook for an additional 3-5 minutes, or until the salmon is cooked through and flakes easily with a fork. Remove the salmon from the grill and let it rest for a couple of minutes.
- Garnish and Serve: Transfer the grilled salmon to a serving platter. Drizzle any remaining marinade that hasn’t touched the raw fish over the top for added flavor (optional). Sprinkle with sesame seeds and chopped green onions before serving.
Extra Tips:
To elevate the flavor of your Grilled Salmon with Soy-Ginger Glaze, consider adding a splash of lime juice for a zesty kick or incorporating a little chili paste for heat.
If you don’t have a grill, this recipe can also be adapted for the oven by broiling the salmon instead. Just place the fillets on a lined baking sheet and broil for 6-8 minutes, keeping a close eye to prevent burning.
Enjoy your delicious and healthy meal!
Chicken Yakitori Skewers

Chicken Yakitori Skewers are a delightful and flavorful Japanese dish that showcases tender pieces of chicken grilled to perfection over an open flame. Traditionally served at izakayas (Japanese pubs), these skewers are marinated in a savory-sweet sauce known as tare, which combines soy sauce, mirin, and sugar.
Yakitori can also be customized with various vegetables or different parts of the chicken, such as thighs, breasts, or even liver, making it a versatile dish that caters to various tastes.
This low-carb version of Chicken Yakitori Skewers isn’t only delicious but also easy to make at home. Perfect for a family dinner or a gathering with friends, these skewers are a great way to enjoy a taste of Japan without the carbs.
The grilling process infuses the chicken with a smoky flavor, while the tare sauce adds a rich glaze that keeps the meat juicy and flavorful. Whether served as an appetizer or a main course, these skewers are sure to impress.
Ingredients (serves 4-6):
- 1.5 lbs boneless, skinless chicken thighs (or breasts)
- 1/4 cup soy sauce (or tamari for gluten-free)
- 1/4 cup mirin (or sugar-free alternative)
- 2 tablespoons erythritol or another low-carb sweetener
- 1 tablespoon rice vinegar
- 2 tablespoons sesame oil
- 1 teaspoon grated fresh ginger
- 2 green onions, chopped (for garnish)
- Skewers (bamboo or metal)
Cooking Instructions:
- Preparation of Chicken: Start by cutting the chicken thighs into bite-sized pieces, approximately 1 to 1.5 inches. This allows for even cooking and easy eating once grilled.
- Marinate the Chicken: In a large bowl, whisk together the soy sauce, mirin, erythritol, rice vinegar, sesame oil, and grated ginger to create the marinade. Add the chicken pieces to the bowl and make certain they’re well-coated. Cover and refrigerate for at least 30 minutes, or up to 4 hours for more flavor.
- Soak Skewers: If you’re using bamboo skewers, soak them in water for about 30 minutes before grilling. This prevents the skewers from burning on the grill.
- Preheat Grill: Preheat your grill to medium-high heat. If using a grill pan, heat it over medium-high heat as well. Make sure the grill grates are clean and lightly oiled to prevent sticking.
- Assemble the Skewers: Once marinated, thread the chicken pieces onto the skewers, leaving a small space between each piece for even cooking. If you’d like, you can alternate with vegetables such as bell peppers or zucchini for added flavor and color.
- Grill the Skewers: Place the skewers on the preheated grill. Cook for about 3-4 minutes on each side, or until the chicken is cooked through and has nice grill marks. It’s important not to overcrowd the grill, so you may need to cook in batches.
- Glaze and Serve: Brush the remaining marinade over the chicken during the last minute of grilling for extra flavor. Once cooked, remove from the grill, garnish with chopped green onions, and serve hot.
Extra Tips:
For added flavor, you can experiment with different types of low-carb sweeteners in the marinade.
Additionally, if you prefer a smoky flavor without grilling, you can cook the skewers under the broiler in your oven. Just keep an eye on them to prevent burning, and remember to turn them halfway through cooking.
Serving these skewers with a side of low-carb vegetables or a fresh salad can make for a complete meal. Enjoy your delicious Chicken Yakitori Skewers!
Spicy Tuna Tartare
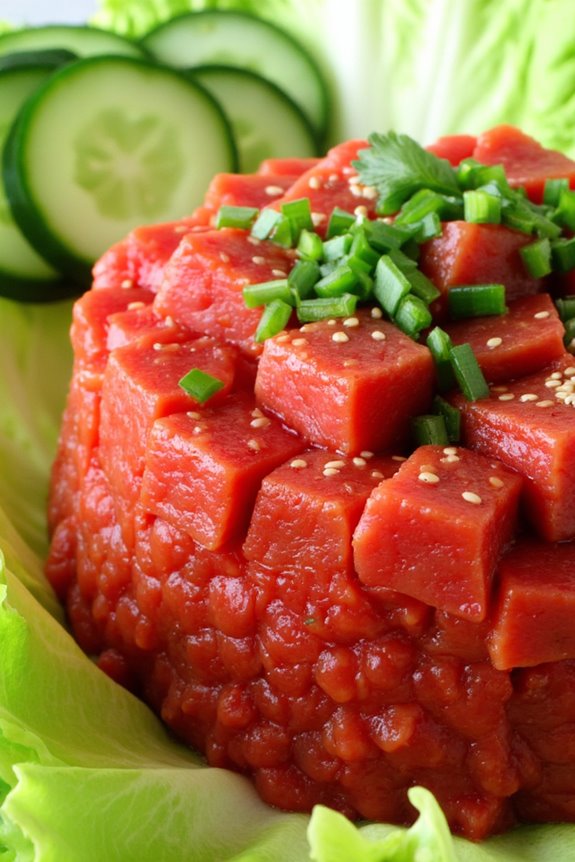
Spicy Tuna Tartare is a delightful and vibrant dish that combines the fresh flavors of sushi-grade tuna with a spicy kick. This Japanese-inspired recipe is perfect for those following a low-carb diet, as it emphasizes fresh ingredients and healthy fats without the need for heavy sauces or fillers. The tartare isn’t only visually appealing but also packed with protein, making it a great appetizer or light meal option for gatherings or quiet nights at home.
The beauty of Spicy Tuna Tartare lies in its simplicity and the quality of its ingredients. By using fresh, high-quality tuna, you guarantee the dish is flavorful while also providing a satisfying texture. The addition of spices and aromatics elevates the dish, making it a standout choice for sushi lovers or anyone looking to enjoy a rejuvenating seafood dish. Serve it with cucumber slices or lettuce wraps for a crunchy contrast that complements the rich flavors of the tuna.
Ingredients (Serves 4-6):
- 1 lb sushi-grade tuna, diced
- 2 tablespoons mayonnaise (preferably Japanese Kewpie)
- 1 tablespoon soy sauce (or tamari for gluten-free)
- 1 tablespoon Sriracha sauce (adjust for spice preference)
- 1 teaspoon sesame oil
- 1 green onion, finely chopped
- 1 tablespoon fresh cilantro, chopped
- 1 teaspoon sesame seeds
- Cucumber slices or lettuce leaves, for serving
Instructions:
- Prepare the Tuna: Start by guaranteeing you have sushi-grade tuna. Dice the tuna into small cubes, about 1/4 inch in size. This will create a pleasant texture for the tartare. Place the diced tuna in a mixing bowl.
- Make the Sauce: In a separate small bowl, combine the mayonnaise, soy sauce, Sriracha sauce, and sesame oil. Mix well until you have a uniform sauce. This mixture will provide the creamy and spicy flavor to the tartare.
- Combine Ingredients: Pour the sauce over the diced tuna in the mixing bowl. Gently fold the tuna into the sauce using a spatula or spoon, being careful not to mash the tuna. The goal is to evenly coat the tuna with the sauce while maintaining the integrity of the fish.
- Add Fresh Herbs: Once the tuna is well-coated, add the chopped green onion and cilantro to the bowl. Fold them into the mixture for added freshness and flavor. Sprinkle sesame seeds on top for a nutty crunch.
- Chill and Serve: Cover the bowl with plastic wrap and let the tartare chill in the refrigerator for about 15-20 minutes. This allows the flavors to meld together. When ready to serve, use a ring mold or simply scoop the tartare onto plates and garnish with additional sesame seeds if desired.
Extra Tips:
When preparing Spicy Tuna Tartare, the quality of the tuna is paramount; always choose sushi-grade fish from a reputable source. Additionally, feel free to adjust the spiciness by altering the amount of Sriracha to suit your taste.
If you want to add a bit of crunch, consider incorporating diced avocado or chopped nuts. Serve the tartare immediately after chilling to maintain the freshness of the ingredients. Enjoy your delightful low-carb dish!
Eggplant Nasu Dengaku

Eggplant Nasu Dengaku is a delightful Japanese dish that showcases the rich umami flavors of miso, perfectly complementing the tender texture of roasted eggplant. This dish isn’t only low in carbs, making it a great option for those watching their carbohydrate intake, but it also bursts with flavor, making it a crowd-pleaser.
Traditionally, the eggplant is halved, grilled or broiled to perfection, and then topped with a sweet and savory miso glaze before being served hot.
This recipe for Eggplant Nasu Dengaku is simple yet satisfying, making it an excellent addition to any meal or a stand-alone dish. It can be enjoyed as a side dish or served alongside rice for a complete meal. With just a few ingredients, you can create a restaurant-quality dish that will impress your family and friends while keeping your meals healthy and low in carbs.
Ingredients (Serves 4-6):
- 2 large Japanese eggplants (or 1 large regular eggplant)
- 4 tablespoons white miso paste
- 2 tablespoons mirin
- 1 tablespoon sake
- 1 tablespoon sugar (or a low-carb sweetener)
- 1 tablespoon sesame oil
- 2 green onions, finely chopped (for garnish)
- Sesame seeds (for garnish)
Cooking Instructions:
- Prepare the Eggplants: Begin by preheating your oven to 400°F (200°C). While the oven is heating, wash and dry the eggplants. Cut them in half lengthwise. To help soften the eggplants and enhance their flavor, lightly score the flesh in a diamond pattern with a knife, being careful not to cut through the skin.
- Roast the Eggplants: Place the halved eggplants cut-side up on a baking sheet. Brush the cut sides with sesame oil to enhance their flavor and prevent sticking. Roast in the preheated oven for about 20-25 minutes, or until the eggplants are soft and slightly caramelized. If you prefer a smokier flavor, you can also use a grill or broiler.
- Make the Miso Glaze: While the eggplants are roasting, prepare the miso glaze. In a small saucepan over low heat, combine the white miso paste, mirin, sake, and sugar (or low-carb sweetener). Stir continuously until the mixture is smooth and the sugar has dissolved. Allow it to simmer gently for about 2-3 minutes, then remove from heat.
- Glaze the Eggplants: Once the eggplants are done roasting, take them out of the oven and carefully spoon the miso glaze over the cut sides of each eggplant half, ensuring they’re well-coated.
- Final Bake: Return the glazed eggplants to the oven and bake for an additional 5-10 minutes, or until the miso glaze is bubbly and lightly browned.
- Garnish and Serve: Remove the eggplants from the oven and let them cool slightly before transferring to a serving platter. Garnish with finely chopped green onions and a sprinkle of sesame seeds for added texture and flavor. Serve warm.
Extra Tips:
For a variation on this dish, consider adding toppings like toasted nori strips for added crunch or a drizzle of soy sauce for extra saltiness.
If you want to make it spicier, you can mix in a bit of chili paste or flakes into the miso glaze. This dish pairs wonderfully with grilled meats or can be served as part of a vegetarian spread. Enjoy experimenting with different flavors while keeping it low-carb!
Shirataki Noodles With Tempura
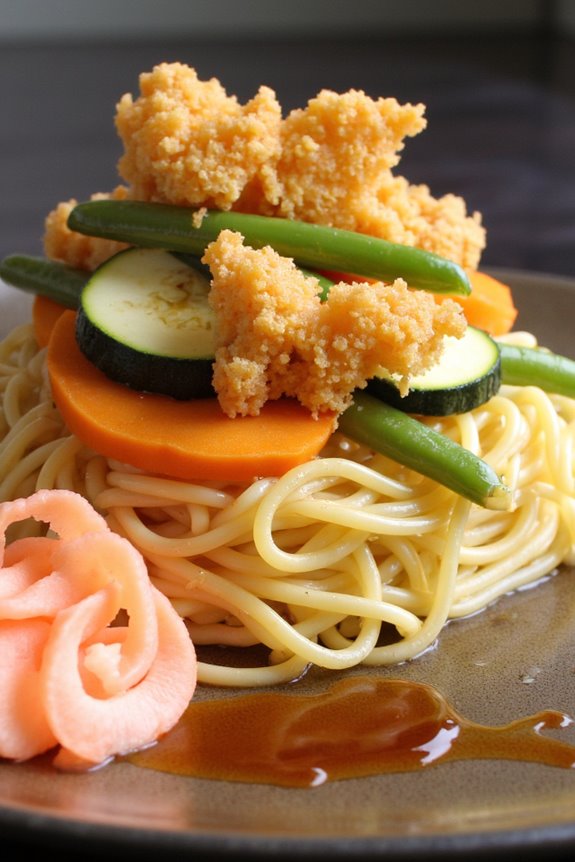
Shirataki noodles are a fantastic low-carb alternative to traditional pasta, making them an excellent choice for those looking to reduce their carbohydrate intake while still enjoying a satisfying meal. These noodles are made from konjac yam, which is high in fiber and low in calories, creating a guilt-free base for a variety of dishes.
In this recipe, we’ll pair shirataki noodles with crispy tempura vegetables, providing a delightful contrast of textures and flavors that will surely please everyone at the table. Tempura is a popular Japanese cooking technique that involves lightly battering and frying vegetables or seafood until they’re golden and crispy.
The key to achieving the perfect tempura is to keep the batter light and cold, guaranteeing that the fried pieces remain crunchy and airy. This dish harmonizes the chewy texture of shirataki noodles with the crunch of tempura, making it a delectable and unique meal option. Let’s get started on creating this delightful low-carb Japanese dish!
Ingredients (Serves 4-6):
- 2 packages (14 oz each) shirataki noodles
- 1 large sweet potato, peeled and sliced into thin rounds
- 1 large zucchini, cut into thin rounds
- 1 cup green beans, trimmed
- 1 cup all-purpose gluten-free flour (or regular flour)
- 1 large egg
- 1 cup cold sparkling water
- Salt, to taste
- Vegetable oil, for frying
- Soy sauce, for serving (optional)
- Pickled ginger, for serving (optional)
Cooking Instructions:
- Prepare the Shirataki Noodles: Begin by draining the shirataki noodles from their packaging and rinsing them thoroughly under cold water. This helps to remove any residual odor. After rinsing, you can either boil them for 2-3 minutes or sauté them in a pan for about 5 minutes to help improve their texture. Set aside.
- Make the Tempura Batter: In a mixing bowl, combine the gluten-free flour and a pinch of salt. In a separate bowl, whisk the egg and then add the cold sparkling water to it. Gradually pour this mixture into the flour while stirring gently, just until combined. The batter should be lumpy and not overmixed to guarantee a light texture.
- Prepare the Vegetables: Slice the sweet potato and zucchini as instructed, and trim the green beans. Make sure the vegetable pieces are uniform in size for even cooking.
- Heat the Oil: In a deep frying pan or wok, heat about 2 inches of vegetable oil over medium-high heat until it reaches around 350°F (175°C). You can test if the oil is ready by dropping a small amount of batter into the oil; it should sizzle and float to the surface.
- Fry the Tempura: Dip each vegetable piece into the tempura batter, allowing any excess to drip off before gently lowering them into the hot oil. Don’t overcrowd the pan; fry in batches if necessary. Fry until golden brown and crispy, about 2-3 minutes per side. Use a slotted spoon to remove them from the oil and drain on a paper towel-lined plate.
- Serve the Dish: To serve, divide the warmed shirataki noodles among serving bowls. Arrange the crispy tempura vegetables on top of the noodles. Drizzle with soy sauce and serve with pickled ginger on the side if desired.
Extra Tips:
For the best results, keep all your ingredients, especially the sparkling water and the bowl used for mixing, as cold as possible. This will help create a crispier tempura batter.
Additionally, experiment with different vegetables such as bell peppers, mushrooms, or broccoli for added variety. If you want to enhance the flavor of your noodles, consider adding a splash of soy sauce or sesame oil before serving. Enjoy your low-carb Japanese meal!
Japanese Cucumber Salad
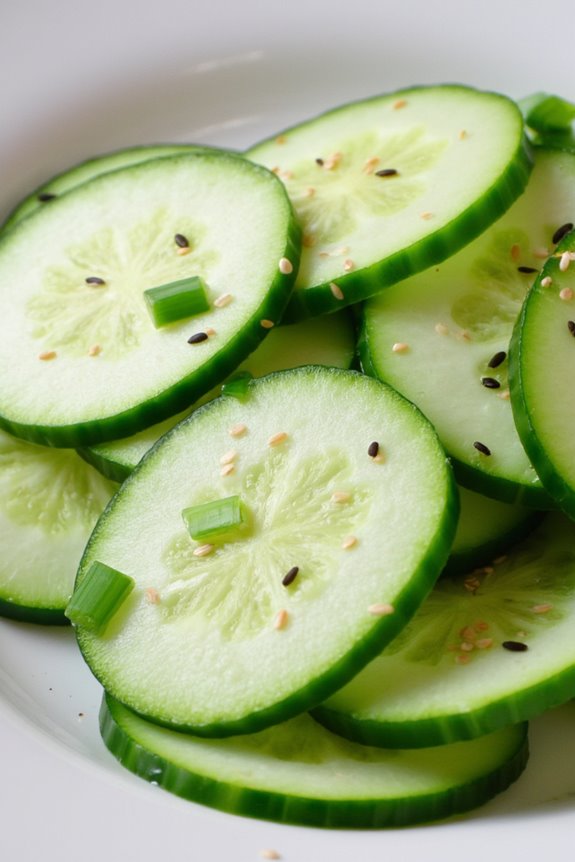
Japanese Cucumber Salad, known as “Kyuri no Sunomono,” is a revitalizing and light dish that embodies the essence of Japanese cuisine. This salad isn’t only low in carbohydrates but also packed with flavor, making it a perfect side dish for any meal. The crisp cucumbers are often paired with a tangy vinegar dressing, adding a delightful balance of taste that complements various main courses.
With its simple ingredients and quick preparation, this salad is an excellent choice for those looking to maintain a low-carb diet without sacrificing flavor. This salad is especially popular during the warmer months due to its revitalizing qualities, but it can be enjoyed year-round. The use of fresh ingredients, such as cucumbers and rice vinegar, provides a burst of flavor while keeping the dish light and healthy.
This recipe serves 4-6 people and is a fantastic way to incorporate more vegetables into your meals while enjoying the unique flavors of Japanese cuisine.
Ingredients:
- 4 medium cucumbers
- 1 teaspoon salt
- 1/4 cup rice vinegar
- 1 tablespoon soy sauce
- 1 tablespoon sesame oil
- 1 tablespoon sugar substitute (like erythritol or stevia)
- 1 teaspoon sesame seeds (optional)
- 1 green onion, finely chopped (optional)
Cooking Instructions:
- Prepare the Cucumbers: Start by washing the cucumbers thoroughly. If desired, you can peel them partially for a decorative look. Slice the cucumbers thinly using a sharp knife or a mandoline. The thinner the slices, the better they’ll absorb the dressing.
- Salt the Cucumbers: Place the sliced cucumbers in a large bowl and sprinkle with salt. Toss the cucumbers gently to make sure they’re evenly coated. Allow them to sit for about 10-15 minutes. This process will draw out excess moisture from the cucumbers, making them crisper and enhancing their flavor.
- Make the Dressing: In a small bowl, whisk together the rice vinegar, soy sauce, sesame oil, and sugar substitute until well combined. Taste the dressing and adjust the sweetness or acidity as desired. This dressing will provide the salad with a tangy and slightly sweet flavor.
- Combine Ingredients: After the cucumbers have rested, drain any excess liquid that has been released. Add the cucumbers to a serving bowl and pour the dressing over them. Toss gently to coat the cucumbers evenly in the dressing.
- Garnish and Serve: If using, sprinkle sesame seeds and chopped green onions over the top of the salad for added flavor and presentation. Serve the salad chilled or at room temperature for the best taste.
Extra Tips: For added texture and flavor, consider incorporating other vegetables such as thinly sliced radishes or carrots. You can also experiment with different types of vinegar, like apple cider vinegar, for a unique twist.
This salad can be made ahead of time and stored in the refrigerator for up to a day, but it’s best enjoyed fresh to maintain the crispness of the cucumbers. Be mindful of the salt, as it can draw out too much moisture if left for too long, so adjust the soaking time based on your preferences.
Sashimi Platter With Wasabi Soy Sauce
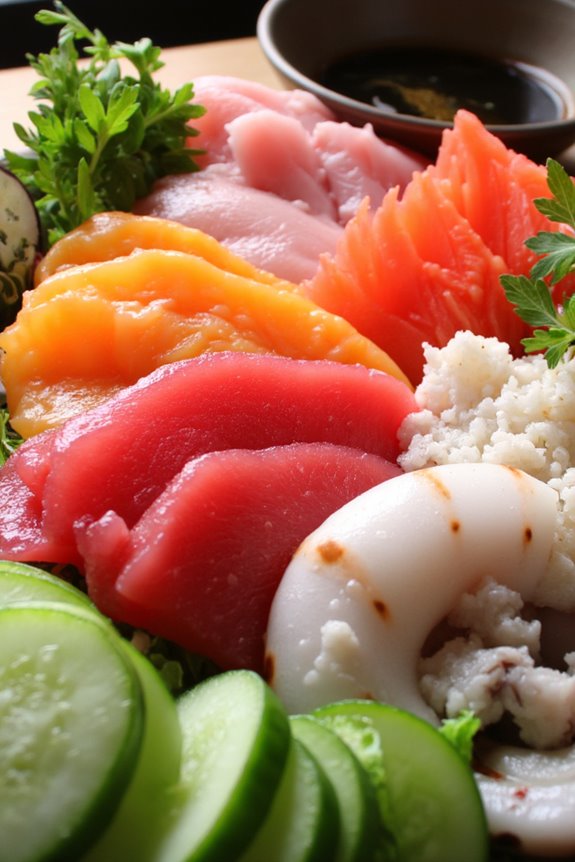
Sashimi is a quintessential Japanese dish that showcases the delicate flavors and textures of fresh fish. Unlike sushi, which is often accompanied by rice, sashimi highlights the pure taste of fish, making it a fantastic low-carb option. This Sashimi Platter with Wasabi Soy Sauce isn’t only visually stunning but also simple to prepare, allowing the natural flavors of the seafood to take center stage. Perfect for gatherings or a special dinner, this dish is sure to impress your guests with its elegance and taste.
When preparing sashimi, the quality of the fish is paramount. It’s vital to source high-grade, sashimi-grade fish from a reputable market to guarantee safety and flavor. This recipe will guide you through assembling a beautiful sashimi platter, complete with a homemade wasabi soy sauce that adds a delightful kick to the dish. Whether you’re a seasoned chef or a beginner, this dish is accessible and will elevate your culinary repertoire.
Ingredients (Serves 4-6)
- 200g sashimi-grade tuna, sliced thinly
- 200g sashimi-grade salmon, sliced thinly
- 200g sashimi-grade yellowtail, sliced thinly
- 200g sashimi-grade octopus, thinly sliced
- 1 unpeeled cucumber, thinly sliced for garnish
- 1 radish, thinly sliced for garnish
- 1 cup soy sauce
- 1 tablespoon wasabi paste (adjust to taste)
- Fresh shiso leaves or cilantro for garnish (optional)
Cooking Instructions
- Prepare the Fish: Start by confirming your fish is completely thawed if previously frozen. Using a sharp knife, slice each type of fish against the grain into thin pieces, approximately 1/4 inch thick. The slices should be uniform to guarantee even presentation and texture.
- Arrange the Platter: On a large serving plate or platter, artistically arrange the sliced fish. You can group each type of fish together or alternate them for a colorful presentation. Use the cucumber and radish slices to create a visually appealing border around the fish.
- Make the Wasabi Soy Sauce: In a small bowl, combine the soy sauce and wasabi paste. Stir until the wasabi is fully dissolved into the soy sauce. Taste the mixture and adjust the amount of wasabi according to your spice preference.
- Garnish: If using, place fresh shiso leaves or cilantro on top of the sashimi or around the platter for added color and flavor. This not only enhances the look of your dish but also adds a revitalizing herbal note.
- Serve: Serve the sashimi platter immediately with the wasabi soy sauce on the side for dipping. This will allow your guests to enjoy the fresh flavors of the fish while controlling the amount of sauce they use.
Extra Tips
When preparing sashimi, it’s important to maintain the freshness of the fish, so serve it immediately after plating. If you need to prepare it in advance, keep the fish covered in the refrigerator until just before serving.
Also, confirm your knife is well-sharpened to achieve clean cuts, which will enhance the overall presentation and texture of the sashimi. Finally, don’t hesitate to experiment with different types of fish or add other garnishes like pickled ginger or sesame seeds to create your own signature platter.