

When weeknight dinners roll around, I know the struggle of wanting something delicious without the hassle of a big cleanup. That’s why these 13 easy Korean sheet pan recipes are a game changer. Think marinated chicken with colorful veggies or spicy gochujang shrimp, all cooked together on a single pan. These recipes bring bold Korean flavors to your table with minimal effort. If you’re looking to simplify dinner while savoring a taste of Korea, these ideas are just what you need.
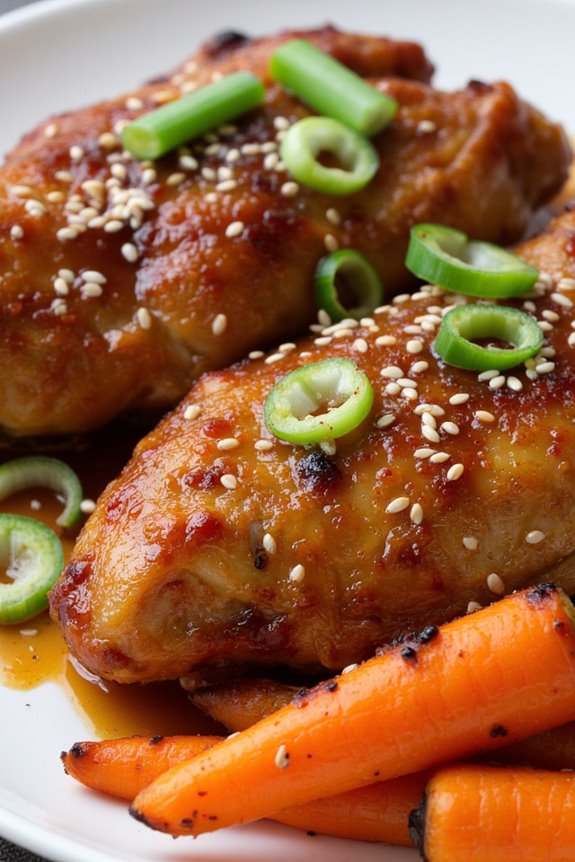
Korean BBQ Chicken and Veggies
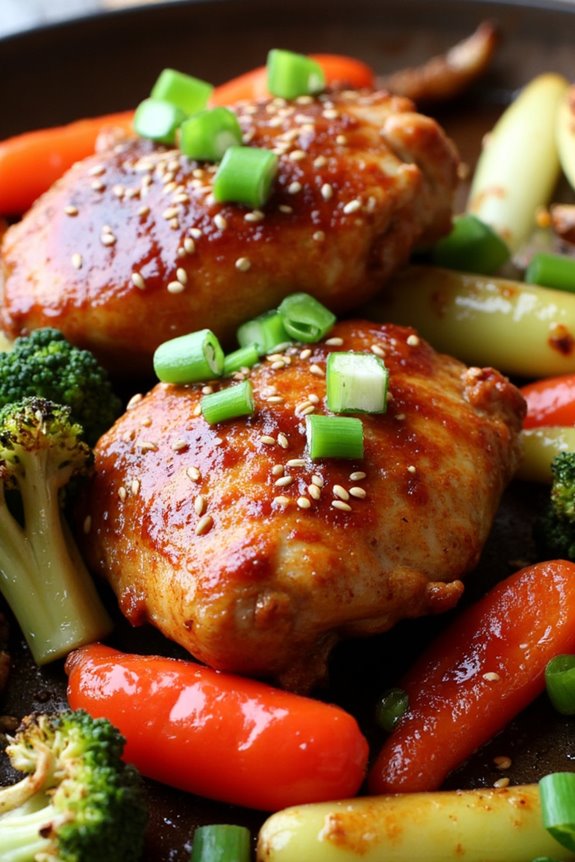
Korean BBQ Chicken and Veggies is a vibrant and flavorful dish that brings the essence of Korean cuisine right to your kitchen. This sheet pan recipe allows you to marinate juicy chicken pieces in a savory and slightly sweet marinade, which is a hallmark of Korean BBQ flavors.
By roasting the chicken alongside an array of colorful vegetables, you not only create a hearty meal but also a visually appealing one that’s perfect for family dinners or entertaining guests.
This one-pan meal is incredibly convenient, as it minimizes cleanup and cooks everything at the same time. The chicken becomes tender and infused with the rich flavors of soy sauce, garlic, ginger, and sesame oil, while the vegetables caramelize beautifully in the oven.
Serve this dish with steamed rice or warm tortillas for a complete and satisfying meal that transports you straight to the bustling streets of Seoul.
Ingredients (Serves 4-6)
- 2 lbs chicken thighs, boneless and skinless
- 1/4 cup soy sauce
- 2 tablespoons brown sugar
- 2 tablespoons sesame oil
- 4 cloves garlic, minced
- 1 tablespoon ginger, grated
- 1 teaspoon red pepper flakes (optional)
- 1 tablespoon rice vinegar
- 1 tablespoon sesame seeds
- 2 cups broccoli florets
- 1 red bell pepper, sliced
- 1 cup carrots, sliced
- 1 cup snap peas
- 3 green onions, chopped for garnish
Cooking Instructions
- Prepare the Marinade: In a large bowl, combine soy sauce, brown sugar, sesame oil, minced garlic, grated ginger, red pepper flakes (if using), and rice vinegar. Whisk until the sugar is dissolved and the mixture is well blended. This marinade will infuse the chicken with incredible flavor.
- Marinate the Chicken: Add the chicken thighs to the bowl, ensuring they’re well coated with the marinade. Cover the bowl with plastic wrap or transfer the chicken to a resealable plastic bag. Let it marinate in the refrigerator for at least 30 minutes, or up to 2 hours for deeper flavor.
- Preheat the Oven: Preheat your oven to 425°F (220°C). A hot oven will help the chicken cook quickly and the vegetables get that nice roasted texture.
- Prepare the Vegetables: While the chicken is marinating, wash and chop the broccoli, bell pepper, carrots, and snap peas. In a large bowl, toss the vegetables with a drizzle of olive oil, salt, and pepper to taste.
- Arrange on the Sheet Pan: Remove the chicken from the marinade and place it on a large baking sheet. Arrange the marinated chicken pieces in the center, leaving enough space for the vegetables. Spread the prepared vegetables around the chicken in a single layer.
- Bake the Dish: Place the sheet pan in the preheated oven and bake for 25-30 minutes, or until the chicken is cooked through (internal temperature should reach 165°F) and the vegetables are tender with crispy edges. If desired, you can broil the dish for an additional 2-3 minutes for extra caramelization.
- Garnish and Serve: Once cooked, remove the sheet pan from the oven. Sprinkle sesame seeds on top and garnish with chopped green onions. Serve the Korean BBQ chicken and veggies warm, accompanied by rice or tortillas.
Extra Tips
For an even more authentic flavor, consider adding a splash of Korean gochujang (spicy red pepper paste) to the marinade for a spicy kick.
Additionally, you can mix and match the vegetables based on what you have on hand or what’s in season. Bell peppers, zucchini, or mushrooms also work great in this dish.
Feel free to adjust the marinating time as well; longer marination can enhance the flavor, but even a quick 30-minute soak will yield delicious results. Enjoy your culinary adventure!
Spicy Gochujang Shrimp With Broccoli
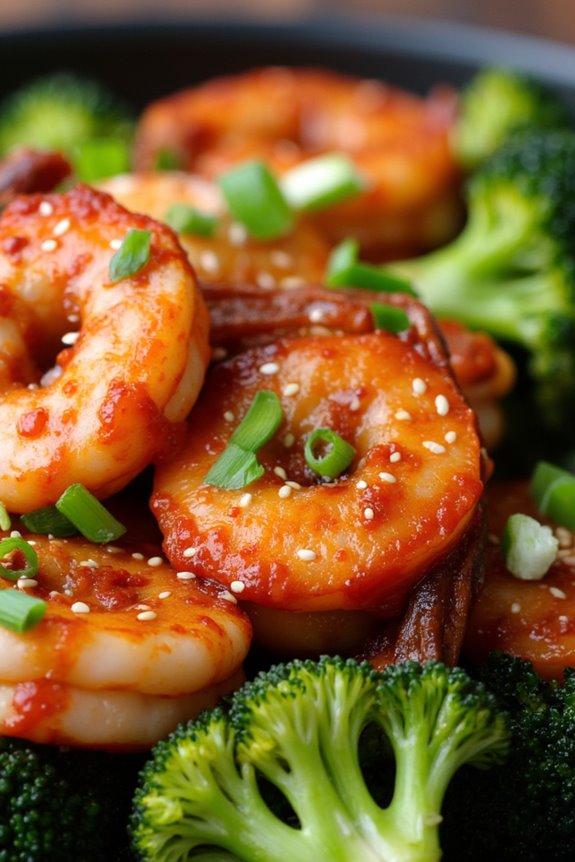
Spicy Gochujang Shrimp With Broccoli is a vibrant and flavorful dish that perfectly combines the rich heat of gochujang with succulent shrimp and crisp-tender broccoli. This one-pan meal isn’t only easy to prepare but also delivers a delightful mix of textures and flavors that will keep you coming back for more.
The use of sheet pans makes clean-up a breeze, allowing you to enjoy your meal without the hassle of multiple pots and pans. This recipe is perfect for gatherings, family dinners, or a cozy weeknight meal.
By roasting the shrimp and broccoli together, you maximize the flavor and guarantee everything is cooked to perfection. The spicy gochujang sauce adds a delicious kick that can be adjusted to your taste, making it a versatile dish for spice lovers and those who prefer a milder flavor.
Ingredients (Serves 4-6)
- 1 pound large shrimp, peeled and deveined
- 1 pound broccoli florets
- 3 tablespoons gochujang (Korean chili paste)
- 2 tablespoons soy sauce
- 1 tablespoon honey
- 2 tablespoons sesame oil
- 4 cloves garlic, minced
- 1 teaspoon ginger, grated
- 2 tablespoons sesame seeds
- 2 green onions, chopped (for garnish)
- Salt and pepper to taste
- Cooked rice or noodles (for serving)
Cooking Instructions
- Preheat the Oven: Begin by preheating your oven to 400°F (200°C). This high temperature will allow the shrimp and broccoli to roast quickly, developing a nice char and enhancing their flavors.
- Prepare the Sauce: In a medium bowl, whisk together the gochujang, soy sauce, honey, sesame oil, minced garlic, and grated ginger until well combined. This spicy sauce will coat the shrimp and broccoli, infusing them with flavor.
- Toss the Shrimp and Broccoli: In a large mixing bowl, combine the peeled shrimp and broccoli florets. Pour the prepared gochujang sauce over the shrimp and broccoli, and toss everything together until well coated. Make sure each piece is evenly covered for maximum flavor.
- Spread on a Sheet Pan: Line a large baking sheet with parchment paper or lightly grease it. Spread the shrimp and broccoli mixture evenly across the sheet pan, guaranteeing that they’re in a single layer to promote even cooking.
- Roast in the Oven: Place the sheet pan in the preheated oven and roast for 12-15 minutes, or until the shrimp are pink and opaque, and the broccoli is tender but still crisp. Keep an eye on them to prevent overcooking.
- Garnish and Serve: Once cooked, remove the sheet pan from the oven. Sprinkle sesame seeds and chopped green onions over the top for added flavor and presentation. Serve the spicy gochujang shrimp and broccoli over cooked rice or noodles for a complete meal.
Extra Tips
For an extra layer of flavor, consider marinating the shrimp in the gochujang sauce for 15-30 minutes before roasting. This allows the shrimp to absorb more of the sauce’s spicy essence.
Additionally, feel free to add other vegetables to the mix, such as bell peppers or snap peas, for a colorful and nutritious twist. Adjust the amount of gochujang to suit your spice preference, and enjoy this delightful Korean-inspired dish!
Beef Bulgogi Sheet Pan Bake
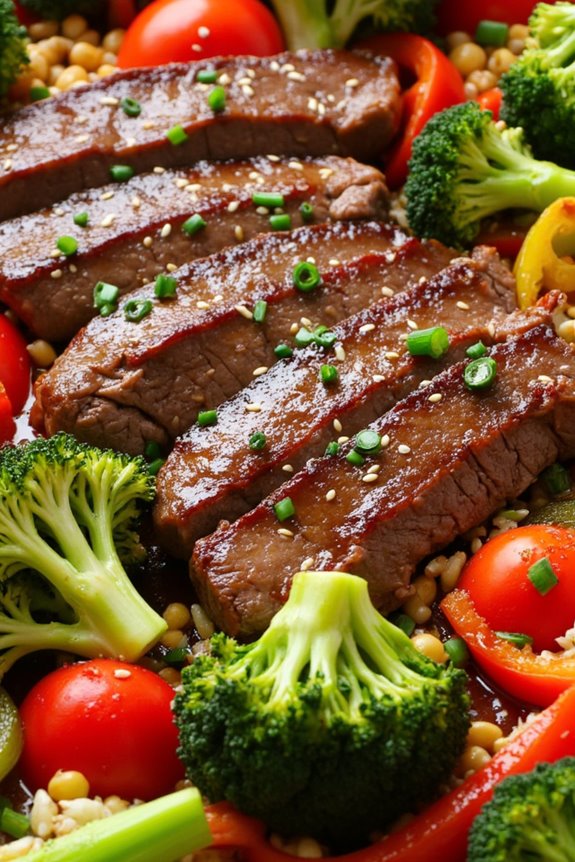
Beef Bulgogi is a beloved Korean dish known for its marinated, tender beef and a medley of vibrant vegetables. This sheet pan bake version offers a convenient and efficient way to enjoy this classic flavor profile without the fuss of grilling or stir-frying. The combination of marinated beef, colorful veggies, and a savory sauce all baked together creates a delicious one-pan meal that’s easy to assemble and perfect for busy weeknights or gatherings.
In this recipe, the beef is marinated in a sweet and savory sauce that highlights ingredients like soy sauce, sesame oil, and garlic. Pairing it with a variety of vegetables not only adds texture and flavor but also guarantees that you’re getting a nutritious meal. The sheet pan method allows everything to cook evenly, making cleanup a breeze as well.
Ingredients (Serves 4-6):
- 1.5 pounds flank steak, thinly sliced
- 1/4 cup soy sauce
- 2 tablespoons brown sugar
- 2 tablespoons sesame oil
- 4 cloves garlic, minced
- 1-inch piece ginger, grated
- 1 tablespoon rice vinegar
- 1 teaspoon black pepper
- 1 red bell pepper, sliced
- 1 green bell pepper, sliced
- 1 medium onion, sliced
- 2 cups broccoli florets
- 1 tablespoon sesame seeds
- Cooked rice, for serving
- Green onions, for garnish (optional)
Cooking Instructions:
- Marinate the Beef: In a mixing bowl, combine the soy sauce, brown sugar, sesame oil, minced garlic, grated ginger, rice vinegar, and black pepper. Add the sliced flank steak to the marinade, making sure all pieces are well-coated. Cover and let it marinate for at least 30 minutes or up to overnight in the refrigerator for deeper flavors.
- Preheat the Oven: Preheat your oven to 400°F (200°C). This temperature will help to roast the vegetables and beef, creating a delicious caramelization.
- Prepare the Vegetables: While the oven is preheating, prepare your vegetables. Slice the bell peppers and onion, and wash the broccoli florets. Spread all the vegetables evenly on a large sheet pan.
- Combine Ingredients on the Sheet Pan: Once the beef is marinated, remove it from the refrigerator and distribute it evenly over the vegetables on the sheet pan. Make sure to spread the beef out so it cooks thoroughly and gets a nice sear.
- Bake the Dish: Place the sheet pan in the preheated oven and bake for 20-25 minutes, or until the beef is cooked through and the vegetables are tender. Stir halfway through to guarantee even cooking.
- Garnish and Serve: Once cooked, remove the sheet pan from the oven. Sprinkle sesame seeds over the top and garnish with chopped green onions, if desired. Serve the beef bulgogi bake over a bed of cooked rice for a complete meal.
Extra Tips:
For a bit of extra flavor and texture, consider adding sliced mushrooms or snap peas to the vegetable mix. You can also adjust the marinade ingredients to suit your taste—add more sugar for sweetness or a splash of gochujang (Korean chili paste) for some heat.
If you prefer a smoky flavor, broil the dish for an additional 2-3 minutes at the end of cooking. Finally, this dish reheats well, making it great for leftovers!
Teriyaki Salmon With Asparagus
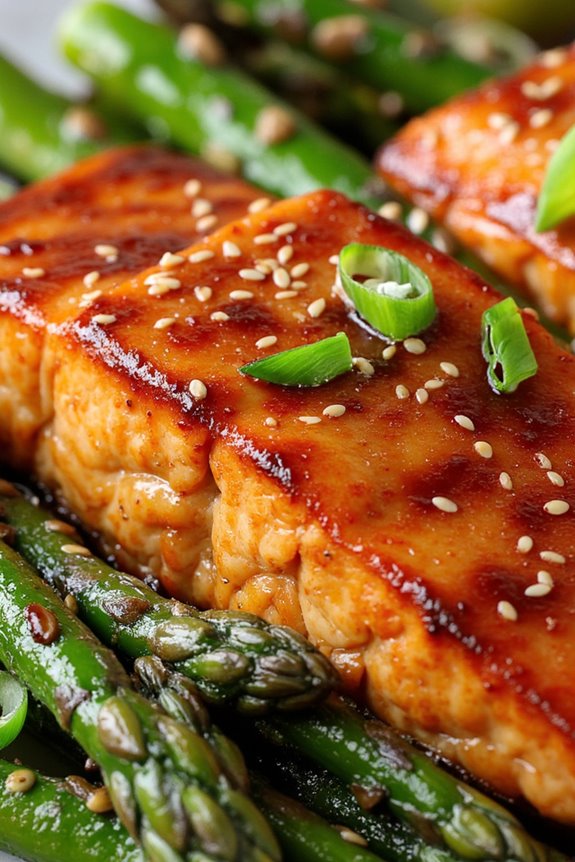
Teriyaki Salmon with Asparagus is a delicious and healthy dish that perfectly combines the rich flavors of teriyaki sauce with the freshness of asparagus. This one-pan meal isn’t only easy to prepare but also makes for a stunning presentation, making it an excellent choice for weeknight dinners or special occasions.
The salmon fillets are tender and flaky, while the asparagus adds a delightful crunch, creating a harmonious balance of textures and flavors.
In this recipe, the salmon is marinated in a homemade teriyaki sauce that infuses each bite with a sweet and savory profile. The asparagus cooks alongside the salmon, soaking up the flavors from the sauce while maintaining its vibrant green color.
With minimal cleanup required, this sheet pan meal is both convenient and satisfying, perfect for busy cooks looking to whip up something delicious without spending hours in the kitchen.
Ingredients (Serves 4-6)
- 4-6 salmon fillets (about 6 oz each)
- 1 lb asparagus, trimmed
- 1/3 cup soy sauce
- 1/4 cup honey
- 2 tablespoons rice vinegar
- 2 tablespoons sesame oil
- 2 cloves garlic, minced
- 1 teaspoon ginger, grated
- 1 tablespoon cornstarch
- 1 tablespoon water
- Sesame seeds (for garnish)
- Green onions, sliced (for garnish)
Cooking Instructions
- Preheat the Oven: Begin by preheating your oven to 400°F (200°C). This guarantees that when you place the sheet pan in the oven, it cooks evenly and efficiently.
- Prepare the Marinade: In a small bowl, whisk together the soy sauce, honey, rice vinegar, sesame oil, minced garlic, and grated ginger. This mixture will serve as your teriyaki marinade that imparts flavor to the salmon.
- Marinate the Salmon: Place the salmon fillets in a shallow dish or a resealable plastic bag and pour half of the teriyaki marinade over them. Let it marinate for at least 15-30 minutes to allow the flavors to penetrate the fish.
- Prepare the Asparagus: While the salmon is marinating, wash and trim the asparagus. Place the asparagus on a large sheet pan and drizzle with olive oil, salt, and pepper. Toss them to verify they’re evenly coated.
- Combine Ingredients on the Sheet Pan: After marinating, remove the salmon from the marinade and place the fillets on the sheet pan with the asparagus. Pour the remaining marinade over the salmon and asparagus.
- Bake in the Oven: Place the sheet pan in the preheated oven and bake for about 15-20 minutes, or until the salmon is cooked through and flakes easily with a fork, and the asparagus is tender but still crisp.
- Thicken the Sauce (Optional): If you prefer a thicker sauce, mix the cornstarch and water in a small bowl, then add it to the remaining marinade in a saucepan. Heat over medium heat until it thickens, stirring constantly. Drizzle this over the salmon and asparagus before serving.
- Garnish and Serve: Once cooked, remove the sheet pan from the oven. Sprinkle sesame seeds and sliced green onions over the salmon and asparagus for a burst of flavor and color. Serve immediately.
Extra Tips
For an extra layer of flavor, consider adding sliced bell peppers or snap peas to the sheet pan alongside the asparagus. This not only enhances the dish visually but also introduces more textures and nutrients.
You can also adjust the sweetness of the teriyaki sauce by varying the amount of honey to suit your taste. If you have leftovers, they can be stored in an airtight container in the refrigerator for up to 2 days, making for a quick and easy lunch option!
Kimchi Fried Rice Bake

Kimchi Fried Rice Bake is a delightful fusion dish that brings the comforting flavors of Korean cuisine right to your table. This recipe transforms traditional kimchi fried rice into a hearty sheet pan meal, making it perfect for feeding a crowd or meal prepping for the week. The combination of spicy, tangy kimchi, savory vegetables, and fluffy rice topped with cheese creates a satisfying and delicious experience that will leave your taste buds dancing.
With just a few simple steps, you can create a dish that’s both flavorful and visually appealing. This dish isn’t only quick to prepare but also allows for customization based on your preference. You can add proteins like chicken, tofu, or shrimp, or even switch up the vegetables according to what you have on hand.
The baking method guarantees that every bite is infused with the vibrant flavors of kimchi, while the cheese adds a creamy finish that ties everything together. Gather your ingredients and get ready to impress your family and friends with this easy, yet scrumptious, Kimchi Fried Rice Bake.
Ingredients (Serves 4-6)
- 2 cups cooked rice (preferably day-old)
- 1 cup kimchi, chopped
- 1 cup mixed vegetables (carrots, peas, corn)
- 1 cup green onions, chopped
- 3 large eggs
- 1 cup shredded cheese (mozzarella or cheddar)
- 2 tablespoons soy sauce
- 1 tablespoon sesame oil
- 1 tablespoon gochujang (Korean chili paste)
- Salt and pepper to taste
- Sesame seeds for garnish (optional)
Instructions
- Preheat the Oven: Begin by preheating your oven to 375°F (190°C). This guarantees that your dish cooks evenly and achieves a nice, golden-brown finish when baked.
- Prepare the Rice Mixture: In a large mixing bowl, combine the cooked rice, chopped kimchi, mixed vegetables, and green onions. Make sure to mix them thoroughly to evenly distribute the ingredients.
- Add the Wet Ingredients: In a separate bowl, whisk together the eggs, soy sauce, sesame oil, gochujang, and a pinch of salt and pepper. Once combined, pour the egg mixture over the rice and vegetable mixture, and stir until everything is well incorporated.
- Transfer to Sheet Pan: Lightly grease a sheet pan or baking dish. Spread the rice mixture evenly across the pan, pressing it down gently to form an even layer. This will help it bake uniformly.
- Top with Cheese: Sprinkle the shredded cheese evenly over the rice mixture, covering it completely. This will create a deliciously cheesy crust as it bakes.
- Bake: Place the sheet pan in the preheated oven and bake for about 25-30 minutes, or until the cheese is bubbling and golden brown on top.
- Garnish and Serve: Once baked, remove the pan from the oven. Let it cool for a few minutes, then sprinkle with sesame seeds if desired. Cut into squares and serve warm.
Extra Tips
For the best flavor and texture, use leftover rice that has been refrigerated overnight, as it will be less sticky and will hold up better during baking. If you want to enhance the dish further, consider topping it with a fried egg or additional kimchi when serving.
Feel free to experiment with different vegetables and proteins to suit your taste. Enjoy your delicious Kimchi Fried Rice Bake!
Honey Soy Chicken Thighs With Carrots
Honey Soy Chicken Thighs with Carrots is a delightful sheet pan recipe that combines savory and sweet flavors, making it a fantastic option for a family dinner. This dish features tender, juicy chicken thighs glazed in a honey-soy marinade, perfectly complemented by vibrant, roasted carrots.
It’s not only delicious but also incredibly easy to prepare, allowing you to spend more time enjoying your meal and less time in the kitchen. This one-pan meal is perfect for serving 4-6 people, making it a great choice for gatherings or weeknight dinners.
The chicken thighs get a delicious caramelization from the honey while the carrots add a touch of earthiness, making it a well-rounded dish that everyone will love. With just a few simple ingredients and minimal cleanup, this recipe is sure to become a staple in your home cooking repertoire.
Ingredients
- 6 chicken thighs, bone-in and skin-on
- 4 medium carrots, peeled and sliced into 1-inch pieces
- 1/4 cup honey
- 1/4 cup soy sauce
- 2 tablespoons rice vinegar
- 1 tablespoon sesame oil
- 4 cloves garlic, minced
- 1-inch piece of ginger, minced
- Salt and pepper, to taste
- 1 tablespoon sesame seeds, for garnish
- 2 green onions, sliced, for garnish
Cooking Instructions
1. Preheat the Oven: Begin by preheating your oven to 400°F (200°C). This guarantees that the chicken will roast evenly and develop a beautiful, caramelized exterior.
2. Prepare the Marinade: In a mixing bowl, whisk together the honey, soy sauce, rice vinegar, sesame oil, minced garlic, and minced ginger. This marinade will infuse the chicken with flavor and help create a delicious glaze.
3. Marinate the Chicken: Place the chicken thighs in a large resealable bag or a shallow dish. Pour half of the marinade over the chicken, making sure each piece is coated well. Reserve the other half of the marinade for later.
Let the chicken marinate for at least 30 minutes, or up to 2 hours in the refrigerator for deeper flavor.
4. Prepare the Carrots: While the chicken is marinating, prepare the carrots. Toss the sliced carrots with a drizzle of olive oil, salt, and pepper in a large bowl. This will help them roast nicely alongside the chicken.
5. Arrange on Sheet Pan: Line a large baking sheet with parchment paper for easy cleanup. Place the marinated chicken thighs on one side of the sheet pan and arrange the carrots on the other side, spreading them out in a single layer.
6. Bake the Dish: Pour the reserved marinade over the chicken and carrots. Bake in the preheated oven for 35-40 minutes, or until the chicken is fully cooked (internal temperature of 165°F) and the carrots are tender.
For an extra crispy skin, broil for an additional 2-3 minutes at the end.
7. Garnish and Serve: Once cooked, remove the sheet pan from the oven. Sprinkle sesame seeds and sliced green onions over the chicken and carrots for a fresh touch. Serve immediately, spooning any remaining glaze over the dish for added flavor.
Extra Tips
For an extra burst of flavor, consider adding a squeeze of fresh lime or lemon juice just before serving. You can also substitute other vegetables like bell peppers or broccoli for the carrots if you prefer.
If you like a bit of heat, add some red pepper flakes to the marinade for a spicy kick. Make sure to let the chicken rest for a few minutes after baking, as this will help keep it juicy when you cut into it. Enjoy your delicious Honey Soy Chicken Thighs with Carrots!
Korean Pork Belly With Brussels Sprouts
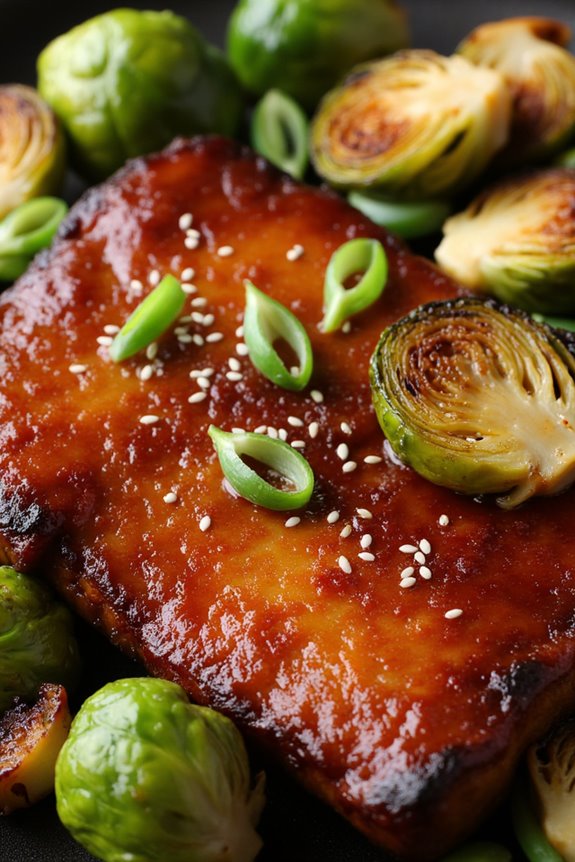
Korean Pork Belly with Brussels Sprouts is a delightful and savory dish that combines the rich flavors of marinated pork belly with the earthiness of Brussels sprouts. This sheet pan recipe not only simplifies the cooking process, but it also allows the flavors to meld beautifully as everything roasts together, resulting in a dish that’s both satisfying and easy to prepare.
The caramelized edges of the pork belly paired with the crispy Brussels sprouts make for a perfect combination that will leave your taste buds dancing. This dish is ideal for family dinners or gatherings, as it serves 4-6 people.
The marinade, inspired by traditional Korean flavors, includes ingredients like soy sauce, sesame oil, and gochugaru, giving the pork belly a delightful umami taste that complements the roasted vegetables perfectly. Pair it with steamed rice or a simple salad for a complete meal that everyone will love.
Ingredients (Serves 4-6):
- 1.5 lbs pork belly, sliced into 1-inch pieces
- 1 lb Brussels sprouts, halved
- 3 tablespoons soy sauce
- 2 tablespoons sesame oil
- 1 tablespoon gochugaru (Korean red chili flakes)
- 2 tablespoons honey
- 4 cloves garlic, minced
- 1 teaspoon ginger, minced
- Salt and pepper to taste
- 2 green onions, chopped (for garnish)
- Sesame seeds (for garnish)
Cooking Instructions:
- Prepare the Marinade: In a mixing bowl, combine the soy sauce, sesame oil, gochugaru, honey, minced garlic, and minced ginger. Whisk together until well blended. This marinade will infuse the pork belly with a rich flavor and create a beautiful glaze when cooked.
- Marinate the Pork Belly: Place the sliced pork belly into the bowl with the marinade. Make sure each piece is well-coated. Cover the bowl with plastic wrap and let it marinate in the refrigerator for at least 30 minutes, or up to 2 hours for more intense flavor.
- Preheat the Oven: Preheat your oven to 425°F (220°C). A hot oven is essential for achieving that crispy texture on the pork belly while guaranteeing the Brussels sprouts are perfectly roasted.
- Prepare the Sheet Pan: Line a large sheet pan with parchment paper or aluminum foil for easy cleanup. Spread the halved Brussels sprouts evenly on one side of the pan. Drizzle them with a little oil and sprinkle with salt and pepper, then toss to coat.
- Add the Pork Belly: After marinating, remove the pork belly from the refrigerator. Arrange the marinated pork belly pieces on the other side of the sheet pan, making sure there’s enough space between each piece for even cooking.
- Roast in the Oven: Place the sheet pan in the preheated oven and roast for 25-30 minutes, or until the pork belly is caramelized and cooked through, and the Brussels sprouts are tender and crispy. Make sure to flip the pork belly halfway through for even cooking.
- Garnish and Serve: Once cooked, remove the sheet pan from the oven. Let it rest for a few minutes, then garnish with chopped green onions and a sprinkle of sesame seeds. Serve hot, ideally with steamed rice or your choice of side.
Extra Tips:
For the best results, ascertain that the pork belly is well-marbled for added flavor and tenderness. If you prefer a bit of heat, you can adjust the amount of gochugaru in the marinade.
Additionally, for added texture, consider broiling the dish for the last few minutes of cooking to achieve an extra crispy finish on the pork belly. Don’t forget to keep an eye on the Brussels sprouts to prevent them from burning while broiling! Enjoy your delicious Korean Pork Belly with Brussels Sprouts!
Sesame Tofu and Mixed Vegetables
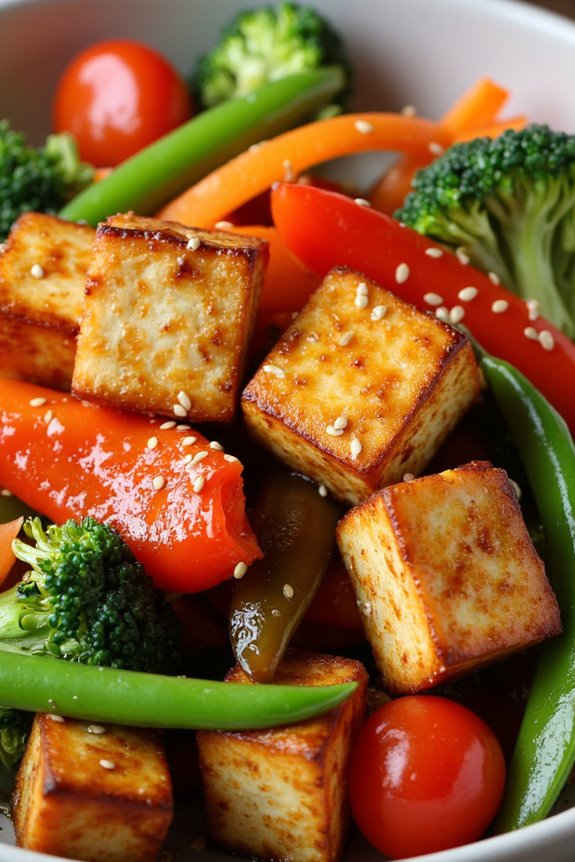
Sesame Tofu and Mixed Vegetables is a vibrant and nutritious dish that showcases the best of Korean flavors in a convenient sheet pan format. This recipe is perfect for busy weeknights or meal prep, allowing you to enjoy a delightful combination of crispy tofu and colorful vegetables all in one go. The sesame oil and soy sauce bring depth to the dish, while the assorted veggies add texture and freshness. This simple yet satisfying meal is bound to please both vegetarians and meat-lovers alike.
In addition to being delicious, this recipe is also highly adaptable. You can easily substitute vegetables based on what you have on hand or what’s in season. Whether it’s bell peppers, broccoli, or snap peas, feel free to mix and match to create your ideal medley. Plus, this dish isn’t only visually appealing but also packed with nutrients, making it a guilt-free indulgence for the whole family.
Ingredients (Serves 4-6):
- 14 oz firm tofu, pressed and cubed
- 3 tablespoons sesame oil
- 2 tablespoons soy sauce
- 1 tablespoon maple syrup or honey
- 1 teaspoon garlic powder
- 1 teaspoon ginger powder
- 1 red bell pepper, sliced
- 1 cup broccoli florets
- 1 cup snap peas
- 1 carrot, thinly sliced
- 1 tablespoon sesame seeds
- Salt and pepper to taste
- Optional: sliced green onions for garnish
Cooking Instructions:
- Preheat the Oven: Begin by preheating your oven to 400°F (200°C). This high temperature will help achieve that perfect crispiness on the tofu and veggies.
- Prepare the Tofu: Press the tofu to remove excess moisture, then cut it into bite-sized cubes. In a mixing bowl, combine the sesame oil, soy sauce, maple syrup (or honey), garlic powder, and ginger powder. Gently toss the tofu cubes in this mixture, making sure they’re evenly coated.
- Prepare the Vegetables: Wash and chop the vegetables into uniform sizes to promote even cooking. Add the sliced bell pepper, broccoli florets, snap peas, and carrot to the bowl with the tofu. Mix everything together, adding salt and pepper to taste.
- Arrange on Sheet Pan: Line a large sheet pan with parchment paper for easy cleanup. Spread the tofu and vegetable mixture evenly across the pan, making sure not to overcrowd the pan, which can cause steaming instead of roasting.
- Roast in the Oven: Place the sheet pan in the preheated oven and roast for 25-30 minutes, stirring halfway through. This will allow the tofu to crisp up and the vegetables to caramelize beautifully.
- Garnish and Serve: Once cooked, remove the sheet pan from the oven and sprinkle sesame seeds on top. If desired, garnish with sliced green onions for added flavor and color. Serve hot and enjoy your delicious Sesame Tofu and Mixed Vegetables!
Extra Tips:
When making this dish, it’s important to verify that the tofu is well-pressed to avoid sogginess. If you’re looking for extra crunch, consider broiling the dish for the last 2-3 minutes of cooking.
Additionally, feel free to experiment with different vegetables or even add a hot sauce drizzle for a kick of spice. Leftovers can be stored in an airtight container in the refrigerator and reheated easily, making this a great meal prep option for the week ahead.
Korean-style Meatballs and Sweet Potatoes
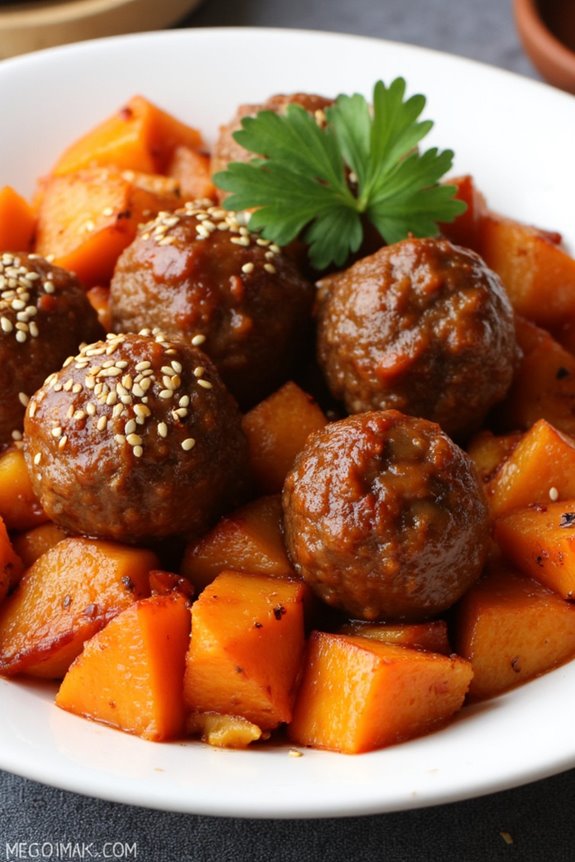
Korean-style Meatballs and Sweet Potatoes is a delightful dish that brings together the savory flavors of traditional Korean cuisine with the hearty texture of roasted sweet potatoes. This recipe is perfect for a family dinner or a gathering with friends, as it not only serves 4-6 people but also showcases the vibrant and unique flavors of Korean cooking.
The meatballs are infused with garlic, ginger, and sesame oil, while the sweet potatoes add a natural sweetness and a nutritious dimension to the meal. This dish is also incredibly easy to prepare, as everything can be cooked on a single sheet pan. This means less cleanup and more time to enjoy your meal with loved ones.
The combination of juicy meatballs and tender sweet potatoes is sure to please everyone at the table, making it a go-to recipe for busy weeknights or special occasions.
Ingredients (serving size: 4-6 people)
- 1 lb ground beef (or ground pork)
- 1/2 cup breadcrumbs
- 1/4 cup green onions, chopped
- 2 cloves garlic, minced
- 1 tsp fresh ginger, grated
- 2 tbsp soy sauce
- 1 tbsp sesame oil
- 1 tbsp brown sugar
- 1/2 tsp black pepper
- 1/2 tsp salt
- 2 large sweet potatoes, peeled and cubed
- 2 tbsp olive oil
- 1 tbsp sesame seeds (for garnish)
- Fresh cilantro (for garnish, optional)
Cooking Instructions
- Preheat the Oven: Begin by preheating your oven to 400°F (200°C). This guarantees that the meatballs and sweet potatoes cook evenly and develop a nice roasted flavor.
- Prepare the Meatball Mixture: In a large bowl, combine the ground beef (or pork) with breadcrumbs, chopped green onions, minced garlic, grated ginger, soy sauce, sesame oil, brown sugar, black pepper, and salt. Mix everything together until well combined, but be careful not to overmix as this can lead to tough meatballs.
- Form the Meatballs: Once the meat mixture is well combined, use your hands to form small meatballs, about 1-1.5 inches in diameter. Place them on a large sheet pan lined with parchment paper, spacing them out evenly.
- Prepare the Sweet Potatoes: In a separate bowl, toss the cubed sweet potatoes with olive oil, salt, and pepper until they’re well coated. Arrange the sweet potatoes around the meatballs on the same sheet pan.
- Bake in the Oven: Place the sheet pan in the preheated oven and bake for 25-30 minutes, or until the meatballs are cooked through (internal temperature should reach 160°F) and the sweet potatoes are tender and slightly caramelized.
- Garnish and Serve: Once cooked, remove the sheet pan from the oven. Sprinkle sesame seeds over the meatballs and garnish with fresh cilantro if desired. Serve hot, and enjoy the delicious combination of flavors!
Extra Tips
When preparing Korean-style Meatballs and Sweet Potatoes, consider adjusting the level of spice according to your taste. You can add a teaspoon of gochujang (Korean chili paste) to the meat mixture for a kick of heat.
Also, feel free to experiment with different vegetables such as carrots or bell peppers alongside the sweet potatoes for added color and nutrition. Leftovers can be stored in an airtight container in the refrigerator for up to three days and can easily be reheated in the oven or microwave. Enjoy your culinary adventure!
Korean Fried Cauliflower With Garlic Sauce

Korean Fried Cauliflower with Garlic Sauce is a delightful vegetarian twist on traditional Korean fried dishes. This recipe features crispy, golden cauliflower florets that are coated in a savory and slightly spicy garlic sauce, making it a perfect appetizer or side dish for your next meal.
The combination of textures and flavors will tantalize your taste buds, offering the essence of Korean cuisine without any meat. It’s an excellent way to enjoy the health benefits of cauliflower while still indulging in a satisfying and flavorful dish.
This dish isn’t only easy to prepare but also incredibly versatile. Whether you’re hosting a gathering or just looking for a quick weeknight meal, Korean Fried Cauliflower can be served alongside rice, or as a topping for salads.
The garlic sauce amplifies the dish’s flavor profile, making every bite a burst of deliciousness. Prepare to impress your family and friends with this delightful recipe that showcases the bold and vibrant flavors of Korean cuisine.
Ingredients (Serves 4-6)
- 1 head cauliflower, cut into florets
- 1 cup all-purpose flour
- 1 cup cornstarch
- 1 teaspoon baking powder
- 1 teaspoon salt
- 1 teaspoon black pepper
- 1 cup water (or as needed)
- Oil for frying
- 4 tablespoons unsalted butter
- 6 cloves garlic, minced
- 2 tablespoons soy sauce
- 2 tablespoons gochujang (Korean chili paste)
- 1 tablespoon honey or maple syrup
- 1 tablespoon sesame oil
- Sesame seeds for garnish
- Chopped green onions for garnish
Cooking Instructions
1. Prepare the Cauliflower: In a large bowl, combine the cauliflower florets with the flour, cornstarch, baking powder, salt, and black pepper. Mix well to guarantee that the florets are evenly coated.
Gradually add water to the mixture until a thick batter forms, ensuring that the cauliflower is well-coated but not drowning in excess batter.
2. Heat the Oil: In a deep skillet or frying pan, add enough oil to cover the bottom of the pan (about 1-2 inches deep). Heat the oil over medium-high heat until it reaches 350°F (175°C).
You can test the oil by dropping a small amount of batter into it; if it sizzles and bubbles, the oil is ready.
3. Fry the Cauliflower: Carefully add the battered cauliflower florets to the hot oil in batches, ensuring not to overcrowd the pan. Fry for about 4-5 minutes, or until golden brown and crispy.
Use a slotted spoon to remove the fried cauliflower and transfer it to a plate lined with paper towels to drain excess oil. Repeat until all cauliflower is fried.
4. Prepare the Garlic Sauce: In a separate pan, melt the butter over medium heat. Add the minced garlic and sauté for about 1-2 minutes until fragrant but not browned.
Stir in the soy sauce, gochujang, honey (or maple syrup), and sesame oil. Mix well and let it simmer for 2-3 minutes until the sauce thickens slightly.
5. Combine and Serve: In a large mixing bowl, toss the crispy cauliflower florets with the garlic sauce until they’re well coated. Transfer to a serving dish and garnish with sesame seeds and chopped green onions.
Serve immediately while hot.
Extra Tips
When preparing Korean Fried Cauliflower, make sure to monitor the temperature of the oil to guarantee perfect frying without burning.
You can adjust the spice level of the garlic sauce by adding more or less gochujang according to your taste preference. For an extra crunch, consider adding some panko breadcrumbs to the batter.
Enjoy experimenting with this dish by adding other seasonings or vegetables to customize it to your liking!
Spicy Korean Chicken Wings

Spicy Korean Chicken Wings are a delectable and flavorful dish that brings a taste of Korea right to your kitchen. Perfect for game day, parties, or a flavorful dinner, these wings are coated in a spicy, sweet, and sticky sauce that will have everyone coming back for more. The best part is that they can be easily cooked on a sheet pan, allowing for simple preparation and minimal cleanup.
With the combination of gochujang (Korean chili paste) and soy sauce, these wings are bursting with umami flavors that will tantalize your taste buds. This recipe features crispy chicken wings that are baked to perfection, guaranteeing they’re juicy on the inside while achieving that desirable crunch on the outside.
Serve them with some sesame seeds and sliced green onions on top for an extra pop of flavor and presentation. Whether you’re serving them as a main dish or an appetizer, these Spicy Korean Chicken Wings are sure to impress your guests and make any meal feel special.
Ingredients (Serves 4-6)
- 2 pounds chicken wings
- 1/4 cup gochujang (Korean chili paste)
- 1/4 cup soy sauce
- 2 tablespoons honey
- 2 tablespoons rice vinegar
- 1 tablespoon sesame oil
- 1 tablespoon minced garlic
- 1 tablespoon minced ginger
- 1 teaspoon black pepper
- 1 tablespoon sesame seeds (for garnish)
- 2 green onions, sliced (for garnish)
Cooking Instructions
- Preheat the Oven: Begin by preheating your oven to 425°F (220°C). A high temperature is essential for achieving crispy wings, so make sure your oven is properly heated before placing the wings inside.
- Prepare the Marinade: In a large mixing bowl, combine the gochujang, soy sauce, honey, rice vinegar, sesame oil, minced garlic, minced ginger, and black pepper. Whisk together until all ingredients are well mixed and the marinade has a smooth consistency.
- Marinate the Wings: Add the chicken wings to the bowl with the marinade, making sure that they’re fully coated. Cover the bowl with plastic wrap and let the wings marinate in the refrigerator for at least 30 minutes. For best results, marinate for 2 hours to allow the flavors to penetrate the chicken.
- Prepare the Baking Sheet: Line a large baking sheet with aluminum foil or parchment paper for easy cleanup. Place a cooling rack on top of the baking sheet if you have one; this will help the wings cook evenly and become crispier.
- Arrange the Wings: After marinating, remove the wings from the refrigerator and arrange them in a single layer on the prepared baking sheet (or cooling rack). Make sure there’s space between each wing to allow for proper airflow during cooking.
- Bake the Wings: Place the baking sheet in the preheated oven and bake for 30-35 minutes, flipping the wings halfway through cooking. This will guarantee that they get crispy on both sides. Keep an eye on them towards the end to prevent burning.
- Garnish and Serve: Once the wings are golden brown and crispy, remove them from the oven. Transfer them to a serving platter and sprinkle with sesame seeds and sliced green onions for garnish. Serve immediately with your favorite dipping sauces if desired.
Extra Tips
To enhance the flavor even further, consider adding a splash of lime juice to the marinade for a zesty kick. You can also adjust the level of spiciness by adding more or less gochujang based on your preference.
If you have leftovers, they can be stored in an airtight container in the refrigerator for up to three days and can be reheated in the oven for that same crispy texture. Enjoy your Spicy Korean Chicken Wings!
Miso Glazed Eggplant With Rice
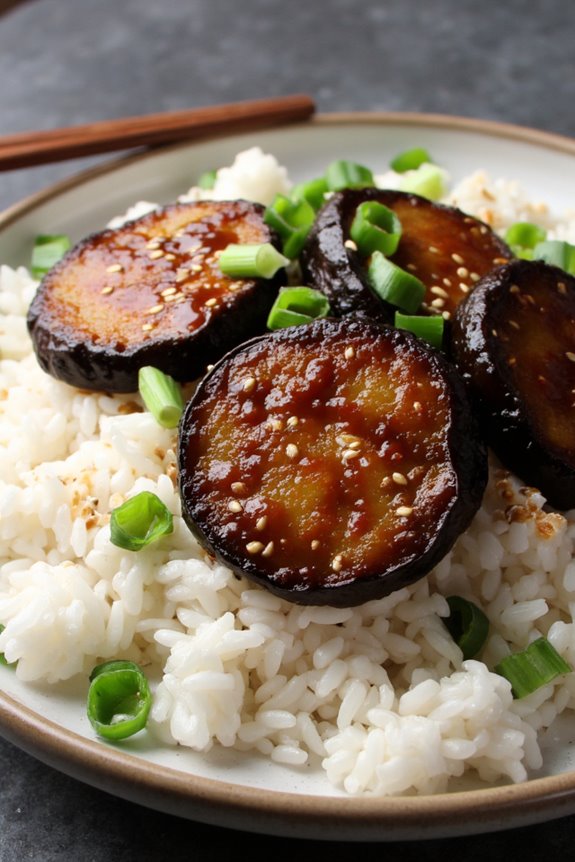
Miso Glazed Eggplant With Rice is a delightful and easy-to-make dish that perfectly combines sweet and savory flavors. The star of this recipe is the eggplant, which absorbs the rich umami taste of miso, creating a deliciously caramelized exterior while remaining tender on the inside. Served over a bed of fluffy rice, this dish not only offers a satisfying meal but is also a great way to incorporate more plant-based options into your diet.
The best part about this sheet pan recipe is its simplicity and versatility. You can easily customize it by adding other vegetables or proteins to suit your taste. The miso glaze is easy to whip up, and roasting everything on a single sheet pan means less cleanup and more time to enjoy your meal. Whether you’re hosting a dinner or just enjoying a quiet night at home, this dish is sure to impress!
Ingredients (Serves 4-6):
- 2 large eggplants, sliced into ½-inch rounds
- 1 cup cooked rice (white, brown, or jasmine)
- 3 tablespoons miso paste (red or white)
- 2 tablespoons maple syrup or honey
- 2 tablespoons soy sauce
- 2 tablespoons sesame oil
- 1 tablespoon rice vinegar
- 1 tablespoon grated ginger
- 2 cloves garlic, minced
- 1 tablespoon sesame seeds (for garnish)
- 2 green onions, sliced (for garnish)
- Salt and pepper to taste
Cooking Instructions:
- Preheat the Oven: Begin by preheating your oven to 400°F (200°C). This guarantees that the eggplant will roast evenly and become tender while developing a nice caramelized finish.
- Prepare the Miso Glaze: In a medium bowl, combine the miso paste, maple syrup (or honey), soy sauce, sesame oil, rice vinegar, grated ginger, and minced garlic. Whisk until the mixture is smooth and well combined. This glaze will impart a wonderful flavor to the eggplant.
- Slice and Arrange the Eggplant: Slice the eggplants into ½-inch rounds and lay them flat on a large sheet pan. You can line the pan with parchment paper for easier cleanup. Season the eggplant slices lightly with salt and pepper to enhance their flavor.
- Coat with Miso Glaze: Using a brush or spoon, generously coat each eggplant slice with the miso glaze, making sure to cover both sides. This step is vital as it allows the eggplant to absorb all the delicious flavors.
- Roast the Eggplant: Place the sheet pan in the preheated oven and roast the eggplant for about 25-30 minutes, flipping the slices halfway through. The eggplant should be tender and slightly caramelized when done.
- Cook the Rice: While the eggplant is roasting, prepare the rice according to package instructions if it’s not already cooked. Fluff the rice with a fork before serving.
- Serve and Garnish: Once the eggplant is done roasting, remove it from the oven and let it cool slightly. Serve the roasted miso glazed eggplant over a generous scoop of rice, and garnish with sesame seeds and sliced green onions for added texture and freshness.
Extra Tips:
For an added layer of flavor, consider marinating the eggplant in the miso glaze for 30 minutes to an hour before roasting. Additionally, feel free to include other vegetables like bell peppers or zucchini on the sheet pan for a colorful and nutritious meal.
If you prefer a bit of spice, a sprinkle of red pepper flakes on the miso glaze can elevate the dish further. Finally, this recipe is excellent for meal prepping; simply store the leftovers in an airtight container in the refrigerator for up to three days. Enjoy your delicious and healthy Miso Glazed Eggplant With Rice!
Kalbi Beef Ribs With Grilled Corn
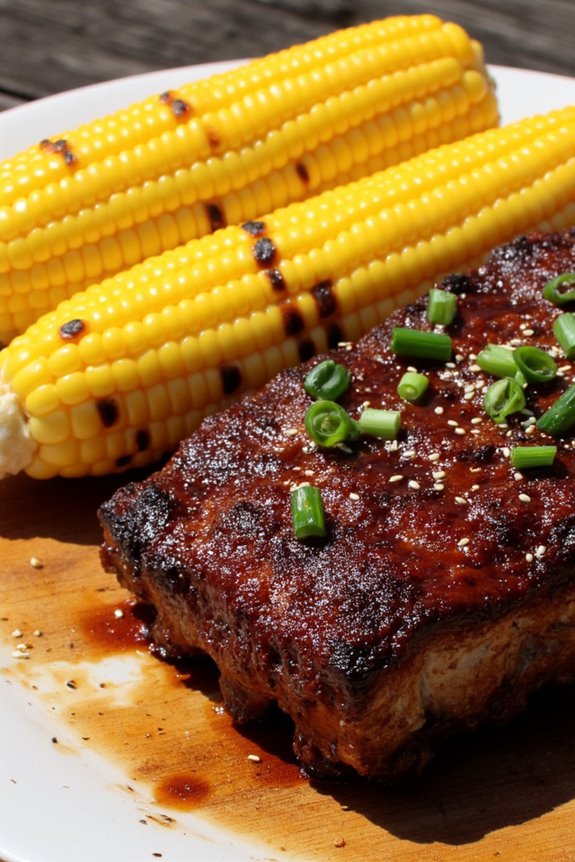
Kalbi, also known as Korean short ribs, is a beloved dish known for its rich flavors and tender texture. This recipe takes the traditional kalbi and gives it a modern twist by cooking it on a sheet pan alongside sweet, grilled corn. The combination of the marinated beef ribs and the smoky sweetness of the corn creates a delightful balance of flavors that’s certain to please everyone at the table. Perfect for gatherings or family dinners, this dish is both easy to prepare and impressive to serve.
Cooking kalbi beef ribs on a sheet pan allows for an easy cleanup and guarantees that the meat cooks evenly. The marinade, made from soy sauce, sesame oil, garlic, and ginger, infuses the meat with a savory sweetness. The grilled corn adds a vibrant touch to the dish, and when brushed with a bit of butter and sprinkled with salt, it becomes the perfect accompaniment to the succulent ribs. Let’s get started on this delicious meal!
Ingredients (Serves 4-6)
- 3 lbs of beef short ribs (kalbi)
- 1 cup soy sauce
- 1/2 cup brown sugar
- 1/4 cup sesame oil
- 1/4 cup rice vinegar
- 6 cloves garlic, minced
- 2 tablespoons fresh ginger, grated
- 1 tablespoon black pepper
- 2 teaspoons red pepper flakes (optional)
- 4 ears of corn, husked
- 4 tablespoons unsalted butter, melted
- Salt to taste
- Chopped green onions and sesame seeds for garnish (optional)
Cooking Instructions
- Prepare the Marinade: In a large bowl, combine the soy sauce, brown sugar, sesame oil, rice vinegar, minced garlic, grated ginger, black pepper, and red pepper flakes (if using). Whisk the ingredients together until the sugar is dissolved. This marinade will tenderize the beef and infuse it with flavor.
- Marinate the Ribs: Add the beef short ribs to the marinade, making sure they’re fully submerged. Cover the bowl with plastic wrap and refrigerate for at least 4 hours, or preferably overnight. The longer the ribs marinate, the more flavorful they’ll be.
- Prepare the Oven and Corn: Preheat your oven to 400°F (200°C). While the oven is heating, prepare the corn by brushing the ears with melted butter and sprinkling them with salt. This will enhance the natural sweetness of the corn when grilled.
- Arrange on Sheet Pan: Line a large sheet pan with parchment paper for easier cleanup. Place the marinated beef short ribs on one side of the sheet pan, allowing space for the corn. Arrange the husked corn on the other side of the pan.
- Bake in the Oven: Place the sheet pan in the preheated oven and bake for 25-30 minutes. Halfway through cooking, turn the corn to guarantee even grilling. The ribs should be nicely caramelized and cooked through, while the corn should have a light char.
- Finish and Serve: Once done, remove the sheet pan from the oven. Let the ribs rest for a few minutes before slicing. Serve the kalbi beef ribs alongside the grilled corn, garnished with chopped green onions and sesame seeds if desired.
Extra Tips
For the best flavor, consider grilling the beef ribs and corn on an outdoor grill if you have access to one, as the smoky flavor from the grill will enhance the dish even further.
Additionally, you can customize the level of spiciness by adjusting the amount of red pepper flakes in the marinade.
Finally, serving this dish with steamed rice or a fresh salad can complement the rich flavors and create a well-rounded meal. Enjoy your kalbi beef ribs with grilled corn!