

Cooking with kids is always a joyful experience. It’s not just about preparing meals; it’s about the fun and creativity that fills the kitchen. From crafting DIY Dumplings to making Sweet and Sour Chicken Bites, each recipe is an opportunity to explore flavors together. Curious about how to transform family meals into a delightful culinary adventure? Let’s uncover these tasty treasures!
Sweet and Sour Chicken Bites
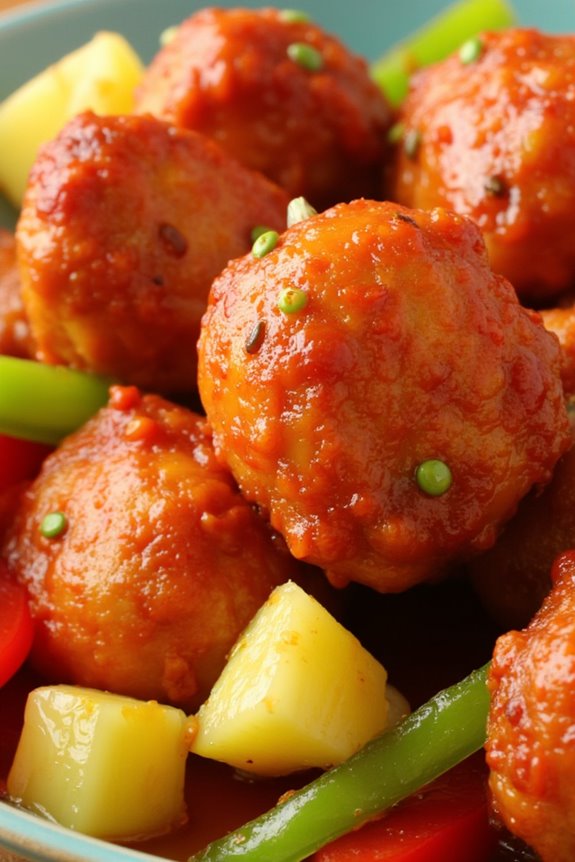
Sweet and Sour Chicken Bites are a delightful dish that combines crispy chicken pieces with a tangy, flavorful sauce. This recipe is perfect for kids, as the sweet and tangy flavors make it appealing to young taste buds. It’s also a great opportunity to introduce children to cooking, allowing them to get hands-on with cutting and mixing ingredients.
As an added bonus, this dish is simple to prepare and can be served as an appetizer or a main course. In this recipe, we’ll coat bite-sized chicken pieces in a crispy batter, deep-fry them to golden perfection, and then toss them in a homemade sweet and sour sauce. The vibrant combination of colors and flavors not only makes the dish visually appealing but also encourages kids to enjoy their meals.
Serve it alongside steamed rice or vegetables for a complete meal that the whole family will love.
Ingredients (Serves 4-6):
- 1 pound boneless, skinless chicken breasts, cut into bite-sized pieces
- 1 cup all-purpose flour
- 1 teaspoon salt
- 1 teaspoon black pepper
- 1 teaspoon garlic powder
- 1 teaspoon onion powder
- 2 large eggs, beaten
- 1 cup breadcrumbs
- Oil for frying
- 1/2 cup sugar
- 1/4 cup apple cider vinegar
- 1/4 cup ketchup
- 1 tablespoon soy sauce
- 1 tablespoon cornstarch
- 1/4 cup water
- 1 bell pepper, chopped (optional)
- 1 cup pineapple chunks (optional)
Cooking Instructions:
- Prepare the Chicken: Start by cutting the chicken breasts into bite-sized pieces. This will guarantee that they cook evenly and are easy for kids to eat. Pat the chicken pieces with a paper towel to remove any excess moisture, which helps the coating stick better.
- Set Up Breading Station: In three separate bowls, prepare the breading station. In the first bowl, mix the flour, salt, black pepper, garlic powder, and onion powder. In the second bowl, beat the eggs. In the third bowl, place the breadcrumbs. This setup allows for easy breading of the chicken.
- Bread the Chicken: Dip each piece of chicken into the flour mixture, making sure it’s fully coated. Shake off any excess flour, then dip it into the beaten eggs, allowing any extra egg to drip off. Finally, coat the chicken in the breadcrumbs, pressing down slightly to confirm the crumbs adhere well. Place the breaded chicken on a plate.
- Fry the Chicken: Heat about two inches of oil in a large pot or deep fryer over medium-high heat. Once the oil is hot (around 350°F), carefully add the breaded chicken pieces in batches. Fry them for about 4-5 minutes or until they turn golden brown and are cooked through. Use a slotted spoon to remove the chicken and place it on a paper towel-lined plate to drain excess oil.
- Make the Sweet and Sour Sauce: In a saucepan over medium heat, combine sugar, apple cider vinegar, ketchup, and soy sauce. Stir until the sugar dissolves. In a small bowl, mix cornstarch with water to create a slurry, then add it to the saucepan. Stir continuously until the sauce thickens, about 2-3 minutes.
- Combine Chicken and Sauce: If using, add the chopped bell pepper and pineapple chunks to the thickened sauce and cook for an additional 2 minutes. Then, gently toss the crispy chicken bites into the sauce until they’re nicely coated.
- Serve: Transfer the sweet and sour chicken bites to a serving platter. They can be served warm with rice or as a fun finger food for the kids.
Extra Tips:
To enhance the dish’s flavor and nutrition, consider adding vegetables like snap peas or carrots to the sweet and sour sauce. You can also experiment with different sweeteners such as honey or agave syrup to adjust the sweetness level to your liking.
If you prefer a healthier version, try baking the breaded chicken in the oven at 400°F for about 20 minutes, flipping halfway through, instead of frying it. This will reduce the oil content while still providing a deliciously crispy texture.
Vegetable Spring Rolls

Vegetable Spring Rolls are a delightful and colorful dish that’s perfect for kids to enjoy. These crispy rolls are packed with fresh vegetables and can be served as a snack, appetizer, or even a main course. The best part is that they’re easy to make and can be customized with your child’s favorite veggies. With a little bit of help from an adult, kids can have a fun time rolling up their own spring rolls!
Making Vegetable Spring Rolls isn’t only a fun cooking activity but also a great way to introduce kids to a variety of vegetables. The combination of flavors and textures in each bite will make this dish a family favorite. Plus, these spring rolls can be served with a delicious dipping sauce like soy sauce or sweet chili sauce, adding a burst of flavor that kids will love.
Ingredients (serving size: 4-6 people)
- 10 spring roll wrappers
- 1 cup shredded carrots
- 1 cup shredded cabbage
- 1 cup bean sprouts
- 1 bell pepper, thinly sliced
- 1 cucumber, julienned
- 2 green onions, chopped
- 2 cloves garlic, minced
- 1 tablespoon soy sauce
- 1 tablespoon sesame oil
- Oil for frying
Cooking Instructions
- Prepare the Vegetables: Start by washing and prepping all the vegetables. Shred the carrots and cabbage, slice the bell pepper, julienne the cucumber, and chop the green onions. Make sure to mince the garlic finely. This step is essential as it guarantees that all the vegetables are ready to be mixed and rolled.
- Make the Filling: In a large mixing bowl, combine the shredded carrots, cabbage, bean sprouts, bell pepper, cucumber, green onions, minced garlic, soy sauce, and sesame oil. Toss everything together until the veggies are well coated and evenly mixed. This mixture will serve as the flavorful filling for your spring rolls.
- Assemble the Spring Rolls: Lay a spring roll wrapper on a clean surface or a cutting board with one corner facing you. Place about 2 tablespoons of the vegetable filling near that corner. Fold the corner over the filling, tuck it in tightly, then fold the two side corners inwards. Roll the wrapper away from you to form a tight cylinder, sealing the edge with a little water if necessary. Repeat this process with the remaining wrappers and filling.
- Fry the Spring Rolls: Heat about 2 inches of oil in a deep frying pan or pot over medium heat. Once the oil is hot, carefully place a few spring rolls in the oil, making sure not to overcrowd the pan. Fry for about 3-4 minutes on each side or until they’re golden brown and crispy. Remove the spring rolls from the oil and place them on a paper towel-lined plate to drain any excess oil.
- Serve: Once the spring rolls have cooled slightly, transfer them to a serving platter. They can be served warm or at room temperature with dipping sauces on the side for a fun and tasty treat.
Extra Tips
When making Vegetable Spring Rolls, feel free to get creative with the filling! You can add other vegetables like zucchini or mushrooms, or even include some protein such as tofu or cooked shrimp for added nutrition.
If you’re concerned about frying, you can also bake the spring rolls in the oven at 400°F (200°C) for about 20 minutes, turning them halfway through for an equally delicious and healthier option.
DIY Dumplings
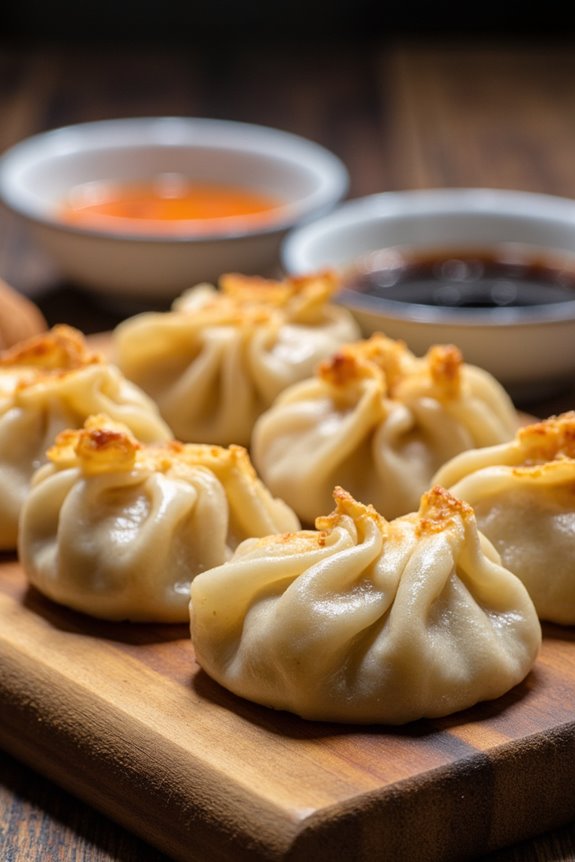
Making dumplings is a fun and engaging activity that kids can participate in, allowing them to enjoy both the process and the delicious results. These little pockets of flavor can be filled with a variety of ingredients, making them a versatile dish that can cater to different tastes and dietary preferences.
The process of folding the dumplings can be a creative outlet for children, making it a perfect family bonding experience in the kitchen. Plus, the satisfaction of eating something they’ve made from scratch is truly rewarding.
This DIY Dumplings recipe is designed to serve 4-6 people, making it ideal for family dinners or gatherings with friends. You can customize the filling based on your family’s preferences, using either meat, vegetables, or a combination of both. Once you master the basic technique, feel free to experiment with different flavors and dipping sauces to accompany your dumplings.
Let’s get started on this delightful culinary adventure!
Ingredients:
- 2 cups all-purpose flour
- ½ cup water
- 1 teaspoon salt
- 1 cup ground pork (or chicken, or a mix of finely chopped vegetables for a vegetarian option)
- 1 cup finely chopped cabbage
- 2 green onions, chopped
- 1 teaspoon ginger, minced
- 1 tablespoon soy sauce
- 1 tablespoon sesame oil
- ½ teaspoon black pepper
- Cooking oil (for frying)
- Water (for steaming)
Cooking Instructions:
- Make the Dough: In a large bowl, combine the flour and salt. Gradually add the water while mixing with a fork or your hands until the dough begins to come together. Knead the dough on a floured surface for about 5 minutes until it’s smooth and elastic. Cover it with a damp cloth and let it rest for 30 minutes.
- Prepare the Filling: In a separate bowl, mix together the ground pork, chopped cabbage, green onions, ginger, soy sauce, sesame oil, and black pepper. Stir well until all ingredients are thoroughly combined. This flavorful mixture will be the filling for your dumplings.
- Roll Out the Dough: Once the dough has rested, divide it into small pieces, about the size of a golf ball. Roll each piece out on a floured surface into a thin circle, approximately 3 inches in diameter. Aim for an even thickness for even cooking.
- Fill the Dumplings: Place about 1 tablespoon of the filling in the center of each dough circle. Be careful not to overfill. Using your finger, moisten the edge of the dough with a little water to help seal the dumpling. Fold the dough over the filling to create a half-moon shape and pinch the edges together tightly to seal. You can also create pleats for a decorative touch.
- Cook the Dumplings: You can either steam or fry the dumplings. To steam, place them in a steamer basket lined with parchment paper and steam over boiling water for about 10-12 minutes. To fry, heat a tablespoon of cooking oil in a skillet over medium heat. Add the dumplings and fry for 2-3 minutes until they’re golden brown on the bottom. Then, add a splash of water to the skillet, cover, and let them steam for about 5 minutes until cooked through.
- Serve: Once cooked, remove the dumplings from the steamer or skillet and serve them hot with your choice of dipping sauce, such as soy sauce or a spicy chili sauce.
Extra Tips: When making dumplings, it’s important to keep the dough covered to prevent it from drying out. If you’re making a large batch, you can freeze the uncooked dumplings on a baking sheet, then transfer them to a freezer bag for later use.
When ready to cook, you can steam them straight from the freezer without thawing. This makes for a quick and easy meal option in the future! Enjoy your homemade dumplings with family and friends for a delightful treat.
Colorful Fried Rice
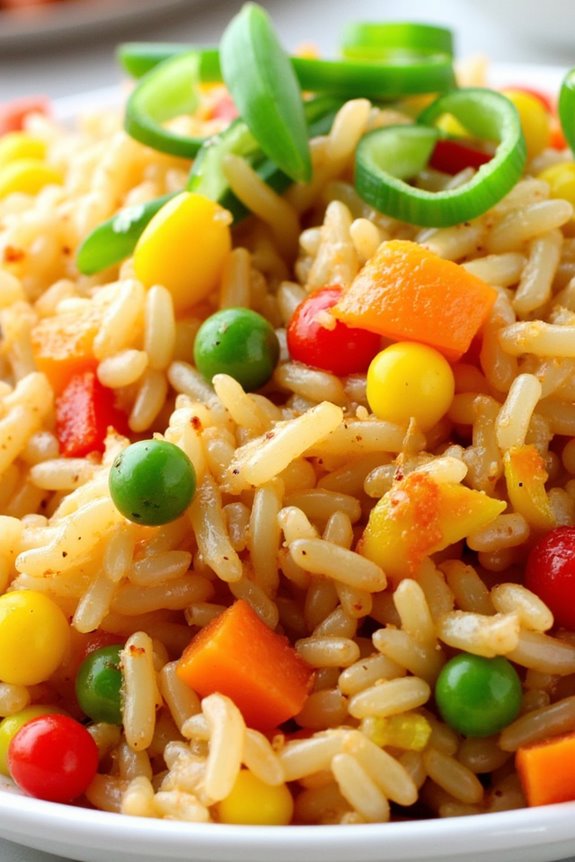
Colorful Fried Rice is a delightful and vibrant dish that’s perfect for kids and adults alike. Not only does it offer a feast for the eyes with its array of colorful vegetables, but it also provides a nutritious and flavorful meal that can be customized to suit various tastes. This dish is quick to prepare and can be a fantastic way to utilize leftover rice and vegetables, making it a practical choice for busy families.
Cooking Colorful Fried Rice can be a fun activity for kids, as they can help with washing and chopping vegetables, mixing ingredients, and stirring the rice. The rice can be cooked ahead of time, allowing for a smooth and enjoyable cooking experience. This dish isn’t just delicious; it’s also an excellent way to introduce children to cooking while teaching them about different ingredients and flavors.
Ingredients (Serves 4-6):
- 4 cups cooked rice (preferably day-old)
- 1 cup peas (fresh or frozen)
- 1 cup diced carrots
- 1 cup diced bell peppers (red, yellow, and green)
- 1 cup corn (fresh or frozen)
- 3 tablespoons soy sauce
- 2 tablespoons vegetable oil
- 2 eggs (beaten)
- 2 green onions (sliced)
- 1 teaspoon minced garlic
- Salt and pepper to taste
Cooking Instructions:
- Prepare the Rice: If using fresh rice, make certain it’s cooled down and not too sticky. Day-old rice works best as it dries out slightly and separates easily when frying. If you don’t have leftover rice, you can cook it and let it cool for at least 30 minutes.
- Cook the Eggs: In a large skillet or wok, heat 1 tablespoon of vegetable oil over medium heat. Pour in the beaten eggs and scramble them until fully cooked. Once done, transfer the eggs to a plate and set aside.
- Sauté the Vegetables: In the same skillet, add the remaining 1 tablespoon of oil. Increase the heat to medium-high and add the minced garlic. Sauté for about 30 seconds until fragrant. Then, add the diced carrots, bell peppers, peas, and corn. Stir frequently for about 5-7 minutes until the vegetables are tender yet crisp.
- Combine Rice and Vegetables: Add the cooked rice to the skillet with the sautéed vegetables. Use a spatula to break up any clumps and mix everything together thoroughly.
- Season the Fried Rice: Pour the soy sauce over the rice and vegetable mixture. Stir well to guarantee that the rice is evenly coated. Add the scrambled eggs back into the skillet along with sliced green onions. Mix everything until combined. Season with salt and pepper to taste.
- Final Cook: Allow the fried rice to cook for an additional 2-3 minutes, stirring occasionally to guarantee it heats through and achieves a nice texture.
- Serve: Once heated through, remove from the heat and serve the Colorful Fried Rice warm. You can garnish with additional green onions, if desired.
Extra Tips: When preparing Colorful Fried Rice, feel free to get creative with the vegetables! You can add broccoli, zucchini, or even leftover cooked chicken or shrimp for added protein. Additionally, using a hot skillet ensures that the rice gets a nice crispiness, giving the dish a delicious texture. Encourage kids to help with the chopping and mixing, making the cooking process even more enjoyable!
Chicken Lo Mein
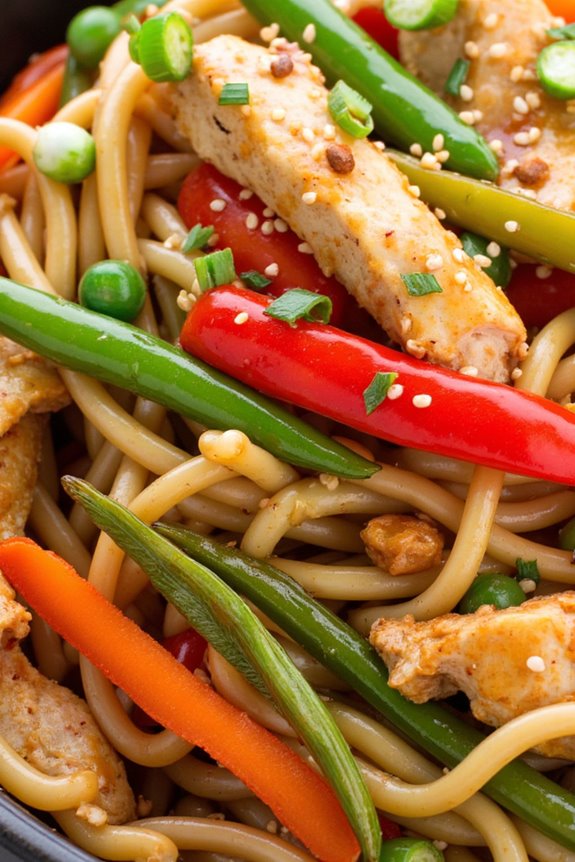
Chicken Lo Mein is a delightful and easy-to-make dish that kids will love. This classic Chinese noodle dish is flavorful and colorful, featuring tender chicken, fresh vegetables, and savory sauce all tossed together with soft lo mein noodles.
It’s a fantastic way to introduce children to cooking, as they can help with simple tasks like mixing the sauce, chopping vegetables, or stirring the noodles. Plus, it’s a great option for family dinners, allowing everyone to enjoy a healthy and delicious meal together.
Making Chicken Lo Mein isn’t only a fun activity to do with kids, but it also allows for creativity in the kitchen. You can personalize the recipe by adding their favorite vegetables or adjusting the sauce’s flavor to suit their taste.
The simple cooking steps and minimal preparation time make this dish accessible for beginner cooks. So, roll up your sleeves and get ready to whip up a batch of Chicken Lo Mein that your family will love!
Ingredients (Serves 4-6):
- 8 ounces lo mein noodles
- 1 pound boneless, skinless chicken breasts, sliced thinly
- 2 tablespoons vegetable oil
- 2 cups mixed vegetables (such as bell peppers, carrots, and snow peas)
- 3 cloves garlic, minced
- 1 tablespoon ginger, minced
- 3 tablespoons soy sauce
- 2 tablespoons oyster sauce
- 1 tablespoon sesame oil
- 1 tablespoon cornstarch mixed with 2 tablespoons water (optional for thickening)
- Salt and pepper, to taste
- Green onions, chopped (for garnish)
Cooking Instructions:
- Cook the Noodles: Begin by boiling a large pot of water. Once boiling, add the lo mein noodles and cook according to the package instructions until al dente. Drain the noodles and rinse them under cold water to stop the cooking process. Set them aside.
- Prepare the Sauce: In a small bowl, whisk together the soy sauce, oyster sauce, sesame oil, and a pinch of salt and pepper. If you prefer a thicker sauce, mix the cornstarch with water in a separate bowl and set it aside. This will be added later if needed.
- Cook the Chicken: In a large skillet or wok, heat the vegetable oil over medium-high heat. Add the sliced chicken and season with salt and pepper. Cook for about 5-7 minutes, stirring frequently, until the chicken is cooked through and no longer pink. Remove the chicken from the skillet and set it aside.
- Stir-Fry the Vegetables: In the same skillet, add the minced garlic and ginger, cooking for about 30 seconds until fragrant. Add the mixed vegetables and stir-fry for 3-4 minutes until they’re tender but still crisp.
- Combine All Ingredients: Return the cooked chicken to the skillet with the vegetables. Add the cooked lo mein noodles and pour the sauce over everything. Toss everything together until well combined. If using the cornstarch mixture, add it now and stir until the sauce thickens slightly.
- Serve and Garnish: Once everything is heated through and coated with sauce, remove from the heat. Serve the Chicken Lo Mein hot, garnished with chopped green onions.
Extra Tips: When cooking Chicken Lo Mein, feel free to customize it with your kids’ favorite vegetables such as broccoli, mushrooms, or bok choy. You can also substitute chicken with shrimp or tofu for a different protein option.
Encourage your kids to help in the kitchen by letting them wash the vegetables or mix the sauce. Always taste as you go to adjust flavors if needed, and remember to have fun while cooking together!
Teriyaki Beef Skewers
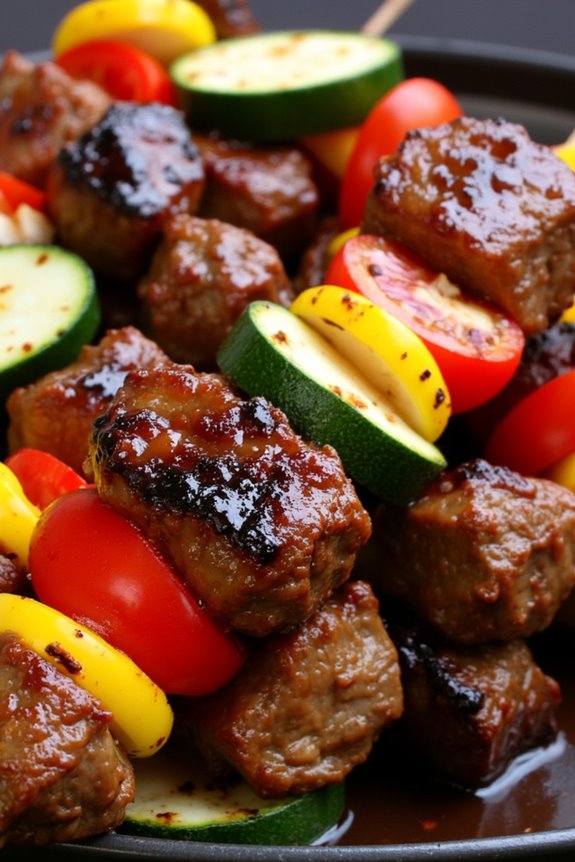
Teriyaki Beef Skewers are a delightful dish that combines tender marinated beef with the sweet and savory flavors of teriyaki sauce. This recipe is perfect for kids who enjoy helping out in the kitchen, as they can participate in assembling the skewers and brushing on the glaze. With a quick marinade and simple grilling method, these skewers aren’t only delicious but also fun to eat!
This dish isn’t only a great way to introduce children to the joys of cooking but also allows them to explore different flavors and textures. The skewers can be paired with a variety of vegetables, making it a colorful and nutritious meal. Whether you’re hosting a family dinner or a backyard barbecue, Teriyaki Beef Skewers are sure to be a hit with both kids and adults alike.
Ingredients (Serves 4-6):
- 1.5 pounds of beef sirloin, cut into 1-inch cubes
- 1/2 cup soy sauce
- 1/4 cup brown sugar
- 1/4 cup rice vinegar
- 2 tablespoons sesame oil
- 2 cloves garlic, minced
- 1 tablespoon freshly grated ginger
- 1/2 teaspoon black pepper
- Wooden or metal skewers (if using wooden skewers, soak them in water for 30 minutes)
- Optional vegetables (bell peppers, zucchini, cherry tomatoes, or onions)
Cooking Instructions:
- Prepare the Marinade: In a medium bowl, whisk together the soy sauce, brown sugar, rice vinegar, sesame oil, minced garlic, grated ginger, and black pepper until the sugar is dissolved. This mixture will serve as both a marinade and a baste for the skewers.
- Marinate the Beef: Place the cubed beef sirloin into a large resealable plastic bag or a shallow dish. Pour the marinade over the beef, making certain all pieces are well coated. Seal the bag or cover the dish and refrigerate for at least 30 minutes, or up to 2 hours for more flavor.
- Prep the Skewers: If you’re using wooden skewers, make sure they’ve been soaking in water for at least 30 minutes to prevent burning while grilling. If using metal skewers, you can skip this step.
- Assemble the Skewers: After marinating, remove the beef from the refrigerator. Thread the beef cubes onto the skewers, alternating with any desired vegetables for added color and nutrition. Leave a little space between each piece to guarantee even cooking.
- Preheat the Grill: Preheat your grill to medium-high heat. If using a grill pan, heat it over medium heat on the stove.
- Grill the Skewers: Place the assembled skewers on the grill and cook for about 8-10 minutes, turning occasionally. Brush the skewers with the leftover marinade during cooking to enhance the flavor. Cook until the beef is browned and reaches your preferred level of doneness.
- Serve: Remove the skewers from the grill and let them rest for a few minutes before serving. This allows the juices to redistribute and keeps the meat tender. Serve with extra teriyaki sauce on the side for dipping if desired.
Extra Tips:
When cooking Teriyaki Beef Skewers, feel free to customize the vegetables based on your kids’ preferences or whatever you have on hand. Bell peppers, zucchini, and onions add a nice crunch and color, while cherry tomatoes bring a burst of sweetness.
Additionally, for a more intense flavor, consider marinating the beef overnight. Just be mindful not to over-marinate, as the soy sauce can make the meat too salty. Enjoy this fun and interactive meal with your family!
Wonton Soup
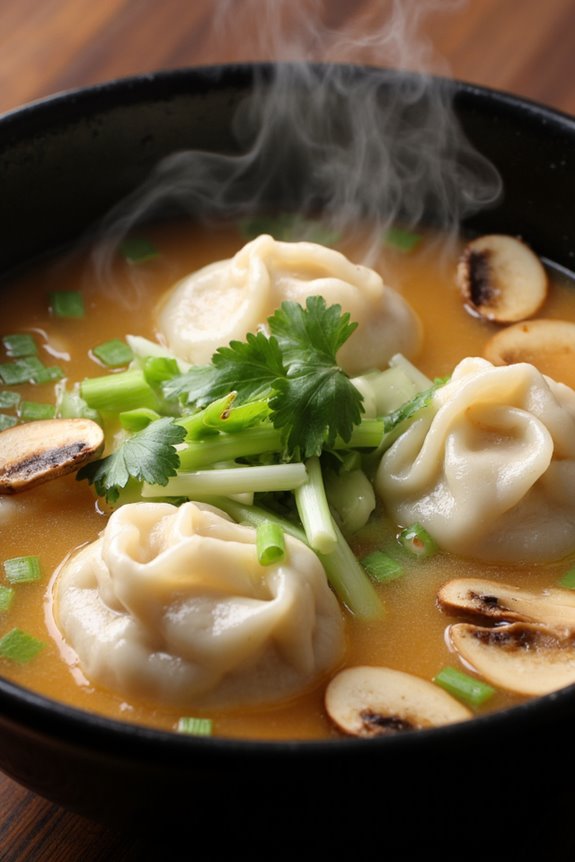
Wonton soup is a delightful and comforting dish that’s perfect for kids and adults alike. This Chinese classic features tender, savory wontons filled with a mixture of ground meat and vegetables, all simmered in a flavorful broth. It’s simple to make and allows children to participate in the cooking process, from mixing the filling to folding the wontons.
Plus, the warm broth is soothing and perfect for chilly days or when someone is feeling under the weather. Making wonton soup can be a fun family activity. Kids can help roll the wontons and learn about different ingredients used in Chinese cuisine.
This dish isn’t only delicious but also nutritious, as you can customize the filling with various vegetables and proteins. Serve it with a sprinkle of green onions and a dash of soy sauce for added flavor, and watch as your kids enjoy every spoonful!
Ingredients (Serves 4-6):
- 1 package of wonton wrappers (about 40-50 wrappers)
- 1 pound ground pork or chicken
- 1 cup finely chopped cabbage
- 2 green onions, finely chopped
- 2 cloves garlic, minced
- 1 tablespoon soy sauce
- 1 teaspoon sesame oil
- 6 cups chicken or vegetable broth
- 1 cup sliced mushrooms (shiitake or button)
- Salt and pepper to taste
- Fresh cilantro (optional, for garnish)
Cooking Instructions:
1. Prepare the Filling: In a large mixing bowl, combine the ground pork or chicken, chopped cabbage, green onions, minced garlic, soy sauce, sesame oil, and a pinch of salt and pepper. Mix well until all ingredients are incorporated. This mixture will be the filling for your wontons.
2. Assemble the Wontons: Take a wonton wrapper and place about a teaspoon of the filling in the center. Moisten the edges of the wrapper with a little water using your finger. Fold the wrapper over to create a triangle and press to seal. Then, bring the two corners of the triangle together, pinching them to form a wonton shape.
Repeat this process until all the filling is used.
3. Prepare the Broth: In a large pot, bring the chicken or vegetable broth to a boil. Add the sliced mushrooms and let them simmer for about 5 minutes to soften and infuse the broth with their flavor.
4. Cook the Wontons: Carefully add the assembled wontons to the boiling broth. Allow them to cook for about 5-7 minutes, or until they float to the surface and are cooked through. Stir gently to prevent sticking.
5. Serve: Ladle the soup into bowls, making sure to include a good number of wontons and mushrooms in each serving. Garnish with fresh cilantro and extra green onions if desired. Serve hot and enjoy!
Extra Tips:
When making wonton soup, you can customize the filling to suit your family’s tastes. Feel free to add finely chopped carrots, bell peppers, or even shrimp for variety.
To make the soup even heartier, you can add some leafy greens like bok choy or spinach right before serving. Always taste the broth and adjust the seasoning as needed before serving, and remember that the wontons can be made ahead of time and frozen for a quick meal later on!
Egg Fried Noodles
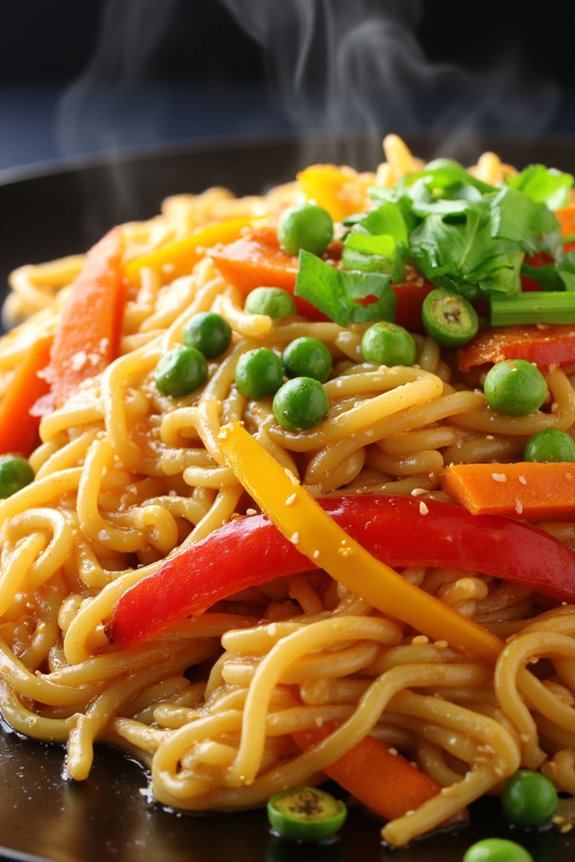
Egg Fried Noodles is a delightful and simple dish that kids will love to help prepare and eat. This recipe incorporates the satisfying flavors of stir-fried noodles with eggs, making it a great meal option for the whole family. It’s quick to cook and can be customized with a variety of vegetables or proteins, making it a versatile choice for busy weeknights or a fun cooking activity with your kids.
The beauty of Egg Fried Noodles lies in its simplicity. Not only is it a great way to introduce children to cooking, but it also allows for creativity by adding different ingredients based on personal preferences. This dish isn’t only tasty but also visually appealing, as the vibrant colors of the vegetables and the golden hue of the eggs come together beautifully in the pan.
Gather your ingredients, and let’s get started on this delicious and easy recipe!
Ingredients (serving size: 4-6 people):
- 400g egg noodles
- 3 large eggs
- 2 tablespoons vegetable oil
- 1 cup mixed vegetables (carrots, peas, bell peppers, etc.)
- 3 green onions (chopped)
- 2 cloves garlic (minced)
- 3 tablespoons soy sauce
- 1 teaspoon sesame oil
- Salt and pepper to taste
Cooking Instructions:
- Cook the Noodles: Begin by boiling a pot of water. Once it reaches a rolling boil, add the egg noodles and cook according to package instructions until they’re al dente. Drain the noodles and rinse them under cold water to stop the cooking process. Set aside.
- Prepare the Eggs: In a bowl, crack the eggs and whisk them until well beaten. This will help guarantee they cook evenly when added to the noodles.
- Heat the Oil: In a large skillet or wok, heat the vegetable oil over medium-high heat. Confirm the oil is hot enough to create a sizzle when the ingredients are added.
- Sauté the Vegetables and Garlic: Add the minced garlic to the hot oil and sauté for about 30 seconds until fragrant. Then, add the mixed vegetables and cook for 3-4 minutes until they’re tender but still vibrant in color. Stir frequently to avoid burning.
- Add the Eggs: Push the vegetables to the side of the pan and pour the beaten eggs into the cleared space. Allow the eggs to cook for a minute before stirring them into the vegetables. Scramble the eggs until fully cooked.
- Combine with Noodles: Add the cooked egg noodles to the skillet, tossing everything together to combine. Pour in the soy sauce and sesame oil, mixing well to guarantee the noodles are evenly coated. Season with salt and pepper to taste.
- Garnish and Serve: Finally, sprinkle the chopped green onions over the top and give everything a final toss. Serve hot, and enjoy your delicious Egg Fried Noodles!
Extra Tips:
For added flavor and nutrition, consider incorporating proteins such as chicken, shrimp, or tofu into the dish. Simply cook them in the skillet before adding the vegetables.
Additionally, feel free to experiment with different vegetables based on what you have on hand or what your kids enjoy. This dish is very forgiving and can easily be adjusted to suit your family’s tastes. Enjoy your cooking adventure!
Mini Bao Buns

Mini Bao Buns, also known as Baozi, are delightful steamed buns that are perfect for kids and adults alike. These soft and fluffy buns can be filled with a variety of ingredients, making them versatile and fun to customize. The process of making them can be an enjoyable family activity, as kids can help with shaping and filling the buns.
With their playful size and delicious taste, Mini Bao Buns are sure to be a hit at any meal or snack time.
In this recipe, we’ll guide you through the steps to create Mini Bao Buns filled with a tasty mixture of ground meat and vegetables. This dish isn’t only delicious but also a fantastic way to introduce children to the joys of Asian cuisine. Plus, the steaming method used in preparation helps to retain the nutrients in the ingredients, making these buns a healthier option for your family.
Ingredients (Serves 4-6)
- 2 cups all-purpose flour
- 1 tablespoon sugar
- 1 teaspoon instant yeast
- 1/2 teaspoon baking powder
- 1/2 teaspoon salt
- 3/4 cup warm water (110°F)
- 1 tablespoon vegetable oil
- 1 cup ground pork (or chicken)
- 1/2 cup finely chopped cabbage
- 1/4 cup grated carrots
- 2 green onions, finely chopped
- 1 tablespoon soy sauce
- 1 teaspoon sesame oil
- 1 clove garlic, minced
- 1 teaspoon ginger, minced
Cooking Instructions
1. Make the Dough: In a large mixing bowl, combine the all-purpose flour, sugar, instant yeast, baking powder, and salt. Slowly add the warm water and vegetable oil while stirring with a wooden spoon.
Once the dough starts to come together, knead it on a floured surface for about 5-7 minutes until it’s smooth and elastic. Place the dough in a lightly greased bowl, cover it with a damp cloth, and let it rise in a warm place for about 1 hour or until it has doubled in size.
2. Prepare the Filling: While the dough is rising, Prepare the Filling. In a bowl, mix the ground pork (or chicken) with chopped cabbage, grated carrots, green onions, soy sauce, sesame oil, minced garlic, and ginger.
Confirm all ingredients are well combined and season with salt and pepper to taste. Cover the filling and set it aside in the refrigerator until ready to use.
3. Shape the Bao Buns: After the dough has risen, punch it down to release the air. Divide the dough into 12 equal pieces. Roll each piece into a small ball and then flatten it into a round disc about 3 inches in diameter.
Make sure the center is slightly thicker than the edges to help hold the filling.
4. Fill the Buns: Place about 1 tablespoon of the filling in the center of each dough disc. Carefully gather the edges of the dough around the filling, pinch them together to seal, and shape the bun into a round ball.
Confirm the filling is well enclosed.
5. Steam the Buns: Line a steamer basket with parchment paper, leaving holes for steam to escape. Place the filled buns in the steamer, allowing space between each one to expand while cooking.
Cover the steamer with a lid and steam the buns over boiling water for about 15-20 minutes, or until the buns are fluffy and cooked through.
6. Serve and Enjoy: Once cooked, carefully remove the buns from the steamer and let them cool slightly before serving. You can enjoy them plain or with additional soy sauce or dipping sauce on the side.
Extra Tips
When making Mini Bao Buns, it’s crucial to verify that the filling isn’t too wet, as this can make the buns soggy. Additionally, feel free to experiment with different fillings such as tofu, mushrooms, or other vegetables for a vegetarian option.
For added fun, let the kids personalize their buns by choosing their favorite fillings or even creating their own dipping sauces! If you have leftovers, you can store them in an airtight container in the refrigerator for up to 2 days and reheat them by steaming or microwaving.
Sesame Chicken Tenders

Sesame Chicken Tenders are a delightful twist on the classic chicken tenders, combining the crispy texture that kids love with the nutty flavor of sesame. This dish isn’t only easy to make but also a healthier alternative to fried chicken tenders, making it a perfect family-friendly option for dinner or lunch.
The tender chicken is coated in a crispy sesame seed crust, making every bite a tasty experience. Plus, it’s a great way to introduce kids to Asian flavors in a fun and familiar format.
These chicken tenders are versatile and can be served with a variety of dipping sauces, such as sweet and sour sauce, soy sauce, or a homemade honey mustard. Pair them with steamed rice or a colorful vegetable stir-fry for a complete meal that will have everyone coming back for seconds.
Get ready to whip up a dish that’s guaranteed to become a favorite in your household!
Ingredients (Serves 4-6):
- 1 pound boneless, skinless chicken breasts (cut into strips)
- 1 cup breadcrumbs
- 1/2 cup sesame seeds
- 1/2 cup all-purpose flour
- 2 large eggs (beaten)
- 1 teaspoon garlic powder
- 1 teaspoon salt
- 1/2 teaspoon black pepper
- 1/4 teaspoon cayenne pepper (optional for a little heat)
- 1/4 cup vegetable oil (for frying)
Cooking Instructions:
- Prepare the Chicken: Begin by cutting the boneless, skinless chicken breasts into strips. Make sure the pieces are uniform in size to guarantee they cook evenly. Pat the chicken strips dry with paper towels to help the coating adhere better.
- Set Up Breading Station: In three separate shallow dishes, place the flour seasoned with garlic powder, salt, black pepper, and cayenne pepper in one dish. In the second dish, pour the beaten eggs, and in the third dish, combine the breadcrumbs and sesame seeds.
- Coat the Chicken: Take each chicken strip and first dip it into the flour mixture, ensuring it’s fully coated. Shake off any excess flour. Next, dip the chicken into the beaten eggs, allowing the excess to drip off, and finally, roll it in the breadcrumb and sesame seed mixture, pressing gently to make sure the coating sticks well.
- Heat the Oil: In a large skillet, heat the vegetable oil over medium-high heat. To check if the oil is hot enough, drop a small piece of bread into the oil; if it sizzles and browns quickly, the oil is ready for frying.
- Fry the Chicken Tenders: Carefully place the coated chicken strips in the hot oil, making sure not to overcrowd the pan. Fry them for about 3-4 minutes on each side, or until they’re golden brown and cooked through. You may need to fry in batches depending on the size of your skillet.
- Drain and Serve: Once cooked, remove the chicken tenders from the skillet and place them on a plate lined with paper towels to drain any excess oil. Serve hot with your choice of dipping sauces.
Extra Tips:
For extra flavor, consider marinating the chicken strips in a mixture of soy sauce and ginger for about 30 minutes before breading. This will infuse the chicken with a delicious taste that pairs beautifully with the sesame coating.
Additionally, you can bake the chicken tenders at 400°F (200°C) for about 20-25 minutes if you prefer a healthier, less oily option. Just make sure to spray them lightly with cooking spray for a crispy texture!
Stir-Fried Broccoli With Garlic
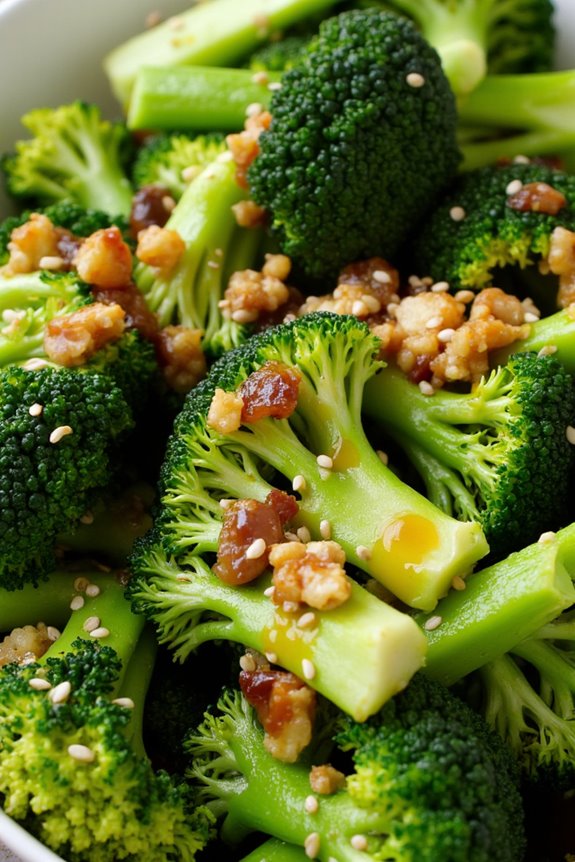
Stir-fried broccoli with garlic is a delicious and nutritious dish that’s perfect for kids and the whole family. Broccoli is packed with vitamins and minerals, making it a fantastic choice for a healthy meal. This recipe combines the vibrant green vegetable with the rich flavor of garlic, resulting in a dish that’s both simple to prepare and full of taste. Not only is this dish visually appealing, but it’s also a great way to promote kids to eat their greens.
This easy-to-follow recipe is perfect for a quick weeknight dinner or as a side dish for a larger meal. With just a few ingredients and minimal preparation, you’ll have a colorful plate of stir-fried broccoli in no time. Cooking together can be a fun activity for kids, allowing them to learn about healthy eating while enjoying the cooking process.
Ingredients (serving size: 4-6 people)
- 1 pound fresh broccoli, cut into florets
- 4 cloves garlic, minced
- 2 tablespoons vegetable oil
- 1 tablespoon soy sauce
- 1 teaspoon sesame oil (optional)
- Salt and pepper to taste
- Sesame seeds for garnish (optional)
Cooking Instructions
- Prepare the Broccoli: Start by washing the broccoli thoroughly under cold water. Cut it into bite-sized florets and set aside. This will guarantee that the broccoli cooks evenly and is easy for kids to eat.
- Heat the Oil: In a large skillet or wok, heat the vegetable oil over medium-high heat. Allow the oil to become hot, which usually takes about 1-2 minutes. The hot oil will help in cooking the broccoli quickly while retaining its bright green color.
- Add Garlic: Once the oil is hot, add the minced garlic to the skillet. Stir-fry the garlic for about 30 seconds until it becomes fragrant but not browned. Be careful not to burn the garlic, as it can turn bitter if overcooked.
- Cook the Broccoli: Add the broccoli florets to the skillet and stir to coat them with the garlic and oil. Stir-fry the broccoli for about 4-5 minutes, or until it turns bright green and is tender-crisp. Stirring frequently will guarantee even cooking.
- Season the Dish: Once the broccoli is cooked, drizzle the soy sauce and sesame oil (if using) over the vegetables. Toss everything together for another minute, allowing the sauce to coat the broccoli evenly. Season with salt and pepper to taste.
- Serve: Remove the skillet from heat and transfer the stir-fried broccoli to a serving dish. If desired, sprinkle sesame seeds on top for an extra crunch and flavor. Serve immediately while hot.
Extra Tips
When cooking stir-fried broccoli with garlic, consider using fresh broccoli for the best texture and flavor. You can also experiment by adding other vegetables, such as bell peppers or carrots, for added color and nutrition.
For a bit of heat, try adding a pinch of red pepper flakes or a drizzle of chili oil. Encourage kids to help with washing the vegetables or tossing the broccoli in the skillet to make them feel involved in the cooking process!
Sweet Chili Shrimp
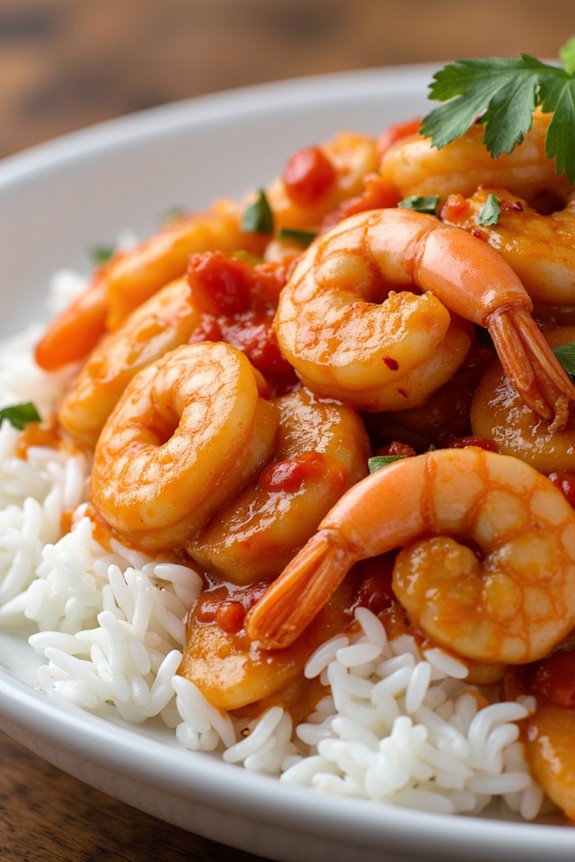
Sweet Chili Shrimp is a delightful dish that combines the succulent flavors of shrimp with a sweet and spicy sauce that’s sure to please even the pickiest eaters. This recipe isn’t only quick to prepare but also offers a great opportunity for kids to get involved in the kitchen.
The vibrant colors and enticing aroma of this dish make it a perfect choice for family dinners or gatherings, guaranteeing that everyone will enjoy a taste of the exotic.
This dish is a fantastic way to introduce children to cooking with seafood. The shrimp cooks quickly, and the sweet chili sauce brings a perfect balance of flavors that are both accessible and appealing.
Serve this dish over rice or alongside some steamed vegetables for a complete meal that the whole family will love. Let’s plunge into making this scrumptious Sweet Chili Shrimp!
Ingredients (Serves 4-6):
- 1 pound large shrimp, peeled and deveined
- 1/4 cup sweet chili sauce
- 2 tablespoons soy sauce
- 1 tablespoon lime juice
- 2 cloves garlic, minced
- 1 tablespoon vegetable oil
- 1/2 teaspoon red pepper flakes (optional, for extra heat)
- 1 tablespoon chopped fresh cilantro (for garnish)
- Cooked rice (for serving)
Cooking Instructions:
- Prepare the Shrimp: Start by rinsing the shrimp under cold water and patting them dry with paper towels. This step is essential as it helps remove any excess moisture, allowing the shrimp to sear properly when cooked.
- Mix the Sauce: In a small bowl, combine the sweet chili sauce, soy sauce, lime juice, and minced garlic. If you prefer a bit of heat, add the red pepper flakes. Stir the mixture well until all ingredients are fully combined. This sauce will be the star of your dish, so make sure it’s well-mixed!
- Heat the Oil: In a large skillet or wok, heat the vegetable oil over medium-high heat. Once the oil is shimmering, it’s ready for the shrimp. Heating the oil properly will guarantee that the shrimp sear beautifully and develop a nice texture.
- Cook the Shrimp: Add the shrimp to the hot skillet in a single layer, making sure not to overcrowd the pan. Cook for about 2-3 minutes on each side, or until the shrimp turn pink and opaque. This quick cooking method keeps the shrimp tender and juicy.
- Add the Sauce: Once the shrimp are cooked, pour the sweet chili sauce mixture over the shrimp in the skillet. Stir gently to coat the shrimp evenly with the sauce. Allow the mixture to simmer for an additional 1-2 minutes to heat through and let the flavors meld together.
- Serve: Remove the skillet from heat and transfer the shrimp to a serving platter. Garnish with chopped fresh cilantro for an added burst of flavor and color. Serve the Sweet Chili Shrimp over cooked rice or alongside your favorite vegetables.
Extra Tips:
When making Sweet Chili Shrimp, it’s important to not overcook the shrimp, as they can become tough and rubbery. Keep an eye on them, and remove them from the heat as soon as they turn pink.
For a fun twist, consider adding vegetables such as bell peppers or snap peas to the dish during the last few minutes of cooking for added texture and nutrition. Enjoy experimenting with different levels of spice by adjusting the amount of red pepper flakes to suit your family’s taste!
Chinese Pancakes With Scallions

Chinese pancakes with scallions, also known as scallion pancakes or “cong you bing,” are a delightful treat that kids will love to help make. These crispy, flaky pancakes aren’t only easy to prepare but also offer a fun cooking experience for children. The combination of the aromatic scallions and the crispy texture creates a savory dish that can be served as a snack, appetizer, or side dish.
In this recipe, we’ll guide you through the process of making these delicious pancakes from scratch. The dough is simple to make and can be rolled out and filled with chopped scallions. Kids will enjoy getting their hands messy as they knead the dough and roll it out. Once cooked, the pancakes are golden brown and flaky, making for a tasty addition to any meal.
Ingredients (serving size: 4-6 people):
- 2 cups all-purpose flour
- 3/4 cup boiling water
- 1/4 teaspoon salt
- 1/4 cup vegetable oil (plus extra for frying)
- 6-8 scallions, finely chopped
- Additional salt to taste
Cooking Instructions:
1. Prepare the Dough:
In a mixing bowl, combine the all-purpose flour and 1/4 teaspoon of salt. Slowly pour the boiling water into the flour while stirring with chopsticks or a fork until a shaggy dough forms.
Once the mixture is cool enough to handle, knead the dough on a lightly floured surface for about 5-7 minutes until it becomes smooth and elastic. Cover the dough with a damp cloth and let it rest for 30 minutes.
2. Roll Out the Dough:
After the resting period, divide the dough into 4 equal portions. Take one piece of dough and roll it out on a floured surface into a thin circle, about 8-10 inches in diameter. You want the dough to be as thin as possible without tearing.
3. Add Scallions:
Brush a thin layer of vegetable oil over the rolled-out dough, then sprinkle a generous amount of chopped scallions evenly over the top. Add a pinch of salt if desired.
4. Form the Pancake:
Starting from one edge, tightly roll the dough into a log. Once rolled, coil the log into a spiral shape, tucking the end underneath. Flatten the spiral gently with your hand, then roll it out again into a 1/2-inch thick circle.
5. Fry the Pancakes:
Heat a skillet over medium heat and add enough vegetable oil to cover the bottom. Once the oil is hot, add the rolled pancake to the skillet and fry for about 3-4 minutes on each side, or until golden brown and crispy.
Repeat the process for the remaining dough portions.
6. Serve:
Once cooked, remove the pancakes from the skillet and place them on a paper towel to absorb any excess oil. Cut into wedges and serve warm, either plain or with a dipping sauce like soy sauce or sweet chili sauce.
Extra Tips:
When making Chinese pancakes with scallions, don’t be afraid to experiment with the fillings! You can add other ingredients like sesame seeds or even minced garlic for an extra flavor boost.
Also, make sure your skillet is hot enough before adding the pancakes to achieve that perfect crispy texture. If you have any leftover pancakes, they can be stored in an airtight container and reheated in the skillet for a quick snack. Enjoy your cooking adventure with the kids!
Mango Sticky Rice

Mango Sticky Rice is a delightful Thai dessert that combines sweet, ripe mangoes with creamy coconut sticky rice, creating a perfect harmony of flavors and textures. This dish isn’t only delicious but also a fun way for kids to get involved in the kitchen, as it involves simple steps that they can help with.
The vibrant colors and sweet taste of the mango paired with the rich coconut make it an irresistible treat that can be enjoyed by the whole family. This recipe is great for a serving size of 4-6 people, making it perfect for family gatherings or special occasions. Kids will love helping to prepare the sticky rice and slicing the mango, while adults can take charge of cooking the rice and preparing the coconut sauce.
With only a few ingredients and straightforward steps, Mango Sticky Rice is an excellent introduction to Asian desserts for young chefs.
Ingredients
- 1 cup glutinous rice (also known as sticky rice)
- 1 ½ cups coconut milk
- ½ cup sugar
- ¼ teaspoon salt
- 2 ripe mangoes
- Sesame seeds or mung beans for garnish (optional)
Cooking Instructions
- Soak the Rice: Begin by rinsing the glutinous rice under cold water until the water runs clear. This helps to remove excess starch. Next, soak the rice in water for at least 3 hours or overnight for best results. This step is essential because it allows the rice to absorb water and become tender during cooking.
- Steam the Rice: After soaking, drain the rice and place it in a steamer lined with cheesecloth or a clean kitchen towel. Steam the rice for 20-30 minutes, or until it becomes soft and sticky. If you don’t have a steamer, you can also use a pot with a lid and a steaming rack. The key is to make sure that the rice cooks evenly and retains its shape.
- Prepare the Coconut Sauce: While the rice is steaming, combine the coconut milk, sugar, and salt in a saucepan over medium heat. Stir until the sugar is fully dissolved, but don’t let it boil. Reserve about ¼ cup of this coconut sauce for drizzling on top of the finished dish. This sauce will add creaminess and flavor to the sticky rice.
- Mix the Rice with Coconut Sauce: Once the rice is cooked, transfer it to a mixing bowl and pour in the remaining coconut sauce (the part that you didn’t reserve). Gently fold the sauce into the rice until well combined. Let it sit for about 10 minutes to allow the flavors to meld together.
- Prepare the Mangoes: While the rice is resting, peel the mangoes and slice them into thin strips or wedges. Make sure to remove the pit, and be careful while cutting, as the mango can be slippery.
- Assemble the Dish: To serve, place a generous scoop of the coconut sticky rice on a plate and arrange the mango slices beside it. Drizzle the reserved coconut sauce over the top and sprinkle with sesame seeds or mung beans if desired.
Extra Tips
When cooking Mango Sticky Rice, it’s important to use glutinous rice, as it gives the dish its characteristic sticky texture. You can find this type of rice at Asian grocery stores.
If you prefer a sweeter dessert, feel free to adjust the amount of sugar in the coconut sauce according to your taste. Additionally, for a fun twist, consider adding a splash of vanilla extract to the coconut sauce or experimenting with other fruits like bananas or strawberries.
Enjoy making this delicious dessert with your kids!